1
ZyWALL 2
Internet Security Gateway
Quick Start Guide
Version 3.62
2/2005
English ……… 2
Deutsch …….14
Français …… 28
ZyWALL 2
1 Introducing the ZyWALL
The ZyWALL 2 is the ideal secure gateway for all data passing between the Internet and the LAN.
By integrating NAT, firewall and VPN capability, ZyXEL’s ZyWALL 2 is a complete security
solution that protects your Intranet and efficiently manages data traffic on your network. The
embedded web configurator is easy to operate and totally independent of the operating system
platform you use.
You should have an Internet account already set up and have been given most of the following
information.
Internet Account Information
Your device’s WAN IP Address (if given): __________________
DNS Server IP Address (if given): Primary __________________, Secondary _________________
Encapsulation:
Ethernet
Service Type: _______________________
Login Server IP Address: ______________
PPTP
User Name: ____________
Password: ____________
User Name: ____________
Password: ____________
Your WAN IP Address: ____________
PPTP Server IP Address: ___________
Connection ID (if required): ____________
PPPoE
(PPPoE) Service Name: ____________
User Name: ____________
Password: ____________
2 Hardware
This section provides details on hardware specifications.
2
ZyWALL 2
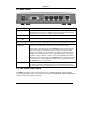
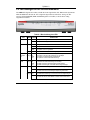
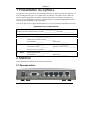
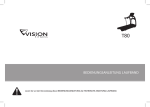
2.1 Rear Panel
LABEL
DESCRIPTION
1.
LAN 10/100M 14
Connect a computer to one of these ports with an Ethernet cable. These ports are autonegotiating (can connect at 10 or 100Mbps) and auto-sensing (automatically adjust to
the type of Ethernet cable you use (straight-through or crossover).
2.
WAN 10/100M
Connect your cable/DSL modem to this port with the cable that came with your modem.
3.
POWER 12
VDC
Connect the included power adaptor (use only this adapter) to this power socket.
After you’ve made the connections, connect the power cable to a power supply and look at the front panel LEDs.
CON/AUX switch
CON/AUX port
Only connect this port if you want to configure the ZyWALL using the SMT via console
port or set up a backup WAN connection; see your User’s Guide for details.
Set this switch to the “CON” side to use the CON/AUX port as a console port for local
device configuration and management. Connect the 9-pin male end of the console
cable to the console port of the ZyWALL and the other end to a serial port (COM1,
COM2 or other COM port) on your computer. Your computer should have a terminal
emulation communications program (such as HyperTerminal) set to VT100 terminal
emulation, no parity, 8 data bits, 1 stop bit, no flow control and 9600 bps port speed.
Set this switch to the “AUX” side to use the CON/AUX port as an auxiliary dial-up WAN
connection. Use the included CON/AUX converter, with the console cable to connect
the CON/AUX port to your modem or TA.
RESET
You only need to use this button if you’ve forgotten the ZyWALL’s password. It returns
the ZyWALL to the factory defaults (password is 1234, LAN IP address 192.168.1.1,
terminal emulation settings as described above etc.; see your User’s Guide for details).
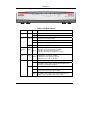
2.2 The Front Panel LEDs
The PWR LED turns on when you connect the power. The SYS LED blinks while performing
system testing and then stays on if the testing is successful. The CON/AUX, LAN, and WAN LEDs
turn on if the ports are properly connected.
3
ZyWALL 2
Table 1 LED Descriptions
LED
PWR
SYS
COLOR STATUS
Green
Green
MEANING
On
The ZyWALL is turned on.
Off
The ZyWALL is turned off.
Off
The ZyWALL is not ready or failed.
On
The ZyWALL is ready and running.
Flashing The ZyWALL is rebooting.
Red
On
The power to the ZyWALL is too low.
LAN
10/100M
1-4
Green On
Orange On
Flashing
Off
The ZyWALL has a LAN connection of 10Mbps.
The ZyWALL has a LAN connection of 100Mbps.
The ZyWALL is sending/receiving packets.
The ZyWALL does not have an Ethernet connection.
10/100M
WAN
Green On
Orange On
Flashing
Off
The WAN link is connected at 10Mbps.
The WAN link is connected at 100Mbps.
The WAN link is sending/receiving packets.
The WAN link is not ready, or has failed.
CON/AUX
Green
Off
The CON/AUX link is not ready, or has failed.
On
The CON/AUX switch is set to CON and the CON/AUX port is
connected to a management computer.
Orange Off
On
The CON/AUX link is not ready, or has failed.
The CON/AUX switch is set to AUX and the CON/AUX port has an
Internet connection through a dial-up modem.
Flashing The CON/AUX switch is set to AUX and the CON/AUX port is
sending or receiving data through a dial-up modem.
4
ZyWALL 2
3 Setting Up Your Computer’s IP Address
Skip this section if your computer is already set up to accept a dynamic IP
address. This is the default for most new computers.
The ZyWALL is already set up to assign your computer an IP address. Use this section to set up
your computer to receive an IP address or assign it a static IP address in the 192.168.1.2 to
192.168.1.254 range with a subnet mask of 255.255.255.0. This is necessary to ensure that your
computer can communicate with your ZyWALL.
Your computer must have an Ethernet card and TCP/IP installed. TCP/IP should already be installed
on computers using Windows NT/2000/XP, Macintosh OS 7 and later operating systems.
3.1 Windows 2000/NT/XP
1.
In Windows XP, click start, Control Panel. In Windows 2000/NT, click Start, Settings, Control Panel.
2.
In Windows XP, click Network Connections.
In Windows 2000/NT, click Network and Dial-up Connections.
3.
Right-click Local Area Connection and then click Properties.
4.
Select Internet Protocol (TCP/IP) (under the General tab in Win XP) and click Properties.
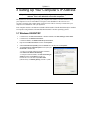
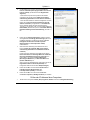
5.
The Internet Protocol TCP/IP Properties screen opens (the
General tab in Windows XP).
- To have your computer assigned a dynamic IP address,
click Obtain an IP address automatically.
-To configure a static IP address, click Use the following IP
Address and fill in the IP address (choose one
from192.168.1.2 to 192.168.1.254), Subnet mask
(255.255.255.0), and Default gateway (192.168.1.1) fields.
5
ZyWALL 2
6.
Click Advanced. Remove any previously installed gateways
in the IP Settings tab and click OK to go back to the Internet
Protocol TCP/IP Properties screen.
7.
Click Obtain DNS server address automatically if you do
not know your DNS server IP address(es).
If you know your DNS server IP address(es), click Use the
following DNS server addresses, and type them in the
Preferred DNS server and Alternate DNS server fields.
If you have more than two DNS servers, click Advanced, the
DNS tab and then configure them using Add.
8.
Click OK to close the Internet Protocol (TCP/IP) Properties
window.
9.
Click OK to close the Local Area Connection Properties
window.
Checking Your Computer’s IP Address
1.
In the computer, click Start, (All) Programs, Accessories and then Command Prompt.
2.
In the Command Prompt window, type "ipconfig" and then press ENTER. Your computer’s IP address
must be in the correct range (192.168.1.2 to 192.168.1.254) with subnet mask 255.255.255.0 in order to
communicate with the ZyWALL.
Refer to your User’s Guide for detailed IP address configuration for other Windows and Macintosh
computer operating systems.
4 Configuring Your ZyWALL
This Quick Start Guide shows you how to use the web configurator wizard
only. See your User’s Guide for background information on all ZyWALL
features and System Management Terminal (SMT) configuration.
Web Configurator
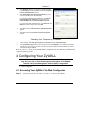
4.1 Accessing Your ZyWALL Via Web Configurator
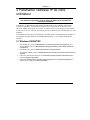
Step 1.
Launch your web browser. Enter “192.168.1.1” as the web site address.
6
ZyWALL 2
Web site address
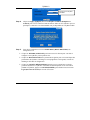
Step 2.
The default password (“1234”) is already in the password field (in non-readable format).
Click Login to proceed to a screen asking you to change your password. Click Reset to
revert to the default password in the password field.
Default password
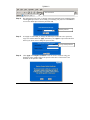
Step 3.
It is highly recommended you change the default password! Enter a new password,
retype it to confirm and click Apply; alternatively click Ignore to proceed to the main
menu if you do not want to change the password now.
Change default password
Step 4.
Click Apply in the Replace Certificate screen to create a certificate using your
ZyWALL’s MAC address that will be specific to this device. This feature is not
available on the ZyWALL 2WE.
7
ZyWALL 2
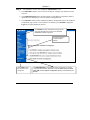
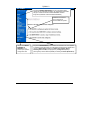
Step 5.
You should now see the web configurator MAIN MENU screen.
Click WIZARD to begin a series of screens to help you configure your ZyWALL for the
first time.
Click MAINTENANCE in the navigation panel to see ZyWALL performance statistics,
upload firmware and back up, restore or upload a configuration file.
Click LOGOUT when you have finished a ZyWALL management session. The ZyWALL
automatically logs you out if it is left idle for five minutes; press ENTER to display the
Login screen again and then log back in.
Click WIZARD for initial configuration including general
setup, ISP Parameters for Internet Access and WAN
IP/DNS/MAC Address Assignment.
Use the submenus to
configure ZyWALL
features.
Click LOGOUT at any
time to exit the web
configurator.
Click MAINTENANCE to view information about your ZyWALL or upgrade
configuration/firmware files. Maintenance includes Status (Statistics), DHCP
Table, F/W (firmware) Upload, Configuration (Backup, Restore Default) and
Restart.
8
ZyWALL 2
4.2 Internet Access Using the Wizard
Step 1.
Click Wizard Setup in the main menu to display the first wizard screen.
System Name is for identification
purposes. Enter your computer's
"Computer Name".
The Domain Name entry is what is
propagated to the DHCP clients on
the LAN. If you leave this blank, the
domain name obtained by DHCP
from the ISP is used.
Click Next to continue.
Step 2.
The second wizard screen has three variations depending on what encapsulation type you
use. Use the information in Internet Account Information to fill in fields.
9
ZyWALL 2
Choose Ethernet when the WAN
port is used as a regular Ethernet.
Choose from Standard or a
RoadRunner version. You’ll need
User Name, Password and Login
Server IP Address for some
Roadrunner versions.
Click Next to continue.
Point-to-Point Protocol over
Ethernet (PPPoE) functions as a
dial-up connection. Therefore you’ll
also need a username and
password and possibly the PPPoE
service name. Your ISP will give
you all needed information.
Select Nailed Up Connection if
you do not want the connection to
the PPPoE server to time out.
Otherwise, enter the number of
seconds to elapse before the
ZyWALL disconnects from the
server in the Idle Timeout field.
The default value is 100 seconds.
Enter “0” to prevent the connection
from timing out.
Click Next to continue.
10
ZyWALL 2
Choose PPTP if your service
provider uses a DSL terminator
with PPTP login. The ZyWALL
must have a static IP address (My
IP Address) in this case, and
possibly a subnet mask (My IP
Subnet Mask) if provided by your
ISP.
You’ll also need a username,
associated password, and the DSL
terminator IP address (Server IP
Address). If your ISP has provided
a connection ID name, enter it in
the Connection ID/Name field.
See the PPPoE encapsulation
above for information on the
Nailed Up Connection and Idle
Timeout fields.
Click Next to continue.
Step 3.
Fill in the fields and click Finish to save and complete the wizard setup.
WAN IP Address Assignment
Select Get automatically from
ISP if your ISP did not assign
you a fixed IP address. Select
Use fixed IP address if the ISP
assigned a fixed IP address and
then enter your IP address and
subnet mask in the next two
fields. Enter the gateway IP
address in this field (if provided)
when you select Use Fixed IP
Address.
System DNS Servers
Select From ISP if your ISP
dynamically assigns DNS server
information (and the ZyWALL’s
WAN IP address). The field to
the right displays the (read-only)
DNS server IP address that the
ISP assigns.
Select User-Defined if you have
the IP address of a DNS server.
Enter the DNS server's IP
address in the field to the right.
11
ZyWALL 2
Select None if you do not want to configure DNS servers. If you do not configure a system DNS server, you must use
IP addresses when configuring VPN, DDNS and the time server.
WAN MAC Address
Select Factory Default to use the factory assigned default MAC address. Alternatively, select Spoof this
Computer's MAC address - IP Address and enter the IP address of the computer on the LAN whose MAC address
you are cloning.
4.3 Test Your Internet Connection
Launch your web browser and navigate to www.zyxel.com. You don’t need a dial-up program such
as Dial Up Networking. Internet access is just the beginning. Refer to the User’s Guide for more
detailed information on the complete range of ZyWALL features.
5 Troubleshooting
For advanced troubleshooting help, see the Logs section in the User’s Guide.
PROBLEM
CORRECTIVE ACTION
None of the LEDs turn
on when you turn on
the ZyWALL.
Make sure that you have the correct power adaptor connected to the ZyWALL and
plugged in to an appropriate power source. Check all cable connections.
Cannot access the
ZyWALL from the LAN.
Check the cable connection between the ZyWALL and your computer or hub. Refer
to the Rear Panel section for details.
If the LEDs still do not turn on, you may have a hardware problem. In this case, you
should contact your local vendor.
Ping the ZyWALL from a LAN computer. Make sure your computer Ethernet card is
installed and functioning properly.
Cannot ping any
computer on the LAN.
If the 10/100M LAN LEDs are off, check the cable connections between the ZyWALL
and your LAN computers.
Verify that the IP address and subnet mask of the ZyWALL and the LAN computers
are in the same IP address range.
Cannot get a WAN IP
address from the ISP.
The WAN IP is provided after the ISP verifies the MAC address, host name or user
ID.
Find out the verification method used by your ISP and configure the corresponding
fields.
If the ISP checks the WAN MAC address, you should clone the MAC address from a
LAN computer. Click WAN and then the MAC tab, select Spoof this Computer's
MAC address - IP Address and enter the IP address of the computer on the LAN
whose MAC address you are cloning.
If the ISP checks the host name, enter your computer’s name (refer to the Wizard
Setup section in the User’s Guide) in the System Name field in the first screen of the
WIZARD.
12
ZyWALL 2
PROBLEM
CORRECTIVE ACTION
If the ISP checks the user ID, click WAN and then the ISP tab. Check your service
type, user name, and password.
Cannot access the
Internet.
Check the ZyWALL’s connection to the cable/DSL device.
Check whether your cable/DSL device requires a crossover or straight-through cable.
Click WAN to verify your settings.
Check that you entered the password correctly. Some ISPs may lock you out after
several unsuccessful attempts.
13
ZyWALL 2
1 Einführung
Die ZyWALL 2 ist das ideale Sicherheitsgateway für alle Daten, die zwischen dem Internet und
dem LAN übertragen werden. Die ZyWALL 2 von ZyXEL vereint NAT, Firewall und VPNFähigkeit und bietet auf diese Weise eine umfassende Sicherheitslösung für den Schutz Ihres
Intranets und verwaltet effektiv den Datenverkehr in Ihrem Netzwerk. Der integrierte WebKonfigurator ist unabhängig vom verwendeten Betriebssystem und einfach zu benutzen.
Voraussetzung ist ein bestehendes Internetkonto und ein Vorliegen der folgenden Daten.
Daten zum Internetkonto
Die WAN-IP-Adresse Ihres Geräts (wenn vergeben):
IP-Adresse des DNS-Servers (wenn vergeben): Primär __________________, Sekundär _________________
Verkapselung:
Ethernet
Servicetyp: _______________________
IP-Adresse des Login-Servers:
______________
PPTP
Nutzername: ____________
Passwort: ____________
Nutzername: ____________
Passwort: ____________
Ihre WAN-IP-Adresse: ____________
IP-Adresse des PPTP-Servers:
___________
Verbindungs-ID (wenn erforderlich): ____________
PPPoE
(PPPoE) Servicename: ____________
Nutzername: ____________
Passwort: ____________
2 Hardware
In diesem Abschnitt werden die Spezifikationen der Hardware ausführlich erläutert.
14
ZyWALL 2
2.1 Geräterückseite
KENNZEICHNUNG
BESCHREIBUNG
1.
LAN 10/100M 14
An einen dieser Anschlüsse wird mit einem Ethernetkabel ein Computer
angeschlossen. Es handelt sich um Auto-negotiating- (eine Verbindung ist mit 10 und
100Mbps möglich) und Auto-sensing-Anschlüsse (der verwendete Ethernetkabeltyp
wird automatisch erkannt: Straight-through oder Cross-over).
2.
WAN 10/100M
Schließen Sie das Kabel-/DSL-Modem mit dem Kabel an diesen Anschluss an, das Sie
zusammen mit dem Modem erhalten haben.
3.
POWER 12
VDC
Schließen Sie den mitgelieferten Netzadapter (verwenden Sie nur diesen Adapter) an
diese Netzanschlussbuchse an.
Schließen Sie, wenn Sie alle anderen Kabelverbindungen hergestellt haben, das Netzkabel an eine
Netzsteckdose an und prüfen Sie die LED-Anzeigen an der Gerätevorderseite.
CON/AUX-Schalter
CON/AUX-Anschluss
Verwenden Sie diesen Anschluss nur, wenn Sie die ZyWALL mit dem SMT über einen
Konsolenanschluss konfigurieren oder eine WAN-Verbindung absichern möchten. Eine
ausführliche Beschreibung finden Sie im Benutzerhandbuch.
Stellen Sie diesen Schalter auf die Position “CON”, wenn Sie den CON/AUX-Anschluss
als Konsolenanschluss für die Konfiguration und Verwaltung von lokalen Geräten
verwenden möchten. Schließen Sie das 9-polige Ende des Konsolenkabels an den
Konsolenanschluss der ZyWALL und das andere Ende an den seriellen Anschluss
(COM1, COM2 oder einen anderen COM-Anschluss) des Computers an. Ihr Computer
muss über ein Terminalemulationsprogramm (z.B. HyperTerminal) verfügen, das
folgendermassen eingestellt ist: Terminalemulation VT100, keine Parität, 8 Datenbits,
1 Stoppbit, keine Flusskontrolle, Portgeschwindigkeit 9600 bps.
Stellen Sie diesen Schalter auf die Position “AUX”, wenn Sie den CON/AUX-Anschluss
als zusätzliche DFÜ-Verbindung für das WAN verwenden möchten. Schiessen Sie den
CON/AUX-Anschluss mit dem mitgelieferten CON/AUX-Konverter und dem
Konsolenkabel an das Modem oder den TA an.
RESET
Sie müssen diese Taste nur dann verwenden, wenn Sie das ZyWALL-Passwort
vergessen haben. Auf diese Weise werden alle Einstellungen der ZyWALL auf ihre
Standardwerte zurückgesetzt (Passwort: 1234, LAN-IP-Adresse 192.168.1.1 usw.;
Detailinformationen hierzu finden Sie im Benutzerhandbuch).
15
ZyWALL 2
2.2 LED-Anzeigen an der Gerätevorderseite
Die PWR-LED beginnt zu leuchten, sobald das Gerät eingeschaltet wird. Während des Systemtests
blinkt die SYS-LED. Wurde der Test erfolgreich abgeschlossen, bleibt diese Anzeige an. Die
Anzeige-LEDs CON/AUX, LAN und WAN beginnen zu leuchten, wenn die Ports richtig
angeschlossen wurden.
Tabelle 1 Beschreibung der LEDs
LED
PWR
SYS
FARBE STATUS
Grün
Grün
Rot
BEDEUTUNG
Ein
Die ZyWALL ist eingeschaltet.
Aus
Die ZyWALL ist ausgeschaltet.
Aus
Die ZyWALL ist nicht bereit oder es ist ein Fehler aufgetreten.
Ein
Die ZyWALL ist bereit und läuft.
Blinkt
Die ZyWALL wird neu gestartet.
Ein
Der Strom ist für die ZyWALL ist zu gering.
LAN
10/100M
1-4
Grün
Ein
Orange Ein
Blinkt
Aus
Die ZyWALL hat eine LAN-Verbindung mit 10 Mbps.
Die ZyWALL hat eine LAN-Verbindung mit 100 Mbps.
Die ZyWALL sendet/empfängt gerade Pakete.
Das ZyWALL hat keine Ethernetverbindung.
10/100M
WAN
Grün
Ein
Orange Ein
Blinkt
Aus
Es besteht eine WAN-Verbindung mit 10 Mbps.
Es besteht eine WAN-Verbindung mit 100 Mbps.
Die WAN-Verbindung sendet/empfängt gerade Pakete.
Die WAN-Verbindung ist nicht bereit oder ist fehlgeschlagen.
CON/AUX Grün
Aus
Die CON/AUX-Verbindung ist nicht bereit oder ist fehlgeschlagen.
Ein
Der CON/AUX-Schalter ist auf CON eingestellt, und der CON/AUXAnschluss ist an einen Verwaltungscomputer angeschlossen.
Orange Aus
Ein
Die CON/AUX-Verbindung ist nicht bereit oder ist fehlgeschlagen.
Der CON/AUX-Schalter ist auf AUX eingestellt, und der CON/AUXAnschluss ist über ein DFÜ-Modem mit dem Internet verbunden.
16
ZyWALL 2
Tabelle 1 Beschreibung der LEDs
LED
FARBE STATUS
Blinkt
BEDEUTUNG
Der CON/AUX-Schalter ist auf AUX eingestellt, und der CON/AUXAnschluss sendet oder empfängt gerade Daten über ein DFÜModem.
3 Einstellen der IP-Adresse des
Computers
Wenn Ihr Computer bereits so konfiguriert ist, dass er eine dynamische IPAdresse annimmt, können Sie diesen Abschnitt überspringen. Das ist bei
den meisten neuen Computern der Fall.
Die ZyWALL ist so voreingestellt, dass sie Ihrem Computer eine IP-Adresse zuweist. In diesem
Abschnitt wird beschrieben, wie Sie Ihren Computer so konfigurieren, dass er eine IP-Adresse
empfängt, oder wie Sie ihm eine statische IP-Adresse (zwischen 192.168.1.2 und 192.168.1.254)
mit einer Subnetz-Maskz von 255.255.255.0 zuweisen. Dieser Schritt ist notwendig, um
sicherzustellen, dass Ihr Computer mit der ZyWALL kommunizieren kann.
Ihr Computer muss über eine Ethernetkarte verfügen, und das TCP/IP-Protokoll muß installiert sein.
Normalerweise sind bei Computern, die mit Windows NT/2000/XP oder Macintosh OS 7 und
neueren Betriebssystemen ausgestattet sind, Ethernet-Karten mit TCP/IP bereits vorinstalliert.
3.1 Windows 2000/NT/XP
1.
Klicken Sie bei Windows XP auf Start (Start), Control Panel (Systemsteuerung). Klicken Sie bei Windows
2000/NT auf Start (Start), Settings (Einstellungen), Control Panel (Systemsteuerung).
2.
Klicken Sie bei Windows XP auf Network Connections (Netzwerkverbindungen).
Klicken Sie bei Windows 2000/NT auf Network and Dial-up Connections (Netzwerk und DFÜVerbindungen).
3.
Klicken Sie mit der rechten Maustaste auf Local Area Connection (LAN-Verbindung) und dann auf
Porperties (Eigenschaften).
4.
Wählen Sie Internet Protocol (TCP/IP) (bei Windows XP auf der Registerkarte General (Allgemein) und
klicken Sie auf Properties (Eigenschaften).
17
ZyWALL 2
5.
Auf dem Bildschirm erscheint das Dialogfeld Internet
Protocol TCP/IP Properties (Eigenschaften von Internet
Protocol TCP/IP) (bei Windows XP die Registerkarte
Allgemein).
- Damit Ihrem Computer eine dynamische IP-Adresse
zugewiesen wird, klicken Sie auf Obtain an IP address
automatically (Automatisch eine IP-Adresse zuweisen).
- Wenn Sie eine statische IP-Adresse konfigurieren möchten,
klicken Sie auf Use the following IP Address (diese IPAdresse verwenden) und geben Sie im Feld IP-Adresse
eine IP-Adresse (wählen Sie eine Adresse zwischen
192.168.1.2 und 192.168.1.254), im Feld Subnetz-Maskz die
Subnet-Mask (255.255.255.0) und im Feld Default Gateway
(Standard-Gateway) das Standard-Gateway (192.168.1.1)
ein.
6.
Klicken Sie auf Advanced (Erweitert). Entfernen Sie auf
der Registerkarte IP Settings (IP-Einstellungen) alle zuvor
installierten Gateways und klicken Sie auf OK, um zum
Dialogfeld Internet Protocol TCP/IP Properties
(Eigenschaften von Internetprotokoll TCP/IP)
zurückzukehren.
7.
Wenn Sie die IP-Adresse(n) Ihres DNS-Servers nicht
kennen, klicken Sie auf Obtain DNS server address
automatically (Automatisch eine DNS-Serveradresse
zuweisen).
Kennen Sie die IP-Adresse(n) Ihres DNS-Servers jedoch,
klicken Sie auf Use the following DNS server addresses
(Die folgenden DNS-Serveradressen verwenden) und
geben diese in den Feldern Preferred DNS server
(Bevorzugter DNS-Server) und Alternate DNS server
(Anderer DNS-Server) ein.
Wenn es mehr als zwei DNS-Server gibt, klicken Sie auf der
Registerkarte DNS auf Advanced (Erweitert) und
konfigurieren diese mit der Funktion Add (Hinzufügen).
8.
Klicken Sie auf OK, um das Fenster Internet Protocol
(TCP/IP) Properties (Eigenschaften von
Internetprotokolle (TCP/IP)) zu schließen.
9.
Klicken Sie auf OK, um in das Fenster Local Area
Connection Properties (LAN-Eigenschaften) zu schließen.
Prüfen der IP-Adresse Ihres Computers
1.
Klicken Sie im Computer auf Start, (Alle) Programme, Zubehör und dann auf Eingabeaufforderung.
18
ZyWALL 2
2.
Geben Sie bei der Befehlsaufforderung “ipconfig" ein und drücken Sie auf ENTER. Die IP-Adresse
Ihres Computers muss mit der Subnetz-Maskz 255.255.255.0 im richtigen Bereich liegen (192.168.1.2 bis
192.168.1.254), damit er mit der ZyWALL kommunizieren kann.
Eine Beschreibung der Konfiguration der IP-Adresse bei anderen Windows- und MacintoshBetriebssystemen finden Sie im Benutzerhandbuch.
4 Konfigurieren der ZyWALL
In dieser Kurzanleitung wird nur die Verwendung des
Konfigurationsassistenten beschrieben. Hintergrundinformationen zu allen
Leistungsmerkmalen der ZyWALL und der SMT-Konfiguration (System
Management Terminal) finden Sie im Benutzerhandbuch.
Web-Konfigurator
4.1 Zugriff auf Ihre ZyWALL über den Web-Konfigurator
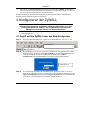
Step 1.
Starten Sie Ihren Internetbrowser. Geben Sie als Websiteadresse “192.168.1.1” ein.
Websiteadresse
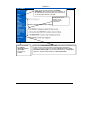
Step 2.
Das Standardpasswort (“1234”) ist im Passwortfeld bereits eingegeben (in einem nicht
lesbaren Format). Klicken Sie auf Login (Anmelden), um zum nächsten Dialogfeld zu
wechseln, in dem Sie das Passwort ändern können. Klicken Sie auf Reset
(Zurücksetzen), um zum Standardpasswort im Passwortfeld zurückzukehren.
Standardpasswort
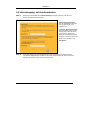
Step 3.
Es wird dringend empfohlen, das Standardpasswort zu ändern! Geben Sie ein neues
Passwort ein, geben Sie es, um es zu bestätigen, ein zweites Mal ein und klicken Sie auf
Apply (Übernehmen). Oder klicken Sie auf Ignore (Ignorieren), um zum Hauptmenü
zu wechseln, wenn Sie das Passwort erst später ändern möchten.
19
ZyWALL 2
Standardpasswort ändern
Step 4.
Klicken Sie im Dialogfeld Replace Certificate (Zertifikat ersetzen) auf Apply
(Übernehmen), wenn Sie mit der MAC-Adresse Ihrer ZyWALL ein für dieses Gerät
spezifisches Zertifikat erzeugen möchten .
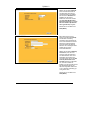
Step 5.
Es erscheint das Hauptmenü (MAIN MENU) des Web-Konfigurators.
Klicken Sie auf WIZARD (Assistent), um die ZyWALL das erste Mal zu konfigurieren.
Klicken Sie im Navigationsfeld auf MAINTENANCE (Wartung), um die
Leistungsstatistiken, der ZyWALL anzuzeigen, Firmware zu laden und
Konfigurationsdateien zu speichern, wiederherzustellen oder zu laden.
Klicken Sie auf LOGOUT (Abmelden), wenn Sie eine Management-Session für die
ZyWALL-Gateway beenden möchten. Die ZyWALL meldet sich automatisch ab, wenn sie
fünf Minuten lang nicht benutzt wird. Drücken Sie dann auf ENTER, um das
Anmeldefenster aufzurufen und sich erneut anzumelden.
20
ZyWALL 2
Klicken Sie für die Erstkonfiguration auf WIZARD
(ASSISTENT). Dazu gehört die allgemeine Installation, die
ISP-Parameter für den Internetzugang und die Zuweisung
von IP-/DNS-/MAC-Adressen des WAN.
Konfigurieren Sie die
ZyWALL in den
entsprechenden
Untermenüs.
Sie können jederzeit
auf LOGOUT
(Abmelden) klicken,
um den WebKonfigurator zu
verlassen.
Klicken Sie auf MAINTENANCE (WARTUNG), wenn Sie sich Informationen zur
ZyWALL ansehen oder Konfigurations-/Firmwaredateien aktualisieren
möchten. Zur Wartung gehören die Funktionen Status (Statistiken), DHCP
Table (DHCP-Tabelle), F/W-Upload (Firmwareaktualisierung) , Configuration
(Speichern, Standard wiederherstellen) und Restart (Neustart).
21
ZyWALL 2
4.2 Internetzugang mit dem Assistenten
Step 1.
Klicken Sie im Hauptmenü auf Wizard Setup (Setup mit Assistent), um das erste
Fenster des Assistenten aufzurufen.
System Name (Systemname)
dient der Identifikation. Geben Sie
den "Computernamen" Ihres
Computers ein.
Der Domain Name (Domainname)
wird an die DHCP-Clients im LAN
weitergegeben. Wenn Sie dieses
Feld frei lassen, wird der vom
DHCP des Internetdienstanbieters
erhaltene Domainname verwendet.
Klicken Sie zum Fortfahren auf
Next (Weiter).
Step 2.
Im zweiten Fenster des Assistenten gibt es je nach verwendetem Verkapselungstyp
verschiedene Möglichkeiten. Füllen Sie die Felder mit den Daten aus Internet Account
Information (Informationen zum Internetkonto) aus.
22
ZyWALL 2
Wählen Sie die Option Ethernet,
wenn der WAN-Anschluss als
normaler Ethernet-Anschluss
verwendet werden soll. Wählen
Sie die Version Standard oder
RoadRunner. Bei einigen
Roadrunner-Versionen müssen
Sie User Name (Nutzername),
Password (Passwort) und Login
Server IP Address (IP-Adresse
des Login-Servers) eingeben.
Klicken Sie zum Fortfahren auf
Next (Weiter).
Die Funktion Point-to-Point
Protocol over Ethernet (PPPoE)
wird als DFÜ-Verbindung
verwendet. Daher benötigen Sie
auch einen Nutzernamen und ein
Passwort und möglicherweise
auch den Namen des PPPoEDienstes. Die notwendigen Daten
erhalten Sie von Ihrem
Internetdienstanbieter.
Wählen Sie die Option Nailed Up
Connection, wenn Sie nicht
möchten, dass die Verbindung
zum PPPoE-Server nach einer
bestimmten Zeit unterbrochen
wird. Oder geben Sie im Feld Idle
Timeout (Ausschalten nach
Leerlauf) die Dauer in Sekunden
ein, nach deren Ablauf die
ZyWALL vom Server getrennt wird.
Der Standardwert ist auf 100
Sekunden eingestellt. Geben Sie
“0” ein, damit die Verbindung gar
nicht getrennt wird.
Klicken Sie zum Fortfahren auf
Next (Weiter).
23
ZyWALL 2
Wählen Sie PPTP, wenn Ihr
Dienstanbieter einen DSLTerminator mit PPTP-Anmeldung
verwendet. Die ZyWALL muss in
diesem Fall eine statische IPAdresse (My IP Address (Eigene
IP-Adresse)) und möglicherweise
noch eine Subnet-Mask (My IP
Subnet Mask (Eigene SubnetzMaske)) haben, wenn diese von
Ihrem Internetdienstanbieter
angeboten wird.
Sie benötigen auch einen
Nutzernamen, ein damit
verbundenes Passwort und die IPAdresse des DSL-Terminators (IPAdresse des Servers). Wenn Ihr
Internetdienstanbieter Ihnen eine
Verbindungs-ID gegeben hat,
geben Sie diese im Feld
Connection ID/Name
(Verbindungs-ID/Name) ein.
Informationen zu den Feldern
Nailed Up Connection (NailedUp-Verbindung) und Idle
Timeout (Leerlauf-Ausschaltzeit)
finden Sie unter PPPoEVerkapselung.
Klicken Sie zum Fortfahren auf
Next (Weiter).
Step 3.
Geben Sie die Daten ein und klicken Sie auf Finish (Fertig stellen), um die Daten zu
speichern und die Installation des Assistenten abzuschließen.
24
ZyWALL 2
Zuweisen der WAN IP-Adresse
Wenn Ihnen Ihr
Internetdienstanbieter keine feste
IP-Adresse zugewiesen hat,
wählen Sie die Option Get
automatically from ISP
(Automatisch vom ISP
beziehen). Hat Ihnen Ihr
Internetdienstanbieter eine feste
IP-Adresse zugewiesen, wählen
Sie die Option Use fixed IP
address (Feste IP-Adresse
verwenden). Geben Sie diese
und die Subnetz-Maske in die
nächsten zwei Felder ein. Wenn
Sie die Option Use Fixed IP
Address (Feste IP-Adresse
verwenden) gewählt haben,
geben Sie in diesem Feld die
Gateway-IP-Adresse (wenn
verfügbar) ein.
DNS-Server des Systems
Wenn Ihnen Ihr Internetdienstanbieter dynamisch DNS-Serverinformationen und die WAN-IP-Adresse der ZyWALL
zuweist, wählen Sie die Option From ISP (Vom ISP). Im Feld rechts wird (schreibgeschützt) die IP-Adresse des
DNS-Servers angezeigt, die vom Internetdienstanbieter zugewiesen wurde.
Wählen Sie User-Defined (Benutzerdefiniert), wenn Sie die IP-Adresse eines DNS-Servers haben. Geben Sie in
das Feld rechts die IP-Adresse des DNS-Servers ein.
Wählen Sie die Option None (Keine), wenn Sie keine DNS-Server konfigurieren möchten. Wenn Sie keinen DNSSystemserver konfigurieren möchten, müssen Sie bei der Konfiguration der VPN-, DDNS- und Zeitserver die IPAdressen verwenden.
MAC-Adresse des WAN
Wählen Sie die Option Factory Default (Werksstandard), um die werkseitig vordefinierte MAC-Adresse zu
verwenden. Sie können aber auch die Option Spoof this Computer's MAC address - IP Address wählen und die
IP-Adresse des Computers im LAN eingeben, dessen MAC-Adresse Sie klonen.
4.3 Prüfen der Internetverbindung
Starten Sie Ihren Internetbrowser und navigieren Sie zu www.zyxel.com. Sie benötigen kein DFÜProgramm wie Dial Up Networking. Der Internetzugang wird gestartet. Ausführliche Informationen
zu allen Funktionen der ZyWALL finden Sie im Benutzerhandbuch.
25
ZyWALL 2
5 Fehlerbehebung
Eine erweiterte Hilfe zur Fehlerbehebung finden Sie im Abschnitt Logs des Benutzerhandbuchs.
PROBLEM
LÖSUNGSMÖGLICHKEIT
Wenn Sie die ZyWALL
anschalten, leuchtet
keine der LEDAnzeigen.
Stellen Sie sicher, dass Sie den richtigen Netzadapter richtig an die ZyWALL und an
eine geeignete Netzsteckdose angeschlossen haben. Überprüfen Sie alle
Kabelverbindungen.
Aus dem LAN kann
nicht auf die ZyWALL
zugegriffen werden.
Überprüfen Sie die Kabelverbindung zwischen der ZyWALL und dem Computer oder
Hub. Lesen Sie nach unter Geräterückseite.
Ich kann keinen
Computer im LAN
erreichen.
Wenn die LAN-LEDs 10/100M nicht leuchten, prüfen Sie die Kabelverbindungen
zwischen der ZyWALL und den Computern im LAN.
Ich erhalte vom
Internetdienstanbieter
keine WAN IPAdresse.
Die WAN-IP wird dann geliefert, wenn der Internetdienstanbieter die MAC-Adresse,
den Hostnamen oder die Nutzer-ID geprüft hat.
Wenn die LEDs auch dann nicht leuchten, besteht möglicherweise ein
Hardwareproblem. In diesem Fall sollten Sie sich an Ihren Händler wenden.
Versuchen Sie die ZyWALL mit einem Ping von einem LAN-Computer aus zu
erreichen. Stellen Sie sicher, dass die Ethernetkarte des Computers installiert ist und
einwandfrei funktioniert.
Stellen Sie sicher, dass sich die IP-Adresse und Subnetz-Maske der ZyWALL und
der LAN-Computer im gleichen IP-Adressbereich befinden.
Finden Sie das von Ihrem Internetdienstanbieter verwendete Prüfverfahren heraus
und konfigurieren Sie die entsprechenden Felder.
Wenn der Internetdienstanbieter die WAN MAC-Adresse prüft, sollten Sie die MACAdresse eines LAN-Computers klonen. Klicken Sie auf WAN und dann auf die
Registerkarte MAC und wählen Sie die Option Spoof this Computer's MAC
address - IP Address Geben Sie die IP-Adresse des Computers im LAN ein, dessen
MAC-Adresse Sie klonen möchten.
Wenn der Internetdienstanbieter den Hostnamen abfragt, geben Sie im ersten
Fenster des Assistenten (WIZARD) im Feld System Name (Systemname) den
Namen des Computers ein (lesen Sie im Benutzerhandbuch im Abschnitt Setup mit
Assistent nach).
Wenn der Internetdienstanbieter die Nutzer-ID prüft, klicken Sie auf WAN und wählen
Sie dann die Registerkarte ISP. Prüfen Sie Ihren Diensttyp, den Nutzernamen und
das Passwort.
Ein Zugriff auf das
Internet ist nicht
möglich.
Prüfen Sei die Verbindung der ZyWALL zum Kabel-/DSL-Gerät.
Prüfen Sie, ob das Kabel-/DSL-Gerät ein Cross-over-Kabel oder ein Straight-throughKabel benötigt.
Klicken Sie auf WAN, um Ihre Einstellungen zu prüfen.
26
ZyWALL 2
PROBLEM
LÖSUNGSMÖGLICHKEIT
Prüfen Sie, ob das Passwort richtig eingegeben wurde. Einige Internetdienstanbieter
sperren den Zugriff nach einigen nicht erfolgreichen Versuchen.
27
ZyWALL 2
1 Présentation du ZyWALL
Le ZyWALL 2 est la passerelle de sécurité idéale pour toutes les données passant entre Internet et le
LAN. En intégrant NAT, pare-feu et capacité VPN, le ZyWALL 2 de ZyXEL est une solution de
sécurité complète protégeant votre Intranet et gérant efficacement la circulation des données sur
votre réseau. Le configurateur web intégré est facile à utiliser et totalement indépendant de la plateforme du système d'exploitation que vous utilisez.
Vous devez déjà avoir un compte Internet installé et avoir reçu la plupart des informations suivantes.
Informations sur le compte Internet
L'adresse IP WAN de votre périphérique (si fournie) : __________________
Adresse IP du Serveur DNS (si fournie) : Principale __________________, Secondaire _________________
Encapsulation:
Ethernet
Type de service: _______________________
Adresse IP de connexion du serveur: ______________
PPTP
Nom d'utilisateur: ____________
Mot de passe: ____________
Nom d'utilisateur: ____________
Mot de passe: ____________
Votre adresse IP WAN: ____________
Adresse IP du serveur PPTP: ___________
ID de Connexion (si nécessaire): ____________
PPPoE
(PPPoE) Nom de service: ____________
Nom d'utilisateur: ____________
Mot de passe: ____________
2 Matériel
Cette section donne les détails des spécifications matérielles:
2.1 Panneau arrière
28
ZyWALL 2
ÉTIQUETTE
DESCRIPTION
1.
LAN 10/100M 14
Connectez un ordinateur à l'un de ces ports avec un câble Ethernet. Ces ports
possèdent la fonction d'auto-négociation (et peuvent se connecter à 10 ou 100Mbps) et
d'auto-détection (s'ajuste automatiquement au type de câble Ethernet que vous utilisez
(droit ou croisé).
2.
WAN 10/100M
Connectez votre modem câblé/DSL à ce port avec le câble livré avec votre modem.
3.
ALIMENTATION
12 VCC
Connectez l'adaptateur d'alimentation fourni (utilisez uniquement cet adaptateur) à
cette prise d'alimentation.
Après avoir effectué les connexions, connectez le câble d'alimentation à une alimentation et observez les LED du
panneau avant.
Commutateur
CON/AUX port
CON/AUX
Connectez seulement ce port si vous voulez configurer le ZyWALL à l'aide du SMT via
le port de la console ou installer une connexion WAN de secours; voir votre Guide de
l'utilisateur pour plus de détails.
Positionnez ce commutateur sur le côté “CON” pour utiliser le port CON/AUX comme
port de console pour la configuration et la gestion de périphérique local. Connectez
l'extrémité mâle à 9 broches du câble de la console au port de la console du ZyWALL
et l'autre extrémité à un port série (COM1, COM2 ou autre port COM) sur votre
ordinateur. Votre ordinateur doit avoir un programme de communication d'émulation de
terminal (tel qu'HyperTerminal) paramétré sur l'émulation de terminal VT100, pas de
parité, 8 bits de données, 1 bit de stop, pas de contrôle de flux et une vitesse de port de
9600 bps.
Positionnez ce commutateur sur le côté “AUX” pour utiliser le port CON/AUX comme
connexion WAN par numérotation. Utilisez le convertisseur CON/AUX inclus, avec le
câble de console pour connecter le port CON/AUX à votre modem ou TA.
RÉINITIALISER
Vous avez besoin d'utiliser ce bouton seulement si vous avez oublié le mode de passe
du ZyWALL. Cela rétablit le ZyWALL à ses paramètres par défaut d'usine (le mot de
passe est 1234, adresse IP LAN 192.168.1.1, les paramètres d'émulation du terminal
comme décrits ci-dessus etc.; voir votre Guide de l'utilisateur pour plus de détails).
2.2 Les LED du panneau avant
La LED PWR s'allume quand vous connectez l'alimentation. La LED SYS clignote lors du test du
système et reste ensuite allumée si le test a réussi. Les LED CON/AUX, LAN, et WAN s'allument
si les ports sont correctement connectés.
29
ZyWALL 2
Tableau 1 Descriptions des LED
LED
PWR
SYS
COULEUR
Verte
Verte
ETAT
SIGNIFICATION
Allumée
Le ZyWALL est allumé.
Eteinte
Le ZyWALL est éteint.
Eteinte
Le ZyWALL n'est pas prêt ou a échoué.
Allumée
Le ZyWALL est prêt et en marche.
Clignotante Le ZyWALL est en cours de redémarrage.
Rouge
Allumée
L'alimentation du ZyWALL est trop faible.
LAN
Verte
10/100M 1- Orange
4
Allumée
Allumée
clignotante
Eteinte
Le ZyWALL a une connexion LAN de 10Mbps.
Le ZyWALL a une connexion LAN de 100Mbps.
Le ZyWALL est en train d'envoyer/recevoir des paquets.
Le ZyWALL n'a pas de connexion Ethernet.
10/100M
WAN
Verte
Orange
Allumée
Allumée
clignotante
Eteinte
La liaison WAN est connectée à 10Mbps.
La liaison WAN est connectée à 100Mbps.
La liaison WAN est en train d'envoyer/recevoir des paquets.
La liaison WAN n'est pas prête ou à échoué.
CON/AUX
Verte
Eteinte
La liaison CON/AUX n'est pas prête ou a échoué.
Allumée
Le commutateur CON/AUX est positionné sur CON et le port
CON/AUX est connecté à un ordinateur de gestion.
Eteinte
La liaison CON/AUX n'est pas prête ou a échoué.
Allumée
Le commutateur CON/AUX est positionné sur AUX et le port
CON/AUX a une connexion Internet à l'aide d'un modem à
numérotation.
Orange
Clignotante Le commutateur CON/AUX est positionné sur AUX et le port
CON/AUX est en train d'envoyer ou de recevoir des données
à l'aide d'un modem à numérotation.
30
ZyWALL 2
3 Paramétrer l'adresse IP de votre
ordinateur
Passez cette section si votre ordinateur est déjà paramétré pour accepter
une adresse IP dynamique. C'est la valeur par défaut pour la plupart des
nouveaux ordinateurs.
Le ZyWALL est déjà paramétré pour attribuer une adresse IP à votre ordinateur. Utilisez cette
section pour paramétrer votre ordinateur afin qu'il reçoive une adresse IP ou attribuez-lui une
adresse IP statique dans la plage de 192.168.1.2 à 192.168.1.254 avec un masque de sous-réseau de
255.255.255.0. Ceci est nécessaire pour assurer que votre ordinateur puisse communiquer avec votre
ZyWALL.
Votre ordinateur doit avoir une carte Ethernet et TCP/IP installée. TCP/IP doit déjà être installé sur
les ordinateurs utilisant Windows NT/2000/XP, Macintosh OS 7 et les systèmes d'exploitation
ultérieurs.
3.1 Windows 2000/NT/XP
1.
Dans Windows XP, cliquez sur Start (Démarrer), Control Panel (Panneau de configuration). Dans
Windows 2000/NT, cliquez sur Start (Démarrer), Settings (Paramètres), Control Panel (Panneau de
configuration).
2.
Dans Windows XP, cliquez sur Network Connections (Connexions réseau).
Dans Windows 2000/NT, cliquez sur Network and Dial-up Connections (Connexions réseau et accès à
distance).
3.
Cliquez avec le bouton droit de la souris sur Local Area Connection (Connexion de réseau local) et
cliquez sur Properties (Propriétés).
4.
Sélectionnez Internet Protocol (Protocole Internet) (TCP/IP) (dans l'onglet General (Général) dans
Windows XP) et cliquez sur Properties (Propriétés).
31
ZyWALL 2
5.
L'écran Internet Protocol TCP/IP Properties (Propriétés
TCP/IP de Protocole Internet) s'ouvre (l'onglet General
(Général) dans Windows XP).
- Pour qu'une adresse IP dynamique soit attribuée à votre
ordinateur, cliquez sur Obtain an IP address automatically
(Obtenir automatiquement une adresse IP).
-Pour configurer une adresse IP, cliquez sur Use the
following IP Address (Utiliser l'adresse IP suivante) et
remplissez les champs IP address (Adresse IP) (choisissez
en une entre 192.168.1.2 et 192.168.1.254), Subnet mask
(Masque de sous-réseau) (255.255.255.0), et Default
gateway (Passerelle par défaut) (192.168.1.1).
6.
Cliquez sur Advanced (Avancé). Retirez toutes les
passerelles précédemment installées dans l'onglet IP
Settings (Paramètres IP) et cliquez sur OK pour retourner à
l'écran Internet Protocol TCP/IP Properties (Propriétés
TCP/IP de protocole Internet).
7.
Cliquez sur Obtain DNS server address automatically
(Obtenir automatiquement une adresse de serveur DNS)
si vous ne connaissez pas la (les) adresse(s) IP de votre
serveur DNS.
Si vous connaissez la (les) adresse(s) IP de votre serveur
DNS, cliquez sur Utiliser les adresses de serveur DNS
suivantes, et tapez-les dans les champs Preferred DNS
server (Serveur DNS préféré) et Alternate DNS server
(Serveur DNS auxiliaire).
Si vous voulez plus de deux serveurs DNS, cliquez sur
Advanced (Avancé), l'onglet DNS et configurez-les ensuite
avec Add (Ajouter).
8.
Cliquez sur OK pour fermer la fenêtre de Propriétés
(TCP/IP) de protocole Internet.
9.
Cliquez sur OK pour fermer la fenêtre Local Area
Connection Properties (Propriétés de connexion de
réseau local).
Vérifier l'adresse IP de votre ordinateur
1.
Sur l'ordinateur, cliquez sur Start (Démarrer), (All) Programs (Tous) Programmes, Accessories
(Accessoires) et ensuite sur Command Prompt (Invite de commande).
32
ZyWALL 2
2.
Dans la fenêtre Command Prompt(Invite de commande), tapez "ipconfig" et appuyez sur
ENTER(ENTRÉE). L'adresse IP de votre ordinateur doit se trouver dans la plage correcte (192.168.1.2 à
192.168.1.254) avec un masque de sous-réseau de 255.255.255.0 afin de communiquer avec le
ZyWALL.
Reportez-vous à votre Guide de l'utilisateur pour une configuration détaillée de l'adresse IP pour les
autres systèmes d'exploitation Windows et Macintosh.
4 Configurer votre ZyWALL
Ce Guide d'installation vous indique seulement comment utiliser l'assistant
du configurateur web. Reportez-vous à votre Guide de l'utilisateur pour
toutes informations sur les fonctionnalités du ZyWALL et la configuration
du System Management Terminal (Terminal de gestion du système) (SMT).
Configurateur Web
4.1 Accéder à Votre ZyWALL Via le configurateur Web
Step 1.
Lancez votre navigateur web. Entrez "192.168.1.1" comme adresse de site Web.
Adresse du site Web
Step 2.
Le mot de passe par défaut (“1234”) se trouve déjà dans le champ de mot de passe (dans
un format non lisible). Cliquez sur Login (Ouverture de session) pour continuer par un
écran vous invitant à changer votre mot de passe. Cliquez sur Reset (Réinitialiser) pour
rétablir le mot de passe par défaut dans le champ mot de passe.
Mot de passe par
défaut
Step 3.
Il est fortement recommandé de changer le mot de passe par défaut ! Saisissez un
nouveau mot de passe, retapez-le pour confirmer et cliquez sur Apply (Appliquer); vous
pouvez aussi cliquer sur Ignore (Ignorer) pour aller au menu principal, si vous ne
voulez pas changer le mot de passe maintenant.
33
ZyWALL 2
Changer le mot de passe
par défaut
Step 4.
Cliquez sur Apply (Appliquer) dans l'écran Replace Certificate (Remplacer le
certificat) pour créer un certificat à l'aide de l'adresse MAC de votre ZyWALL qui sera
spécifique à ce matériel. Cette fonctionnalité n'est pas disponible sur le ZyWALL 2WE.
Step 5.
Vous devriez maintenant voir l'écran MAIN MENU (MENU PRINCIPAL) du
configurateur web.
Cliquez sur WIZARD (ASSISTANT) pour lancer une série d'écrans pour vous aider à
configurer votre ZyWALL pour la première fois.
Cliquez sur MAINTENANCE dans le panneau de navigation pour voir les statistiques des
performances du ZyWALL, télécharger le microprogramme et sauvegarder, restaurer ou
télécharger un fichier de configuration.
Cliquez sur LOGOUT (DÉCONNEXION) quand vous avez terminé une session de
gestion de ZyWALL. Le ZyWALL se déconnecte automatiquement s'il est resté inactif
pendant cinq minutes; appuyez sur ENTER (ENTRÉE) pour afficher à nouveau l'écran
Login (Ouverture de session) et réouvrir une session.
34
ZyWALL 2
Cliquez sur WIZARD (ASSISTANT) pour la configuration initiale
comprenant la configuration générale, ISP Parameters (Paramètres
ISP) pour accéder à Internet et WAN IP/DNS/MAC Address
Assignment (Attribution d'adresse WAN IP/DNS/MAC).
Utilisez les sous-menus
pour configurer les
fonctionnalités du ZyWALL.
Cliquez sur LOGOUT
(FERMER LA
SESSION) à tout
moment pour quitter le
configurateur web.
Cliquez sur MAINTENANCE pour visualiser les informations sur votre ZyWALL
ou mettez à niveau les fichiers de configuration/microprogramme. Maintenance
comprend Status (Etat) (Statistiques), DHCP Table (Tableau DHCP),
Téléchargement du F/W (microprogramme), Configuration (Backup
(Sauvegarder), Restore Default (Rétablir par défaut)) et Restart (Redémarrer).
35
ZyWALL 2
4.2 Internet Access (Accès à Internet) en utilisant l'Assistant
Step 1.
Cliquez sur Wizard Setup (Assistant d'installation) dans le menu principal pour
afficher le premier écran de l'assistant.
System Name (Nom du système)
est destiné à l'identification. Tapez
le "Computer Name" ("Nom
d'ordinateur") de votre ordinateur.
L'entrée Domain Name (Nom de
domaine) est ce qui est propagé
sur les clients DHCP sur le LAN. Si
vous laissez cela vide, le nom de
domaine obtenu par DHCP de l'ISP
est utilisé.
Cliquez sur Next (Suivant) pour
continuer.
Step 2.
Le second écran d'assistant présente trois variations en fonction du type d'encapsulation
utilisé. Utilisez les informations dans Internet Account Information (Informations du
compte Internet) pour remplir ces champs.
36
ZyWALL 2
Choisissez Ethernet quand le port
WAN est utilisé comme un
Ethernet normal. Choisissez une
version Standard ou RoadRunner.
Vous aurez besoin d'un User
Name (Nom d'utilisateur),
Password (Mot de passe) et
d'une Login Server IP Address
(Adresse IP de serveur de
connexion) pour certaines
versions de Roadrunner.
Cliquez sur Next (Suivant) pour
continuer.
Point-to-Point Protocol over
Ethernet (Protocole Point à Point
via Ethernet) (PPPoE) fonctionne
comme une connexion d'accès à
distance. Vous aurez donc aussi
besoin d'un nom d'utilisateur et
d'un mot de passe et peut-être
aussi du nom du service PPPoE.
Votre ISP vous donnera toutes les
informations dont vous avez
besoin.
Sélectionnez Nailed Up
Connection (Connexion
permanente) si vous ne voulez
pas que la connexion au serveur
PPPoE se termine. Autrement,
saisissez le nombre de secondes
devant s'écouler avant que le
ZyWALL se déconnecte du
serveur dans le champ Idle
Timeout (Délai d'inactivité). La
valeur par défaut est 100
secondes. Entrez “0” pour
empêcher que la connexion
n'arrive à expiration.
Cliquez sur Next (Suivant) pour
continuer.
37
ZyWALL 2
Choisissez PPTP si votre
fournisseur d'accès utilise un
terminateur DSL avec ouverture de
session PPTP. Le ZyWALL doit
posséder une adresse IP statique
(My IP Address (Mon adresse
IP)) dans ce cas, et
éventuellement un masque de
sous-réseau (My IP Subnet Mask
(Mon IP de Masque de sousréseau) est fournie par votre ISP.
Vous aurez aussi besoin d'un nom
d'utilisateur, d'un mot de passe
associé, et de l'adresse IP du
terminateur DSL (Server IP
Address (Adresse IP du
serveur)). Si votre ISP a fourni un
nom d'ID de connexion, saisissezle dans le champ Connection
ID/Name (ID/Nom de connexion).
Voir l'encapsulation PPPoE plus
haut pour les informations sur les
champs Nailed Up Connection
(Connexion permanente) et Idle
Timeout (Délai d'inactivité).
Cliquez sur Next (Suivant) pour
continuer.
Step 3.
Remplissez les champs et cliquez sur Finish (Terminer) pour enregistrer et terminer
l'assistant d'installation.
38
ZyWALL 2
Attribution d'adresse IP WAN
Sélectionnez Get automatically
from ISP (Obtenir
automatiquement de l'ISP) si
votre ISP ne vous a pas attribué
une adresse IP fixe. Sélectionnez
Use fixed IP address (Utiliser
une adresse IP fixe) si l'ISP a
attribué une adresse IP fixe et
entrez ensuite votre adresse IP et
votre masque de sous-réseau
dans les deux champs suivants.
Entrez l'adresse IP de la
passerelle dans ce champ (s'il
est fourni) quand vous
sélectionnez Use Fixed IP
Address (Utiliser une adresse
IP fixe).
Serveurs DNS Système
Sélectionner From ISP (De l'ISP)
si votre ISP vous assigne
dynamiquement les informations
de serveur DNS (et l'adresse IP
WAN du ZyWALL). Le champ sur
la droite affiche l'adresse IP du
serveur DNS (lecture seule)
attribuée par l'ISP.
Sélectionnez User-Defined
(Définie par l'utilisateur) si vous
avez l'adresse IP sur un serveur
DNS. Entrez l'adresse IP du
serveur DNS dans le champ de
droite.
Sélectionnez None (Aucun) si vous ne voulez pas configurer de serveur DNS. Si vous ne configurez pas un serveur
DNS système, vous devez utiliser les adresses IP quand vous configurez VPN, DDNS et le serveur de temps.
Adresse MAC WAN
Sélectionnez Factory Default (Par défaut d'usine) pour utiliser l'adresse MAC par défaut attribuée en usine. Vous
pouvez aussi sélectionner Spoof this Computer's MAC address - IP Address (Usurper les adresses MAC adresses IP de cet ordinateur et entrez l'adresse IP de l'ordinateur sur le LAN dont vous clonez l'adresse MAC.
4.3 Tester votre connexion Internet
Lancez votre navigateur web et naviguez sur www.zyxel.com. Vous n'avez pas besoin d'un
programme de connexion par numérotation tel que Dial Up Networking. L'accès à Internet n'est que
le début. Reportez-vous au Guide de l'utilisateur pour des informations plus détaillées sur la gamme
complète des fonctionnalités de ZyWALL.
39
ZyWALL 2
5 Dépannage
Pour l'aide de dépannage avancée, reportez-vous à la section Logs (Journaux) dans le Guide de
l'utilisateur.
PROBLÈME
ACTION CORRECTIVE
Aucune des LED ne
s'allume quand vous
allumez le ZyWALL.
Vérifiez que l'adaptateur d'alimentation adéquat est connecté au ZyWALL et branché
dans une prise de courant appropriée. Vérifiez tous les raccordements.
Impossible d'accéder
au ZyWALL à partir du
LAN.
Vérifiez le raccordement entre le ZyWALL et votre ordinateur ou hub. Reportez-vous
à la section Rear Panel (Panneau arrière) pour plus de détails.
Je ne peux pas
envoyer de ping aux
autres ordinateurs sur
le LAN.
Si les LED LAN 10/100M sont éteintes, vérifiez les raccordements entre le ZyWALL
et vos ordinateurs du LAN.
Impossible d'obtenir
une adresse IP WAN
de la part de l'ISP.
L'IP WAN est fournie après que l'ISP vérifie l'adresse MAC, nom d'hôte ou ID de
l'utilisateur.
Si les LED ne s'allument toujours pas, cela signifie que vous avez peut-être un
problème matériel. Dans ce cas-là, vous devez contacter votre revendeur local.
Envoyez une commande Ping au ZyWALL à partir d'un ordinateur du LAN. Vérifiez
que la carte Ethernet de votre ordinateur est installée et fonctionne correctement.
Vérifiez que l'adresse IP et le masque de sous-réseau du ZyWALL et les ordinateurs
du LAN sont dans la même plage d'adresse IP.
Trouvez la méthode de vérification utilisée par votre ISP et configurez les champs
correspondants.
Si l'ISP vérifie l'adresse MAC WAN, vous devez cloner l'adresse MAC à partir d'un
ordinateur du LAN. Cliquez sur WAN et ensuite sur l'onglet MAC, sélectionnez Spoof
this Computer's MAC address - IP Address (Usurper l'adresse MAC de cet
ordinateur - Adresse IP) et entrez l'adress IP de l'ordinateur sur le LAN dont vous
clonez l'adresse MAC.
Si l'ISP vérifie le nom d'hôte, saisissez le nom de votre ordinateur (reportez-vous à la
section Wizard Setup (Assistant d'installation) dans le Guide de l'utilisateur) dans le
champ System Name (Nom du système) dans le premier écran de WIZARD
(ASSISTANT).
Si l'ISP vérifie l'ID de l'utilisateur, cliquez sur WAN et ensuite sur l'onglet ISP. Vérifiez
votre type de service, nom d'utilisateur et mot de passe.
Impossible d'accéder à
Internet.
Vérifiez la connexion du ZyWALL au matériel câble/DSL.
Vérifiez si votre matériel câble/DSL nécessite un câble croisé ou droit.
Cliquez sur WAN pour vérifier vos paramètres.
Vérifiez que vous avez correctement saisi le mot de passe. Certains ISP peuvent
vous interdire l'accès après plusieurs tentatives infructueuses.
40