1
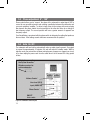
Owner’s M a n u al
Bipolar Series & ΤΧ-Subwoofers
•
•
•
•
•
BPS 2.0 Bipolar satellites (pair)
LCR speaker (pc)
BPS 5.1 Bipolar satellites & TX-8SUB / TX-10SUB Subwoofer (5.1 system)
BPT 5.0 Bipolar Towers & center (5.0 system)
TX-8SUB / TX-10SUB Subwoofer (pc)
www.crystal-acoustics.com
ATTENTION
Please read this booket carefully so that you get the best performance from this product
and so that you become familiar with the functions of this device.
This manual cannot be reproduced by any other person or company and these
instructions are subject to change without warning due to continuous imporovement
of our products.
Contents
Bipolar Series & TX-8SUB / TX-10SUB
1. Precautions
4
2. Introduction
2.1 Prior to installation
2.2 Product features
5
5
3.
Positioning your new Bipolar speakers
3.1 Placing BPS or BPT speakers as front left and right
3.2 Placing BPS as a centre channel speaker
3.3 Placing BPS or BPT speakers as surround left and right
3.4 Placing BPS speakers on the wall
7
9
9
9
10
4. Speakers and subwoofer connections with your AV receiver
12
5.
Installation of TX-8SUB / TX-10SUB
5.1 Inputs
5.2 Volume control
5.3 Phase adjustment 0ο/180ο
5.4 Auto On/Off
5.5 Subwoofer installation guide
13
13
14
14
14
15
6.
Troubleshooting
6.1 No sound from any of the speakers
6.2 No sound coming from one speaker
6.3 The system plays at low volumes but shuts off as volume increases
6.4 There is no sound from the surround speakers
6.5 No sound from TX-8SUB / TX-10SUB
6.6 Boomy, dull, out of focus low frequencies
6.7 50/60 cycle hum coming from the subwoofer
16
16
16
17
17
18
18
18
7. Specifications
19
3
Precautions
Operating voltage: Before powering the subwoofer make sure the operating voltage of
the local power supply is identical to that specified for the subwoofer.
AV amplifier: Ensure that your AV amplifier is switched off before connecting the
subwoofer. Make sure you have connected the plus (+) and minus (-) binding posts
of each speaker to the corresponding plus (+) and minus (-) terminals on the amplifier
or receiver.
Connection with AV amplifier: Turn off the subwoofer before connecting the input signal
cable to its internal amplifier.
Binding Posts: Make sure all binding posts are tight, especially if using bare speaker
wires. Contact between + and - wire strands may cause a short-circuit and potentially
damage your equipment.
Ventilation: The product should be situated so that its location or position does not
interfere with its proper ventilation. The product should not be placed in such a way that
may block the ventilation openings.
Follow instructions: All operating and usage instructions should be followed.
Operation: Avoid using your ΑV amplifier at its power limit especially if it is a low-power
design.
> Continuous high power levels can cause distortion.
> Amplifier clipping may cause severe damage to your speakers.
> High-power amplifiers are preferable.
Power: Do not drive your new speakers with a continuous power output exceeding its
maximum power rating as indicated in this instruction manual for each speaker model.
Cables: Use the best speaker and interconnect cables possible.
Non-use periods: The power cord of the subwoofer should be unplugged from the outlet
when
left unused for a long period of time.
Heat: This product should be placed away from heat sources such as radiators, stoves,
or
other products that produce heat.
Humidity: Do not place loudspeakers in dusty or humid environments
Sunlight: Avoid exposure to direct sunlight
CAUTION: To prevent electrical shock, ensure the subwoofer’s plug is fully inserted
into the socket
4
2 Intr o duc ti o n
Congratulations on your purchase of the Crystal Acoustics loudspeakers and
subwoofer!
Your new loudspeakers and subwoofer are designed and built to the highest standards
for powerful and vivid high performance.
Crystal Acoustics home cinema systems deliver powerful, engaging, you-are-there
video and a profound yet nuanced, detailed and dynamic musical presentation.
Immerse yourself in an action film and be-in-the-scene while thunderous dynamics and
huge soundscapes take your breath away!
2.1 Prior to installation
•
•
•
Please unpack the system carefully as the units are heavy
Use caution when lifting or moving to avoid injury
Please retain the carton and all packaging materials for future use; units may be
damaged during transportation if packed in non-suitable cartons
•
Please observe all warnings in the instruction manual and on the unit itself and refer
all questions to your Crystal Acoustics representative
2.2 Product features
Bipolar BPS and BPT Speaker Systems are designed to be used with TX-8SUB / TX10SUB or our THX Select Certified Subwoofers. BPS and BPT Systems, due to their slim
cabinets, should use your receiver’s “Small Speaker” setting with a crossover point of
150Hz or more for best performance. This is also dependent on your room’s dimensions,
the subwoofer placement in the room, as well as your listening taste.
BPS satellites are especially designed so that they can either be placed horizontally or
vertically, surrounding you with a high-quality, wide-dispersion surround sound.
Crystal Acoustics BPS and BPT speakers are available as 2.0 pairs of satellites or towers
or 5.1 system sets with TX-8SUB / TX-10SUB subwoofer, as following:
1. Bipolar satellites BPS 2.0 (pair of satellite speakers)
••Bipolar Satellites BPS with 2 x 3” woofers and 1 x 1” tweeter for use as front or surround
speakers.
5
2. LCR speaker (pc)
• LCR speaker for use as a center, front or surround speaker on any system
3. Bipolar Towers BPΤ-3Τ 2.0 (pair of tower speakers)
••Bipolar Tower Speakers BPT with 2 x 3” woofers and 1 x 1” tweeter for use as front
or surround speakers.
4. Bipolar System 5.0 BPT
••4 Bipolar Tower Speakers BPT with 2 x 3” woofers and 1 x 1” tweeter for use as
front or surround speakers
••1 LCR center
5. Bipolar System 5.1 BPS & TX-8SUB / TX-10SUB
••5 Bipolar speakers BPS for use as the centre, front and surround speakers
••1 subwoofer TX-8SUB / TX-10SUB
The overall presentation is engagingly vivid with your TX-8SUB / TX-10SUB subwoofer
supporting flat anechoic response from 40Hz to 200Hz. It also features accurate room
response from 29Hz to 300Hz. With these specifications, your new speakers reproduce
sound beautifully and deliver powerful action films with the authority of larger and more
expensive speakers.
Your new speakers feature:
•Electronic protection for tweeters and woofers
•Magnetic shielding
•Wide horizontal dispersion that permits full, flat frequency response throughout a room
•Controlled vertical dispersion diminishes ceiling and floor reflections for superior
focus and imaging.
•High sensitivity for low power amplifiers and A/V receivers
•TX-8SUB / TX-10SUB 8-inch or 10inch long-throw woofer
•TX-8SUB / TX-10SUB flat frequency response from 30Hz or 40Hz to 200Hz
•TX-8SUB / TX-10SUB line level (RCA) input (AUDIO IN)
•TX-8SUB / TX-10SUB variable volume control
••TX-8SUB / TX-10SUB selectable phase control (0ο or 180ο)
••TX-8SUB / TX-10SUB signal sensing auto turn ON/OFF
6
3 Positioning your new Bipolar speakers
The sound field reproduced by a multi-channel audio system envelops listeners to create a
very three-dimensional image. To achieve the best results follow these set-up procedures.
> Ideally, all five speakers should be equidistant from the listener and develop identical
sound levels when fed identical signals.
> BPT floor standing placement: Due to the woofers at the rear of the cabinet, avoid
placing the BPT-3T floor-standing speakers close to the wall, but at a distance. This
way the BPT speakers will surround you with a wide range response for a truly lifelike
sound.
> BPS placement: The BPS speakers can be placed horizontally or vertically and either
on a shelf or on a wall with their metal wall brackets. Due to their unique bipolar 450
design they can be placed as close to the wall as you like without dispersion problems.
Depending on the placement you prefer and the distance from your listening position
you may experiment with the exact on-axis position of the BPS speaker by shifting the
speaker left and right in regards to the centre. Choose the position you like most.
> It may not be practical for your speakers to be set equidistantly in your room, but
electronic time delay circuits easily compensate for this and can be found in any
processor or receiver’s set-up menu.
> We recommend positioning your TX-SUB close to the listening position (Figure 1).
*** Additionally, using the Crystal Acoustics Wireless Transmitter-Receiver you can easily
connect your subwoofer with the minimum of fuss and free from the clutter of speaker wires.
> Avoid positioning the subwoofer equidistantly from room boundaries like walls.
> Avoid positioning it near corners where walls are not of solid construction.
> Corner placement may exacerbate room resonance, resulting in boomy, muddy bass.
> Further experiment with speaker positioning; place the subwoofer near your listening
position and play jazz with acoustic bass and move around the room.
> Place the subwoofer where you hear the deepest, best controlled and most articulate
bass frequencies.
7
>Your TX-8SUB / TX-10SUB subwoofer is magnetically shielded to reduce the amount
of stray magnetic energy emitted from the speaker’s motor structure. This greatly
increases flexibility when placing the unit close to video monitors, as there is very little
stray magnetism. Certain types of TV are particularly sensitive to stray magnetic fields.
If your TV produces distorted colours after installing your subwoofer, simply increase
the distance between your TV and the subwoofer, until normal colour and operation is
returned.
CAUTION! This subwoofer has electronics built into the cabinet. Do not place the
cabinet next to sources of heat or near sources of excessive moisture.
Figure 1: Speaker and subwoofer placement
8
3.1 Placing BPS, LCR or BPT speakers as front left and right
Try to follow these set-up suggestions as illustrated in Figure 1. Use our online
Room Acoustics Designer® (www.crystal-acoustics.com) to find other placement
suggestions.
1. Place your BPS or BPT speakers equidistantly from your TV/projector’s screen
2. Measure the distance between your left and right speakers
3. Measure the distance between the listening position and the midpoint between your
left and right speakers
4. The difference in length between them should be no greater than 15%
5. Angle your speakers inwards towards the listening position and find the optimum
angle for best sound
6. Adjust your speakers so that the tweeters are about ear-height at the listening position
if possible
7. Move the speakers towards room boundaries (walls or corners) to reinforce low
frequencies. Do the opposite to reduce lower frequencies
8. Do not place the speakers too far apart or a hole develops in the centre image
9. Do not place the speakers too close together or the soundstage collapses into a fuzzy
mono centre -only image.
3.2 Placing BPS or LCR as a centre channel speaker
> TV screen: Place your your BPS or LCR speaker directly above or below the screen
depending on which is closer to ear level.
> Projector screen: Place your BPS or LCR speaker behind or in front of the centre of
the screen whether it is acoustically transparent or not.
3.3 Placing BPS, LCR or BPT speakers as left and right surrounds
Due to their bipolar design both BPS and BPT speakers are optimized to deliver an
attractive, engaging, powerful and enveloping sound field. Follow the setup suggestions
as illustrated in figure 1.
1. Place the speakers slightly behind the primary listening position
2. Adjust the speakers to fire towards each other behind the seating area
9
*** Additionally, using the Crystal Acoustics Wireless amplifiers TR-100 or TR-60 (optional) you
can easily connect your surround speakers with the minimum of fuss and free from the clutter
of speaker wires.
3.4 Placing BPS & LCR speakers on the wall
The LCR speaker includes an invisible wall mounting system at the rear of the cabinet for
either vertical or horizontal placement.
1. Due to their unique bipolar 45ο design they can be placed as close to the wall as you
like without dispersion problems.
2. Depending on the placement you prefer and the distance from your listening position
you may experiment with the exact on-axis position of the BPS speaker by shifting the
speaker left and right (when placed horizontally) or up and down (when placed vertically),
in regards to the centre. Choose the position you like most at the listening position.
Wall bracket Installation
1) Screw the Bracket top (4) on the back of the speaker.
2) Place the bracket bottom (8) on the wall. Make sure to use the appropriate screws so
that the bracket is fully and stably placed.
3) Position the speaker Bracket top (4) on the Bracket bottom (8) until they are fully
seated and use the Molded nut (1) to tight them together adjusting the speaker position
on the same time. Make sure the Metal nut (9) is fully tightened in order to hold the BPS
speaker weight.
Figure 2: On-wall placement of BPS in vertical or horizontal position
10
Wall bracket Installation
**ΑΤΤΕΝΤΙΟΝ: Please consult a special
technician for advisory on your wall
specifications and mounting instructions if
you are not familiar or you don’t know how
much weight your wall can stand.
Wall bracket parts
1. Molded nut
2. Metal nut
3. Screw
4. Bracket top
5. BPS speaker
6. EVA
7. Screws (not included)
8. Bracket bottom
9. Metal nut
11
4 Speakers & subwoofer connections with your AV receiver
Figure 3: Connection of speakers and subwoofer with receiver.
IMPORTANT: All connections must be made with the equipment switched off. Refer
to your AV receiver manual before proceeding with connections.
Connections to the speakers are made at the binding post terminals located on the rear
panel of the receiver. These terminals permit a variety of connection methods.
1. Single-wire: Ensure the positive binding post on the speaker (marked in red) is
connected to the positive output terminal of the amplifier or receiver. Similarly, the
negative speaker terminal (marked in black) is connected to the negative amplifier or
receiver output terminal. Incorrect connections can result in poor imaging and reduced
bass output.
2. Bi-wire (not supported on all speakers): Remove the jumper links by loosening
the speaker terminal caps and use a separate pair of speaker cables from the amplifier
or receiver to each pair of speaker binding posts. Bi-wiring can improve resolution of
low-level detail. Always observe correct polarity. Incorrect connections can also degrade
bass, focus and imaging.
12
Be sure to choose the correct output terminals on your amplifier or receiver to properly
connect your BPS and BPT speakers (figure 3).
> For front left and right speakers: use the front left and right speaker output terminals on
your amplifier or receiver and connect two BPS or BPT speakers
> For centre speaker: use the centre channel speaker output terminals on your amplifier or
receiver to connect your BPS speaker
> For surround (rear) speakers: use the two surround (rear) speaker output terminals on
your amplifier or receiver to connect two BPS or BPT speakers
5
Installation of TX-8SUB / TX-10SUB
5.1 Inputs
Your new subwoofer is equipped with line-level (RCA→ Audio In) input for connection with a
pre-amp, signal processor or receiver with pre-amp level outputs. Some receivers may not
provide enough signal to have the unit’s Auto On/Off feature operate properly. Additionally
this lack of signal may cause the subwoofer to produce less output than it is capable of.
• If using a receiver with LFE out, be sure the LFE channel is sending adequate signal to
the subwoofer. We recommend setting the subwoofer’s level to the 9 o’clock setting (1/4
volume setting) and then adjust the LFE channel on your receiver or processor to achieve
the desired bass output.
*See your receiver or processor’s owner manual for more information.
5.2 Volume Control
The volume control allows you to balance the output from the subwoofer to the main
speakers/amplifier in your system. This control should be set to achieve similar output
levels from both the main speakers and subwoofer when listening to music. A good
starting point for the volume control is two or three levels above minimum.
13
5.3 Phase adjustment 0ο / 180ο
Phase control allows you to “reverse” the phase of the subwoofer’s output signal 180ο to
correct for any possible mismatch and resulting cancellation between the subwoofer and
your main speakers/ amplifier. To adjust, simply listen to the system with music playing
then depress the phase switch from one position to the other and listen for a change in
low frequency output. The correct position will have a greater amount of apparent low
frequency output.
For all installations, experiment with the phase switch to determine the setting that produces
the most bass. If the settings sound similar we recommend the 0ο position.
5.4 Auto On /Off
The subwoofer will turn itself on automatically when an audio signal is present. If no signal
is present for approximately 10 minutes, the unit will switch to standby mode. While in
standby mode your subwoofer will draw minimal power, however we suggest you turn it
off or even unplug the power cord from the outlet when it is left unused for a long period
of time.
AC plug for connecting
the Crystal Acoustics
Wireless receiver for
active subwoofers
Volume Control
Line Level (RCA)
input (AUDIO IN)
Phase Control
ON/OFF
Power switch
Figure 4: Subwoofer Control layout
14
5.5 Subwoofer installation guide
The following instructions are for THX Certified as well as non-certified Dolby Digital/DTS
A/V receivers or surround processors.
1. Turn off your receiver or multi-channel amplifier and make sure the TX-8SUB /
TX-10SUB is off
2. Use a high quality shielded interconnect with RCA connectors to link the TX-8SUB /
TX-10SUB to the output of your receiver or multi-channel amplifier.
3. Set the phase switch to 0ο
4. Turn on your system and the TX-8SUB / TX-10SUB
5. Navigate to the Speaker Setup menu of your receiver or processor to calibrate channel
level and size of your front, centre and surround speakers.
6. Set your main and surround speakers to “Small” on your receiver or processor.
7.
•
•
•
Set the roll off point to the following:
80Hz (THX standard) for THX Select loudspeakers or other speakers of bigger size
120-150Hz for other small speakers (Crystal Acoustics Plasma, SmArt System and
Bipolar series)
The higher the crossover, the better the power handling of your main speakers
8. Change the Phase Control of your TX-8SUB / TX-10SUB between 0ο and 180ο
positions.
9. Listen to music with prominent bass.
10.Stay with the switch position that produces the fullest, deepest and tightest bass in your
listening area.
11.Use the pink noise test signal of your receiver, processor or test DVD.
12.Take a seat at the main listening and viewing position.σύ
13.Use a SPL meter (C scale, slow) and calibrate the output sound level of each channel
(fronts, centre, surrounds) plus your subwoofer, so that all outputs levels are equal.
14.Connection of multiple subwoofers to a receiver or processor with only one SUB/LFE
output can be accomplished with Y-adapters (RCA male to two RCA female connectors).
ρ με
15
15. Using the Crystal Acoustics Wireless Transmitter-Receiver solution you can easily
connect your subwoofer with the minimum of fuss and free from the clutter of speaker wires.
Use the AC socket at the rear panel of the TX-8SUB / TX-10SUB in order to connect the Crystal
Acoustics receiver. Refer to Crystal Acoustics Wireless Transmitter-Receiver owner’s manual
for further details on connection capabilities.
6
Troubleshooting
6.1 No sound from any of the speakers
> Check that receiver/amplifier is on and a source is playing
> Check all wires and connections between receiver/amplifier and speakers
> Make sure all wires are connected properly
> Make sure none of the speaker wires are frayed, cut or punctured, or touching each other
> Review proper operation of your receiver/amplifier
6.2 No sound coming from one speaker
> Check the “Balance” control on your receiver/amplifier
> Check all wires between receiver/amplifier and speakers
> Make sure all wires are connected properly
> Make sure none of the speaker wires are frayed, cut or punctured, or touching each other
> In Dolby® Digital or DTS® modes, make sure that the receiver/amplifier is configured so
that the speaker in question is enabled
> Turn off all electronics and switch the speaker in question with one of the speakers that is
working properly. Turn everything back on, and determine whether the problem has followed
the speaker, or has remained in the same channel. If the problem is in the same channel,
the source of the problem is most likely with your receiver/amplifier, and you should consult
the owner’s manual for that product for further information. If the problem has followed the
speaker, consult your dealer for further assistance or contact [email protected]
16
6.3 The system plays at low volumes but shuts off as volume increases
> Check all wires and connections between receiver/amplifier and speakers
> Make sure all wires are connected properly
> Make sure none of the speaker wires are frayed, cut or punctured, or touching each other.
> If more than one pair of main speakers is being used, check the minimum impedance
requirements of your receiver/amplifier
6.4 There is no sound from the surround speakers
> Check all wires and connections between receiver/amplifier and speakers
> Make sure all wires are connected properly
> Make sure none of the speaker wires are frayed, cut or punctured, or touching each other/
> Review proper operation of your receiver/amplifier and its surround sound features
> Make sure the movie or TV show you are watching is recorded in a surround sound
mode. If it is not, check to see whether your receiver/amplifier has other surround
modes you may use
>
In Dolby® Digital or DTS® modes, make sure your receiver/amplifier is configured
so that the surround speakers are enabled. When five satellites are in use, remember
to configure your receiver or processor for 6.1-channel operation, and when six
satellites are in use, configure your receiver or processor for 7.1-channel operation
>
Review the operation of your DVD player and the jacket of your DVD to make sure that
the DVD features the desired Dolby® Digital or DTS® modes, and that you have
properly selected that mode using both the DVD player’s menu and the DVD disc’s
menu
17
6.5 No sound from TX-8SUB / TX-10SUB
> Make sure your TX-8SUB / TX-10SUB is plugged into an AC outlet
> Make sure the Subwoofer Y/N option is set to Yes in your receiver or processor’s
speaker setup menu
> Make sure the volume control is not set to Minimum
> Make sure your subwoofer interconnect is functioning properly and replace any
defective cables
6.6 Boomy, dull, out of focus low frequencies
> Try moving your subwoofer away from corners or walls in small steps
> The boom results from exciting room resonances
> Small changes in position can make a big difference
6.7 50/60 cycle hum coming from the subwoofer
Your TX-8SUB / TX-10SUB is reproducing ground loop hum from elsewhere in your system
> Make sure interconnect and speaker cables are routed away from AC power cords and
component power supplies to avoid induced hum
>
18
Cross interconnects at 90 degrees to AC power cords and keep them separated by at
least an inch. Also connect the power cord of your TX-8SUB / TX-10SUB and receiver/
processor and multi-channel amplifier to the same AC outlet to keep the grounds
all at the same potential avoiding hum
19
www.crystal-acoustics.com
[email protected]
USA Tel.: (443) 569-3569
UK Tel.: 020 8133 7066