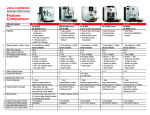
1
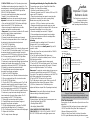
5) DECALCIFYING (chapter 18 of Operating Instructions).
For different water hardness levels see chapter 14a. The
water hardness is set at level 2 and the decalcifying monitor
is active. Decalcify when the MESSAGE light and the
DECALCIFYING light illuminate.
You need to order special decalc tablets (see section M
“Supplies”). You can still make coffee.
Important: Keep Access door open during the program.
Important: Once started, do not interrupt the program!
• Push and hold the DECALCIFYING button until its light
blinks. Now the EMPTY TRAY light blinks, also.
• Remove and empty the drawer and used coffee
container and replace complete assembly.
• Please note: You must remove the drawer for 20 seconds
even if it is empty. Replace complete drawer.
1. The FILL WATER light blinks.
2. Remove the water tank and make sure it is empty.
3. Dissolve 3 white square tablets in 16 oz. of water, pour
the mixture into the water tank and replace tank.
4. The SELECTOR light blinks.
5. Remove the Dual Frother Plus.
6. Place a container (at least 16 oz.) under the Steam nozzle.
7. Turn the SELECTOR to the Water symbol. The C5 pumps
the mixture through the nozzle in intervals. During this
procedure the SELECTOR light is on. When the cycle ends
the C5 stops pumping and the SELECTOR light blinks.
8. Turn the SELECTOR to the Cup symbol. Now the
C5 continues to pump the mixture through the internal brew
chamber into the used coffee container. The C5 stops
pumping the solution and the EMPTY TRAY light blinks.
9. Remove the container from under the frother.
10. Carefully lift and remove the drawer, empty and
thoroughly rinse all parts and replace.
11. Now the FILL WATER light blinks.
12. Remove the tank, rinse, fill with cold water and replace.
13. Place a container (at least 16 oz.) under the nozzle.
14. The SELECTOR light blinks.
15. Turn the SELECTOR to the Water symbol. The C5 will
pump fresh water through the nozzle in intervals. During
this procedure the SELECTOR light is on. When this cycle
ends, the pumping stops and the SELECTOR light blinks.
16. Turn the SELECTOR back to the Cup symbol. Now the
C5 continues to pump fresh water through the internal
brew chamber into the used coffee container. The C5
stops pumping, the EMPTY TRAY light blinks.
17. Remove the container from under the frother.
18. Carefully lift and remove the drawer. Empty and
thoroughly rinse all parts and replace.
19. The decalcifying procedure is complete. The RINSE
symbol blinks indicating that the C5 is heating up.
20. The C5 will remind you when it’s time to decalcify again.
21. Replace the Dual Frother.
The C5 is ready to brew coffee again.
L) Installing and Activating the Clearyl Blue Water Filter
The machine comes with one Clearyl Blue Water Filter
Cartridge. The Clearyl Blue cartridge...
• Reduces the water hardness up to 75%.
• Removes (if present) up to 85% chlorine, 90% lead, 95%
copper and 67% aluminum.
• Cleans the water through an upward current principle
just before the brewing cycle starts, ensuring freshly
filtered water every time you make coffee.
• Lasts for ~2,000 oz. of water or up to two months.
• Eliminates decalcifying except when using very hard
water (30 grains or higher), (see chapter 14a). In this case we
recommend decalcifying once or twice a year.
• To reorder cartridges, see section M “Supplies”.
1. Rinse cartridge under running water. Insert cartridge
into water tank reception and close the cartridge holder.
2. Fill tank with cold water.
Activating:
You must activate the cartridge for the C5 to monitor it.
Otherwise the C5 is in decalcifying mode.
The C5 is turned off, but in stand-by mode. Only the ON
symbol is visible.
3. Open the Access Door and push and hold the CLEARYL
button until its light is on.
4. Turn DIAL right until all three DIAL lights are on.
5. Push DIAL to confirm the activation process. The three
DIAL lights begin to blink.
6. Place a 20 oz. container under the steam nozzle.
7. Turn the SELECTOR to the Water symbol. The C5 pumps
water through the steam nozzle for 60 seconds. The water
may have a slight discoloration. The C5 will stop.
Please note: To empty the container during this process you
can stop the water flow by turning the SELECTOR to the
Cup symbol. Then replace the container, turn the SELECTOR
to the Water symbol and let the program finish.
8. Turn the SELECTOR back to the Cup symbol.
The C5 will return to stand-by mode. From now on the C5
will monitor the flow of water. After approx. 60 liters
(~2,000 oz.) of water use the C5 will remind you to
replace the filter (see chapter 15b of Operating Instructions).
Please note: As long as the filter is activated, the water
hardness setting is automatically turned off.
M) SUPPLIES can be ordered through:
Customer Service, Mail Order Form or www.capresso.com
• Clearyl Blue Water Filter: #67879
• Cleaning Tablets: #62205
• Decalcifying Tablets: #61848
JURA-CAPRESSO CUSTOMER SERVICE:
1-800-220-5701 M-F 9AM - 9PM; Sat. 9AM - 5PM EST
FAX: 201-767-9684; email: [email protected]
Impressa C5 Quick
Reference Guide
This Guide does not replace the
Operating Instructions.
For details and Cautions please
read Operating Instruction Manual
1-cup Espresso
2-cup Espresso
1-cup Coffee
2-cup Coffee
Three DIAL Lights
“DIAL” with push button
ON/OFF
RINSE
STEAM
PRE-GROUND COFFEE
MESSAGE BAR
FILL WATER light
EMPTY TRAY light
FILL BEANS light
CLEANING button with light
DECALCIFYING button with light
CLEARYL button with light
Dual Frother
Frothing
down
“SELECTOR”
a
c
Steam
nozzle
Steaming
up
b
a. Cup (for coffee)
b. Water (hot water/steam)
c. SELECTOR light
Traces of Coffee Grounds in New Machine?
This is normal! Grinder was tested during assembly with beans.
Despite cleaning, traces of ground coffee may be found.
A) First Time Preparation
Place machine on a flat, hard surface. Open the Access Door
(below DIAL).
1. Fill water in tank (left) and beans in bean container (right).
2. DO NOT install the Clearyl Blue Filter Cartridge now!
3. Remove Sticker around the DIAL.
4. Switch on Main Power Switch in the back of machine.
The “ON” symbol illuminates, indicating that the main power
69007
switch is on. The C5 is in stand-by mode.
5. Push the DIAL to turn on C5. The SELECTOR light blinks.
6. Place a cup under the frother.
7. Turn the SELECTOR to the Water symbol. The C5 fills the
system and stops. The SELECTOR light blinks.
8. Turn the SELECTOR to the Cup symbol. The RINSE symbol
blinks, the C5 heats up.
9. Place a large cup under the coffee spouts and push the
DIAL. The C5 rinses and pre-warms the coffee spouts with
warm water and stops. All eight symbols around the DIAL are
now visible.
10. The 1-cup Espresso Symbol is highlighted. This is the
Coffee Ready Mode.
11. Push the DIAL. The 1-cup Espresso symbol blinks, the C5
starts grinding and makes coffee.
12. Push again to make two cups of coffee and discard.
B) Daily Preparation
1. Fill fresh water in tank and check bean container. The C5 is
in stand-by mode.
2. Push the DIAL. The RINSE symbol blinks.
3. When the RINSE symbol stops blinking, place a cup under
the coffee spouts and push the DIAL. The C5 rinses and
stops. All eight symbols around the DIAL are now visible, the
1-cup Espresso symbol is highlighted = Coffee Ready Mode.
Empty the cup.
C) Auto-Off
The C5 will turn off 2 hours after last use. It rinses hot water
through the coffee spouts and enters stand-by mode.
D) Factory Settings / Changing Cup Sizes
For all factory settings see chapter 5 of Operating Instructions.
The C5 has four coffee settings producing approx.:
• 1 cup espresso: 5 seconds grinding and 1.5 oz. of coffee
• 2 cup espresso: 9 sec. grinding and 1.5 oz of coffee per cup
• 1 cup coffee: 5 sec. grinding and 5 oz. of coffee
• 2 cup coffee: 9 sec. grinding and 5 oz. of coffee per cup
All cup sizes can be re-programmed to your personal
preferences (chapter 9d).
E) Brewing Coffee / Espresso
Coffee Ready Mode
Turn DIAL to highlight one of the cup symbols to brew coffee.
Place one or two cups under the spouts and push the DIAL.
After grinding and brewing the C5 goes back into Coffee
Ready Mode. You can brew more coffee.
Note: you can always push the DIAL to stop the brewing.
Stronger Coffee for 1 cup settings: during grinding turn the
DIAL clockwise until all three DIAL lights are on (= 9 seconds
grinding).
Hotter Coffee: Pre-warm cups with the Hot Water feature
(see “Using Hot Water” section H).
F. CHANGING THE CUP SIZE PERMANENTLY
All four Cup symbols can be customized to your personal
cup size. The machine is in Coffee Ready Mode.
• Place a cup under the coffee spouts. Highlight the cup
symbol to re-program, e.g. the 1-cup Coffee symbol.
• Push and hold the DIAL until the left DIAL light starts
blinking. During brewing the left segment keeps blinking,
indicating that the machine is in programming mode.
• Once the cup is filled with the desired amount push the
DIAL to stop. Now the machine will produce this cup size for
this symbol. You can re-program all four Cup symbols in the
same way. The C5 will keep the information, even if it is
unplugged. You can change the cup size again at any time.
G) Changing the Grinder Fineness
Important: You can only adjust the fineness during the actual
grinding process.
• Open the bean container lid and turn the dial while grinding:
thicker bars: coarser grind; thinner bars: finer grind.
• For darker, oily beans – grind somewhat coarser.
For lighter beans – grind somewhat finer.
H) Using Hot Water
Coffee Ready Mode
• Place a cup under the frother.
• Turn the SELECTOR to the Water symbol.
• Turn the SELECTOR to the Cup symbol to stop the flow.
I) Frother – Steam – Cappuccino - Espresso
Important: frother parts must be tightly connected and clean.
• Cappuccino: One shot espresso plus ~ 4 oz. of steamed
and frothed milk. Metal frother sleeve DOWN.
• Latte: One shot espresso plus ~ 4 to 5 oz. of steamed
milk. Metal frother sleeve UP: steaming only (no frothing).
Steaming and Frothing
1. Fill half a pitcher with cold milk (i.e. 5 oz. in a 10 oz. pitcher).
2. Turn the DIAL to highlight the STEAM symbol, then push it.
3. The STEAM symbol blinks. When the SELECTOR light
turns on, immerse the frother into the milk and turn the
SELECTOR to the Water symbol. Steam pushes into the milk.
4. When the milk is hot enough and has enough froth, turn the
SELECTOR to the Cup symbol to stop the steam.
As long as the SELECTOR light blinks, you can continue to
steam/froth more milk.
Tip: Try steaming/frothing directly into your cappuccino cup.
HOTTER MILK? After frothing the milk, use the steaming
position (Frother sleeve UP) to increase the milk temperature.
5. Then place the cup under the coffee spouts and add a shot
of espresso.
J) Cleaning the Frother
Within 10 min. after last use, place a cup under the frother.
Turn the SELECTOR to the Water symbol for 5 seconds. For
thorough cleaning see page 16 of Operating Instructions.
K) Monitoring and Messages
1) FILL WATER (chapter 16a Operating Instructions)
MESSAGE light and the FILL WATER light blink; no
coffee can be made until the water container is filled.
2) EMPTY TRAY (chapter 16b Operating Instructions)
MESSAGE light and the EMPTY TRAY light blink; no
more coffee can be made.
• Carefully lift and remove drawer since there is water
in it. Important: Do not unplug the C5 while you are
emptying the coffee grounds.
• Empty the used coffee container and the drawer.
• Replace coffee container, tray, grid and drawer.
3) FILL BEANS (chapter 16c Operating Instructions).
MESSAGE light and FILL BEANS light blink. Open bean
container lid and add beans. Please note: The message
will disappear after making the next cup of coffee.
4) CLEANING WITH SPECIAL TABLET
After 200 coffees both MESSAGE and CLEANING
lights illuminate. This cleaning program removes coffee
oils inside the C5. It takes about 15 minutes.
2 tablets come with the C5. You can still make coffee.
Important: Only use this cleaning tablet!
Important: Once started, do not interrupt the program!
Important: Keep Access door open during cleaning.
1. Push and hold the CLEANING button until its light
blinks. Make sure the water tank is at least half full.
2. Now the EMPTY TRAY light blinks, too.
3. Remove and empty the drawer and used coffee
container and replace complete assembly.
4. Please note: You must remove the drawer for 20
seconds even if it is empty. Replace complete drawer.
5. The CLEANING light stops blinking.
6. Place a cup (at least 12 oz.) under the coffee spouts.
7. Push the CLEANING button. The C5 will disperse
some water through the coffee spouts. Then the
PRE-GROUND COFFEE symbol blinks.
8. Open the ground coffee lid, drop in one white
cleaning tablet and close lid.
9. Push the CLEANING button. The cleaning program
will dispense foamy water in intervals through the
coffee spouts. This will take a few minutes.
10. Then the EMPTY TRAY light blinks.
11. Lift and remove the drawer. Empty the used coffee
container and drawer and replace.
12. The RINSE symbol blinks indicating that the C5 is
heating up. The C5 reminds you when it’s time to
repeat the tablet cleaning cycle again. The C5 is ready
to brew coffee again.