1
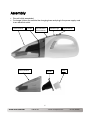
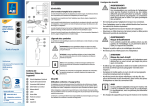
Contents 02 03 05 07 08 10 Introduction General Information and Safety Instructions Assembly and Parts List Getting Started Other Useful Information Warranty Card AFTER SALES SUPPORT 1 888 367 7373 [email protected] 03-12-14 / KB-8085 Introduction 2 1 Congratulations! You have made an excellent choice with the purchase of this quality Easy Home product. By doing so you now have the assurance and peace of mind which comes from purchasing a product that has been manufactured to the highest standards of performance and safety, supported by the high quality standards of ALDI. We want you to be completely satisfied with your purchase so this Easy Home product is backed by a comprehensive manufacturer’s 2 year warranty and an outstanding after sales service through our dedicated Helpline. We hope you will enjoy using your purchase for many years to come. If you require technical support or in the unlikely event that your purchase is faulty please telephone our Helpline for immediate assistance. Faulty product claims made within the 2 year warranty period will be repaired or replaced free of charge provided that you have satisfactory proof of purchase (keep your receipt safe!). This does not affect your statutory rights. However, be aware that the warranty will become null and void if the product is found to have been deliberately damaged, misused or disassembled. 2 AFTER SALES SUPPORT 1 888 367 7373 [email protected] 03-12-14 / KB-8085 3 General Information and Safety Instructions When using an electrical appliance, basic safety precautions should also be observed, including the following. PLEASE READ AND SAVE ALL INSTRUCTIONS BEFORE USING THE WET/DRY VACUUM. 1. Do not use the Wet/Dry Vac outdoors. It is for household use only. 2. Do not allow the Wet/Dry Vac to be used as a toy. Close attention is necessary when used by or near children. 3. Do not use the Wet/Dry Vac with damaged cord or outlet plug. Do not use the Wet/Dry Vac if it has been dropped, damaged, left outdoors, or dropped in water. Return it to the service center for examination, repair or adjustment. 4. Do not attempt to change accessories while the Wet/Dry Vac is running. 5. Do not handle the plug or the Wet/Dry Vac with wet hands 6. Use the Wet/Dry Vac only as described in this manual. Use only manufacturer’s recommended attachments. 7. Do not put any object into openings. Do not use with any opening blocked. Keep free of dust, lint, hair and anything that may reduce air flow. 8. Keep hair, loose clothing, fingers, and all parts of body away from openings and moving parts. 9. Do not pick up anything that is burning or smoking, such as cigarettes, matches, or hot ashes with the Wet/Dry Vac. 10. Do not use abrasive materials to clean the Wet/Dry Vac. Do not immerse the Wet/Dry Vac in water. 11. You may pick up small amounts of liquids with the Wet/Dry Vac using the rubber liquid nozzle attachment. 12. Do not use the Wet/Dry Vac on concrete, tar, or similar rough surfaces. 13. Do not pick up pieces of string or fabrics with the Wet/Dry Vac. 14. Do not clean frayed carpets or tassels on carpets with the Wet/Dry Vac. 15. Do not use the Wet/Dry Vac to pick up flammable or combustible liquids such as gasoline or use in areas where they may be present. 16. Read and follow all operational instructions. 17. Do not use the Wet/Dry Vac without dust container, divider and filter in place. 18. Store the Wet/Dry Vac indoors. Store after use to prevent accidents. 19. Do not abuse the power cord. Never pull the power cord to disconnect the outlet plug from an outlet; instead grasp the outlet plug and pull to disconnect. 20. Unplug the charger for the Wet/Dry Vac after the initial 12 hour charging time and after any subsequent charging. 21. Do not place the Wet/Dry Vac near a heat source or oven. 3 AFTER SALES SUPPORT 1 888 367 7373 [email protected] 03-12-14 / KB-8085 WARNING! Read and understand all instructions. Failure to follow all instructions listed below may result in electric shock, fire or serious personal injury. The warnings, cautions, and instructions discussed in this instruction manual cannot cover all possible conditions and situations that may occur. It must be understood by the operator that common sense and caution are a factor which cannot be built into this product, but must be supplied by the operator. SAFETY WARNING Although your Wet/Dry Vac is easy to operate, for your safety, the warnings below must be followed: 1. Do not place the Wet/Dry Vac near a heat source. 2. Do not unplug by pulling on the power supply cord. 3. The Wet/Dry Vac must be unplugged: A. Before any cleaning or maintenance. B. If it appears to be faulty. C. If it is fully charged. THIS PRODUCT IS INTENDED FOR HOUSEHOLD USE ONLY. SAVE THESE INSTRUCTIONS 4 AFTER SALES SUPPORT 1 888 367 7373 [email protected] 03-12-14 / KB-8085 5 Assembly and Parts List 1 Main Parts 1. 2. 3. 4. 5. 6. 7. 8. Main body Brush attachment Liquid nozzle Crevice tool Charging base Power cord Screws and anchors for wall mounting Filter 2 3 5 4 1 1 6 8 7 Contents of Packaging 1. 2. 3. 4. Instruction manual and screws Main body with filter Attachments Charging base with power cord If any of the above items are missing, please contact our customer service department at 1-888-367-7373 or email us at [email protected] for replacements. Our business hours are Mon-Fri 10:00 AM - 5:00 PM EST. 5 AFTER SALES SUPPORT 1 888 367 7373 [email protected] 03-12-14 / KB-8085 Assembly This unit is fully assembled. To charge it place the unit into the charging base and plug in the power supply cord to an electrical outlet. Dust Container Dust Container Dust ContainerRelease button Divider Dust Container Indicator Light Divider Dust Container On/Off Button Filter Dust Container 6 AFTER SALES SUPPORT 1 888 367 7373 [email protected] 03-12-14 / KB-8085 Getting Started 7 1 How to Use the Wet/Dry Vac 1. Make sure the Wet/Dry Vac is turned off and placed securely in the charging base. 2. Plug the power cord into a power outlet and allow the unit to fully charge for 12 hours the first time. Please note that subsequent charging times will vary depending on how long the Wet/Dry Vac was used. 3. The charging indicator light will glow red when the unit is on the charging base and the charging base is plugged in. When the light turns off it is fully charged. The charging base can also be used to store the crevice tool and the brush. 4. After the unit is fully charged, unplug the charging base and remove the Wet/Dry Vac from the base. 5. Securely attach any of the tools (if needed) and press the On/Off button. 6. When you are through with the Wet/Dry Vac, press the On/Off button, remove the attachments. Please remember to only use the liquid nozzle when vacuuming up small amounts of liquids. 7. Point the unit with the opening in a downward position and take it to a trash can or a sink if liquids have been picked up. 8. Press the dust container release button (see page 6), pull out the filter and the divider (see page 6), and empty the dust container into the trash or the sink if it contains liquids. 9. Rinse the dust container with clean water and let it dry thoroughly before snapping it back onto the unit. 7 AFTER SALES SUPPORT 1 888 367 7373 [email protected] 03-12-14 / KB-8085 8 Other Useful Information 1 Technical Specifications Model Number Handset Rating Voltage Handset Rated Wattage KB-8085 12V 7.5Amps Maintenance CAUTION: Always be sure that the Wet/Dry Vac is turned OFF and the charging unit is unplugged before cleaning or attempting to store the item. NEVER IMMERSE THE MOTOR in water or any other liquid. NEVER operate the Wet/Dry Vac without the dust container and filter in place. How to Clean the Dust Container 1. Hold the vacuum with the air inlet pointing downward. Press the dust container release button to remove the dust container. 2. Remove the filter and the divider before emptying the dirt in the dust container in to a trash receptacle or the liquid into a sink. 3. Rinse the dust container and divider in clear water and let dry thoroughly. 4. Shake the filter over the trash receptacle to remove dirt in the filter. 5. Replace the filter in the divider and push the divider securely into the main body of the dust container. 6. Replace the dust container back onto the main unit securely. 7. Use a soft damp cloth to wipe the outside of the main body and handgrip. Do not use abrasive cleaners on any parts of the Wet/Dry Vac. How to Clear Clogs Low suction or poor pick up may be due to a clog in the air inlet or attachments. If you notice a change in the sound of the motor or a reduction in performance, check for clogs and remove right away. Always be sure that the Wet/Dry Vacuum is switched OFF before attempting to remove a clog. 8 AFTER SALES SUPPORT 1 888 367 7373 [email protected] 03-12-14 / KB-8085 Storing Store the Wet/Dry Vac in a dry location. Do not place any heavy items on top of Wet/Dry Vac during storage as this may result in possible damage of the Wet/Dry Vac. Service Center If you have any questions in regards to the operation of this Wet/Dry Vac please contact our service center at: Wachsmuth & Krogmann, Inc. Tel: 1-888-367-7373 Email: [email protected] (Business hours Mon - Fri 10:00 AM - 5:00 PM EST) Environmental Protection If the appliance should no longer work at all, please make sure that it is disposed of in an environmentally friendly way. 9 AFTER SALES SUPPORT 1 888 367 7373 [email protected] 03-12-14 / KB-8085