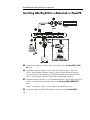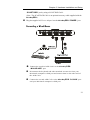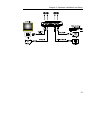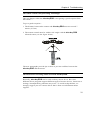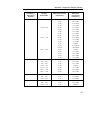
1
FCC NOTICE This device has been tested and found to comply with the limits for a Class B digital device, pursuant to Part 15 of the FCC Rules. These limits are designed to provide reasonable protection against harmful interference in a commercial, industrial or business environment. This equipment can generate, use and radiate radio frequency energy and, if not installed and used in accordance with the instruction, may cause harmful interference to radio communications. However, there is no guarantee that interference will not occur in a particular installation. If this equipment does cause harmful interference to radio or television reception, which can be determined by turning the equipment off and on, the user is encouraged to try to correct the interference by one or more of the following measures : • Reorient or relocate the receiving antenna. • Increase the separation between the equipment and receiver. • Connect the equipment into an outlet on a circuit different from that to which the receiver is connected. • Consult the dealer or an experienced radio/TV technician for help. This device complies with Part 15 of the FCC Rules. Operation is subject to the following two conditions: (1) this device may not cause harmful interference, and (2) this device must accept any interference received, including interference that may cause undesired operation. CAUTION ON MODIFICATIONS To comply with the limits for the Class B digital device, pursuant to Part 15 of the FCC Rules, this device must be installed in computer equipment certified to comply with the Class B limits. All cables used to connect the computer and peripherals must be shielded and grounded. Operation with non-certified computers or non-shielded cables may result in interference to radio or television reception. Any changes or modifications not expressly approved by the grantee of this device could void the user's authority to operate the equipment. CE NOTICE This is a Class B product. DISCLAIMER No warranty or representation, either expressed or implied, is made with respect to the contents of this documentation, its quality, performance, merchantability, or fitness for a particular purpose. Information presented in this documentation has been carefully checked for reliability; however, no responsibility is assumed for inaccuracies. The information contained in this documentation is subject to change without notice. In no event will AVerMedia be liable for direct, indirect, special, incidental, or consequential damages arising out of the use or inability to use this product or documentation, even if advised of the possibility of such damages. TRADEMARKS AVerMedia and AVerKey are registered trademarks of AVerMedia TECHNOLOGIES, Inc. IBM PC is a registered trademark of International Business Machines Corporation. Macintosh is a registered trademark of Apple Computer, Inc. Microsoft is a registered trademark and Windows is a trademark of Microsoft Corporation. All other products or corporate names mentioned in this documentation are for identification and explanation purposes only, and may be trademarks or registered trademarks of their respective owners. COPYRIGHT © 2004 by AVerMedia TECHNOLOGIES, Inc. All rights reserved. No part of this publication may be reproduced, transmitted, transcribed, stored in a retrieval system, or translated into any language in any form by any means without the written permission of AVerMedia TECHNOLOGIES, Inc. Table of Contents Chapter 1 Introduction Features ...................................................................................................... 1 What’s in the Package ................................................................................. 4 What You Can Do with the AVerKey550...................................................... 5 System Requirements .................................................................................. 5 Chapter 2 Hardware Installation and Setup The Back Panel........................................................................................... 6 Installing AVerKey550 to an IBM PC........................................................... 8 Connecting a Wired Mouse................................................................... 9 Installing AVerKey550 to a Macintosh or PowerPC ...................................... 10 Connecting a TV Monitor and Video Source................................................ 12 Chapter 3 Using the AVerKey550 The Remote Control Unit............................................................................. 14 Selecting Your Computer or a Video Source as the TV Output (Video Switcher Function) .................................................... 17 Changing the Operating Mode of the Remote................................................ 18 The Remote Mouse..................................................................................... 18 Remote Mouse Buttons......................................................................... 19 Presentation Highlight Functions .................................................................. 20 AVerMedia Spot................................................................................... 21 AVerMedia Pointer ............................................................................... 22 AVerMedia Spylight.............................................................................. 23 Different Types of Zoom............................................................................. 23 Normal Zoom....................................................................................... 23 AVerMedia Area Zoom......................................................................... 24 AVerMedia Spot-Zoom ........................................................................ 24 AVerMedia Pointer-Zoom..................................................................... 25 Panning and Positioning ........................................................................ 25 Page Saver.................................................................................................. 25 Touch-Button Panel Control........................................................................ 26 i The PAN/POS Button........................................................................... 26 Panning to Other Parts of the Zoomed Image......................................... 26 Adjusting the Image Position................................................................. 27 The LED Panel............................................................................................ 27 Chapter 4 Troubleshooting .........................................................29 Appendix......................................................................................32 Limited Warranty .......................................................................34 ii Chapter 1 Introduction Thank you for purchasing the AVerKey 550 . We are certain you will find this product a useful video presentation tool that is highly suitable for your business and multimedia applications. This chapter gives you an overview of what the AVerKey 550 can do. You will also find a list of the system requirements needed to use the product. Features Display Computer Images on TV The AVerKey 550 can convert computer images into video format (Composite, S-video or SCART RGB) and display them on any TV monitor or large-screen LCD projector. It is compatible with all IBM PCs, Macintosh computers, PCs, and Laptops. AVerKey 550 can support any application under DOS, all editi on of Windows OS, and Macintosh OS. The AVerKey 550 provides dual display on both your computer and TV monitors. (It supports all VGA monitors and MultiScan MAC monitors.) True Plug-and-Play The AVerKey 550 is plug-and-play! No software drivers are required. Supports Up to 1600 x 1200 With Super-VGA compatibility, your applications can be converted up to 1600 X 1200 (PC) and 1600 X 1024 (Macintosh) ! Remote Mouse and Remote Control in One The remote control unit allows you to give your presentation from up to 7 meters (23 feet) away. With the built-in remote mouse, you can roam around the classroom or conference room freely and still be able to control your presentation. 1 AVerMedia AVerKey550 User’s Manual Touch-Button Panel Control Just in case the remote control is lost, you can still operate the AVerKey550 through the Touch Button Panel Control. All major control functions are available through touch button on the hardware case. Easily Highlight Key Points in Your Presentation By simply using the remote, you can highlight important points in your presentation. Choose from 3 types of presentation highlight functions : AVerMedia POINTER Similar to a Laser Pointer, the AVerMedia Pointer is a 4 x 4 pixel square that lets you direct your viewers attention to key areas on the screen. Choose from an array of vibrant colors. AVerMedia SPYLIGHT Highlight part of your presentation and darken the rest of the screen. You can darken areas horizontally or vertically with the simple push of a remote control button. AVerMedia SPOT Highlight a certain area on the image by darkening external areas and creating a colored border within your area of interest. Create a highlight as large as 1/4th of your screen or as small as 1/64th of your presentation screen. Zoom into Any Area on the Presentation Screen Enlarge any area of your presentation screen through one of these special zoom functions : (You can adjust picture sharpness while you are in any of the zoom modes.) Traditional Zoom and Pan Users can zoom in (200%) the computer screen on TV and pan around freely to any part of the screen. Linear Zoom and Pan Gradually magnify the computer screen on TV allowing you to fully control the magnification up to 200% and pan. Area Zoom This function cuts the screen into 9 parts and allows you to select the desired part through the available buttons on the remote control. AVerMedia POINTER Zoom You can point to a key area in your presentation using AVerMedia Pointer and then enlarge that area. 2 Chapter 1 Introduction AVerMedia SPOT Zoom Once you have highlighted a certain area using AVerMedia Spot, you can zoom in and out of the highlighted area. Up to 7 Sharpness Selections The AVerKey550 gives you up to 7 flicker-filter selections which provide 100% flicker-free TV display. Video Switcher Connect the AVerKey550 with a computer and a video source such as a LaserDisc player or VCR. Select either source to be your final TV output. Screen Freeze/Unfreeze Screen Freeze lets you pause the TV display and make changes to your presentation without your audience knowing it. You can also prolong the time of display when you are giving demos. Linear Adjustment, Vertical and Horizontal Scale The AVerKey550 allows you to adjust both the screen width and height. This is one very special feature not found in most video converters. A wide selection of sizes are available. Full Screen Underscan/Overscan Full Screen Underscan/Overscan prevents your images from being "chopped out". Picture Controls Controls like horizontal/vertical picture positioning, horizontal/vertical screen panning and TV brightness control are also provided. Auto-Save The AVerKey550 automatically saves your settings when you power off the unit. Page Saver While giving presentations to an audience, you may need to return to a certain page and emphasize again some important ideas. AVerKey 550's Page Saver function allows you to save any page from your presentation. Just press a button to access and display the last page you saved. Auto Power On AVerKey 550 powers on automatically after you have connected the proper cables to your TV, PC & AVerKey550. 3 AVerMedia AVerKey550 User’s Manual What’s in the Package Your AVerKey 550 package includes the following : AC Power Adapter Unit S-Video Cable AVerKey550 Scan Converter and Remote Control (batteries included) This User’s Manual AV Cable 2 ADB Cables (for Macintosh) Computer Extension Cable (for IBM PC and compatibles) 2 RS-232 Cables (for IBM PC and compatibles) 2 PS2 Cables (for IBM PC and compatibles) Optional Accessories : Monitor Adapter (for MAC) 4 Computer Adapter (for MAC) SCART Cable (optional on PAL version) Chapter 1 Introduction What You Can Do with the AVerKey550 • Business Conference Room Presentation • Classroom Presentation • Trade Show Presentation • Software Training Tape Recording • Advertisement • Multimedia and Video Production And more!! System Requirements To use the AVerKey 550, you will need : • IBM PC or compatibles; or • Any Macintosh the support up to 1600 x 1024 display mode (MAC systems without the monitor output require a Power-R or Apple adapter) NOTE: AVerKey 550 should in theory support any computer and display systems with a vertical display frequency range of 56Hz to 120Hz and a horizontal display frequency of 31.5KHz to 108KHz. However, due to different custom hardware configurations and the wide variety of connectors used on various systems, we cannot guarantee that AVerKey 550 will function properly. 5 Chapter 2 Hardware Installation and Setup This chapter will show you how to install the AVerKey 550 to an IBM compatible PC and Macintosh computer. The Back Panel The ports on the back panel of the AVerKey 550 are for connecting the converter to the computer and graphics display monitor. The figure and descriptions below specify what device should go into each port. Œ POWER : Plug the AC Power Adapter to this port. • VGA IN : For IBM PC or compatible : This port connects the AVerKey 550 to the IBM compatible PC’s VGA port via the supplied Computer Extension Cable. For Macintosh : This port connects the AVerKey 550 to the Macintosh PC’s display card via the Computer Adapter and Computer Extension Cable. (The Computer Adapter is provided as an optional accessory.) 6 Chapter 2 Hardware Installation and Setup Ž MONITOR : • MOUSE/ADB : For IBM PC or compatible : If you need to use your wired mouse, connect the mouse to this port. Use the supplied RS-232 Cable to connect a Microsoft compatible mouse to this port. Connect the VGA or Macintosh display monitor to this port. A Monitor Adapter is needed to connect the Macintosh display monitor. (The Monitor Adapter is provided as an optional accessory.) For Macintosh : Connect the ADB devices (e.g. keyboard, mo use, etc.) from your Macintosh computer to this port. • PC/ADB : For IBM PC or compatible : Connect the supplied RS-232 Cable between this port and the serial port on your PC if you connected a Microsoft compatible mouse to the AVerKey 550 . For Mac : Connect the supplied ADB Cable between this port and the Macintosh computer's ADB port. ‘ SCART RGB : If you want to use a SCART RGB monitor with your PC and the AVerKey 550 , connect it to this port using the SCART RGB Cable. (Note : The SCART RGB Cable is an optional accessory cable supplied with the AVerKey 550 .) 7 AVerMedia AVerKey550 User’s Manual Installing AVerKey550 to an IBM PC Follow the setup diagram and procedure below to install the AVerKey 550 to an IBM compatible PC. Œ Connect the AVerKey550 to the PC. Plug one end of the supplied Computer Extension Cable to the AVerKey550 “VGA IN” port and the other end to the PC’s VGA port. • Connect the VGA monitor to AVerKey550. Plug the VGA monitor cable to the AVerKey550 “MONITOR” port. Ž If you are using a SCART RGB monitor, connect it to the AVerKey550 “SCART RGB” port by using the SCART RGB Cable. (Note : The SCART RGB cable is an optional accessory cable supplied with the AVerKey550.) • 8 Plug the supplied AC Power Adapter into the AVerKey550 “POWER” port. Chapter 2 Hardware Installation and Setup Connecting a Wired Mouse The AVerKey 550 remote control already provides a remote mouse which allows you to control your presentations. If you still need to use a wired mouse, make sure it is Microsoft compatible. If you have an IBM PC mouse or another mouse type, check if it can be switched to Microsoft mouse mode. Follow the diagram and instructions below to connect a wired mouse to the AVerKey 550 . Œ • Ž Plug the supplied RS-232 Cable to the AVerKey 550 “MOUSE/ADB” port. Disconnect your wired mouse from the PC and plug the mouse to the other end of the RS-232 Cable. Connect the other RS-232 Cable to the AVerKey 550 “PC/ADB” port and the PC's serial port. 9 AVerMedia AVerKey550 User’s Manual Installing AVerKey550 to a Macintosh or PowerPC Œ Connect the supplied Computer Extension Cable to the AVerKey550 “VGA IN” port. • Attach the Computer Adapter to the other end of the Computer Extension Cable. Then, plug the Computer Adapter along with the attached Computer Extension Cable to the monitor port on the back panel of your Macintosh PC. (Note : The Computer Adapter is provided as an optional accessory.) Ž Attach the Monitor Adapter to your Macintosh monitor. Then, plug the Monitor Adapter with the attached monitor cable to the AVerKey550 “MONITOR” port. (Note : The Monitor Adapter is provided as an optional accessory.) • If you are using a SCART RGB monitor, connect it to the AVerKey550 10 Chapter 2 Hardware Installation and Setup “SCART RGB” port by using a SCART RGB Cable. (Note : The SCART RGB Cable is an optional accessory cable supplied with the AVerKey550.) • Plug the supplied AC Power Adapter into the AVerKey550 “POWER” port. Connecting a Wired Mouse Œ • Ž Connect the supplied ADB Cable to the AVerKey 550 “MOUSE/ADB” port. Disconnect the keyboard and other attached accessories from your Macintosh computer's ADB port and connect them to the other end of the ADB Cable. Connect the second ADB Cable to the AVerKey 550 “PC/ADB” port and your Macintosh computer's ADB port. 11 AVerMedia AVerKey550 User’s Manual Connecting a TV Monitor and Video Source Use the connectors at the side panel of the AVerKey 550 to connect a TV monitor (or any video monitor). If you have a video source such as a VCR, laserdisc player or video camera originally connected to your TV monitor, you can also connect the video source to the AVerKey 550 . To output your computer presentation to a TV monitor : Œ S-OUT : If you have a TV monitor that uses the S-video standard, connect the supplied S-Video Cable to the AVerKey 550 "S-OUT" port and the TV monitor's "S-IN" port. • VIDEO-OUT : If you have a TV monitor that uses the Composite video standard, connect the supplied AV Cable to the AVerKey 550 "VIDEO-OUT" port and the TV monitor's "VIDEO-IN" port. Refer also to the setup diagram on the next page for the proper cable connections. To use the AVerKey 550 as a Video Switcher : The AVerKey550 allows you to connect a computer and a video device such as the VCR or LaserDisc Player. You can then use the AVerKey550 as a Video Switcher to select either source to be the final output. Environments such as classrooms and conference rooms usually require a TV to be connected to a VCR at all times. Now with the AVerKey550 , you do not need to disconnect cables whenever you need to use the TV with either the computer or the VCR/LaserDisc. To connect the AVerKey550 to a VCR or any video source : Ž S-IN : • VIDEO-IN : If the VCR (or any video source) is originally attached to your TV monitor and it uses the S-video standard, use an S-Video Cable to connect the VCR to the AVerKey 550 "S-IN" port and the TV monitor's "S-OUT" port. If a VCR (or any video source) is originally attached to the TV monitor and it uses the Composite video standard, use an AV Cable to connect the VCR to the AVerKey 550 "VIDEO-IN" port and the TV monitor's "VIDEO-OUT" port. Refer also to the setup diagram on the next page. 12 Chapter 2 Hardware Installation and Setup 13 Chapter 3 Using the AVerKey550 This chapter will show you how to use the Remote Control Unit and Touch Button Control Panel of the AVerKey 550 . Here, you will also learn how to operate the remote mouse, highlight important points in your presentation, and use the various zoom functions of AVerKey 550 . The Remote Control Unit The AVerKey 550 Remote lets you control your presentation from over 7 meters (23 feet) away. To use the remote control, first insert the supplied batteries (2 size “AAA” batteries) into the battery compartment at the back of the remote. While using the remote, aim it at the Infrared Sensor. The infrared sensor is located at the front panel of the AVerKey 550 . AVerMedia AVerKey550 Front Panel The descriptions on the next page briefly explain what the remote control buttons are used for. Continue reading the rest of this chapter for more information on using the remote control. 14 Chapter 3 Using the AVerKey550 POWER : Switches the AVerKey550 on/off. RESET : Restores the AVerKey550 to original factory settings. : Press the + button to increase the sharpness level. Press the button to decrease the sharpness level. SHARPNESS - BRIGHTNESS : Press the + button to increase the brightness level. Press the button to decrease the brightness level. : Toggles between Underscan and Overscan. OVERSCAN Overscan displays the computer image on TV to the fullest. The image will be chopped off at the borders when displayed this way. When you switch to Underscan, the computer image will be completely displayed on TV. MOUSE/ZOOM : Toggles between the Remote Mouse and LinearZoom modes. L (Left Mouse : Works the same as the left mouse button Button)/ZOOM of a wired mouse. To drag-and-drop, you must use this button with the L.DRAW or IN R.DRAW button. Refer to the section, The Remote Mouse, for more details. Gradually increase the magnification up to 200% R (Right Mouse : Works the same as the right mouse button of a wired mouse. To drag-and-drop, you must use this button with the Button)/ ZOOM L.DRAW or R.DRAW button. Refer to the section, The OUT Remote Mouse, for more details. Gradually decrease the magnification to normal size. MOUSE : The big round button on the remote is the MOUSE CONTROL CONTROL button. - 15 AVerMedia AVerKey550 User’s Manual Mouse Control Button In Remote Mouse mode: L.DRAW R.DRAW HEIGHT WIDTH AREA ZOOM Use this button to move the mouse cursor or a selected object (e.g. icon or window). In AVerKey550 mode: Use this button to : • Pan (move) around the computer image on TV. • Move the AVerMedia Pointer (or line) around the TV screen. • Highlight other areas of your presentation. : Use L.DRAW with the MOUSE CONTROL button to drag an object, e.g. an icon or window. (This is just the same as dragging an object using the left mouse button of a wired mouse.) You can also use these two buttons to select a group of objects. Refer to the section, The Remote Mouse, for more information. : Use R.DRAW with the MOUSE CONTROL button to drag an object, e.g. an icon or window. A menu with selectable options will then appear. (This is just the same as dragging an object using the right mouse button of a wired mouse.) Refer to the section, The Remote Mouse, for more information. : Press p to enlarge the height of the computer image on TV. Press q to reduce the height of the computer image on TV. : Press u to enlarge the width of the computer image on TV. Press t to reduce the width of the computer image on TV. : Provides quick selection of the screen area to magnify. The Area Zoom function divides the computer image on the TV into 9 parts and allows you to select the desired part to zoom. Refer to the section, Different Types of Zoom, for more details. POINT (AVerMedia Pointer) : This button functions just like a laser pointer. Refer to the section, Presentation Highlight Functions, for more details. SPOT (AVerMedia Spot) : Press this button to highlight a certain area in your presentation. The highlighted area will be surrounded by a colored frame and areas outside the frame will look dark. Refer to the section, Presentation Highlight Functions, for 16 Chapter 3 Using the AVerKey550 SPYLIGHT (AVerMedia Spylight) ZOOM more details. : Press this button to highlight a part of your presentation and darken the rest of the screen. Refer to the section, Presentation Highlight Functions, for more details. : Press this button to zoom in or out of the : • Computer image on TV • An area on the presentation screen which you highlighted using the SPOT button (AVerMedia SpotZoom) • A key point on the presentation which you highlighted using the POINT button (AVerMedia Pointer-Zoom) : Freeze or unfreeze the computer image on TV. FREEZE : You can use this button to change the color of the COLOR AVerMedia Pointer. You can also change the color of the frame which surrounds a highlighted area (AVerMedia Spot). There are 8 available colors to choose from. Refer to the section, Presentation Highlight Functions, for more details. : Press this button to save the current page shown on the TV SAVE PAGE screen. RECALL PAGE : Press this button to access the last page you saved with the SAVE PAGE button. : Use these buttons to move the computer image on TV. You POSITION can move the image up, down, left, or right. CONTROL Selecting Your Computer or a Video Source as the TV Output (Video Switcher Function) AVerKey 550 's Video Switcher Function allows you to select your computer or a video source as the final output on TV. (Refer to the section, Connecting a TV Monitor and Video Source, in Chapter 2 for details on how to connect a video source to the AVerKey 550 .) 17 AVerMedia AVerKey550 User’s Manual If you want your computer to be the output on TV, simply power on the AVerKey 550 unit. If you have a video source like a VCR, LaserDisc Player or Camcorder connected to the AVerKey 550 and you want the video source to be the output on TV, power off the AVerKey 550 unit. When the AVerKey 550 is switched off, all your settings will also be saved automatically. Changing the Operating Mode of the Remote The Remote Control operates in two types of modes: Remote Mouse mode and Linear Zoom mode. Use the MOUSE/ZOOM button to toggle between these two modes. • Remote Mouse Mode Check and see if the MOUSE LED on the AVerKey 550 front panel is ON. If it's not, press the MOUSE/ZOOM button to switch to Remote Mouse Mode. Refer to The Remote Mouse section below for information on how to use the remote mouse. • Linear Zoom Mode Check and see if the MOUSE LED on the AVerKey 550 front panel is OFF. If it's not, press the MOUSE/ZOOM button to switch to Linear Zoom Mode. The Remote Mouse AVerKey 550 's remote control has a built-in Remote Mouse. The Remote Mouse functions just like your ordinary mouse, except now, you can stand 7 meters (23 feet) away from your computer and simply use your fingers to scroll, point and click on your applications. To use the remote mouse, you must set the remote control to operate in Remote Mouse Mode. 18 Chapter 3 Using the AVerKey550 Remote Mouse Buttons Mouse Control Button Left Mouse Button Right Mouse Button L.DRAW R.DRAW The table on the next page provides detailed, step-by-step procedures on how to use the remote mouse on a Windows environment. HOW TO …. Procedure How to move the mouse pointer/cursor Hold down the Mouse Cursor Button and move the mouse pointer/cursor in any direction you want. How to select an icon or window on the Windows desktop; 1. Position the mouse pointer on top of the icon or window you want. (Use the Mouse Cursor Button.) 2. Press the L (Left Mouse) Button. How to "double-click" How to select an option from a shortcut menu 1. Press the R (Right Mouse) Button to open the shortcut menu. 2. Hold down the Mouse Cursor Button and move the mouse pointer to your desired option. 3. Press the L (Left Mouse) Button. How to select icons that are next to each other 1. Place the mouse pointer at the proper position. (Use the Mouse Cursor Button.) 2. Press the L.DRAW Button. 3. Hold down the Mouse Cursor Button and drag a rectangle around the icons you want to select. 19 AVerMedia AVerKey550 User’s Manual How to select text in a Windows application How to drag and drop 1. Place the mouse cursor at the start of the text you want to select. (Use the Mouse Cursor Button.) 2. Press the L (Left Mouse) Button. 3. Then, press the L.DRAW Button. 4. Hold down the Mouse Cursor Button and drag over the text you want to select. 5. When you reach the end of the text you want to select, press the L.DRAW Button. Use the L.DRAW or R.DRAW button. If you use the L.DRAW button : 1. After selecting an icon, window, group of icons, or an amount of text, press the L.DRAW button. 2. Hold down the Mouse Cursor Button and drag the icon(s), window or text to your desired destination. 3. Press the L.DRAW button again to drop the icon(s), window or text. If you use the R.DRAW button : 1. After selecting an icon, window, group of icons, or an amount of text, press the R.DRAW button. 2. Hold down the Mouse Cursor Button and drag the icon(s), window or text to your desired destination. 3. A menu with available options will then appear. Select your desired option. 4. Press the R.DRAW button again to drop the icon(s), window or text. Presentation Highlight Functions The AVerKey 550 provides 3 special functions for highlighting key points in any presentation : AVerMedia Spot, AVerMedia Pointer and AVerMedia Spylight. You can use these functions by pressing the corresponding buttons on the remote control. 20 Chapter 3 Using the AVerKey550 AVerMedia Spot To highlight a certain area in your presentation, press the SPOT button on the remote. A colored frame will appear around the highlighted area and the rest of the image will be darkened. The highlighted area will appear as if there is a "light" directed on it. The figure below shows an illustration. Colored Frame Highlighted Area Changing the Color of the Frame Use the COLOR button to select a color for the frame. Press this button repeatedly and select your desired color. There are 8 available colors to choose from. Changing the Size of the Highlight Use the WIDTH and HEIGHT buttons to change the scope of the highlighted area. You can create a highlight as large as 1/4th of your screen or as small as 1/64th of your presentation screen. Higlighting Another Area Use the MOUSE CURSOR Button to highlight another area in your presentation. 21 AVerMedia AVerKey550 User’s Manual AVerMedia Pointer AVerMedia Pointer is very similar to the laser pointer. It is a 4 x 4 pixel square which lets you direct your viewer's attention to key areas in your presentation. To point on a key area in your presentation, press the POINTER button on the remote. Extending the AVerMedia Pointer into a Line Line If you have a very large audience, the AVerMedia Pointer on the presentation screen might not look obvious and clear enough. You can extend the AVerMedia Pointer into a Line. Use the WIDTH button to extend the AVerMedia Pointer into a line or vice versa. At most, you can stretch the line up to the full extent of your screen width. Moving the AVerMedia Pointer (or Line) Use the MOUSE CURSOR Button to move the AVerMedia Pointer (or line) up, down, left or right. Changing the Color Press the COLOR button repeatedly and choose your desired color for the AVerMedia Pointer (or line). There are 8 available colors to choose from. 22 Chapter 3 Using the AVerKey550 AVerMedia Spylight Highlighted Area The AVerMedia Spylight function works somewhat the same as your regular overhead projector. With this function, you can highlight a part of your presentation and then "cover" the rest by darkening areas which you do not want to show to your audience. When you press the SPYLIGHT button for the first time, the upper part of your presentation screen will be highlighted. (See the sample screen above.) Highlighting Areas Horizontally and Vertically Use the MOUSE CURSOR Button to show or darken more parts of your presentation screen. Different Types of Zoom The AVerKey 550 provides 4 types of zoom : Normal Zoom, AVerMedia Area Zoom, AVerMedia Spot-Zoom, and AVerMedia Pointer-Zoom. Normal Zoom Normal Zoom allows you to zoom in and out of the computer image on TV. When you press the ZOOM button for the first time, the upper left side of your computer image will be enlarged and displayed on TV. Once you have used other AVerMedia zoom functions (e.g. AVerMedia Area Zoom, Pointer-Zoom, etc.), you can press the ZOOM button to redisplay the last zoomed image. 23 AVerMedia AVerKey550 User’s Manual AVerMedia Area Zoom This function divides your screen into 9 parts and allows you to select the desired part to zoom through the available buttons on the remote control. The directional buttons on the remote corresponds to 9 parts of your screen : Directional Buttons on the Remote Control 9 Parts of the Screen Press one of the 9 directional buttons which corresponds to the part of the screen you want to zoom. For example : AVerMedia Spot-Zoom As described earlier in the section, AVerMedia Spot, under Presentation Highlight Functions, you can highlight a certain area in your presentation by pressing the SPOT button. After pressing the SPOT button, press ZOOM to enlarge the highlighted area inside the colored frame. (The figure below shows an illustration.) 24 Chapter 3 Using the AVerKey550 Press the SPOT button to highlight an area. Then, press the ZOOM button to enlarge the highlighted area. AVerMedia Pointer-Zoom After you press the POINTER button to point on a key area in your presentation screen, press the ZOOM button to magnify the area where you are pointing to. Panning and Positioning You can pan (move) to other parts of the zoomed image by using the MOUSE CURSOR button. To shift the position of the zoomed image, use the POSITION CONTROL buttons of the remote control. Page Saver RECALL PAGE button RECALL PAGE SAVE PAGE button SAVE PAGE AVerKey550's Page Saver feature allows you to store any page from your presentation and easily call out that page. Press the SAVE PAGE button on the remote to save the current page on your presentation screen. To access and display the last page you saved, press RECALL PAGE. 25 AVerMedia AVerKey550 User’s Manual Touch-Button Panel Control The Touch-Button Panel Control on the AVerKey 550 unit gives you access to the most commonly used functions. Some of the touch buttons work differently than the remote control buttons. These include Brightness, Sharpness, PAN/POS, and the Directional Buttons. Refer to the figure and descriptions below for the details. The PAN/POS Button The PAN/POS touch button toggles between the PAN (Panning) and POS (Positioning) modes. Panning to Other Parts of the Zoomed Image 1. Check and see if the PAN/POS LED on the AVerKey 550 front panel is OFF. If it's not, press the PAN/POS button to switch to PAN mode. 2. Press on the Directional Buttons to view other parts of the zoomed image. 26 Chapter 3 Using the AVerKey550 Adjusting the Image Position 1. Check and see if the PAN/POS LED on the AVerKey 550 front panel is ON. If it's not, press the PAN/POS button to switch to POS mode. 2. Press on the Directional Buttons to move the image up, down, left, or right. The LED Panel At the front panel of the AVerKey 550 , you will find the Infrared Sensor and several LEDs. Each LED shows you whether or not a particular function or operating mode is active. The figure and descriptions below explain what each LED represents. MOUSE : This LED shows which type of mode the remote control is currently in. If the LED light is off, it means that the remote is operating in Linear Zoom mode. If the LED light is on, it means that the remote is operating in Remote Mouse mode. FREEZE : This LED shows whether FREEZE or UNFREEZE is in operation. If this LED light is on, it means that the user has paused, i.e, frozen the screen. PAN/POS : This LED works in conjunction with the PAN/POS 27 AVerMedia AVerKey550 User’s Manual button of the Touch-Button Control Panel. If the LED is OFF, it means that the panning function is active. If the LED is ON, it means that the positioning function is active. Infrared Sensor : The infrared sensor (at the middle of the front panel) receives incoming commands from the remote control. DRAW : This LED works in conjunction with the L.DRAW and R.DRAW buttons of the Remote Control. It lights up when you are selecting objects or performing a drag-and-drop. READY : If this LED light is on, it indicates that the AVerKey550 is ready for use. POWER : This red LED is the power ON/OFF indicator. If this LED is on, it indicates that the AVerKey550 has been powered ON. 28 Chapter 4 Troubleshooting This chapter provides many useful tips on how to solve common problems while using the AVerKey 550 . There is no picture on my TV. 1. 2. 3. 4. 5. Check all the connectors again as shown in this manual. Check your TV remote control on/off switch and channel setting. Verify the setting of Composite Input or S-VHS Input of your TV set. If you are using a SCART connector, check the SCART input of your TV set. If you are using a notebook, you may have to switch to external VGA mode. (Refer to your notebook's manual.) 6. As specified by IBM, some systems may require that the monitor is present and connected when the system is powered up. The picture on my TV is distorted. 1. Before doing any adjustments, reset all the picture attributes to the factory default setting using the RESET button on the remote control. 2. Each VIDEO display device is slightly different from another. Use the Panning Control of AVerKey 550 to adjust the picture. 3. Use the Brightness and Sharpness picture attributes controls on the remote control to reduce the distortion. 29 AVerMedia AVerKey550 User’s Manual When the signal runs through a VCR, there is no picture on the TV. 1. Check your TV/VCR input channel setting. 2. If your TV and VCR are connected to an AV Amplifier, please check the input/output selection. I have set up AVerKey550 and checked all the connections as specified in the manual, but I can only get a picture on the VGA monitor, not on the TV screen. AVerKey 550 is in "Ready" mode once power is connected. You need to switch AVerKey 550 "ON", either from the Remote Control or Touch-Button Panel Control to display both VGA and VIDEO. The picture on my TV is all messed up. When using AVerKey 550 with IBM PC compatible computers, only screen resolutions up to 1600 x 1200 (horizontal frequency less than 108KHz) are supported. While using the remote control or wired mouse, the PC does not respond. (The mouse cursor does not appear on-screen; the mouse cursor won't move.) 1. Make sure that power is connected. Check and see if the READY LED on the AVerKey 550 front panel is on. 2. Check if the RS-232 cable is securely connected to the AVerKey 550 "PC/ADB" port. 3. Make sure that the mouse driver has been invoked successfully. 4. If you are using a wired mouse, AVerKey 550 can support the standard (two-button) MS mouse. 5. If you're using the remote control unit, make sure that the batteries have enough power. 30 Chapter 4 Troubleshooting The remote control is not performing well enough. This may happen when the AVerKey 550 is not getting a good reception from the remote. To get a good reception : 1. The distance between the remote and AVerKey 550 must not exceed 7 meters (23 feet). 2. The remote control must be within a 90° angle with the AVerKey 550 infrared sensor (see the figure below). The next paragraphs provide tips on how to prevent conflicts between the AVerKey 550 and the mouse. The mouse driver I'm using cannot work with AVerKey550. Basically, AVerKey 550 can be used with any mouse driver. But since different driver programs support different types of mouse devices, functions or settings, incompatibility problems may occur. To avoid such problems, we strongly suggest you use a mouse driver that is from a world-known mouse supplier. 31 Appendix Supported Display Modes The reference table below lists the various display resolutions which the AVerKey 550 can support. Computer / Operating System Display Resolution Maximum Vertical Frequency Maximum Horizontal Frequency IBM PC 720 × 400 70 Hz 31.5 KHz DOS/V 640 × 480 60 Hz 31.5 KHz 72 Hz 37.9 KHz 75 Hz 37.5 KHz 85 Hz 43.3 KHz 90 Hz 47.9 KHz 800 × 600 1024 × 768 32 100 Hz 52.2 KHz 120 Hz 61.79 KHz 56 Hz 35.1 KHz 60 Hz 37.9 KHz 72 Hz 48.1 KHz 75 Hz 46.9 KHz 85 Hz 53.7 KHz 90 Hz 57.0 KHz 100Hz 62.5 KHz 120 Hz 77.17 KHz 60 Hz 48.4 KHz 70 Hz 56.5 KHz 72 Hz 57.5 KHz 75 Hz 60 KHz 85 Hz 68.57 KHz 100 Hz 81.42 KHz 120 Hz 98.78 KHz Appendix Supported Display Modes Computer / Operating System Display Resolution Maximum Vertical Frequency Maximum Horizontal Frequency 1152 × 864 60 Hz 72 Hz 75 Hz 85 Hz 60 Hz 70 Hz 72 Hz 75 Hz 85 Hz 60 Hz 70 Hz 72 Hz 75 Hz 85 Hz 100 Hz 60 Hz 70 Hz 72 Hz 75 Hz 85 Hz 53.68 KHz 64.8 KHz 67.47 KHz 77.1 KHz 75.16 KHz 69.9 KHz 72.1 KHz 75.16 KHz 85.9 KHz 63.96 KHz 74.6 KHz 76.8 KHz 80 KHz 91.30 KHz 108.4 KHz 75 KHz 87.4 KHz 90.1 KHz 93.8 KHz 106.3 KHz 120 Hz 75 Hz 35 KHz 46.8 KHz 832 × 624 1024 × 768 1152 × 874 1280 × 1024 75 75 75 75 Hz Hz Hz Hz 49.7 KHz 60 KHz 68.7 KHz 79.98 KHz 1600 × 1024 60 Hz 63.6 KHz iMac DV 640 × 480 800 × 600 1024 × 768 117 Hz 95 Hz 75 Hz 60.8 KHz 59.98 KHz 59.97 KHz Mac G3 640 × 480 832 × 624 1024 × 768 67 Hz 75 Hz 75 Hz 35 KHz 49.8 KHz 60 KHz 1280 × 960 1280 × 1024 1600 × 1200 Macintosh 640 × 480 800 × 600 33 LIMITED WARRANTY 1. Limited Warranty: For a period of time beginning on the date of purchase of the applicable product and extending as set forth in Section 6 of this Limited Warranty (the “Warranty Period”), AVerMedia Technologies, Inc. (“AVerMedia”) warrants that the applicable product (“Product”) substantially conforms to AVerMedia’s documentation for the product and that its manufacture and components are free of defects in material and workmanship under normal use. “You” as used in this agreement means you individually or the business entity on whose behalf you use or install the product, as applicable. This limited warranty extends only to You as the original purchaser. Except for the foregoing, the Product is provided “AS IS.” In no event does AVerMedia warrant that You will be able to operate the Product with-out problems or interruptions, or that the Product is suitable for your purposes. Your exclusive remedy and the entire liability of AVerMedia under this paragraph shall be, at AVerMedia’s option, the repair or replacement of the Product with the same or a comparable product. This warranty does not apply to (a) any Product on which the serial number has been defaced, modified, or removed, or (b) car-tons, cases, batteries, cabinets, tapes, or accessories used with this product. This warranty does not apply to any Product that has suffered damage, deterioration or malfunction due to (a) accident, abuse, misuse, neglect, fire, water, lightning, or other acts of nature, commercial or industrial use, unauthorized product modification or failure to follow instructions included with the Product, (b) misapplication of service by someone other than the manufacturer’s representative, (c) any shipment damages (such claims must be made with the carrier), or (d) any other causes that do not relate to a Product defect. The Warranty Period of any repaired or replaced Product shall be the longer of (a) the original Warranty Period or (b) thirty (30) days from the date of delivery of the repaired or replaced Product. 2. Limitations of Warranty: AVerMedia makes no warranties to any third party. You are responsible for all claims, damages, settlements, expenses, and attorneys’ fees with respect to claims made against You as a result of Your use or misuse of the Product. This warranty applies only if the Product is installed, operated, maintained, and used in accordance with AVerMedia specifications. Specifically, the warranties do not ex-tend to any failure caused by (i) accident, unusual physical, electrical, or electro-magnetic stress, neglect or misuse, (ii) fluctuations in electrical power beyond AVerMedia specifications, (iii) use of the Product with any accessories or options not furnished by AVerMedia or its authorized agents, or (iv) installation, alteration, or repair of the Product by anyone other than AVerMedia or its authorized agents. 34 3. Disclaimer of Warranty EXCEPT AS EXPRESSLY PROVIDED OTHERWISE HEREIN AND TO THE MAXIMUM EXTENT PERMITTED BY APPLICABLE LAW, AVERMEDIA DISCLAIMS ALL OTHER WARRANTIES WITH RESPECT TO THE PRODUCT, WHETHER EXPRESS, IMPLIED, STATUTORY OR OTHERWISE, INCLUDING WITHOUT LIMITATION, SATISFACTORY QUALITY, COURSE OF DEALING, TRADE USAGE OR PRACTICE OR THE IMPLIED WARRANTIES OF MERCHANTABILITY, FITNESS FOR A PARTICULAR PURPOSE OR NONINFRINGEMENT OF THIRD PARTY RIGHTS. 4. Limitation of Liability IN NO EVENT SHALL AVERMEDIA BE LIABLE FOR INDIRECT, INCIDENTAL, SPECIAL, EXEMPLARY, PUNITIVE, OR CONSEQUENTIAL DAMAGES OF ANY NATURE INCLUDING, BUT NOT LIMITED TO, LOSS OF PROFITS, DATA, REVENUE, PRODUCTION, OR USE, BUSINESS INTERRUPTION, OR PROCUREMENT OF SUBSTITUTE GOODS OR SERVICES ARISING OUT OF OR IN CONNECTION WITH THIS LIMITED WARRANTY, OR THE USE OR PERFORMANCE OF ANY PRODUCT, WHETHER BASED ON CON-TRACT OR TORT, INCLUDING NEGLIGENCE, OR ANY OTHER LEGAL THEORY, EVEN IF AVERMEDIA HAS ADVISED OF THE POSSIBILITY OF SUCH DAMAGES. AVERMEDIA’S TOTAL, AGGREGATE LIABILITY FOR DA-MAGES OF ANY NATURE, REGARDLESS OF FORM OF ACTION, SHALL IN NO EVENT EXCEED THE AMOUNT PAID BY YOU TO AVERMEDIA FOR THE SPECIFIC PRODUCT UPON WHICH LIABILITY IS BASED. 5. Governing Law and Your Rights This warranty gives You specific legal rights; you may also have other rights granted under state law. These rights vary from state to state. Section 6 Warranty Period of AVerMedia Product Purchased: AVerVision110: 2 Year Limited Parts and Labor. All other AVerVision Products*: 3 Year Limited Parts and Labor. All other AVerMedia Products: 1 Year Limited Parts and Labor. All AVerVision Accessories: 1 Year Parts and Labor. * Except AVerVision DL, 100, 100 Pro – 1 Year Parts and Labor. CONTACT INFORMATION http://www.avermedia.com 35