1
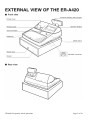
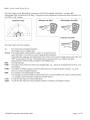
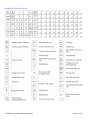
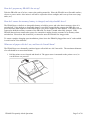
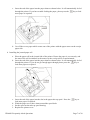
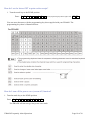
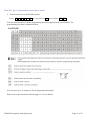
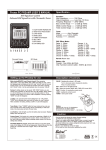
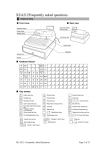
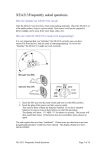
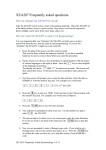
ERA420 Frequently Asked Questions. This list of Frequently Asked Questions is not intended to replace the ERA420 instruction manual. It does not list all the functions and features of the ERA420. Please refer to the ERA420 instruction manual for more guidance on functions and programming steps not covered in these “Frequently Asked Questions”. The ERA420 has some features and functions that are not enabled at the factory default settings. You will require the assistance of a Sharp cash register dealer to activate these features. Please contact Sharp’s customer care centre on: Phone: 1300 13 50 22, Fax: 1300 727 717, or log on to www.sharp.net.au to find a cash register dealer near you. The cash register dealer will advise you of their fees for providing additional programming assistance with your ERA420. List of common features and functions that require a dealer’s assistance to enable or implement. 1. Change the position or function of keys. 2. Change the number of Departments or PLUs available. 3. Change the number of receipt logo text lines. 4. Enable copy receipt. 5. Set the currency symbol to: $. 6. Enable rounding of sales subtotal to the nearest the 5cents for cash sales. 7. Allow refunds to credit cards. 8. Setting up a training cashier. 9. Auto log off of cashier at the end of a sale. This list is not exhaustive. ERA420 Frequently Asked Questions Page 1 of 20 ERA420 Frequently Asked Questions Page 2 of 20 Mode Switch and Mode Keys ERA420 Frequently Asked Questions Page 3 of 20 Standard Keyboard Layout ERA420 Frequently Asked Questions Page 4 of 20 How do I prepare my ERA420 for set-up? Take the ERA420 out of its box, remove the packing materials. Place the ERA420 on a flat stable surface, close to a power outlet. Also insure it will not be exposed to direct sunlight, and is away from water (taps, sinks, etc). How do I ensure the memory battery is charged, and why should I do so? The ERA420 uses a built-in re-chargeable battery to hold its preset, and sales data in memory when it is switched off. If the built-in re-chargeable battery is not fully charged before you use the ERA420 your preset and sales data might be cleared when there is no power supplied to the ERA420. The battery can be expected to hold the memory contents of the ERA420, for about 1 month when fully charged. If the ERA420 has not been connected to power for sometime it might clear the contents of its memory when switched on. Please bear this in mind if you intend to store the ERA420 for long periods. To ensure complete charging upon installation, please leave the ERA420 plugged into an AC outlet which is switch on for 24 to 48 hours. What sort of paper rolls do I use, and how do I install them? The ERA420 uses two thermally sensitised paper rolls which are: 44.5 mm wide. The maximum diameter of a roll should be no more than 80mm. 1. Pull the printer cover forward and detach it. The paper cutter is mounted on the printer cover, be careful not to cut yourself. ERA420 Frequently Asked Questions Page 5 of 20 2. Your ERA420 is shipped with the print head release lever held by a white retainer in the lifted up position. Be sure to remove this retainer (see the diagram below), if you have not already done so. Move the print head release lever to the printing position (print head down). 3. Installing the receipt paper roll a. Turn the mode switch to the REG position. b. Set the paper in the receipt side of the printer as shown below. Note: If the top end of the paper roll is fixed with paste or tape, the paper at the start of the roll might not print clearly or at all. When setting a new paper roll, be sure to cut off about the first 25cm of the roll. Please cut the paper roll with a straight edge as illustrated below. ERA420 Frequently Asked Questions Page 6 of 20 c. Insert the end of the paper into the paper chute as shown below. It will automatically be fed key to feed through the printer. If you have trouble feeding the paper, please press the more paper as required. d. Cut off the excess paper which comes out of the printer with the paper cutter on the receipt paper side. 4. Installing the journal paper roll a. Place the paper roll in the journal side of the printer. Ensure the paper is set correctly, and the start of the roll is trimmed, in the same way the receipt roll is set and trimmed. b. Insert the end of the paper into the paper chute as shown below. It will automatically be fed through the printer. If you do not get enough paper through please press the key to feed more paper as required. c. Insert the end of the paper into the slot in the paper take-up spool. Press the feed more paper if required. d. Wind the paper two or three times around the spool shaft. e. Set the spool on the take-up spool bearing. f. Replace the printer cover. ERA420 Frequently Asked Questions key to Page 7 of 20 5. Procedure to use to install paper rolls if you encounter problems with the normal procedure a. Trim the paper rolls as required b. Pull the print head release lever toward you to lift up the print head. c. Insert the end of the paper into the paper chute, while pressing the receipt or journal paper feed key as required. d. When the end of the paper comes out of the printer, release the feed key and return the print head release lever to its original position. e. Press the feed keys to feed more paper if needed. How do I set the time and date? 1. Turn the mode key to the PGM2 position. 2. Enter the time as a four digit number. Use the 24 hour format. For example 2:30pm would be entered as 1 4 3 0 3. Press the # key 4. Enter the date as an eight digits using the day-month-year format. For example 5. 7th of December 2012 would be entered as 0 7 1 2 2 0 1 2 6. Press the # key ERA420 Frequently Asked Questions Page 8 of 20 How do I set a 10% GST rate? 1. Turn the mode key to the PGM2 position 2. Enter: 2 7 1 1 ● 1 1 0 TL How do I set a Department as taxable or not taxable? 1. Turn the mode key to the PGM2 position a. To make a department taxable, enter: -2- -1- -1- -1 ● use numeric keys to enter the department code -0- -0- -0- -1- ST TL For example to make department 1 taxable enter: -2- -1- -1- -1 ● 1 -0- -0- -0- -1- ST TL b. To make a department non-taxable, enter: -2- -1- -1- -1 ● use numeric keys to enter the department code -0- -0- -0- -0- ST TL For example to make department 1 non-taxable enter: -2- -1- -1- -1 ● 1 -0- -0- -0- -0- ST TL ERA420 Frequently Asked Questions Page 9 of 20 How do I set the letters GST to print on the receipt? 1. Turn the mode key to the PGM2 position Enter: -2- -3- -1- -4 ● 1 5 use the programming key sheet to type in GST ST TL You can enter characters with the programming key sheet supplied with your ERA420. The programming key sheet is illustrated below How do I turn off the power save (screen off) function? 1. Turn the mode key to the PGM2 position Enter: -2- -6- -8- -9 ● 0 9 9 9 TL The ERA420 will not now go into power save mode. ERA420 Frequently Asked Questions Page 10 of 20 How do I give a department a descriptive name? 2. Turn the mode key to the PGM2 position Enter: -2- -1- -1- -4 ● key in department code type in description ST TL You can enter characters with the programming key sheet supplied with your ERA420. The programming key sheet is illustrated below You can enter up to 16 characters for the department description. Please refer to the instruction manual (pages 18 -19) for details. ERA420 Frequently Asked Questions Page 11 of 20 How do I programme the PLUs (Price Look Ups)? The ERA420 is set with 20 PLUs when at its factory default settings. You can programme up to 500 PLUs using factory default settings. PLUs are used to “look up”, a description and price for often sold items. Please follow the steps below to programme a PLU To create a PLU with an open price. 2. Turn the mode key to the PGM2 position. 3. Enter: -2- -2- -1- -0 ● key PLU number with numeric key pad -1- ST TL 4. Enter: -1- -2- -0- -0 ● key PLU number with numeric key pad associated department code ST TL This assigns the PLU to a department. A PLU must be assigned to a department. For example: To create PLU 21 as an open price PLU assigned to department 1 you would enter: -2- -2- -1- -0 ● -2- -1- -1- ST TL -1- -2- -0- -0 ● -2- -1- -1- ST TL To create a PLU with a preset price. 1. Turn the mode key to the PGM2 position. 2. Turn the mode key to the PGM2 position. 3. Enter: -2- -2- -1- -0 ● key PLU number with numeric key pad -2- ST TL 4. Enter: -1- -2- -0- -0 ● key PLU number with numeric key pad associated department code ST TL This assigns the PLU to a department. A PLU must be assigned to a department. For example: To create PLU 21 as a preset price PLU assigned to department 1 you would enter: -2- -2- -1- -0 ● -2- -1- -2- ST TL -1- -2- -0- -0 ● -2- -1- -1- ST TL ERA420 Frequently Asked Questions Page 12 of 20 To set a price for a preset PLU. Each PLU can have two prices set. 1. Turn the mode key to PGM2 2. Enter: -1- -2- -1- -0 ● key PLU number with numeric key pad st PLU’s 1 price in cents ST nd PLU’s 2 price in cents ST TL For example: To set PLU 21 to a preset price 1 of $6.00 and a preset price 2 of $4.00 you would enter: -1- -2- -1- -0 ● -2- -1- -6- -0- -0 ST -4- -0- -0 ST TL You can skip the 2nd price by pressing ST twice. For example: To set PLU 21’s 2nd price to zero you would enter: -1- -2- -1- -0 ● -2- -1- -6- -0- -0 ST -ST TL ERA420 Frequently Asked Questions Page 13 of 20 Set a description or a PLU 1. Turn the Mode key to PGM2. Enter: -2- -2- -1- -4 ● key PLU number with numeric key pad type description ST TL You can enter characters with the programming key sheet supplied with your ERA420. The programming key sheet is illustrated below You can enter up to 16 characters for the department description. Please refer to the instruction manual (pages 18 -19) for details ERA420 Frequently Asked Questions Page 14 of 20 How do I put PLUs on Keyboard Levels 2 and 3? The ERA420 has three keyboard levels. PLUs 1 to 70 are on level one. You can assign other PLUs to level two or three. The keys: -L1_ -L2_ -L3_ are used to select each level, when programming, and when using the PLUs on different levels during a sales transaction. To assign a PLU to a level. PLU keys have key numbers pre-assigned to them. These key numbers are used when assigning PLUs to keyboard levels. The key numbers for PLUs start at 21 and finish at 90, as illustrated below: 1. Turn the mode key to PGM2 2. Enter: -2- -2- -1- -9 ● enter PLU number ST press -L2_ or -L3_ to select level, key in PLU key number on numeric keypad TL For example: To set PLU 71 to Direct PLU key 1 on level 2, you would enter: -2- -2- -1- -9 ● -L2_ -2- -1- -7- -1- -ST TL ERA420 Frequently Asked Questions Page 15 of 20 How do I get my business name and ABN to print on the receipt? 1. Turn the mode key to the PGM2 position 2. Type each line of your information, up to 3 lines as follows: 3. Enter the Top (first) line do the following: Enter: -2- -6- -1- -4 ● -1- type in text up to 24 characters ST TL type in text up to 24 characters ST TL type in text up to 24 characters ST TL 4. Enter the second line do the following: Enter: -2- -6- -1- -4 ● -2- 5. Enter the third line do the following: Enter: -2- -6- -1- -4 ● -3- You can enter up to 24 characters per line. You can enter characters with the programming key sheet supplied with your ERA420. The programming key sheet is illustrated below Please refer to the instruction manual (pages 18 -19) for details on text entry methods. ERA420 Frequently Asked Questions Page 16 of 20 How do I make a sale? Enter a sale directly into a department 1. Turn the mode key to REG 2. Enter the price in cents. For example $15.00 is entered as: -1 5 0 0 3. Press the department key you wish to apply the $15.00 sale to for example department 2: 4. Press TL to finalise the sale to cash Sell a preset PLU 1. Turn the mode key to REG 2. Press a preset PLU key you have programmed with a price: 3. Press TL to finalise the sale to cash Sell a PLU with an open price 1. Turn the mode key to REG 2. Enter the price in cents. For example $15.00 is entered as: -1 5 0 0 3. Press a PLU key which has been programmed for an open price: 4. Press TL to finalise the sale to cash ERA420 Frequently Asked Questions Page 17 of 20 How do I make a Correction after finalizing a Transaction (void mode)? When you need to correct (void) incorrect entries after the sale has been finalised, Please use the following procedure: 1. Turn the mode key to MGR position. 2. Press the key (void key) 3. Re-enter the sale information you wish to remove. All the amounts you enter will be removed from the relevant Department and/or PLU as well as the Transaction totals such as Cash in Drawer. The amounts removed will be added to the Void Mode Transaction totaliser. A Void Mode receipt will print even if the receipt is switched off. How do I stop the receipt printing after each sale? 1. Turn the mode key to OP X/Z 2. Press _RCPT_ This key toggles the receipt printing from ON to OFF or OFF to ON In REG mode, Press the _RCPT_ key to print a receipt after the sale if required. The ERA420 displays “OVER LIMIT” when I try to finalise a sale to cash. How do I fix this? 1. First you must either: finalise the sale to Credit card CR or Cheque CH 2 or do a subtotal void to clear the sale. Subtotal void is done by entering: ST ST 2. Turn the mode key to PGM2 3. Enter the following: -1 -8 - ST TL 4. Turn the mode key back to REG. The “OVER LIMIT” problem should be fixed. ERA420 Frequently Asked Questions Page 18 of 20 The ERA420 display shows “NOT ASSIGNED” and I cannot make a sale. How do I fix this? You must sign a cashier on. Please do the following to fix this problem. 1. Turn the mode key to REG 2. Press the CL button to clear the “NOT ASSIGNED” message. 3. Enter: 1 CASH # to sign on cashier 1. How do I produce sales reports? There are two type types of reports: X or e(X)amine reports Z or (Z)ero reports X reports read out your sales data, but do not clear it from the ERA420 Z reports read out your sales data, and clear it from the ERA420 There are two levels of X and Z reports: Daily Period A daily X report allows you to examine your daily figures anytime during the day without clearing them. A daily Z report allows you to print out your daily figures at the end of the day, and clear them. This is done to ready the ERA420 for the next day’s trading. The daily Z report also adds its data to the Period report memory. A Period X report allows you to see your sales data for the period up to the time of the last Daily Z report. A Period Z report allows you to print out your period sales data, and clears it to ready the ERA420 for the next period. To produce a daily X report, do the following: 1. Turn the mode key to X1/Z1 position 2. Enter -1 -0 -0 - TL 3. Your daily X report will print. It will have *X1* printed at the top of the report. You can see an example report on page 98 of the ERA420 instruction manual. To produce a daily Z report, do the following: 1. Turn the mode key to X1/Z1 position 2. Enter -1 -0 -0 ● - TL 3. Your daily Z report will print. It will have *Z1* printed at the top of the report. You can see an example report on page 98 of the ERA420 instruction manual. ERA420 Frequently Asked Questions Page 19 of 20 To produce a period X report, do the following: 1. Turn the mode key to X2/Z2 position 2. Enter -2 -0 -0 - TL 3. Your period X report will print. It will have *X2* printed at the top of the report. To produce a period Z report, do the following: 4. Turn the mode key to X2/Z2 position 5. Enter -2 -0 -0 ● - TL Your period Z report will print. It will have *Z2* printed at the top of the report. This list of Frequently Asked Questions is not intended to replace the ERA420 instruction manual. It does not list all the functions and features of the ERA420. Please refer to the ERA420 instruction manual for more guidance on functions and programming steps not covered in these “Frequently Asked Questions”. The ERA420 has some features and functions that are not enabled at the factory default settings. You will require the assistance of a Sharp cash register dealer to activate these features. Please contact Sharp’s customer care centre on: Phone: 1300 13 50 22, Fax: 1300 727 717, or log on to www.sharp.net.au to find a cash register dealer near you. The cash register dealer will advise you of their fees for providing additional programming assistance with your ERA420. ERA420 Frequently Asked Questions Page 20 of 20