1
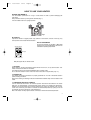
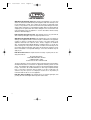
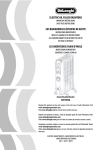
GB-E
13-01-2004
14:26
Pagina 1
IMPORTANT INSTRUCTIONS
ELECTRIC OIL FILLED RADIAT ORS
SAVE THESE INSTRUCTIONS
INSTRUCIONES IMPORTANTES
LOS RADIADORES ELÉCTRICOS DE ACEITE
GUARDE ESTAS INSTRUCCIONES
MODE D’EMPLOI IMPORTANT
LES RADIATEURS À BAIN D’HUILE
CONSERVEZ CE MODE D’EMPLOI
ISTRUZIONI PER L'USO
RADIAT ORI AD OLIO
CONSERVARE LE PRESENTI ISTRUZIONI
The De’ Longhi electric oil filled radiators are the finest and most versatile portable
heaters available.
Please review the following to ensure the fullest benefit from their features.
Los radiadores eléctricos de aceite De’Longhi son los mejores y más versátiles calentadores portátiles en el mercado.
Favor de repasar la información a continuación para asegurar el beneficio completo de
sus características.
Les radiateurs à bain d’huile De’ Longhi, portables et polyvalents, sont les meilleurs
actuellement disponibles sur le marché.
Afin d’exploiter au mieux les potentialités du produit, lisez attentivement ce qui suit.
I radiatori ad olio De’ Longhi sono i migliori e più versatili apparecchi di riscaldamento
portatili presenti sul mercato.
Leggere attentamente le presenti istruzioni per sfruttare al meglio le caratteristiche dell'apparecchio.
GB-E
13-01-2004
14:26
Pagina 2
IMPORTANT SAFEGUARDS
When using electrical appliances, basic precautions should always be taken to avoid the risk of
fire, electric shock and personal injury, including the following:
1. Read these instructions thoroughly before using this heater.
2. If your radiator is equipped with a polythene tape, which serves as carry handle, remove it
prior to connecting the appliance to an outlet.
3. This heater becomes very hot when operating. To avoid burns, do not touch its hot surfaces with your bare skin. Use the heater’s handle when moving it. Keep combustible materials, such as furniture, pillows, bedding, papers, clothes and curtains at least 3 feet (90 cm)
away from the heater’s front and top, and also well away from its sides and rear.
4. Extreme caution should be taken when leaving an operating heater unattended near children or handicapped persons.
5. Always unplug the heater when it is not in use.
6. Do not operate your heater when its cord or plug has been damaged or after it has
malfunctioned, has been dropped or damaged in any manner. If you notice any
leakage of oil, switch it off immediately and contact a service center as indicated in
these instructions. Return the heater to an authorized service facility for inspection,
electrical or mechanical adjustment, or repair.
7. Your heater should not be operated outdoors.
8. Your heater is not intended for use in bathrooms, laundry areas and similar indoor locations. Never locate the heater where it might fall into a bathtub or other water containers.
9. Do not run the electric cord under carpeting. Do not cover cord with throw rugs, runners, or the like. Run the cord away from traffic areas and where it will not be tripped
over.
10.To disconnect the heater, switch it OFF, then unplug its cord from the outlet.
11. Connect to properly polarized outlets only.
12. Do not insert or allow foreign objects to enter any ventilation or exhaust opening, as this
might cause an electric shock, fire, or damage the heater.
13. To prevent fire, do not block air intakes or exhaust in any manner. Do not place the heater
on soft surfaces, like a bed, where openings may be blocked.
14. Your heater’s internal parts may become hot or issue sparks during normal operation. Therefore, you should not use it in areas where gasoline, paint, or flammable
liquids are used or stored.
15. Use this heater only as described in this manual. Any other use not recommended by the
manufacturer might cause fire, electric shock, or personal injury.
16. To prevent overload and blown fuses, be sure that no other appliances are plugged into the
same shared outlet, or a separate outlet on the same shared circuit.
17. The heater’s electric cord and plug may grow warmer during normal operation. However,
exceedingly hot or deformed plug or cord are not normal, and are often the result of a
defective power outlet. You should replace such outlets prior to further use of the heater.
Continuous use of defective outlets might cause cord overheating and fire.
18. The use of extension cords is not recommended, as they are likely to overheat and
increase the risk of fire. However, where necessary, you may use a No. 1 4 AWG or
larger cord rated for 1875 watts or more; the extension cord should not be shared
by any other appliance.
19. Make sure the heater is firmly plugged into the wall outlet. Please note that the quality of
wall outlets may deteriorate over time: Check the electric plug periodically for signs of
overheating or deformation, and in such cases, stop using that outlet and have it fixed.
20. Check that neither the heater nor the power cable has been damaged in any way during
transportation.
21. Make sure that no pieces of polystyrene or other packaging material have been left
between heating elements. If necessary, remove such pieces using a vacuum cleaner.
22. When switching the heater on for the first time, allow it to run at full power for about
two hours to get rid of a possibly unpleasant smell. Make sure that the room where
the heater is placed is well ventilated during this first operation. Soft crackling
sounds are normal during the heater’s first operation.the appliance is located is well
ventilated during this operation. It is normal for the appliance to emit small cracking
sounds when you turn it on for the first time.
CAUTION: To prevent electric shock match wide blade of plug to wide slot, fully insert.
SAVE THESE INSTRUCTIONS
2
GB-E
13-01-2004
14:26
Pagina 3
HOW TO USE YOUR HEATER
FITTING THE WHEELS
Turn the radiator upside-down on a rug or a soft surface in order to prevent damaging the
paint finish.
Fully unfold the castors by turning them outwards (Fig. 1).
Turn the radiator back to its upright position.
fig.1
BE CAREFUL
Operate the heater in upright position only (wheels on the bottom, controls on the top). Any
other position could create hazard situation!
ON/OFF Switches
WATTS ECONOMIZER
For more economical use, the Min. or Med. Watt
switches may be used individually, after unit has
reached the operating temperature.
Pilot lights
800
700
WATTS WATTS
BOTH 1500 WATTS
With pilot lights ON, the heater is ON!
1. LOCATION
Place heater on the floor beneath the coldest window in the room, or any other location. Your
heater will reduce the effect of cold drafts.
The heater should not be placed immediately below a power outlet.
Do not use this radiator in rooms with a floor area of less than 43 square feet (4 sq. m.).
2. CONNECTION
The radiator should be connected to a properly polarized A/C 110/120 V household outlet in
perfect working conditions.
Keep loose clothing or bedding, furniture and flammable material away from the heater’s wall
outlet.
3. TURNING ON TWO-SWITCH MODELS
Turn the thermostat clockwise to its maximum position. Push down both switches. The switch
lights stay on independently of the thermostat cycling. When room reaches the desired temperature, turn the thermostat knob counter-clockwise very slowly and carefully until you hear
a click. This should set your heater to maintain the desired temperature by cycling on and off
as required. (For timer instructions, see paragraph 5.)
Note: The heater normally requires about 15 minutes to reach the desired temperature.
3
GB-E
13-01-2004
14:26
Pagina 4
4. USE OF THERMOSTAT
The thermostat operates according to room air temperature, rather than radiator temperature.
Turning it counter-clockwise to smaller numbers would decrease the temperature; clockwise
to greater numbers would increase the temperature.
Antifreeze function
Turn the thermostat dial to the
position and push the switches on. The appliance will maintain a minimum room temperature of approximately 42°F (5°C), thus preventing freezing while
conserving energy. In models that come with a timer, tabs must be set in the inward position.
REMINDER
To completely shut the heater off, ON/OFF switches must be set in the OFF position.
5. UNITS WITH TIMER
Clock setting
The program/timer, as with all clocks, must be set to the correct time. If for example the time
is 9.30 a.m. (day zone), rotate the dial clockwise (following the direction of the arrow) until
9.30 is aligned with the triangular pointer.
IMPORTANT:
DO NOT ROTATE CLOCK DIAL COUNTER-CLOCKWISE.
The timer is in effect an electric clock and would only work while it is plugged into a power
supply.
When unplugged, the timer stops and must be later re-set.
Your product is equipped with a polarized alternating current line plug (a plug having one
blade wider than the other). There is only one way it can be plugged into a power supply. This
is a safety feature. If you are unable to insert the plug fully into the outlet, try again by turning
it the other way. If it would still not go in, it is probably due to an obsolete outlet which should
be replaced. Do not temper with the plug or outlet to defeat the purpose of this safety mechanism.
HOW TO USE THE TIMER
Please refer to the illustration below:
2
1
2
3
1
3
IMPORTANT: There are 96 tabs around the dial. Each tab represents a 1/4 hour (15 minutes)
and there is a tab for each quarter hour of the day (24 hours). Your appliance can be programmed to switch itself ON and OFF at the time of your choice. With a timer you can
approximate your setting to within 15 minutes and program up to 48 cycles (1 cycle = 1 “ON”
+ 1 “OFF”) over a period of 24 hours (12 hours a.m.+12 hours p.m.).
The tabs can be pushed inwards or pulled outwards simply by using your fingers. When a tab
is in the inward position (towards the center of the dial), the heater will be on during the corresponding 15 minute period. If a tab is in the outward position, the heater will be off during that
period.
4
GB-E
13-01-2004
14:26
Pagina 5
Please note that when you first use your heater all the tabs are out. You must push in the tabs
that correspond to the period when you want the heater to be on. (If you want to bypass the
timer you must push all 96 tabs inward.)
Timer operation
A) Plug in the heater.
B) Turn timer dial clockwise to set clock with the current time of day (see CLOCK SETTING).
C) Push tabs inwards for the period you want the heater to operate. For example, in the
shown illustration, the heater will operate from 14.00 (2 p.m.) to 16.30 (4.30 p.m.) and
from 4.45 a.m. to 5 a.m.
D) Push switch(-es) in.
E) Once you have set the tabs for the desired heating periods, your heater will cycle on and
off according to these settings.
F) As long as you keep the heater plugged in, the timer will maintain the proper time.
A safety device
A safety device switches the heater off in the event of everheating. To restart the heater, call
the nearest Service center.
6. MAINTENANCE AND SERVICE
Always unplug the heater from the power outlet and allow the radiator to cool. Wipe radiator
with a soft damp cloth; do not use detergents and abrasives.
Should the radiator not be in use over a certain length of time, roll the cable around the holder
and store it in a dry place (see fig. on front page).
This appliance has been built to last for many years of trouble-free service.
In case of malfunction or doubt, do not try to repair the heater by yourself: this might increase
the risk of fire and electric shock.
Call your nearest Service Center (see attached list of Service Centers).
5
GB-E
13-01-2004
14:26
Pagina 6
LIMITED WARRANTY
What Does This Warranty Cover? We warrant each appliance to be free from
defects in material and workmanship. Our obligation under this warranty is limited to replacement or repair, free of charge at our factory or authorized service
centers, of any defective or parts thereof other than parts damaged in transit,
which shall be returned to us, transportation prepaid. Please be advised that any
shipping cost for replacement items will be charged to the consumer.This warranty shall apply only if the appliance is used in accordance with the factory
directions which acompany it.
How Long Does The Coverage Last? This warranty runs for one year from the
date of delivery and applies only to the original purchase for use.
What Does This Warranty Not Cover? This warranty does not cover defects or
damage of the appliance which result from repairs or alterations to the appliance
outside our factory or authorized service centers, nor shall it apply to any
appliance which has been subject to abuse, misuse, negligence or accidents.
Also, consequential and incidental damages resulting from the use of this product or arising out of any breach of contract or breach of this warranty are not
recoverable under this warranty. Some states do not allow the exclusion or limitation of incidental or consequential damages, so the above limitation may not
apply to you.
How Do You Get Service? If repairs become necessary or spare parts are needed, please write to:
De’Longhi America Inc.
Park 80 West Plaza One, 4th floor
Saddle Brook N.J. 07663
or call Service Tel. No. 1-800-322-3848
The above warranty is in lieu of all other express warranties and representations.
All implied warranties are limited to the applicable warranty period set forth
above. This limitation does apply if you enter into an extended warranty with De'
Longhi. Some states do not allow limitations on how long an implied warranty
lasts, so the above exclusions may not apply to you. De' Longhi does not
authorize any other person or company to assume for it any liability in
connection with the sale or use of its appliance.
How Does State Law Apply? This warranty gives you specific legal rights, and
you may also have other rights which vary from state to state.
6