1
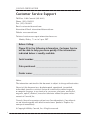
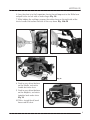
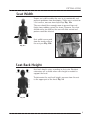
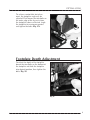
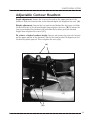
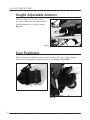
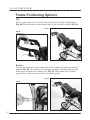
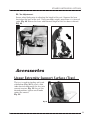
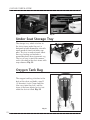
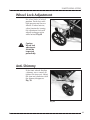
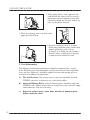
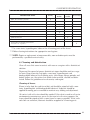
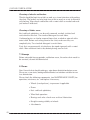
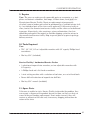
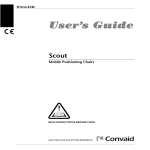
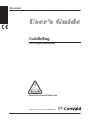
ENGLISH
User’s Guide
CuddleBug
Tilt-In-Space Wheelchair
READ INSTRUCTIONS BEFORE USING
SAVE THIS BOOK FOR FUTURE REFERENCE
CONVAID USER’S GUIDE
Customer Service Support
Toll Free: 1-888-Convaid (266-8243)
Phone: (310) 618-0111
Fax: (310) 618-8811
Email: [email protected]
International Email: [email protected]
Website: www.convaid.com
Technical assistance or repair information hours are:
Monday-Friday, 7 a.m. to 5 p.m. PST
Before Calling:
Please fill in the following information. Customer Service
will be able to help you more quickly if the information
indicated below is readily available.
Serial number: ________________________________________
Date purchased: ______________________________________
Dealer name: _________________________________________
Notice:
The information contained in this document is subject to change without notice.
No part of this document may be photocopied, reproduced, transmitted,
transcribed, stored in a retrieval system or translated to another language
or computer language, in any form or by any means, electronic, mechanical,
magnetic, optical, chemical, manual or otherwise without the prior written
consent of Convaid, Inc.
Use only Convaid accessories and parts on Convaid products. Convaid parts
are not interchangeable with other manufacturers’ products. Replace any
worn parts immediately.
© Copyright 2008 by Convaid, Inc. All rights reserved.
i
Table of Contents
Setting Up
Unpacking . . . . . . . . . . . . . . . . . . . . . . . . . . . . . . . . . . . . . . . . . . . . . 1
Unfolding . . . . . . . . . . . . . . . . . . . . . . . . . . . . . . . . . . . . . . . . . . . . . . .1
Folding . . . . . . . . . . . . . . . . . . . . . . . . . . . . . . . . . . . . . . . . . . . . . . . 3
Fitting Guide
Seat depth. . . . . . . . . . . . . . . . . . . . . . . . . . . . . . . . . . . . . . . . . . . . . . 5
Seat width . . . . . . . . . . . . . . . . . . . . . . . . . . . . . . . . . . . . . . . . . . . . . 5
Seat back height. . . . . . . . . . . . . . . . . . . . . . . . . . . . . . . . . . . . . . . . . 6
Seat-to-footplate height adjustment . . . . . . . . . . . . . . . . . . . . . . . . 7
Footplate depth adjustment . . . . . . . . . . . . . . . . . . . . . . . . . . . . . . . 8
Positioning
Guide
Positioning belt . . . . . . . . . . . . . . . . . . . . . . . . . . . . . . . . . . . . . . . . . 9
Depth adjustable crotch strap . . . . . . . . . . . . . . . . . . . . . . . . . . . . 10
Anterior trunk support vest . . . . . . . . . . . . . . . . . . . . . . . . . . . . . . 11
Lateral thoracic supports . . . . . . . . . . . . . . . . . . . . . . . . . . . . . . . . 12
Hip inserts . . . . . . . . . . . . . . . . . . . . . . . . . . . . . . . . . . . . . . . . . . . . 13
Medial thigh support (pommel). . . . . . . . . . . . . . . . . . . . . . . . . . . 13
Adjustable contour headrest. . . . . . . . . . . . . . . . . . . . . . . . . . . . . . 14
Height adjustable armrest. . . . . . . . . . . . . . . . . . . . . . . . . . . . . . . . 15
Foot positioner. . . . . . . . . . . . . . . . . . . . . . . . . . . . . . . . . . . . . . . . . 15
Height adjustable push handle. . . . . . . . . . . . . . . . . . . . . . . . . . . . 16
Frame
Positioning
Options
Tilt-in-space. . . . . . . . . . . . . . . . . . . . . . . . . . . . . . . . . . . . . . . . . . . 17
Recline. . . . . . . . . . . . . . . . . . . . . . . . . . . . . . . . . . . . . . . . . . . . . . . 17
Hi/Lo. . . . . . . . . . . . . . . . . . . . . . . . . . . . . . . . . . . . . . . . . . . . . . . . . 18
Accessories
Upper extremity support suface (tray). . . . . . . . . . . . . . . . . . . . . 18
Under seat storage tray. . . . . . . . . . . . . . . . . . . . . . . . . . . . . . . . . . 19
Oxygen Tank Bag . . . . . . . . . . . . . . . . . . . . . . . . . . . . . . . . . . . . . 19
Headrest cover. . . . . . . . . . . . . . . . . . . . . . . . . . . . . . . . . . . . . . . . . 20
Upholstery
Wheels
Important
Information
Removal . . . . . . . . . . . . . . . . . . . . . . . . . . . . . . . . . . . . . . . . . . . . . . 21
Cleaning. . . . . . . . . . . . . . . . . . . . . . . . . . . . . . . . . . . . . . . . . . . . . . 22
Specifications . . . . . . . . . . . . . . . . . . . . . . . . . . . . . . . . . . . . . . . . . 22
Locking and unlocking . . . . . . . . . . . . . . . . . . . . . . . . . . . . . . . . . . 23
Wheel lock adjustment . . . . . . . . . . . . . . . . . . . . . . . . . . . . . . . . . . 24
Anti-shimmy . . . . . . . . . . . . . . . . . . . . . . . . . . . . . . . . . . . . . . . . . . 24
Operating and Safety instructions . . . . . . . . . . . . . . . . . . . . . . . . 25
Warranty . . . . . . . . . . . . . . . . . . . . . . . . . . . . . . . . . . . . . Back cover
ii
CONVAID USER’S GUIDE
Setting Up
Unpacking
Check to see that the following items are included with the chair:
• Left and right footplates.
• Accessories as ordered.
• Hex wrench (5/32”).
Unfolding
1. Lay chair down with seat
facing upward. Fig. 1
2. Push in grey detent buttons
on the footplate, and swing
footplate out and upward
until parallel with the ground.
Fig. 2
Fig.1
3. Squeeze the recline lever
on the right side of the
chair’s handle and lift seat
back into full upright
position. Fig. 3
SIZE / MODEL
CHART
Fig.2
CuddleBug
Size
Model No.
1
2
CB-size 1
CB-size 2
!
Caution:
Keep fingers
free of folding
mechanism.
Fig.3
1
SETTING UP
4. Squeeze the lever located
on the back of the seat and
pull up on chair. Fig 4
5. Adjust handles and foot
plate into desired position.
Fig.4
6. Apply wheel locks before
placing individual in chair.
Fig. 5
Fig.5
2
CONVAID USER’S GUIDE
Folding
1. Before folding, the front wheels of
chair should be in a forward facing
position for best results. Fig. 6
2. Tilt chair in upright position.
3. Push in grey detent buttons on the
footplate, and swing footplate out
and upward until parallel with the
ground. Fig. 7
Fig.6
Fig.7
4. Apply wheel locks. Fig. 8
5. Squeeze the lever located on the back of the seat and push forward and down.
Fig. 9 Release the lever when the chair is at its lowest position.
Fig.8
3
Fig.9
SETTING UP
6. Once the chair is in the Lo position, locate the red loop next to the Hi/Lo lever
and pull to the far left with an index finger. Fig. 10
7. While holding the red loop, squeeze the recline lever on the right side of the
chair's handle and recline the back all the way down. Fig. 11& 12
Fig.10
Fig.11
Fig.12
8. Push in grey detent buttons
on the handle, and rotate
handle back into chair.
9. Push in grey detent buttons
on the footplate, and rotate
footplate back under chair.
Fig. 13
10. With a straight back, bend
knees and lift chair.
Fig.13
4
CONVAID USER’S GUIDE
Fitting Guide
Correct seating and positioning encourages good posture, which in turn aids circulation, breathing and digestion. Please take the time
to properly adjust the chair to fit the user.
Seat Depth
Measure from the most posterior
portion of the buttocks to the back of
the knee. Subtract from that measurement 1-2” to allow adequate clearance
between the seat and the back of the
knee. Fig.14a
To Adjust:
1. Apply wheel locks.
2. Loosen adjustment levers under the
seat by rotating them once in a
counter clockwise direction.
Fig 14b
3. Position yourself facing the chair
and turning the round knobs on the
side of the seat to desired position.
4. Tighten adjustable levers under the
seat by rotating them in a clockwise
direction. Fig. 14c
Seat depth
Fig.14a
Fig.14b
Fig.14c
view from bottom of chair
5
FITTING GUIDE
Seat Width
Proper seat width enables the user to sit comfortably and
prevents problems from developing. While user is seated on
a flat surface, measure from hip to hip. Fig. 15a
The user should have enough room to prevent hips and
thighs from rubbing against the frame. However, the chair
should not be too wide or the user will slide around and
posture could be affected.
Seat width is measured
from the inside walls of
the seat pan. Fig. 15b
Fig.15a
Fig.15b
Seat Back Height
Seat back height
Seat back height varies according to chair size. Headrest
extensions are available when extra height is needed to
support the head.
To determine the seat back height, measure from the seat
to the upper part of the head. Fig. 16
Fig.16
6
CONVAID USER’S GUIDE
Seat-to-Footplate Height Adjustment
Seat-to-footplate height is measured
from the back of the knee to the
bottom of the heel. Soles of the feet or
heels should rest comfortably on top
of footplates. Fig. 17a
Fig.17a
F
sup oot
hei port
ght
The soles of the feet or heels should
rest comfortably on top of the footplates. To achieve this, remove detent
pins on the front of the leg tubes, slide
the footplate to the desired position
and reinsert the pins. Fig. 17b In case
of an especially short seat-to-footplate
adjustment, the excess material of the
calf flap may be wrapped under the
footplate and attached with Velcro®.
Fig.17b
7
FITTING GUIDE
To achieve comfortable foot placement, the footplate angle may be
adjusted. First loosen the four bolts on
the outer edge of the leg rest where
the footplate tubes are located. Angle
the footplate for maximum comfort
and tighten the bolts. Fig. 17c
Fig.17c
Footplate Depth Adjustment
To adjust the depth of the footplate,
loosen the four bolts on the bottom of
the footplate and slide the footplate
into desired position, then tighten the
bolts. Fig. 18
Fig.18
8
CONVAID USER’S GUIDE
Positioning Guide
Positioning Belts
The Cuddle Bug comes with either a two-point or a three-point positioning belt.
Both can be attached to the back of the seat (to achieve a 45 degree lap belt
angle) or to the sides of the seat pan (to achieve a 60 degree lap belt angle)
Fig. 19-20. To attach the belts to the chair, open the plastic clip located at the
ends of the positioning belts and thread it through the desired fabric loop, then
press clip together until it clicks shut. Fig. 20-22
9
Fig.19 Two-point positioning belt
Fig.20 Three-point positioning belt
Fig.21 Seat Pan
Fig.22 Seat Back
POSITIONING GUIDE
To tighten:
Tighten the positioning by pulling on the metal loop located on
the end of the strap. Fig. 23
To loosen:
Grasp buckle and pull away from chair. Fig. 24
Fig.23
Fig.24
Depth Adjustable
Crotch Strap
The 3-point positioning belt comes with a
depth adjustable crotch strap.
To adjust:
1. Locate the small metal retainer on the
crotch strap. Push it through the slot
under the seat until crotch strap is
removed. Fig. 25
Fig.25
2. Push metal retainer through proper hole in
seat and back into the desired slot. Avoid
twisting the strap. Fig 26
Fig.26
10
CONVAID USER’S GUIDE
Anterior Trunk Support Vest
The Anterior Trunk Support helps the user to retain upright trunk position, and
prevents forward slumping. Fig. 27-28
Anterior Trunk Support Height Adjustment:
Locate the two small metal retainers on the upper portion of the shoulder straps
behind the seat back. Push them through the slots in the seat to the front. Once you
have established the desired shoulder height, push each metal retainer back through
the appropriate hole in the back pan. (Make sure the metal retainers are through
both the plastic back and the metal back.) Avoid twisting straps. Fig. 29
Anterior Trunk Support Width Adjustment:
Locate the two small metal retainers on the lower portion of the shoulder straps
behind the seat back. Push them through the slots in the seat to the front. Once
you have established the desired shoulder width, push each metal retainer back
through the appropriate hole in the back pan. Avoid twisting straps.
Fig.27
Fig.28
Fig.29
11
POSITIONING GUIDE
Lateral Thoracic Spports
Lateral thoracic supports are used to maintain midline positioning of the trunk.
To Open: Press latch located at top of thoracic support and pull outward until it
snaps into place. Fig. 30
Height Adjustment: Loosen two adjustable levers on the back of the chair by
rotating them counter clockwise. Slide thoracic support vertically to desired position, and tighten levers. Fig. 31
Width Adjustment: Loosen two adjustable levers on the back of the chair, slide
thoracic support horizontally to desired position, and tighten levers. Fig. 32
To Fold: Press latch located at the top of the thoracic support and fold inward
Fig. 33.
Fig.30
Fig.31
Fig.32
Fig.33
12
CONVAID USER’S GUIDE
Hip Guides
Hip guides help to stabilize the pelvis.
To adjust the width: Velcro the
desired number of foam positioning
pads to each side of the seat to
achieve desired width. Fig. 34
Fig.34
Medial Thigh Support (Pommel)
The pommel separates the legs at the
knees for proper seating.
Depth adjustment: Use a wrench to
loosen the two nuts located under the
pommel. Slide pommel to desired position and tighten the nuts. Fig. 35
To swing pommel up: Rotate up
until pommel snaps into place. Fig. 36
To swing pommel down: Press snap
button on the right side of the pommel
and swing pommel under the seat.
Fig. 37
Fig.36
13
Fig.35
Fig.37
POSITIONING GUIDE
Adjustable Contour Headrest
Depth adjustment: Loosen the two nuts located on the upper portion of the
headrest. Slide the front bracket to the desired depth and retighten the nuts. (A)
Height adjustment: Loosen the two nuts located behind the back pan and slide
the back bracket to the desired height then retighten the nuts. (B) Or loosen the
two screws behind the headrest pad and slide the headrest pad your desired
height then retighten the screws. (C)
To achieve a higher headrest height: Loosen and remove the two nuts located
on the upper portion of the headrest. Rotate the front bracket 90-degrees so that
the bracket points upward. Then retighten the nuts. (A)
(A)
(C)
(B)
14
CONVAID USER’S GUIDE
Height Adjustable Armrest
To adjust height of armrests, loosen
the two round knobs and slide armrest
to desired position, re-tighten knobs.
Fig. 38
Fig.38
Foot Positioner
The foot positioner holds the foot securely in place. To attach, select desired
location on the footplate and press down to Velcro. Fig. 39a & 39b
Fig.39a
Fig.39b
15
POSITIONING GUIDE
Height Adjustable Push Handle
Angle Adjustment:
Press and hold the grey detent button. Fig. 40 While holding the detent button,
adjust the handle to desired angle and release button. Fig. 41
Fig.40
Fig.41
Height Adjustment:
Pull the black knob located on the bottom of the push handle’s arms and
turn one quarter of the way. Fig. 42 Swing the push handle forward or backward
to desired height, and turn black knob back into original position. Fig. 43
Fig.42
Fig.43
16
CONVAID USER’S GUIDE
Frame Positioning Options
Tilt:
To tilt, squeeze the lever on the left side of the chair's handle and push down.
Fig. 44 Release the lever when desired angle of tilt has been achieved. Fig. 45
Fig.45
Fig.44
Recline:
Squeeze the lever on the right side of the chair's handle and recline to desired
position. Fig. 46 To recline past 115-degrees, grasp the red loop with your left
index finger and pull to the furthest left. Fig. 47 While holding the red loop,
squeeze the recline lever and recline to desired position.
Fig.47
Fig.46
17
FRAME POSITIONING OPTIONS
Hi / Lo Adjustment:
Secure wheel locks prior to adjusting the height of the seat. Squeeze the lever
located on the back of the seat. Using your body weight, press down at a forward
angle. Fig. 48 Release the lever when desired height of seat has been achieved.
Fig. 49
Fig.48
Fig.49
Accessories
Upper Extremity Support Surface (Tray)
The tray is used for feeding and trunk
stabilization. Fig. 50 To attach, slide
tubes located underneath the tray into
armrest receiver. Fig. 51 Once in the
desired position, tighten small knobs
under the armrest.
Fig. 52
Fig.50
18
CONVAID USER’S GUIDE
Fig.51
Fig.52
Under Seat Storage Tray
The storage tray, which attaches to
the chair frame under the seat, is
designed to hold disposables, miscellaneous medical items and other supplies. The tray is made of mesh fabric
for easy cleaning and includes a
removable plastic base to prevent sag.
The tray is easy to install or remove,
and is attached to the chair frame with
snap closures. Fig. 53
Fig.53
Oxygen Tank Bag
The oxygen tank bag attatches to the
back of the chair and holds a size E
(4” diameter) tank. Clasps hold the
takn away from the chair, and the
strap at the base adjusts to stay taut
when the chair is tilted. Fig. 53
Fig.53
19
ACCESSORIES
Headrest Cover (Canopy)
To attach canopy, rotate push handle down Fig. 54 & Fig. 55, then insert canopy
rod into socket tubes located on the sides of the back pan and rotate handle to
desired position. Fig. 56 & Fig. 57
Fig.54
Fig.55
Fig.56
Fig.57
Opening and closing the canopy:
To open: grasp and push away from you. Fig. 58
To close: grasp and pull toward you. Fig. 59
Fig.58
Fig.59
20
CONVAID USER’S GUIDE
Upholstery
Fabric Removal
Chair fabric may be removed to facilitate cleaning. To remove seat upholstery and seat
pad, unfasten the Velcro strips.
1. Remove accessories and
unfasten belts/vest.
2. Unfasten snap buttons
located at the top of the
upholstery near headrest.
3. Loosen fabric at sides of
chair. Fig. 60
4. Remove the fabric bag by
unsnapping buttons. One
button on eachside.
Fig. 61
Fig.60
Fig.61
5. Remove the headret
mounting bracket cover
by releasing the Velcro at
the top and bottom of
cover.
Fig. 62
6. Remove fabric back by
releasing the Velcro at
the top and bottom of
seatback. Fig. 63
Fig.62
Fig.63
7. Unfasten buckle at back
of chair. Fig. 64
8. Release fabric under
footplate Fig. 65, and
remove upholstery
from chair.
9. Remove armrest covers
by releasing Velcro.
Fig. 66
Fig.64
21
WHEELS
Cleaning
To clean upholstery, wipe spills with a damp clean cloth. For dried stains, combine 1 part of an enzyme powder detergent with 5 parts water. Apply the solution
to the stain and wait 1 to 2 minutes to allow the detergent to begin removing the
stain. Then lightly scrub the area and rinse thoroughly with clean water. All soap
residues must be removed.
Wheels
Specifications
The CuddleBug comes standard with 6" and 8" solid tires. When ordering
replacements, please have the following information available:
• Chair name
• Wheel size
• Tire type - solid or pneumatic
Solid Tire Sizes:
Size: 6”
Dimensions:
11/4” x 6”
Size: 8”
Dimensions:
11/4” x 8”
Pneumatic Tire Sizes:
Size: 6”
Dimensions:
11/4” x 6”
Size: 8”
Dimensions:
11/4” x 8”
See wheel for size and dimensions.
22
CONVAID USER’S GUIDE
Fig.65
Fig.66
Locking and Unlocking
Toggle Wheel Locks
To lock, push down on rear lever of wheel lock. Fig. 67
To unlock, press down on front lever of wheel lock. Fig. 68
Fig.67 Locked
23
Fig.68 Unlocked
POSITIONING GUIDE
Wheel Lock Adjustment
Set wheel locks to locked
position. Push chair with
light pressure on the rear
wheels. If wheel rotates,
adjust tension by turning
the adjustment nut until
wheels no longer rotate
while locked. Fig.69
!
Caution:
Wheel lock
adjustment
should be
inspected
periodically.
Fig.69
Anti-Shimmy
If the front wheels develop
a shimmy, use a wrench to
tighten the stem nut. Adjust
the stem nut clockwise until
the shimmy disappears.
Fig. 70
Fig.70
24
CONVAID USER’S GUIDE
Important Information
Maintenance, Operating & Safety Instructions
• READ ALL INSTRUCTIONS BEFORE USING THE PRODUCT
• ALWAYS FOLLOW THESE SAFETY INSTRUCTIONS
• SAVE SAFETY INSTRUCTIONS FOR FUTURE REFERENCE
CAUTION: • For increased safety, the seat belt should be used at all times.
• Do not leave user unattended.
• Do not strap user too tight.
• Straps should not interfere with breathing or circulation
• Always apply wheel locks before letting go of the chair.
• If front edge of seat is at or forward of the point where tires
touch the floor, avoid using front of seat tubes for support
during entry or exit from chair to prevent tipping.
• Avoid using footplates for weight support during exit or entry
of the chair.
!
1. Waste Disposal
The shipping carton should be kept for possible return to the manufacturer/service facility
for repair or maintenance. Other paper packaging waste should be set aside for recycling.
For disposition of replaced parts or the complete chair, the materials should be separated
into: plastic, rubber, steel, aluminum, etc., and set aside for recycling.
2. Intended Use
This product is intended for use by a person with physical disabilities who is frequently or
permanently non-ambulatory. The chair is always under the control and supervision of an
attendant, and the occupant should never be left unattended.
3. Suitable Environment
The chair is intended for both indoor and outdoor use. If the chair is used in the rain, the
excess water should be wiped off with a soft cloth. If the chair is splashed with mud or
corrosive substances like salt water or road salt, the chair should be washed clean with
water, wiped dry and a hypoallergenic and biodegradable lubricant reapplied to the moving parts. The chair should never go into seawater, as it will corrode areas that cannot be
washed clean. When going from outside to inside, clean any excess dirt or mud from the
wheels to prevent soiling of inside environment.
25
CONSUMER INFORMATION
4. Safety Instructions
• Follow folding/unfolding instructions.
• Never leave occupied chair unattended.
• Do not attempt to take occupied chair up or down stairs, escalators, steep inclines, or
icy or slippery surfaces.
• To avoid tipping, do not overload the chair, or hang heavy items on the handles that
might cause tipping.
• Be aware of newly created sharp edges.
• Frequently inspect the adjustments on the frame and the positioning accessories.
• Do not use chair after occupant has outgrown it.
• Do not ignore minor malfunctions and maintain the chair in good operating condition.
Monitor the wheel locks (brakes) regularly and adjust as needed.
• When going up a curb or step, face the chair forward and tilt back to lift the front
wheels over the curb. Move forward and lift the rear wheels over the curb.
• If and whenever possible and feasible, the rider should transfer out of the
chair and into an approved vehicle seat and passenger restraint system.
However, if a transfer is not possible, use only designated chairs in a moving vehicle
which apply to the wheelchair Tiedown and Occupant Restrain System (WTORS)
following the requirements of SAE J2249. Follow tie-down harness manufacturer’s
instructions carefully and refer to Convaid’s ‘Transit Guide’ for specifics.
• When going up a curb or step, face forward and
tilt the chair back to lift the front wheels over the
curb. Move forward and lift the rear wheels over
the curb.
26
CONVAID USER’S GUIDE
• When going down a curb, approach the
curb backwards. Lower the rear wheels
down the curb and continue backwards,
taking the weight off the front wheels so
they can be gently lowered.
• When transferring user to or from chair,
apply foot wheel locks.
• Maintain control of chair at all times
while going up/down ramp. Avoid steep
slopes, particularly with a heavy
occupant. If in doubt, do not attempt a
descent unless a third party is present
to help maintain control of chair.
5. User Maintenance
The following maintenance procedures should be conducted on a regular
basis: Examine your Convaid product visually from time to time for possible
wear and tear. Lubricant* should be applied to frame and moving parts to
maintain easy folding and adjustment.
27
a)
Tire Air Pressure: The air pressure in your tires should be checked
WEEKLY, since low air pressure may affect brake ability.
b)
Axles and Moving Parts: Axles and moving parts should be wiped off
WEEKLY with a slightly moist cloth, to remove dust, dirt and mud. Apply
some lubricant* after each cleaning.
c)
Repair or replace loose, worn, bent, missing or damaged parts
before using the chair!
CONSUMER INFORMATION
MAINTENANCE CHART
Rims, tires and tire pressure
Wheel locks and hand brakes
Accessories
Weekly
Every 3
months
Every 6
months
As necessary
•
•
•
Front and rear wheel axles
Cleaning & lubricating all moving parts
Belts, zippers and Velcro closures
Seat-/ back upholstery**/tautness
Armrests & foam
Frame
•
•
•
•
•
•
Contacting a Convaid representative
for service or repair***
•
* Use a non-toxic, hypoallergenic lubricant for all moving parts of the frame
** Follow cleaning instructions for appropriate user hygiene
*** NOTE: Repair or replacement of non-removable, worn or broken parts must be
performed by a qualified service facility.
6. Cleaning and disinfection
Clean all areas that come in contact with user or caregiver with a disinfectant
solution.
To prevent the spread of germs, disinfectant wipes should be used on a regular basis. Keep frame dry and apply a non-toxic, hypoallergenic and
biodegradable lubricant to all moving parts. After longer storage periods, and
before further use, the entire chair needs to be serviced, cleaned and disinfected. Follow the guidelines of each country and region.
Cleaning of frame:
Frame is to be kept dry and free of dirt and should be wiped off with a nontoxic, hypoallergenic and biodegradable lubricant. Lubricant should be
applied to moving parts as needed to maintain easy folding and adjustment.
All contact with salt water should be avoided. If the chair is used in salt-water
environments corrosion may occur. In the event of salt-water exposure, the
frame should be wiped off with a moist towel as soon as possible. Water and a
soft cloth are sufficient; lubricant should be reapplied to all moving parts.
28
CONVAID USER’S GUIDE
Cleaning of wheels and brakes:
Wheels should be kept free of dirt or mud so as to not interfere with pushing
the chair. The brakes are to be kept free of dirt or mud, so as not to interfere
with locking. Wipe wheels and brakes with a moist cloth as needed and readjust brakes if indicated.
Cleaning of fabric cover:
Seat and back upholstery can be easily removed, washed, air dried and
reattached to the chair. Use standard detergent to wash fabric.
Cushioned parts can also be removed from chair, washed or wipe off with a
moist cloth. Before reattaching them to the chair, make sure they are
completely dry. Use standard detergent to wash fabric.
Parts that are permanently attached may be wiped vigorously with a moist
cloth. Allow sufficient time to dry before placing user in chair.
7. Storage
Before extended storage periods, and before reuse, the entire chair needs to
be serviced, cleaned and disinfected.
8. Reuse
Your Convaid chair should undergo a wipe-down disinfection before reuse.
Please use a non-toxic, biodegradable disinfectant solution suitable for surface disinfection.
Please check the following components (see MAINTENANCE CHART) for
operation, intactness, etc. and replace if necessary:
• Wheels (tread pattern), air pressure if applicable
• Frame
• Seat- and back upholstery
• Wheel lock operation
• Bearings and axles: check wear and tear/ lubrication
• Straight-running stability of wheels
• Attachments
29
CONSUMER INFORMATION
9. Repairs
User: The user can replace easily removable parts or accessories, e.g. footplates and footrest assemblies, heel loops, all fabric items, hand grips, etc.
Manufacturer/Service Facility: Repair or replacement of permanently
attached, worn or broken parts must be performed by a qualified service facility. Any individual part of the chair can be replaced. If the service facility is
close, contact the manufacturer/service facility and the chair can be delivered
in person. Alternatively, after receiving a return authorization, the chair
should be packaged in the original or suitable shipping carton for return to
the manufacturer/service facility. Ship via parcel post or by private package
delivery services.
10. Tools Required
User:
• 7⁄16”, 1⁄2”, 5⁄8”, 3⁄4” or 2 adjustable wrenches with 3⁄4” capacity Phillips head
screwdriver
• Hex key 5⁄32” (included)
Service Facility / Authorized Service Dealer
• A selection of imperial size wrenches, or two adjustable wrenches with
3⁄4”capacity.
• A Phillips head and a flat head screwdriver
• A rivet setting machine with a selection of tool sizes, or a set of hand tools
• Power drill with selection of imperial size drill bits
• Hex key 5⁄32” wrench (included)
11. Spare Parts
If the user is unable to visit a Service Facility to describe the problem, they
can request a diagram of the product be sent to them, so they can draw an
arrow to the part needing replacement. If not under warranty, they will
receive an estimate of the cost and, if necessary, shipping instructions for
return of the chair.
30
CONVAID USER’S GUIDE
12. Functional Tests
All four wheels should make contact with the floor. With the chair empty,
push it forward on a smooth level surface with enough momentum to travel
six feet (2 m). The chair should not veer to the left or right more than six
inches (15 cm). Wheels should be free running and the wheel locks (brakes)
adjusted to adequately secure the chair. Following the fold/unfold instructions, the chair should fold/unfold smoothly without undue effort. All fasteners should be secure. Fasteners on moving joints should not be over tight.
Seat fabric should not be wide-stretched or sagging. Positioning accessories
should be correctly adjusted and secure.
13. Authorized Service Dealer
31
NOTES
32
Limited Lifetime Warranty
Convaid warrants to the original retail purchaser of the Convaid product, that if any part
thereof proves functionally defective in material or workmanship within the specified
warranty period, such defective part will be repaired or replaced (at Convaid’s discretion)
free of charge. Warranty service may be performed by an authorized service center or
(at Convaid’s discretion) the factory.
Warranty Period
Frame & X-Braces.......................................5 years for original retail buyer
Other components ......................................18 months
Fabric & webbing ........................................18 months
This warranty does not cover normal wear and tear or damage caused by accident or misuse.
To exercise this limited warranty, the user should first obtain a Return Authorization Number from
Convaid’s customer service. The product must be delivered charges pre-paid (UPS recommended)
to the factory or to an authorized service center, together with a copy of the original invoice, the
Return Authorization Number and a written description of the problem.
THIS LIMITED WARRANTY EXCLUDES ANY CLAIM FOR INCIDENTAL OR CONSEQUENTIAL
DAMAGES. ANY IMPLIED WARRANTY APPLICABLE IS LIMITED IN DURATION TO THE
DURATION OF THIS WRITTEN WARRANTY. SOME STATES DO NOT ALLOW THE EXCLUSION
OR LIMITATIONS OF INCIDENTAL OR CONSEQUENTIAL DAMAGES OR LIMITATIONS ON HOW
LONG AN IMPLIED WARRANTY LASTS. SO THE ABOVE LIMITATIONS OR EXCLUSIONS MAY
NOT APPLY TO YOU. THERE ARE NO WARRANTIES WHICH EXTEND BEYOND THE
DESCRIPTION ON THE FACE THEREOF.
This warranty gives you specific legal rights and you may have other rights that vary from state to state.
Warranty applicable in USA only, may vary in other countries.
FAST FACTORY SERVICE: If being without your chair creates a hardship, you may wish to
take advantage of our Fast Factory Service, whether under warranty or not.
WARRANTY REPAIR: Simply send your chair to Convaid by UPS Next Day Air (prepaid).
It will be fixed and shipped out within 48 hours by UPS Next Day Air at our expense.
NON-WARRANTY REPAIR: The time to repair and ship back to you will be extended by the
length of time it takes us to reach you for approval of estimated repair costs.
The CE Mark Authorized Representative is Medical Specialties Ltd, Whalley BB7 9UE UK
PO Box 4209, Palos Verdes, CA 90274
Toll free in the US: 1-888-CONVAID (266-8243) • Phone: (310) 618-0111 • Fax: (310) 618-8811
Email: [email protected] • International Email: [email protected]
Website: www.convaid.com
07/08