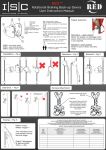
1
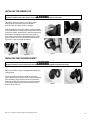
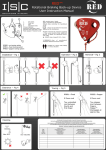
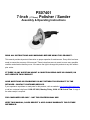
PS07401
7-Inch (177.8mm) Polisher / Sander
Assembly & Operating Instructions
READ ALL INSTRUCTIONS AND WARNINGS BEFORE USING THIS PRODUCT.
This manual provides important information on proper operation & maintenance. Every effort has been
made to ensure the accuracy of this manual. These instructions are not meant to cover every possible
condition and situation that may occur. We reserve the right to change this product at any time without
prior notice.
IF THERE IS ANY QUESTION ABOUT A CONDITION BEING SAFE OR UNSAFE, DO
NOT OPERATE THIS PRODUCT!
HAVE QUESTIONS OR PROBLEMS? DO NOT RETURN THIS PRODUCT TO THE
RETAILER - CONTACT CUSTOMER SERVICE.
If you experience a problem or need parts for this product, visit our website http://www.buffalotools.com
or call our customer help line at 1-888-287-6981, Monday-Friday, 8 AM - 4 PM Central Time. A copy of
the sales receipt is required.
FOR CONSUMER USE ONLY – NOT FOR PROFESSIONAL USE.
KEEP THIS MANUAL, SALES RECEIPT & APPLICABLE WARRANTY FOR FUTURE
REFERENCE.
PS07401 7-Inch (177.8mm) Polisher / Sander
FEATURES:
• 10 AMP
• 5/8 Inch Arbor
• 1 Foam Pad And 1 Wool Polishing Bonnet
• Trigger Lock
SPECIFICATIONS
Rated Current
Rated Voltage
No-Load Speed
Wheel Diameter
10 AMP
120V – 60 Hz
200 – 3,350 RPM
7 Inch (177.8mm)
FOR CONSUMER USE ONLY – NOT FOR PROFESSIONAL USE
PS07401 7-Inch Polisher / Sander Assembly & Operating Instructions
2
TABLE OF CONTENTS
GENERAL SAFETY RULES
RECOGNIZE SAFETY SYMBOLS, WORDS AND LABELS................................................................................. 4
IMPORTANT SAFETY INSTRUCTIONS .............................................................................................................. 5
WORK AREA........................................................................................................................................... 5
ELECTRICAL SAFETY............................................................................................................................ 5
TOOL USE & CARE ................................................................................................................................ 5
SERVICE ................................................................................................................................................. 7
SPECIFIC SAFETY RULES AND/OR SYMBOLS
SYMBOLS ............................................................................................................................................................ 8
FUNCTIONAL DESCRIPTION
PACKAGE CONTENTS........................................................................................................................................ 8
COMPONENTS LIST ........................................................................................................................................... 9
ASSEMBLY
ASSEMBLY .......................................................................................................................................................... 9
INSTALLING THE RUBBER PAD ...................................................................................................................... 10
INSTALLING THE POLISHING BONNET .......................................................................................................... 10
OPERATION
POLISHER OPERATION ................................................................................................................................... 11
SANDER OPERATION....................................................................................................................................... 11
MAINTENANCE
MAINTENANCE ................................................................................................................................................. 12
ACCESSORIES
ACCESSORIES .................................................................................................................................................. 12
PS07401 7-Inch Polisher / Sander Assembly & Operating Instructions
3
GENERAL SAFETY RULES FOR ALL ELECTRIC POWER TOOLS
READ AND UNDERSTAND ALL INSTRUCTIONS. Failure to follow all instructions listed below may
result in electric shock, fire and/or serious personal injury.
RECOGNIZE SAFETY SYMBOLS, WORDS AND LABELS
What You Need to Know About Safety Instructions
Warning and Important Safety Instructions appearing in this manual are not meant to cover all possible conditions
and situations that may occur. Common sense, caution and care must be exercised when operating or cleaning
tools and equipment.
Always contact your dealer, distributor, service agent or manufacturer about problems or conditions you do not
understand.
This is the safety alert symbol. It is used to alert you to potential
personal injury hazards. Obey all safety messages that follow this
symbol to avoid possible injury or death.
DANGER indicates an imminently hazardous situation,
which, if not avoided, will result in death or serious injury.
WARNING indicates a potentially hazardous situation, which,
if not avoided, could result in death or serious injury.
CAUTION indicates a potentially hazardous situation, which,
if not avoided, may result in minor or moderate injury.
CAUTION used without the safety alert symbol indicates a
potentially hazardous situation, which, if not avoided, may
result in property damage.
NOTE provides additional information that is useful for proper use
and maintenance for this tool. If a NOTE is indicated make sure it is
fully understood.
PS07401 7-Inch Polisher / Sander Assembly & Operating Instructions
4
IMPORTANT SAFETY INSTRUCTIONS
WORK AREA
Keep your work area clean and well lit. Cluttered work benches and dark work areas may cause accidents or injury.
Do not operate power tools in explosive areas, such as in the presence of flammable liquids, gases or dust. Power tools create
sparks, which may ignite the dust or fumes.
Keep bystanders, children and visitors away while operating a power tool. Distractions can cause you to lose control.
ELECTRICAL SAFETY
Double insulated tools are equipped with a polarized plug (one blade is wider than the other.) This plug will fit in a polarized
outlet only one way. If the plug does not fit fully in the outlet, reverse the plug. If it still does not fit, contact a qualified
electrician to install a polarized outlet. Do not change the plug in any way. Double insulation eliminates the need for the three wire
grounded power cord and grounded power supply system.
Avoid body contact with grounded surfaces such as pipes, radiators, ranges and refrigerators. There is an increased risk of
electric shock if your body is grounded.
Do not abuse the cord. Never use the cord to carry the tool or pull the plug from an outlet. Keep the cord away from heat, oil,
sharp edges, or moving parts. Replace damaged cords immediately. Damaged cords increase the risk of electric shock.
When operating the tool outside, use an outdoor extension cord marked “WA” or “W.” These cords are rated for outdoor use and
reduce the risk of electric shock. Make sure the extension cord being used is in good condition. If there are any cuts or nicks (no matter
how deep) in the insulation, DO NOT use that cord. Also, make sure the extension cord is heavy enough to carry the current needed.
DO NOT use small “around-the-house” lamp extension cords. These cords can easily overheat and/or catch fire when used with power
tools.
TOOL USE & CARE
Use clamps or other practical ways to secure and support the workpiece to a stable platform. Holding the work by hand or
against your body is unstable and may lead to loss of control.
Do not force tool. Use the correct tool for your application. The correct tool will do the job better and safer at the rate for which it is
designed.
Do not use the tool if the power switch does not turn it “ON” or “OFF”. Any tool that cannot be controlled with the switch is
dangerous and must be repaired.
Disconnect the power cord plug from the power source before making any adjustments, changing accessories or storing the
tool. Such preventive safety measures reduce the risk of starting the tool accidentally.
Store idle tools out of reach of children and other untrained persons. Tools are dangerous in the hands of untrained users.
People with pacemakers or other electronic devices should consult with a physician before operating this product. Interruption
or failure of the pacemaker could occur when electrical equipment is operated within close proximity of electrical devices.
PS07401 7-Inch Polisher / Sander Assembly & Operating Instructions
5
Inhaling dust created as a result of construction projects could be hazardous to your health. Construction dust may contain
chemicals, which are known to cause cancer, birth defects and other reproductive harm in the State of California.
These chemicals could be, but are not limited to: lead from lead based paints, crystalline silica from bricks or cement, arsenic, and
chromium from chemically treated-lumber.
To reduce your risk of exposure to harmful materials: always wear a dust mask that is designed to filter out hazardous microscopic
contaminants, always work in a well ventilated area, and wear other approved safety equipment.
Never install carbide tipped or steel circular saw blade for use on this Polisher / Sander. Never install a wood carving blade,
carving disc with saw chain cutters, or a cutting carving disc on this Polisher / Sander. Never install abrasive cutoff discs and
wheels, flap wheels, wire brushes, or wire wheel brushes.
Wash hands after handling the power cord. Touching the power cord could expose you to lead, which is known in the State of
California to cause cancer, birth defects and other reproductive harm.
All work areas should be clean and well lit. Accidents are more likely to occur in poorly lit and cluttered areas.
Do not operate power tools in the presence of flammable liquids, gas, or dust. Sparks created from the power tool could ignite
flammable materials.
Keep children, and other distractions at a distance while operating power tools.
This power tool is equipped with a polarized plug; meaning one blade is wider than the other and is designed to fit into a
standard polarized outlet. The plug will fit into polarized outlets only one way. DO NOT FORCE THE PLUG INTO THE OUTLET!
If the plug does not fit, a polarized outlet may need to be installed by a qualified electrician.
Keep the power cord in good condition, and replace damaged cords immediately. Do not use the cord to pull the plug from the
outlet. Keep the cord away from materials and surfaces that could damage cords. The risk of electric shock increases when the power
cord is damaged.
Always use the appropriate extension cord, making sure it is rated for use with power tools. Always be sure the extension cords
are in good condition, free of cuts or nicks in the insulation. If using the power tool in an outside area with an extension cord, make sure
the cord is rated for outdoor use.
Do not make contact with a grounded surface while using this power tool. Contact with surfaces like pipes, radiators or major
appliances increases your risk of electric shock.
PS07401 7-Inch Polisher / Sander Assembly & Operating Instructions
6
Use common sense while operating this power tool.
Do not use this tool if you are:
• Feeling tired or are under the influence of alcohol or drugs.
• Wearing loose clothing or jewelry. Keep long hair pulled back and away from moving parts.
• Overreaching or have improper footing. Handling the tool in this way could cause serious injury.
When using this power tool always:
• Wear the proper safety equipment, such as safety goggles, dust masks, non-skid shoes, etc.
• Check to be sure all adjusting keys or wrenches have been removed before starting the power tool.
• Check to be sure the power switch is in the “OFF” position before plugging the power tool into an electrical outlet.
Follow these steps to maintain safe working conditions and good working condition of power tools. Improper care can result in
electric shock or serious injury.
• Secure and support the work piece using clamps. Do not use your hands to hold the piece in place.
• Use the correct tool for the job. Using the correct tool is safer and faster.
• Make sure the power switch is in good working order. If the power switch no longer turns the tool “ON” or “OFF”,
discontinue use, and have the tool replaced or repaired.
• Remove the power cord from the power source before storage, changing accessories, or moving the tool.
• Keep out of reach of children, or any untrained person. Store tools in a safe and dry place.
• Keep tools clean, and cutting tools sharp. Maintaining tools with proper care will increase the life of the power tool, and
reduce the risk of injury.
• Check to be sure all moving parts are free from binding and are properly aligned.
• Use only accessories that are recommended by the manufacturer for your tool model.
• Hold the tool by the insulated grip when using in an area where contact with a “live” wire is a possibility.
Only qualified repair personnel must perform power tool service. Service or maintenance performed by unqualified personnel
could result in a risk of injury.
Safety glasses and ear protection must be worn during operation.
You can create dust when you cut, sand, drill or grind materials such as wood, paint, metal, concrete, cement, or other
masonry. This dust often contains chemicals known to cause cancer, birth defects, or other reproductive harm. Wear
protective gear.
SERVICE
Tool service must be performed only by qualified repair personnel. Service or maintenance by unqualified personnel could result in a
risk of injury.
When servicing a tool, use only identical replacement parts. Follow instructions in the Maintenance section of this manual. Use
of unauthorized parts or failure to follow Maintenance Instructions may create a risk of shock or injury.
SAVE THESE INSTRUCTIONS FOR FUTURE REFERENCE.
This manual contains important information regarding safety, operation, maintenance and storage of this product. Before use, read carefully
and understand all warnings, cautions, instructions and labels. Failure to do so could result in serious personal injury, property damage or
even death.
PS07401 7-Inch Polisher / Sander Assembly & Operating Instructions
7
IMPORTANT SAFETY INSTRUCTIONS
Before using this tool, you need to become familiar with the operation of the tool. If you are unsure about the operation of the
tool, or have any questions about the proper use of the tool, call Customer Service at 1-888-287-6981.
Follow these instructions for safe handling of the tool:
• Always secure and support the work piece using clamps. Do not use your hands to hold the piece in place.
• Be sure your work area is clean and secure before turning the power switch into the “ON” position.
• Turn the tool “OFF” and unplug from the power source before making any changes or adjustments to the wheel.
• Do not use solvents containing carbon tetrachloride, ammonia or acetone to clean the Polisher / Sander. Never use
gasoline, paint thinner, or other caustic chemicals that can damage the plastic parts of the tool.
• Always use the appropriate safety gear when operating this tool. Including but not limited, to goggles, dust mask or
respirator. Always work in a well-ventilated area to reduce your exposure to harmful chemicals and dust particles.
• Before installing the sanding wheel or polishing bonnet, make sure you have checked the following:
Use Sander paper and accessories that are rated for 3,000 RPM or greater.
SPECIFIC SAFETY RULES AND/OR SYMBOLS
SYMBOLS
The following symbols may be used on your tool. Be familiar with and learn the symbols to operate the tool safely.
Symbol
V
A
Hz
W
Kg
min
s
…/min
1,2,3…
Name
Volts
Amperes
Hertz
Watt
Kilograms
Alternating Current
Direct Current
Alternating or Direct Current
Earthing Terminal
Class II Construction
Minutes
Seconds
Diameter
No Load Speed
Revolutions per Minute
Ring Selector Settings
Description
Voltage (Potential)
Current
Frequency (Cycles per Second)
Power
Weight
Type of Current
Type of Current
Type of Current
Grounding Terminal
Denotes Double Insulation
Time
Time
Size of Drill Bits, Grinding Wheel Bits, etc.
No-load Rotational Speed
Revolutions, Surface Speed, Strokes, etc per Minute
Speed, Torque or Position Settings
FUNCTIONAL DESCRIPTION
PACKAGE CONTENTS
• Polisher / Sander
• 1 Foam Pad And 1 Wool Polishing Bonnet
• 1 Wrench
• Handle
• Hex Key
PS07401 7-Inch Polisher / Sander Assembly & Operating Instructions
8
COMPONENTS LIST
3
1
5
4
8
6
2
9
10
7
Part #
1
2
3
4
5
Description
Motor Housing
Carbon Brush Access (Each Side)
Variable Speed Power Setting
Power Trigger
Trigger Lock
Part #
6
7
8
9
10
Description
Side Handle
Wool Polishing Bonnet
Spindle-Locking Button
Spindle
Rubber Pad (Hidden By Bonnet)
ASSEMBLY
Always use the side handle when operating this tool. Using this tool without the handle could result in lose of control, and result in
serious injury.
Check to be sure the Polisher / Sander is unplugged before installing the Handle. Attach the adjustable handle by screwing it
tightly into the tool.
PS07401 7-Inch Polisher / Sander Assembly & Operating Instructions
9
INSTALLING THE RUBBER PAD
Improper installation of the rubber pad can cause damage to the rubber pad and the work surface.
The Polisher / Sander is sold with 1 Foam Pad And 1 Wool
Polishing Bonnet and includes a wrench for installation.
Check to be sure the Polisher / Sander is unplugged.
Install the rubber pad by turning the Polisher / Sander upside-down
so the spindle faces up. Press the spindle locking button located on
the top of the Polisher / Sander (Figure 2). Place the rubber pad on
the spindle with the depressed section facing down (Figure 3).
Next, place the clamp washer on the spindle and tighten with the
wrench. (Figures 4 and 5). When installing the Foam pad, follow
Figure 6 & 7, to apply to hook and loop fastener.
Figure 6
Figure 7
Figure 2
Figure 3
Figure 4
Figure 5
INSTALLING THE POLISHING BONNET
Improper installation of the polishing bonnet can cause damage to the polishing bonnet and the work surface.
Make sure the Polisher / Sander is unplugged before installing the
Polishing Bonnet.
For best results, place the Polisher / Sander on a flat, sturdy
surface. Make sure the string on the bonnet is loose and unknotted
before proceeding. (Figure 8) Slip the bonnet evenly around the
rubber pad, and then tie the strings tightly. Secure the loose ends
by tucking them under the edge of the bonnet before using the
Polisher / Sander (Figure 9)
PS07401 7-Inch Polisher / Sander Assembly & Operating Instructions
Figure 8
Figure 9
10
OPERATION
POLISHER OPERATION
Be certain the work piece is secure before polishing or sanding. Never use your hands to hold the work piece in place. An unsecured
work piece could cause serious injury.
Lift the Polisher / Sander off the work surface before starting and stopping the motor.
Applying too much pressure on the work surface can damage the Polisher / Sander.
This tool is equipped with a Trigger Lock. To engage the Trigger Lock, pull the Power Trigger, and press the Trigger Lock button until the
Power Trigger is held. To unlock the Power Trigger, press the Power Trigger.
To start the tool, grip the Polisher with both hands then press the Power Trigger. Press the Trigger Lock Button to lock the power in the “ON”
position. Press the Power Trigger to unlock. Position the unit on the area to be polished, select the desired speed by rotating the Speed
Adjustment knob, and allow the Polishing Pad to rotate until it has reached that speed before applying to the surface. Keep pressure off of the
Polisher / Sander when operating. The Polishing Bonnet should contact the polishing surface lightly.
Use the lower, slower speeds (1 through 4) for polishing. Damage may occur to the paint being polished. Polish the vehicle by lightly
buffing off the wax residue in a circular pattern. Polish until all the wax residue is removed. When complete, release the Power Trigger and
unplug the power cord from the power source.
This tool is equipped with a Variable Speed Control. To adjust the Variable Speed Power Setting to increase or decrease the speed of the
Polisher, first press the Power Trigger. Then turn the Variable Speed Power Setting wheel. Setting 1 is slow speed, setting 6 is high speed.
Always select the appropriate polishing bonnet for the job. The wool polishing bonnet provided is best used for general polishing.
SANDER OPERATION
Be certain the work piece is secure before polishing or sanding. Never use your hands to hold the work piece in place. An unsecured
work piece could cause serious injury.
Lift the Polisher / Sander off the work surface before starting and stopping the motor.
Applying too much pressure on the work surface can damage the Polisher / Sander.
Be certain the power cord will reach the area you wish to sand. Grip the Polisher / Sander firmly and press the Power Trigger. Do not apply
heavy pressure to the Polisher / Sander: let the sanding disk do the work.
Do not use the entire sanding disk surface on the work piece. The inner edge of the disk should be used at a 15-25 degree angle.
Move the Polisher / Sander in a uniform pattern up and down, or side to side, to ensure even sanding.
Check the Polisher / Sander for disk wear and replace worn or used sanding disks as necessary.
When complete, release the Power Trigger and unplug the power cord from the power source.
PS07401 7-Inch Polisher / Sander Assembly & Operating Instructions
11
MAINTENANCE
Disconnect the power supply before cleaning. Wear safety eyewear before cleaning. Used compressed dry air to blow off
dust and debris. Use a soft bristle brush if compressed air is not available.
Applying excessive force to the tool can overload the motor, decrease the life and increase the wear on the tool.
Some chemicals can damage the product. Do not use harsh chemicals such as gasoline, carbon tetrachloride, paint
thinner, etc.
A qualified repair technician must perform any tool service or repair. Service or maintenance performed by unqualified
personnel could result in injury. Use only identical replacement parts. Use of unauthorized parts or failure to follow maintenance
instructions may create a risk of electric shock or injury.
Do not make contact with a grounded surface while using this power tool. Contact with surfaces like pipes, radiators or major
appliances increases your risk of electric shock.
Keep construction debris out of vents and triggers by blowing with compressed air.
Use only mild soap and a slightly damp cloth to clean the Polisher / Sander.
This motor uses carbon brushes, which may require replacing. Carbon brushes wear out over time, and could create motor trouble. Keep
carbon brushes free and clear of debris, and replace worn parts when necessary.
ACCESSORIES
All accessories used with this tool must be rated for 200 – 3,350 RPM. Select accessories that are appropriate for the material for which
they will be used. The wool polishing bonnet included with this tool is useful for polishing vehicles.
Use only accessories that are recommended by the manufacturer for your model. Accessories that may be suitable for one tool
may become hazardous when used on another tool.
Always attach grounded (3-prong) extension cords to grounded (3-prong) outlets.
If you must use an extension cord, be sure that the gauge is large enough to carry the amount of current necessary for your
power tool. If not, your tool may experience a loss of power, excessive voltage drop or overheating. The smaller the gauge number,
the heavier the cord.
(201402)
PS07401 7-Inch Polisher / Sander Assembly & Operating Instructions
12