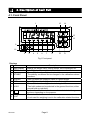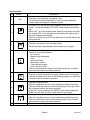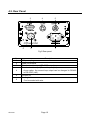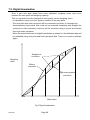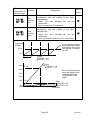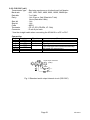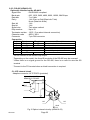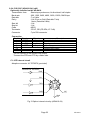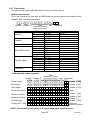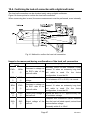
1
AD-4410 Weighing Indicator INSTRUCTION MANUAL 1WMPD4002591 WARNING DEFINITIONS The warnings described in this manual have the following meanings: A potentially hazardous situation which, if not avoided, could result in death or serious injury. A potentially hazardous situation which, if not avoided, may result in minor or moderate injury or damage to the instrument. This symbol indicates caution against electrical shock. Do not touch the part where the symbol is placed. This symbol indicates the ground terminal. This symbol indicates that an operation is prohibited. NOTE Information or cautions to use the device correctly. © 2013 A&D Company, Limited. All rights reserved. No part of this publication may be reproduced, transmitted, transcribed, or translated into any language in any form by any means without the written permission of A&D Company, Limited. The contents of this manual and the specifications of the instrument covered by this manual are subject to change for improvement without notice. Contents 1. 2. 3. 4. 5. 6. 7. 8. Safety Precautions .......................................................................................................3 Introduction...................................................................................................................4 Specifications ...............................................................................................................5 3.1. Analog Section .......................................................................................................5 3.2. Digital Section.........................................................................................................5 3.3. General...................................................................................................................6 3.3.1. Interface ..........................................................................................................6 3.3.2. Measuring functions ........................................................................................6 3.3.3. Other ...............................................................................................................7 3.3.4. Accessories.....................................................................................................7 3.3.5. Options............................................................................................................7 3.3.6. Sold separately ...............................................................................................7 Description of Each Part ...............................................................................................8 4.1. Front Panel .............................................................................................................8 4.2. Rear Panel ...........................................................................................................10 Installation ..................................................................................................................11 5.1. Precautions ..........................................................................................................11 5.1.1. Environment ..................................................................................................11 5.1.2. Power source ................................................................................................12 5.2. Type of load cell cables ........................................................................................13 5.3. Connecting the shield wire ...................................................................................13 5.4. Load Cell Connection ...........................................................................................13 5.5. Checking the load cell connection ........................................................................15 Operation....................................................................................................................16 6.1. General Functions ................................................................................................16 6.1.1. Zero adjustment ............................................................................................16 6.1.2. Zero tracking .................................................................................................16 6.1.3. Tare...............................................................................................................17 6.1.4. F key .............................................................................................................17 6.1.5. display.......................................................................................................18 6.1.6. Memory backup.............................................................................................19 6.1.7. Near zero detection function .........................................................................19 6.1.8. Upper or lower limit detection function ..........................................................19 6.1.9. Hold function .................................................................................................20 6.2. Mode Map ............................................................................................................22 Calibration ..................................................................................................................23 7.1. General Description..............................................................................................23 7.2. Calibration With an Actual Load (Cal5et) ............................................................24 7.3. Dual range ............................................................................................................26 7.4. Gravity acceleration correction .............................................................................26 7.5. Digital linearization.................................................................................................28 7.6. Calibration-Related Functions (Calf) ...................................................................31 7.7. Linearity-related functions (lnrfnc) .....................................................................38 7.8. Calibration Errors..................................................................................................39 7.9. Load Cell Output Adjustment................................................................................40 General Functions ......................................................................................................41 8.1. Setting Procedure.................................................................................................41 8.2. Adjusting the digital filter.......................................................................................42 Page 1 AD-4410 9. 10. 11. 12. 8.3. Basic Functions (fncf).........................................................................................43 8.4. Hold ......................................................................................................................45 8.5. Control I/O ............................................................................................................46 8.6. Standard Serial (current loop) ..............................................................................47 8.7. RS-232C (Standard) / RS-232C (ch2) / RS-485 ...................................................48 Interface......................................................................................................................49 9.1. Control I/O ............................................................................................................49 9.1.1. Specifications ................................................................................................49 9.1.2. Connection ....................................................................................................49 9.2. Serial interface......................................................................................................50 9.2.1. Standard serial output (Current loop) ............................................................50 9.2.2. RS-232C (ch1) ..............................................................................................51 9.2.3. RS-485 (AD4410-03) ....................................................................................52 9.2.4. RS-232C (AD4410-04) (ch2).........................................................................53 9.2.5. Bit structure ...................................................................................................54 9.2.6. Data transfer mode .......................................................................................54 9.2.7. Data format ...................................................................................................55 9.2.8 Command format ...........................................................................................56 Maintenance ...............................................................................................................61 10.1. Error Messages ..................................................................................................61 10.2. Check Mode .......................................................................................................61 10.2.1. Entering the check mode.............................................................................61 10.2.2. Checking the key switches ..........................................................................62 10.2.3. Checking the standard serial output............................................................62 10.2.4. Checking the RS-232C ...............................................................................63 10.2.5. Checking the RS-232C / RS-485 (Option)...................................................63 10.2.6. Checking the control I/O..............................................................................63 10.2.7. Checking the A/D (load cell)........................................................................63 10.2.8. Checking the internal count.........................................................................63 10.2.9. Checking the program version ....................................................................64 10.2.10. Checking the serial number.......................................................................64 10.2.11. Checking the program checksum..............................................................64 10.2.12. Checking the FRAM checksum .................................................................64 10.2.13. Checking the calibration-related functions.................................................64 10.3. Initialization Mode...............................................................................................65 10.3.1. RAM initialization / General functions initialization ......................................65 10.3.2. All data initialization.....................................................................................66 10.4. Confirming the load cell connection with a digital multi meter ............................67 Setting List..................................................................................................................69 11.1. Basic Functions ..................................................................................................69 11.2. Hold ....................................................................................................................71 11.3. Control I/O ..........................................................................................................72 11.4. RS-232C (Standard) / RS-232C (ch2) / RS-485 .................................................73 11.5. Standard Serial Output .......................................................................................74 11.6. Linearity-Related ................................................................................................75 11.7. Calibration-Related.............................................................................................76 External Dimensions...................................................................................................78 AD-4410 Page 2 1. Safety Precautions For safe and correct usage, read the following precautions carefully before using the indicator. Grounding Be sure to ground the AD-4410 when using it. Do not use the same grounding wire that power-driven equipment such as motors or inverters are using. Accidents such as electrical shocks, fire, or malfunctions may occur if the instrument is not grounded properly. Using proper power cables Be sure to use the provided power cable. If you wish to use a cable other than the provided cable, be sure to use a cable matching the voltage and current of the power source. It may cause an accident such as electrical leakage or fire if a cable with insufficient pressure-resistance is used. Fuse replacement A fuse is provided to protect against a short circuit and possible fire hazard. The indicator is equipped with various protection circuits and the fuse should not burn out under normal operations. If the fuse burns out, the internal circuits may have been damaged by surges. Do not try to replace the fuse. Contact the nearest A&D dealer. Avoid water and moisture The indicator is not water-resistant. Securing the front panel to the control panel using the accessory panel mount packing will provide the indicator with IP-65 protection. Avoid an environment with flammable gases Do not use the indicator in places where flammable gases are present. Indicator overheat To prevent the indicator from overheating, allow appropriate clearance between the peripheral devices. If the ambient temperature exceeds the specified operating temperature, use a fan to cool the environment. Page 3 AD-4410 2. Introduction The AD-4410 is a weighing indicator that amplifies signals from a load cell, converts it to digital data and displays it as a mass value. The accessory panel mount packing will provide the indicator with IP-65 protection. This indicator has the following performance: Input sensitivity: ......................... 0.15 μV /d Display resolution: ..................... 999,999 d max. (Less than 20,000 d recommended) Sampling rate:............................ 100 times/second Input voltage range:................... -35 mV to +35 mV (-7 mV/V to +7 mV/V) Dual range Divides the weighing range into two and displays the net weight or gross weight with an appropriate scale interval, depending on the value. Gravity acceleration correction Calculates a correction for instances when gravity acceleration differs in the place where the scale was calibrated and the place where measurement is being conducted. Digital linearization Nonlinearity correction feature to correct weighing errors that occur halfway between the zero point and weighing capacity. It is possible to input up to four points in addition to the zero point. Areas between the inputted points will be nonlinearly corrected. Digital span mode: Keying in the load cell output voltage (mV/V) allows calibration to be performed without an actual load. NOTE: The unit “d” indicates a minimum division. AD-4410 Page 4 3. Specifications 3.1. Analog Section Input sensitivity Input voltage range Zero adjustment range Load cell excitation voltage Load cell drive capacity Temperature Zero coefficient Span Nonlinearity A/D conversion method A/D resolution count Display resolution Sampling rate 0.15 μV/d or greater -35 mV to +35 mV (-7 mV/V to +7 mV/V) -35 mV to +35 mV (-7 mV/V to +7 mV/V) 5VDC 5%, 120 mA with remote sensing capability Maximum 8 x 350 Ω load cells 0.02 μV /°C typ., 0.1 μV /°C max. 3ppm /°C typ., 15ppm /°C max. 0.005 % of full scale Delta-sigma method Approximately 16,000,000 counts 999,999 d max. (Less than 20,000 d recommended) 100 times/second 3.2. Digital Section Display element Measurement display Status indicators Key switches • Measurement display: 6-digit 7-segment green LED • Character height: 14.6 mm • Polarity display: 1 green LED • Status indicators: 6 red LEDs • Switches between NET and GROSS • Selectable decimal places (101, 102, 103, 104, 105) • Overflow display All the digits turn OFF. (When the polarity is negative, the minus sign appears at the highest-order digit.) ZERO, STABLE, GROSS, NET, HOLD, ZERO, TARE, NET/GROSS, F, ON/OFF, ENTER, CAL Page 5 AD-4410 3.3. General 3.3.1. Interface Control I/O Standard serial output Input: open collector Output: photo coupler DIN connector 8 pin Output for communication with A&D peripheral devices (20 mA current loop) DIN connector 7 pin RS-232C (Standard equipment) D-sub 9 pin male RS-232C/RS-485 (Option) It is possible to change the current loop to the RS-232C (ch2) or RS-485. RS-232C AD4410-04 RS-485 AD4410-03 3.3.2. Measuring functions • Sets the gross weight to zero by pressing the ZERO key. • Selection of disable or enable for the operation when unstable. • The zero value is stored in the non-volatile memory. Zero adjustment • Zero adjustable range Can be set optionally in the range of 1 to 100% of the weighing capacity. • Tracks the weight drift around the zero point to maintain zero. • Zero tracking time Zero tracking 0.0 to 5.0 seconds (Can be set optionally within the range.) • Zero tracking band 0.0 to 9.9 d (Can be set optionally within the range.) • Sets the net weight to zero by pressing the TARE key. • Selection of disable or enable for the operation when unstable or negative. Tare • The tare weight is stored in the non-volatile memory. • Tare range: Gross weight ≤ Weighing capacity • Turns ON the stabilization indicator when the variables of the weight values per sampling are within the set band in the set time. • Stability detection time Stability detection 0.0 to 9.9 seconds (Can be set optionally within the range.) • Stability detection band 0 to 9 d (Can be set optionally within the range.) Digital filter Cutoff frequency range (-3dB) : 0.07 to 11 Hz Detects whether there is a load or not and outputs the result Near zero detection function as near zero. HI, OK, or LO is output by comparing a value to an upper or Comparison function lower limit value. This is displayed by holding the weighing value. Hold function Normal hold / Peak hold / Averaging hold AD-4410 Page 6 3.3.3. Other Data backup against power failures Power source Power consumption Operating temperature Operating humidity Installation method Mass • Zero value, tare weight, calibration data and function data are written into the FRAM. • Data retention time is 10 years or more. 100 VAC to 240 VAC (50/60 Hz) Approximately 10 VA -10°C to +40°C 85% R.H. or less (no condensation) Panel mount Approximately 800 g 3.3.4. Accessories Item Weighing capacity plate Unit label Panel mount packing Rubber foot DIN connector 7 pin DIN connector 8 pin Load cell connector Power cable Grounding adapter Quantity 1 1 1 4 1 1 1 1 1 3.3.5. Options Model name AD4410-03 AD4410-04 AD4410-11 RS-485 RS-232C Stand 3.3.6. Sold separately Model name DIN connector 7pin Load cell connector Power cable Model name, other 108-4030167 108-4023456 106-4004213 110-NO.5837 1JA-TCP0576 1JA-TCP0586 1JM-NJC-207-PF 1KO-115 1ET-MK-18 Description Description AX-TCP0576-S AX-NJC-207-PF AX-KO115 Page 7 AD-4410 4. Description of Each Part 4.1. Front Panel 1 15 14 ZERO TARE 13 12 Net/B/G NET GROSS ZERO STABLE GROSS NET HOLD 9 ON/OFF ESC ENTER 10 11 CAL 16 2 3 4 5 6 7 8 Fig.1 Front panel Displays No. Name 1 Main display 2 ZERO 3 STABLE 4 5 GROSS NET 6 HOLD 7 8 UNIT AD-4410 Description Displays the weight value, setting values, error messages, etc. Turns ON when the weight value is in the center of zero. • Turns ON when the weight value is stable. • The stability conditions can be changed in the calibration-related functions. Turns ON when the displayed value is a gross weight. Turns ON when the displayed value is a net weight. • Turns ON when the weight value is being held. • Two hold modes can be selected in the general functions, either normal hold or peak hold. The function for this indicator can be selected in the general functions, depending on the purpose. • Place a unit label. • A unit used for weighing is set in the calibration-related functions. Page 8 Key switches No. Name 9 10 11 CAL ON/OFF ESC ENTER Net/B/G NET GROSS 14 TARE 15 ZERO 16 • The key to proceed to the selected mode. • Stores the data when pressed after a setting is changed. • The function for this key can be selected in the general functions, from the list below: No function Manual print command Hold Alternate switch Momentary switch Clear the tare weight Clear the zero value • The key decreases the value of the blinking digit by one when the numerical values are being entered. 12 13 Description • The key to enter the calibration mode. • The key is concealed by a sealable cover. To avoid unintentional operations, keep the cover attached except when entering the calibration mode. • The key to turn the indicator ON (Weighing mode) and OFF (OFF mode). To turn the indicator OFF (OFF mode), press and hold this key. • When OFF, all of the displays and external output/input devices are turned OFF, but a decimal point located at the right side of the main display remains ON. • The key functions as an ESC key when the numerical values are being entered. Seal • The key to switch between the gross weight and the net weight. • The key increases the value of the blinking digit by one when the numerical values are being entered. • The key to perform tare. • The tare conditions are set in the calibration-related functions. • The key shifts the position of the blinking digit to the right when the numerical values are being entered. • In the OFF mode, pressing the ON/OFF key while holding the TARE key will clear the zero value and the tare weight. • The key to zero the current display. • The zero conditions are set in the calibration-related functions. • The key shifts the position of the blinking digit to the left when the numerical values are being entered. • Cover be sealed using a wire seal. Page 9 AD-4410 4.2. Rear Panel 3 6 4 5 2 1 Fig.2 Rear panel No. 1 2 3 4 5 6 AD-4410 Description AC power plug Load cell terminal Standard serial output (RS-232C output) Standard serial output (Current loop output) As an option, the current loop output can be changed to RS-485 or RS-232C (ch2). Control I/O Sealing bolt Can be sealed with wire. Page 10 5. Installation The weighing indicator is a precision electronic instrument. Handle it carefully. 5.1. Precautions 5.1.1. Environment The operating temperature range is -10°C to +40°C . Do not install the indicator in a position where it is exposed to direct sunlight. The indictor is not water-resistant. When used in an environment where the indicator may be exposed to splashing water, secure the front panel to the control panel using the accessory panel mount packing. This makes the front panel water-resistant equivalent to IP-65. Panel mount packing Guide rail Control panel D-sub Washer Screw Load cell connector Sealing bolt Fig.3 Panel mounting method Page 11 AD-4410 5.1.2. Power source Earth ground the indicator to prevent electrical shock or indicator malfunction. Before connecting the indicator to the power source, read the instruction manual thoroughly. Do not connect the indicator to the power source before the installation is complete. To avoid electrical shock, do not handle the power cable with wet hands. Earth ground the indicator. Do not share the ground line with other electrical power equipment. The power requirement is 100 VAC to 240 VAC and the frequency is 50 Hz or 60 Hz. Use a stable power source free from instantaneous power failure or noise. To avoid a malfunction, do not share the power line with other devices. The output voltage of a load cell is a very sensitive signal. Keep all electrical noise sources away from the load cell and load cell cable. Use shielded I/O cables. Connect the cable shield to the F.G. terminal or the indicator housing. AD-4410 Page 12 5.2. Type of load cell cables The load cell cable must have high insulation and shield performance. Use a shield cable that is made with a material with high insulation resistance, such as Teflon or polyethylene. For best results, we recommend using A&D's load cell cables. AX-KO162-5M to 100M (5m to 100m) Cable diameter…φ9mm Cross-sectional area of the conducting wire…0.5mm2 6 wire cable equipped 5.3. Connecting the shield wire Connect the shield wire of the load cell cable to only the shield terminal (7th pin of the load cell connector) of the AD-4410. As a general rule, do not ground between the load cell and AD-4410. This is because when there are multiple ground points, a ground loop can be created along the wiring route, and interference such as high-frequency noise becomes more likely. 5.4. Load cell connection Connecting the shield wire As a general rule, only connect the load cell cable's shield wire to the weighing indicator's shield terminal. This is because when there are multiple ground points, it becomes easier for noise to occur as a result of a ground loop. However, when there are higher priorities than noise prevention, such as explosion prevention systems or static electricity release routes, this rule does not necessarily need to be followed. Connecting the signal wire AD-4410 has two connection configurations: the 6-wire configuration and the 4-wire configuration. We recommend connecting using the 6-wire configuration for optimum accuracy and stability. Page 13 AD-4410 Terminal No. 1 2 3 4 5 6 7 EXC+ SEN+ SENEXCSIG+ SIGSHIELD Function Load cell excitation voltage (+) Sensing input (+) Sensing input (-) Load cell excitation voltage (-) Load cell input (+) Load cell input (-) Shield Load cell Load cell cable EXC+ SIG+ SIG- Indicator's load cell connector EXC+ SEN+ 1 SIG+ SEN- EXC- 4 3 EXC- 2 6 5 7 SIGSHIELD (A) 6-wire configuration connection to load cell (recommended) Load cell Load cell cable EXC+ Indicator's load cell connector EXC+ SIG- 2 SEN+ 1 SIG+ 4 SEN- 3 EXC- EXC- 6 5 SIG+ 7 SIGSHIELD (B) 4-wire configuration connection to load cell (not recommended) Fig.4 Load cell connection configuration AD-4410 Page 14 Method 6-wire configuration (recommended) 4-wire configuration Merit Demerit Even if load cell cables are lengthened or thin load cell cables are used, error margins are Wiring is somewhat kept low. difficult. Error margins are also kept low where multiple load cells are used. The temperature coefficient will be negatively affected by the lead resistance of Wiring is easy. the load cell cable. Contact resistance from the connector etc. will also have an effect. Description When using a summing box, we strongly recommend using the 6-wire configuration. Errors become more likely when lengthened load cells or multiple load cells are used. Precautions to be taken when using the 4-wire configuration: If the 4-wire configuration has to be used, please take the following measures. - Be sure to connect terminals 1 and 2 (EXC+ and SEN+) and terminals 3 and 4 (SEN- and EXC-). - When lengthening the load cell cable, try to use cable with a large cross-sectional area. Also, keep the cable as short as possible. 5.5. Checking the load cell connection Once the load cell has been connected, perform a connection check using the following procedure. 1. Perform a visual check to ensure that there are no wiring mistakes. 2. Turn the AD-4410 ON. When calibration has not yet been carried out, the display value may be blank. However, as long as there are no problems with the display, confirmation can still be carried out using check mode. 3. Confirm the output value of the load cell by using check mode. Refer to “10.2. Check Mode”, and start check mode for the A/D (load cell). 4. Confirm that the displayed load cell output value matches the specified value. As a general rule, the displayed value should become the rated output value of the load cell or less. 5. Refer to “10.4. Confirming the load cell connection with a digital multi meter” if there is an issue with the indicator, and check the connection. Page 15 AD-4410 6. Operation 6.1. General Functions 6.1.1. Zero adjustment Zero adjustment is a function to set the gross weight to zero. It is performed by pressing the ZERO key. The zero adjustment range is set in Calf05 (zero adjustment range) and is expressed as a percentage of the weighing capacity with the calibration zero point as the center. Zero adjustment is disabled, even within the zero adjustment range, if an A/D converter overflow occurs. A ZERO error is output if zero adjustment is not performed. The zero value is stored in the non-volatile memory and is maintained, even if the power is disconnected. Clearing the zero value is performed using the F key assigned to clear the zero value. Alternately, apply power to the indicator while holding the TARE key, or with the indicator in the OFF mode, press and hold the TARE key and press the ON/OFF key to clear the zero value. Functions related to zero adjustment z Calf05: Changes the zero adjustment range. (0 to 100%) z Calf10: Enables or disables zero adjustment when unstable. z Calf16: Enables or disables power-ON zero function (to zero upon power-ON). 6.1.2. Zero tracking Zero tracking is a function to track the weight drift around the zero point to maintain zero. The zero tracking time is set in Calf06 (zero tracking time) and the zero tracking band is set in Calf07 (zero tracking band). When the weight drift is within the specified ranges, zero adjustment is performed automatically. A ZERO error is not output even if zero tracking is not performed. Functions related to zero tracking z Calf06: Changes the zero tracking time. (0.0 to 5.0 seconds) z Calf07: Changes the zero tracking band. (0.0 to 9.9 d) AD-4410 Page 16 6.1.3. Tare Tare is a function to store the gross weight as the tare value and set the net weight to zero. The tare weight is stored in the non-volatile memory and is maintained, even if the power is disconnected. Clearing the tare weight is performed using the F key assigned to clear the tare weight. Alternately, apply power to the indicator while holding the TARE key, or with the indicator in the OFF mode, press and hold the TARE key and press the ON/OFF key to clear the tare weight. Functions related to tare z Calf10: Enables or disables tare when unstable. z Calf11: Enables or disables tare when the gross weight is negative. 6.1.4. F key Assign a function to the F key in the general functions. Functions related to the F key zfncf02: Assigns a function to the F key from the functions below: 0: None 1: Manual print command 2: Hold 3: Alternate switch (Read the description below.) 4: Momentary switch (Read the description below.) 5: Clear the tare weight 6: Clear the zero value zCalf15: Enables or disables clearing the zero value. zCalf20: Enables or disables the print command when the gross weight is negative. Alternate switch and momentary switch zBy assigning these switches to the F key, the ON/OFF status of the F key can be transmitted to the master station. This is useful when building a network or performing maintenance. zBy selecting “3: F key status” for fncf04 ( display), the ON/OFF status of the F key can be confirmed by the memory in sync with the display. zThese switches perform as below: Alternate switch Press the switch once and release the switch to turn ON or OFF. Press the switch again to turn OFF or ON. Momentary switch Only when the switch is being pressed, the F key is ON. When released, OFF. Page 17 AD-4410 6.1.5. display Assign a function to the display in the general functions. Functions related to the display zfncf04: Assigns a function to the display from the functions below: 0: None 1: Zero tracking in progress 2: Alarm (Zero range setting error, over limit) 3: F key status (Read the description below.) 4: Near zero 5: HI output (Over upper limit) 6: OK output (Within upper and lower limits) 7: LO output (Below lower limit) 8: User input 1 9: User input 2 10: User input 3 11: User output 1 12: User output 2 13: User output 3 F key status zEnables when alternate switch or momentary switch is selected for fncf02 (F key). The display turns ON when the F key is ON and turns OFF when the F key is OFF. About user input and user output User I/O can be used for any purpose the user wishes. It will not have any direct effect on the weighing instrument's operation. Using RS-232C or RS-485 interface commands, one can turn on certain output terminals or check the status of certain input terminals using the display on the front panel. Usage examples Example 1) You would like to monitor the input of a photo sensor with a computer, but you don't have an input port that can work with it. - Connect the photosensor to a control input terminal that is assigned to the user input. - Using RS-232C/485 IOU commands, monitor the control input connected to the photo sensor. AD-4410 Page 18 Example 2) You would like to remotely control the relay via computer, but you don't have a usable output port. - Connect the relay to a control output terminal that is assigned to the user output. - Monitor the control output terminal, connected to a solenoid, with RS-232C/485 IOU commands. Example 3) With the AD-4410's front panel, you want to monitor a computer running a relay. - Using the display function, set the user output terminal you want to monitor. Because the AD-4410’s control I/O terminal is well-insulated, it can prevent noise interference with computers created by issues such as relays. 6.1.6. Memory backup Zero value, tare weight, calibration data and function data are written into the FRAM. FRAM is a non-volatile memory and does not require batteries. The data retention period is 10 years. 6.1.7. Near zero detection function Near zero is a function to detect whether an object has been placed on the weighing pan. A near zero state is when the weighing value is within the set value for the near zero range. Related functions - When setting a comparative value for near zero: Set using fncf08 (near zero value setting) - When selecting an item to be compared with the near zero value: Select gross weight or net weight using fncf09 (comparison weight of near zero) 6.1.8. Upper or lower limit detection function This is a function to detect whether the weighed value is above an upper limit value or below a lower limit value. Related functions - When setting a comparative upper or lower limit value: Set using fncf10 (set upper limit value) or fncf11 (set lower limit value) - When selecting an item to be compared with the upper or lower limit value: Select gross weight or net weight using fncf12 (weight compared with upper and lower limits) - When selecting logic to output the upper or lower limit: Page 19 AD-4410 Select positive logic or negative logic using fncf13 (logic output for upper and lower limits) 6.1.9. Hold function There are three types of hold functions which can be used for different purposes. 1. Normal hold Holds the value displayed at the time the hold command was received. 2. Peak hold Holds the maximum value reached after the hold command was received. The value will be refreshed if it increases again. 3. Averaging hold This function averages weighing data over a certain period of time and then holds the result. It is useful for measuring things that are difficult to weigh such as an animal that won’t settle down, or for averaging out the weight of an object in an unstable state. In addition, it can reduce the effects of breezes which the digital filter cannot eliminate. Related functions - To select the type of hold function: Select the type of hold function with fncf07 (hold) - To set operating conditions for the hold function: Set the averaging time length, standby time, or start and stop conditions with Hldf01 to 07. (Will not affect normal holds) AD-4410 Page 20 Peak hold Standard state Waiting time (Busy state) (Start standby timer) Hold start command Automatic start condition Hold Refresh (Busy state) Hold Standard state Hold cancellation command Automatic cancellation condition Judgment start Averaging hold Standard state Waiting time (Busy state) (Start standby timer) Hold start command Automatic start condition Averaging (Busy state) (Averaging time) Averaging start Hold Standard state Averaging finish Hold cancellation command Automatic cancellation condition Fig.5 Peak hold / Averaging hold Page 21 AD-4410 6.2. Mode Map The indicator has several modes to perform various operations. Perform mode switching by the key operation shown below, only in the direction of the solid arrow. After setting a mode, the indicator resets automatically. Alternatively, the indicator resets when the power is disconnected. Automatic reset after setting Power ON Weighing mode Switch using the ON/OFF key See the note below. OFF mode General function mode Enter using the key combination ENTER + F Maintenance mode Enter using the key combinations ENTER + F and then ZERO + ENTER Calibration mode Check mode Initialization mode Calibration using an actual load Calibration-related function mode Enter using the CAL key Digital linearize mode NOTE: When the power is Lnr-related function mode disconnected while in the OFF mode, the indicator will start in the OFF mode when power is re-connected. All data initialization mode Fig.6 Mode map AD-4410 Page 22 7. Calibration 7.1. General Description In the calibration mode, the operation to relate the output voltage from a load cell to the actual weight value and other operations directly related to weighing are performed. Calibration is performed using a calibration weight. • Zero calibration: Adjusts the indicator so that the measured value will be zero when no load is applied to the load cell. Calibration with an • Span calibration: Enter the calibration weight value and place the calibration weight on the load actual load cell. When the indicator enters the mode of calibration with an actual load, the tare weight and the zero value will be automatically cleared. Calibration is performed without an actual load, by keying in the load cell output voltage (mV/V). • Input voltage at zero: Key in the load cell output at zero. • Input voltage at span: Key in the load cell output at span. (Load cell output at full capacity – load cell output at zero) Digital span • Calibration weight value at span: Key in the calibration weight value corresponding to the input voltage at span. (The input voltage at span is related to the weight value.) Divides the weighing range into two and displays the net weight or gross weight with an appropriate scale interval, Dual range depending on the value. Calculates and corrects for gravity acceleration if the location Gravity acceleration where the instrument was calibrated and the location it is correction being used in are different. Nonlinearity correction feature to correct weighing errors that occur halfway between the zero point and weighing capacity. Up to 4 points can be input in addition to the zero point, and Digital linearization the intervals between each point will be calculated using curves. Setting basic constant values of the indicator such as the minimum division and weighing capacity and other data Calibration-related directly related to weighing is performed. function Setting the parameters for digital span calibration, dual range or gravity acceleration correction is also performed. Clears all the data such as zero value, tare weight, All data initialization calibration data and function data. NOTE: All the data set in the calibration mode is stored in the FRAM. Page 23 AD-4410 7.2. Calibration With an Actual Load (Cal5et) Calibration is performed using a calibration weight Before performing calibration for the first time, set the unit, decimal point position, minimum division and weighing capacity in the calibration-related function mode. NOTE: To avoid drift caused by changes in temperature, warm up the indicator for ten minutes or more before performing calibration with an actual load. Step 1 Press the ON/OFF key to turn the indicator ON (weighing mode) if it is in the OFF mode. Remove the CAL key cover and press the CAL key. CalL is displayed to indicate that the indicator has entered the calibration mode. Step 2 Press the ENTER key to display Cal5et . The indicator enters the mode of calibration with an actual load. To go back to the weighing mode, press the ESC key. Zero calibration Step 3 Press the ENTER key to display Cal 0 . If zero calibration is not to be performed, press the F key and go to step 5. To monitor the current weight value, press the CAL key. Press the CAL key again to display CalL 0 . Step 4 With nothing placed on the load cell, wait for the stabilization indicator to turn ON and press the ENTER key. - - - - - - is displayed for approximately two seconds. If span calibration is not to be performed, press the ESC key twice to return to the weighing mode. Span calibration Step 5 Press the ENTER key when Cal5pn is displayed. The calibration weight value (the weighing capacity currently set) is displayed and the lowest value number blinks. AD-4410 Page 24 < > ∧ ∨ keys: Press to correct the value of the calibration weight used. CAL key : Press to check the current value (the gross weight) and press again to display the calibration weight value. ESC key : Press three times to go back to the weighing mode without performing span calibration. Step 6 Place a calibration weight on the load cell. Wait for the stabilization indicator to turn ON and press the ENTER key. - - - - - - is displayed for approximately two seconds. Step 7 Calend is displayed. To re-adjust the span, press the F key. Step 8 Press the ESC key. Cal5et is displayed and the calibration data is written into the FRAM. Step 9 The current state is the same as that of step 2. To go back to the weighing mode, press the ESC key again. NOTE: The blinking decimal point indicates that the current value is not the weight value. If C errX is displayed, an error has occurred. Refer to “7.8. Calibration Errors” to take some measures. Page 25 AD-4410 7.3. Dual range Dual range is a function that divides the weighing range into two and displays the net weight or gross weight with an appropriate scale interval, depending on the value. This function is a feature of a dual range instrument. Setting of the range and division Set the following items using these calibration-related functions Calf03: minimum division Calf04: weighing capacity Calf24: scale interval of dual range Calf25: dual range border Scale interval of the first range Upper limit of the second range Scale interval of the second range Upper limit of the first range * Make sure you set the scale interval for the second range to a larger value than the first range. * Set the dual range’s border so that it is a smaller value than the weighing range. 7.4. Gravity acceleration correction - When the scale (indicator) has been calibrated in the same place as it is being used, gravity acceleration correction is not required. - A span error will appear if there is a gravity acceleration difference between the place where the instrument has been calibrated and the place it is being used. The gravity acceleration correction calculates and corrects this span error by setting gravity acceleration correction values for both points (the place it was calibrated and the place it is being used in). * When the span is calibrated with actual load calibration, the gravity acceleration correction settings are cleared, and the two gravity acceleration settings return to their default values. Set gravity acceleration Set the following items with these calibration-related functions Calf26: gravity acceleration of the place of calibration Gravity acceleration of the place where the instrument was calibrated. Calf27: gravity acceleration of the place of usage Gravity acceleration of the place where the instrument is being used. AD-4410 Page 26 Gravity Acceleration Table Amsterdam Athens Auckland NZ Bangkok Birmingham Brussels Buenos Aires Calcutta Chicago Copenhagen Cyprus Djakarta Frankfurt Glasgow Havana Helsinki Kuwait Lisbon London (Greenwich) Los Angeles Madrid 9.813 9.800 9.799 9.783 9.813 9.811 9.797 9.788 9.803 9.815 9.797 9.781 9.810 9.816 9.788 9.819 9.793 9.801 9.812 9.796 9.800 m/s2 m/s2 m/s2 m/s2 m/s2 m/s2 m/s2 m/s2 m/s2 m/s2 m/s2 m/s2 m/s2 m/s2 m/s2 m/s2 m/s2 m/s2 m/s2 m/s2 m/s2 Page 27 Manila Melbourne Mexico City Milan New York Oslo Ottawa Paris Rio de Janeiro Rome San Francisco Singapore Stockholm Sydney Tainan Taipei Tokyo Vancouver, BC Washington DC Wellington NZ Zurich 9.784 9.800 9.779 9.806 9.802 9.819 9.806 9.809 9.788 9.803 9.800 9.781 9.818 9.797 9.788 9.790 9.798 9.809 9.801 9.803 9.807 m/s2 m/s2 m/s2 m/s2 m/s2 m/s2 m/s2 m/s2 m/s2 m/s2 m/s2 m/s2 m/s2 m/s2 m/s2 m/s2 m/s2 m/s2 m/s2 m/s2 m/s2 AD-4410 7.5. Digital linearization Even if zero and span points have been calibrated, weighing errors may occur between the zero point and weighing capacity. This is a corrective function designed to non-linearly correct weighing errors. - It is possible to input up to four points in addition to the zero point. - The zero point and each input point will be corrected to put them in a straight line. - Areas between input points that could not be corrected completely with straight line correction or with secondary correction will be corrected using a curved line derived from high-order equations. - When the actual load input for digital linearization is entered in, the calibrated data will be refreshed using zero point and final input point data. There is no need to calibrate again. Straight line correction Weighing value Before correction High-order equation correction Zero ① ② ③ Mass value Fig.7 Digital linearization AD-4410 Page 28 ④ Actual load setting Set digital linearization by loading/unloading masses. * Warm up the instrument for at least ten minutes to avoid the effects of temperature drift. * The input order should proceed from the smallest mass to the largest mass. Step 1 Remove the calibration switch cover on the lower left of the front panel, and press the CAL key (the switch inside). Cal is displayed, meaning the instrument can go into calibration mode. Press the ENTER key to enter into calibration mode, at which point Cal5et is displayed. Press the ∧ or ∨ key to select lnr5et , then press the ENTER key. Step 2 lnr 0 is displayed. If you want to monitor the current weighing value, press the CAL key. The gross weight is displayed. If the CAL key is pressed again, displayed. lnr 0 is Step 3 With nothing placed on the load cell, wait for the stabilization indicator to turn ON and then press the ENTER key. -----seconds. Step 4 is displayed for two lnr 1 is displayed. Press the ENTER key. The mass value is displayed (current weight value setting), and the last digit of the mass value blinks. Press the < > ∧ ∨ keys to adjust the number to the mass that should be inputted. If you want to check the current weighing value, press the CAL key. The gross weight is displayed. If the CAL key is pressed again, the mass value is displayed. Step 5 Place a calibration weight on the load cell. Wait for the stabilization indicator to turn ON and then press the ENTER key. two seconds. ------ is displayed for Page 29 AD-4410 Step 6 lnr 2 is displayed. Repeat the procedures in Step 4 and Step 5. The input steps are as follows: lnr 3 → lnr 4→lnrend Step 7 To finish inputting, proceed to Step 8. If you want to reenter some settings, press the ∧ or ∨ key to select the input. All data following the reentered data will be cleared. Step 8 Press the ON/OFF key. lnr5et is displayed, and the inputted data will be written into the FRAM. At the same time, the calibrated data is also refreshed. Press the ON/OFF key again to return to the normal mode. * If C errXX is displayed, it means some sort of error has occurred. For details, refer to “7.8 Calibration Errors” to address the issue. * The blinking of the decimal points indicates that it is not the weighed value. AD-4410 Page 30 7.6. Calibration-Related Functions (Calf) Step 1 Press the ON/OFF key to turn the indicator ON (weighing mode) if it is in the OFF mode. Remove the CAL key cover and press the CAL key. Cal is displayed to indicate that the indicator has entered the calibration mode. Step 2 Press the ENTER key to display Cal5et . The indicator enters the mode of calibration with an actual load. To go back to the weighing mode, press the ESC key. Step 3 Press the ∧ or ∨ key to select CalfF and press the ENTER key. Step 4 Press the ∧ or ∨ key to select a function number to be used and press the ENTER key. The current setting value is displayed. Step 5 Change the value as necessary. Two methods to change are available, depending on the function number as below Method Selecting a parameter Inputting the value Description Only the available parameter is displayed and blinks. Press the ∧ or ∨ key to select a parameter. All the digits are displayed and a digit to be changed blinks. Press the < or > key to select a digit and press the ∧ or ∨ key to change the value. After setting, press the ENTER key. The next function number is displayed. When the value is not to be changed, press the ESC key to return to the function number display. Step 6 Press the ESC key. Calf is displayed and the data of the calibration-related functions is written into the FRAM. Press the ESC key again to go back to the weighing mode. NOTE: The blinking decimal point indicates that the current value is not the weight value. If a value exceeding the settable range is entered, err dt is displayed and the input is canceled. Page 31 AD-4410 Function No. Parameter or Setting range Calf01 0 to 5 Calf02 0 to 5 Calf03 1 to 6 Calf04 1 to 999999 Calf05 0 to 100 AD-4410 Function Description Unit of the weight value 0: None 1: g Unit 2: kg 3: t 4: N 5: kN Decimal point position of the weight value 0: None 123456 1: 101 12345.6 Decimal 2 point 2: 10 1234.56 position 3: 103 123.456 4 4: 10 12.3456 5 5: 10 1.23456 Minimum division (d) of the weight value 1: 1 2: 2 Minimum 3: 5 division 4: 10 5: 20 6: 50 Weighing capacity of the weighing instrument Weighing is possible up to the value of this setting plus 8 d. If the value exceeds this, Weighing overflow will occur and will not be capacity displayed. The decimal point position is the same as the setting of Calf02. Range to enable zero adjustment by the ZERO key Expressed as a percentage of the weighing capacity with the calibration zero point as the center. Zero adjustment For example, if this is set to 2, the value in range the range of ±2% of the weighing capacity with the calibration zero point at the center will be to zero. When a power-ON zero is performed, the initial zero point will be the center. Page 32 Default value 2 0 1 70000 2 Function No. Parameter or Setting range Function Calf06 0.0 to 5.0 Zero tracking time Calf07 0.0 to 9.9 Zero tracking band Default value Description Performs zero tracking using this setting in combination with the setting of the zero tracking band. When 0.0, zero tracking will not be performed. Unit: second in 0.1 increments Performs zero tracking using this setting in combination with the setting of the zero tracking time. When 0.0, zero tracking will not be performed. Unit: d (minimum division) in 0.1 increments Displayed weight 0.0 0.0 Zero tracking follows the weight value drifting around the zero point and adjusts to display as zero. 4.5 d 0d 1 second 5.0 d When CALF06 = 1.0 CALF07 = 4.5 When CALF06 = 1.0 CALF07 = 4.5 4.5 d 4.0 d Zero tracking functions when the weight value is drifting within the range shown in the graph. 3.0 d 2.0 d 1.0 d 0.5 d 0d 0 second 1 second Page 33 When CALF06 = 2.0 CALF07 = 0.5 2 seconds AD-4410 Function No. Parameter or Setting range Function Calf08 0.0 to 9.9 Stability detection time Calf09 0 to 9 Stability detection band Default value Description Performs stability detection using this setting in combination with the setting of the stability detection band. When 0.0, stability detection will not be performed. (Stable all the time) Unit: second in 0.1 increments Performs stability detection using this setting in combination with the setting of the stability detection time. When 0, stability detection will not be performed. (Stable all the time) Unit: d (minimum division) 1.0 2 Stability detection outputs the STABLE signal when changes in the weight value are within a certain range during a certain time. Weight value CALF09 CALF08 CALF09 CALF08 STABLE signal Calf10 0 to 1 Calf11 0 to 1 Calf12 0 to 1 AD-4410 Tare and zero adjustment when unstable Tare when the gross weight is negative Output when overflow and unstable Tare and zero adjustment when the weight value is unstable. 0: Disables both functions. 1: Enables both functions. 1 Tare when the gross weight is negative. 0: Disables tare. 1: Enables tare. 1 Standard serial output when the weight value overflows and is unstable. 0: Disables output. 1: Enables output. 1 Page 34 Function No. Parameter or Setting range Function Calf13 1 to 3 Exceeding negative gross weight Calf14 1 to 2 Exceeding negative net weight Calf15 0 to 1 Clear the zero value Calf16 0 to 1 Zero setting when power is turned on Calf17 -7.00000 to 7.00000 Input voltage at zero Calf18 0.00001 to 9.99999 Input voltage at span Calf19 1 to 999999 Calibration weight value corresponding to Input voltage at span Description Default value To judge when the negative gross weight is exceeded. A/D negative exceeded or, 1 1: Gross weight < -999999 2: Gross weight < negative weighing capacity 3: Gross weight < -19 d To judge when the negative net weight is exceeded. Gross weight negative exceeded or, 1 1: Net weight < -999999 2: Net weight < negative weighing capacity Select whether or not to clear the zero value. 1 0: Disables. 1: Enables. Select whether or not to perform zero setting when power is turned on. 0 0: Disables. 1: Enables. Input voltage from a load cell at zero. Unit: mV/V This value is determined in zero 0.00000 calibration during the calibration with an actual load. Input voltage from a load cell at span Unit in mV/V This value and the value of Calf19 are 3.20000 determined in span calibration during the calibration with an actual load. The calibration weight value corresponding to the Input voltage at span of Calf18. When performing digital span, Calf17, 32000 18 and 19 are required. The decimal point position is the same as the setting of Calf02. Page 35 AD-4410 Input voltage CALF18 CALF17 CALF19 0 Displayed weight 0 NOTE: Record the setting values of Calf17, 18 and 19 in the “Setting List” at the end of the manual to prepare against a failure. By changing the parameters of Calf17, 18 and 19, “zero calibration” and “span calibration” can be adjusted optionally. (Digital span accuracy approx. 1/5000: The accuracy varies depending on the load cell output accuracy and the conditions of calibration.) Except for an emergency, perform calibration with an actual load. Output by the manual print command when the gross weight is negative. Calf20 Output when the gross weight 0: Enables output. 0 to 1 is negative 1: Disables output. Restriction on network-related communication such as changing station Calf21 Communication numbers or ID numbers and outputting by auto printing restriction 0 to 1 0: Disables restriction. 1: Enables restriction. Second header of serial output Calf22 Header 2 1: GS/NT/TR 1 to 2 2: G_/N_/T_ ( _ is space, ASCII 20h) Number of digits for Calf23 1: 2 digits unit in serial output 2: 3 digits 1 to 2 data Minimum division (d) of second range Calf24 Scale interval of 1: 1 dual range 1 to 6 2: 2 AD-4410 Page 36 0 0 1 1 1 Calf25 0 to 999999 Calf26 9.75000 to 9.85000 Calf27 9.75000 to 9.85000 Calf28 0 to 1 Dual range border 3: 5 4: 10 5: 20 6: 50 If this is set to less than the scale interval of Range 1, the instrument will revert to single range mode. The scale interval for Range 1 is Calf03. When the absolute weighing value (gross weight or net weight) is over the set range, it will become Range 2. The weighing capacity for Range 2 is Calf04. The decimal point position is linked to Calf02. 0 Gravity acceleration of place of calibration Gravity acceleration of the place of calibration. Units in m/s2 Gravity acceleration of place of use Gravity acceleration of the place where the scale is being used. 9.80000 2 Units in m/s Disable averaging hold 0: Enabled 1: Disabled 9.80000 0 NOTE: To receive a Measuring instruments directive (MID) approval, networkrelated communication must be restricted. Confirm that “1: Enables restriction” is selected for Calf21 (Communication restriction). Page 37 AD-4410 7.7. Linearity-related functions (LnrFnc) Confirm and change linearity settings. To use this function, select “lnrf” in the same way as calibration-related functions are selected. Function No. Parameter or Setting range Function Description Default value Llnrf01 0 to 5 Number of input points Number of points where linear input was done. The linear-zero input is included as one point. Digital linearization is not performed when the set value is between 0 and 2. 0 Llnrf02 -7.00000 to 7.00000 Linear-zero Voltage during linear-zero input Units in mV/V. Llnrf03 0 to 999999 Linear 1 mass value Llnrf04 0.00000 to 9.99999 Linear 1 span Llnrf05 0 to 999999 Linear 2 mass value Llnrf06 0.00000 to 9.99999 Linear 2 span Llnrf07 0 to 999999 Linear 3 mass value Llnrf08 0.00000 to 9.99999 Linear 3 span Llnrf09 0 to 999999 Linear 4 mass value Llnrf10 0.00000 to 9.99999 Linear 4 span AD-4410 The mass value during linear 1 input The decimal point position depends on Calf02. The span voltage from linear-zero during linear 1 input Units in mV/V. The mass value during linear 2 input The decimal point position depends on Calf02. The span voltage from linearity zero during linearity 2 input Units in mV/V. The mass value during linear 3 input The decimal point position depends on Calf02. The span voltage from linearity zero during linearity 3 input Units in mV/V. The mass value during linear 4 input The decimal point position depends on Calf02. The span voltage from linearity zero during linearity 4 input Units in mV/V. Page 38 0.00000 0 0.00000 0 0.00000 0 0.00000 0 0.00000 7.8. Calibration Errors When an error occurs during calibration, the error number is displayed. If calibration is finished without removing the error, the setting values will be restored to the state before calibration. Calibration errors and remedies Error No. Description C err1 The display resolution (weighing capacity / minimum division) exceeds the specified value. C err2 Voltage at zero calibration exceeds in the positive direction. C err3 Voltage at zero calibration exceeds in the negative direction. C err4 The value of the calibration weight Use an appropriate exceeds the weighing capacity. calibration weight and The value of the calibration weight is less calibrate again. than the minimum division. Use a load cell with higher The load cell sensitivity is not sufficient. sensitivity or make the minimum division greater. The load cell output voltage is too high Use a load cell with a when the load of the weighing capacity is greater rating or make the placed. weighing capacity smaller. Voltage at span calibration is less than Check the load cell voltage at the zero point. connection. C err5 C err6 C err8 C err7 Page 39 Remedy Make the minimum division greater or make the weighing capacity smaller. The specified value depends on the instrument or specifications. Check the load cell rating and connection. When nothing is wrong with the rating and connection, adjust the load cell output as described in the next section. When the load cell or A/D converter may be the cause of error, confirm this by using the check mode. AD-4410 7.9. Load Cell Output Adjustment Add a resistor as shown below to adjust the load cell output. Use a resistor with a high resistance value and a low temperature coefficient. SIG- "C Err 3" When exceeding in the negative direction) EXC+ EXC+ r to is es d R dd e a R e ad sis de tor d "C Err 2" (When exceeding in the positive direction) SIG+ SIG- EXC- SIG+ EXC- Fig.8 Load cell output adjustment * Because the zero point of the AD-4410 has a wide adjustable range, as long as there is no problem with a load cell, correcting an output by the AD-4410 is hardly ever required. Before an output correction is carried out, confirm load cells (deformation, wiring mistakes, contact with anything, or model selection etc.) and connections. AD-4410 Page 40 8. General Functions General functions are divided into groups according to function and are indicated by the group name with the function number. NOTE: General functions determine the AD-4410 performance and all of the settings are stored in the FRAM. 8.1. Setting Procedure Step 1 While pressing and holding the ENTER key, press the F key. fnc is displayed to indicate that the indicator will enter the general function mode. Step 2 Press the ENTER key. The indicator enters the general function mode. To go back to the weighing mode without entering the general function mode, press the ESC key. Step 3 Press the ∧ or ∨ key to select the function group to be set. Display Group name Basic functions fncfF Hold functions HldfF Control I/O io f Standard serial output Cl f RS-232C (Standard) r51f RS-232C (ch2) / RS-485 r52f Press the ENTER key. The function number will be displayed. Step 4 Press the ∧ or ∨ key to select the function number to be set. Press the ENTER key. The current setting value will be displayed. Step 5 Change the setting value using either one of the methods below. Method Selecting a parameter Inputting the value Description Only the parameter number to be selected is displayed and blinks. Press the ∧ or ∨ key to select a parameter. All the digits are displayed and the digit to be changed blinks. Press the < or > key to select a digit and press the ∧ or ∨ key to change the value. After setting, press the ENTER key. The next function number is displayed. When the parameter is not to be changed, press the ESC key to return to the function number display. Page 41 AD-4410 Step 6 Press the ESC key. The function number disappears and the indicator returns to the state of step 3. Press the ESC key to store the setting values in the FRAM and go back to the weighing mode. NOTE: The blinking decimal point indicates that the current value is not the weight value. If a value exceeding the settable range is entered, err dt is displayed and the input is canceled. 8.2. Adjusting the digital filter Adjust the digital filter using fncf05 (digital filter). The available settable range for the cutoff frequency is from 11 Hz to 0.07 Hz. The cut off frequency is the frequency where vibrations begin to decline. 1. If the weighing value is unstable, set the cutoff frequency lower. 2. To make the response faster, set the cutoff frequency higher. Cut off frequency is high. Response rate is fast. Weak against disturbances. Cut off frequency is low. Response rate is slow. Strong against disturbances. * It is possible to make adjustments while watching the effects of the digital filter with your own eyes. By pressing the CAL key while setting fncf05 (digital filter), it is possible to check the weight displayed. ZERO key ∧ Key ∨ Key Set the display to zero. Increase stability. Increase speed. CAL key Return to the value setting display. AD-4410 Page 42 8.3. Basic Functions (fncf) Function No. Parameter range Ffncf01 000000 to 111111 Function Default value Description Each digit of the setting corresponds to a key switch. Only available in the weighing mode. 0: Does not disable the key switch function. 000000 Disable key 1: Disables the key switch function. switch (binary) Key assignment to each binary digit 6th 5th 4th 3rd 2nd 1st ZERO fncf02 0 to 6 F key fncf03 1 to 3 Display update rate fncf04 0 to 13 display fncf05 0 to 16 Digital filter TARE Net/B/G NET GROSS ON/OFF ESC ENTER Assigns a function to the F key. 0: None 1: Manual print command 2: Hold 3: Alternate switch 4: Momentary switch 5: Clear the tare weight 6: Clear the zero value NOTE: Clearing the zero value can be enabled or disabled by Calf15 1: 20 times/second 2: 10 times/second 3: 5 times/second Assigns a function to the display. 0: None 1: Zero tracking in progress 2: Alarm (Zero range setting error, over) 3: F key status 4: Near zero 5: HI output (Over the upper limit value) 6: OK output (Within upper and lower limit values) 7: LO output (Below the lower limit value) 8: User input 1 9: User input 2 10: User input 3 11: User output 1 12: User output 2 13: User output 3 Selects a cutoff frequency. 0: None 1: 11.0 Hz 2: 8.0 Hz 3: 5.6 Hz 4: 4.0 Hz 5: 2.8 Hz 6: 2.0 Hz Page 43 0 1 0 8 AD-4410 fncf07 1 to 3 fncf08 -999999 to 999999 fncf09 1 to 2 Ffncf10 -999999 to 999999 Ffncf11 -999999 to 999999 Ffncf12 1 to 2 Ffncf13 1 to 2 AD-4410 7: 1.4 Hz 8: 1.0 Hz 9: 0.7 Hz 10: 0.5 Hz 11: 0.33 Hz 12: 0.25 Hz 13: 0.17 Hz 14: 0.13 Hz 15: 0.10 Hz 16: 0.07 Hz 1: Normal hold Hold 2: Peak hold 3: Averaging hold The reference value for near-zero Set value of Decimal point position is linked to Calf02. near-zero Mass to be Item to be compared with near-zero compared 1: Gross weight with 2: Net weight near-zero Reference value for the upper limit Set value of The decimal point position is linked to upper limit Calf02. Reference value for the lower limit Set value of The decimal point position is linked to lower limit Calf02. Mass to be Item to be compared with the upper and compared lower limit with upper 1: Gross weight and lower 2: Net weight limit Logic used when the result of the Output logic comparison with the upper and lower limit is of upper output and lower 1: Positive logic limit 2: Negative logic Page 44 1 10 1 10 -10 1 1 8.4. Hold Function No. Parameter range Function Description Default value Time to perform the averaging. 0.00 Units in seconds. 0.00 is not averaged. Time to wait before commencing hold or LHldf02 Start wait 0.00 averaging. time 0.00 to 9.99 Units in seconds. Condition to start the hold or averaging Condition of automatically LHldf03 automatic 0: Do not use automatic start. 0 0 to 2 start 1 Above the near-zero range, and stable 2 Above the near-zero range Release due Release when control input is falling LHldf04 1 to falling 0: Do not release 0 to 1 control input 1: Release Release after a set amount of time has passed LHldf05 Time 0.00 Units in seconds. release 0.00 to 9.99 Release will not happen if the value is set to 0.00. Release when fluctuation from the holding value exceeds a set value Release due LHldf06 The decimal point position is linked to 0 to range of Calf02. 0 to 999999 fluctuation Release will not happen if the value is set to 0. Release when the weighing value is in Release in the near-zero range LHldf07 near-zero 0 0: Do not release 0 to 1 range 1: Release * This hold function only works when fncf07 (hold) is set to 2 (peak hold) or 3 (averaging hold). This hold function has no function when fncf07 (hold) is set to 1 (normal hold). LHldf01 0.00 to 9.99 Averaging time * Hldf01 (averaging time) works only when fncf07 (hold) is set to 3 (averaging hold). Page 45 AD-4410 8.5. Control I/O Function No. Parameter or Setting range Function Li0 f01 0 to 13 Control input 1 Li0 f02 0 to 13 Control input 2 Li0 f03 0 to 13 Control input 3 Li0 f04 0 to 18 Control output 1 Li0 f05 0 to 18 Control output 2 Li0 f06 0 to 18 Control output 3 Description 0: None 1: Zero 2: Clear zero 3: Tare 4: Clear tare 5: Gross weight display 6: Net weight display 7: Changing between gross weight and net weight 8: Hold 9: Print command 10: F key 11: User input 1 12: User input 2 13: User input 3 0: None 1: Stabilization 2: While displaying gross weight 3: While displaying net weight 4: During tare 5: Near zero 6: During hold 7: Hold busy state 8: HI output (Over upper limit) 9: OK output (Within upper and lower limits) 10: LO output (Under lower limit) 11: User output 1 12: User output 2 13: User output 3 14: During operating weighing (On) 15: During operating weighing (1 Hz) 16: During operating weighing (50 Hz) 17: Zero correction error 18: Tare error * User I/O can check and control sensors and switches other than the AD-4410. AD-4410 Page 46 Default value 1 3 7 3 4 5 8.6. Standard Serial (current loop) Function No. Parameter or Setting range Function Cl f01 1 to 5 Output data Cl f02 1 to 3 Data transfer mode Cl f03 1 to 2 Baud rate Cl f04 0 to 99 ID number Description 1: Displayed weight 2: Gross weight 3: Net weight 4: Tare weight 5: Gross/Net/Tare 1: Stream 2: Auto printing (Note 1) 3: Manual printing 1: 600 bps 2: 2400 bps Adds an ID number to the standard serial output. (Note 2) 0: Does not add an ID number. 1: ⏐ 99: Default value 1 1 2 0 NOTE: When “1: Enables restriction” is selected for Calf21 (Communication restriction): (Note 1) Auto printing will not be performed even if auto printing conditions are met. (Note 2) ID numbers can not be changed. Page 47 AD-4410 8.7. RS-232C (Standard) / RS-232C (ch2) / RS-485 Function No. Parameter or Setting range Function Sr51f01 r52f01 1 to 5 Output data Sr51f02 r52f02 1 to 4 Data transfer mode Sr51f03 r52f03 1 to 7 Baud rate Sr51f04 r52f04 0 to 2 Sr51f05 r52f05 1 to 2 Sr51f06 r52f06 0 to 99 Sr51f07 r52f07 1 to 2 Sr51f08 r52f08 0 to 1 Parity of number of data bits 1: Displayed weight 2: Gross weight 3: Net weight 4: Tare weight 5: Gross / Net / Tare When the data transfer mode is set to jet stream, 5: will output the load cell output signal at 0.00001mV/V. 1: Stream (Every time display is refreshed) 2: Auto print 3: Manual print 4: Jet stream (Every sampling) 1: 600bps 2: 1200bps 3: 2400bps 4: 4800bps 5: 9600bps 6: 19200bps 7: 38400bps Default value 1 1 3 0: 8-bit data, no parity 1: 7-bit data, odd parity 2: 7-bit data, even parity 2 Terminator 1: CR, LF 2: CR 1 ID number 0: None 1 to 99 0 Decimal point/ Delimiter 1: Decimal point: dot / Delimiter: comma 2: Decimal point: comma / Delimiter: semicolon 1 Time out 1: No limit 2: Approx. 1 second 1 Sr51f09 r52f09 0 to 4 Delay when outputting repeatedly Sr52f10 0 to 1 Internal terminating resistance AD-4410 Description 0: No delay 1: Approx. 0.5 second 2: Approx. 1.0 second 3: Approx. 1.5 second 4: Approx. 2.0 second 0: Off 1: On (120Ω) Available only when using RS-485 Page 48 0 0 9. Interface 9.1. Control I/O - Display and data output can be controlled externally using control input. - Weighing states and results can be output to external devices using control output. - User I/O can check and control sensors and switches other than the AD-4410. Sensors and switches can be controlled together with the AD-4410, eliminating the need for additional specialized equipment. 9.1.1. Specification Input circuit method Input terminal open voltage Input circuit driving current Allowable residual voltage Output circuit method Output circuit pressure-resistance Allowable driving current Output terminal residual voltage 9.1.2. Connection Function Pin No. Control input 7 5 3 2 Control 6 output 4 1 8 Shell DC input (Source type) Approx. 5V 5mA (Maximum) 2V (Maximum) Open corrector output DC40V 50mA 1.5V (When driving current is 50mA) Signal name IN1 IN2 IN3 COM (in) OUT1 OUT2 OUT3 COM (out) FG Description Control input 1 Control input 2 Control input 3 Common terminal of control input Control output 1 Control output 2 Control output 3 Common terminal of control output Earth Adaptive connector JA-TCP0586 (provided) +5V Internal circuit COM(in) OUT2 IN2 1kΩ OUT3 IN3 1kΩ OUT1 IN1 COM(out) 1kΩ Fig.9 Internal circuit of control I/O Page 49 AD-4410 9.2. Serial interface 9.2.1. Standard serial output (Current loop) AD-4410 has standard serial output (Current loop) and RS-232C (ch1) as standard equipment. Also, it is possible to change the current loop to RS-485 or RS-232C (ch2) for optional units. AD4410-03 RS-485 AD4410-04 RS-232C (ch2) * It is impossible to use the current loop when options are connected. Connection Pin No. Signal name 3 C.L. 5 C.L. 1,2,4,6,7 Shell FG Direction Output Output Description Current loop output (No polarity) Current loop output (No polarity) No use (No connection) Shield C.L./OP internal circuit Adaptive connector JA-TCP0576 (provided) NC Current loop output ~ + NC NC ~ - NC NC Shell FG Fig.10 Internal circuit of standard serial output (Current loop) AD-4410 Page 50 9.2.2. RS-232C (ch1) Transmission type Baud rate Data bits Parity : Start-stop synchronous, bi-directional, half duplex : 600, 1200, 2400, 4800, 9600, 19200, 38400 bps : 7 or 8 bits : 1 bit, Even or Odd (Data bits 7 bits) None (Data bits 8 bits) Start bit : 1 bit Stop bit : 1 bit Code : ASCII Terminator : CR LF, OR (CR:0Dh, LF: 0Ah) Connector : D-sub 9 pin male * Use the straight cable when connecting the AD-4410 to a PC or PLC. Connection Pin No. Signal name 2 TXD 3 RXD 5 SG 7 RTS 8 CTS 1,4,6,9 Shell Direction Output Input - Description Transmission data Received data Signal ground 7 pin and 8 pin are connected internally. Not used (No connection) Shield D-sub 9 pin connector (male) Case Fig.11 Standard serial output internal circuit (RS-232C) Page 51 AD-4410 9.2.3. RS-485 (AD4410-03) Optionally installed on the AD-4410. Signal form : EIA RS-485 compliant Baud rate : 600, 1200, 2400, 4800, 9600, 19200, 38400 bps Data bits : 7 or 8 bits Parity : 1 bit, Even or Odd (Data bits 7 bits) None (Data bits 8 bits) Start bit : 1 bit Stop bit : 1 bit Signal wire : Twin wires method Drop number : Up to 32 Terminator resistor : 120Ω (Can select internal connection) Character code : ASCII, JIS 8 Connector : 7 pin DIN connector Connection Pin No. Signal name 1 A 2 B 4 SG 6,7 3,5 Shell FG Direction I/O I/O - Description Transmission data Received data Signal ground Not used (No connection) Current loop output Shield - * Do not connect to the current loop output. * Depending on the model, the A and B terminals of the RS-485 may be reversed. * When there is no signal ground for the RS-485, there is no need to wire the SG terminal * Connect to the FG terminal when a shield connection is required. C.L./OP internal circuit Adaptive connector JA-TCP0576 (provided) Internal circuit of the AD4410-03 RS-485 A B RE/DE SG NC NC Shell FG Fig.12 Option internal circuitry (AD4410-03) AD-4410 Page 52 9.2.4. RS-232C (AD4410-04) (ch2) Optionally installed on the AD-4410. Transmission form : Start-stop synchronous, bi-directional, half duplex Baud rate : 600, 1200, 2400, 4800, 9600, 19200, 38400 bps Data bits : 7 or 8 bits Parity : 1 bit, Even or Odd (Data bits 7 bits) None (Data bits 8 bits) Start bit : 1 bit Stop bit : 1 bit Code : ASCII Terminator : CR LF, OR (CR:0Dh, LF: 0Ah) Connector : 7-pin DIN connector Connection Pin No. Signal name Direction Description 1 TXD Output Transmission data 2 RXD Input Received data 4 SG Signal ground 6 DSR Output 7 Not used (No connection) 3,5 Current loop output Shell FG Shield * Do not connect to the current loop output. * Connect the RTS and CTS by a cable side. C.L./OP internal circuit Adaptive connector JA-TCP0576 (provided) Internal circuit of the AD4410-04 RS-232C RXD SG TXD DSR NC Shell FG Fig.13 Option internal circuitry (AD4410-04) Page 53 AD-4410 9.2.5. Bit structure Data 7 bits Data bit Stop bit Start bit Parity bit Data 8 bits Stop bit Data bit 9.2.6. Data transfer mode Four data transfer modes are available; stream, auto printing, manual printing or jet stream. Stream mode Auto printing mode Manual printing mode Jet stream Transmits data in sync with the display update rate. If the indicator can not catch up with the update rate because of the baud rate, the transmission is paused until the next updating. The transmitted data is the same as what is being displayed. Data that is not displayed is never transmitted. Transmits data one time once a weight value of 5 d or greater has stabilized. For a further transmission, the weight value must fall below 5 d and then stabilize again above that value. Transmits data when the F key, assigned as the manual print command, is pressed. Transmits data in sync with the sampling rate. If the indicator can not catch up with the sampling because of the baud rate, the transmission is paused until the next sampling. Functions related to the data transfer mode zSet Cl f04, r51f06 or r52f06 (ID number) to add an ID number to standard serial output. Example: @ 0 9 S T , G S , + 0 1 2 3 . 4 5 k g CR LF ID number zSet Calf20 (disables negative output) to disable the print command when gross weight is negative. zSet Calf22 (header 2) to change header 2 to G, N or T. AD-4410 Page 54 9.2.7. Data format The data format used is A&D standard format or jet stream format. A&D standard format This is the format to be used with an A&D printer or remote display and consists of two headers, data, unit and a terminator. S T , G S , + 0 Header 1 Header 2 1 2 3 . 4 5 Data (8-digit with a polarity and a decimal point) ASCII code ST US OL GS NT TR , 0 to 9 + SP (space) . (period) SP SP SP g kg SP t SP N kN CR LF Header 1 Header 2 Separator Data (ASCII code) Unit (six types) Terminator k g CR LF Unit Terminator Hexadecimal [53 54] [55 53] [4F 4C] [47 53] [4E 54] [54 52] [2C] [30 to 39] [2B] [2D] [20] [2E] [20 20] [20 67] [6B 67] [20 74] [20 4E] [6B 4E] [0D] [0A] A&D standard format examples Description Stable Unstable Overload Gross weight Net weight Tare weight No unit g kg t N kN Data (8-digit with a polarity and a decimal point) Header 1 Header 2 Unit Terminator 0 1 2 3 4 5 k g CR LF Header 2 [GS] 0 1 0 0 0 0 k g CR LF Header 2 [NT] 0 2 3 4 5 k g CR LF Header 2 [TR] Gross weight S T , G S Net weight S T , N T , Tare weight S T , T R , + Data with a decimal point S T , G S Positive overflow O L , G S , + SP SP SP SP . SP SP k Negative overflow O L , G S , Unstable data U , + 0 + 0 0 0 , + 0 1 2 3 . 4 5 k g CR LF g CR LF - SP SP SP SP . SP SP k g CR LF S , G S , + 0 “Output OFF” data O L , G S , + 1 2 3 . 4 5 k g CR LF SP SP SP SP . SP SP k g CR LF Data [ . ] Header 1 [OL] Header 1 [OL] Polarity [ - ] Header 1 [US] Same as positive overflow NOTE: The decimal point position is the same even when overflow occurs. Page 55 AD-4410 Jet stream format This is the format for jet stream mode, which has no headers, decimal points, or units to maintain high-speed output. + 1 2 3 4 5 6 CR LF Data (7 digits) Data (ASCII code) Terminator Terminator ASCII code 0 to 9 + SP (space) CR LF Hexadecimal [30 to 39] [2B] [2D] [20] [0D] [0A] Description 9.2.8 Command format 9.2.8.1 Commands to output data Display data request Outputs display data immediately after the command is received. Command RW Command example RWCRLF Response example ST,GS,+00123.0kgCRLF Gross weight data request Outputs gross weight data immediately after the command is received. Command RG Command example RGCRLF Response example ST,GS,+00123.0kgCRLF Net weight data request Outputs net weight data immediately after the command is received. Command RN Command example RNCRLF Response example ST,NT,+00123.0kgCRLF Tare weight data request Outputs tare weight data immediately after the command is received. Command RT Command example RTCRLF Response example ST,TR,+00123.0kgCRLF Center zero point confirmation Outputs whether or not it is within the center zero point. Command RZ Command example RZCRLF AD-4410 Page 56 Response example 1) RZ,0CRLF : When it is not within the zero point 2) RZ,1CRLF : When it is within the zero point 9.2.8.2 Control commands Zero operation Performs a zero operation. Command MZ Command example MZCRLF Response example MZCRLF Zero clear The zero and tare values are cleared and the gross weight is displayed. Command CZ Command example CZCRLF Response example CZCRLF Tare Subtract tare. Command Command example Response example MT MTCRLF MTCRLF Tare clear The tare is cleared, the tare value becomes zero, and the gross weight is displayed. Command CT Command example CTCRLF Response example CTCRLF Gross weight display Change the display to gross weight. Command MG Command example MGCRLF Response example MGCRLF Net weight display Change the display to net weight. Command MN Command example MNCRLF Response example MNCRLF Disable key switch Disable key switch operations. (The disabled state induced by this command is released by turning off the power.) Page 57 AD-4410 Command Command example Response example DK DKCRLF DKCRLF Release key switch disabled state Re-enable key switch operation through DK commands. Command EK Command example EKCRLF Response example EKCRLF 9.2.8.3 Commands related to holds Begin hold Starts a hold. For averaging holds, either averaging standby or averaging is initiated. The response depends on what state is currently selected. Command HS Command example HSCRLF Response example 1) HSCRLF The standard state. (Neither holds nor Averaging are taking place.) C L 2) HD,1 R F During a busy state. (Averaging standby, Averaging state) C L 3) HD,2 R F During a hold state. C L 4) HD,3 R F During a simultaneous hold state and busy state. Release hold Cancels a hold. At this time, averaging is canceled if it has started, and the device returns to the standard state. Command HC Command example HCCRLF Response example HCCRLF Confirm hold state Outputs hold state. (Averaging, holding, standard) Command HD Command example HDCRLF Response example 1)HD,0CRLF During standard state. (Neither holds nor Averaging are taking place.) C L 2)HD,1 R F During Averaging. C L 3)HD,2 R F During hold. C L 4)HD,3 R F During simultaneous hold state and Averaging state. AD-4410 Page 58 9.2.8.4. Commands related to near-zero detection Read near-zero setting Reads the set value for near-zero. Command RZB Command example RZBCRLF Response example RZB,+012345CRLF (Polarity, 6 digits, no decimal point) Write near-zero value Sets the near-zero value. Command WZB, setting value Command example WZB,+012345CRLF Response example WZB,+012345CRLF (Polarity, 6 digits, no decimal point) 9.2.8.5. Commands related to upper/lower limit settings Read upper limit value Reads upper limit value. Command RH Command example RHCRLF Response example RH,+012345CRLF (Polarity, 6 digits, no decimal point) Write upper limit value Sets the upper limit value. Command WH, setting value Command example WH,+012345CRLF Response example WH,+012345CRLF (Polarity, 6 digits, no decimal point) Read lower limit value Reads lower limit value. Command RL Command example RLCRLF Response example RL,+012345CRLF (Polarity, 6 digits, no decimal point) Write lower limit value Sets the lower limit value. Command WL, setting value Command example WL,+012345CRLF Response example WL,+012345CRLF (Polarity, 6 digits, no decimal point) Page 59 AD-4410 9.2.8.6. Commands related to control I/O Change user output Sets user output state with a numerical value. Returns the new user output/input states using a numerical value. Command IO Command example IO,4CRLF Response example IO,40CRLF User input User output Confirm user I/O state Returns the user output/input states using a numerical value. Command IO Command example IOCRLF Response example IO,32CRLF User input (Input 3: OFF, Input 2: ON, Input 1: OFF) User output (Output 3: OFF, Output 2: ON, Output 1: ON) User output Numerical Output 3 Output 2 Output 1 value 0 OFF OFF OFF 1 OFF OFF ON 2 OFF ON OFF 3 OFF ON ON 4 ON OFF OFF 5 ON OFF ON 6 ON ON OFF 7 ON ON ON AD-4410 User input Numerical Input 3 value 0 OFF 1 OFF 2 OFF 3 OFF 4 ON 5 ON 6 ON 7 ON Page 60 Input 2 Input 1 OFF OFF ON ON OFF OFF ON ON OFF ON OFF ON OFF ON OFF ON 10. Maintenance 10.1. Error Messages If an error message is displayed, refer to the chart below to take proper measures. Error message C5 err ad err ra err fraerr Calerr C errX err dt Cause Remedy Program checksum error Repair is required. Data can not be acquired Repair is required. from the A/D converter. Data can not be written into Repair is required. the backup memory. Perform initialization. Correct data can not be If initialization does not clear the read from the FRAM. error, repair is required. Calibration data is not Perform calibration. correct. Calibration error Refer to “7.8. Calibration Errors”. The setting value is out of Check the setting value and set the settable range. again. 10.2. Check Mode The check mode checks the performance of the display, key switches and external I/O. 10.2.1. Entering the check mode Step 1 While pressing and holding the ENTER key, press the F key. fnc is displayed to indicate that the indicator will enter the general function mode. To go back to the weighing mode, press the ESC key. Step 2 While pressing and holding the ZERO key, press the ENTER key. 1Chc is displayed to indicate that the indicator will enter the check mode. Press the ENTER key again to display an item to be checked. Step 3 Press the ∧ or ∨ key to select the item to be checked and press the ENTER key to enter the check mode of the selected item. To exit from the current mode, press the ESC key. Page 61 AD-4410 Display Chckey Chc Cl Chcr51 Chcr52 Chc io Chc ad Chc in Chcpr9 Chc 5n C5 pr9 C5 fra Calfdt Checking item Key switches Standard serial output RS-232C RS-232C/485 (Option) Control I/O A/D (Load cell) Internal count Program version Serial number Program checksum Memory (FRAM) checksum Calibration-related functions 10.2.2. Checking the key switches With Chckey displayed, press the ENTER key to enter the key switch check mode. In the key switch check mode, six squares ( ) are displayed. Each square corresponds to a key switch as shown below. When a key switch is pressed, the corresponding square moves up ( ). When the CAL key is pressed, the minus LED turns ON. To exit from the key switch check mode, press the ESC key twice. CAL ZERO TARE Net/B/G NET GROSS ON/OFF ESC ENTER 10.2.3. Checking the standard serial output With Chc ClL displayed, each time the ENTER key is pressed, the test data is transmitted with the baud rate set in the general functions and the decimal point blinks. Test data S T , G S , + 0 0 0 0 0 . 0 k g AD-4410 Page 62 CR LF 0.0 10.2.4. Checking the RS-232C While Chcr51L is displayed, each time the ENTER key is pressed, test data is transmitted using the baud rate set in general functions. When the data is received, it is displayed for two seconds. Test data S T , G S , + 0 0 0 0 0 . 0 k g CR LF 10.2.5. Checking the RS-232C / RS-485 (Option) While Chcr52L is displayed, each time the ENTER key is pressed, test data is transmitted using the baud rate set in general functions. When the data is received, it is displayed for two seconds. Test data S T , G S , + 0 0 0 0 0 . 0 k g CR LF 10.2.6. Checking the control I/O While Chc io is displayed, press the ENTER key to enter control I/O mode. In control I/O mode, the control I/O state is displayed as ON (□) or OFF (□) on the display. Pressing the TARE, F or ENTER key will return the state of output 1, output 2 or output 3, respectively. Output 3 Output 2 Output 1 Input 3 ENTER Input 2 Input 1 TARE 10.2.7. Checking the A/D (load cell) With Chc ad displayed, press the ENTER key to enter the A/D check mode. The load cell output value is displayed in mV/V. The example below is for an internal count of 1.23456 mV/V. 1.23456 The decimal point blinks If the value exceeds ±7mV/V, it may be because of mechanical damage or a connection error involving the load cell. Refer to “10.4. Confirming the load cell connection with a digital multi meter” to check the connection. 10.2.8. Checking the internal count With Chc in displayed, press the ENTER key to enter the internal count check mode. The internal count value (display value times 10) is displayed. The example below is for an internal count of 123. 123. The decimal point blinks Page 63 AD-4410 10.2.9. Checking the program version With Chcpr9 displayed, press the ENTER key to display the version of the current program. The example below is for program version 1.00. p001.00 10.2.10. Checking the serial number With Chc 5n displayed, press the ENTER key to display the last five digits of the serial number. The example below is when the last five digits of the serial number are 12345. 12345. The decimal point blinks 10.2.11. Checking the program checksum With C5 pr9 displayed, press the ENTER key to display the program checksum. The example below is when the checksum is EF. C500ef 10.2.12. Checking the FRAM checksum With C5 fraP displayed, press the ENTER key to display the FRAM checksum. The memory set in the general functions is not counted. The example below is when the checksum is EF. C500ef 10.2.13. Checking the calibration-related functions With CalfdtP displayed, press the ENTER key to display the settings of the calibration-related functions. NOTE: For contents and operation of the calibration-related functions, refer to “7.6. Calibration-Related Functions”. The settings can not be changed here. AD-4410 Page 64 10.3. Initialization Mode Initialization restores the contents of the FRAM to the default values. Three types of initialization are available as shown below. Initialization mode Display RAM initialization ini ra General functions initialization inifnc All data initialization iniall Description Initializes the contents of the RAM only. The zero and tare values will be restored to 0. Initializes the contents of the general functions stored in the FRAM. Initializes all the contents in the FRAM. The calibration-related data is also initialized. So, calibration is required before using the indicator again. 10.3.1. RAM initialization / General functions initialization Step 1 While pressing and holding the ENTER key, press the F key. fnc is displayed to indicate that the indicator will enter the general function mode. To go back to the weighing mode, press the ESC key. Step 2 While pressing and holding the ZERO key, press the ENTER key. 1Chc is displayed to indicate that the indicator will enter the check mode. Step 3 Press the ∧ or ∨ key to select the initialization mode ( ini ) and press the ENTER key. Step 4 Press the ∧ or ∨ key to select the item to be initialized and press the ENTER key. Step 5 All the status LEDs blink to prompt a confirmation. To initialize, press and hold the ENTER key for three seconds or more. After initialization, the indicator is reset and all the display segments are ON. And the indicator enters the weighing mode. To exit from this mode without performing initialization, press the ESC key. Page 65 AD-4410 10.3.2. All data initialization Step 1 Remove the CAL key cover and press the CAL key. Cal is displayed to indicate that the indicator enters the calibration mode. Step 2 Press the ENTER key to display Cal5et . The indicator enters the mode of calibration with an actual load. To go back to the weighing mode, press the ESC key. Step 3 Press the ∧ or ∨ key to select the all data initialization mode ( iniallLL ) and press the ENTER key. Step 4 All the status LEDs blink to prompt a confirmation. To initialize, press and hold the ENTER key for three seconds or more. After initialization, the indicator is reset and all the display segments are ON. The indicator then enters the weighing mode. To exit from this mode without performing initialization, press the ESC key. AD-4410 Page 66 10.4. Confirming the load cell connection with a digital multi meter The load cell connection can be checked easily using a digital multimeter. Figure 14 shows points to confirm the load cell connection. When a summing box is used, the same measurement must be performed, even internally. mV Fig.14 Method to confirm the load cell connection Items to be measured during confirmation of the load cell connection Measurement point EXC+ SEN+ ① ② EXC+ EXC- ① ④ SEN- EXC- ③ ④ SIG- EXC- ⑥ ④ SIG+ SIG- ⑤ ⑥ Item to be measured Judging the voltage Normally 100mV or less. However, it may Decrease in voltage on exceed 1V when an extremely long load the EXC+ side of the cell cable is used. For the 4-wire load cell cable configuration, it must be 0V. Load cell voltage excitation If it is between 4.75 to 5.25V, it is normal. Normally 100mV or less. However, it may Decrease in voltage on exceed 1V when an extremely long load the EXC- side of the cell cable is used. For the 4-wire load cell cable configuration, it must be 0V. Center point voltage of Should be about 2.5 V, approximately half the load cell of excitation voltage. Compare with theoretical values obtained Output voltage of the from the load cell rated capacit, actural load load cell and excitation voltage. Generally within 0 to 15mV. Page 67 AD-4410 When the AD-4410 does not operate properly, write the required items in the table below and contact your local A&D dealer. User’s usage circumstances Model number, rated, Item Description measurement value etc. When using the 4-wire configuration, Load cell connection □ 4-wire configuration it is necessary to connect a jumper between EXC+ and SEN+, and method □ 6-wire configuration between EXC- and SIG-. Model number of load cell used Rated capacity of the load [Unit ] cell Rated output of the load [mV/V] cell Allowable overload of the [%] load cell Number of load cells used Use of summing box Length of the extension Length from the indicator to the [m] summing box etc. cable Initial load on the weighing [Unit ] instrument Write all digits including decimal Minimum division of the [Unit ] figures. weighing instrument Example: 0.002kg Write all digits including decimal Weighing capacity of the [Unit ] figures. weighing instrument Example: 10.000kg Load cell output during From -0.1mV/V to rated [mV/V] sensitivity value initial load (when no load is applied) (With the first load) When loaded to capacity, the Load cell output when Load cell output at output value of the initial load + loaded to capacity (Or Load [Units ] the rated output value of the load when a mass of choice is cell. [mV/V] (Must be within allowable overload) loaded) Measurement point EXC+ SEN+ ① ② EXC+ ① SEN③ EXC④ EXC④ SIG⑥ SIG+ ⑤ EXC④ SIG⑥ AD-4410 Measurement contents Decrease in voltage on the EXC+ side of the load cell cable Load cell excitation voltage Decrease in voltage on the EXC- side of the load cell cable Load cell center point voltage Load cell output voltage Page 68 Measurement result [mV] [V] [mV] [V] [mV] 11. Setting List When performing maintenance, use the following list as a memorandum. When making inquiries about the product, inform your local A&D dealer of the user settings. 11.1. Basic Functions Function No. Parameter or Setting range Ffncf01 000000 to 111111 fncf02 0 to 6 fncf03 1 to 3 fncf04 0 to 13 fncf05 0 to 16 Description Disables key switch 0: Does not disable the key switch function. 1: Disables the key switch function. Assigns a function to the F key. 0: None 1: Manual print command 2: Hold 3: Alternate switch 4: Momentary switch 5: Clear the tare weight 6: Clear the zero value Displays update rate 1: 20 times/second 2: 10 times/second 3: 5 times/second Assigns a function to the display. 0: None 1: Zero tracking in progress 2: Alarm (Zero range setting error, over) 3: F key status 4: Near zero 5: HI output (Over upper limit value) 6: OK output (Within upper and lower limit values) 7: LO output (Under lower limit value) 8: User input 1 9: User input 2 10: User input 3 11: User output 1 12: User output 2 13: User output 3 Digital filter (cutoff frequency) 0: None 1: 11.0 Hz 2: 8.0 Hz 3: 5.6 Hz 4: 4.0 Hz 5: 2.8 Hz 6: 2.0 Hz 7: 1.4 Hz 8: 1.0 Hz Page 69 Default value User setting 000000 (binary) 0 1 0 8 AD-4410 fncf07 1 to 3 fncf08 -999999 to 999999 fncf09 1 to 2 Ffncf10 -999999 to 999999 Ffncf11 -999999 to 999999 Ffncf12 1 to 2 Ffncf13 1 to 2 AD-4410 9: 0.7 Hz 10: 0.5 Hz 11: 0.33 Hz 12: 0.25 Hz 13: 0.17 Hz 14: 0.13 Hz 15: 0.10 Hz 16: 0.07 Hz Hold 1: Normal hold 2: Peak hold 3: Averaging hold Near-zero value The decimal point position depends on the Calf02. Weight compared with near-zero 1: Gross weight 2: Net weight Upper limit value The decimal point position depends on the Calf02. Lower limit value The decimal point position depends on the Calf02. Weight compared with upper and lower limits 1: Gross weight 2: Net weight Output logic of the upper and lower limits 1: Positive logic 2: Negative logic Page 70 1 10 1 10 -10 1 1 11.2. Hold Function No. Parameter or Setting range LHldf01 0.00 to 9.99 LHldf02 0.00 to 9.99 LHldf03 0 to 2 LHldf04 0 to 1 LHldf05 0.00 to 9.99 LHldf06 0 to 999999 LHldf07 0 to 1 Description Averaging time Units in seconds. Averaging is not done for 0.00. Start wait time Units in seconds. Automatic start conditions 0: Do not use automatic start. 1: Above near-zero range and stable 2: Above near-zero range Release when control input falls 0: Do not release 1: Release Release after time limit Units in seconds. 0.00 will not cause a release. Release due to fluctuation The decimal point position depends on Calf02. 0 does not cause a release. Release within near-zero range 0: Cancellation has no function 1: Cancellation has function Page 71 Default value User setting 0.00 0.00 0 1 0.00 0 0 AD-4410 11.3. Control I/O Function No. Parameter or Setting range Function Li0 f01 0 to 13 Control input 1 Li0 f02 0 to 13 Control input 2 Li0 f03 0 to 13 Control input 3 Li0 f04 0 to 18 Control output 1 Li0 f05 0 to 18 Control output 2 Li0 f06 0 to 18 Control output 3 AD-4410 Description 0: None 1: Zero 2: Zero clear 3: Tare 4: Tare clear 5: Gross weight display 6: Net weight display 7: Changing between gross weight or net weight 8: Hold 9: Print command 10: F key 11: User input 1 12: User input 2 13: User input 3 0: None 1: Stabilization 2: While displaying gross weight 3: While displaying net weight 4: During tare 5: Near zero 6: During hold 7: Hold busy state 8: HI output (Over upper limit) 9: OK output (Within upper and lower limits) 10: LO output (Less than lower limit) 11: User output 1 12: User output 2 13: User output 3 14: While weighing (On) 15: While weighing (1 Hz) 16: While weighing (50 Hz) 17: Zero correction error 18: Tare error Page 72 Default value 1 3 7 3 4 5 User setting 11.4. RS-232C (Standard) / RS-232C (ch2) / RS-485 Function No. Parameter or Setting range Sr51f01 r52f01 1 to 5 Sr51f02 r52f02 1 to 4 Sr51f03 r52f03 1 to 7 Sr51f04 r52f04 0 to 2 Sr51f05 r52f05 1 to 2 Sr51f06 r52f06 0 to 99 Sr51f07 r52f07 1 to 2 Sr51f08 r52f08 0 to 1 Sr51f09 r52f09 0 to 4 Sr52f10 0 to 1 Description Output data 1: Display weighing value 2: Gross weight 3: Net weight 4: Tare weight 5: Gross weight / Net weight / Tare weight Data transfer mode 1: Stream (Every time display refreshes) 2: Auto print 3: Manual print 4: Jet stream (Every sampling) Baud rate 1: 600bps 2: 1200bps 3: 2400bps 4: 4800bps 5: 9600bps 6: 19200bps 7: 38400bps Number of data bits, parity 0: 8-bit data, no parity 1: 7-bit data, odd parity 2: 7-bit data, even parity Terminator 1: CR, LF 2: CR ID number 0: None 1 to 99 Default value User setting 1 1 3 2 1 0 Decimal point / Delimiter 1: Decimal point: dot / Delimiter: comma 2: Decimal point: comma / Delimiter: semicolon Time out 1: No limit 2: Approx. 1 second Delay when outputting repeatedly 0: No delay 1: Approx. 0.5 second 2: Approx. 1.0 second 3: Approx. 1.5 second 4: Approx. 2.0 second Internal terminator resistance 0: None 1: Available (120Ω) Available only when RS-485 is used Page 73 1 1 0 0 AD-4410 11.5. Standard Serial Output Function No. Parameter or Setting range Cl f01 1 to 5 Cl f02 1 to 3 Cl f03 1 to 2 Cl f04 0 to 99 AD-4410 Description Output data 1: Displayed weight 2: Gross weight 3: Net weight 4: Tare weight 5: Gross/Net/Tare Data transfer mode 1: Stream 2: Auto printing 3: Manual printing Baud rate 1: 600 bps 2: 2400 bps ID number 0: Does not add an ID number. 1: ⏐ 99: Page 74 Default value 1 1 2 0 User setting 11.6. Linearity-Related Function No. Parameter or Setting range Llnrf01 0 to 5 Llnrf02 -7.00000 to 7.00000 Llnrf03 0 to 999999 Llnrf04 0.00000 to 9.99999 Llnrf05 0 to 999999 Llnrf06 0.00000 to 9.99999 Llnrf07 0 to 999999 Llnrf08 0.00000 to 9.99999 Llnrf09 0 to 999999 Llnrf10 0.00000 to 9.99999 Description Number of input points Linearity zero input is included in this. Linearity zero Units in mV/V. Linearity 1 mass value The decimal point position depends on the Calf02. Linearity 1 span Units in mV/V. Linearity 2 mass value The decimal point position depends on the Calf02. Linearity 2 span Units in mV/V. Linearity 3 mass value The decimal point position depends on the Calf02. Linearity 3 span Units in mV/V. Linearity 4 mass value The decimal point position depends on the Calf02. Linearity 4 span Units in mV/V. Page 75 Default value User setting 0 0.00000 0 0.00000 0 0.00000 0 0.00000 0 0.00000 AD-4410 11.7. Calibration-Related Function No. Parameter or Setting range Description Default value Calf01 0 to 4 Unit of the weight value 0: None 1: g 2: kg 3: t 4: lb (USA version) 2 Calf02 0 to 5 Decimal point position of the weight value: 10n 0 Minimum division (d) of the weight value 1: 1 2: 2 Calf03 3: 5 1 to 6 4: 10 5: 20 6: 50 Weighing capacity of the weighing instrument Calf04 The decimal point position is the same as 1 to 999999 the setting of Calf02. Range to enable zero adjustment by the ZERO key Calf05 Expressed in percent of the weighing 0 to 100 capacity with the calibration zero point as the center Calf06 Zero tracking time (Unit: second) When 0.0, zero tracking will not be performed. 0.0 to 5.0 Calf07 0.0 to 9.9 Calf08 0.0 to 9.9 Calf09 0 to 9 Calf10 0 to 1 Calf11 0 to 1 Calf12 0 to 1 AD-4410 Zero tracking band (Unit: 0.1 d) When 0.0, zero tracking will not be performed. Stability detection time (Unit: second) When 0.0, stability detection will not be performed. Stability detection band (Unit: d) When 0, stability detection will not be performed. Tare and zero adjustment when the weight value is unstable. 0: Disables both functions. 1: Enables both functions. Tare when the gross weight is negative. 0: Disables tare. 1: Enables tare. Standard serial output if the weight value overflows and is unstable. 0: Disables output. 1: Enables output. Page 76 1 70000 2 0.0 0.0 1.0 2 1 1 1 User setting Function No. Parameter or Setting range Calf13 1 to 3 Calf14 1 to 2 Calf15 0 to 1 Calf16 0 to 1 Calf17 -7.00000 to 7.00000 Calf18 0.00001 to 9.99999 Calf19 1 to 999999 Calf20 0 to 1 Calf21 0 to 1 Calf22 1 to 2 Calf23 1 to 2 Calf24 1 to 6 Description To judge when the negative gross weight is exceeded. A/D negative exceeded or, 1: Gross weight < -999999 2: Gross weight < negative weighing capacity 3: Gross weight < -19 d To judge when the negative net weight is exceeded. Gross weight negative exceeded or, 1: Net weight < -999999 2: Net weight < negative weighing capacity Select whether or not to clear the zero value. 0: Disables. 1: Enables. Select whether or not to perform zero upon power-ON. 0: Disables. 1: Enables. Default value 1 1 1 0 Input voltage from a load cell at zero. X.XXXXX mV/V 0.00000 Input voltage from a load cell at span X.XXXXX mV/V 3.20000 The value of the calibration weight corresponding to the span input voltage Select whether or not to output when the gross weight is negative. 0: Enables output. 1: Disables output. Select whether or not to restrict network-related communication. 0: Disables restriction. 1: Enables restriction. Second header for serial output 1: GS / NT / TR 2: G_ / N_ / T_ ( _ is space, ASCII 20h) Number of unit digits for serial output 1: 2 digits 2: 3 digits Scale interval of dual range 1: 1 2: 2 3: 5 4: 10 5: 20 6: 50 Page 77 User setting 32000 0 0 1 1 1 AD-4410 Calf25 0 to 999999 Calf26 9.75000 to 9.85000 Calf27 9.75000 to 9.85000 Calf28 0 to 1 Dual range border 0 Gravity acceleration in the location of calibration Units in m/s2. Gravity acceleration in the location of use Units in m/s2. Disabling averaging hold 0: Enabled 1: Disabled 9.80000 9.80000 0 12. External Dimensions 144 72 ZERO TARE Net/B/G NET GROSS ZERO STABLE GROSS NET HOLD ON/OFF ESC ENTER (6) 10 108.5 68+0.7 0 138+10 Panel cutout dimensions Unit: mm Fig.15 External dimensions AD-4410 Page 78 When installing the AD-4410 to the optional stand (AD4410-11) (181) 144 10 ZERO TARE 72 Net/B/G NET GROSS ZERO STABLE GROSS NET HOLD 123 ON/OFF ESC 2- ENTER 5 48 4-6x12 80 99.6 70 116 152.2 Unit: mm Fig.16 External dimensions (when installing the AD4410-11) Page 79 AD-4410 AD-4410 Page 80