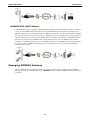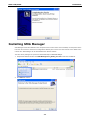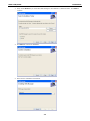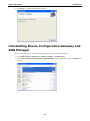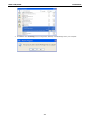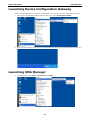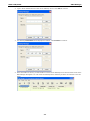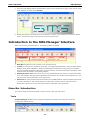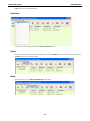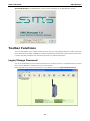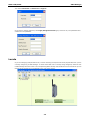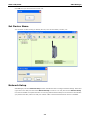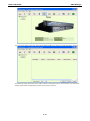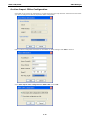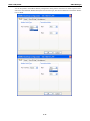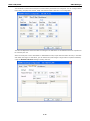
1
SMG-1100/6100 User’s Manual First Edition, January 2011 www.moxa.com/product © 2011 Moxa Inc. All rights reserved. Reproduction without permission is prohibited. SMG-1100/6100 User’s Manual The software described in this manual is furnished under a license agreement and may be used only in accordance with the terms of that agreement. Copyright Notice Copyright ©2011 Moxa Inc. All rights reserved. Reproduction without permission is prohibited. Trademarks The MOXA logo is a registered trademark of Moxa Inc. All other trademarks or registered marks in this manual belong to their respective manufacturers. Disclaimer Information in this document is subject to change without notice and does not represent a commitment on the part of Moxa. Moxa provides this document as is, without warranty of any kind, either expressed or implied, including, but not limited to, its particular purpose. Moxa reserves the right to make improvements and/or changes to this manual, or to the products and/or the programs described in this manual, at any time. Information provided in this manual is intended to be accurate and reliable. However, Moxa assumes no responsibility for its use, or for any infringements on the rights of third parties that may result from its use. This product might include unintentional technical or typographical errors. Changes are periodically made to the information herein to correct such errors, and these changes are incorporated into new editions of the publication. Technical Support Contact Information www.moxa.com/support Moxa Americas Moxa China (Shanghai office) Toll-free: 1-888-669-2872 Toll-free: 800-820-5036 Tel: +1-714-528-6777 Tel: +86-21-5258-9955 Fax: +1-714-528-6778 Fax: +86-21-5258-5505 Moxa Europe Moxa Asia-Pacific Tel: +49-89-3 70 03 99-0 Tel: +886-2-8919-1230 Fax: +49-89-3 70 03 99-99 Fax: +886-2-8919-1231 Table of Contents 1. Introduction ...................................................................................................................................... 1-1 Overview ........................................................................................................................................... 1-2 Introduction to IPSec VPN Connectivity ................................................................................................. 1-2 IPSec VPN Requirements .............................................................................................................. 1-2 Typical IPSec VPN Scheme ........................................................................................................... 1-2 Planning IPSec VPNs .................................................................................................................... 1-2 Configuring IPSec Tunnels ............................................................................................................ 1-3 Introduction to MODBUS Gateway ........................................................................................................ 1-3 MODBUS Gateway Applications ..................................................................................................... 1-3 Managing MODBUS Gateway......................................................................................................... 1-4 2. Installation ....................................................................................................................................... 2-1 Installation ........................................................................................................................................ 2-2 Deploying the SMG-1100.............................................................................................................. 2-2 Installing Device Configuration Gateway ................................................................................................ 2-2 Installing SMG Manager ....................................................................................................................... 2-4 Uninstalling Device Configuration Gateway and SMG Manager .................................................................. 2-6 3. SMG Manager .................................................................................................................................... 3-1 Launching Device Configuration Gateway ............................................................................................... 3-2 Launching SMG Manager ..................................................................................................................... 3-2 Connecting to Device Configuration Gateway ......................................................................................... 3-3 Introduction to the SMG Manager Interface ............................................................................................ 3-5 Menu Bar Introduction ................................................................................................................. 3-5 Toolbar Functions ............................................................................................................................... 3-7 Login/Change Password ............................................................................................................... 3-7 Locate ....................................................................................................................................... 3-8 Set Device Name ......................................................................................................................... 3-9 Network Setup ............................................................................................................................ 3-9 GPRS ....................................................................................................................................... 3-11 VPN(IPSec)............................................................................................................................... 3-13 Modbus .................................................................................................................................... 3-20 Import/Export Configuration ....................................................................................................... 3-24 Apply ....................................................................................................................................... 3-25 Monitor Connections .................................................................................................................. 3-25 Upgrading the Firmware ............................................................................................................. 3-26 Reboot ..................................................................................................................................... 3-28 Disconnecting Device Configuration Gateway ................................................................................ 3-28 1 1. Introduction Thank you for using Moxa’s SMG-6100 IPSec Gateway and SMG-1100 MODBUS Gateway. These products help you easily establish the secured network communication with the IPSec protection and the protocol conversion between MODBUS/Serial and MODBUS/TCP. In this manual, you will learn how to configure and monitor the SMG-6100 and the SMG-1100 for your network communication. The following topics are covered in this chapter: Overview Introduction to IPSec VPN Connectivity IPSec VPN Requirements Typical IPSec VPN Scheme Planning IPSec VPNs Configuring IPSec Tunnels Introduction to MODBUS Gateway MODBUS Gateway Applications MODBUS TCP Master MODBUS RTU/ASCII Master Managing MODBUS Gateway SMG-1100/6100 Introduction Overview The SMG-6100 can be used as a smart gateway with sophisticated Machine-to-Machine solutions to help construct a tunnel server (IPSec) and bi-directional IP communications. When used with Moxa’s SMG-1100, the SMG-6100 can serve as a secure networking host over IPSec to back-end host computers and MODBUS TCP Master/Slave devices. In addition, the SMG-1100 features 2 software selectable RS-232/422/485 ports, 1 Ethernet port, and quad-band GPRS/EDGE 900/1800/850/1900 MHz for cellular communication. The SMG-1100 series provides a sophisticated wireless M2M solution for distributed MODBUS devices. Implemented with protocol conversion functionality, the SMG-1100 can serve both serial masters and slaves and the built-in IPSec function guarantees that data transmission is encrypted in a wireless connectivity environment. Introduction to IPSec VPN Connectivity This section describes how to use and manage IPSec VPN on the SMG-6100. IPSec VPN Requirements The following requirements must be met to use IPSec VPN on the SMG-6100: You must have a fixed public IP address accessible to the Internet. You must have a computer running Device Configuration Gateway (DCG) and SMG Manager to set up and monitor IPSec VPN for the SMG-6100. Typical IPSec VPN Scheme An SMG-6100 acting as an IPSec VPN gateway can create multiple IPSec VPN tunnels between its VPN subnet interface and remote mobile SMGs via the Internet. An IPSec VPN tunnel is created between the remote SMG-1100s and the SMG-6100. Computers on the same VPN subnet as the SMG-6100 can securely and mutually communicate with remote mobile SMGs via IPSec VPN tunnels. Planning IPSec VPNs The IPSec tunnel provides mobile operators with an independent solution that considers remote mobile SMGs part of the internal intranet, allowing several remote mobile SMGs to be implemented on the same subnet. In the example illustrated below, the SMG-1100 is assigned the IP address of 192.168.30.95 during LAN 1 port network configuration. After it is deployed to the remote site, its IP address does not need to be changed. This is convenient as it allows administrators to configure programs such as SCADA and remote device monitoring at the local field site with a fixed IP address. 1-2 SMG-1100/6100 Introduction Configuring IPSec Tunnels To set up IPSec tunnels between the SMG-6100 and the remote mobile SMG (the SMG-1100), refer to the VPN(IPSec) section in the SMG Manager chapter of this manual. We strongly recommend that IPSec tunnels be configured from the SMG-6100 and deployed to the SMG-1100 at the same time via SMG Managerat the local site. When finished, the SMG-1100 can be moved to the remote field site. Introduction to MODBUS Gateway The Moxa SMG-1100 is a secure mobile MODBUS gateway that provides IPSec tunnels between itself and the peer IPSec Gateway SMG-6100 via the Internet while transferring MODBUS messages. It features two RS-232/422/485 serial ports, one 10/100 Mbps Ethernet port, and a GPRS/EDGE wireless module for mobile connections. MODBUS Gateway Applications MODBUS TCP Master In the MODBUS Gateway configuration for a MODBUS TCP master and MODBUS RTU/ASCII slave, programs running on the MODBUS TCP master can securely send MODBUS TCP request messages via the Internet to the MODBUS TCP slave. The MODBUS Gateway then sequentially converts MODBUS TCP request messages to MODBUS RTU/ASCII messages and sends the request messages to connected MODBUS RTU/ASCII slave devices through the serial port, based on specified slave ID values in the MODBUS request messages and settings in the MODBUS Gateway. When the slave devices receive MODBUS RTU/ASCII request messages, they reply with MODBUS RTU/ASCII response messages to the MODBUS Gateway. Once the MODBUS Gateway receives MODBUS RTU/ASCII response messages, they are converted to MODBUS TCP response messages and sent to the corresponding programs of the MODBUS TCP master. 1-3 SMG-1100/6100 Introduction MODBUS RTU/ASCII Master In the MODBUS Gateway configuration for a MODBUS RTU/ASCII master and MODBUS TCP slave, the software running on each MODBUS RTU/ASCII master device sends MODBUS RTU/ASCII request messages to the MODBUS Gateway via its connected serial port. The MODBUS Gateway then converts the messages to MODBUS TCP request messages and securely sends them to MODBUS TCP slaves in MODBUS TCP slave devices via the Internet, based on slave ID values in the MODBUS request messages and settings in the MODBUS Gateway. After the slave devices receive MODBUS TCP request messages, they reply with MODBUS TCP response messages to the MODBUS Gateway. Once the MODBUS Gateway receives MODBUS TCP response messages, they are converted to MODBUS RTU/ASCII response messages and sent to the corresponding MODBUS RTU/ASCII master device. Managing MODBUS Gateway After the MODBUS Gateway application for each serial port is determined, the configuration of MODBUS Gateway can be set up via SMG Manager. Refer to MODBUS section for detailed MODBUS Gateway configuration instructions. 1-4 2 2. The following topics are covered in this chapter: Installation Deploying the SMG-1100 Installing Device Configuration Gateway Installing SMG Manager Uninstalling Device Configuration Gateway and SMG Manager Installation SMG-1100/6100 Installation Installation Deploying the SMG-1100 You must use SMG Manager to configure the SMG-1100. In the example shown below, SMG Manager, Device Configuration Gateway, and the SMG-6100 are all on subnet 192.168.3.xxx. Each SMG-1100 also has an intranet IP address in subnet 192.168.30.xxx, and this IP address is used when the SMG-1100 is deployed at the remote site. The next step in the implementation process is to insert the SIM card, Ethernet cable and power cable. After the SMG-1100 is accessible via the LAN, SMG-1100 should connect to Device Configuration Gateway automatically. Finally, use SMG Manager to configure the SMG-1100. A step-by-step procedure is outlined below. Client IP: Wan IP: Client IP: 1. Refer to the MODBUS section in the SMG Manager chapter of this manual to set up the MODBUS Gateway. In addition, see Step 4 below to manage MODBUS Gateways on an SMG-1100. 2. Refer to the VPN(IPSec) section in the SMG Manager chatper to create an IPSec tunnel between an SMG-6100 and SMG-1100. 3. When deploying the SMG-1100, change the IP address of the LAN port to a static private IP address, without default gateway. In the example shown above, 192.168.30.95 is used for the SMG-1100. 4. Reboot the SMG-1100 to test the configuration. 5. Power off the SMG-1100 and deploy it to the remote site. To use SMG Manager to remotely monitor and manage Moxa’s SMGs, you need to install two software programs: 1. Device Configuration Gateway: This program must be installed on the computer(s) used as the Device Configuration Gateway. It serves as a portal between two programs, allowing them to share information by communicating between protocols on the same computer or between computers. Device Configuration Gateway can be used to connect to many SMGs at remote sites, so that a centralized management architecture can be established. 2. SMG Manager: This program is installed on the computer, usually a PC or a laptop, in the control center. It allows users to connect to the Device Configuration Gateway to monitor and manage the remote SMGs. Installing Device Configuration Gateway Device Configuration Gateway should be installed on the computers that you will use as the Device Configuration Gateway that the remote SMGs connect to. Device Configuration Gateway can be downloaded from Moxa's website. The files will be packaged as zip files. Follow these steps to install Device Configuration Gateway. 1. Unzip the file and double click DCG_Setup_Ver1.0_Build_xxx.exe to start the installation procedure. 2-2 SMG-1100/6100 Installation 2. Click Next to continue. 3. Next, select Browse if you would like DCG to be installed in a different folder. Click Next to continue. 4. Click Finish to complete the installation procedure. 2-3 SMG-1100/6100 Installation Installing SMG Manager SMG Manager should be installed on the computers at the control center. Once installed, the computers at the local site can connect to the Device Configuration Gateway and connect over the internet to the SMGs at the remote site. SMG Manager can be downloaded from Moxa’s website. The files will be packaged in zip format. Follow these steps to install SMG Manager. 1. Unzip the files and then double click SMG Manager V1.0_Build_xxx.msi to start the installation. 2. Click Next to continue. 2-4 SMG-1100/6100 Installation 3. Next, select Browse if you would like SMG Manager to be installed in a different folder. Click Next to continue. 4. Click Next to confirm the installation. 5. Wait until the installation has finished. 2-5 SMG-1100/6100 Installation 6. Click Close to complete the installation procedure. Uninstalling Device Configuration Gateway and SMG Manager Follow these instructions to uninstall Device Configuration Gateway and SMG Manager. 1. Select Add or Remove Programs from Start Settings Control Panel. 2. Select Device Configuration Gateway and SMG Manager from the program list, and click Remove to continue. 2-6 SMG-1100/6100 Installation 3. Click Yes to start removing Device Configuration Gateway or SMG Manager from your computer. 2-7 3 3. SMG Manager This chapter describes how to use SMG Manager to monitor and configure SMG-6100 and SMG-1100 devices at remote sites over the Internet. The following topics are covered in this chapter: Launching Device Configuration Gateway Launching SMG Manager Connecting to Device Configuration Gateway Introduction to the SMG Manager Interface Menu Bar Introduction Toolbar Functions Login/Change Password Locate Set Device Name Network Setup GPRS VPN(IPSec) Modbus Import/Export Configuration Apply Monitor Connections Upgrading the Firmware Reboot Disconnecting Device Configuration Gateway SMG-1100/6100 SMG Manager Launching Device Configuration Gateway Before using SMG Manager on your PC to manage SMGs, you must first run Device Configuration Gateway. 1. Select Device Configuration Gateway from the Start menu under All ProgramsMOXA. 2. The Device Configuration Gateway will run in the background; an icon will be displayed in the system tray. Launching SMG Manager 1. Click SMG Manager from Start All Programs MOXA. 3-2 SMG-1100/6100 SMG Manager 2. Once launched, the SMG Manager interface will appear. Connecting to Device Configuration Gateway 1. Choose Gateway Manager from Tools. 3-3 SMG-1100/6100 SMG Manager 2. Type in the IP address and the name of the Gateway Server. Click Add to continue. 3. The Gateway information will be displayed as follows. Click Connect to continue. 4. If the information is correct, you will be able to connect to the Gateway Server and the main screen of the SMG Manager will appear. You can check the Gateway Server that has just been connected to in the left panel. 3-4 SMG-1100/6100 SMG Manager 5. If you have left Gateway Server and would like to connect to the existing server again, right-click the name of the Gateway, and then select Connect. 6. Please note that only one Gateway Server is allowed to connect. If you would like to connect to another server, disconnect the first server and then connect the second one. Introduction to the SMG Manager Interface When you connect to a Gateway Server, the following screen will appear. 1. Menu Bar: Includes the Tools, Function, View, and Help menus. 2. Toolbar: The icons shown, listed from left to right, are Login/Change Password, Locate, Set Device Name, Network Setup, GPRS, VPN(IPSec), Modbus, Import/Export Configuration, Apply, Monitor Connections, Firmware Upgrade and Reboot. Note that if right-click a device, a list of function options will appear. Each function will be introduced in the following sections. 3. Gateway & Device Tree: In this area, you can view the Gateway Server and the currently active SMGs under this Gateway. Both gateway and IP address can be shown here. Double-click the Gateway icon, you can view the all device information on the right frame. 4. Device List: This area contains all of the information on the SMGs attached under the Gateway Service that you have connected to. This includes device IP, model name, firmware version, and device name. Double-click a device icon to view information about a single SMG in the right frame. Menu Bar Introduction This section briefly introduces the options under the Tools, View, and Help menus. Tools Gateway Manager: Enables users to manage the gateway information and connect to the Device Configuration Gateway Server. 3-5 SMG-1100/6100 SMG Manager Exit: Click this to quit SMG Manager. Function Each function will be introduced in the Toolbar Functions section. View Allows you to decide if the toolbar will be displayed. Check the Toolbar option to show the toolbar; uncheck the Toolbar option to remove the toolbar. Help Allows users to view the About SMG Manager information. 3-6 SMG-1100/6100 SMG Manager About SMG Manager: The SMG Manager version number will appear in the SMG Manager window. Toolbar Functions The icons that appear on the toolbar, listed from left to right, are Login/Change Password, Locate, Set Device Name, Network Setup, GPRS, VPN(IPSec), Modbus, Import/Export Configuration, Apply, Monitor Connections, Firmware Upgrade and Reboot. See the following sections for detailed descriptions. Login/Change Password You can set a password to prevent unauthorized users from configuring the unit. The password will be required when anyone attempts to configure the unit over the network. Select the SMG unit on which you would like to set a password and click Login/Change Password. 3-7 SMG-1100/6100 SMG Manager The default Username and Password is smguser. If you want to change password, click Login/Change Password again, and fill in old, new passwords and confirm the new password. Locate If you are managing multiple SMG units, it can be confusing to keep track of which physical SMG unit you are currently configuring in SMG Manager. To check which SMG unit is currently being configured, select the unit in SMG Manager and click Locate. The corresponding SMG’s “Ready” LED will blink for a few seconds so you can identify which physical unit corresponds to the unit on the screen. 3-8 SMG-1100/6100 SMG Manager Click OK once you have found the correct unit. Set Device Name You can enter a name to help you identify the unit, such as the location, function, etc. Network Setup SMG Manager provides a Network Setup function that allows users to configure network settings. Select and right-click on the SMG, and then select Network Setup to continue. You may also use the Network Setup icon from the toolbar to complete the task. You can only perform Network Setup on one device at a time. Before you perform this task, make sure that your network cable is connected and Internet service is available. 3-9 SMG-1100/6100 SMG Manager This function configures the IP address and DNS settings. Click the IP tab to select the interface, and enter the related IP information, including the interface name, DHCP or Fixed IP, IP address, subnet mask, and default gateway. If there is more than one network interface, select one from the Interface Name option menu to continue. 3-10 SMG-1100/6100 SMG Manager GPRS 3-11 SMG-1100/6100 SMG Manager Before using the GPRS, the APN (Access Point Name), Username (user ID account) and Password (user password) must be filled in for the modem initialization command. Connect rule: Select Connect at boot to configure the SMG-1100 to automatically connect to GPRS upon boot up, or select none if not using a GPRS connection. Reconnect rule: Select Periodically Reconnect to configure the SMG-1100 to automatically reconnect to GPRS if disconnected. Reconnect interval: If the reconnect rule is set as Periodically Reconnect, you can designate the reconnect interval time (1 to 3600 seconds). Status: Shows the current SIM card and PIN lock status. Connection Test: Click this to check your settings. The SMG-1100 will try to establish a GPRS connection and then disconnect. 3-12 SMG-1100/6100 SMG Manager VPN(IPSec) This section introduces how to configure the SMG-6100 as the IPSec Gateway.It also illustrates how to configure the SMG-1100 to work with the SMG-6100 via IPSec security on the Internet for secure data transmission and remote device monitoring. Client IP: Wan IP: Client IP: Select the SMG-6100 on the device list to check the information of the device and click the VPN(IPSec) icon. 3-13 SMG-1100/6100 SMG Manager You can see the IPSec tunnel list. Select which WAN interface you wish to use and click Add to continue. The following section describes how to make a offline configuration file for future/remote use, and how to directly import IPSec configuration into the client over the network. 3-14 SMG-1100/6100 SMG Manager Off-Line Import IPSec Configuration Tunnel Name: Select the Off-Line Client and click Next to continue. Tunnel Name: Provide a name for this IPSec tunnel. In the screenshot below the tunnel is named T1. Server/Client Tunnel ID: Provide the ID that will be used in authentication. This ID must be in the form of a domain name preceded by @ or an IP address. For example, you may use @S1 to indicate this is the server of the IPSec tunnel and use @C1 to indicate this is the client of the IPSec tunnel. Server Subnet: Identify the private subnet behind the SMG-6100. Use the format subnet network/subnet mask. Client IP: This option is used to make the IPSec gateway itself use its internal IP. This IP is the local LAN IP of the SMG-1100. RSA Key Length: Select a RSA key length from the drop-down list. 3-15 SMG-1100/6100 SMG Manager Click OK to save the IPSec configuration. Select a local file to save. 3-16 SMG-1100/6100 SMG Manager In SMG-6100 page, you can see all IPSec configuration that you have set. Take this IPSec configuration file to corresponding SMG-1100s, and click Import to load the IPSec tunnel info. Connect Rule: whenever the SMG-1100 have IPSec tunnel info, you can select its activity mode. Select None to manually connect to the IPSec tunnel by yourself; select Connect follows GPRS to automatically connect to the IPSec tunnel once a GPRS connection is established. 3-17 SMG-1100/6100 SMG Manager 3-18 SMG-1100/6100 SMG Manager On-Line Import IPSec Configuration If the SMG-1100 is online for configuration, you will see the IP in the drop-down list. Select the IP of the client you wish to configure and directly import the IPSec configuration. Refer to off-line configuration directions for information on IPSec settings. Click Add to continue. Select Auto import client configuration to SMG-1100 and click OK. 3-19 SMG-1100/6100 SMG Manager Once you see the Import VPN configuration successfully popup message, the IPSec tunnel info has been configured in both the SMG-6100 and SMG-1100. Modbus In the device list, select the SMG-1100, then click the Modbus icon. 3-20 SMG-1100/6100 SMG Manager You will be guided to the Modbus Gateway Configuration dialog. Select either Slave or Master type for Port 1 and Port 2. Note that both Modbus serial ports use the same type, but can have different Transmission Modes: RTU or ASCII. 3-21 SMG-1100/6100 SMG Manager The Serial tab is where each serial port’s communication parameters are configured. You can configure Baud Rate, Parity, Stop Bit, Flow Control, FIFO, and Interface Mode. Data bits is not configurable. The Slave ID Map tab is where slave IDs are managed. The definitions on this tab determine how requests will be routed by the unit. When the serial port is set to RTU Master or ASCII Master mode, simple select the Slave ID entry in the table and modify the range. For TCP slaves, you can add an entry that assigns a range of IDs to a specific IP address, using the Remote TCP Slave settings including TCP Port. 3-22 SMG-1100/6100 SMG Manager When the serial port is set to RTU Slave or ASCII Slave mode, simple select the Slave ID entry in the table and modify the range. For TCP slaves, you can add an entry that assigns a range of Slave IDs from any IP address access. On the Miscellaneous page, all fields are set independently for each serial port. The Response Time-out field is used to configure how long the gateway will wait for a response from a Modbus ASCII or RTU slave. Please refer to your device manufacturer’s documentation to manually set the response time-out. The Gateway Exception is used to determine whether the SMG-1100 should create an exception and send to Master or just ignore it when a response timeout occurs. The Slave Exception is used to determine whether the SMG-1100 should pass through or drop any exceptions that come from serial ports. 3-23 SMG-1100/6100 SMG Manager Import/Export Configuration To import or export the configuration of an SMG-6100/1100, click Import/Export Configuration, and then follow the onscreen instructions to upload/download the configuration file. 3-24 SMG-1100/6100 SMG Manager Apply After configuring the SMG-6100/1100, remember to click Apply to save the information to the host system registry. Settings or changes to the SMG-6100/1100 will not become effective until they are applied. Monitor Connections Click Monitor Connections to check the status of GPRS, VPN and Modbus connections. 3-25 SMG-1100/6100 SMG Manager Upgrading the Firmware If you would like to upgrade the firmware on one device, first click the check box next to the SMG, and then right-click it and select Firmware Upgrade. You may also use the Firmware Upgrade icon in the toolbar. If you would like to upgrade the firmware on two or more devices, make sure that the devices have been selected, and then click the Firmware Upgrade icon to continue. 3-26 SMG-1100/6100 SMG Manager In the Open window, choose the firmware file, and then click Open to continue. If you would like to upgrade the firmware on multiple SMGs, make sure that they are of the same model type and that you have the correct firmware file. Using the incorrect firmware may cause the system to crash. Select additional devices from the Non-selected device(s) list and use the arrow buttons to move them to the Selected device(s) list. When ready, click Upgrade to continue. 3-27 SMG-1100/6100 SMG Manager Please note that when firmware upload is complete, it will still take several minutes for the SMG to update the new information. All the functions may not work during this period. Reboot SMG Manager provides a Reboot function that allows users to reboot the device. Select and right-click the SMG and then select Reboot to continue. Note that you can only use the Reboot function on one SMG at a time. Make sure you want to reboot the SMG and then click OK to finish. Disconnecting Device Configuration Gateway To disconnect Device Configuration Gateway, right-click Gateway and select Disconnect. 3-28 SMG-1100/6100 SMG Manager 3-29