1
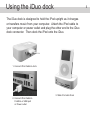
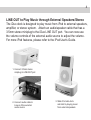
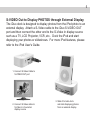
TM
Atech Flash Technology, Inc.
iDuo
TM
User's Guide
Guide de l'utilisateur
Congratulations
Congratulations on your purchase of the iDuo dock/media reader.
The iDuo is a docking station for your iPod™ and also a media reader
for your Mac or PC computer. This guide will explain the features and
specifications of your new iDuo, as well as the installation in
a few simple steps. Please retain this guide for further reference.
Convenient features like fully Plug-and-Play make it easy to setup
iDuo with your computer.
Operating System Requirements:
Mac OS X v10.1.2+
Mac OS 9.2.+ (driver installation required)
Windows ME, XP
Windows 98SE, 2000 (driver installation required)
Computer Requirements:
Mac/PC computer with open USB port 2.0/1.1
If you have any questions regarding with the Atech product,
please contact:
Technical Support :
Toll free number (USA only) 1-866-85-ATECH (1-866-852-8324)
[email protected]
www.atechflash.com
1
Package Contents
iDuo
External USB 2.0 Cable x 1 - Connects iDuo to open USB port in your computer.
To Reader unit connector
To open USB port in your computer
2
Using the iDuo dock
3
The iDuo dock is designed to hold the iPod upright as it charges
or transfers music from your computer. Attach the iPod cable to
your computer or power outlet and plug the other end to the iDuo
dock connector. Then dock the iPod onto the iDuo.
1. Connect iPod Cable to dock
2. Connect iPod Cable to
FireWire or USB port
or Power outlet
3. Slide iPod onto Dock
4
LINE-OUT to Play Music through External Speakers/Stereo
The iDuo dock is designed to play music from iPod to external speakers,
amplifier, or stereo system. Attach an audio/speaker cable that has a
3.5mm stereo miniplug to the iDuo LINE OUT port. You can now use
the volume controls of the external audio source to adjust the volume.
For more iPod features, please refer to the iPod User's Guide.
1. Connect 3.5mm stereo
miniplug to LINE OUT port
2. Connect audio cable to
Line-in of the external
audio source
3. Slide iPod onto dock
and start to playing music
from external speakers
5
S-VIDEO Out to Display PHOTOS through External Display
The iDuo dock is designed to display photos from the iPod photo to an
external display. Attach a S-Video cable to the iDuo S-VIDEO OUT
port and then connect the other end to the S-Video In display source
such as a TV, LCD Projector, VCR, etc.. Dock the iPod and start
displaying your photos or slideshows. For more iPod features, please
refer to the iPod User's Guide.
1. Connect S-Video Cable to
S-VIDEO OUT port
2. Connect S-Video cable to
S-Video In of external
display source
3. Slide iPod onto dock
and start displaying photos
from an external display
Using the iDuo media reader
The iDuo USB media reader is designed to transfer data between
media cards your computer(does not transfer data directly to iPod).
Attach the USB cable to READER port of the iDuo and then plug the
other end to the USB port of your computer. Insert the media card
into the slot and wait for your system to recognize the card. Once
recognized, you can open the file and begin transferring data.
** Operating Systems running Mac 9.2.+ and Windows 98SE/2000
will need to install the USB Driver setup CD.**
1. Connect USB cable to
READER port
2. Connect USB Cable to
USB port of Computer
3. Insert Media Card into
designated card slot
6
Installing Driver CD
This step is required for Mac 9.2.+ and Windows 98SE / 2000 only.
If you have Mac OS X V10.1.2+ or Windows ME / XP, please skip this
step and proceed ahead.
(1) Close all applications that are running, including applications
running in the background.
(2) Insert AFT Setup CD into CD-ROM drive and locate setup.exe file
(3) Double click on setup.exe will lead you into setup program.
(4) Follow setup instruction on your screen.
(5) After driver files are copied into your system, setup program will
prompt you to restart your computer. Please do so.
(6) Once computer is restarted, you can proceed to next step.
AFT Custom Icons (for Windows XP/ME/2000/98SE)
To use the AFT Custom Icons, you need to do the previous driver
installation. An example: Insert Memory Card and click on the Icon
that matches your memory card.
7
8
Using Media Reader with Mac
Insert media card into designated card slot. Your Mac OS will
display removable disk icons labeled 'no name' representing the
media slot. Then you can open the files and begin read/write
data to your media card.
Before removing your media card from the reader, you must first
EJECT the selected media card.
Using Media Reader with Windows
Insert media card into designated card slot. Your Windows OS will
display 3 removable disk icons representing each type of media slot.
Double-click the selected media icon to open the files and begin
read/write data to your media card.
Before removing your media card from the reader, you must first
EJECT the selected media card.
Specifications
Dimension (W x H x D):
3.93 inch x 1.18 inch x 2.36 inch / 100 mm x 30 mm x 60 mm
Power Requirement:
5V DC, 500mA (USB bus power)
Supported media format:
Compact Flash™ Type I
Compact Flash™ Type II
MicroDrive™
Memory Stick™
MagicGate Memory Stick™**
Memory Stick Pro™
Secure Digital™ Card
xD-Picture Card™***
Smart Media™ Card
Operation Current:
Suspend Current:
<200mA
<500uA
Transfer rate:
Up to 480 Mbps (via USB 2.0)
Up to 12 Mbps (via USB 1.1)
Supported O/S:
Mac OS X 1.2+
Mac OS 9.2+ (driver required)
Windows XP, ME
Windows 98 SE , 2000 (driver required)
Specifications are subject to change without further notice.
Apple and the Apple logo, iPod and the iPod logo are trademarks of Apple Computer, Inc.
All trademarks, trade names and copyrights are properties of their respective owners.
*Does not operate with MagicGate Memory Stick in secure mode.
**xD-Picture Card™ is a trademark owned by Fuji Photo Film Co., Ltd.
9
Limited Warranty
10
Atech Flash Technology, Inc. ("AFT"), warrants to the original end user ("Customer")
that under normal intended use AFT memory flash card readers will be free from defects
in materials and workmanship for one (1) year from the date of purchase. During warranty
period, AFT shall either repair, or replace defective product. AFT shall not be liable for
any losses or damages of any kind resulting from the use of AFT products or for any of
Customer's data stored on products returned to AFT for service. AFT accepts no liability
for and provides no expressed or implied warranty against any loss of data or images.
You may register your product at http://www.atechflash.com. Customer must have proof
of purchase and obtain warranty service authorization from AFT within the applicable
warranty period before returning defective products to AFT. Returned products must be
shipped prepaid and packaged appropriately, and it is recommended that they be insured
or sent by a method that provides for tracking of the package.
Limitations: This limited warranty is in lieu of all other warranties, terms or conditions;
including warranties, terms, or conditions of merchantability, fitness for a particular
purpose, satisfactory quality, suppliers, and in no event will AFT be liable for any special,
incidental, consequential, or indirect damages resulting from the possession, use or
failure of this product. Product names mentioned herein are for identification purposes only
and may be trademarked and/or registered trademarks of their respective companies.
Media Cards* Compatibility Note
Media cards may not work properly when working with AFT product. If you encounter
this problem, contact AFT Tech Support for compatible media card list and potential driver
support and updates.