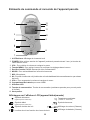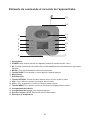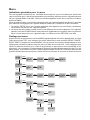
1
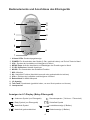
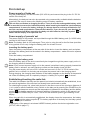
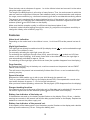
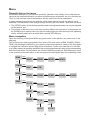
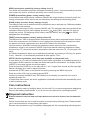
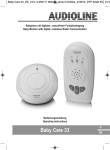
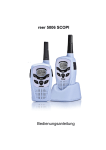
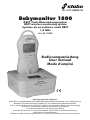
Babymonitor 1800 DECT Funk-Überwachungssystem DECT wireless monitoring system Système de surveillance radio DECT 1,8 GHz Art.-Nr. 51059 Bedienungsanleitung User manual Mode d'emploi Wichtig / Important / Important Lesen Sie vor Inbetriebnahme des Geräts alle Bedienhinweise aufmerksam und vollständig durch. Bewahren Sie diese Anleitung sorgfältig auf, sie enthält wichtige Betriebshinweise. Prior to using the device for the first time, carefully and completely read through all operating instructions. Keep these operating instructions in a safe place; it contains important hints for operating the device. Avant la première mise en service de lappareil, lisez toutes les indications de service attentivement et complètement. Gardez ce mode demploi soigneusement, il contient des indications de service importantes. Wichtiger Hinweis stabo Babymonitor 1800 ermöglicht per Funkübertragung an das mobile Elterngerät eine störungsarme akustische Überwachung des Kinderzimmers, der integrierte Temperatursensor erlaubt zudem die Kontrolle der Raumtemperatur. Grundsätzlich gilt jedoch: der Einsatz eines Babymonitors erleichtert zwar die Betreuung eines Kindes/einer pflegebedürftigen Person, kann aber die persönliche Beaufsichtigung nicht ersetzen! Jede Art von Haftung außerhalb der gesetzlichen Gewährleistungs-Vorschriften ist deshalb ausgeschlossen - dies gilt insbesondere für den nicht vorgesehenen medizinischen Einsatz. Sicherheitshinweise Nur für die Nutzung in Innenräumen! Setzen Sie die Geräte keinesfalls den Witterungseinflüssen im Freien aus. Schützen Sie Ihr stabo Babymonitor 1800 vor Hitze, Feuchtigkeit, Staub und starken Erschütterungen! Nicht in Kinderhände! Legen Sie das Babygerät nie in das Kinderbett! Verhindern Sie, dass Kinder mit den Geräten spielen oder Zugriff auf Geräte- oder Zubehörteile haben. Nicht im Krankenhaus oder in vergleichbaren Einrichtungen nutzen! Ihr Babymonitor 1800 erzeugt Funkwellen, diese können u. U. die Funktion medizinischer Geräte beeinträchtigen. Nicht öffnen keine Veränderungen vornehmen! Öffnen Sie niemals Ihr stabo Babymonitor 1800 und nehmen Sie keine Veränderungen an den Geräten vor. Lassen Sie Reparaturen nur von qualifiziertem Fachpersonal durchführen. Sonst entfallen Ihr Garantieanspruch und/oder möglicherweise die Gerätezulassung! Bei beschädigtem Gehäuse: Netzstecker ziehen! Ist das Gehäuse eines der Geräte Ihres Babymonitor 1800 beschädigt trennen Sie es sofort vom Stromnetz (bei Netzbetrieb). Die unmittelbare Nähe anderer Sender meiden! Andere Funksender (DECT-Telefone, WirelessRouter, Mobiltelefone) im Übertragungsweg können u. U. die Verbindung zwischen Eltern- und Babygerät stören. Produkteigenschaften Störungsarme DECT-Technologie (1,8 GHz) Nachtlicht-Funktion Schlaflied-Funktion (5 verschiedene Melodien) Sprech-Funktion Sendeleistung einstellbar (hoch/niedrig) Mikrofon-Empfindlichkeit einstellbar (4 Stufen) Raumtemperatur-Anzeige Temperatur-Alarm bei Minimal-/Maximal-Wert Ruf-Taste (Page-Funktion) Außer-Reichweite-Warnung Batteriezustands-Anzeige Lieferumfang 1 Babygerät 1 Elterngerät 2 Netzteile (5 V DC/500 mA) 1 NiMH-Akkupack für Elterngerät (2,4 V/800 mAh) 1 Bedienungsanleitung Bitte überprüfen Sie den Packungsinhalt auf Vollständigkeit. Prüfen Sie vor der Benutzung der Geräte, ob äußerliche Beschädigungen vorliegen. In diesem Fall nehmen Sie das Produkt nicht in Betrieb, sondern setzen sich umgehend mit Ihrem Fachhändler in Verbindung. 3 Bedienelemente und Anschlüsse des Elterngeräts 1 13 12 11 2 10 3 9 4 5 6 8 7 1. 2. 3. 4. 5. 6. 7. 8. 9. 10. 11. 12. 13. 4 blaue LEDs: Geräuschpegelanzeige POWER: Ein-/Ausschalten des Geräts (3 Sek. gedrückt halten) und Zurück-Taste im Menü VOL-: Senken der Lautstärke und Navigieren im Menü MENU-Taste: Aufrufen des Menüs und Bestätigen der Einstellungen im Menü 5 V DC IN Buchse: Netzteil-Anschluss MUSIC: Ein-/Ausschalten der Schlaflied-Funktion MIC: Mikrofon NL: Nachtlicht-Funktion (Nachtlicht manuell oder geräuschaktiviert ein/aus) VOL+: Erhöhen der Lautstärke und Navigieren im Menü Batteriefach für NiMH-Akkupack LC-Anzeige Talk-Taste: Sprechtaste (gedrückt halten, um zum Kind sprechen zu können) Lautsprecher Anzeigen im LC-Display (Baby-/Elterngerät) Antennen-Symbol (nur Elterngerät) Raumtemperatur (°Celsius o. °Fahrenheit) Baby-Symbol (nur Elterngerät) Schlaflied-Symbol Nachtlicht-Symbol Lautstärkeanzeige (5 Balken) Nachtlicht geräuschaktiviert Batterieanzeige (3 Balken) 4 Bedienelemente und Anschlüsse des Babygeräts 15 14 2 13 12 11 3 10 4 9 5 8 6 7 1 1. 2. 3. 4. 5. 6. 7. 8. 9. 10. 11. 12. 13. 14. 15. Lautsprecher POWER: Ein-/Ausschalten des Geräts (3 Sek. gedrückt halten) NL: Nachtlicht-Funktion (Nachtlicht manuell oder geräuschaktiviert ein/aus) MUSIC: Ein-/Ausschalten der Schlaflied-Funktion PAGE-Taste: Aussenden eines Ruftons an das Elterngerät Mikrofon LC-Anzeige RETURN-Taste: Zurück-Taste im Menü und Verlassen des Menüs VOL-: Senken der Lautstärke und Navigieren im Menü VOL+: Erhöhen der Lautstärke und Navigieren im Menü MENU-Taste: Aufrufen des Menüs und Bestätigen der Einstellungen im Menü Batteriefach Lademulde für Elterngerät Netzteil-Anschluss: 5 V DC IN Buchse Temperatur-Sensor 5 Inbetriebnahme Stromversorgung Babygerät Stecken Sie das Netzteil in eine Steckdose (230 V/50 Hz) und verbinden Sie den Stecker mit der 5 V DC IN-Buchse des Babygeräts. Alternativ können Sie das Babygerät auch mit handelsüblichen Alkaline-Batterien (Typ AAA) betreiben. Bitte beachten Sie beim Betrieb mit Batterien folgende Hinweise: Das Gerät hat keine Ladefunktion, verwenden Sie deshalb keinesfalls wiederaufladbare Akkuzellen! Beachten Sie beim Einlegen der Batterien unbedingt die im Batteriefach angegebene Polarität! Ersetzen Sie bei einem Batteriewechsel stets alle Batterien: mischen Sie nie alte und neue Batterien. Entnehmen Sie die Batterien, wenn Sie die Geräte längere Zeit nicht nutzen. Wenn das Babygerät mit Batterien betrieben wird erscheint im Display des Elterngeräts das Baby-Symbol . Stromversorgung Elterngerät Das Elterngerät wird über den im Lieferumfang enthaltenen NiMH-Akkupack (2,4 V/800 mAh) mit Spannung versorgt. Hinweis: Der Akku ist nicht vorgeladen: Laden Sie den Akkupack deshalb vor der ersten Inbetriebnahme (sowie nach längerem Nichtgebrauch des Geräts) mindestens 6 Stunden lang auf! Einlegen des Akkupacks Öffnen Sie das Batteriefach auf der Geräterückseite. Legen Sie den Akkupack ein und stecken den Stecker des Akkupacks in die Buchse im Batteriefach - achten Sie dabei darauf, das Kabel nicht einzuklemmen. Schließen Sie das Batteriefach. Laden des Akkupacks Der Akku im Gerät kann nun direkt über das Netzteil oder in der Lademulde des Babygeräts geladen werden. Hinweis: Wenn Sie ein Netzteil an das Elterngerät anschließen, ohne zuvor den Akkupack korrekt eingelegt zu haben, ertönt ein Warnton und im Display erscheint NO BA. Stecken Sie das Netzteil in eine 230 V-Steckdose und verbinden das Netzteil mit der 5 V DC INBuchse des Elterngeräts oder verbinden Sie das Netzteil mit dem Babygerät und stellen das Elterngerät in die Lademulde. Während des Ladevorgangs läuft die Batterie-Ladezustandsanzeige im Display des Elterngeräts. Wenn der Akku vollständig geladen ist wird (Batterie voll) angezeigt. Herstellen/Überprüfen der Funkverbindung Die Aufnahme der Funkverbindung zwischen Babygerät und Elterngerät sollte automatisch erfolgen, da die gegenseitige Registrierung bereits ab Werk eingestellt ist. Zur Überprüfung der ordnungsgemäßen Verbindung stellen Sie zunächst beide Geräte im selben Raum auf (Mindestabstand 1 m, um Rückkopplungsgeräusche zu verringern). Schalten Sie dann das Babygerät ein, indem Sie für 3 Sek. die POWER-Taste drücken: es ertönt ein doppelter Quittungston und im Display erscheint die Temperaturanzeige (und beim Betrieb mit Batterien zusätzlich das Batteriesymbol ). Schalten Sie anschließend das Elterngerät ein, indem Sie für 3 Sek. die POWER-Taste drücken: im Display erscheinen blinkend SRCH und das Antennensymbol . Mit dem automatischen Herstellen der Funkverbindung erscheinen im Display die Temperaturanzeige, das Batteriesymbol und das Antennensymbol , bei Batteriebetrieb des Babygeräts zusätzlich das Babysymbol . Sollte stattdessen UNREG im Display des Elterngeräts erscheinen führen Sie jetzt die GeräteRegistrierung (SETUP, siehe Seite 9) durch. 6 Stellen Sie dann das Babygerät in ca. 1 m Entfernung zum Kinderbett auf und schließen es über das Netzteil an das Stromnetz an. Die Reichweite des Babymonitor hängt von mehreren Faktoren ab, einen wesentlichen Einfluss hat die Umgebung, in der die Geräte eingesetzt werden: jedes Hindernis (Wände) im Übertragungsweg senkt die Reichweite, manche Materialien (z. B. Stahlbeton) schirmen besonders stark ab. Das Elterngerät verfügt über eine Reichweitenkontrolle: Wenn sich das Elterngerät außerhalb des Empfangsbereichs des Babygeräts befindet (oder das Babygerät ausgeschaltet ist), gibt das Elterngerät einen Signalton ab und im Display erscheinen blinkend das Antennensymbol und SRCH. Vergewissern Sie sich, dass Sie am geplanten Einsatzort ausreichend Empfang haben. Nehmen Sie bei Bedarf individuelle Einstellungen über das Menü vor (z. B. Mikrofonempfindlichkeit anpassen oder Einschlaflied ändern, siehe MENÜ Seite 8 ). Funktionen Geräuschpegelanzeige Je nach Geräuschpegel im Kinderzimmer leuchten 1 bis 4 der blauen LEDs am Elterngerät. Nachtlichtfunktion Das Nachtlicht lässt sich direkt an den Geräten ein-/ausschalten (Displayanzeige ) oder über Geräusche im Kinderzimmer aktivieren: Zum manuellen Einschalten des Nachtlichts drücken Sie 1 x NL. Um das Nachtlicht geräuschaktiviert einschalten zu lassen (VOX) drücken Sie 2 x NL ( und VOX werden in den Gerätedisplays angezeigt). Bei Geräuschen im Kinderzimmer wird das Nachtlicht dann automatisch für ca. 20 Sek. eingeschaltet. Zum Ausschalten des Nachtlichts drücken Sie 3 x NL (die Symbole erlöschen im Display). Page-Funktion Mit Druck auf die PAGE-Taste am Babygerät ertönt ein Rufton am Elterngerät und im Display blinkt PAGE. Der Rufton im Elterngerät verstummt nach 60 Sek. automatisch oder kann durch Druck auf eine beliebige Taste ausgeschalten werden. Sprech-Funktion Babymonitor 1800 bietet Ihnen die Möglichkeit, vom Elterngerät aus zu Ihrem zu Kind sprechen. Drücken Sie dazu die Talk-Taste und halten Sie sie gedrückt (im Display erscheint SPK): sprechen Sie nun im Abstand von ca. 5 - 10 cm mit normaler Lautstärke ins Mikrofon. Nach dem Sprechen lassen Sie die Talk-Taste wieder los (im Display erlischt SPK). Reichweitenkontrolle Wenn sich das Elterngerät außerhalb des Empfangsbereichs des Babygeräts befindet (oder das Babygerät ausgeschaltet ist), gibt das Elterngerät einen Signalton ab und im Display erscheinen blinkend das Antennensymbol und SRCH. Battery-low-Anzeige Babygerät Sind die Batterien verbraucht, so blinkt das Batteriesymbol im Display. Im Elterngerät ertönt alle 10 Sek. ein zweifacher Warnton und im Display blinkt das Baby-Symbol . Tauschen Sie die Batterien oder schließen Sie das Netzteil an. Battery-low-Anzeige Elterngerät Ist die Kapazität des Akkupacks zu gering, so blinkt das Batteriesymbol im Display und alle 10 Sek. ertönt ein zweifacher Warnton. Laden Sie den Akkupack. 7 Menü Allgemeine Hinweise zum Menü Alle individuellen Einstellungen (z. B. Mikrofon-Empfindlichkeit, Auswahl der Schlaflied-Melodie, Eingabe der gewünschten Temperaturalarm-Werte) können sowohl am Elterngerät als auch am Babygerät vorgenommen werden. Beide Geräte müssen dazu eingeschaltet und die Funkverbindung muss hergestellt sein. In dieser Bedienungsanleitung wird die Auswahl der Menüoptionen über das Elterngerät beschrieben, die Einstellungen über das Babygerät sind - bis auf zwei Dinge identisch: 1. Die Funktion SETUP (für eine eventuell erforderliche Neuregistrierung der Geräte) kann nur am Elterngerät ausgewählt werden. 2. Die Zurück-Taste im Menü-Modus ist unterschiedlich: Beim Elterngerät dient die Power-Taste als Zurück-Taste (auch zum Verlassen des Menüs und Rückkehr in den Betriebsmodus), beim Babygerät ist dies die RETURN-Taste. Menüführung Öffnen Sie mit der MENU-Taste (Elterngerät 2 x drücken, Babygerät 1 x drücken) das Menü. Sie navigieren mit den VOL-Tasten durch die vier Punkte des Hauptmenüs (SENS, POWER, SONG, TEMP). Mit Druck auf die MENU-Taste öffnen Sie die entsprechenden Untermenüs und bewegen sich dort wieder mit den VOL-Tasten zwischen den einzelnen Optionen. Sie bestätigen Ihre Auswahl eines Unterpunkts (z. B. Schlaflied-Melodie) mit der MENU-Taste und kehren damit gleichzeitig wieder zum entsprechenden Hauptmenüpunkt zurück. Beim Elterngerät bewegen Sie sich mit der POWER-Taste (Babygerät: RETURN-Taste) zum nächsten Hauptmenüpunkt zurück oder verlassen das Menü und wechseln wieder in den Betriebsmodus. SENS MENU Empfindlichkeit POWER VOL SONG1 VOL CE_FA MENU SENS2 VOL SENS3 VOL SONG3 VOL SENS4 hoch LOW Niedrig MENU Schlafmelodie Melodie 1 VOL Temperatur HIGH Hoch VOL TEMP VOL MENU Sendeleistung SONG SENS1 gering VOL SONG2 VOL CELSI VOL ON VOL TE_HI VOL Melodie 2 Melodie 3 MENU Celsius Celsius VOL ALERT An VOL Alarm-Bereich Fahrenheit MENU Temperaturalarm RANGE FAHRE OFF Aus MENU Obergrenze TE_LO Untergrenze MENU MENU HI 24°C LO 16°C 8 SONG4 Melodie 4 VOL SONG5 Melodie 5 SENS (Mikrofonempfindlichkeit, Werkseinstellung: Stufe 4) Die Mikrofonempfindlichkeit ist in 4 Stufen einstellbar (Stufe 1: niedrigste Empfindlichkeit, nimmt nur laute Geräusche auf, Stufe 4: höchste Empfindlichkeit, nimmt auch leise Geräusche auf). POWER (Sendeleistung, Werkseinstellung: hoch) Wenn Entfernung und bauliche Gegebenheiten (Reichweitenkontrolle beachten!) es erlauben können Sie durch die Reduzierung der Sendeleistung den Energieverbrauch der Geräte senken. SONG (Schlafliedfunktion, Werkseinstellung: Melodie 5) Sie können die Schlafliedfunktion sowohl am Eltern- als auch am Babygerät ein-/ausschalten, es stehen 5 verschiedene Melodien zur Auswahl. Zum Einschalten der Schlafliedfunktion drücken Sie die MUSIC-Taste: das eingestellte Schlaflied und SONG). Die erklingt und wird fortlaufend wiederholt (in den Gerätedisplays erscheinen Lautstärke lässt sich durch Drücken der VOL-Tasten verändern. Zum Ausschalten des Schlafliedes drücken Sie die MUSIC-Taste ( und SONG erlöschen im Display). TEMP (Raumtemperatur, Werkseinstellung: Alarm aus) Babymonitor 1800 verfügt über einen Temperatursensor und eine Temperaturalarm-Funktion. Wenn die Raumtemperatur im Kinderzimmer einen von Ihnen vorgegeben Minimal-/MaximalWert erreicht, so ertönt am Elterngerät ein dreifacher Alarmton und im Display blinkt ALERT. Sie aktivieren den Temperaturalarm im Untermenü ALERT und geben die entsprechenden Temperaturwerte im Untermenü RANGE ein. Stellen Sie dort unter TE_HI die gewünschte Maximaltemperatur und unter TE_LO die Minimaltemperatur (über die VOL-Tasten) ein. Durch Drücken einer VOL-Taste (für ca. 3 Sek.) lässt sich ein ausgelöster Temperaturalarm manuell abschalten (oder er endet automatisch nach ca. 5 Min.). SETUP (Geräteregistrierung, Menüpunkt nur im Elterngerät verfügbar) Sehr selten (z. B. bei Störungen durch andere Funksender in unmittelbarer Nähe) kann es vorkommen, dass Eltern- und Babygerät ihre spezifische Kennung verlieren, im Display erscheint UNREG. Erneuern Sie dann die Geräteregistrierung: Drücken Sie 7 Sek. lang die PAGE-Taste am Babygerät: es ertönt ein Signalton und das Nachtlicht blinkt, das Babygerät befindet sich jetzt im Registrier-Modus. Rufen Sie nun am Elterngerät SETUP auf, indem Sie 1 x die MENU-Taste drücken. Drücken Sie dann eine der VOL-Tasten, im Display erscheint REG. Bestätigen Sie mit der MENU-Taste: im Display blinkt REG, das Elterngerät ist nun ebenfalls im Registrier-Modus. Wenn ein dreifacher Quittungston ertönt ist die Geräteregistrierung abgeschlossen, und die Geräte kehren automatisch in den Betriebsmodus zurück. Pflegehinweise Reinigen Sie die Geräte nur mit einem leicht angefeuchteten, fusselfreien Tuch. Verwenden Sie keinesfalls aggressive Reinigungsmittel. Entnehmen Sie Akkupack/Batterien, wenn Sie die Geräte längere Zeit nicht nutzen. Entsorgungshinweis Defekte elektrische/elektronische Geräte und verbrauchte Akkus gehören nicht in den Hausmüll! Geben Sie defekte/gebrauchte Geräte bei einer entsprechenden Sammelstelle ab. Informationen darüber erhalten Sie bei Ihrem kommunalen Entsorger bzw. bei Ihren örtlichen Behörden. Geben Sie verbrauchte Akkus nur völlig entleert bei einer entsprechenden Sammelstelle im Handel bzw. bei Ihrem Entsorger ab. 9 Technische Daten Frequenzbereich: Reichweite: Spannungsversorgung Babygerät: Spannungsversorgung Elterngerät: 1,880-1,900 GHz max. 300 m (je nach Umgebung) Netzteil DC 5 V / 500 mA oder 3x Batterien Typ AAA 2.4 V / 800 mAh NiMH-Akkupack Maße Babygerät (BxHxT): Gewicht: 103 x 45 x 98 mm 155 g Maße Elterngerät (BxHxT): Gewicht 60 x 125 x 35 mm 105 g 10 Important note Thanks to radio transmission to the mobile parents set, the stabo Babymonitor 1800 enables an acoustic monitoring of the childrens room which is almost free from interferences. Furthermore, the integrated temperature sensor checks the room temperature. In general, the usage of the Babymonitor permits to ease the supervision of a child or another dependent person; however, it can by no means substitute the personal supervision! For this reason, any liability outside of the legal regulations of guarantee is excluded. This is particularly applicable to any medical application which is not intended. Safety warnings Designed for indoor use only! Do not expose the devices to the weather in the open. Protect your stabo Babymonitor 1800 from heat, humidity, dust and strong vibrations! The devices must be kept out of the reach of children! Never place the baby set in the childrens bed! Prevent children from playing with the devices or from having access to the devices and accessories. Do not use the sets in a hospital or comparable facilities! The Babymonitor 1800 produces radio waves which might affect the proper functioning of medical electrical equipment. Do not open the devices or make any modifications to them! Never open your stabo Babymonitor 1800 and make any modifications to the devices. Ensure that any repairs are carried out by qualified personnel only. Otherwise, no further guarantee claim can be accepted and/or the devices could lose their approval for use! If the housing is damaged, disconnect the power plug! If the housing of one of the devices belonging to your Babymonitor 1800 is damaged, immediately disconnect it from the mains (in case of mains operation). The immediate proximity of other radio transmitters is to be avoided! Other radio transmitters (DECT phones, wireless routers, mobile phones) on this transmission path might interfere with the connection between the parents and the baby set. Product features DECT technology almost free from interferences (1.8 GHz) Night light function Lullaby function (5 different melodies) Speech function Adjustable transmitting power (high/low) Adjustable microphone sensitivity (4 levels) Room temperature indication Temperature alarm at minimum/maximum value Page function Out-of-reach alert Battery status indicator Scope of delivery 1 baby unit 1 parents' unit 2 power supplies (5 V DC/500 mA) 1 NiMH battery pack for parents' set (2.4 V/800 mAh) 1 operating instructions Please check the contents of the package for completeness. Prior to using the sets examine them with respect to any external damage. In case of an external damage, do not put the product into operation, but contact your specialist dealer immediately. 11 Control elements and connections of the parents set 1 13 12 11 2 10 3 9 4 5 6 8 7 1. 4 blue LEDs: Noise level indication 2. POWER: Switches the radio set on/off (press and hold for 3 sec.) and is used as return key in the menu 3. VOL-: Reduces the volume and is used for menu navigation 4. MENU key: Activates the menu and confirms the settings in the menu 5. 5 V DC IN socket: Power supply connector 6. MUSIC: Switches the lullaby function on and off. 7. MIC: Microphone 8. NL: Night light function (night light is manually switched on/off or noise acitvated) 9. VOL+: Increases the volume and is used for menu navigation 10. Battery compartment for NiMH battery pack 11. LC display 12. Talk key: Push-to-talk key (press and hold to talk to the child) 13. Loudspeaker Indications in the LC display (baby/parents set) Antenna symbol (parents set only) Room temperature (°Celsius or °Fahrenheit) Baby symbol (parents set only) Lullaby symbol Night light symbol Volume indicator (5 bars) Night light is noise activated Battery indicator (3 bars) 12 Control elements and connections of the baby set 15 14 2 13 12 11 3 10 4 9 5 8 6 7 1 1. 2. 3. 4. 5. 6. 7. 8. 9. 10. 11. 12. 13. 14. 15. Loudspeaker POWER: Switches the set on/off (press and hold for 3 sec.) NL: Night light function (night light is manually switched on/off or noise activated) MUSIC: Switches the lullaby function on and off PAGE key: Emits a call tone to the parents set Microphone LC display RETURN key: Return key in the menu and exits the menu VOL-: Reduces the volume and is used for menu navigation VOL+: Increases the volume and is used for menu navigation MENU key: Activates the menu and confirms the settings in the menu Battery compartment Charging stand for parents set 5 V DC IN socket: Power supply connector Temperature sensor 13 First start-up Power supply of baby set Plug the power supply unit into a socket (230 V/50 Hz) and connect the plug to the 5 V DC IN socket of the baby set. Alternatively, the baby set can also be operated using commercially available alkaline batteries (type AAA). Be sure to observe the following notes for battery operation: The set does not feature a charging function. Thus, do not use rechargeable battery cells! It is essential to ensure the indicated polarity when inserting the batteries into the battery compartment! In case of a battery change you always have to exchange all batteries. Do not mix used and new batteries. Remove the batteries, if you do not use your devices for a prolonged period! When operating the baby set with batteries, the baby symbol is shown on the display of the parents set. Power supply of parents set The power supply of the parents set is provided through the NiMH battery pack (2.4 V/800 mAh) included in the scope of supply. Note: The battery pack is not precharged. Thus, prior to using the set for the first time (and after a long period of non-use) charge the battery pack for at least 6 hours! Inserting the battery pack Open the battery compartment at the rear side of the device. Insert the battery pack and place the plug of the battery pack into the socket in the battery compartment make sure not to squeeze the cable. Close the battery compartment. Charging the battery pack Now, the battery pack in the device can directly be charged through the power supply unit or in the charging stand of the baby set. Note: If you connect a power supply unit to the parents set without having correctly inserted the battery pack in advance, an audio warning sounds and the display shows NO BA. Plug the power supply unit into a 230 V socket and connect it to the 5 V DC IN socket of the parents set or connect it to the baby set and place the parents set in the charging stand. During charging, the charging state indicator of the battery appears on the display of the parents set. When the battery pack is completely charged, a battery full symbol is shown. Establishing/checking the radio link The radio link between the baby and the parents set should automatically be established, since the mutual registration of the devices has already been performed ex works. For checking the proper link, place both devices in the same room at first (minimum distance of 1 m in order to reduce feedback noise). Switch on the baby set by pressing the POWER key for 3 sec.: A double beep tone sounds and the temperature is indicated on the display (and the battery symbol for battery operation of the set in addition). Afterwards, switch on the parents set by pressing the POWER key for 3 sec.: SRCH and the antenna symbol are flashing on the display. When the radio link is automatically established, the display shows the temperature, the battery symbol and the antenna symbol . For battery operation of the baby set, the baby symbol is displayed in addition. If the display of the parents set shows UNREG instead, perform the device registration now (SETUP, refer to page 17). 14 Place the baby set at a distance of approx. 1 m to the childrens bed and connect it to the mains using the power supply unit. The range of the Babymonitor is a function of many factors. Thus, the environment in which the sets are used has a significant influence: Each obstacle (walls) on the transmission path reduces the range; some materials (e.g. reinforced concrete) give rise for considerable screening effects. The parents set is equipped with a range-checking function: If the parents set is out of the range of the baby set (or if the baby set is switched off), the parents set emits a signal tone and the antenna symbol and SRCH flash on the display. Make sure that the reception quality is sufficient at the planned place of use. If required, make individual setting through the menu (e.g. adjust the microphone sensitivity or change the lullaby, refer to MENU, page 16). Features Noise level indication Depending on the noise level in the childrens room, 1 to 4 blue LEDs at the parents set are lit up. Night light function The night light can directly be switched on/off (the display shows ) or can be activated through the noise in the childrens room: For manually activating the night light, press NL once. For activating the night light through noise (VOX), press NL twice ( symbol and VOX are shown on the device display). At a certain noise level in the childrens room, the night light is now automatically activated for approx. 20 sec. For switching off the night light, press NL three times (the symbols disappear from the display). Page function By pressing the PAGE key at the baby set, a call tone sounds on the parents set and PAGE flashes on the display. The call tone on the parents set automatically finishes after 60 sec. or can be switched off by pressing any key. Speech function Babymonitor 1800 enables you to talk to your child through the parents set. To do so, press and hold the Talk key (the display shows SPK): Now speak with normal voice level and a distance of approx. 5 - 10 cm into the microphone. After you have finished speaking, release the Talk key again (SPK disappears from the display). Range-checking function If the parents set is out of the range of the baby set (or if the baby set is switched off), the parents set emits a signal tone and the antenna symbol and SRCH flash on the display. Battery low indicator of the baby set If the batteries are used up, the battery symbol flashes on the display. Every 10 sec., a double warning tone sounds in the parents set and the baby symbol flashes on the display. Replace the batteries or connect the power supply unit. Battery low indicator of the parents set If the capacity of the battery pack is low, the battery symbol flashes on the display and a double warning tone sounds every 10 sec. Charge the battery pack. 15 Menu General hints on the menu All individual settings (e.g. microphone sensitivity, selection of the lullaby, entry of the desired values for the temperature alarm) can either be performed on the parents set or on the baby set. To do so, both devices must be switched on and the radio link must be established. In these operating instructions, the selection of the menu options through the parents set is described. The adjustment of the settings through the baby set is the same apart from two items: 1. The SETUP function (if the devices possibly need to be registered anew) can only be adjusted on the parents set. 2. The function of the return key in the menu mode is different for both sets: For the parents set, the POWER key is used as return key (also for exiting the menu and returning to the operating mode), while the baby set is provided with a special RETURN key. Menu navigation Open the menu by pressing the MENU key (press twice on the parents set, press once on the baby set). The VOL keys are used to navigate the four items of the main menu (SENS, POWER, SONG, TEMP). By pressing the MENU key, you open the respective submenus. Use the VOL keys again to navigate the individual options within these submenus. Confirm your selection of a sub-item (e.g. lullaby melody) by pressing the MENU key and thus simultaneously return to the corresponding item of the main menu. On the parents set, use the POWER key (baby set: RETURN key) to return to the next item of the main menu or exit the menu and switch again back to the operating mode. SENS MENU SENS1 VOL SENS2 VOL SENS3 VOL SENS4 HIGH VOL LOW SONG1 VOL SONG2 VOL SONG3 VOL SONG4 CE_FA MENU CELSI VOL FAHRE ON VOL OFF TE_HI VOL TE_LO VOL POWER MENU VOL SONG MENU VOL TEMP MENU VOL ALERT MENU VOL RANGE MENU MENU MENU LO 16°C HI 24°C 16 VOL SONG5 SENS (microphone sensitivity, factory setting: level 4) Four levels are provided to adjust the microphone sensitivity (level 1: minimum sensitivity, records loud noises only, level 4: maximum sensitivity, also records low noises). POWER (transmitting power, factory setting: high) If the distance and constructional conditions (observe the range-checking function!) permit, the energy consumption of the devices can be reduced by decreasing the transmitting power. SONG (lullaby function, factory setting: song 5) The lullaby function can be switched on/off on the parents and on the baby set, 5 different melodies are available to be selected. For activating the lullaby function, press the MUSIC key: The selected lullaby sounds and will be and SONG). Use the VOL keys to repeated continuously (the device display shows the modify the volume. For switching off the lullaby, press the MUSIC key (the and SONG disappear from the display). TEMP (room temperature, factory setting: alarm off) The Babymonitor 1800 is equipped with a temperature sensor and a temperature alarm function. If the room temperature in the childrens room reaches the adjusted minimum/maximum value, the parents set emits a triple alarm tone and ALERT flashes on the display. Use the submenu ALARM to activate the temperature alarm and enter the corresponding temperature values in the submenu RANGE. Adjust the desired maximum temperature under the menu item TE_HI and the minimum temperature under the menu item TE_LO (using the VOL keys). An initiated temperature alarm can be switched off manually by pressing a VOL key (for approx. 3 sec.). However, it is automatically switched off after approx. 5 min. SETUP (device registration, menu item only available on the parents set) In rare cases (e.g. in case of interferences by other radio transmitters in immediate proximity) it may happen that the parents and baby set loose their specific identification, the display shows UNREG. In this case, register the devices again: Press and hold the PAGE key on the baby set for 7 sec.: A signal tone sounds and the night light flashes, the baby set is now in registering mode. Activate the SETUP menu on the parents set now by pressing the MENU key once. Press one of the VOL keys, the display shows REG. Confirm by pressing the MENU key: REG flashes on the display, the parents set is now in registering mode, too. If a triple beep tone sounds, the device registration is finished and the devices automatically return to their operating mode. Care instructions Clean the sets by means of a slightly damp, lint-free cloth. Do not use any aggressive detergents. Remove the battery pack/batteries, if you do not use your devices for a prolonged period! Disposal instruction Electric/electronic devices and used up batteries are not to be thrown into the domestic waste. Deliver devices that are out of order/used with a corresponding collecting point. Please contact your local authorities for corresponding information. Dispose used up batteries (only if completely discharged) with the corresponding collecting points. 17 Technical specifications Channel frequency: Range: Power supply baby unit: Power supply parent unit: 1,880-1,900 GHz up to 300 m (depending on the environment) Power supply: DC 5 V/ 500 mA or 3 x alkaline batteries Typ AAA 2.4 V / 800 mAh NiMH battery pack Dimensions baby unit (WxHxD): Weight: 103 x 45 x 98 mm 155 g Dimensions parent unit (WxHxD): Weight: 60 x 125 x 35 mm 105 g 18 Indication importante Par la transmission radio à lappareil parents mobile, votre stabo Babymonitor 1800 vous permet la surveillance acoustique antiparasite de la chambre denfants. En plus, grâce au détecteur de température intégrée, la température ambiante peut être contrôlée. En générale, veuillez considérer le suivant: Il est vrai que lutilisation dun Babymonitor facilite les soins dun enfant ou dune personne dépendante, mais il ne peut pas vous dispenser de la surveillance personnelle! Nous attirons votre attention sur le fait que les responsabilités de toute nature nentrant pas dans le cadre de la législation sur la garantie sont exclues. Ceci concerne notamment lutilisation du Babymonitor 1800 à des fins médicales pour lesquelles il nest pas prévu. Indications de sécurité Lappareil nest prévu que pour lusage à lintérieur! Nexposez les appareils en aucun cas aux intempéries en plein air. Protégez votre stabo Babymonitor 1800 contre la chaleur, lhumidité, la poussière et des chocs/vibrations forts! Pas appropriés pour les mains denfants! Ne placez jamais lappareil bébé dans le lit de votre enfant! Il faut éviter que les enfants jouent avec des appareils ou quils aient accès aux appareils ou accessoires. Lutilisation des appareils à lhôpital ou bien dans des institutions similaires est interdite! Votre stabo Babymonitor 1800 produit des ondes radioélectriques qui peuvent éventuellement détériorer les appareils médicaux à lhôpital. Ne pas ouvrir ne pas adapter ou modifier les appareils! Nouvrez jamais votre stabo Babymonitor 1800 pour adapter ou modifier les appareils. Demandez au personnel spécialisé et qualifié deffectuer les réparations éventuelles. Sinon, vos droits découlant de la garantie sont assumés et/ou ladmission dappareil éventuellement expire. Si lappareil est endommagé, débranchez sa prise secteur! Si le boîtier dun des appareils de votre Babymonitor 1800 est endommagé, débranchez-le immédiatement du réseau électrique (en cas dun fonctionnement sur secteur). Évitez linstallation à proximité directe dautres émetteurs! Dautres émetteurs radio (téléphone DECT, routeur sans fil, téléphone mobile) dans la voie de transmission peuvent éventuellement perturber la communication entre lappareil parents et bébé. Caractéristiques techniques Technologie DECT antiparasite (1,8 GHz) Fonction lumière de nuit Fonction berceuse (5 mélodies différentes) Fonction de conversation Puissance démission réglable (high (haut) /low (bas)) Sensibilité du microphone réglable (4 niveaux) Affichage de la température ambiante Alarme de température pour valeur minimale/maximale Son d'appel (fonction page) Avertissement «hors de portée» Affichage du niveau de charge de la batterie Gamme de livraison 1 appareil bébé 1 appareil parents 2 blocs dalimentation (5 V DC/ 500 mA) 1 accu NiMH à 2,4 V/800 mAh (pour appareil parents) 1 mode demploi Vérifiez immédiatement lintégralité de la livraison. Avant dutiliser les appareils, vérifiez-les à légard des endommagements extérieurs. Dans ce cas, ne mettez pas le produit en service, mais contactez immédiatement votre spécialiste. 19 Eléments de commande et raccords de lappareil parents 1 13 12 11 2 10 3 9 4 5 6 8 7 1. 4 LEDs bleus: Affichage du niveau de bruit 2. POWER: Mise en/hors service de lappareil (maintenir pressée durant 3 sec.) et touche de retour dans le menu 3. VOL-: Pour réduire le volume et naviguer le menu 4. Touche MENU: Pour activer le menu et confirmer les réglages dans le menu 5. Douille dentrée 5 V DC: Raccord du bloc dalimentation 6. MUSIC: Pour activer/désactiver la fonction berceuse 7. MIC: Microphone 8. NL: Fonction lumière de nuit (lumière de nuit activée/désactivée manuellement ou par niveau de bruit) 9. VOL+: Pour augmenter le volume et naviguer le menu 10. Compartiment de batterie pour accu NiMH 11. Afficheur LCD 12. Touche de conversation: Touche de conversation (maintenez pressée pour pouvoir parler à lenfant) 13. Haut-parleur Affichages sur lafficheur LCD (appareil bébé/parents) Symbole dantenne Température ambiante Symbole bébé Symbole berceuse Symbole lumière de nuit Affichage de volume (5 barres) Lumière de nuit en fonction du niveau de bruit Affichage de batterie (3 barres) (appareil parents seulement) (°Celsius ou °Fahrenheit) (appareil parents seulement) 20 Eléments de commande et raccords de lappareil bébé 15 14 2 13 12 11 3 10 4 9 5 8 6 7 1 1. Haut-parleur 2. POWER: Mise en/hors service de lappareil (maintenir pressée durant 3 sec.) 3. NL: Fonction lumière de nuit (lumière de nuit activée/désactivée manuellement ou par niveau de bruit) 4. MUSIC: Pour activer/désactiver la fonction berceuse 5. Touche PAGE: Pour émettre un son dappel à lappareil parents 6. Microphone 7. Afficheur LCD 8. Touche RETURN: Touche de retour dans le menu et pour quitter le menu 9. VOL-: Pour réduire le volume et naviguer dans le menu 10. VOL+: Pour augmenter le volume et naviguer dans le menu 11. Touche MENU: Pour activer le menu et confirmer les réglages dans le menu 12. Compartiment de batterie 13. Compartiment de charge pour lappareil parents 14. Douille dentrée 5 V DC: Raccord du bloc dalimentation 15. Détecteur de température 21 Mise en service Alimentation en courant de lappareil bébé Raccordez le bloc dalimentation à une prise de courant (230 V/ 50 Hz) et la fiche à la douille dentrée DC de lappareil bébé. Lappareil bébé peut également être opéré à laide des batteries alcalines courantes (type AAA). Veuillez considérer les indications suivantes en cas dun service de lappareil avec des batteries: Lappareil ne dispose pas dune fonction de charge. Pour cette raison, nutilisez en aucun cas des accus rechargeables! En insérant les batteries, observez en tout cas la polarité indiquée dans le compartiment de batterie! En cas de besoin, remplacez toujours toutes les batteries: Ne combinez jamais des batteries usagées et de nouvelles batteries. Enlevez les batteries, si vous nutilisez pas les appareils pour bien longtemps. Si lappareil bébé est opéré à laide des batteries, lafficheur de lappareil parents affiche le symbole . Alimentation en courant de lappareil parents Lappareil parents est fourni par laccu NiMH (2,4 V/800 mAh) inclus dans la gamme de livraison. Indication: Laccu nest pas préchargé: Pour cette raison, chargez laccu avant la première mise en service (et après une période longue de non-utilisation de l'appareil) durant 6 heures au moins! Mise en place de laccu Ouvrez le compartiment de batterie sur la face arrière de lappareil. Insérez laccu et connectez la fiche de laccu à la douille dans le compartiment de batterie - faites attention à ne pas coincer le câble. Fermez le compartiment de batterie. Charger laccu Maintenant, laccu dans lappareil peut être chargé soit directement par le bloc dalimentation, soit par le compartiment de charge de lappareil bébé. Indication: Si vous raccordez un bloc d'alimentation à l'appareil parents sans avoir inséré l'accu de façon correcte auparavant, un son davertissement se fait entendre et lafficheur indique NO BA. Raccordez le bloc dalimentation à une prise de courant de 230 V et connectez le bloc dalimentation à la douille dentrée de 5 V DC de lappareil parents ou raccordez alternativement le bloc dalimentation avec lappareil bébé et positionnez lappareil parents dans le compartiment de charge. Durant le processus de chargement, létat de charge de la batterie apparaît sur lafficheur de lappareil parents. Si laccu est complètement chargé, le symbole de batterie est affiché. Établir/vérifier la liaison radio Normalement, la liaison radio entre lappareil bébé et lappareil parents est automatiquement établie, comme le registration mutuelle a déjà effectué en usine. Pour vérifier la liaison correcte, positionnez dabord les deux appareils dans la même salle (distance minimale de 1 m, pour réduire les bruits de réaction acoustique). Mettez lappareil bébé en service en appuyant sur la touche POWER durant 3 sec.: Un son double dacquittement se fait entendre et laffichage de température apparaît sur lafficheur (et également le symbole de batterie en cas dun service de lappareil avec des batteries). Maintenant, mettez lappareil parents en service en appuyant sur la touche POWER durant 3 sec.: SRCH et le symbole dantenne clignotent sur lafficheur. Si la liaison radio est automatiquement établie, la température, le symbole de batterie et le symbole dantenne sont indiqués sur lafficheur. En cas dune alimentation par batterie de apparaît également. lappareil bébé, le symbole bébé Si UNREG apparaît sur lafficheur de lappareil parents au lieu de cela, effectuez maintenant la registration dappareils (SETUP, voir page 25). Ensuite positionnez lappareil bébé à une distance denv. 1 m du lit denfant et le raccordez au réseau électrique par le bloc dalimentation. 22 La portée du Babymonitor dépend de plusieurs facteurs. Donc, lenvironnement dans lequel les appareils sont utilisés a une influence considérable: Chaque obstacle (mur) dans la voie de transmission réduit la portée, certains matériaux (p.ex. béton armé) causent un blindage très élevé. Lappareil parents est muni dun contrôle de portée: Si lappareil parents se trouve en dehors de la zone de réception de lappareil bébé (ou lappareil bébé est mis hors service), lappareil parents émet un signal acoustique et le symbole d'antenne et SRCH clignotent sur lafficheur. Assurez-vous que la réception est suffisante à lemplacement planifié de lappareil. En cas de besoin, effectuez des réglages individuels par le menu (p.ex. adapter la sensibilité du microphone ou modifier la berceuse, voir MENU, page 24). Fonctions Affichage du niveau de bruit Selon le niveau de bruit dans la chambre denfants, 1 à 4 LEDs bleus sallument sur lappareil parents. Fonction lumière de nuit La lumière de nuit peut être mise en/hors service directement sur les appareils (affichage ) ou activée par les bruits dans la chambre denfants: Appuyez une fois sur NL pour activer la lumière de nuit manuellement. Pour activer la lumière de nuit en fonction du niveau de bruit (VOX), appuyez deux fois sur NL ( et VOX sallument sur les afficheurs). Lors dun certain niveau de bruit dans la chambre denfants, la lumière de nuit se met automatiquement en service pendant env. 20 sec. Pour mettre la lumière de nuit hors service, appuyez trois fois sur NL (les symboles disparaissent de lafficheur). Fonction PAGE Par un appui sur la touche PAGE sur lappareil bébé, un son dappel est émit sur lappareil parents et PAGE clignote sur lafficheur. Le son dappel sur lappareil parents automatiquement cesse après 60 sec. ou peut être désactivé en appuyant sur nimporte quelle touche. Fonction de conversation Le Babymonitor 1800 vous offre la possibilité de parler à votre enfant à partir de lappareil parents. Appuyez sur la touche de conversation et la maintenez pressée (lafficheur vous indique SPK): Maintenant parlez dune voix normale dans le microphone à une distance denv. 5 - 10 cm. Après avoir fini de parler, laissez échapper la touche de conversation de nouveau (SPK séteint sur lafficheur). Contrôle acoustique de portée Si lappareil parents se trouve en dehors de la zone de réception de lappareil bébé (ou lappareil bébé est mis hors service), lappareil parents émet un signal acoustique et le symbole d'antenne et SRCH clignotent sur lafficheur. Indicateur de faible batterie sur lappareil bébé Si les batteries sont usagées, le symbole de batterie clignote sur lafficheur. Lappareil parents clignote sur émet un son davertissement double toutes les 10 sec. et le symbole bébé lafficheur. Échangez les batteries ou raccordez le bloc dalimentation. Indicateur de faible batterie sur lappareil parents Si la capacité de laccu est trop faible, le symbole de batterie clignote sur lafficheur et un son davertissement double se fait entendre toutes les 10 sec. Rechargez laccu. 23 Menu Indications générales pour le menu Tous les réglages individuels (p.ex. sensibilité du microphone, choix de la berceuse, entrée des valeurs requises pour lalarme de température) peuvent être effectués soit sur lappareil parents, soit sur lappareil bébé. A cet effet, il faut que les deux appareils soient mis en service et la liaison radio soit établie. Dans ce mode demploi, le choix des options de menu par lappareil parents est décrit. Le procédé pour effectuer les réglages par lappareil bébé est identique à lexception de deux éléments: 1. La fonction SETUP (pour une nouvelle registration des appareils qui peut devenir nécessaire) ne peut être activée que sur lappareil parents. 2. La touche de retour dans le mode de menu est différente sur les deux appareils: Sur lappareil parents, la touche POWER sert de touche de retour (également pour quitter le menu et retourner dans le mode de service), sur lappareil bébé, on utilise la touche RETURN à cet effet. Guidage par menu Activez le menu en appuyant sur la touche MENU (appareil parents: deux fois, appareil bébé: une fois). Grâce aux touches VOL, vous naviguez les quatre éléments du menu principal (SENS, POWER, SONG, TEMP). Par appui sur la touche MENU, vous ouvrez les sous-menus correspondants et vous naviguez de nouveau les options dans les menus à laide des touches VOL. Vous confirmez votre choix dun élément de menu (p.ex. choix de la berceuse) en appuyant sur la touche MENU et, de cette façon, vous retournez en même temps à lélément correspondant du menu principal. Sur lappareil parents, vous utilisez la touche POWER (appareil bébé: touche RETURN) pour retourner au prochain élément du menu principal ou quitter le menu et retourner de nouveau au mode de service. SENS MENU sensibilité POWER puissance d'émission VOL SONG1 VOL CE_FA MENU SENS2 VOL SENS3 VOL SONG3 VOL SENS4 haut LOW bas MENU mélodie 1 VOL température HIGH haut berceuse TEMP VOL MENU VOL SONG SENS1 bas VOL SONG2 VOL CELSI VOL ON VOL OFF TE_HI VOL TE_LO mélodie 2 mélodie 3 MENU Celsius Celsius VOL ALERT alarme de température FAHRE Fahrenheit MENU VOL RANGE gamme d'alarme MENU plafond seuil MENU MENU HI 24°C LO 16°C 24 SONG4 mélodie 4 VOL SONG5 mélodie 5 SENS (sensibilité du microphone, réglage de lusine: niveaux 4) La sensibilité du microphone peut être réglée par 4 niveaux (niveau 1: sensibilité la plus basse, ne capte que des bruits forts, niveaux 4: sensibilité la plus haute, capte également des bruits légers). POWER (puissance démission, réglage de lusine: high/haut) Si la distance et les conditions de la construction (observer le contrôle de portée!) le permettent, vous pouvez réduire la consommation dénergie des appareils en réduisant la puissance démission. SONG (fonction berceuse, réglage de lusine: berceuse 5) La fonction berceuse peut être mise en/hors service soit sur lappareil parents, soit sur lappareil bébé, 5 mélodies différentes sont disponibles. Pour activer la fonction berceuse, appuyez sur la touche MUSIC: La berceuse réglée se fait et SONG). Grâce aux touches VOL, entendre et se répète en continue (lafficheur indiquent vous modifiez le volume. Pour mettre la berceuse hors service, appuyez sur la touche MUSIC et SONG disparaissent de lafficheur). ( TEMP (température ambiante, réglage de lusine: alarme hors service) Le Babymonitor 1800 est muni dun détecteur de température et dune fonction dalarme de température. Si la température ambiante dans la chambre denfants atteint une valeur minimale/maximale prédéfinie, un son dalarme triple se fait entendre sur lappareil parents et ALERT clignote sur lafficheur. Vous activez lalarme de température dans le sous-menu ALERT et vous entrez les valeurs correspondantes de températures dans le sous-menu RANGE. Sous TE_HI vous réglez la température maximale requise et sous TE_LO vous réglez la température minimale (à laide des touches VOL). Par appui sur une touche VOL (pendant env. 3 sec.), une alarme de température déclenchée peut être manuellement désactivée (ou elle cesse automatiquement après env. 5 min.). SETUP (registration des appareils, élément de menu seulement disponible sur lappareil parents) Il se peut très rarement (p.ex. lors des perturbations par dautres émetteurs radio à proximité immédiate) que les appareils parents et bébé perdent leur identification spécifique. Lafficheur indique UNREG. Dans ce cas, renouvelez la registration des appareils: Appuyez sur la touche PAGE sur lappareil bébé pendant 7 sec.: Un signal acoustique se fait entendre et la lumière de nuit clignote, lappareil bébé maintenant se trouve en mode de registration. Ensuite activez le SETUP sur lappareil parents en appuyant une fois sur la touche MENU. Puis appuyez sur nimporte quelle touche VOL, REG apparaît sur lafficheur. Utilisez la touche MENU pour confirmer: REG clignote sur lafficheur, maintenant lappareil parents se trouve également en mode de registration. Si un son triple dacquittement se fait entendre, la registration des appareils est terminée et les appareils automatiquement retournent dans le mode de service. Conseils dentretien Ne nettoyez les appareils quavec un chiffon très peu humide et doux. Nutilisez en aucun pas des nettoyants agressifs. Enlevez laccu/les batteries, si vous nutilisez pas les appareils pour bien longtemps. Indication pour lélimination Ne jetez pas les appareils électriques/électroniques ou les accus et les batteries usés dans les ordures ménagères! Mais, déposez les appareils défectueux/usés chez un point de rassemblement public. Les autorités compétentes locales vous fournissent des informations appropriées. Veuillez respecter les prescriptions nationales pour enlever les déchets et déposez les accus/batteries usés (seulement complètement déchargés) chez un point de rassemblement public. 25 Données techniques Gamme des fréquences: Portée: Tension de service de l'appareil bébé: 1,880-1,900 GHz max. 300 m (dépendant de l'environnement) bloc d'alimentation DC 5 V / 500 mA ou 3 x batteries micro, type AAA Tension de service de l'appareil parents: 2.4 V / 800 mAh accu NiMH Dimensions Appareil bébé (HxLxP): Poids: 103 x 45 x 98 mm 155 g Dimensions Appareil parents (HxLxP): Poids 60 x 125 x 35 mm 105 g 26 Hersteller - Garantie Als Hersteller dieses Geräts gewähren wir, die stabo Elektronik GmbH, Münchewiese 16, 31137 Hildesheim/Deutschland eine selbständige Garantie gegenüber dem Verbraucher. Die Garantieleistung erstreckt sich auf die kostenlose Beseitigung aller Fabrikations- und Materialfehler zum Zeitpunkt des Kaufs dieses Geräts (Beschaffenheitsgarantie). Die Garantie gilt nicht für: - Transportschäden, - den Betrieb mit Zubehör, das nicht durch stabo für den Betrieb mit diesem Gerät freigegeben und entsprechend gekennzeichnet wurde - Sicherungen, Anzeigenleuchten und Halbleiter, die durch fehlerhafte Bedienung beschädigt wurden, - Geräte, die unbefugt geöffnet oder verändert wurden, - Funktionen, die nicht in der Bedienungsanleitung beschrieben sind, - Fehler durch unsachgemäße Handhabung, mutwillige Beschädigung, mechanische Überbeanspruchung, übermäßige Hitze oder Feuchtigkeitseinwirkung, ausgelaufene Batterien, falsche Versorgungsspannung oder Blitzschlag, - Verbrauchsmaterialien (Akkupacks, Batterien) - Fracht- oder Transportkosten. Gewährleistungsansprüche gegenüber dem Händler aufgrund des Kaufvertrages bestehen gesondert neben diesen Garantie-bestimmungen und werden hierdurch nicht eingeschränkt. Dieser Garantie-Abschnitt ist nur gültig, wenn er vollständig ausgefüllt und unterschrieben ist. Geräte-Typ:________________________________ Geräte-Nummer(n):__________________________ Gekauft bei: (Stempel oder genaue Anschrift des Händlers) Kaufdatum:_____________________________ Unterschrift des Händlers:______________________________ 14 Gibt es Schwierigkeiten, das neue Gerät in Betrieb zu nehmen? Hochwertige elektronische Geräte sind sehr komplex: kleine Ursachen haben manchmal große Wirkung! Viele Probleme lassen sich jedoch schnell und unkompliziert am Telefon lösen. Schicken Sie deshalb Ihr neues Gerät nicht gleich zurück, STOP sondern nutzen Sie die telefonische Beratung des stabo Service-Teams. Unsere Techniker kennen sich mit den Geräten sehr genau aus und stehen Ihnen gerne mit praktischen Tipps und kompetenten Ratschlägen zur Seite. Sie erreichen uns Mo. bis Fr. von 9 -12 Uhr: Telefon 05121-762032 Halten Sie für das Gespräch das Gerät und die Bedienungsanleitung bereit. stabo Elektronik GmbH Münchewiese 14 -16 . 31137 Hildesheim/Germany Tel. +49 (0) 5121-76 20 - 0 . Fax: +49 (0) 5121- 51 29 79 Internet: www.stabo.de . E-Mail: [email protected] Irrtümer und Änderungen vorbehalten. Errors and technical modification reserved. Sous réserve derreurs et de modifications. Copyright © 06 / 2012 stabo Elektronik GmbH 14