1
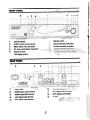
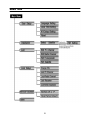
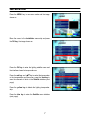
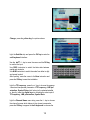
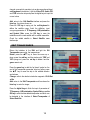
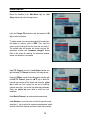
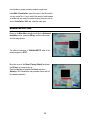
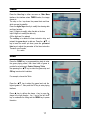
DIGITAL SATELLITE RECEIVER
ESR-D103
INSTRUCTION MANUAL
1
SATETY INSTRUCTION
Please read the following instructions carefully
Do not overload the following wall outlets, extension cords or integral convenience receptacles as this
can result in a risk of fire or electrical shock
Never allow liquids, spray or other materials to come into contact with the inside of the STB.
Unplug the STB from the wall outlet before cleaning.
Use a soft cloth and a mild solution of washing-up liquid to clean the exterior of the STB.
Allow clear apace around the STB for sufficient ventilation.
Do not use the STB where it is exposed to direct sunlight or near a heater.
Never stack other electronic equipment on top of the STB.
Locate the STB indoor place properly to prevent lightening, raining and direct sunlight.
Do not use any attachment that are not recommended as these may cause hazards or damage the
equipment.
Do not connect or modify cables where the STB is plugged in.
The LNB cable must be earthed to the system earth for the satellite dish.
Do not cover the STB or place it on a unit that emits heat.
1
FRONT PANEL
1
2
5
4
3
6
7 8 910
.
1.
2.
3.
4.
5.
Standbyswitch
Volumedecrease/leftbutton
Channelincreaselup button
Cardslot (spare)
AUDIO:choosesoundchannel
MENU:Menuentrylexitbulton
OK: menuconfirmationlchannellist
Remotereceiver
LEDdisplaywindow
.;.
REAR PANEL
1
1.
2.
3.
4.
5.
2
3
6.
7.
8.
9.
Powerswitch
Satellitesignaloutputterminal
Satellitesignalinputterminal
Audiosignaloutputterminal
Videosignaloutputterminal
22
CATVsignaloutputterminal
CATVsignalinputterminal
TV scart
REMOTE CONTROLLER KEYS
Advice operates each function of the STB by using the button on the remote controller. Please read this
section to help advance your understanding of the function of the STB.
Non-menu: to mute the audio output
To instruct the unit to enter standby mode
Non-menu: to select the favorite installed channel
Non-menu: to show satellite list
Menu mode: to select or adjust the parameter
Non-menu: volume decrease/increase
Menu mode: to move cursor up/down
Non-menu: to turn the channel forward or backward
To return to the non-menu (program-watching mode)
To enter the Main Menu interface or return to the last grade interface
Ln non-menu: to choose the channel
To show the Select Satellite interface
Non-menu: Press once, press +/ -, ? /? to move the selected area, press the OK key to
magnify the area and press the key once more to recover the normal
Non-menu: to show the EPG Infor
Non-menu: to show the image’s brightness, contrast, color and modify
Non-menu: To edit the audio channel
3
Non-menu: to shift from present channel to the last one
To enter the timer edits function
To select the TV or radio mode
Non-menu: to show the stored channel list, menu mode: to confirm the
operation
Non-menu: to show the present channel’s information
Non-menu: to enter Game interface
Non-menu: to pause the active image and press twice recover the active
image
PRECAUTIONS ABOUT BATTERIES
Improper use of batteries may cause corrosion or fluid leakage. Please observe the following
instructions for the safe use of batteries
1. Do not mistake the polarities of batteries
2. Never leave dead batteries in the remote control
3. Remove batteries from the remote controller it is not going to be used for a certain time
4. Do not attempt to disassemble, short-circuit, heat, recharge or throw the batteries into the fire
source
5. Do not use new batteries and old one together, or which is different type
6. Wipe away any electrolyte fluid inside the remote controller, and insert new batteries
4
SYSTEM CONNECTION
Connect the AUDIO, VIDEO, and Scart output terminals with the corresponding terminals of TV set.
Adjust the direction of the dish according to the antenna signal level display on the screen.
Connect F terminal to both ends of the cable, one end to LNB of satellite antenna and the other end to
“SAT IN” input terminal of this unit.
Please make sure that the F terminals are connected well.
Do not tie antenna cable with power line.
POWER ON
n Plug the machine and press its power switch to keep the “1” status, the unit enters its normal
mode
n Press the standby key on the remote controller to the remote receiving window of the machine or
the key on the set, which enters its standby mode and the “standby” character appears on the
screen for seconds. Re-press the key, the unit recovers to its normal
n If the channel has been locked, the lock light lights up
5
MENU TREE
6
INSTALLATION
Press the MENU key in non-menu mode and the image
shows as
Move the cursor to the Installation menu strip and press
the OK key, the image shows as:
Press the OK key to enter the lighting satellite name and
the interface shows its transponders as:
Press the red key and ▲▼key to select the transponder
or the transponders and then scan, press the blue key to
scan the channels of which in the Satellite interface (next
page)
Press the yellow key to delete the lighting transponder
strip
Press the blue key to enter the Satellite menu interface
(next page):
7
Press the MENU key to return to the Select Satellite
interface, press the red key and ▲▼ key to select one
or more the satellites and press the blue key to enter the
Satellite interface ( right side) to scan the chosen satellite
or satellites
Move the cursor to the Satellite strip, press the +/- key to
select the chosen satellite (when have selected more than
one satellite in Select Satellite interface) name which
above-mentioned
Move the cursor to the LNB type strip, therein, eight types,
press the +/- key to select the suitable one or, press the OK
key to enter LNB setting interface, the image is:
Light the LNB index (1.8) to choose one type name (for
example, Type 1 is as indication)
Light the LNB Freq. Low and LNB Freq. High menu strip,
press the +/- key to install the parameter by referring to the
frequency value of tuner on the antenna or the number
keys to input the digits directly, finish installing, force down
the OK key to save the installation
Light the DiSEqC strip to select the port through pressing
the +/- key; the DiSEqC parameter of the port must be
consistent with the actual input terminal of the present
satellite antenna
Attention:
LNB Power: Single machine situation: keep the status on “on”
Loop situation: keep the status of the machine
which connected the satellite sig
-nal on the “on” and others on
the “off”
Press the MENU key to return the interface to the Satellite one
as above, light the TP Freq., press the +/- key to choose the sui
-table parameter of TP Freq., TP Polar, TP SR or, press the digi
-tal keys to input the correct value which what we according to
are either Quality or Level strips show together a certain length
8
and whether the lock light lights up simultaneously.
Light the sixth strip; press the +/- key to switch the status
between “on” and “off”, press the OK key to enter the
motor interface when the “on” status is chosen and the
interface shows as
Light the seventh instruction strip; press the OK key to
spring out a inquire window with a sentence “ARE YOU
SURE?” Use pressing the red key to confirm and the
green one to give up
Light ht e fourth instruction strip to press the +/- key to
choose one of the three instructions: Off, West, and East.
Press the OK key to confirm. Therein:
1. West: to limit the westward limit of the dish-adjustment
2. East: to limit the eastward limit of the dish-adjustment
3. Off: to give up the limit set
Light the Position auto, Move dish, Step Move; the functions
of these three instructions are to adjust the direction and angle
of dish, hereinto:
1. Position auto: the drive instruction will not be stopped
until to press the OK key
2. Move dish: to drive the dish to adjust a relative biggish
range
3. Step Move instruction is to modify a relative minor range.
What we according to of adjustment is the Quality strip show
its longest length, in which:
=>E: to drive the dish to the east direction
=>W: to drive the dish to the west direction
=>Stop: to stop the adjustment
After adjustment:
1. Light the fifth instruction strip Store position, force down
the number keys to input the adjusted situation (position)
code and then press the OK key to save the code
2. Light the sixth instruction strip Goto position, use input
the code value to drive the dish to the situation where
has saved
The function of eighth instruction strip Recalculate position
is to send an instruction to the motor, and calculate the
9
suitable situation by itself
Press the MENU key to return to the Satellite interface to
start the scan, there four modes to search the satellite
channels, they are: Auto, TP, FTA, NIT. In which:
Auto: to scan all the channels in the selected satellite name.
TP: to scan the channels which in the chosen transponder
FTA: to scan the channels, which are, belong to the free to
air
NIT: to scan the channels, which are, belong to the network
For example: press the blue key to search the FTA
channels and the image shows as:
Finish scanning, if the channel has been searched then the
machine will auto save all the scanned channels and turn
the image to program-watching mode, or, return to the
Select Satellite interface
USER SETUP
Force down the MENU key on program-watching mode,
light and press the User Setup strip, the image shows:
LANGUAGE SETTING
Light the Language Setting strip and press the OK key to
enter its sub-menu, the picture shows
Language Setting: press the +/- key to select the
appropriate language. Therein, Audio Language: what
language is chosen means which is used for owning the
priority in broadcasting. The function which rest with the
support of satellite service
10
LOCAL TIME SETTING
Light the Local Time Setting and enters its sub-menu:
GMT: the Greenwich Meantime-central Europe time
Selected time zone: to choose the appropriate location
Summer time: daylight saving time
Time offset: to modify the time
What the Current Time appears is the synchro-time which
is sent by the satellite signal
A/V OUTPUT SETTING
Light the A/V Output Setting menu strip and enters
Aspect: use the +/- key to select the window style (4:3; 16:9)
Delay Time: use the +/- key to select 2-7second, always
etc.; the magnitude of value decide the length of time of
channel info strip stay on the screen when switch the
channel.
Always: the instruction means the info strip will stay on the
screen until press the EXIT key when switching
Transparency: use the +/- key to modify the value and the
magnitude of it decide the transparency degree of menu
Light the About menu strip and press the OK key to enter
its sub-menu, the interface shows the model and software
of the machine:
EDIT
Return to the Main Menu interface then light ht e Edit
menu strip and force down, the image shows as:
11
EDIT TV CHANNEL
Light Edit TV Channel and enters its interface:
Press the green key repeatedly to change the mode and
which will be shown on the yellow strip correspondingly,
the status includes: MOVE, FAV OR1-4, SORT, DELETE
1. Move: when the yellow strip shows the “move” character,
press the yellow key, press the ▲▼ key to move the
channel name strip to the suitable location and press the
yellow key once more to release.
2. Favor: when the yellow strip shows “favor1… favor4”
character, press the yellow key and press the ▲▼
key to add the “heart” symbol on the end of channel
name strip, the symbol shows the channel has been
added in the present favor mode. The same operation in
turn to finish the rest of three favor modes
3. Delete: to remove the chosen channel name, press the
yellow key when the yellow strip shows the “delete”
word, the window with “YES” and “NO” springs out,
press the red key once more to delete or green key to
give up
4. Sort : when the yellow strip shows the “sort” word, press
the yellow key, the list which what we according to sort
the channels spring out, press the ▲▼ key to choose
one suitable instruction to complete the sorting
Force down the red key to switch the list mode between TV and
radio
Force down the blue key to show the satellite name list
EDIT RADIO CHANNEL
The same operation as above-mentioned
EDIT RADIO CHANNEL
Return to the Edit interface and enter the Edit Satellite interface
the image shows:
Delete: press the red key, the window with “YES” and “NO”
Instructions springs out, force down the red key again to delete
the selected satellite name and the green one to give up
12
Change: press the yellow key, the picture shows:
Light the Satellite strip and press the OK key to enter the
soft-keyboard interface:
Use the ▲▼, +/- key to move the cursor and the OK key
to confirm the input
Use CAPS instruction to switch the letter state between
capital and miniscule
Use NUM instruction to switch the mode from letter to digit
and special symbol
After inputting, move the cursor to the Save instruction and
press the OK key to save the installation
Light the TP frequency, press the +/- key to choose the appropr
-iate stored transponder parameter of TP frequency, LNB pol
-arization, Symbol Rate which belong to the selected satellite
or, directly, press the digital keys to complete the value input of
TP frequency, LNB polarization, Symbol Rate
Light the Channel Name menu strip; press the +/- key to choose
the channel’s name which belong to the chosen transponder,
press the OK key to appear the soft-keyboard to rename the
13
channel name which operation just as above-mentioned about
soft-keyboard introduction. Light the Video PID, Audio PID,
and PCR instruction strip and press the digital keys to input the
correct value,
Add: return to the Edit Satellite interface and press the
blue key, the picture shows as:
Press the OK key to spring out the soft-keyboard to
define the satellite name, finish the definition, input
one-group parameter of TP frequency, LNB polarization
and Symbol Rate, press the OK key to save the
installation and the new satellite will be added meanwhile.
Check the added satellite in Select Satellite menu
interface pls
EDIT TRANSPONDER
Return the interface to the Edit and light the Edit
Transponder menu strip, the image shows
Delete: press the ▲▼ key to move the cursor up or
down, press the red key and the window with “YES” and
“NO” springs out, press the red key to delete it and the
green one to exit
Press the green key to add the “up/ down” symbol on the
end of the transponder parameter strip turn yellow, press
the ▲▼ key to move the strip to the suitable situation
and release
Change: refer to the relative introduction segment of Edit Sat
-ellite
Add: return to the Edit Transponder and force down the
blue key to enter the image:
Press the digital keys to finish the input of parameter of
TP frequency, LNB polarization, Symbol Rate, press the
OK key to save the new added transponder and which can
be detected in the interface of Select Transponder of
Select Satellite
14
LOCK SETUP
Return the interface to the Main Menu, light the Lock
Setup menu strip and the image shows:
Light the Change PIN instruction strip and press the OK
key to enter its interface
To realize create one new private code by this instruction:
the default or primary code is “0000”. First, input the
correct current code and then the new one and verify it.
The verified code will become the current one and the
information window with “password changed!” phrase
flash on the screen for seconds; the information window
shows the operation is successful
Lock TV Channel: return the Lock Setup interface and
light the Lock TV Channel instruction, the image shows
Press the OK key to enter its interface which is similar with
the Edit TV Channel, press the ▲▼ key to select the
channel name which will be locked and press the yellow
key to add one “lock” symbol on the end of installing
channel name strip. Just as the right side image indicates.
Press the yellow key once more to unlock the lock
installation
Lock Radio Channel: as same as above-mentioned
Lock Receiver: move the cursor to the forth instruction strip,
press the +/- key to switch the receiver mode between locked
and free. When the machine has been locked, start machine
15
from standby or power-on status needs the code input
Lock Edit & Installation: move the cursor to the fifth instructi
-on strip, press the +/- key to switch the receiver mode betwee
-n locked and free, when the mode is locked, enter the sub-m
-enu of Installation, Edit, etc. need the code input
ADVANCED SETTING
Return to the Main Menu interface and light the Advanced
Installation menu, press the OK key to enter its sub-menu
and the image shows:
The relative introduction of Edit/Add SAT/TP refer to the
relative segment in EDIT
Move the cursor to the Reset (Factory Default) and press
the OK key, the image shows as
Press the red key to complete the Reset instruction
Attention: all the installation and parameter former set will
be cleared completely!
16
TIMER
Press the blue key in either non-menu or Main Menu
interface, the interface enters TIMER function, the image
shows as
The strip on the top shows the present date and time
which are sent by satellite
Press the digital keys directly to modify the showing date
and time, hereinto:
Input 12 digits is to modify either the date or the time
Input 8 digits is to modify the date only
(All the digits are 0 is useless)
The red key is to delete the timer instruction strip, and
instead, the green key is to add one. Press the ▲▼, +/key to move the cursor up/ down, press the yellow and
blue keys to adjust the parameter of the timer instruction.
Thereinto: mod->mode;
A-> audio
GAME
Press the GAME key in program-watching state to enter
the game playing status, their three kinds of game to
provide for entertainment: Snake, Gobang, Tetris
Use pressing the ▲▼ key to select the game strip and
OK key to enter which interface
For example, choose the Tetris:
Press the ▲▼ key to adjust the game level and the
highest grade is 7, then press the OK key to enter playing
interface
Press ▲ key to deform the shape, + key to move the
shape to the right direction , the – key to the left, the▼
key to accelerate the falling and the MENU key to pause
the action
17
TELEPHONE DIRECTORY
Either in non-menu mode to press the TEL key or MAIN
MENU to press the green key, the interface enters the
Telephone directory one
Press the green key to add the telephone list, and instead
the red key to remove which.
Press the +/-, ▲▼ key to redden the item of the
telephone list which as Name, Tel.No.(Office),
Tel.No.(Res), Mobile No. to edit, Therein:
1. Use the soft-keyboard to complete the name definition
2. Press the digital keys to complete input of the rest
three items
FEATURE
Advanced Feature
Multi-Mode auto search satellite programs (AUTO/FTA/NIT/TP)
Maximum storage 3000 Channels, 2000 Transponders, 150 Satellites
4 users defined Favorite groups with user-friendly editing functions
Teletext by VBI insertion
Real-time antenna signal strength indicator
Multi-satellite/transponder searching at one time
ZOOM / EPG / Recall / Timer / Still Picture
Basic Feature
Free-To-Air Compatible
High Sensitiveness, Low Eb/No Tuner
4-digital 7-segment LED
Fully DVB-S/MPEG2 Compliant
SCPC/MCPC, C-band/Ku-band Compatible
Multi-Language OSD
Automatic PAL / NTSC Detection
Satellite signal loop through
RF output, RF in, AV output, TV Scart
Convenient software up-grade (DFU&DFA) – PC to Receiver, Receiver to Receiver
256 color graphic menu
Powerful edit abilities (rename, add, delete, move) channels, transponders & satellites edit
Timer function
Editable TEL Directory
Selectable Three kinds of game
Note:
Rest with the availability of satellite service
18
SPECIFICATION
Tuner
Input Frequency
Signal Level
LNB Control
LNB Power & Polarization
950 ~ 2,150 MHz
-25dBm ~ -65dBm (75Ω)
DiSEqC1.0/ 22KHz
13V/18V (Max. 400mA)
Channel Decode
Demodulation
Input Symbol Rate
QPSK (SCPC, MCPC)
2~30MSPS
Video
Profile Level
Output System
Output Terminal
Output Level
MPEG-II MP@ ML
NTSC / PAL
RCA, TV Scart
1Vp-p (75Ω) (RCA)
Audio
Audio Decoding
Sampling Rate
Freq response
Output Level
MPEG-II layer I & II
32/44.1/48Khz
20Hz ~ 20kHz
Adjustable (600Ω unbalance)
Working condition
Power supply voltage
Power consumption
Temperature
Humidity
Size
Weight
AC: 90~240/250V 50/60 Hz
About 15W
0℃ ~ 40℃
10% ~90%
370 X 242 X 70mm(L/W/H)
Approx. 2.4Kg
19