1
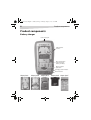
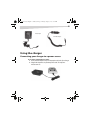
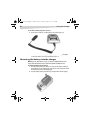
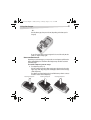
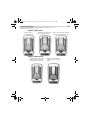
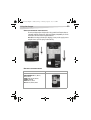
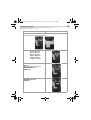
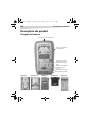
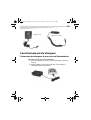
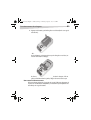
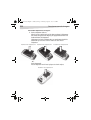
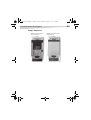
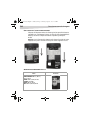
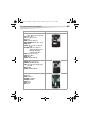
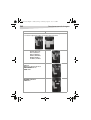
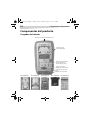
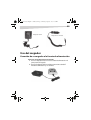
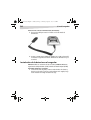
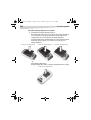
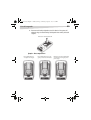
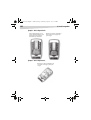
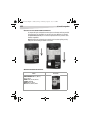
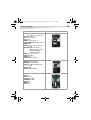
DX-DA100501 English - combined.fm Page 1 Monday, August 7, 2006 12:25 PM
Lithium-Ion Battery Charger
Chargeur de batterie ion-lithium
Cargador de baterías de Lition
DX-DA100501
U S E R G U I D E • G U I D E D E L’ U T I L I S AT E U R • G U Í A D E L U S UA R I O
DX-DA100501 English - combined.fm Page 2 Monday, August 7, 2006 12:25 PM
2
Dynex DX-DA100501 lithium-ion battery charger
Dynex DX-DA100501 lithium-ion battery
charger
Introduction
Congratulations on your purchase of the Dynex Model DX-DA100501 lithium-ion
camcorder and digital camera battery quick charger. With the included AC adapter
(for use with a standard power outlet) or the 12 V car cord, you can quickly charge
your digital camera and camcorder batteries at home or in the car.
Contents
Introduction..................................................................................................2
Important safety instructions .......................................................................2
Features ........................................................................................................3
Product components.....................................................................................4
Using the charger..........................................................................................6
Troubleshooting..........................................................................................14
Maintenance...............................................................................................15
Specifications..............................................................................................15
Warranty.....................................................................................................15
Legal notices...............................................................................................15
Français ............................................................. 16
Español .............................................................. 32
Important safety instructions
Safety precautions
Do not use this charger inside a drawer, closed cabinet, or covered with a cloth.
The heat from charging may damage the charger or the battery pack. This charger
becomes slightly warm during use.
Do not attempt to open the charger. Doing so voids your warranty.
Do not allow moisture of any kind to come in contact with the charger. Never
immerse in water for any reason.
DX-DA100501 English - combined.fm Page 3 Monday, August 7, 2006 12:25 PM
3
Features
Do not store in areas which may expose the charger to extreme temperatures.
Avoid placing in direct sunlight, such as on a car dashboard. High temperatures
will warp or melt plastics.
Do not drop the charger. A severe jolt may cause permanent damage and is not
covered by the warranty.
Follow this User Guide carefully. Follow the correct procedures when setting up the
battery charger.
Warning: For use with Lithium-Ion (Li-ion) batteries only. Do not attempt to
charge Nickel Cadmium (Ni-Cd) or Nickel Metal Hydride (Ni-MH) batteries with
this charger.
Features
• Compatible with most 3.6 V, 3.7 V, 7.2 V and 7.4 V Camcorder/Digital
Camera Lithium-Ion (Li-ion) batteries
• Precision end-of-charge voltage detection guarantees full charging of
battery packs
• Top-off function trickle charges to maintain a full charge
• Automatic battery voltage detection with LED indication
• LED status indicator displays charger mode
• Abnormal battery detection identifies faulty battery and stops charging
• Overcharge protection
• Timer protection
DX-DA100501 English - combined.fm Page 4 Monday, August 7, 2006 12:25 PM
4
Product components
Product components
Battery charger
Power input jack
Adapter plate
latches
Main charging bay
(with Sony-type
battery contacts)
Battery adapter
plate latch
Charging status indicator
Power indicator
Adapter plate A
Adapter plate B
Adapter plate C
Adapter plate D Adapter plate E
DX-DA100501 English - combined.fm Page 5 Monday, August 7, 2006 12:25 PM
5
AC adapter
12V DC adapter
Using the charger
Connecting your charger to a power source
To use with an standard AC power outlet:
1 Connect the AC adapter to the power input jack on the back of your charger.
2 Plug the AC adapter into any standard power outlet. The red power
indicator turns on.
DX-DA100501 English - combined.fm Page 6 Monday, August 7, 2006 12:25 PM
6
Using the charger
To use with a 12 V DC (car) power connector:
1 Connect the 12 V DC car cord barrel plug to the power input jack.
2 Insert the 12 V DC car cord cigarette lighter plug into the cigarette lighter
socket of the vehicle. The red power indicator turns on.
Mounting the battery into the charger
Warning: For use with Lithium-Ion (Li-ion) batteries only. Do not attempt to
charge Nickel Cadmium (Ni-Cd) or Nickel Metal Hydride (Ni-MH) batteries.
To mount the battery into the charger:
1 Note where the guides and contacts are located on the battery and align
them with the corresponding guides and contacts on the charger, then slide
the battery into place in the charging bay.
2 Press the battery down, then slide it up (away from the indicator lights).
DX-DA100501 English - combined.fm Page 7 Monday, August 7, 2006 12:25 PM
7
Using the charger
- OR Slide the battery up, then press it down (depending on the battery to be
charged).
Do not force the battery onto the charger. If it does not slide easily into the
guides, re-align it and try again.
USING AN ADAPTER TRAY
Depending on your battery type, you may need to use an adapter tray. Refer to the
Battery Compatibility List to determine which adapter tray should be used with
your battery type.
To install the adapter tray onto the charger:
1 For adapter trays A, B, or C:
Slide the central notch on the adapter tray’s upper edge into the slot on the
upper edge of the charger bay, then carefully press down on the lower edge
of the adapter tray.
The adapter tray snaps firmly in place. Install the battery so that its contacts
meet the contacts on the adapter tray.
Installing Adapter A
Installing Adapter B
Installing Adapter C
DX-DA100501 English - combined.fm Page 8 Monday, August 7, 2006 12:25 PM
8
Using the charger
- OR For adapter tray D:
Push the tray upward. The tray snaps firmly into place.
Installing Adapter D
2 To remove the adapter tray, pull back on the battery/adapter latch, then lift
the adapter tray up and out of the charger.
Removing Adapter D
DX-DA100501 English - combined.fm Page 9 Monday, August 7, 2006 12:25 PM
9
Using the charger
Example - Adapter Plate A
Adapter plate A
locked into place.
Adapter plate A with guides
and contacts lined up.
Battery in adapter plate A locked
into place and ready to charge.
Example - Adapter Plate B
Adapter plate B with guides
lined up. Note that the tray is
flipped up due to cell type.
Battery in adapter plate B
locked in place and ready to
charge.
DX-DA100501 English - combined.fm Page 10 Monday, August 7, 2006 12:25 PM
10
Using the charger
Example - Adapter Plate C
Battery in adapter plate C locked
in place and ready to charge.
Example - Adapter Plate D
Adapter plate D
locked in charger.
Battery locked in Adapter plate D
DX-DA100501 English - combined.fm Page 11 Monday, August 7, 2006 12:25 PM
11
Using the charger
USING THE UNIVERSAL ADAPTER PLATE
The universal adapter plate label provides only a partial list of batteries that are
compatible with this charger plate. Refer to the Battery Compatibility List for the
entire make and model list of compatible batteries.
Note: When inserting your battery for charging, you may need to apply pressure
and pull down to open the spring-loaded slide tray.
BATTERY POSITIONING GUIDE
Batteries
JVC: BN-V306, BN-V312U
KONICA-MINOLTA: NP-200, NP-400,
NP-800, NP-900
NIKON: EN-EL1, EN-EL3, EN-EL8
OLYMPUS: PS-BLM1
SANYO: DB-L20, UR-421
SONY: NP-FT1, NP-FR1, NP-FE1
Position
DX-DA100501 English - combined.fm Page 12 Monday, August 7, 2006 12:25 PM
12
Using the charger
Batteries
CANON: NB-1L, NB-1LH, NB-2L, NB-2LH,
NB-3L, NB2F12, BP-2L12, BP-3LCL
CASIO: NP-30, NP-40
FUJI: NP-40, NP-60, NP-120
JVC: BN-V37U
KODAK: KLIC 5000, KLIC 5001
KONICA-MINOLTA: DR-LB4, NP-1, NP-600
NIKON: EN-EL5
OLYMPUS: LI-10, LI-10B, LI-12B, LI-20B,
LI-40B
PANASONIC: CGR-S101A, CGA-S301,
CGA-S302A, CGA-S003A/1B,
DMV-BC7, DMV-BCB7,
VW-BVA05, VM-VBA10
PENTAX: D-L12, D-L17, D-L18
RICOH: DB-40, DB-43
SANYO: DB-L10
TOSHIBA: PDR-BT2, PDR-BT3
KONICA: DR-LB1
KYOCERA: BP-800S, BP-1000S
POLAROID: PR111DG, PR110DG
SHARP: AD-S30BT, AD-S31BT, AD-T50BT,
AD-T51BT
SONY: LIP-4WM
TOSHIBA: PDR-BT1, PDR-BT9
FUJI: NP80, NP100
JVC: BN-V101
KODAK: KLIC-3000
PANASONIC: VW-VBP10
POLAROID: PR105DG
RICOH: DB-30
SANYO: UR-211
SONY: LIP-10
Position
DX-DA100501 English - combined.fm Page 13 Monday, August 7, 2006 12:25 PM
13
Using the charger
Batteries
Position
For the batteries in the boxes below, you need to flip up the Flip 2 mating battery contact
terminals found on the right side of charger plate.
PANASONIC: CGA-DU07, CGA-DU14,
CGA-DU21,CGA-S001E,
CGA-S002,CGR-602A,
CGR-602E, CGR-D120,
CGR-D220, DMW-BCA7,
MW-BM7, MW-BL14,
VW-VBD07, VW-VBD14
CASIO: NP-20
FUJI: NP-30
JVC: BN-VF707, BN-VF714, BN-VF733
KONICA-MINOLTA: NP-700
NIKON: EN-EL2
CANON: NB-4L
PANASONIC: DMW-BCC12
RICOH: DB-60
DX-DA100501 English - combined.fm Page 14 Monday, August 7, 2006 12:25 PM
14
Troubleshooting
Charging the battery
Charging begins as soon as the battery is properly connected. The green charging
status indicator blinks as the battery is being charged. When the battery is fully
charged, the green charging status indicator stops blinking and stays on. You can
remove the battery for use when this happens, but we recommended that you
leave the battery on the charger for another 30 minutes to ensure a full (topped
off) charge.
ABNORMAL BATTERY DETECTION
Your charger detects an abnormal battery pack by sensing the voltage. If it is too
high or too low, or if the battery pack does not reach full charge status within 8
hours of charging, the charger stops the operation immediately and indicate the
abnormal condition by flashing both the power and battery status indicator LEDs.
Normal operation resumes when the faulty battery is removed.
Troubleshooting
Problem
Possible causes and solutions
No indicator lights
• Confirm that the AC Adapter is firmly connected at
both ends (wall and power input jack)
• Confirm that the power outlet is functioning normally
• Confirm that the car cord is firmly connected at both
ends (cigarette lighter socket and power input jack)
• Confirm that the cigarette lighter socket is
functioning normally
Power light only
• The battery is fully charged *
• The battery is mounted incorrectly, remove and
remount the battery
• Clean the battery and charger contacts
• The battery may be defective*
Power and battery status LEDs both blinking Defective battery*
Hissing noise while charging
Normal operation due to advance switching
circuitry
* To determine if the battery is overcharged or defective, place it on the camcorder or digital camera and turn it
on. If the camcorder or digital camera does not turn on, the battery is probably defective. If the camcorder or
digital camera does not operate, leave the power turned on for 30+ minutes, then remove the battery and put it
on the charger. The charger should go into charge mode, indicated by the green blinking charge status indicator.
DX-DA100501 English - combined.fm Page 15 Monday, August 7, 2006 12:25 PM
15
Maintenance
Maintenance
If the charger must be cleaned, make sure it is unplugged, and then wipe the body
of the charger with a clean cloth lightly dampened with mild detergent. To clean
the metal contacts, use a clean cloth lightly dampened with rubbing alcohol.
Specifications
Input:
Stand-by current:
Charging current:
Charge termination:
12 V DC
30 mA
800 mA max @ constant current mode
Fixed voltage
(4.2 V for 3.6 V battery, 8.4 V for 7.2 V battery)
Warranty
Limited 1 Year Warranty
Dynex warrants that for 1 year from date of purchase as stated on your receipt, it
will replace this product if found to be defective in materials or workmanship. If
defective, return the item to the store where it was purchased before the
expiration of the 1 year warranty period, with your original receipt, and we will
replace it with a then-current equivalent Dynex product (or a pro-rated refund at
Dynex's option). This warranty is available only for the original purchaser of this
product. Dynex will not be responsible for any incidental or consequential
damages or for any loss arising in connection with the use or inability to use this
product. Some states and provinces do not allow the exclusion or limitation of
incidental or consequential damages, so the above limitation or exclusion may not
apply to you. For defective products purchased online, please contact:
www.dynexproducts.com
Dynex support service at 1-800-305-2204. Dynex, Richfield, Minnesota
Legal notices
© 2006 Dynex. DYNEX and the DYNEX logo are trademarks of Best Buy Enterprise
Services, Inc. Other brands and product names are trademarks or registered
trademarks of their respective holders. Specifications and features are subject to
change without notice or obligation.
Support number: (800) 305-2204 URL: www.dynexproducts.com
DX-DA100501 English - combined.fm Page 16 Monday, August 7, 2006 12:25 PM
16
Chargeur de batterie ion-lithium DX-DA100501 de Dynex
Chargeur de batterie ion-lithium
DX-DA100501 de Dynex
Introduction
Félicitations d’avoir acheté ce chargeur rapide de batterie ion-lithium pour
appareil photo numérique et caméscope, modèle DX-DA100501 de Dynex. Avec
l’adaptateur CA inclus (pour utilisation sur une prise secteur standard) ou le câble
pour voiture de 12 V, il est possible de charger rapidement les batteries d’un
appareil photo ou d’un caméscope chez soi ou dans la voiture.
Table des matières
Introduction................................................................................................16
Instructions de sécurité importantes...........................................................16
Caractéristiques ..........................................................................................17
Description du produit ...............................................................................18
Fonctionnement du chargeur......................................................................19
Problèmes et solutions................................................................................29
Entretien.....................................................................................................30
Spécifications..............................................................................................30
Garantie......................................................................................................30
Avis juridiques.............................................................................................31
Instructions de sécurité importantes
Mesures de sécurité
Ne pas utiliser ce chargeur dans un tiroir, une armoire fermée ou recouvert d’un
tissu. La chaleur dissipée pendant la charge peut endommager le chargeur ou le
bloc-batterie. Ce chargeur chauffe légèrement pendant son utilisation.
Ne pas tenter d’ouvrir le chargeur. Cela annulerait la garantie.
Ne pas exposer le chargeur à une quelconque humidité. Ne jamais l’immerger
dans l’eau.
DX-DA100501 English - combined.fm Page 17 Monday, August 7, 2006 12:25 PM
Caractéristiques
17
Ne pas entreposer le chargeur dans des zones où il serait exposé à des
températures élevées. Éviter de l’exposer à la lumière directe du soleil, par
exemple ne pas le mettre sur le tableau de bord d’un véhicule. Des températures
élevées déformeront ou feront fondre le plastique.
Ne pas faire tomber le chargeur. Une secousse importante peut causer des
dommages permanents non couverts par la garantie.
Se référer à ce Guide de l’utilisateur avec attention. Observer les procédures
recommandées pour l’installation du chargeur de batterie.
Avertissement : Ne doit être utilisé que pour des batteries ion-lithium. Ne pas
essayer de charger des batteries au nickel-cadmium (Ni-Cd) ou à hydrure
métallique de nickel (NiMh) avec ce chargeur.
Caractéristiques
• Compatible avec la majorité des batteries ion-lithium de 3,6 V, 3,7 V, 7,2 V
et 7,4 V pour appareil photo numérique ou caméscope
• Un dispositif de détection de la tension détermine avec précision le niveau
de charge, garantissant la pleine charge des bloc-batteries
• La fonctionnalitécomplément de charge et charge d’entretien permet de
maintenir la charge totale en permanence
• Détection automatique de tension avec DEL témoin
• La DEL témoin indique le mode du chargeur
• Dispositif de détection d’anomalie de la batterie pour arrêter la charge
• Protection contre les surcharges
• Temporisation de protection
DX-DA100501 English - combined.fm Page 18 Monday, August 7, 2006 12:25 PM
18
Description du produit
Description du produit
Chargeur de batterie
Prise d’entrée de l’alimentation
Pattes de verrouillage
de l’adaptateur
Logement de charge
principal (avec bornes
pour batteries de type
Sony)
Patte de verrouillage de
l’adaptateur pour
batterie
Témoin d’état de charge
Témoin de Marche/Arrêt
Adaptateur A
Adaptateur B
Adaptateur C
Adaptateur D
Adaptateur E
DX-DA100501 English - combined.fm Page 19 Monday, August 7, 2006 12:25 PM
19
Adaptateur CA
Adaptateur 12 V CC
Fonctionnement du chargeur
Connexion du chargeur à une source d’alimentation
Pour l’utiliser avec une prise secteur CA standard:
1 Connecter l’adaptateur CA à la prise d’entrée d’alimentation à l’arrière du
chargeur.
2 Brancher l’adaptateur sur n’importe quelle prise secteur standard. Le
témoin d’alimentation rouge s’allume.
DX-DA100501 English - combined.fm Page 20 Monday, August 7, 2006 12:25 PM
20
Fonctionnement du chargeur
Pour l’utiliser avec un connecteur d’alimentation 12 V CC (de voiture) :
1 Connecter la fiche banane du câble pour voiture de 12 V CC dans la prise
d’entrée d’alimentation.
2 Insérer la prise allume-cigare du câble pour voiture de 12 V CC dans la
douille de l’allume-cigare du véhicule. Le témoin d’alimentation rouge
s’allume.
Installation de la batterie dans le chargeur
Avertissement : Ne doit être utilisé que pour des batteries ion-lithium. Ne pas
essayer de charger des batteries au nickel-cadmium (Ni-Cd) ou à hydrure
métallique de nickel (NiMh).
Pour installer la batterie dans le chargeur :
1 Noter où les guides et les bornes sont situées sur la batterie et les aligner
avec les guides et bornes sur le chargeur, puis glisser la batterie dans le
logement de charge.
DX-DA100501 English - combined.fm Page 21 Monday, August 7, 2006 12:25 PM
Fonctionnement du chargeur
21
2 Appuyer sur la batterie, puis la faire glisser vers le haut (dans le sens opposé
aux témoins).
- OU Insérer la batterie, puis appuyer dessus pour la faire glisser vers le bas (en
fonction de la batterie à charger).
Ne forcer en aucun cas l'introduction de la pile dans le chargeur. Si elle ne
glisse pas facilement dans les guides, l’aligner de nouveau et réessayer.
UTILISATION D’UN ADAPTATEUR
En fonction du type de batterie, il peut être nécessaire d’utiliser un adaptateur. Se
reporter à la Liste de batteries compatibles pour déterminer quel adaptateur doit
être utilisé pour ce type de batterie.
DX-DA100501 English - combined.fm Page 22 Monday, August 7, 2006 12:25 PM
22
Fonctionnement du chargeur
Pour installer l’adaptateur sur le chargeur :
1 Pour les adaptateurs A, B ou C :
Glisser l’encoche centrale située sur la bordure supérieure de l’adaptateur
dans la fente du logement du chargeur, puis appuyer délicatement sur la
bordure inférieure de l’adaptateur.
L’adaptateur s’enclenche solidement dans son emplacement. Installer la
batterie afin que ses bornes soient en contact avec les bornes de
l’adaptateur.
Installation de l’adaptateur A
Installation de l’adaptateur B
Installation de l’adaptateur C
- OU Pour l’adaptateur D:
Pousser l’adaptateur vers le haut. La plaque s’enclenche en place.
Installation de l’adaptateur D
DX-DA100501 English - combined.fm Page 23 Monday, August 7, 2006 12:25 PM
Fonctionnement du chargeur
23
2 Pour enlever l’adaptateur, tirer sur la patte de verrouillage de l’adaptateur
pour batterie, puis sortir l’adaptateur du logement du chargeur par le haut.
Retrait de l’adaptateur D
Exemple - Adaptateur A
Adaptateur A enclenché
dans son logement.
Adaptateur A avec guides et
bornes alignés.
Batterie dans l’adaptateur A
enclenché dans son logement
et prête pour la charge.
DX-DA100501 English - combined.fm Page 24 Monday, August 7, 2006 12:25 PM
24
Fonctionnement du chargeur
Exemple - Adaptateur B
Adaptateur B avec les guides
alignés. Noter que
l’adaptateur a été inversé en
raison du type de batterie.
Batterie dans l’adaptateur B
enclenché dans son logement
et prête pour la charge.
Exemple - Adaptateur C
Batterie dans l’adaptateur C
enclenché dans son logement
et prête pour la charge.
DX-DA100501 English - combined.fm Page 25 Monday, August 7, 2006 12:25 PM
25
Fonctionnement du chargeur
Exemple - Adaptateur D
Adaptateur D enclenché
dans le chargeur.
Batterie enclenchée dans
l’adaptateur D.
DX-DA100501 English - combined.fm Page 26 Monday, August 7, 2006 12:25 PM
26
Fonctionnement du chargeur
UTILISATION DE L’ADAPTATEUR UNIVERSEL
L’étiquette de l’adaptateur universel ne fournit qu’une liste partielle des batteries
compatibles avec cet adaptateur de charge. Se référer à la Liste de compatibilité des
batteries pour une liste complète des batteries compatibles par marque et
modèle.
Remarque : Lors de l’insertion de la batterie pour la charger, il peut être nécessaire
d’appliquer une pression en tirant vers le bas pour ouvrir le logement à ressort.
GUIDE DE POSITIONNEMENT DE LA BATTERIE
Piles
JVC : BN-V306, BN-V312U
KONICA-MINOLTA: NP-200, NP-400,
NP-800, NP-900
NIKON : EN-EL1, EN-EL3, EN-EL8
OLYMPUS : PS-BLM1
SANYO : DB-L20, UR-421
SONY : NP-FT1, NP-FR1, NP-FE1
Position
DX-DA100501 English - combined.fm Page 27 Monday, August 7, 2006 12:25 PM
27
Fonctionnement du chargeur
Piles
CANON : NB-1L, NB-1LH, NB-2L, NB-2LH,
NB-3L, NB2F12, BP-2L12, BP-3LCL
CASIO : NP-30, NP-40
FUJI : NP-40, NP-60, NP-120
JVC: BN-V37U
KODAK : KLIC 5000, KLIC 5001
KONICA-MINOLTA: DR-LB4, NP-1, NP-600
NIKON : EN-EL5
OLYMPUS : LI-10, LI-10B, LI-12B, LI-20B,
LI-40B
PANASONIC : CGR-S101A, CGA-S301,
CGA-S302A, CGA-S003A/1B,
DMV-BC7, DMV-BCB7,
VW-BVA05, VM-VBA10
PENTAX : D-L12, D-L17, D-L18
RICOH : DB-40, DB-43
SANYO : DB-L10
TOSHIBA : PDR-BT2, PDR-BT3
KONICA : DR-LB1
KYOCERA : BP-800S, BP-1000S
POLAROID : PR111DG, PR110DG
SHARP : AD-S30BT, AD-S31BT, AD-T50BT,
AD-T51BT
SONY: LIP-4WM
TOSHIBA : PDR-BT1, PDR-BT9
FUJI : NP80, NP100
JVC : BN-V101
KODAK : KLIC-3000
PANASONIC : VW-VBP10
POLAROID : PR105DG
RICOH : DB-30
SANYO : UR-211
SONY : LIP-10
Position
DX-DA100501 English - combined.fm Page 28 Monday, August 7, 2006 12:25 PM
28
Fonctionnement du chargeur
Piles
Position
Pour les batteries dans le tableau ci-dessous il est nécessaire de basculer « Flip 2 » situé sur
le côté droit de l’adaptateur pour faire correspondre les bornes de batteries.
PANASONIC : CGA-DU07, CGA-DU14,
CGA-DU21,CGA-S001E,
CGA-S002,CGR-602A,
CGR-602E, CGR-D120,
CGR-D220, DMW-BCA7,
MW-BM7, MW-BL14,
VW-VBD07, VW-VBD14
CASIO: NP-20
FUJI: NP-30
JVC: BN-VF707, BN-VF714, BN-VF733
KONICA-MINOLTA: NP-700
NIKON : EN-EL2
CANON : NB-4L
PANASONIC : DMW-BCC12
RICOH : DB-60
DX-DA100501 English - combined.fm Page 29 Monday, August 7, 2006 12:25 PM
29
Problèmes et solutions
Charge de la batterie
La charge commence dès que la batterie est correctement connectée. Le témoin
de charge vert clignote dès que la batterie est en cours de charge. Quand la
batterie est complètement chargée, le témoin de charge vert cesse de clignoter et
reste allumé. Il est possible d’enlever la batterie dans ce cas, mais il est
recommandé de laisser la batterie sur le chargeur pendant 30 minutes de plus
pour une charge totale (complète).
DÉTECTION D’UNE BATTERIE DÉFECTUEUSE
Ce chargeur détecte un bloc-batterie défectueux par détection de la tension. Si
elle est trop basse ou trop haute ou si la batterie n’atteint pas la pleine charge
dans les 8 heures, le chargeur s’arrête immédiatement et indique une condition
défectueuse ; les deux DEL témoin d’alimentation et de charge se mettent à
clignoter. Le fonctionnement normal reprend quand la batterie défectueuse est
retirée.
Problèmes et solutions
Problème
Causes possibles et solutions
Pas de lumières témoin
• Vérifier que l’adaptateur CA est correctement connecté des
deux côtés (à la prise secteur et à la prise d’entrée)
• Vérifier que la prise secteur fonctionne normalement
• Vérifier que le câble pour véhicule est correctement connecté
des deux côtés (à la douille de l’allume-cigare et à la prise
d’entrée)
• Vérifier que la douille de l’allume-cigare fonctionne
normalement
Témoin d’alimentation uniquement
• Batterie complètement chargée*.
• La batterie est placée incorrectement, enlever la batterie et la
remettre en place
• Nettoyer les bornes de la batterie et le chargeur
• La batterie est défectueuse*
Les deux DEL témoins d’alimentation et de
batterie clignotent
Batterie défectueuse*
Sifflement pendant la charge
Fonctionnement normal dû à des circuits de
commutation de pointe
* Pour déterminer si la batterie est trop chargée ou défectueuse, la mettre dans le caméscope ou l’appareil photo
et le mettre en marche. Si le caméscope ou l’appareil photo ne se met pas en marche, la batterie est
probablement défectueuse. Si le caméscope ou l’appareil photo ne fonctionne pas, laisser l’appareil en marche
pendant 30 minutes ou plus, puis enlever la batterie et la mettre dans le chargeur. Le chargeur devrait se mettre
en fonctionnement, ce qui est indiqué par le témoin de charge vert clignotant.
DX-DA100501 English - combined.fm Page 30 Monday, August 7, 2006 12:25 PM
30
Maintenance
Maintenance
Si le chargeur doit être nettoyé, s’assurer qu’il est débranché, puis essuyer son
boîtier avec un chiffon propre légèrement imbibé d’un détergent doux. Pour
nettoyer les bornes métalliques, utiliser un chiffon propre légèrement imbibé
d’alcool à friction.
Spécifications
Entrée :
Courant d’attente :
Courant de charge :
Interruption de charge :
12 V CC
30 mA
800 mA maximum à courant constant
tension fixe (4,2 V pour une batterie de 3,6 V, 8,4 V
pour une batterie de 7,2 V)
Garantie
Garantie limitée d’un an
Dynex garantit que pendant un an, à compter de la date d’achat telle qu’indiquée
sur le reçu, ce produit sera remplacé s’il est considéré comme défectueux par suite
d’un vice de fabrication ou de matériaux. S’il est défectueux, le retourner au
magasin où il a été acheté avant l’expiration de la période de garantie d’un an,
accompagné du reçu original ; il sera alors remplacé par un produit Dynex
équivalent (ou remboursé proportionnellement à sa valeur à la seule discrétion de
Dynex). Cette garantie ne s’applique qu’à l’acheteur initial du produit. Dynex ne
sera pas responsable de dommages accessoires ou consécutifs ou de toute perte
résultant de l’utilisation ou de l’impossibilité d’utiliser ce produit. Certains états
n’acceptent ni l’exclusion, ni la limitation relatives aux dommages accessoires ou
consécutifs, de sorte que les limitations ou exclusions ci-dessus peuvent ne pas
être applicables au premier acheteur. Pour tout produit défectueux acheté en
ligne, contacter :
www.dynexproducts.com
Assistance de Dynex au numéro 1-800-305-2204. Dynex, Richfield, Minnesota
DX-DA100501 English - combined.fm Page 31 Monday, August 7, 2006 12:25 PM
Avis juridiques
31
Avis juridiques
©2006 Dynex. DYNEX et le logo de DYNEX sont des marques de commerce de Best
Buy Enterprise Services, Inc. Les autres noms de marques et de produits sont des
marques de commerce ou des marques de commerce déposées de leurs
propriétaires respectifs. Les spécifications et caractéristiques sont susceptibles
d’être modifiées sans préavis.
Assistance technique : (800) 305-2204Adresse Web : www.dynexproducts.com
DX-DA100501 English - combined.fm Page 32 Monday, August 7, 2006 12:25 PM
32
Cargador de baterías de Lition de Dynex DX-DA100501
Cargador de baterías de Lition de Dynex
DX-DA100501
Introducción
Felicitaciones por su compra del cargador rápido de baterías de Lition para
videocámaras y cámaras digitales de Dynex modelo DX-DA100501. Con el
adaptador de CA incluido (para uso con un tomacorriente estándar) o el cable de
auto de 12 V, usted puede cargar rápidamente las baterías de su cámara digital y
video cámara en su casa o en el auto.
Contenido
Introducción................................................................................................32
Instrucciones importantes de seguridad .....................................................32
Características.............................................................................................33
Componentes del producto .........................................................................34
Uso del cargador .........................................................................................35
Localización y corrección de fallas ...............................................................45
Mantenimiento...........................................................................................46
Especificaciones ..........................................................................................46
Garantía......................................................................................................46
Avisos legales..............................................................................................47
Instrucciones importantes de seguridad
Precauciones de seguridad
No use este cargador dentro de una gaveta, un gabinete cerrado o mientras esté
cubierto con un paño. El calor producido durante la carga puede dañar el cargador
o la batería. Este cargador se calienta ligeramente durante su uso.
No intente abrir el cargador. Hacerlo anulará su garantía.
No permita que ningún tipo de humedad entre en contacto con el cargador. En
ningún caso lo sumerja en agua.
DX-DA100501 English - combined.fm Page 33 Monday, August 7, 2006 12:25 PM
Características
33
No lo almacene en áreas que puedan exponer el cargador a temperaturas
extremadas. Evite colocar la unidad bajo luz solar directa, tal como sobre el tablero
frontal del auto. Temperaturas altas distorsionarán o derretirán el plástico.
No deje caer el cargador. Un golpe severo puede causar daño permanente y no
está cubierto por la garantía.
Siga esta Guía del Usuario cuidadosamente. Siga los procedimientos correctos
cuando instale el cargador de baterías.
Advertencia: Para uso con baterías de Litio-Ion (Lition) solamente. No intente
cargar baterías de Níquel Cadmio (Ni-Cd) o Hidruro de Metal de Níquel (Ni-MH)
con este cargador.
Características
• Compatible con la mayoría de las baterías de Litio-Ion (Lition) de 3.6 V, 3.7
V, 7.2 V y 7.4 V para video cámaras / cámaras digitales
• Detección precisa de voltaje de fin de carga garantiza la carga completa de
los paquetes de baterías
• Función de terminar carga ligeramente para mantener una carga completa
• Detección automática de voltaje de batería con indicación de LED
• El indicador LED de estado muestra el modo del cargador
• La detección de baterías anormales identifica baterías con problemas y
detiene la carga
• Protección contra sobrecarga
• Protección con temporizador
DX-DA100501 English - combined.fm Page 34 Monday, August 7, 2006 12:25 PM
34
Componentes del producto
Componentes del producto
Cargador de baterías
Conector de entrada de alimentación
Seguros para la
placa adaptadora
Bahía de carga principal
(con contactos de
batería de tipo Sony)
Seguro de la placa
adaptadora de la batería
Indicador del estado de
carga
Indicador de encendido
Placa adaptadora A
Placa adaptadora B
Placa adaptadora C
Placa adaptadora D
Placa adaptadora E
DX-DA100501 English - combined.fm Page 35 Monday, August 7, 2006 12:25 PM
35
Adaptador de CA
Adaptador de 12 V CC
Uso del cargador
Conexión de su cargador a la fuente de alimentación
Para usarlo con un tomacorriente de CA estándar:
1 Conecte el adaptador de CA al conector de entrada de alimentación en la
parte posterior del cargador.
2 Conectar el adaptador de CA en cualquier tomacorriente estándar. El
indicador de alimentación rojo se encenderá.
DX-DA100501 English - combined.fm Page 36 Monday, August 7, 2006 12:25 PM
36
Uso del cargador
Para usar con un conector de alimentación de 12 V CC (auto):
1 Conectar el enchufe para auto de 12 V CC al conector de entrada de
alimentación.
2 Insertar el enchufe del encendedor de cigarrillos de 12 V CC en el toma del
encendedor de cigarrillos del vehiculo. El indicador de alimentación rojo se
encenderá.
Instalación de la batería en el cargador
Advertencia: Para uso con baterías de Litio-Ion (Lition) solamente. No intente
cargar baterías de Níquel Cadmio (Ni-Cd) o Hidruro de Metal de Níquel (Ni-MH).
Para instalar la batería en el cargador:
1 Tome nota de donde las guías y contactos están ubicados en la batería y
alinéelos con las guías y contactos correspondientes en el cargador, luego
deslice la batería en su lugar en la bahía de carga.
DX-DA100501 English - combined.fm Page 37 Monday, August 7, 2006 12:25 PM
Uso del cargador
37
2 Presione la batería hacia abajo, luego deslícela hacia arriba (alejándola de
las luces indicadoras).
-ODeslice la batería hacia arriba y presiónela hacia abajo (dependiendo de la
batería que se carga).
No fuerce la batería en el cargador. Si no se desliza fácilmente en las guías,
realinéela e intente de nuevo.
USO DE UNA BANDEJA ADAPTADORA
Dependiendo del tipo de su batería, puede que necesite usar una bandeja
adaptadora. Refiérase a la Lista de Compatibilidad de Baterías para determinar cual
bandeja adaptadora se debe usar con su batería.
DX-DA100501 English - combined.fm Page 38 Monday, August 7, 2006 12:25 PM
38
Uso del cargador
Para instalar la bandeja adaptadora en el cargador:
1 Para instalar las bandejas adaptadoras A, B, o C:
Deslice la lengüeta central en la sección superior de la bandeja adaptadora
en la ranura en la sección superior de la bahía de carga, luego presione
cuidadosamente en la sección inferior de la bandeja adaptadora.
La bandeja adaptadora encajará firmemente en su lugar. Instalar la batería
de tal forma que sus contactos se encuentren con los contactos en la
bandeja adaptadora.
Instalación del adaptador A
Instalación del adaptador B
Instalación del adaptador C
-OPara la bandeja adaptadora D:
Empuje la bandeja hacia arriba. La bandeja encaja firmemente en su lugar.
Instalación del adaptador D
DX-DA100501 English - combined.fm Page 39 Monday, August 7, 2006 12:25 PM
39
Uso del cargador
2 Para remover la bandeja adaptadora, tire de la batería o la lengüeta del
adaptador, luego levante la bandeja del adaptador hacia arriba y afuera del
cargador.
Extracción del adaptador D
Ejemplo – Placa adaptadora A
Placa adaptadora A
encajada en su lugar
Placa adaptadora A con las
guías y contactos alineados.
Batería en la placa adaptadora
A encajada en su lugar y lista
para cargar.
DX-DA100501 English - combined.fm Page 40 Monday, August 7, 2006 12:25 PM
40
Uso del cargador
Ejemplo – Placa adaptadora B
Placa adaptadora B con las
guías alineadas. Observe que
la bandeja esta invertida
debido al tipo de batería.
Batería en la placa adaptadora
B encajada en su lugar y lista
para cargar.
Ejemplo – Placa adaptadora C
Batería en la placa adaptadora C
encajada en su lugar y lista para
cargar.
DX-DA100501 English - combined.fm Page 41 Monday, August 7, 2006 12:25 PM
41
Uso del cargador
Ejemplo – Placa adaptadora D
Placa adaptadora D
encajada en el cargador.
Batería encajada en la
placa adaptadora D.
DX-DA100501 English - combined.fm Page 42 Monday, August 7, 2006 12:25 PM
42
Uso del cargador
USO DE LA PLACA ADAPTADORA UNIVERSAL
La etiqueta de la placa adaptadora universal provee solamente una lista parcial de
las baterías que son compatibles con esta placa de carga. Refiérase a la Lista de
Compatibilidad de Baterías para ver la lista completa de la marca y modelo de las
baterías compatibles.
Nota: Cuando inserte su batería para cargarla, puede necesitar aplicar presión y
halar para abrir la bandeja deslizante con resorte.
GUÍA DE POSICIÓN DE BATERÍAS
Pilas
JVC: BN-V306, BN-V312U
KONICA-MINOLTA: NP-200, NP-400,
NP-800, NP-900
NIKON: EN-EL1, EN-EL3, EN-EL8
OLYMPUS: PS-BLM1
SANYO: DB-L20, UR-421
SONY: NP-FT1, NP-FR1, NP-FE1
Posición
DX-DA100501 English - combined.fm Page 43 Monday, August 7, 2006 12:25 PM
43
Uso del cargador
Pilas
CANON: NB-1L, NB-1LH, NB-2L, NB-2LH,
NB-3L, NB2F12, BP-2L12, BP-3LCL
CASIO: NP-30, NP-40
FUJI: NP-40, NP-60, NP-120
JVC: BN-V37U
KODAK: KLIC 5000, KLIC 5001
KONICA-MINOLTA: DR-LB4, NP-1, NP-600
NIKON: EN-EL5
OLYMPUS: LI-10, LI-10B, LI-12B, LI-20B,
LI-40B
PANASONIC: CGR-S101A, CGA-S301,
CGA-S302A, CGA-S003A/1B,
DMV-BC7, DMV-BCB7,
VW-BVA05, VM-VBA10
PENTAX: D-L12, D-L17, D-L18
RICOH: DB-40, DB-43
SANYO: DB-L10
TOSHIBA: PDR-BT2, PDR-BT3
KONICA: DR-LB1
KYOCERA: BP-800S, BP-1000S
POLAROID: PR111DG, PR110DG
SHARP: AD-S30BT, AD-S31BT, AD-T50BT,
AD-T51BT
SONY: LIP-4WM
TOSHIBA: PDR-BT1, PDR-BT9
FUJI: NP80, NP100
JVC: BN-V101
KODAK: KLIC-3000
PANASONIC: VW-VBP10
POLAROID: PR105DG
RICOH: DB-30
SANYO: UR-211
SONY: LIP-10
Posición
DX-DA100501 English - combined.fm Page 44 Monday, August 7, 2006 12:25 PM
44
Uso del cargador
Pilas
Posición
Para las baterías en la caja a continuación, necesita voltear los terminales de contacto de
batería Flip 2 que se encuentran al lado derecho de la placa de carga.
PANASONIC: CGA-DU07, CGA-DU14,
CGA-DU21,CGA-S001E,
CGA-S002,CGR-602A,
CGR-602E, CGR-D120,
CGR-D220, DMW-BCA7,
MW-BM7, MW-BL14,
VW-VBD07, VW-VBD14
CASIO: NP-20
FUJI: NP-30
JVC: BN-VF707, BN-VF714, BN-VF733
KONICA-MINOLTA: NP-700
NIKON: EN-EL2
CANON: NB-4L
PANASONIC: DMW-BCC12
RICOH: DB-60
DX-DA100501 English - combined.fm Page 45 Monday, August 7, 2006 12:25 PM
45
Localización y Corrección de Fallas
Carga de la batería
La carga comienza tan pronto como la batería se conecta correctamente. El
indicador verde del estado de carga parpadea cuando la batería se esta cargando.
Cuando la batería esta completamente cargada, el indicador verde del estado de
carga dejará de parpadear y se mantendrá encendido. Puede remover la batería
para usarla cuando esto sucede, pero le recomendamos que deje la batería en el
cargador por otros 30 minutos para asegurar una carga (terminal).
DETECCIÓN DE BATERÍA DEFECTUOSA
Su cargador detecta un paquete de baterías anormal por medio del sondeo de
voltaje. Si es muy alto o muy bajo, o si el paquete de baterías no alcanza un estado
de carga completa dentro de 8 horas de cargarse, el cargador dejará de funcionar
inmediatamente e indicará la condición anormal por medio del parpadeo de los
indicadores LED de alimentación y de estado de batería. El funcionamiento normal
se reanuda cuando la batería defectuosa se remueve.
Localización y Corrección de Fallas
Problema
Causas posibles y soluciones
No hay luces indicadoras encendidas
• Confirme que el adaptador de CA está conectado firmemente
en ambos extremos (a la pared y al conector de entrada de
alimentación)
• Confirme que el tomacorriente está funcionando normalmente
• Confirme que el cable del auto esta conectado firmemente en
ambos extremos (toma del encendedor de cigarrillos y el
conector de la entrada de alimentación)
• Confirme que el toma del encendedor de cigarrillos está
funcionando normalmente
Solo la luz de alimentación esta encendida
• La batería esta completamente cargada *
• La batería esta instalada incorrectamente, remueva y instala de
nuevo la batería
• Limpie los contactos de la batería y del cargador
• La batería puede estar defectuosa*
Los LED de alimentación y de estado de la
batería están parpadeando
Batería defectuosa*
Se escucha un silbido mientras se carga
Es una operación normal debido al sistema de
circuitos de conmutación avanzado
* Para determinar si la batería esta sobrecargada o defectuosa, colóquela en la cámara de video o cámara digital
y enciéndala. Si la videocámara o cámara digital no se enciende, la batería está probablemente defectuosa. Si la
videocámara o cámara digital no funciona, deje la alimentación conectad por 30+ minutos, luego remueva la
batería y colóquela en el cargador. El cargador deberá ir al modo de carga, indicado cuando el indicador verde del
estado de carga parpadea.
DX-DA100501 English - combined.fm Page 46 Monday, August 7, 2006 12:25 PM
46
Mantenimiento
Mantenimiento
Si el cargador debe ser limpiado, asegúrese de que está desconectado, y luego
limpie el exterior del cargador con un paño limpio ligeramente humedecido con
detergente suave. Para limpiar los contactos de metal, use un paño ligeramente
humedecido con alcohol.
Especificaciones
Entrada:
Corriente en standby:
Corriente de carga:
Terminación de carga:
12 V CC
30 mA
800 mA máx. en modo de corriente constante
Voltaje fijo
(4.2 V para baterías de 3.6 V, 8.4 V para baterías de 7.2 V)
Garantía
Garantía limitada de un año
Dynex Products le garantiza a usted por un período de un año a partir de la fecha
de compra de este producto tal como aparece en su recibo, el reemplazo de este
producto en caso de defecto de material o mano de obra. En caso de defecto,
devuelva el producto a la tienda donde fue comprado antes de la fecha de
expiración de 1 año de garantía, con su recibo original, y será sustituido con un
producto Dynex actual en ese momento o similar (o un reembolso proporcional, a
la sola opción de Dynex). Esta garantía se proporciona solamente al comprador
original del producto. Dynex no será responsable por daños incidentales o directos
causados, o por cualquier pérdida relacionada con el uso o la inhabilidad de usar el
producto. Dado que algunos estados y provincias no permiten la exclusión o
imposición de limitaciones sobre daños y perjuicios incidentales o directos, es
posible que la limitación o exclusión anteriormente indicada no se aplique en su
caso. Para los productos defectuosos comprados por Internet, favor contactar a:
www.dynexproducts.com
Asistencia al cliente Dynex: 1-800-305-2204. Dynex, Richfield, Minnesota
DX-DA100501 English - combined.fm Page 47 Monday, August 7, 2006 12:25 PM
Avisos legales
47
Avisos legales
© 2006 Dynex. DYNEX y el logotipo de DYNEX son marcas comerciales de Best Buy
Enterprise Services, Inc. Otras marcas y nombres de productos son marcas
comerciales o marcas registradas de sus respectivos dueños. Las especificaciones y
características están sujetas a cambio sin aviso previo u obligación.
Número de asistencia: (800) 305-2204URL: www.dynexproducts.com
DX-DA100501 English - combined.fm Page 48 Monday, August 7, 2006 12:25 PM
www.dynexproducts.com (800) 305-2204
Distributed by Best Buy Purchasing, LLC
7601 Penn Ave. South, Richfield, MN 55423 U.S.A.
Distribué par Best Buy Purchasing, LLC
7601 Penn Ave. South, Richfield, MN 55423 É.-U.
Distribuido por Best Buy Purchasing, LLC
7601 Penn Ave. South, Richfield, MN 55423 U.S.A.
R1