1
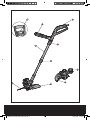
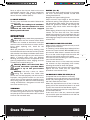
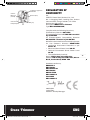
WG101E/WG104E
CRA-WG101E WG104E -M-070104.indd 1
2007-3-28 17:08:33
CRA-WG101E WG104E -M-070104.indd 2
2007-3-28 17:08:33
CRA-WG101E WG104E -M-070104.indd 3
2007-3-28 17:08:33
5
CRA-WG101E WG104E -M-070104.indd 4
2007-3-28 17:08:34
A
B
C
D
E
F
G
H
I
��
��
��
��
��
J
CRA-WG101E WG104E -M-070104.indd 5
2007-3-28 17:08:36
1.
REAR HANDLE
2.
AUXILIARY HANDLE
3.
UPPER LOCKING KNOB
4.
LOWER LOCKING KNOB
5.
AUXILIARY HANDLE LOCKING LEVER
6.
SAFETY GUARD
7.
SPACER GUARD
8.
EDGER WHEEL
9.
LINE CUTTER
10. TELESCOPIC SHAFT
11. CUTTING HEAD COVER (See J)
12. CAP RELEASE LATCH (See J)
13. SPOOL (See J)
14. CUTTING HEAD (See J)
15. EYELET (See J)
16. LINE FEED BUTTON (See I)
6
TECHNICAL DATA
Model no.
WG104E
WG101E
Rated voltage
220V-240V~50Hz/60Hz
220V-240V~50Hz/60Hz
Rated Input
550W
650W
Rated no-Load speed
9500/min
9500/min
Cutting diameter
30cm
30cm
Line diameter
1.4mm
1.4mm
Weight
3.4Kg
3.5Kg
Double insulation
NOISE AND VIBRATION DATA
A weighted sound pressure
83dB(A)
A weighted sound power
96dB(A)
Wear ear protection when sound pressure is over
85dB(A)
Typical weighted vibration
4.0m/s2
Grass Trimmer
CRA-WG101E WG104E -M-070104.indd 6
ENG
2007-3-28 17:08:39
SAFETY INSTRUCTIONS
WARNING! When using the machine the
safety rules must be followed. For your
own safety and bystanders please read these
instructions before operating the machine.
Please keep the instructions safe for later use.
If the supply cord is damaged, it must be
replaced by the manufacturer, its service agent
or similarly qualified persons in order to avoid
a hazard.
Instructions for preparation and correct and
safe use shall include where appropriate
the substance of the following:
1. Wear protective glasses or goggles.
2. Never allow children or people unfamiliar
with the instructions to use the machine.
3. Stop using the machine while people,
especially children, or pets are nearby.
4. Only use the machine in daylight or good
artificial light.
5. Before using the machine and after any
impact, check for signs of wear or damage and
repair as necessary. Do not use the trimmer
if the cords are damaged or worn.
6. Never operate the machine with damaged
guards or without the guards in place.
7. Keep hands and feet away from the cutting
means at all times and especially when
switching on the motor.
8. Take care against injury from any device fitted
for trimming the filament line length. After
extending
new
cutter
line
always
return the machine to its normal
operating
position
before
switching on.
9. Never fit metal cutting elements.
10. Never use replacement parts or accessories
not provided or recommended by the manu
facturer.
11. Disconnect the machine from the mains
before checking, cleaning or working on the
machine and when it is not in use.
12. Always ensure that ventilation openings are
kept clear of debris.
13.
WARNING!
Cutting elements continue to rotate
after the motor is switched off.
14. Keep extension cords away from cutting
elements.
Grass Trimmer
CRA-WG101E WG104E -M-070104.indd 7
15. Do not expose to moisture.
16. Use only on AC mains supply voltage shown
on the product rating label.
17. Avoid operating your trimmer in wet grass,
where feasible.
18. Take care in wet grass, you may lose your
footing.
19. On slopes, be extra careful of your footing
and wear non-slip footwear.
20. DO not walk backwards when trimming, you
could trip. Walk never run.
21. Switch off before pushing the trimmer over
surfaces other than grass.
22. Never pick up or carry a trimmer by the
cable.
23. Do not lean over the trimmer guard-objects
may be throw by the cutting line.
24. Before use the trimmer:
a) Read the instructions carefully.
b) Be familiar with the controls and proper use
of the equipment.
c) Before use check the supply and extension
cord for signs of damage or ageing.
d) If
the
cord
becomes
damaged
during
use,
disconnect
the
cord
from
the
supply
immediately.
DO NOT TOUCH THE CORD BEFORE
DISCONNECTING THE SUPPLY.
Do not use the lawn trimmer (edge trimmer),
if the cords are damaged or worn.
e) The British Standards institute recommend
the use of a Residual Current Device (R.C.D.)
with a tripping current of not more than
30mA.
25. Keep all nuts, bolts and screws tight to
be sure the trimmer is in safe working
condition.
26. Use only the replacement parts and
accessories
recommended
by
the
manufacturer.
27. To avoid the risk of injury keep fingers
and hands clear of the line cutter on the
leading edge of the guard.
28. Inspect and maintain the trimmer regularly.
Any repairs must be carried out by an autho
rised repairperson.
7
ENG
2007-3-28 17:08:40
SYMBOLS
Read the manual
Warning
Double insulation
Wear eye protection
Wear ear protection
To avoid possibility of electric
shock, do not use in damp or wet
conditions.
8
Switch off! Remove plug from mains
before adjusting, cleaning or if cable
is entangled or damaged.
Keep all other people, including
children, pets and bystanders outside
the 15 meters hazard zone, stop
the trimmer immediately if you are
approached.
OPERATING INSTRUCTIONS
1. ASSEMBLY OF THE MAIN HANDLE AND
SHAFT (See A)
Loosen the upper locking knob (3) clockwise.
Insert the telescopic shaft into the main handle,
until a click sound is heard (See A).
Tighten the upper locking knob anti-clockwise.
2. ASSEMBLY OF THE SAFETY GUARD
Fix the safety guard to the trimmer head making
sure the sides are located into the grooves on
the trimmer head (See B).
Secure the safety guard onto the trimmer head
with the screw provided (on the inside of the
guard).
3. ASSEMBLY OF THE SPACER GUARD
Locate and snap fit the pivot bracket of spacer
guard into the hole of trimmer head (See C).
When not required, rotate the spacer guard to
the underside opposite side of the safety guard
and clip into the two locations.
4. ADJUSTMENT OF THE TELESCOPIC
SHAFT (See D)
Unscrew the lower locking knob (4) in the
direction indicated to unlock.
Adjust the length of the telescopic shaft to the
most comfortable length.
Tighten the lower locking knob.
5. MAIN HANDLE ROTATION (See E)
Unscrew the upper locking knob (3) in the direction indicated to unlock.
Adjust the angle of the main handle to be clockwise 90 degree max.
Turn the upper locking knob in the opposite direction to lock.
6. ADJUSTMENT OF AUXILIARY HANDLE
Pull up the auxiliary handle locking lever (5).
Hold the lever and rotate the auxiliary handle to the
most comfortable and balanced position (See F).
Release the lever, your auxiliary handle has
been locked.
7. ADJUSTMENT OF THE TRIMMER HEAD
ANGLE TO THE SHAFT
Use both of your hands, one grips the shaft,
another on the head, then apply adequate
Grass Trimmer
CRA-WG101E WG104E -M-070104.indd 8
ENG
2007-3-28 17:08:41
force to adjust the trimmer head to the most
comfortable position. The ratchet mechanism
will make a heavy clicking sound which is
normal and not a defect (See G).
8. ON/OFF SWITCH
To start, press and hold the switch. Release the
switch to stop.
Warning: The cutting head continues
to rotate after the trimmer has been
switched off, wait until it has stopped
then lay down the tool.
OPERATION
Warning: Always wear the eye protection.
Never lean over the trimmer head. Rocks
or debris can ricochet or be thrown into eyes
and face and cause blindness or other serious
injury when opening unit, check for the
following:
Wear eye protection and heavy clothing. Hold
front handle with one hand and auxiliary handle
with another hand. Keep unit below waist level.
Work only from your right to your left to ensure
debris is thrown away from you. Without
bending over, keep line near and parallel to the
ground (perpendicular when edging) and not
crowded into material being cut.
Warning: Make sure that both lines
are fed out before operation. Make
sure motor is up to full speed before
trimming.
Warning: Use only 1.2mm to 1.4mm
cutting line. diameter line. Other sizes
of line will not feed properly and will result in
improper cutting head function or can cause
serious injury. Do not use other material such as
wire, string, rope, etc. Wire can break off during
cutting and become a dangerous missile that
can cause serious injury.
TRIMMING
Hold the bottom of the trimmer head about 8
cm above the ground and at an angle. Allow
only the tip of line to make contact. Do not force
trimmer line into work area.
Grass Trimmer
CRA-WG101E WG104E -M-070104.indd 9
EDGING (See H)
Unscrew the upper locking knob (3) and rotate
the main and auxiliary handle to 90o with
cutting head (See E).
Retighten the upper locking knob.
Adjust trimmer head angle to be the lowest
horizontal setting. Then position the wheel on
the ground for edge mode. The guard has two
white line guides to indicate the cutting line
position. Align these marks with the edge of
your lawn.
While edging allow the tip of the line to make
contact. Do not force the line. The rotation
wheel helps protect the unit and keeps the unit
from contacting the ground. Take extra caution
while edging as objects can be thrown from the
trimmer line.
AUTOMATIC LINE FEED SYSTEM
When initially switching on the trimmer, a small
length of line is fed out.
A ‘clattering’ noise will be heard when the lines
hit the line cutter. DO NOT BE ALARMED this is
quit normal. After about 5 seconds the line will
be cut to the correct length and the noise will
reduce as the motor receives full speed.
If the noise of the line being cut can’t be heard,
more line will be fed out.
To feed more line, it is first necessary to allow
the trimmer to stop completely, then restart,
allowing the motor to reach full speed.
Repeat above 4 until you hear the lines hitting
against the line cutter (Do not repeat this
procedure more than 6 times).
9
TO MANUALLY FEED THE LINE (See I)
If required line can be feed out manually.
To operate, press and release manual line feed
button (16), whilst gently pull out the lines until
the lines reach the line cutter.
When the required amount of line is fed out,
gently pull on the second line (there is no need
to press the manual line feed button again).
If the line extends past the line cutter, too much
line has been fed out.
If too much line is fed out, remove the spool
cap and click spool anti-clockwise until the line
is at the desired length.
ENG
2007-3-28 17:08:42
TO REMOVE THE CAP
Press and hold in the two latches (12) (See J).
Pull cap away from the spool holder.
WHEN REFITTING THE SPOOL CAP
Keep all areas of the cap and spool holder
clean.
Replace the cap, pressing firmly down towards
the spool holder to ensure cap is fully located.
Check that the cap is correctly fitted by trying to
remove it without depressing the two latches.
TO REPLACE CUT LINE
For your convenience it is recommended you
buy spool and line complete.
TO FIT SPOOL AND LINE COMPLETE:
Remove old spool.
Place new spool into cap with cut out areas of
the spool in line with eyelets.
Release one line from cleat and feed line
through eyelet.
Repeat for second line.
Refit the cap.
10
TO FIT NYLON LINE ONLY:
Warning! Your Trimmer is designed to
use only line with a maximum diameter
of 1.4mm.
IMPORTANT - Always wind the line onto
the upper section of the spool first.
Take approximately 5 metres of line. Insert
15mm of line into one of the holes in the
upper section of the spool and wind line in the
direction of the arrows on the top of the spool.
Leave approximately 100mm of line unwound
and place into cleat. Repeat on lower section
of spool.
Care should be taken to ensure that the line is
neatly coiled on the spool. Failure to do so will
impair the efficiency of the automatic line feed.
Then fit spool as described in “To fit spool
and line complete”.
MAINTENANCE
After use, disconnect the machine from the mains
and check for damage. Your power tool requires
no additional lubrication or maintenance. There
are no user serviceable parts in your power
tool. Mains powered trimmers should only be
Grass Trimmer
CRA-WG101E WG104E -M-070104.indd 10
repaired by an authorised repairer use only
manufacturers recommended replacement
parts and accessories.
Never use water or chemical cleaners to clean
your power tool. Wipe clean with a dry cloth.
Always store your power tool in a dry place
out of the reach of children. Keep the motor
ventilation slots clean. Keep all working controls
free of dust. If you see some sparks flashing in
the ventilation slots, this is normal and will not
damage your power tool.
ENVIRONMENTAL
PROTECTION
Waste electrical products must not be
disposed of with household waste. Please
recycle where facilities exist. Check with
your local authorities or retailer for recycling
advice.
PLUG REPLACEMENT (UK &
IRELAND ONLY)
If you need to replace the fitted plug then
follow the instructions below.
IMPORTANT
The wires in the mains lead are colored in
accordance with the following code:
BLUE =NEUTRAL
Brown = Live
As the colors of the wires in the mains lead of
this appliance may not correspond with the
colored markings identifying the terminals
in your plug, proceed as follows. The wire
which is colored blue must be connected to
the terminal which is marked with N. The wire
which is colored brown must be connected to
the terminal which is marked with L.
Warning:Never connect live or neutral wires
to the earth terminal of the plug. Only fit an
approved 13ABS1363/A plug and the correct
rated fuse.
Note: If a moulded plug is fitted and has to be
removed take great care in disposing of the
plug and severed cable, it must be destroyed
to prevent engaging into a socket.
ENG
2007-3-28 17:08:42
13 Amp fuse approved
to BS1362
Connect
Blue to N
(neutral)
Outer sleeve
firmly clamped
Brown L (live)
Cable grip
DECLARATION OF
CONFORMITY
we,
POSITEC Power Tools (Suzhou) Co., Ltd.
No. 11 Yangqing Road, Loufeng Area, Suzhou
Industrial Park, Jiangsu 215021, P. R. China
Declare that the product,
Description WORX Grass Trimmer
Type WG101E/WG104E,
Complies with the following Directives,
EC Machinery Directive 98/37/EC
EC Low Voltage Directive 73/23/EEC amended
by 93/68/EEC
EC Electromagnetic Compatibility Directive
89/336/EEC amended by 93/68/EEC
Noise Emission in the Environment by Equipment
for Use Outdoors Directive 2000/14/EC
• Conformity Assessment Procedure as per
Annex VI
• Measured Sound Power Level 94 dB
• Declared Guaranteed Sound Power Level
96 dB
• The notified body involved
Name: ITS Testing & Certification
Address: ITS Testing & Certification, Cleeve
Road, Leatherhead, KT22 7SB
11
Standards conform to,
EN60335-1
EN 55014-1
EN 60335-2-91
EN 55014-2
EN ISO 3744
EN 61000-3-2
ISO11094
EN 61000-3-3
2005/10/30
Jacky Zhou
POSITEC Quality Manager
Grass Trimmer
CRA-WG101E WG104E -M-070104.indd 11
ENG
2007-3-28 17:08:43
12
Grass Trimmer
CRA-WG101E WG104E -M-070104.indd 12
ENG
2007-3-28 17:08:44
13
CRA-WG101E WG104E -M-070104.indd 13
2007-3-28 17:08:44
CRA-WG101E WG104E -M-070104.indd 14
2007-3-28 17:08:44