1
LL1158.Book Page 1 Thursday, September 25, 2003 1:26 PM
QuickTime 6.4
User’s Guide
Includes instructions for using
QuickTime Pro
For Mac OS X version 10.3 and Windows
LL1158.Book Page 2 Thursday, September 25, 2003 1:26 PM
K Apple Computer, Inc.
© 2003 Apple Computer, Inc. All rights reserved.
Under the copyright laws, this manual may not be
copied, in whole or in part, without the written consent
of Apple. Your rights to the software are governed by
the accompanying software license agreement.
The Apple logo is a trademark of Apple Computer, Inc.,
registered in the U.S. and other countries. Use of the
“keyboard” Apple logo (Option-Shift-K) for commercial
purposes without the prior written consent of Apple
may constitute trademark infringement and unfair
competition in violation of federal and state laws.
Every effort has been made to ensure that the
information in this manual is accurate. Apple is not
responsible for printing or clerical errors.
Apple Computer, Inc.
1 Infinite Loop
Cupertino, CA 95014-2084
408-996-1010
http://www.apple.com
Apple, the Apple logo, AppleScript, the Apple Store,
Mac, the Mac logo, Mac OS, Macintosh, and QuickTime
are trademarks of Apple Computer, Inc., registered in the
U.S. and other countries.
Finder is a trademark of Apple Computer.
PowerPC is a trademark of International Business
Machines Corporation, used under license therefrom.
Other company and product names mentioned herein
are trademarks of their respective companies. Mention
of third-party products is for informational purposes
only and constitutes neither an endorsement nor a
recommendation. Apple assumes no responsibility with
regard to the performance or use of these products.
Simultaneously published in the United States and
Canada.
022-1158/09-16-03
LL1158.Book Page 3 Thursday, September 25, 2003 1:26 PM
3
Preface
7
7
7
8
8
8
8
Contents
Welcome to QuickTime
What Is QuickTime?
System Requirements
Upgrading to QuickTime Pro
Checking for New Versions of QuickTime
How to Get More Information
Getting Up-to-the-Minute Content Listings
Chapter 1
9
9
10
10
11
11
11
12
12
12
13
13
Getting Started With QuickTime
Using QuickTime Player Controls
Playing Movies in QuickTime Player
Playing Movies in a Web Browser
Viewing QuickTime Virtual Reality (VR) Movies
Adjusting QuickTime Settings
Adjusting QuickTime Player Audio Options
Changing the Brightness, Color, and Tint of a Movie
Viewing and Modifying Still Images
Using QuickTime to Play MIDI Files
Finding Movies Quickly Using QuickTime Favorites
Viewing Information About a File
Chapter 2
15
15
15
15
16
17
17
17
18
QuickTime on the Internet
Playing Movies on the Internet
Getting the Best Playback With Internet Movies
Saving an Internet Movie on Your Hard Disk
Working With Streamed Files
Delivering Movies on the Internet
Preparing a Movie for Fast Start
Preparing a Movie for Real-Time Streaming
Creating Reference Movies to Optimize Web Playback
3
LL1158.Book Page 4 Thursday, September 25, 2003 1:26 PM
4
Chapter 3
19
19
19
20
20
21
21
21
22
22
22
23
24
26
27
27
28
28
28
28
29
29
29
30
30
30
31
Making and Editing QuickTime Movies With QuickTime Pro
Opening and Converting Files With QuickTime
File Formats QuickTime Can Import
Importing and Exporting 3GPP Files
Creating a Slideshow From Still Images
Saving a Still Image From a Movie
Working With Movie Tracks
Viewing QuickTime Movie Tracks
Copying a Track From Another QuickTime Movie
Extracting Individual Tracks
Disabling Individual Tracks
Working With Audio Tracks
Working With Text Tracks
QuickTime Sprite and Tween Tracks
Specifying Languages for Individual Tracks
Changing a Movie’s Appearance With Transparent Tracks
Editing QuickTime Movies
Selecting Part of a Movie
Cutting, Copying, or Deleting a Section of a Movie
Replacing a Section of a Movie
Combining Two QuickTime Movies Into One
Presenting Multiple Movies in the Same Frame
Adding Special Effects to a QuickTime Movie
Pasting Graphics and Text Into a Movie
Resizing, Skewing, or Rotating a Movie
Changing a Movie’s Shape With a Video Mask
Adjusting Individual Movie Options
Chapter 4
33
33
33
33
34
35
35
35
36
36
36
37
37
Advanced Concepts
Making a Movie Self-Contained
Changing Playback Options
Changing Movie Size for Playback
Playing a Movie on a Second Display
Loading Movies Into RAM for Better Playback
Optimizing Movie Playback for Systems With 8-Bit Color
Compressing Movies
Compressing Movies for Streaming (Hinting)
Setting Data Rate Options for Video Compression
Setting Key Frame Options for Video Compression
Choosing Frame Rate Options for Video Compression
Choosing Sound Compression Options
Contents
LL1158.Book Page 5 Thursday, September 25, 2003 1:26 PM
37
38
38
39
39
41
41
Exporting QuickTime Movies
Setting the Frame Rate for Export
Changing a Movie’s Preview and Poster Frame
Adding Annotations to a Movie
Creating a Chapter List for a Movie
Copy-Protecting QuickTime Movies
Automating QuickTime Player With AppleScript
Appendix
43
43
44
Keyboard Combinations for Playing QuickTime Movies
QuickTime Player Controls Shortcuts
QuickTime Pro Shortcuts
Glossary
45
Index
49
Contents
5
LL1158.Book Page 6 Thursday, September 25, 2003 1:26 PM
Welcome to QuickTime
Preface
LL1158.Book Page 7 Thursday, September 25, 2003 1:26 PM
If you want to play movies from your hard disk or the
Internet, you’ve come to the right place. QuickTime
supports the most popular formats on the Internet
for news, entertainment, movie trailers, and virtual
reality (VR).
What Is QuickTime?
With the free version of QuickTime, you can play many kinds of files, including video,
audio, graphics, and virtual reality (VR) movies.
With the full-featured version, called QuickTime Pro, you can do such things as create
movies, play movies full screen, save files from the Internet, edit audio and video, add
special effects, create slideshows, and convert and save video, audio, and images to
more than a hundred standard file formats. You can purchase a registration key to
upgrade to QuickTime Pro at www.apple.com/quicktime/buy/.
System Requirements
For Mac OS computers:
• A PowerPC processor–based Macintosh computer
• At least 128 MB of RAM
• Mac OS X v10.2 or later
For Windows computers:
• A Pentium processor–based PC or compatible computer
• At least 128 MB of RAM
• Windows 98/Me/2000/XP
7
LL1158.Book Page 8 Thursday, October 9, 2003 10:18 AM
Upgrading to QuickTime Pro
Once QuickTime is on your computer, you can purchase the registration key to use
QuickTime Pro features (go to www.apple.com/quicktime/buy/). You will be sent an
email with your user name and registration number. After you enter your registration
number for QuickTime Pro, new menu options appear in QuickTime Player.
To enter your registration number:
1 Open System Preferences, click QuickTime, and click Registration. (In Windows, click
Start, choose Control Panel, open QuickTime, and click Enter Registration.)
2 In the “Registered to” field, enter your name exactly as it appears (including
capitalization) in the email from the Apple Store.
3 In the Number field, enter your registration number exactly as it appears (using
hyphens) in the email from the Apple Store. The registration number uses zeroes, not
the letter “O.”
The Organization field is optional.
Checking for New Versions of QuickTime
From time to time, Apple releases new versions of QuickTime. If you’re connected to
the Internet while using QuickTime Player, you’ll be notified if there’s a newer version of
QuickTime available. It’s a good idea to have the latest version of the software installed
on your computer.
To check for a new version of QuickTime:
Mac OS X: Open System Preferences, click QuickTime, click the Update tab, and click
Update Now.
Windows: Use the QuickTime Updater application in the QuickTime folder. You can
also use the updater to add additional QuickTime components to those you already
have installed.
How to Get More Information
For more information, go to www.apple.com/quicktime.
For more information on the features in QuickTime Pro, go to www.apple.com/
quicktime/upgrade/.
Getting Up-to-the-Minute Content Listings
QuickTime Player includes an up-to-the-minute guide to the best in QuickTime content.
You can view the latest news, entertainment, educational features, and more. You can
also listen to audio programs. To view the content guide, click the “Q” button in the
lower-right corner of QuickTime Player.
8
Preface Welcome to QuickTime
LL1158.Book Page 9 Thursday, September 25, 2003 1:26 PM
1
Getting Started With QuickTime
1
This chapter explains the basics of using QuickTime. Find
out how to use QuickTime Player to play movies or view
still images.
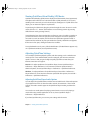
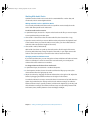
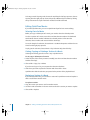
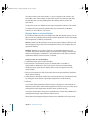
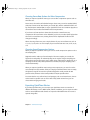
Using QuickTime Player Controls
QuickTime Player has onscreen controls similar to those found on CD players and DVD
players. Use the controls to play, pause, and adjust the volume of a QuickTime movie, to
move forward or backward, and to jump to the beginning or end of a movie.
To go to a specific point in the movie, drag the playback head (the small black triangle)
in the timeline. To step through frame-by-frame, first click the small black triangle and
then press the Right and Left Arrow keys on your keyboard.
To fine-tune the audio, click the Equalizer on the right to reveal Balance, Bass, and
Treble controls.
Playback head
Equalizer
Volume
With QuickTime Pro, you have additional controls. Choose Movie > Show Video
Controls to fine-tune the video settings. For still more controls, choose Movie > Get
Movie Properties, and then choose a track from the left pop-up menu and the property
you want to adjust or monitor from the right pop-up menu.
9
LL1158.Book Page 10 Thursday, September 25, 2003 1:26 PM
Playing Movies in QuickTime Player
You can use QuickTime Player to play media located on your computer’s hard disk, a
CD, or the Internet. Later on, you may want to fine-tune the way QuickTime is set up,
but you can get started playing movies right now.
To play a movie using QuickTime Player:
1 If the movie is on your hard disk or a CD, find the file and double-click it. If the movie is
on the Internet, open QuickTime Player, choose File > Open URL, and enter the URL
(the Internet address) for the movie file.
2 In QuickTime Player, click the Play button (with the right-pointing triangle).
You can also open a movie by choosing File > Open Movie or, in Mac OS X, by dragging
a media file to the QuickTime Player icon in a Finder window or in the Dock.
Playing Movies in a Web Browser
Many websites use QuickTime for video, audio, and animation. On some websites,
movies play automatically. On other sites, you need to click an image of the movie or a
play button.
When a movie plays in a webpage, you typically see controls you can use to play,
pause, fast-forward, rewind, and adjust the volume of the movie.
To play a movie in a web browser:
1 Navigate to the website.
2 Follow the site’s instructions to download the movie file or watch the movie “live.”
With QuickTime Pro, you also have the option of saving the movie to your hard disk (if
the author of the movie allows it). If the movie is a Real-Time Streaming Protocol (RTSP)
movie, it is saved as a small “reference movie” that points to the stream.
The QuickTime website has a number of QuickTime movies (including the latest
Hollywood movie trailers) that you can view in your web browser.
See www.apple.com/quicktime.
10
Chapter 1 Getting Started With QuickTime
LL1158.Book Page 11 Thursday, September 25, 2003 1:26 PM
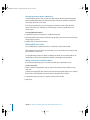
Viewing QuickTime Virtual Reality (VR) Movies
QuickTime Virtual Reality (QTVR) movies display three-dimensional places (panoramas)
and objects with which the user can interact. With a QTVR panorama, it’s as if you’re
standing in the scene and you can look around you 360 degrees. In a QTVR movie of an
object, you can rotate the object in any direction.
To pan through a QTVR movie, drag the pointer through the scene. To zoom in on the
movie, click the + or – button. (If the buttons are not showing, zoom in by pressing
Shift and zoom out by pressing Control.)
Some VR movies have hot spots that take you from one scene (or node) to another. As
you move the mouse over a hot spot, the cursor changes to an arrow. To jump from
one node in a scene to another, click the Show Hot Spot button (question mark). A
translucent blue outline of any hot spots within the currently visible VR scene appears.
If there are no hot spots, clicking this button has no effect.
To step backward scene by scene, click the Back button. (The Back button appears only
on a QTVR movie window, not all QuickTime movies.)
Adjusting QuickTime Settings
You can adjust QuickTime playback options and other settings, such as whether new
movies open in a new window. Make sure the setting for your Internet connection
speed is correct so that you get the highest-quality QuickTime content that your
Internet connection can support.
Mac OS X: To adjust preferences for QuickTime Player, choose QuickTime Player >
Preferences > Player Preferences. To set Internet connection speed and various
advanced options, choose QuickTime Player > Preferences > QuickTime Preferences.
Windows: To adjust preferences for QuickTime Player, choose Edit > Preferences >
Player Preferences. To set Internet connection speed and other options, choose Edit >
Preferences > QuickTime Preferences.
Adjusting QuickTime Player Audio Options
You can adjust the right/left balance and the bass and treble levels of the audio portion
of your QuickTime movie. To show the audio controls, choose Movie > Show Sound
Controls. The audio controls appear in the QuickTime Player window, just below the
movie.
You can also set sound options for playing several movies at once, or for playing a
movie while using another application. To do so, choose QuickTime Player >
Preferences > Player Preferences.
If you have QuickTime Pro, you can save your settings with the movie.
Chapter 1 Getting Started With QuickTime
11
LL1158.Book Page 12 Thursday, September 25, 2003 1:26 PM
Changing the Brightness, Color, and Tint of a Movie
If you have QuickTime Pro, you can change the brightness, contrast, color, and tint of a
movie.
To set video controls:
1 Choose Movie > Show Video Controls.
2 Press the Up or Down Arrow key to display the setting you want to change, then press
the Right or Left Arrow key to adjust the video setting.
After adjusting the settings, you can save the movie so that it always plays using the
adjusted settings.
Viewing and Modifying Still Images
You can view still images in QuickTime Player.
In Mac OS X, you can also use Preview to convert a still image to other formats and to
rotate images. Preview is in the Applications folder on your hard disk.
In Windows, if you have QuickTime Pro, you can use PictureViewer to import and
export various types of still image file formats and to rotate images. PictureViewer is in
the QuickTime folder on your hard disk.
Using QuickTime to Play MIDI Files
QuickTime Player can import MIDI (Karaoke MIDI, Standard MIDI, and General MIDI)
formats. QuickTime has a built-in synthesizer that it uses to play these files. You can also
have QuickTime use an external hardware synthesizer instead of the built-in one.
m
m
12
To specify a different synthesizer:
Mac OS X: Open System Preferences, click QuickTime, click the Music tab, and select
the synthesizer you want to use.
Windows: Open the QuickTime Settings control panel, choose Music, and select a
synthesizer.
Chapter 1 Getting Started With QuickTime
LL1158.Book Page 13 Thursday, September 25, 2003 1:26 PM
Finding Movies Quickly Using QuickTime Favorites
You can easily find and open movies by putting pointers to them in your QuickTime
Favorites window. To view your list of favorites, choose Favorites > Show Favorites.
You can rearrange movies in the list by dragging them.
To add a movie to the Favorites list, open the movie in QuickTime Player and choose
Favorites > Add Movie As Favorite.
m
m
To delete an item from the list:
Mac OS: Drag the item to the Trash or select the item and press the Delete key.
Windows: Drag the item to the Recycle Bin or select the item and press the
Backspace key.
Viewing Information About a File
QuickTime Player can display information about a file, such as its compression format,
size, and frame rate when playing.
To view information about a file:
1 Open the file.
2 Choose Window > Show Movie Info.
3 For more information about a movie, choose Movie > Get Movie Properties.
Chapter 1 Getting Started With QuickTime
13
LL1158.Book Page 14 Thursday, September 25, 2003 1:26 PM
LL1158.Book Page 15 Thursday, October 9, 2003 10:02 AM
2
QuickTime on the Internet
2
This chapter describes how to use QuickTime to play
movies in your web browser and prepare movies for
QuickTime streaming.
Playing Movies on the Internet
With the QuickTime plug-in (part of the free QuickTime software), you can play most
multimedia you encounter on the Internet within your web browser. For more
information, see “Playing Movies in a Web Browser” on page 10.
Getting the Best Playback With Internet Movies
If movies you’re watching on the Internet don’t play properly, check your QuickTime
connection speed setting. Choose QuickTime Player > Preferences > QuickTime
Preferences. (In Windows, choose Edit > Preferences > QuickTime Preferences.)
If you select a speed slower than your actual connection speed, QuickTime tries to play
versions of the movie authored for the match closest to the slower connection speed.
The resulting movie may be smaller in size and lower in quality than your connection
can actually support.
If you select a speed faster than your actual connection, QuickTime playback may
stutter or appear jerky because it has more data than your connection can support.
If you’re unsure of your connection speed, check with your Internet service provider
(ISP).
Saving an Internet Movie on Your Hard Disk
If you have QuickTime Pro, you can save a downloaded movie viewed in your web
browser to your hard disk, so that you can watch the movie when you’re not connected
to the Internet. (The movie must be authored to allow for saving.) If it’s a streaming
movie, QuickTime Pro saves a small “reference movie” that points to the stream.
15
LL1158.Book Page 16 Thursday, September 25, 2003 1:26 PM
To save an Internet movie on your hard disk:
1 When the movie finishes loading, click the down arrow in the playback controls.
2 Choose Save > Save As QuickTime Movie.
If this command is not available, the movie is authored so that it cannot be saved.
Working With Streamed Files
You can use QuickTime Player to view movies streamed from the Internet.
To view Internet streams:
1 In QuickTime Player, choose File > Open URL.
2 Enter the URL of the stream you want to listen to.
Viewing Streamed Files Behind a Firewall
QuickTime streaming chooses the best protocol (a method of communicating via the
Internet) for your needs. Typically, QuickTime streaming uses a protocol called RTSP to
ensure the best performance. (RTSP stands for Real-Time Streaming Protocol.) If your
network connection is protected by a firewall, you may want to use the HTTP protocol
instead.
To use HTTP streaming:
1 Open System Preferences, click QuickTime, click Connection, and click Transport Setup.
2 Select “Use this protocol and port ID,” and choose HTTP from the Transport Protocol
pop-up menu.
If QuickTime can configure itself for your firewall, you can now watch streaming
QuickTime movies. If you still experience problems, contact your network administrator
or see the information on the Apple QuickTime website.
About Instant-On Streaming
QuickTime 6 (and later) includes Instant-On, an advance in Apple’s patent-pending Skip
Protection technology that dramatically reduces buffer, or wait, time when you view a
streaming video. Instant-On provides an instantaneous viewing experience; you can
click around or scrub video as if it were on your hard disk.
You must have a broadband connection to experience Instant-On. The responsiveness
of Instant-On is affected by available bandwidth and the size, or data rate, of the
content. It can also be affected by the codec used to compress the streaming video.
16
Chapter 2 QuickTime on the Internet
LL1158.Book Page 17 Thursday, September 25, 2003 1:26 PM
Delivering Movies on the Internet
You can deliver QuickTime movies and live presentations over a network in real time.
Preparing a Movie for Fast Start
If you have QuickTime Pro, you can set up a movie to start playing from a web server
before the movie has completely downloaded to the user’s hard disk. This is called a
“Fast Start” movie.
Make the Fast Start setting right before you distribute your movie; making other
changes and resaving may undo the Fast Start setting.
If the movie is in the format you want, you can set it up for Fast Start by choosing File >
Save As and then selecting “Make movie self-contained.” If the movie is not in the
format you want, you need to convert it first by following the steps below.
To convert a movie and set it up for Fast Start:
1 In QuickTime Player, choose File > Export.
2 Choose “Movie to QuickTime Movie” from the Export pop-up menu.
3 Click Options and select video and sound compression options that are appropriate for
web delivery.
4 Make sure the “Prepare for Internet Streaming” checkbox is selected and Fast Start
appears in the pop-up menu.
Preparing a Movie for Real-Time Streaming
If you have QuickTime Pro, you can set up a movie to be streamed over the Internet. To
do so, you should compress the movie so that its data rate is appropriate for the
bandwidth at which your users will connect.
Hinted streaming format is for use with QuickTime Streaming Server or Darwin
Streaming Server. When you choose hinted streaming, “hint tracks” (information
needed to stream the movie) are added to the movie. If the movie is already in the
desired format, you can prepare a movie for streaming by choosing File > Export and
then choosing “Movie to Hinted Movie.” If you want to change the movie’s format,
follow the steps below.
To set up a movie for Internet streaming:
1 In QuickTime Player, choose File > Export.
2 Choose “Movie to QuickTime Movie” from the Export pop-up menu.
3 Choose a streaming option from the Use pop-up menu. Select a bit rate (bps)
appropriate for the network settings of your server and expected viewers.
4 Click Options and select the “Prepare for Internet Streaming” checkbox.
5 Choose Hinted Streaming from the pop-up menu.
Chapter 2 QuickTime on the Internet
17
LL1158.Book Page 18 Thursday, September 25, 2003 1:26 PM
For more information about preparing a movie for streaming, go to www.apple.com/
quicktime/tools_tips/tutorials/.
Creating Reference Movies to Optimize Web Playback
A reference movie is a movie that references other movies stored on a web server.
When a user plays the reference movie, one or more of the other movies on the server
downloads or streams to the user as the movie plays.
You can use reference movies to provide the appropriate movie based on a user’s
connection speed. For example, you can have a smaller movie streamed to users
connected over a standard modem, and a larger version of the movie streamed to
users connected over a broadband connection.
You can get a tool for creating reference movies, along with other utilities, on the
developer section of the QuickTime website.
18
Chapter 2 QuickTime on the Internet
LL1158.Book Page 19 Thursday, September 25, 2003 1:26 PM
3
Making and Editing QuickTime
Movies With QuickTime Pro
3
Most of the activities in this chapter apply only to
QuickTime Pro. You can upgrade to QuickTime Pro by
purchasing a registration key at www.apple.com/
quicktime/buy.
Opening and Converting Files With QuickTime
You can open (import) dozens of types of media with QuickTime. To determine if
QuickTime Player can open a file, choose File > Import and select the file you want to
open. You will be able to select only files that can be imported.
If you have QuickTime Pro, you can use QuickTime Player to convert many types of
video, audio, graphics, and animation files (including Flash files) into QuickTime movies.
To convert a file into a QuickTime movie, import it and then choose File > Save.
File Formats QuickTime Can Import
File formats you can import include the following:
Video formats: AVI, DV, Motion JPEG, MPEG-1, MPEG-2,1 MPEG-4, 3GPP
Audio formats: AIFF/AIFC, Audio CD, MP3, Sound Designer II, System 7 Sound, uLaw
(AU), WAV, MPEG-4
Still-image formats: BMP, GIF, JPEG/JFIF, MacPaint, PICT, PNG, Photoshop (with layers),
SGI, Targa, FlashPix, TIFF
Animation formats: 3DMF, Animated GIF, FLC/FLI, Flash, PICS
Other formats: KAR (Karaoke), MIDI, QuickDraw GX, QuickTime Image File, Text
For more information about supported formats, see the Products area of the QuickTime
website.
1. MPEG-2
playback is available via the QuickTime 6 MPEG-2 Playback Component, sold separately at the
Apple Store online.
19
LL1158.Book Page 20 Thursday, September 25, 2003 1:26 PM
Importing and Exporting 3GPP Files
QuickTime Player can import and play back 3GPP files. To import a file, choose File >
Import.
If you have both the QuickTime 3GPP Component and QuickTime Pro, you can export
video, audio, and text to the 3GPP file format.
To export a file to the 3GPP format:
1 Open the movie you wish to export in QuickTime Player, then choose File > Export.
2 Choose “Movie to 3GPP” from the Export pop-up menu.
You can adjust compression and streaming settings by clicking the Options button.
Creating a Slideshow From Still Images
If you have QuickTime Pro, you can combine a series of still images to create a movie
that plays like a slideshow. This is an easy way to share the pictures from your digital
camera.
Note: Slideshows work best when all the images are the same size.
To create a slideshow from still images:
1 Put all the graphic files you want to include in a folder.
2 Name each file with the same name followed by a number; for example, “picture1,”
“picture2.”
Most digital cameras number files automatically.
3 In QuickTime Player, choose File > Open Image Sequence, then select the first file.
4 Choose a frame rate from the Image Sequence Settings pop-up menu.
QuickTime Pro creates the movie, which shows each picture in sequence.
5 Choose File > Save to name and save the movie.
You can add music to your slideshow by adding an audio track to your movie before
saving it. Import an audio file, select the portion you want to add to the slideshow, and
choose Edit > Copy. Then select the slideshow and choose Edit > Select All, then
choose Edit > Add Scaled.
20
Chapter 3 Making and Editing QuickTime Movies With QuickTime Pro
LL1158.Book Page 21 Thursday, September 25, 2003 1:26 PM
Saving a Still Image From a Movie
If you have QuickTime Pro, you can export a single frame from a movie as an image file.
To save a still image from a movie:
1 Move the playback head to the frame you want to export.
2 Choose File > Export.
3 In the Export pop-up menu, choose “Movie to Picture” to save the image as a PICT file.
To export every frame from the movie as a series of images, choose “Movie to Image
Sequence.” Exporting every frame can generate a very large number of files; you may
want to export to a folder rather than to the desktop.
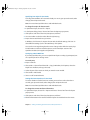
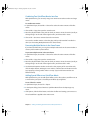
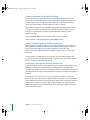
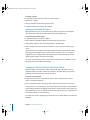
Working With Movie Tracks
A QuickTime movie is made up of one or more “tracks.” Each track stores a particular
kind of data. For example, a QuickTime movie could have a video track, music tracks,
and sound effects tracks.
If you have QuickTime Pro, you can use QuickTime Player to edit tracks individually. You
can move tracks from one movie to another, turn a track on or off, delete tracks, or
modify the information contained in a track.
Audio narration
Video 1
Video 2
Audio sound effect 1
Audio sound effect 2
Text title
Text credits
Viewing QuickTime Movie Tracks
With QuickTime Pro, you can see the tracks in a QuickTime movie.
To see the tracks in a movie:
1 In QuickTime Player, choose Movie > Get Movie Properties.
The movie’s tracks appear in the left pop-up menu.
2 To extract or remove a track, or to turn a track on or off, use the track commands in the
Edit menu.
Chapter 3 Making and Editing QuickTime Movies With QuickTime Pro
21
LL1158.Book Page 22 Thursday, September 25, 2003 1:26 PM
Copying a Track From Another QuickTime Movie
With QuickTime Pro, you can copy tracks from one QuickTime movie to another. When
you add a track, its duration is unaltered. For example, if you add a 10-second sound
track to a 1-minute movie, the sound track plays for 10 seconds starting at the position
in the movie where you added the track. Or you can “scale” a track so that it stretches
or compresses to a particular length.
To add a track:
1 Copy the track from another movie by choosing Edit > Extract Tracks, selecting the
track, and choosing File > Copy.
2 Select the movie you want to add the track to, and choose Edit > Add. Or, to scale the
track, select a portion of the movie equal to the duration of the track you’re adding,
then choose Edit > Add Scaled.
Extracting Individual Tracks
You can select one or more tracks of a movie to create a new movie, while leaving the
original movie file intact. For example, you could create a movie that uses only the
audio from an existing movie.
To extract a track:
1 In QuickTime Player, choose Edit > Extract Tracks.
2 Select the track you want to extract.
You can select more than one track by holding down the Shift key when you click.
QuickTime creates a new movie containing the extracted track.
Disabling Individual Tracks
You can choose one or more tracks to enable or disable. For example, you might want
to turn off tracks to simplify editing, or to hide a track in a final movie.
To disable or enable tracks:
1 In QuickTime Player, choose Edit > Enable Tracks.
2 Click to select or deselect tracks.
Exporting a movie exports only enabled tracks.
22
Chapter 3 Making and Editing QuickTime Movies With QuickTime Pro
LL1158.Book Page 23 Thursday, September 25, 2003 1:26 PM
Working With Audio Tracks
QuickTime audio includes music tracks, which contain MIDI files or other data, and
sound tracks, which contain digitized audio.
Adding an Audio Track to a QuickTime Movie
You can easily add audio and other tracks to a QuickTime movie. Usually the audio
track is laid down parallel to the video track.
To add an audio track to a movie:
1 In QuickTime Player, choose File > Import and select the audio file you want to import.
A new QuickTime Player window opens.
2 Choose Edit > Select All to select the entire audio file, then choose Edit > Copy.
3 Open the movie to which you want to add the audio, and position the playback head
at the location where you want the audio to start (unless you choose Add Scaled to
make the audio exactly fit the length of the movie).
4 Choose Edit > Add (or Add Scaled).
Add Scaled slows down or speeds up the audio track to fit the length of the movie.
(Choosing Add Scaled may change the pitch of the audio, so you might want to add
video to sound, and speed up or slow down the video to match the audio.)
Changing Sound Track Volume Levels
If you have QuickTime Pro, you can change the volume and balance of audio and music
tracks. For example, if a movie has more than one audio track, you can adjust the
volume of the tracks relative to one another.
To change volume and balance for an audio track:
1 In QuickTime Player, choose Movie > Get Movie Properties.
2 In the Properties window, choose the audio track from the left pop-up menu, then
choose Volume from the right pop-up menu.
3 Adjust the volume by dragging the Volume indicator bar to the right or left. Adjust the
balance by dragging the Balance indicator to the right or left of center.
To make the indicator bar snap to numerical values in increments of 25, hold down the
Option key (in Windows, the Alt key) and click in the Volume rectangle. To make the
balance indicator snap to specific positions, hold down the Option key (or Alt key) and
click the balance rectangle. The balance indicator snaps to Left, midway between Left
and Center, Center, midway between Center and Right, and Right.
Chapter 3 Making and Editing QuickTime Movies With QuickTime Pro
23
LL1158.Book Page 24 Thursday, September 25, 2003 1:26 PM
Changing Instruments Used in a MIDI Track
Some QuickTime movies have a music track that contains Musical Instrument Digital
Interface (MIDI) information. This information tells the built-in QuickTime synthesizer
how to play the music in the track.
If you have QuickTime Pro, you can change the instruments used to play back the
music in the movie. For example, you could change an acoustic grand piano to an
electric piano.
To switch MIDI instruments:
1 In QuickTime Player, choose Movie > Get Movie Properties.
2 Choose the MIDI music track from the left pop-up menu, then choose Instruments from
the right pop-up menu.
3 Double-click an instrument in the list.
Working With Text Tracks
You can add text to a QuickTime movie to create titles, credits, and subtitles.
With QuickTime Pro, text tracks are searchable, so you can search for key words to find
precise frames in the movie.
See the following sections for details on adding text tracks. For more information, see
the developer section of the QuickTime website at www.apple.com/quicktime.
Adding a Text Track to a QuickTime Movie
If you have QuickTime Pro, you can import a text file into a QuickTime movie.
To add a text track:
1 Create a text file containing the text you want in the movie, and save the file as text
only (.txt).
Separate each paragraph with a Return character. Each paragraph appears in a separate
frame of the movie. By default, each text frame is displayed for 2 seconds.
2 In QuickTime Player, choose File > Import and select the text file.
3 Click Open.
24
Chapter 3 Making and Editing QuickTime Movies With QuickTime Pro
LL1158.Book Page 25 Thursday, September 25, 2003 1:26 PM
Specifying Font Styles for Text Tracks
To change font attributes of a text track already in a movie, you export the track, make
changes, then reimport the track.
Note: You must have QuickTime Pro to edit individual tracks.
To change font styles for the text track:
1 In QuickTime Player, choose File > Export.
2 In the Export dialog, choose “Text to Text” from the Export pop-up menu.
3 Click Options and select “Show Text, Descriptors, and Time.”
4 Use a text editor to alter the values after the {QTtext} tag.
5 Import the text track back into your movie.
In Windows, click Convert. To import the text with the default settings, click Save. To
select different settings (such as font attributes), click Options.
You can also insert tags throughout the text to change values while the movie plays.
For information on the text track descriptors, see the Developer section of the
QuickTime website (www.apple.com/quicktime).
Overlaying a Movie With Text
If you have QuickTime Pro, you can use QuickTime Player to overlay (superimpose) text
on a specific part of an existing movie.
To overlay text:
1 Import a text file.
2 Choose Edit > Select All and then Edit > Copy. (In Windows, click Options, select the
Keyed Text checkbox, and copy the track).
3 Select the part of the movie on which you want the text overlaid.
4 Choose Edit > Add Scaled.
5 Save as a self-contained movie.
Setting the Frame Duration of a Text Track
To set the duration of each frame in an existing text track to a value other than 2
seconds, you export the track, make changes, then reimport the track.
Note: You must have QuickTime Pro to edit individual tracks.
To change the current text frame information:
1 In QuickTime Player, choose File > Export and choose “Text to Text” from the Export
pop-up menu.
2 Click Options and select “Show Text, Descriptors, and Time.”
3 Edit the information in the text file and then import the track back into the movie.
Chapter 3 Making and Editing QuickTime Movies With QuickTime Pro
25
LL1158.Book Page 26 Thursday, September 25, 2003 1:26 PM
The duration for each line of text in the text file appears on a separate line before the
line of text. The time you type is the length of time after the movie has started at which
this line of text will appear.
Timestamps are specified as hours:minutes:seconds:fractions of a second (the default
Text to Text export setting is 1/600th of a second). For example, if you enter the time
00:02:11:00, the text on the following line appears at 2 minutes and 11 seconds into
the movie.
For information about the other text track descriptors, see the Developer section of the
QuickTime website at www.apple.com/quicktime.
QuickTime Sprite and Tween Tracks
In traditional cel-based animation, images appear in every frame. With sprite animation,
an image (a sprite) is sent once and the user’s computer draws the image in different
locations as the movie plays. Sprites make it possible to have complex animations with
virtually no bandwidth cost.
To add sprite animation to a QuickTime movie, you create a sprite track in an authoring
program and then import the track into QuickTime. The animation can be an image, a
short image sequence, or a video clip moved around in the frame.
One sprite track can contain multiple sprites. They can pass in front of or behind each
other, and change their depth order (allowing variable visibility) in the course of the
movie. The source for a sprite can be a single bitmap, a bitmap image sequence, a
vector image, a video track, a live stream, or even a source specified by a URL.
A “tween track” modifies other tracks. A tween track is often used with sprite tracks to
specify the animation of the sprite. Tween tracks can also be used for things like
smoothly fading video in or out or turning the movie volume up or down.
Adding a Video Track as a Sprite
You can assign a video track to a sprite track to get the effect of having a video image
move across the screen.
To assign a video track to a sprite track:
1 Create a movie with both the video track and sprite track you want to use.
2 Choose Movie > Get Movie Properties.
3 In the Properties window, choose the sprite track from the left pop-up menu, then
choose Image Overrides from the right pop-up menu.
4 Choose the sprite to which you want to assign a new image, click Select Override Track,
then choose the video track you want to assign to the sprite.
5 Save as a self-contained movie by choosing “Make movie self-contained” in the Save As
dialog. (A self-contained movie contains all data in one file that can be transferred to
another computer.)
26
Chapter 3 Making and Editing QuickTime Movies With QuickTime Pro
LL1158.Book Page 27 Thursday, September 25, 2003 1:26 PM
The video track is now a modifier track. Instead of displaying its output, the video track
sends its images to the sprite track, which uses them as the image source for a sprite.
Specifying Languages for Individual Tracks
If you have QuickTime Pro, you can create a movie with support for multiple languages
by specifying a language for an individual track. For example, you can create a movie
that contains different audio tracks for different languages. QuickTime automatically
plays the correct track, based on the language setting of the user’s computer.
To specify languages:
1 Create or assemble the alternate tracks.
Record voiceovers in each desired language or create text tracks to use as subtitles.
Save each alternate track as a self-contained movie, and put all the alternates together
in a single folder.
2 Put a copy of your original movie, self-contained and minus any tracks that are now
stored as alternates, in the folder with the alternates.
3 Open the movie and choose Movie > Get Movie Properties.
4 Choose a sound or text track from the left pop-up menu, then choose Alternate from
the right pop-up menu.
5 Click the Set button for Languages, and choose the language of this track from the list.
6 Choose an alternate track to use when a different language is selected.
7 Save as a self-contained movie by choosing “Make movie self-contained” in the
Save As dialog.
8 Repeat these steps for additional language tracks, each time choosing the previously
selected alternate from the left pop-up menu.
Changing a Movie’s Appearance With Transparent Tracks
With QuickTime Pro, if you have more than one video track, you can specify how the
different tracks appear in relation to each other. You can make one color in any video
track transparent so that tracks below show through the transparent sections. To get
the desired results, you may need to change the layering order of the tracks.
To specify the transparent color:
1 Choose Movie > Get Movie Properties.
2 In the Properties window, use the left pop-up menu to choose the video track to which
you want to add transparency.
3 Choose Graphics Mode from the right pop-up menu and choose Transparent from the
scrolling list.
4 Click the Color button and use the Color panel to specify the color that you want to
be transparent.
Chapter 3 Making and Editing QuickTime Movies With QuickTime Pro
27
LL1158.Book Page 28 Thursday, September 25, 2003 1:26 PM
To change a track’s layering order, choose the track from the left pop-up menu, choose
Layering from the right pop-up menu, and specify a different layer number by clicking
the up or down arrow. Layers with lower numbers are farther forward.
Editing QuickTime Movies
If you have QuickTime Pro, you can use QuickTime Player for basic movie editing.
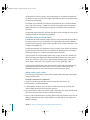
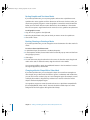
Selecting Part of a Movie
Before you copy or delete part of a movie, you need to select the desired portion.
To select a portion of a movie, move the In and Out selection markers. The darkened
area between the two markers indicates the selected portion. To fine-tune the
selection, select a marker and move it with the arrow keys.
To see the length of a selection, choose Movie > Get Movie Properties and then choose
Time from the right pop-up menu.
To play just the selection, choose Movie > Play Selection Only, then click Play.
Cutting, Copying, or Deleting a Section of a Movie
Selecting and moving part of a movie is easy in QuickTime Pro.
To cut, copy, or delete part of a movie:
1 Select the part of the movie you want to modify (use the In and Out selection markers
and the arrow keys).
2 Choose Edit > Copy, Cut, or Delete.
If you choose Copy or Cut, you can paste the selection elsewhere.
3 Click where you want to paste the selection and choose Edit > Paste.
QuickTime Pro adds the selection you pasted at the position of the playback head.
Replacing a Section of a Movie
If you have QuickTime Pro, you can select a section of a QuickTime movie and replace it
with a section from another movie.
To replace a section:
1 Copy the section you want to use from another movie.
2 Use the In and Out markers in the new movie to select the section you want to replace.
3 Choose Edit > Replace.
28
Chapter 3 Making and Editing QuickTime Movies With QuickTime Pro
LL1158.Book Page 29 Thursday, September 25, 2003 1:26 PM
Combining Two QuickTime Movies Into One
With QuickTime Pro, you can easily merge one movie into another to make one longer
movie.
To combine two movies:
1 In QuickTime Player, choose Edit > Select All to select the entire contents of the first
movie.
2 Choose Edit > Copy, then open the second movie.
3 Move the playback head to the point at which you want to insert the movie (usually at
the beginning or at the end of the original movie), and choose Edit > Paste.
4 Choose File > Save As to name and save the new movie.
You can also combine movies so that they play side-by-side instead of one after the
other (see “Presenting Multiple Movies in the Same Frame”).
Presenting Multiple Movies in the Same Frame
If you have QuickTime Pro, you can place multiple video tracks in the same window or
create a picture-within-a-picture effect.
To present multiple movies in the same frame:
1 In QuickTime Player, choose Edit > Select All to select the entire contents of the first
movie.
2 Choose Edit > Copy, then open the second movie.
3 Move the playback head to the point at which you want to insert the movie (usually at
the beginning or at the end of the original movie), and choose Edit > Add.
4 Use the Movie Properties window to select the Size property of the new video track,
click the Adjust button, and drag the new video to a desired size and location. Use the
Layer property to change which video is “on top.” (Layers with lower numbers are
farther forward.)
Adding Special Effects to a QuickTime Movie
With QuickTime Pro, you can add special effects such as blur, emboss, and film noise to
a movie before you export it. You add special effects by using filters.
To set a filter for a movie:
1 In QuickTime Player, choose File > Export.
2 In the Export dialog, choose “Movie to QuickTime Movie” from the Export pop-up
menu.
3 Click Options, click the Filter button, and select the filter and settings you want to use.
The selected filter is applied to the entire movie.
Chapter 3 Making and Editing QuickTime Movies With QuickTime Pro
29
LL1158.Book Page 30 Thursday, September 25, 2003 1:26 PM
Pasting Graphics and Text Into a Movie
If you have QuickTime Pro, you can paste graphics and text into a QuickTime movie.
QuickTime Pro resizes graphics to fit the dimensions of the movie. For best results, you
should use a graphics program to resize the graphics to match the movie’s dimensions
before you insert them. To find a movie’s dimensions, choose Window > Show Movie
Info. You can export a single frame from the movie to use as a guide for text placement.
To add graphics or text:
1 Copy the text or graphic to the Clipboard.
2 Move the playback head to the point at which you want to insert the copied item.
3 Choose Edit > Paste.
Resizing, Skewing, or Rotating a Movie
If you have QuickTime Pro, you can change the size and orientation of a video track of a
movie.
To resize or skew a QuickTime movie:
1 In QuickTime Player, choose Movie > Get Movie Properties.
2 In the Properties window, choose Video Track from the left pop-up menu and Size from
the right pop-up menu.
3 Click Adjust.
4 To resize the movie, drag the red marks in the corners. To skew the movie, drag the red
marks on the sides. To rotate the movie, drag the red circle in the middle.
You can rotate and flip a movie using additional buttons in the Size window. To restore
the original appearance, click Normal.
Changing a Movie’s Shape With a Video Mask
If you have QuickTime Pro, you can change the shape of a movie from rectangular to
other shapes using a video mask. This feature is great in combination with media skins;
you can “skin” a movie so that it plays in a non-rectangular region (for example, a movie
could play from within a ship porthole), and then use a mask to restrict the movie’s
shape to the desired playback region.
Use a graphics program to create the mask and save it as a QuickTime-compatible file
(for example, BMP, GIF, JPEG, or PICT). The mask should be a black shape on a white
background. The movie appears through the black shape.
30
Chapter 3 Making and Editing QuickTime Movies With QuickTime Pro
LL1158.Book Page 31 Thursday, September 25, 2003 1:26 PM
To add a video mask:
1 In QuickTime Player, choose Movie > Get Movie Properties.
2 From the left pop-up menu, choose the track to which you want to assign the mask,
then choose Mask from the right pop-up menu.
3 Click Set.
4 Select the graphics file and click Open.
Adjusting Individual Movie Options
If you have QuickTime Pro, you can use QuickTime Player to modify different movie
options, such as the display size, bit rate, and volume.
To view and change the movie options you can adjust:
1 Open the movie for which you want to see options, then choose Movie > Get Movie
Properties.
2 In the Properties window, use the left pop-up menu to select the movie’s tracks and
use the right pop-up menu to see the options available for each track.
3 Select the options you want to apply and click OK.
Chapter 3 Making and Editing QuickTime Movies With QuickTime Pro
31
LL1158.Book Page 32 Thursday, September 25, 2003 1:26 PM
LL1158.Book Page 33 Thursday, September 25, 2003 1:26 PM
4
Advanced Concepts
4
The activities in this chapter apply only to QuickTime Pro.
You can upgrade to QuickTime Pro by purchasing a
registration key at www.apple.com/quicktime/buy.
Making a Movie Self-Contained
When you save a movie the usual way, the movie file contains only pointers to data in
your movie folder. If you want to transfer the movie without worrying about links, you
can create a “self-contained” movie that includes all the data (video, audio, and so on)
you used to create the movie within a single file.
Note: You must have QuickTime Pro to export and save movies.
To save a self-contained movie:
1 In QuickTime Player, choose File > Save As.
2 Select “Make movie self-contained” and click Save.
To determine whether any pointers remain in the movie, choose Movie > Get Movie
Properties, and then choose Files from the right pop-up menu. If additional files appear
in the list, the movie has pointers and is not self-contained.
Changing Playback Options
You can change playback options such as the size at which a movie plays and whether
the QuickTime Player window shows. You can also optimize movies for playback on
certain computers. (See “Creating Reference Movies to Optimize Web Playback” on
page 18.)
Changing Movie Size for Playback
QuickTime Player includes several options for changing movie playback size. QuickTime
Pro provides additional playback options, such as setting the screen so that only the
movie, and not the QuickTime Player window, is visible (known as Full Screen mode).
33
LL1158.Book Page 34 Thursday, September 25, 2003 1:26 PM
To change a movie’s size, choose Movie > [a size], or drag the resize control in the
lower-right corner of the window. To stretch the movie in any direction, hold down
the Shift key when you drag (holding down the Shift key doesn’t preserve the
aspect ratio).
To return the movie to its default size and aspect ratio, double-click the resize control.
To activate Full Screen mode in QuickTime Pro, Press Command-F (in Windows,
Control-F) or choose Movie > Full Screen.
Playing a Movie on a Second Display
If you have QuickTime Pro and a two-display setup with dual display support, you can
play a movie on one display while working in another application on the other display.
This arrangement is useful for presentations.
Mac OS X: Make sure Mirror Displays is not selected. (Open Displays preferences and
click Arrangement. If you don’t see an Arrangement button, your computer does not
support this feature.)
Windows: Whether you can play a movie on a second display depends on your
computer and monitor. Open the Display control panel, click Settings, and make sure
that the second display is enabled. If it is not enabled, click it and make sure “Extend
my Windows desktop onto this monitor” is selected.
To play a movie on a second display:
1 In QuickTime Player, open a movie with video.
2 Choose Movie > Present Movie (or press Command-Shift-F on the Mac or
Control-Shift-F in Windows). In the Screen section of the Present Movie dialog,
the filled-in boxes represent your displays and a movie icon appears where the
movie will play.
3 Choose a presentation size. Full Screen makes the movie play without the QuickTime
Player controls showing.
4 Select Normal or Slide Show mode. If you choose Slide Show, you can advance frames
by clicking the mouse button or pressing the Right Arrow or Left Arrow key.
5 Click Play.
You can open other applications while the movie is playing. Press Command-Tab (in
Windows, Control-Tab) to make another application active. You can now use the mouse
and keyboard in other applications while the movie continues to play.
To stop the movie before it ends, press Command-Tab (or Control-Tab, in Windows) to
make QuickTime Player active and then click the mouse.
All QuickTime movie playback keyboard shortcuts are available in Full Screen mode.
34
Chapter 4 Advanced Concepts
LL1158.Book Page 35 Thursday, September 25, 2003 1:26 PM
Loading Movies Into RAM for Better Playback
QuickTime has two memory (RAM) options you can use to improve playback
performance. “Preload” puts the entire movie into memory before it is played. “Cache
hint” keeps movie data in memory after it has played. This option is useful for small files
you want to loop.
If you have QuickTime Pro, you can adjust memory options for a QuickTime movie
track.
To adjust memory options for a track:
1 Choose Movie > Get Movie Properties.
2 Choose the track you want to adjust from the left pop-up menu and Preload from the
right pop-up menu.
Use these options only with tracks that contain very small amounts of data; too much
data in memory may cause poor performance, system errors, or unpredictable results.
Optimizing Movie Playback for Systems With 8-Bit Color
QuickTime movies don’t look their best when they’re composed of millions or
thousands of colors and the computer they’re playing on shows only 256 colors. If you
have QuickTime Pro, you can designate a custom color table for a movie so that when it
plays, the computer on which it is playing uses a better set of 256 colors.
To designate a custom color table:
1 Choose Movie > Get Movie Properties.
2 Choose Movie from the left pop-up menu and Colors from the right pop-up menu.
3 Click Set and select the custom color table file you want to use.
If you have an existing file with a custom color table, you can attach it to your movie.
To define a custom color table, you need software that can analyze your movie
and choose the best colors. Some files, such as GIFs, may already include a custom
color table.
Compressing Movies
Uncompressed video requires a lot of bandwidth (the rate at which data can be
transferred) and disk storage space. You’ll want to compress, or encode, your movie for
delivery to another computer or via the web.
To encode a movie using QuickTime Player:
1 Choose File > Export.
2 Choose “Movie to QuickTime Movie” from the Export pop-up menu.
Chapter 4 Advanced Concepts
35
LL1158.Book Page 36 Thursday, September 25, 2003 1:26 PM
Compressing Movies for Streaming (Hinting)
If you want to stream a QuickTime movie using QuickTime Streaming Server, you
should use a web-optimized video or audio compressor to compress the movie file.
“Hinting” creates a hint track for every streamable track in a movie; the streaming
server uses the hint tracks to turn the media into real-time streams.
All QuickTime compressors are compatible with QuickTime Streaming Server, but the
compressors listed here are optimized to give the best results for delivery over the
Internet. For a complete list of compressors that QuickTime supports, see the
QuickTime website.
Video compressors: MPEG-4, Sorenson Video (any version), H.261, H.263
Audio compressors: AAC, QDesign Music, QUALCOMM PureVoice
Setting Data Rate Options for Video Compression
When you export a QuickTime movie, you can set the data rate for most compressors,
such as MPEG-4 and H.263. The data rate is the amount of data played per second,
usually measured in kilobytes per second or kilobits per second. The data
rate of a movie is also affected by other compression options you set, such as the
frame rate.
You may want to set a data rate based on the way your movie will be viewed. For
example, for viewing over 56K Internet dialup connections, you need to limit the data
rate to a maximum of 36 kilobits per second.
Setting Key Frame Options for Video Compression
In most cases, QuickTime uses “frame differencing” to compress moving images. Frame
differencing is the process of determining what information has changed from a
starting frame (called a “key frame”) to subsequent frames. The key frame contains all of
the information for an image. Subsequent frames contain only the information that has
changed.
Depending on the compressor you use, you can specify how often you want key
frames to occur. If you don’t have enough key frames, the quality of your movie might
be lower because most frames are generated from others. On the other hand, more key
frames result in a larger movie with a higher data rate. With some compressors, an
additional key frame is inserted automatically if too much of the image has changed
from one frame to the next.
36
Chapter 4 Advanced Concepts
LL1158.Book Page 37 Thursday, September 25, 2003 1:26 PM
Choosing Frame Rate Options for Video Compression
When you export a QuickTime movie, you can set video compression options such as
the frame rate.
Frame rate is the number of individual images shown every second. A standard (NTSC)
video has a frame rate of 29.97 frames per second (fps), and the standard for film is 24
fps. The European standard (PAL) is 25 fps. QuickTime movies are sometimes played at a
slower frame rate to reduce bandwidth and CPU requirements.
If you choose a frame rate that’s lower than the movie’s current frame rate,
compression will cause frames to be deleted. If you choose a number that’s higher than
the movie’s current frame rate, existing frames will be duplicated. The file size will
change accordingly.
When choosing a frame rate, use a simple division of your current frame rate, such as
1/2, 1/3, 1/4, 1/5, and so on. For example, if your current frame rate is 30, use 15, 10, 7.5,
or 6.
Choosing Sound Compression Options
When you export a QuickTime movie, you can set sound compression options such as
the sampling rate.
Digitized sound is made up of sound samples. The more samples per second, the
higher the sound quality. To maintain quality, music requires a higher sampling rate
than spoken voice because music uses a wider range of frequencies. (Audio CDs use a
sampling rate of 44.1 kHz.) With QuickTime 6.3 and later, the proper sampling rate is
chosen automatically.
When you export a QuickTime movie using some compressors, you can also set the
sound sample size (the number of bits per sample), which determines how accurately
the dynamic range of the sound is reproduced. Eight-bit sound provides for 256
possible values, whereas 16-bit sound provides for 65,536 possible values.
For music that has very soft and very loud passages, such as orchestral music, choose
16-bit sound. For spoken voice or music with a fairly stable volume level, you can
choose 8-bit and get good results.
Exporting QuickTime Movies
If you have QuickTime Pro, you can export your QuickTime movie to a number of
different file formats, such as MPEG-4, AVI, and DV. In addition, you can export an audio
track to several different audio formats or export the individual frames of a movie as
separate image files.
Chapter 4 Advanced Concepts
37
LL1158.Book Page 38 Thursday, September 25, 2003 1:26 PM
To export a movie:
1 In QuickTime Player, open the movie you wish to export.
2 Choose File > Export.
3 Choose a format from the Export pop-up menu.
4 To adjust compression settings, click Options.
Setting the Frame Rate for Export
With QuickTime Pro, you can set the frame rate when you export a movie. Movies
with higher frame rates show motion better but have larger file sizes.
To set the frame rate for export:
1 In QuickTime Player, choose File > Export.
2 Choose “Movie to QuickTime Movie” from the Export pop-up menu.
3 Click Options and then click the Settings button in the Video box.
4 Enter a number in the “Frames per second” box or choose a rate from the pop-up
menu.
Typical frame rates are 29.97 for NTSC video, 25 for PAL video, and 24 for film. When
exporting low-bandwidth versions, select a frame rate that is 1/2, 1/3, or 1/4 of the
original frame rate. Setting a frame rate higher than the original frame rate makes
the file larger but does not improve the quality.
To see the current frame rate for a movie while it is playing, choose Window > Show
Movie Info and click the More Info triangle.
Changing a Movie’s Preview and Poster Frame
When you open a movie file from within a QuickTime-aware application such as
QuickTime Player, a preview of the movie appears in the Open dialog. The preview,
by default, shows the first 10 seconds of the movie.
To specify a new preview:
1 Select the portion of the movie that you want to use as a preview, then choose
Movie > Get Movie Properties.
2 Choose Preview from the right pop-up menu, then click “Set Preview to Selection.”
A “poster frame” is a still image of a movie that appears, for example, in the QuickTime
Player Favorites window. The default poster frame is the first frame in the movie. If you
have QuickTime Pro, you can change the poster frame by moving to the desired frame
and choosing Movie > Set Poster Frame.
For audio-only movies, changing the poster frame has no visible effect on the preview
displayed.
38
Chapter 4 Advanced Concepts
LL1158.Book Page 39 Thursday, September 25, 2003 1:26 PM
Adding Annotations to a Movie
If you have QuickTime Pro, you can add annotations to a movie to document
information about the movie, such as its author, director, and copyright information.
You can annotate the entire movie and any of its individual tracks.
To annotate a movie:
1 In QuickTime Player, choose Movie > Get Movie Properties.
2 Choose Annotations from the right pop-up menu. The Annotations window shows the
current annotations.
3 Add a new annotation or delete and edit existing annotations using the buttons at the
bottom.
4 To change an annotation, select it in the Properties list and modify it in the Data box.
Users who don’t have QuickTime Pro will see only the first three annotations you enter.
Creating a Chapter List for a Movie
If you have QuickTime Pro, you can create a pop-up chapter list to navigate to specific
points in a movie. First you create a list of topics (or entry points), and then you import
the list into the movie as a text track. When you play the movie in QuickTime Player, the
current chapter displays in the movie controller.
To create a chapter list:
1 In a text editor or word processor, type your list of topics and save the document as
plain text.
Make each item very short (preferably one word but no more than two or three words)
and separate each item with a carriage return.
2 In QuickTime Player, choose File > Import, select the text file, and click Open.
3 Choose File > Export. In the Export pop-up menu, choose “Text to Text.” In the Use
pop-up menu, choose “Text with Descriptors.”
4 Click Options. In the Text Export Settings dialog, select “Show Text, Descriptors, and
Time,”select “Show time relative to start of Movie,” and set fractions of seconds to 1/30
(the default is 1/1000).
5 Click OK, then click Save to create a text file with descriptors.
6 Open the exported list in your text editor or word processor, and open the target
movie in QuickTime Player.
7 If necessary, click the Equalizer icon on the right side of the QuickTime Player window
to make the timeline appear.
Chapter 4 Advanced Concepts
39
LL1158.Book Page 40 Thursday, September 25, 2003 1:26 PM
8 Choose Movie > Get Movie Properties. In the Properties window, then choose Movie
from the left pop-up menu and Time from the right pop-up menu.
9 In QuickTime Player, drag the inverted triangle on the timeline to find the first point in
the movie where you want to begin a new chapter. Use the right and left arrow keys to
step forward or backward a frame at a time as needed.
10 Note the current time in the Properties window.
11 In the text file, find the first chapter title and change the timestamp just before that
chapter title to the time you noted in the Properties window. The timestamp might
now read, for example, [00:01:30.15], meaning that selecting the first chapter title will
jump the viewer 1 minute, 30 seconds, and 15 frames into the movie.
12 Repeat steps 9 through 11 until you’ve identified all the places in the movie that
correspond to the chapter divisions and you’ve entered the proper timestamps in the
text file.
13 Change the last timestamp, which appears after the last chapter title in the text file, to
match the duration of the movie.
14 Save the text file and import it into QuickTime Player. QuickTime creates a new movie
with just a text track.
15 Choose Edit > Select All, choose Edit > Copy, and close the movie.
16 Click in the main movie, choose Edit > Select All, then choose Edit > Add. QuickTime
adds the text track to the movie.
17 In the Properties window, choose the new text track from the left pop-up menu, then
choose Make Chapter from the right pop-up menu. Choose the main video or audio
track as the chapter owner. If you have a movie with alternate subtitle or sound tracks,
you can create multiple chapter lists in different languages and set the appropriate
subtitle or sound track as the owner of each chapter list. The chapter list will change to
match the selected language.
18 Choose Preload from the right pop-up menu and select the Preload checkbox to make
the chapter track load first.
19 Choose Edit > Enable Tracks and disable the new text track so it doesn’t display on top
of the video. (The new track will still function as a chapter track.)
20 Save the movie as a self-contained movie. The chapter titles now appear in a pop-up
menu just to the right of the timeline.
40
Chapter 4 Advanced Concepts
LL1158.Book Page 41 Thursday, September 25, 2003 1:26 PM
Copy-Protecting QuickTime Movies
QuickTime movies can be encrypted so that only authorized people can view them.
Such movies are known as “secured media files.” To use such a file, you must enter a
“media key,” which is usually available from the media file provider.
To enter a media key so you can open a secured QuickTime file:
Mac OS X: Open System Preferences, click QuickTime, click Media Keys, and enter the
key provided by the author or vendor.
Windows: Open the QuickTime control panel, choose Media Keys from the pop-up
menu, and enter the key provided by the author or vendor.
Automating QuickTime Player With AppleScript
In Mac OS X, you can use AppleScript to automate QuickTime Player functions. For
example, you can open a movie and tell it to play for a specific duration; automate the
conversion of movies from one format to another; adjust track playback properties
such as start time, volume, and layer; or adjust movie properties such as copyright and
author.
To determine all of the AppleScript commands you can use to control QuickTime
Player, install AppleScript and look at the QuickTime Player AppleScript dictionary.
1 Open Script Editor.
2 Choose File > Open Dictionary.
3 Select QuickTime Player.
Sample QuickTime Player scripts can be found on the AppleScript website.
Chapter 4 Advanced Concepts
41
LL1158.Book Page 42 Thursday, September 25, 2003 1:26 PM
Keyboard Combinations
for Playing QuickTime Movies
Appendix
LL1158.Book Page 43 Thursday, September 25, 2003 1:26 PM
QuickTime Player and QuickTime Pro provide keyboard shortcuts for most playback
options. When available, each of these shortcuts appears to the right of its associated
menu item. A few keyboard shortcuts have no menu equivalents.
QuickTime Player Controls Shortcuts
For this control
Press (Mac OS X)
Press (Windows)
Play/pause
Space bar
Space bar
Play movie backward
Shift–double-click
Shift–double-click
Stop playback and go back one
frame
Left Arrow
Left Arrow
Stop playback and go forward
one frame
Right Arrow
Right Arrow
Go to beginning of selection
Option–Left Arrow
Control-Alt–Left Arrow
Go to end of selection
Option–Right Arrow
Control-Alt–Right Arrow
Turn volume up
Up Arrow
Up Arrow
Turn volume down
Down Arrow
Down Arrow
Turn volume up to maximum
level
Option–Up Arrow
Control-Alt–Up Arrow
Turn volume down to minimum
level
Option–Down Arrow
Control-Alt–Down Arrow
Mute audio
Control and click Play
Control and click Play
43
LL1158.Book Page 44 Thursday, September 25, 2003 1:26 PM
QuickTime Pro Shortcuts
For this control
Press (Mac OS X)
Press (Windows)
Full Screen Mode
Command-F
Control-F
Exit Full Screen Mode
Command-period or Esc
Control-period or Esc
Half Size
Command-0
Control-0
Normal Size
Command-1
Control-1
Double Size
Command-2
Control-2
Full Size
Command-3
Control-3
Current Size
Command-4
Control-4
Glossary
Glossary
LL1158.Book Page 45 Thursday, September 25, 2003 1:26 PM
AIFF (Audio Interchange File Format) An audio file format used widely on the web.
aspect ratio The relationship between the height and width of an image.
bandwidth The capacity of a network connection, measured in bits or bytes per
second, for carrying data.
BMP A bitmapped graphics format used for still images in the Windows environment.
bitmapped Represented by pixels.
cel A single frame of an animated film using the traditional film animation process.
chapter list A list of “locations” in a movie. A user can choose an item from the chapter
list to go to that point in the movie.
codec From “compressor/decompressor.” A codec is technology for compressing and
decompressing data. Codecs can be implemented in software, hardware, or a
combination of the two.
compression The process of reducing the data size of a file.
Darwin Streaming Server A technology for delivering media over the Internet in real
time. Based on the same code as Apple’s QTSS, Darwin Streaming Server is an opensource streaming server.
Fast Start A method of delivering a movie so that it can start playing before it is fully
downloaded.
frame A single image in a movie.
frame rate The number of frames displayed per second.
GIF (Graphics Interchange Format) A file format for images.
hint track In a streamed movie, a hint track specifies how the movie’s content is to
be transmitted.
45
LL1158.Book Page 46 Thursday, September 25, 2003 1:26 PM
hot spot A place in a virtual reality movie where the user can interact with the movie
using the mouse.
Instant-On A technology that dramatically speeds up access to streaming content for
broadband users.
JPEG (Joint Photographic Experts Group) A standard for compressing still images.
layer In QuickTime movies, how an image is displayed depends on its layer; images
with lower layer numbers are displayed on top.
MIDI (Musical Instrument Digital Interface) A software and hardware standard set by
the music industry that enables electronic instruments to communicate with one
another and with computers.
MP3 (MPEG layer 3) A format for compressing music.
MPEG-4 An ISO standard based on the QuickTime file format that defines multimedia
file and compression formats.
node In QuickTime VR, a point from which an object or panorama can be viewed.
NTSC (National Television System Committee) The organization that defines North
American broadcast standards. The term NTSC video also refers to the video standard
defined by the committee, which is 29.97 fps, 525 lines per frame, and interlaced.
PAL (Phase Alternation Line) A video format used by many European countries and
other countries outside North America. The PAL standard is 25 fps, 625 lines per frame,
and interlaced.
PICT A Macintosh picture file format that does not apply compression to an image and
therefore maintains the same quality level from copy to copy.
pixel The onscreen dots that form text and graphics. A contraction of the words picture
and element.
plug-in Software that helps a web browser interpret certain types of media files.
PNG (Portable Network Graphics) A file format for images.
poster In QuickTime, a still image, usually a single frame from a movie, used to
represent the movie to users.
protocol A set of standards for sending and receiving information on a network.
46
Glossary
LL1158.Book Page 47 Thursday, September 25, 2003 1:26 PM
QTSS (QuickTime Streaming Server) A technology used to deliver media over the
Internet in real time.
QuickTime Player An application that plays QuickTime movies.
QuickTime Pro A version of QuickTime Player with advanced features, primarily the
addition of editing capabilities.
QuickTime VR A QuickTime media type with which users can interact with threedimensional places and objects.
reference movie A file that contains the location of one or more streaming media files.
A reference file linked from a webpage, for example, can direct a client player to the
version encoded for a particular connection speed.
RGB Red, green, blue; a way of representing colors onscreen.
RTSP (Real-Time Streaming Protocol) A protocol for controlling a stream of real-time
multimedia content. Sources of data can include both live feeds and stored digital
video.
sprite An image that is defined once and is then animated by commands that change
its position or appearance.
streaming Delivery of video or audio data over a network in real time, in batches
instead of in a single file download.
TIFF (Tagged Image File Format) A format for graphics, commonly used to transfer
bitmapped images between applications.
track A single data stream in a QuickTime movie. A movie may contain one or more
tracks.
tween track A track that modifies the display of other tracks.
virtual reality (VR) The effect achieved by QuickTime VR, where users can manipulate
objects or environments.
wav A Windows format for sound files.
Glossary
47
LL1158.Book Page 48 Thursday, September 25, 2003 1:26 PM
LL1158.Book Page 49 Thursday, September 25, 2003 1:26 PM
Index
Index
A
I
annotations 39
AppleScript 41
audio
adding an audio track 23
audio controls 11
importing files 19
Instant-On streaming 16
Internet connection speed 15
B
balance
changing for an audio track 23
balance control 11
bass level 11
brightness 12
C
chapter lists 39
color 12, 35
compressing 35–37
contrast 12
converting files to QuickTime 19
copy protection 41
K
keyboard shortcuts 43
key frame options 36
L
languages 27
layering order 28
M
memory options 35
MIDI 12, 24
O
opening files 19
P
data rate 36
displays 34
pasting items into a movie 30
playback 15
poster frames 38
preview 38
E
Q
editing QuickTime movies 28–31
exporting movies 37
QuickTime Player
controls 9
QuickTime Pro
upgrading 7
QuickTime Streaming 17
QuickTime VR movies 11
QuickTime website 8
D
F
Fast Start 17
file formats 19
frame rate 37, 38
Full Screen mode 34
H
hinting 36
R
reference movie 18
registration number for QuickTime Pro 8
RTSP 16
49
LL1158.Book Page 50 Thursday, September 25, 2003 1:26 PM
50
S
T
saving a movie 15
selecting part of a movie 28
self-contained movies 33
settings
adjusting 11
slideshow
creating from still images 20
special effects 29
sprites 26
still images
converting to slideshow 20
exporting frames from a QuickTime movie 21
viewing and modifying 12
streaming 17
system requirements 7
text
overlaying a movie with text 25
specifying font styles 25
tint 12
tracks 21–28
adding a text track 24
disabling 22
sprites 26
tween 26
treble level 11
tween tracks 26
Index
V
versions
getting new versions of QuickTime 8
video masks 30
volume
adjusting during playback 9
changing sound track volume 23