1
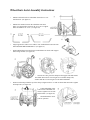
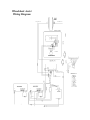
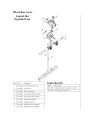
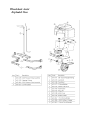
Model 1026
Wheelchair Assist
OWNERS MANUAL
Wheelchair
Assist
17”Wx18”Lx35”H
Patents Pending
CONGRATULATIONS
You have just purchased the best electric Wheelchair-Assist on the market today. These units
incorporate the very latest in technological advances. To assure you of the best and safest
performance as well as longest life, please read the enclosed information. After reading this
manual, if you should require further information, please call our sales department at
1-800-637-8436. For service problems or to order parts call 1-800-637-8436. Be sure to give
the serial number to the service department personnel.
For Information and Sales Call ConvaQuip Ind., Inc. at 1-800-637-8436
For Service and Parts Call 1-800-637-8436
(Please have the serial number available)
IMPORTANT DOCUMENT—DO NOT DISCARD
Wheelchair Assist
Date Manufactured:
Date Shipped:
Serial Number:
IMPORTANT DOCUMENT—DO NOT DISCARD
ConvaQuip Ind., Inc.
Wheelchair Assist
Wheelchair
Assist
Patents Pending
ConvaQuip Ind., Inc.
P.O. Box 3417
Abilene, TX 79604
Phone: (800) 637-8436, Fax: (325) 677-7217
Web site: www.convaquip.com
Manufactured for ConvaQuip Ind., Inc.
(Made in the USA)
OEM-FLP-100107-X
SPECIFICATIONS SUBJECT TO CHANGE WITHOUT NOTICE
PRINTED IN THE USA
Limited Warranty
•
Warranty—One-year from date of shipment.
•
Battery—Six full months from date of shipment. Replacement batteries carry a six-month
warranty. Must provide serial number of cart. Charging the battery for 24 hours is required
to determine that actual replacement is needed.
•
Parts-Limited Warranty—All parts, except circuit breakers needing resetting, and broken
keys in switches, are warranted by the manufacturer to be free from defects in material and
workmanship for a period of six-months from date of shipment. This warranty does not
include wear and tear caused by above normal usage, abuse, negligence, freight damage, or
damage caused by improper use or care, or by outside sources such as fire, floods, etc. If
component has failed due to defect in material or workmanship, it will be replaced or
repaired at the manufacturer’s discretion at no charge to the owner.
•
Labor—The manufacturer will cover labor charges for work performed in the field for one
year from the date of shipment as a result of defect in materials and workmanship. Charges
incurred for resetting the circuit breaker and broken keys in switches are exempt. Double
service calls due to improper first call service or lack of repair parts are exempt.
The above warranties exclude shipping, handling, or travel expenses incurred for the repair of
said unit or parts as well as items worn out through normal use whose malfunction is not
attributable to defect.
All warranty claims should be called in to (800) 637-8436 or (325) 677-4177. Ask for service.
Please provide serial number for warranty verification when requesting service.
For Information and Sales Call 1-800-637-8436
For Service Call 1-800-637-8436 (Please have the serial number available)
—Important Safety Instructions —
Please read before operating.
Warnings
•
•
•
•
•
Never attempt to charge the battery in this cart without using an electrical outlet that is
protected by a GFCI, (Ground Fault Circuit Interrupter).
Replace charging cord if plug is damaged or if the cord is worn or frayed.
Never use the charging cord without proper grounding. Do not use if plug does not have
three terminals.
Always disconnect power before servicing.
See “Daily Maintenance Checklist,” and follow instructions.
Freight Damage
CHECK
• The shipping carton for any visible damage. Report the damage to the freight carrier
immediately. File a claim with the carrier if actual damage to your cart has occurred.
• Contents of the carton. The contents should agree with the information listed on the packing
list. Report any discrepancy to the carrier and the factory immediately.
Recommended Operating Procedures
•
•
•
•
•
•
•
•
•
•
•
•
•
•
New units may need charging! Charge batteries for 24 hours prior to first use.
DO NOT STAND ON UNIT.
DO NOT allow children to operate or play on unit. Keep cart secured with key.
After batteries are charged, disconnect power supply cord and return power cord to the cord
reel before operating unit.
Insert key into key switch on control box and turn counter clockwise and press control button to “ON”, Green light will appear (POWER ON).
Check speed dial knob on left hand side of control box. (Optional)
Place both hands on handlebars.
Move top YELLOW lever forward to go forward.
Move bottom YELLOW lever back to go backwards.
Depress control “ON’ button down for horn.
To stop: Release YELLOW lever.
To turn off: Turn key clockwise.
Always charge unit when not in use.
Remove key.
Attention
It is the responsibility of the owner of this unit to maintain the unit in a safe and reliable
operating condition at all times.
Wheelchair Assist Assembly Instructions
•
Measure and mark each rear wheelchair down tube at 9 1/4”
from the floor. (see figure #1)
•
Measure the distance between the wheelchair rear down
tubes. Use support tubes 601-0183 for 20” to 28” or support
tubes 601-0204 for 28” to 36”. (see figure #2)
•
Align support tubes with receiver tubes in rear of Wheelchair Assist unit. DO
NOT TIGHTEN RECEIVER BOLTS. (see figure #3)
•
Position Wheelchair Assist unit between wheelchair rear wheels with support
tubes facing forward. (see figure #4)
• One side at a time, place the clamp into the support tube and around
wheelchair down tube as seen in figure #4. Assemble clamp, bolts,
washers and nuts as seen in figure #5. DO NOT TIGHTEN.
•
Position each clamp so that the top of the clamp is aligned with 9 1/4” mark on wheelchair down tube. Tighten
all clamp bolts. (see figure #7)
• Center Wheelchair Assist
Unit between wheelchair rear
wheels. Tighten receiver bolts
and lock nuts. (see figure #8)
• Check Wheelchair Assist
Unit for operation.
the following items should be checked daily:
—Replace cord if cord is worn or frayed, 3-pronged plug is broken or
t provides protection through an operating “Ground
Daily Maintenance Check List
For optimum unit availability and performance,
• ELECTRIC —Test
CORDfor smooth “start, acceleration, deceleration and stop.” Repair if
necessary.
Charge
or Be
replace
if needed.
reel will not retract.
sure battery
power outle
—Replace
if broken.
(Multi-Tug, EMT)
Fault Circuit
Interrupter”
(GFCI).
—Repair
or
replace
any
component that would cause a potential safety hazard.
• THROTTLE
—Wipe off and clean as needed.
• CASTERS
• GENERAL
• APPEARANCE
upter (GFCI) in the electrical circuit wherever the unit is
to be charged. This is to protect against any possible shock hazard.
AC voltage
required is 115/230 @ 60/50Hz VAC. Charge batteries every night, all night,
Battery
Charging
at every
opportunity.
When
the batteries are fully charged, the charger will maintain a
• and
Install
a Ground
Fault Circuit
Interr
not damage the batteries.
• Fully discharged batteries will take 12 hours to fully charge, so it is best not to let the
Do
not voltage”
store the which
unit with
“float
willdischarged batteries for more than 30 days, as this can cause
premature battery failure. Fully charge the batteries at least every 30 days, if in a low usage
batteries become completely discharged.
• No maintenance of batteries is required. The batteries are maintenance free and water
•
location.
•
cannot be added.
Be Responsible:
Recycle old batteries or dispose of according to local or national codes.
ons on battery - avoid any sparks)
Turn off
key switch and remove key. Disconnect charger cord from wall outlet, if plugged
Battery
Replacement
To Replace Batteries: (Read precauti
Disconnect the negative and positive wire bundles from the battery posts and remove the
CAUTION: Do not cross battery posts with metal object!
in.
Connect
the
red leads
to from
the positive
post (+) first. Connect the black leads to the negative
• Remove tie-down
strap
batteries.
• post (-). Reposition protective cover over positive post. WARNING: Reversing battery
connections
batteries. may damage motor controller!
•
•
•
: Your unit has been equipped with AGM batteries during the manufacturing
process
as original
• Secure
batteriesequipment.
with strap.The manufacturer recommends that you replace the original
batteries only with the same type and rating to prevent damage to your unit’s internal
components,
charging system, or personal injury to you. Manufacturer is not responsible for any
IMPORTANT
adverse effects caused by replacement with any other type of batteries.
Wheelchair Assist
Wiring Diagram
Wheelchair Assist
Control Box
Exploded View
Wheelchair Assist
Exploded View
Wheelchair Assist
Wiring Schematic