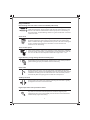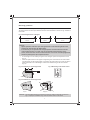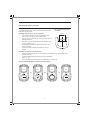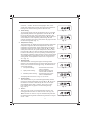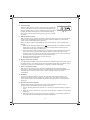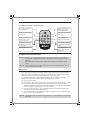
1
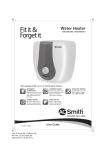
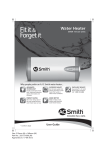
Water Heater
HSE-HNS 50, 60, 80 Litres
0
Hot Water
Quantity
0
C
C
Timer ON
Timer OFF
MAX
Clock/
Timers
Timer 3
Energy
meter
Override
kWh
Timer 3 Timer 1
Timer 2
Low
Quick
Standard
Clock/
Timers
Override
Heat
Modes
Timer 3
MAX
Energy
meter
Heat
Modes
MAX
HSE-HNS: Available in 50, 60 & 80 litre capacities
Adaptive EnergySaving System
Touch Control
Panel
0
Hot Water
Quantity
0
C
C
:
8888
Timer ON
Timer OFF
MAX
Clock/
Timers
Timer3
Energy
meter
Override
Timer 3 Timer 1
Timer 2
Low
kWh
Quick
Standard
Heat
Modes
MAX
Glass Coated & Gilded
Heating Elements
[24kt Gold]
4
User Guide
Size: 210mm (H) x 148mm (W)
Part No.: 323871-000_R0
Approved on: 30-05-2012
Years
Extended
Warranty on
Heating Elements*
Programmable
Timer
7
Years
Warranty on
Blue Diamond®
Glass-Lined Tank
* Conditions Apply
Congratulations!
And welcome to the A. O. Smith family.
We would like to thank you for the trust you have shown in choosing an A. O. Smith water
heater. You can be sure it will live up to your expectations. Thousands of delighted users the
world over trust A. O. Smith water heaters for their families. This user guide will introduce you to
your water heater. Follow the instructions carefully and look forward to enjoying long years of
trouble-free service.
A. O. Smith is a company known for its innovative technologies and energy-efficient solutions.
Ours are the only water heaters with the Blue Diamond® Glass lining for the inner container of
the water heater. This cutting edge technology prevents sediment and scaling, fights corrosion
and extends the life of your water heater. We also offer you an exciting range of colour options
for the front panel of your water heater. Choose the one that matches your bathroom décor
best.
Our customer-centric approach manifests itself in many other ways too. A. O. Smith is the first
water heater company which gives you a dedicated Toll Free Customer Care Number. If you need
any information or assistance with your water heater, just call us from any phone, anywhere in
the country to our Toll Free Customer Care No. 1.800.103.2468.
Or
Factory Address:
A. O. Smith India Water Heating Private Limited
Plot No. 300, Phase-2, KIADB Industrial Area, Harohalli, Kanakapura Taluk,
Ramanagara District - 562 112, Karnataka, India.
About A. O. Smith
A. O. Smith India Water Heating Private Limited was established in 2006. Since this time, the
A. O. Smith team has conducted numerous focus group studies and spent an endless number
of research hours determining what India wanted in a water heater. Backed by 75 years of
proven technological advances, A. O. Smith India has created a stylish design with features
demanded by the Indian consumer.
The A. O. Smith plant with manufacturing facilities spread over 76,000 sq.ft. is located on
20 acres, just outside Bengaluru, in the KIADB Industrial Area, Harohalli. The India operations is
the 16th A. O. Smith manufacturing facility worldwide. A. O. Smith's India plant has extensive
engineering and technical resources and has the latest technologies incorporated. A. O. Smith is
the first and only manufacturer to invest in and produce glass lined water heaters in India.
Today, A. O. Smith Water Products Company is one of the largest water heater manufacturer in
the world, is a global leader in innovative technology and energy efficient solutions.
What's in the box?
User Guide
Electric
Water Heater
Wall Mounting
Accessories
Heater
Water 50,
60, 80 Litres
HSE-HNS
Clock/
Timers
Hot Water
Quantity
0
0
C
MAX
Override
Timer 3
C
MAX
Heat
Modes
Energy
meter
kWh
Timer ON
Timer OFF
Timer 1
Timer 3
Timer 2
Low
Quick
Standard
Heat
Modes
Clock/
Timers
Energy
meter
Timer 3
Override
HSE-HNS: Available
0
C
MAX
in 50, 60 & 80
litre capacities
& Gilded
Glass Coated
Heating Elements
[24kt Gold]
Adaptive EnergySaving System
HQ
ot
u aW
ntait
te
yr
0
C
Programmable
Timer
Timer ON
Timer OFF
MAX
Cim
loc /
T ek
rs
Timer3
Em
nertg
e ry
Override
kWh
Timer 3 Timer 1
Timer 2
Low
Quick
Standard
Cilm
oc /
T ek
rs
Override
Ho
eadtes
M
Timer 3
MAX
Ene
ertg
e ry
m
Ho
ea
dt
es
M
4
MAX
Touch Control
Panel
0
0
C
Hot Water
Quantity
C
:
8888
Timer ON
Timer OFF
MAX
1
Timer 3 Timer
Timer 2
Low
kWh
Quick
Standard
Heat
Modes
Timer3
Clock/
Timers
Energy
meter
Override
MAX
User Guide
Relief Valve
7
Years
Years
Extended
Warranty on
Heating Elements*
Warranty on ®
Blue Diamond
Tank
Glass-Lined
* Conditions
Apply
Drain Pipe
Remote Accessories
& Battery
Contents
User instructions.........................................................................................1
Specifications..............................................................................................3
Key features ................................................................................................4
Electronic features......................................................................................5
Installation instructions .............................................................................6
Directions for use .......................................................................................10
Maintenance instructions ..........................................................................13
Troubleshooting..........................................................................................14
Circuit diagram ...........................................................................................15
Warranty .....................................................................................................16
Jurisdiction..................................................................................................17
Warranty Card.............................................................................................18
Service and Maintenance ...........................................................................19
User Instructions
Please read the instructions carefully before the installation or operation of this HSE-HNS water
heater (henceforth the HSE-HNS water heater will be referred as water heater). This user guide
is meant for your future reference.
?
Only the company recommended professional installers will install the A. O. Smith water
heater for you. In case of improper installation of the water heater by unauthorised
personnel, A. O. Smith will not be responsible.
?
If the users install the water heater manufactured by our company by themselves or do it
by using the self prepared installation materials, our company will not be liable for any
adverse effects on normal operation and service performance of the water heater,
including but not limited to pipeline leakage, fall or improper installation thereof and
harmful effects on or damage to the body of the water heater as well as all losses
incurred thereby.
?
After installation and operation of the water heater, users should inspect the water
heater regularly and make necessary maintenance according to the service conditions.
If any abnormality occurs, stop the operation of the water heater immediately and dial
our Customer Care No. 1.800.103.2468 for repair to ensure the normal, safe and reliable
operation of the water heater.
?
The anode rod is a consumable part and should be examined and replaced at regular
intervals. It is suggested that the longevity is for 2 to 3 years. Consumers should register
and replace the anode rod by dialling our Customer Care No. 1.800.103.2468. In this
way, the service life of the water heater will be extended effectively.
?
Prior to any maintenance or repair of the water heater, please ensure to cut off the
power. Those installers who are not recommended by A. O. Smith should not adjust or
repair the water heater.
?
In case the water heater is subject to dry heating, the generated steam or burning water
might lead to serious scald. Therefore, it is necessary to fill the water heater with water. If
dry heating occurs, cut off the power and water supply at once, stop the operation, dial
the Customer Care No. 1.800.103.2468 and carry out inspection or repair by our
company recommended professional installers.
?
This water heater is provided with power cord, if any damage is observed before
installation, contact our Customer Care No. 1.800.103.2468. (Primary components of the
water heater are protected by insulation layer and thermal protective coating so that the
users can operate with ease).
?
This water heater is equipped with relief valve. For the sake of safe operation, the
mounting position of the valve should not be changed without permission and the
blockage of valve outlet is strictly prohibited. The discharge pipe must be provided for
the relief valve, mounted downwards continuously and should not be knotted in the
middle. The discharge pipe shall be directly connected to the floor drain.
?
Before installing the water heater, confirm that the power of water heater matches its
electric meter capacity and power wire.
?
This water heater should be earthed reliably. It is prohibited to connect the earth wire to
neutral wire or tap water pipe.
?
If the temperature has been set and the relief valve has been installed by the
manufacturer, for the sake of safe operation, users may not alter the installation location
or block its outlet without permission.
?
Hot water above 50°C could result in scald. Before using hot water, please pay attention
to testing water temperature by hand and use water at an appropriate temperature by
mixing cold water.
1
?
Water discharged from the water heater (including high temperature heating water)
should not be used for drinking.
?
A special branch circuit should be used for the water heater. Examine whether the electric
meter, circuit breaker and diameter of electric wire meets the requirement for rated
current of the water heater. If necessary, a qualified electrician should examine.
?
This water heater should be installed at a dry place. Please never insert or pull out the
power plug with a wet hand or else electric shock, injury, etc. may be caused.
?
Do not use the damaged electric wire aged, loose and unfixed power socket otherwise,
electric shock, short circuit, fire, etc. will be caused. Make sure that the power plug is
connected with the socket firmly.
A. O. Smith India Water Heating Pvt. Ltd. reserves all the rights to interpret the above
mentioned provisions.
Caution:
Failure to follow these instructions may lead to risk of fire and could cause
property damage and or personal injury or death.
Warning: Power-on and operation will be permitted only after reliable grounding is
provided for the power socket. The water heater is strictly forbidden for use in
circumstances where no safe grounding or well-drained floor drain is provided. In
the installation area, it should be ensured that the water leakage of the water
heater or joints may not cause damage to the articles in adjacent region or lower
portion of the building.
Note: A. O. Smith reserves the right to amend or modify the specifications and features at
any time, as and when required without any prior notification.
2
Specifications
Model
HSE-HNS
-050
Rated volume [L]
HSE-HNS
-060
HSE-HNS
-080
50
60
80
~220/50
~220/50
~220/50
3000
3000
3000
3000/2000
3000/2000
3000/2000
2000
2000
2000
Net weight [kg]
22
25
29
Reheating time for 35°C [3kW in min]
[2kW in min]
39
58
47
70
62
93
35-75
Rated AC voltage [V]/Rated frequency [Hz]
Rated input power
Quick power heating mode [W]
Standard power heating mode [W]
Low power heating mode [W]
Temperature range [°C]
35-75
35-75
N/cm2
80
80
80
Water head (metres)
80
80
80
BSP ½
BSP ½
BSP ½
Rated water pressure
Inlet/Outlet Connection [Inch]
Dimensions
Model
HSE-HNS-050
A(mm)
A1(mm)
B(mm)
B1(mm)
C(mm)
850
376
434
195
427
HSE-HNS-060
717
305
483
230
483
HSE-HNS-080
876
405
483
230
483
Fig. 1
B
A
C
88 :88
0
C
Timer OFF
MAX
Timer3
Energy
meter
Override
Timer 3 Timer 1
Hot Water
Quantity
0
C
Timer ON
Clock/
Timers
Timer 2
Low
kWh
Quick
Standard
Heat
Modes
MAX
Relief valve*
B1
A1
Hot water (outlet)
100
Cold water (inlet)
Caution: *Relief valve has been factory fit with the water heater and set at 0.8 MPa
(8 Bar) rated pressure.
Warning: Do not tamper or detach the safety valve from the water heater.
3
Key Features
Dual heating elements: Glass coated and Gilded [24kt Gold]
This water heater has dual heating elements. The 2kW heating element is a
gilded [24 karat gold], which minimises and prevents scale formation on the
surface of the element. Gilded element does major portion of the heating in
the water heater. The 3kW heating element is a glass coated which is used for
instant hot water.
Glass lined
This water heater comes with a special glass lined inner tank. This lining offers
protection against the tank corrosion and increases life of the water heater,
which is achieved through a specialised fusion process. The tanks are designed
to pass 1,00,000 cycle fatigue test. This makes it one of the best tank
resistance to rust and scaling.
Touch control panel
0
0
C
Hot Water
Quantity
C
:
8888
Timer ON
Timer OFF
MAX
Clock/
Timers
Timer3
Energy
meter
Override
Timer 3 Timer 1
Timer 2
Low
kWh
Quick
Standard
Heat
Modes
MAX
Touch control panel is used for easy operation of this water heater. It displays
electrical energy consumption, set temperature, actual temperature, timer etc.
The user can select the set temperature within the range of 35°C - 75°C.
High efficiency energy-saving thermal insulating layer
A polyurethane foam insulating layer without freon is used, which provides a
good insulating property and reduces heat loss effectively.
Relief valve
A relief valve (refer to Fig.1) for the water heater is provided and set while
leaving the factory and it is not adjustable by the user. The relief valve must be
installed at the inlet pipe of the water heater. This valve will relieve pressure
automatically while the piping system exceeds the rated pressure.
Anode protection
A strong steel core anode rod is used for protecting the inner tank. It greatly
prolongs the service life of the water heater.
High temperature limit protection switch
This water heater employs a high temperature limit protection switch. In case
any fault occurs and the water temperature exceeds the highest preset
temperature (93°C), then switch rapidly cuts off the live line and neutral line
simultaneously to guarantee safety.
4
Warranty
7
Years
With our careful manufacturing and strict quality control, we assure you the
best quality and long life; is backed by 7 years warranty on the tank and
2 years warranty on the whole unit.
Electronic Features
AES [adaptive energy-saving system] Function
This water heater has unique AES feature which adopts the heating cycles to
the water utilisation habit of the user. This enables the water heater to switch
on automatically at required time, hence saving energy by minimising thermal
losses.
Display of Hot Water Amount
This water heater has a function of displaying the amount of hot water
available. Five lighting block displays the hot water distribution of different
levels in the inner tank of the water heater.
Instant
Users can select instant heating by pressing "override" key at all times and the
water heater starts electrical heating immediately to reach the preset
temperature.
Programmable Timer
This water heater has timer functionality which enables the water heater to
switch on automatically in energy saving mode at preset times of the day, as
required by the user.
Power-off Memory Function
This water heater can retain the set information for 72 hours, even in power
off condition.
Intelligent Dormancy
If no operation is performed within 3 minutes, the water heater enters into
a dormant state.
5
Installation Instructions
Caution:
•
Once the mounting, plumbing, power connection and water filling is done, then only
the power supply should be given. The steps need to be followed as per the user
guide.
•
This water heater is heavy, hence will require at least 2 persons to carry and install,
otherwise it may cause injury.
•
Please carry the water heater in the ex-factory state and do not tilt over 45°C angle or
vertical placing.
•
Disassembly and assembly by users is prohibited.
Caution:
Hot water over 50°C will cause scald. In order to protect you and your family,
especially the safety of children, if you set the temperature exceeding 50°C, please
take care.
Mounting
This water heater should be installed at a location that is close to power socket, floor drain and
water utilisation point. As the outlet of the relief valve might discharge water during the
operation of the water heater, therefore the floor drain should be provided near the water
heater. In the installation area, it should be ensured that the water leakage of the water heater
or pipeline joints should not cause damage to the articles in adjacent region or lower layer of
the building. While installing the water heater, please be sure for mounting the water inlet and
outlet pipes at the bottom of the water heater.
Vertical installation of the water heater is strictly prohibited.
Mounting procedures and precautions
The installing surface must be capable of supporting at least four times the weight of the water
heater when filled with water. If the water heater is not installed on the bearing wall or is
mounted on hollow brick wall, corresponding protective measures must be provided, for
example supporting rack, through-wall screw, mounting of back plate, etc.
Prior to confirming the positions of bolt holes, retain at least 300 mm space on the right side of
the water heater, to open the side cover for repair.
•
If the water heater is embedded into a gusset plate, the plate on the right side should be
moveable for convenience to dismantle the end cover for repair and maintenance.
•
The water heater should not be located outdoors or in an area subject to freezing
environment. If freezing occurs, the container and water pipe will break, causing scald or
leakage.
Caution:
•
This water heater should be installed with the fixing accessories provided.
•
The water heater should be hung until the accessories are fixed firmly or else the
heater may fall off and serious injury accident might be caused.
•
The maximum power of this water heater is 3000 W, hence a single dedicated power
supply circuit is proposed, the core area of electric supply wire should not be less than
2.5 mm2.
6
Mounting guidelines
Drill two holes in 90 mm depth at least by using an electric impact drill with a ø10 mm bit.
The holes must be in level. Space between the two holes should be as shown in Fig. 2 based on
the model.
Fig. 2 Mounting distance of hangers
375mm
198mm
375mm
HSE-HNS-050
HSE-HNS-060
HSE-HNS-080
Caution:
• Nylon expansion tube must pass through the hole of the mounting bracket first,
and then be inserted into the drilled holes.
• It is necessary to use special inner hexagon spanner to fasten the bolts into the
nylon expansion tubes, no other tools are permitted. During fastening of the
screws, ensure that the counter sunk head of the screw is not excessively tightened,
which may damage the nylon expansion tubes.
• Fix the hangers on the wall by using the inner hexagon spanner and expansion screws
(Fig. 3).
• Insert the square holes on the upper of supporting rack at the back of the water heater
into the hanger of the hanging plate, move down the water heater to ensure the square
holes against the root of the hanger. Confirm the reliable fixing of the water heater
(Fig. 4).
Fig. 3 Installation of mounting bracket
Fig. 4 Mounting of the water heater
Wall
Fig. 5 Installation of mounting bracket
Proper
Improper
Caution: The provided mounting accessories can only be used for solid wall, as shown in
Fig. 5. Improper installation may cause the water heater to fall down.
7
Plumbing connection
Connect the relief valve provided with this unit to the inlet of the water heater (inlet pipe has a
blue cap). The arrow points to the direction of water flow (to the water heater). The relief valve
must be connected to the discharge pipe. The hot water pipe is connected to the water outlet
(outlet pipe has a red cap). If the water pressure of the inlet pipe approaches to or exceeds the
relief limit (0.8 MPa) of the multi-functional relief valve, please install a reducing valve on the
water inlet pipe away from the water heater. Refer to Fig. 6 for pipe connection. Nylon pipes
should be used for connection between the tapping pipe in users house and the water heater.
Caution:
Apply proper sealing to the pipe joints to prevent leakage. At the same time,
the relief valve may not be tightened excessively to avoid damage.
Fig. 6 Water inlet and outlet connection diagram
kWh
Timer 3 Timer 1
Quick
0
C
C
Timer OFF
MAX
Timer3
Energy
meter
Override
Hot Water
Quantity
88 :88
0
Timer ON
Clock/
Timers
Timer 2
Low
Standard
Heat
Modes
MAX
Relief Valve
Handle
Discharge Pipe Joint
Hot Water
(outlet)
Cold Water (inlet)
Connection of wired remote control box
If you require a wired remote control box to be installed, please contact A. O. Smith Customer
Care No. 1.800.103.2468
Power connection
The power cord and plug has been provided for the water heater. Users only needs to insert the
plug into the corresponding electrical socket.
Caution: Ensure that the socket is grounded reliably. Use an independent high-quality
socket, its rated current should not be less than 16 A and ensure reliable contact
with the plug.
Water filling
After all the pipes are connected, first open the discharge valve of the water heater, then the
feed valve. Then fill the water heater with water, exhaust the air till water stream flows
uniformly out of the hot water outlet. This indicates that the water heater has been filled up.
Please close the hot water discharge valve and check all connections for any leakage. If leakage
occurs, empty the inner tank, repair the leaked connection and then refill the water heater with
water. For your convenience, please don’t close the feeding valve while filling the water.
8
Installing the remote controller
For convenience of operation, you may install the remote
controller holder/bracket on the wall near the water heater
(a bracket may be used).
Fig. 7 Bracket for remote
controller
Installing the bracket for remote controller:
28mm
•
The remote controller must be installed at a place
where it does not get in contact with water.
•
Drill two holes on the wall by using an electric impact
drill with 6mm bit.
•
The holes must be horizontal and space between two
holes is 28mm (Fig. 7).
•
Fix the bracket on the wall by expansion tubes and
screws attached.
•
Place the remote controller with battery into the
bracket.
Installing the remote controller battery:
•
Rotate counter clockwise by a coin and remove the battery cover at the back of the
remote controller.
•
Load the CR2025 battery (accessory) into the controller.
Note: “+” up.
•
Cover the battery cover and rotate it clockwise by a coin (Fig. 8).
Fig. 8 Installation diagram of remote controller battery
Battery Size:
CR2025 3V
Rotate after
pressing
Open/close
by a coin
Battery Size:
CR2025 3V
Battery Size:
CR2025 3V
r
afte
ate g
Rot ressin
p
CR2025
lose
en/c
Op a coin
by
Battery Size:
CR2025 3V
Rotate after
pressing
Open/close
by a coin
9
Directions for use
Caution:
Before using the water heater, make sure that it should be filled with water and
the power plug has been connected properly.
Attention: When the water heater is installed in its place, connect the power supply after
waiting over 30 minutes initially.
Fig. 9 Touch control panel functions
AES function adopts the
heating cycles to the
water utilisation habit.
The LED displays working
states and setting changes
made on water heater.
To set Clock and upto 3
ON/OFF timers (Timer l,
Timer ll, Timer l+ll).
To change the three
different heating modes.
To display the amount of
hot water in the tank by
changing green to red.
0
Hot Water
Quantity
0
C
C
:
8888
Timer ON
Timer OFF
MAX
Clock/
Timers
Timer3
Energy
meter
Override
Timer 3 Timer 1
Timer 2
Low
kWh
Quick
Standard
Heat
Modes
MAX
To display the total energy
consumption of the water
heater.
To start heating the water,
press ON/OFF key.
To switch ON, the water
heater enters the heating
state instantly.
To increase temperature,
clock, timers.
To set the Timer 3.
To decrease temperature,
clock, timers.
To get more hot water
continuously for longer
bathing time.
1. Initial power
When the water heater power plug is connected for initial power
ON, the electronic controller will detect automatically. All screen
indicators will glow (Fig. 10) and go out seconds later indicating
the heater is standby.
2. Power ON/OFF
Press the ON/OFF key " ", the water heater is on. Firstly, the
electronic controller default state is at preset temperature mode
and default display time. Display the current clock "12:00",
10
Actual Temp. Set Temp.
Low
Fig. 10
Hot Water
Quantity
moreover, ":" flashes. The clock running begins. Here, if the
actual water temperature is lower than the preset temperature
heating starts and the heating indicator becomes red.
Hot Water
Quantity
Low
3. Clock setting
Fig. 11
In non-timing mode, press the "Clock/Timers" key for 3 seconds
approximately and the hour digit flashes. Press the "p
" or "q
"
Actual Temp. Set Temp.
key to set the hour; then, press "Clock/Timers" key again, the
minute digit starts flashing and then press the "p
" or "q
" key to
set the minute. In case of pressing continuously, the data
Low
changes ceaselessly; then press "Clock/Timers" key again and exit
Fig. 12
the clock setting mode. (Fig. 11)
Hot Water
Quantity
4. Temperature setting
This water heater can display the actual temperature and preset
temperature together. The actual temperature is the water
temperature in water heater and set temperature is the water
temperature which the user requires. Press the "p
" or "q
" key
under power ON state, the "preset temperature" flashes, then
press the "p
" or "q
" key again to make the preset temperature
increase or decrease by 1. In case of pressing continuously, the
data changes ceaselessly, release the key to stop at certain value,
"preset temperature" stops flashing, then exit the temperature
setting mode. The temperature can be set in a range of 35°C ~
75°C. (Fig. 12)
Actual Temp. Set Temp.
Hot Water
Quantity
Low
Fig. 13
Actual Temp. Set Temp.
Hot Water
Quantity
Quick
Fig. 14
5. Heating mode
This water heater is having three types of heating modes.
Selection can be made based on the season and purpose of hot
water, more convenient and energy-saving. The default state is
"Low Power Heating".
: Heat the full inner tank of
water in 2000 W.
2. "Quick power heating"
: Heat the upper half inner
tank of water in 3000 W.
3. "Standard power heating" : Heat the full inner tank of
water in 3000/2000 W.
The display will be shown as in Fig. 13, 14, and 15.
Actual Temp. Set Temp.
Standard
1. "Low power heating"
Fig. 15
Actual Temp. Set Temp.
Hot Water
Quantity
Timer ON
Low
Fig. 16
6. Timing setting
Press "Clock/Timers" key for 3 seconds approximately and the
timing hour and minute flashes. Press the "p
" or "q
" key to set
the minute to increase or decrease by 30. User can set upto
three ON/OFF timers (Timer l, Timer ll, Timer l+ll) in a day.
Press "Clock/Timers" key again to exit the timing setting.
(Fig. 16 & 17)
Hot Water
Quantity
Actual Temp. Set Temp.
Hot Water
Quantity
Timer OFF
Low
Fig. 17
7. Timer 3
Press the "Timer 3" key, to set the third timer function. The
setting procedure of Timer 3 is same as Timer l & ll. (Fig. 18)
Note: Functions of "Timer 3" may run simultaneously and enter
the multistage timing mode. Default timing interval for usage is
21:00 ~ 8:00.
11
Actual Temp. Set Temp.
Timer 3
Low
Fig. 18
Hot Water
Quantity
8. Instant heating
Actual Temp. Set Temp.
When the water heater is in timer mode, press the "override" key
and the water heater enters the heating state immediately. The
heating indicator glows, when the temperature preset by users is
reached, the water heater returns to the state before setting.
Also to exit from the instant heating mode, press the "override"
key again.
MAX
Hot Water
Quantity
Quick
Fig. 19
9. MAX increment function
Press the "MAX" key to get more hot water continuously for longer period. By pressing the
"MAX" mode, the lighting block will become light; repress the "MAX" key to cancel the
"MAX" mode, and the lighting block goes out.
Note: The "MAX" mode is only available in "quick power heating" and "standard power
heating".
1. While the LED heating indicator shows " ", indicate that the water heater is in heating
mode; while it goes out, indicate that the water heater has been heated to preset
temperature and is being in holding state.
2. Press "Clock/Timers" and "Override" keys for 8 seconds, set the temperature, clock time,
timing time, timing interval at peak valley by default, clear all fault codes and the
working mode restores to the normal state. After completing reset of the controller, all
characters show 2 seconds and then enter shutdown state.
3. All timing intervals are based on the real-time clock.
4. All digits flash to set the state.
10. Display of hot water amount
Five lighting blocks display the hot water distribution of different levels in the water tank of
the water heater. In your setting mode, when the lighting blocks show red, indicate a high
temperature, green for a low temperature, orange for a medium temperature.
11. Power consumption display
Press the "Energy meter" key for 6 seconds, LED will display the accumulated power
consumption. The minimum show value is 0.1 kWh and the maximum is 999.9 kWh. If the
maximum value is reached, it will restore to 000.0, and again recount the power
consumption.
12. Dormancy
In case of no operation within 3 minutes, the controller enters dormant state. If the
dormant state needs entering quickly, press "Clock/Timers" and "AES" at the same time.
In the dormant state, press the ON/OFF key and the controller returns to the state before
dormancy.
13. Operation of remote controller
The operating method of function keys on the remote controller as shown in Fig. 10
functions same as mentioned above for touch control panel.
1. Prior to operating the remote controller, it is necessary to install the battery as shown in
Fig. 8.
2. While the remote controller is in use, point it at the electronic controller, having a range
within 5 m.
3. When pressing the function keys of the remote controller, if the operating indicator on
the panel does not become light, please replace the battery.
12
Fig. 20 Wireless remote controller function
To start heating the water,
press ON/OFF key.
AES function adopts the
heating cycles to the
water utilisation habit.
To increase temperature,
clock, timers.
To decrease temperature,
clock, timers.
To set Clock and upto 3
ON/OFF timers (Timer l,
Timer ll, Timer l+ll).
Clock /
Timers
Override
Heat
Modes
Timer 3
MAX
Energy
meter
To change the three
different heating modes.
To switch ON, the water
heater enters the heating
state instantly.
To display the total energy
consumption of the water
heater.
To set the Timer 3.
To get more hot water
continuously for longer
bathing time.
Maintenance instructions
Warning: Only A. O. Smith authorised service personnel should maintain and repair this
water heater. Unauthorised servicing could result in serious injury or property
damage.
While repairing the water heater, please disconnect the power plug from the
socket.
Caution: Prior to the repair of the water heater, please refer the troubleshooting chart to
rule out all the obvious causes.
Maintenance
• If the water heater needs to be drained, close the water inlet valve first, open the drain
valve, then rotate the handle of the relief valve, release the nut connected to the water
outlet joint of the inner tank and drain water from the discharge pipe.
• It is recommended that the tank should be flushed to remove sediment which may
buildup during operation. Specific operating procedures are as follows:
(1) Disconnect the power.
(2) Screw off the relief valve and remove the internal water inlet pipe of the water heater.
(3) Connect the water outlet pipe connection of the water heater to the tap water
pipeline and fill water from this end, the water inlet pipe connection is connected to
floor drain by pipes and discharge water from this end.
(4) Open the water inlet valve to get a maximum tap water flow, flush the tank till the
drained water from the tank becomes clean.
(5) Connect the water inlet and outlet pipes again according to Fig. 6, and put the water
heater into use after a leakage test.
Caution: The drained water could have a high temperature, a scald might be caused, please
be careful.
13
Troubleshooting
Problem
Possible causes
Corrective action
• No display
• No hot water
1) No power to heater
2) No power in electric socket
3) Failure in control circuit
or internal wiring
1) Switch on power to heater
2) Check power socket
3) Call Customer Care Centre
• No display
• High water
temperature
1) High temperature limit
switch open
2) Electrical circuit failure
1) Switch off power supply
2) Call Customer Care Centre
• Display, no
hot water
Heating elements or
internal circuit failure
Call Customer Care Centre
• Drip from
pipe joints
Unsealed joints
Reconnect pipes of water
heater and be sure to use
seal tape
• Drip from
enclosure
1) Tank or accessories leakage
2) Drain blocked
3) Condensate pipe distorted
or not downward facing
1) Disconnect power to
heater immediately
2) Check & make condensate
pipe downwards
3) Call Customer Care Centre
• Display ”E1”
Black wire of two-core terminal
open circuit or short circuit
Call Customer Care Centre
• Display ”E2”
White wire of two-core terminal
open circuit or short circuit
Call Customer Care Centre
• Display ”E6”
Red wire of two-core terminal
open circuit or short circuit
Call Customer Care Centre
• Display ”E7”
Blue wire of two-core terminal
open circuit or short circuit
Call Customer Care Centre
• Display ”E3”
Ultra High temperature
Call Customer Care Centre
• Display ”E5”
Low voltage protection
• Display “EA”
The relay breakdown
Note: Call Customer Care Centre on 1.800.103.2468
14
Call Customer Care Centre
1) Switch off power supply
2) Call Customer Care Centre
Circuit Diagram
Power Board
KA4
KA1
EH1
L1
L
COM
Red wire
NO
N
NO
Thermal Cutout
2kW Heating Element
(Lower side of the tank)
Yellow wire
COM
Black wire
KA3
Black wire
NO
EH2
N
Yellow/Green wire
COM
3kW Heating Element
(Upper side of the tank)
White wire
To Water Tank
Control Board
L
N
PE
Temperature Sensor
Ten-core Cable
0
Hot Water
Quantity
0
C
Illustration:
1. Blue probe short connected to water outlet pipe.
2. Red probe connected to upper head cover.
3. Black probe connected to middle head cover.
4. White probe connected to lower head cover.
C
:
8888
Timer ON
Timer OFF
MAX
15
Clock/
Timers
Timer3
Energy
meter
Override
Timer 3 Timer 1
Timer 2
Low
kWh
Quick
Standard
Heat
Modes
MAX
Warranty
Product warranty
Your A. O. Smith water heater is warranted against defects
arising from faulty design, workmanship and materials for a
period of 24 months from the date of the invoice, subject to
the following conditions:
1.
The customer will notify the Company promptly about
defects noticed and give the Company or its authorised
service provider adequate opportunity to inspect, test
and remedy them, for which the customer will deposit
the goods, if necessary, with the Company's
Office/Service Centre along with the original invoice.
2.
Special warranty from the date of purchase is subject to
the following conditions:
3.
•
Tank
- 7 Years
•
Heating Element
- 2 + 2 Years*
•
Rest of the parts
- 2 Years
Inspection and Test Report of the Company's
Office/Service Centre will be treated as final and
binding under the warranty for determining the
defects, repairs/alterations required or carried out, or
certifying working of the goods thereafter.
7
Warranty
on tank
4
Extended
Warranty*
* Register your product with the
A. O. Smith Customer Care
Centre [1.800.103.2468] within
two months of purchase. You will
get an extended warranty on the
element [from 2 years to 4 years].
4.
The Company or its authorised service provider will be
entitled to retain any defective part replaced under the
warranty.
5.
The Company's liability under the warranty will be
limited only to defects which occur under conditions of proper installation, normal
operation and proper use. It excludes defects occurring because of abuse, faulty care or
maintenance and repairs/alterations to product or the parts by others.
6.
Components subject to wear, such as anode, are not covered under this warranty.
7.
The customer will have no claim under this warranty in respect of any personal injury,
damage or property or consequential damages, or for utilisation of the goods not in
accordance with the user guide.
16
General Terms of Warranty
1.
The “goods” shall mean the goods described in the purchase agreement.
2.
“The customer” shall mean the original purchaser under the purchase agreement.
3.
“The Company” shall mean A. O. Smith India Water Heating Pvt. Ltd.
4.
The “Purchase Agreement” shall mean the General Terms and Conditions of Sale agreed
upon by the customer and the Company as printed on the Invoice.
5.
“Invoice” shall mean the Invoice issued for the Unit by the Company or Authorised Dealer
to the customer describing the goods and indicating, inter alia, the total purchase price
thereof, the name of the customer and the place where the goods are to be installed.
6.
“User Guide” shall mean the instructions for installation leaflet published by the Company
and delivered to the customer.
Note: For registration of the Extended Warranty, please call our dedicated Toll Free Call
Centre No. 1.800.103.2468 OR fill up the details in the Warranty Card and mail the same
to A. O. Smith India Water Heating Pvt. Ltd., factory address.
Post Warranty
1.
The customer may be offered a yearly Service Contract at the prevailing Company rates
and terms.
2.
In case the customer does not wish to enter the Service Contract, he has the option of
calling our Service Centre and having his A. O. Smith Water Heater unit serviced on actual
basis i.e. by paying the Labour Cost and Spares needed to attend to that Service or
Complaint Call at the prevailing Company rates. Such service will be rendered by the
Company in towns or places where the Company has its Service Centres.
3.
The Company will provide free servicing of the goods brought to its Service Centre by the
customer, provided that all expenses of transporting the goods to and from the Service
Centre shall be borne by the customer directly.
4.
If, during such service, it is necessary for the Company to replace or repair defective
components or parts, the customer shall be required to pay for the same as per the
Company's prevailing price list.
Jurisdiction
The courts of competent jurisdiction at Bengaluru, Karnataka shall have exclusive jurisdiction
over all matters arising out of any disputes in relation to the product.
17
Warranty Card
Warranty Card (Customer Copy)
(To be retained by the Customer)
Unit Serial Number:
Invoice Number:
Dated:
Customer's Name and Address:
Model:
Capacity:
Dealer’s Stamp and Signature
Warranty Card
Warranty Card (Company Copy)
(To be sent back to the Company)
Unit Serial Number:
Invoice Number:
Dated:
Customer's Name and Address:
Model:
Capacity:
Dealer’s Stamp and Signature
18
Service and Maintenance
For Service needs:
Please contact our A. O. Smith Toll Free Customer Care Centre Helpline at 1.800.103.2468
Registered Office
A. O. Smith India Water Heating Private Limited
Plot No. 300, Phase - 2, KIADB Industrial Area, Harohalli, Kanakapura Taluk,
Ramanagara District - 562 112, Karnataka, India.
¡
Toll Free No.: 1.800.103.2468 ¡
Website: www.aosmithindia.com
Regional Office
Delhi:
602, Laxmi Deep Building, Plot 9, Laxmi Nagar District Centre, Vikas Marg,
New Delhi – 110 092
Pune:
401 & 402, Citi Mall, Ganeshkhind Road, Near Pune University,
Pune – 411 007
19
Manufactured by A. O. Smith India Water Heating Private Limited
Plot No. 300, Phase - 2, KIADB Industrial Area, Harohalli, Kanakapura Taluk, Ramanagara District - 562 112, Karnataka, India.
Toll Free: 1.800.103.2468 n
Website: www.aosmithindia.com