1
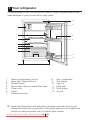
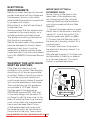
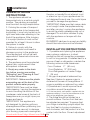
Fridge with
Freezer Compartment
TSM 1541
Instruction manual
Downloaded from Fridge-Manual.com Manuals
Please read this manual first!
Dear Customer,
We hope that your product, which has been produced in modern plants and
checked under the most meticulous quality control procedures, will provide you
with many years of good service.
For this, we recommend you to carefully read the entire manual of your product
before using it and keep it at hand for future reference.
This manual
• Will quickly help you to use your appliance properly and safely.
• Read the manual before installing and operating your product.
• Follow the instructions, especially those for safety.
• Keep the manual in an easily accessible place as you may need it later.
• Besides, read also the other documents provided with your product.
Please note that this manual may be valid for other models as well.
Symbols and their descriptions
This instruction manual contains the following symbols:
•
Important information or useful usage tips.
•
Warning against dangerous conditions for life and property.
•
Warning against electric voltage and shock hazard.
Recycling
This product bears the selective sorting symbol for waste electrical and
electronic equipment (WEEE).
This means that this product must be handled pursuant to European Directive
2002/96/EC in order to be recycled or dismantled to minimize its impact on
the environment. For further information, please contact your local or regional
authorities.
Electronic products not included in the selective sorting process are potentially
dangerous for the environment and human heatlh due to the presence of
hazardous substances.
Downloaded from Fridge-Manual.com Manuals
1 Your refrigerator 3
5 Using your refrigerator 13
2 Warnings
4
TEMPERATURE CONTROL AND
ADJUSTMENT.................................. 13
DEFROSTING................................... 14
ELECTRICAL REQUIREMENTS.......... 5
WARNING! THIS APPLIANCE MUST
BE EARTHED..................................... 5
ENERGY SAVING TIPS....................... 6
3 Installation
7
TRANSPORTATION INSTRUCTIONS.. 7
INSTALLATION INSTRUCTIONS......... 7
REVERSING THE DOORS.................. 9
4 Before operating 12
6 Maintenance and
cleaning
17
7 Do's and Don'ts
18
8 How To Obtain Service 19
9 Guarantee Details
Final Check...................................... 12
2 EN
Downloaded from Fridge-Manual.com Manuals
20
1 Your refrigerator
Congratulations on your choice of a BLOMBERG quality Appliance which has
been designed to give you service for many years.
13
8
1
2
10
3
9
3
4
5
6
11
12
7
1.
2.
3.
4.
5.
6.
7.
Freezing compartment & ice tray
Interior light -Thermostat knob
Movable shelves
Defrost water collection channel-Drain tabe
Crisper cover
Crisper
Adjustable front feet
8.
9.
10.
11.
12.
13.
Dairy compartment
Door shelves
Eggy tray
Bottle shelf
Bottle gripper
Top trim
C Figures that take place in this instruction manual are schematic and may not
correspond exactly with your product. If the subject parts are not included in the
product you have purchased, then it is valid for other models.
3 EN
Downloaded from Fridge-Manual.com Manuals
2 Warnings
• To obtain the best possible
•DO NOT connect your appliance to
performance and trouble free operation
the electricity supply until all packing
from your appliance it is very important
and transit protectors have been
to carefully read these instructions.
removed.
• On delivery, check to make sure that
• Leave to stand for at least 4
the product is not damaged and that
hours before switching on to allow
all the parts and accessories are in
compressor oil to settle if transported
perfect condition.
horizontally.
• Ensure that the plug remains readily
• If you are discarding an old
accessible. Do not use multiple
refrigerator with a lock or latch fitted
adapter bar or extension cable.
to the door, disable the lock/latch,
ensure that it is left in a safe condition
• Failure to observe these instructions
to prevent the entrapment of young
may invalidate your right to free service
children.
during the guarantee period.
• This fridge/freezer must only be used • Keep ventilation openings, in the
for its intended purpose i.e the storing
appliance enclosure or in the built-in
and freezing of edible foodstuff.
structure, clear of obstruction.
• Do not dispose of the appliance on
• Do not use mechanical devices
a fire. At BLOMBERG, the care and
or other means to accelerate the
protection of our environment is an
defrosting process, other than those
ongoing commitment. This appliance
recommended by the manufacturer.
which is among the latest range
• Do not damage the refrigerant circuit.
introduced is particularly environment
• Do not use electrical appliances
friendly. Your appliance contains non
inside the food storage compartments
CFC / HFC natural substances in the
of the appliance, unless they are
cooling system (Called R600a) and in
of the type recommended by the
the insulation (Called cyclopentane)
manufacturer.
which are potentially flammable
• We suggest you keep these
if exposed to fire. Therefore, take
instructions in a safe place for easy
care not to damage, the cooling
reference.
circuit / pipes of the appliance in
• This appliance is not intended for use
transportation and in use. In case of
by persons (including children) with
damage do not expose the appliance
reduced physical, sensory or mental
to fire or potential ignition source and
capabilities, or lack of experience
immediately ventilate the room where
and knowledge, unless they have
the appliance is situated.
been given supervision or instruction
• We suggest you contact your local
concerning use of the appliance by a
authority for disposal information and
person responsible for their safety.
facilities available.
• Children should be supervised to
• See Installation Instructions on on
ensure that they do not play
page 7 for information on suitable
with the appliance.
location.
4 EN
Downloaded from Fridge-Manual.com Manuals
6mm.
22mm.
CORD GRIP
FUSE
N
BLUE
OR
BLACK
L
BROWN
OR
RED
FITTED WITH
BS 1362 13A FUSE ALWAYS
FIT BS 1362 REPLACEMENT
CARTRIDGE FUSE
GREEN &
YELLOW
OR
GREEN
6mm.
If the fitted moulded plug is not
suitable for your socket, then the plug
should be cut off and an appropriate
plug fitted. Destroy the old plug which
is cut off as a plug with bared cord
could cause a shock hazard if inserted
into a socket elsewhere in the house.
The moulded plug on this appliance
incorporates a 13 A fuse. Should
the fuse need to be replaced an
ASTABEAB approved BS 1362 fuse
of the same rating must be used. Do
not forget to refit the fuse cover. In the
event of losing the fuse cover the plug
must not be used until a replacement
fuse cover has been fitted. Colour
of the replacement fuse cover must
be the same colour as that visible on
the pin face of the plug. Fuse covers
are available
from
any good electrical
5 EN
Downloaded
from
Fridge-Manual.com
Manuals
store.
12mm.
WARNING! THIS APPLIANCE
MUST BE EARTHED
32mm.
Before you insert the plug into the wall
socket make sure that the voltage and
the frequency shown on the rating
plate inside the appliance corresponds
to yourelectricity supply.
Rating label is on the left hand side of
fridge inner liner.
We recommend that this appliance be
connected to the mains supply via a
suitable switched and fused socket.
The appliance must be positioned so
that the plug is accessible.
Should the mains lead of the appliance
become damaged or should it need
replacing at any time, it must be
replaced by a special purpose made
mains lead which can only be obtained
from a BLOMBERG Authorised Service
Agent.
IMPORTANT! FITTING A
DIFFERENT PLUG
As the colours of the wires in the
mains lead of this appliance may
not correspond with the coloured
markings identifying the terminals in
your plug proceed as follows: (See
diagram).
1. Connect the green-yellow or green
(Earth) wire to the terminal in the plug
or
marked ‘E’ or with the symbol
coloured green and yellow or green.
2. Connect the blue (Neutral) wire to
the terminal in the plug marked ‘N’ or
coloured black.
3. Connect the brown (Live) wire to
the terminal in the plug marked ‘L’ or
coloured red.
With alternative plugs a 13 A fuse must
be fitted either in the plug or adaptor
or in the main fuse box. If in doubt
contact a qualified electrician.
6mm.
ELECTRICAL
REQUIREMENTS
ENERGY SAVING TIPS
1- Ensure your appliance is installed in
a well ventilated area.
2- Ensure the time between buying
chilled/frozen food and placing them
in your appliance is kept at minimum,
particularly in summer. We recommend
you use a cool bag or a special carrier
bag to carry frozen food.
3- Do not leave the door (s) of your
appliance open longer than necessary
and ensure they are closed properly
after each opening.
4- Defrost frozen food in the fridge
compartment, so that frozen food acts
as an ice pack to assist cooling in the
fridge.
6 EN
Downloaded from Fridge-Manual.com Manuals
3 Installation
TRANSPORTATION
INSTRUCTIONS
1. The appliance should be
transported only in a vertical upright
position. The packing as supplied
must be intact during transportation.
2. If during the course of transport
the appliance has to be transported
horizontally, it must only be laid on its
right hand side when standing in the
frontof the appliance. After bringing
it to upright position,it must not be
operated for at least 4 hours to allow
the system to settle.
3. Failure to comply with the
above instructions could result in
damage occuring to the appliance.
The manufacturer will not be held
responsible if these instructions are
disregarded.
4. The appliance must be protected
against rain, moisture and other
atmospheric influences.
5. Empty any water in the drain
tray before moving see section
“Defrosting” and “Cleaning & Care”
for further information
IMPORTANT : Make sure the plastic
evaporating pan at the back of the
product collects water properly.
“IMPORTANT: Care must be taken
while cleaning / carrying the appliance
to avoid touching the bottom of the
condenser metal wires at the back of
theappliance as you might injure your
fingers and hands.
“IMPORTANT: This appliance is
not designed for stacking with any
otherappliance.When positioning your
appliance, take care not to damage
your flooring, pipes,wall coverings etc.
Do not move the appliance by pulling by
the door or handle.Do not attempt to sit
or stand on top of your appliance as it is
not designed forsuch use. You could injure
yourself or damage the appliance.
“IMPORTANT: Make sure that mains cable
is not caught under the applianceduring
and after carrying / moving the appliance,
to avoid the mains cablebecoming cut or
damaged.”Do not allow children to play
with the appliance or tamper with the
controls.
BLOMBERG declines to accept any liability
should the instructions not be followed.
INSTALLATION INSTRUCTIONS
1. If possible avoid placing the appliance
near cookers, radiators or in direct
sunlight as this will cause the compressor
to run for long periods. If installed next to a
source of heat or refrigerator, maintain the
following minimum side clearances:
From Cookers 2” (50 mm)
From Radiators 12” (300 mm)
From Refrigerators or Larder Fridge
1” (25 mm)
2. No gap is required at sides and top.
See item 3 below to ensure a gap is
obtained at the rear of the appliance. If
a gap is available on side and top, retain
it if possible as it would improve the air
circulation around the appliance.
3. Fit the two plastic wall spacers supplied with the
appliance rotating 1/4 turn to the condenser at the
back of the refrigerator (see diagram).
4. The fridge should be located on a
smooth surface. The two front feet can
be adjusted as required. To ensure that,
your fridge is standing upright adjust the
two front feet by turning clockwise or
anti-clockwise, until the product is in firm
contact with the floor. Correct adjustment
7 EN
Downloaded from Fridge-Manual.com Manuals
of feet avoids excessive vibration and
noise.
5. Refer to “Cleaning and Care”
section to prepare your appliance for
use.
6. This appliance has been designed
to operate in ambient temperatures
between +10 and +32 degrees C (50
and 90 degrees F). There fore if the
appliance is installed in an unheated /
cold room (E.g.: Conservatory /annex /
shed / garage etc.) then the appliance
may not operate and as a result the
storage time of food may be reduced.
7. A special receptacle is supplied to
store the mains plug during transit.
The receptacle is fixed at the back of
the cabinet, on the right hand side of
the compressor. (See diagram) Gently
remove the plug from the receptacle.
Never pull the mains cord, you may
damage the appliance. In the case
of transportation, ensure you locate
the plug in the receptacle provided to
avoid transit damage.
8. The space in the room where the
appliance is installed must not be smaller
than 10 cubic metres.
8 EN
Downloaded from Fridge-Manual.com Manuals
1
2
3
3
3
1
REVERSING THE DOORS
We recommend that you reverse doors
before switching on for the first time.
Tools required: Small and medium size
flat and cross-headed screwdrivers, a
pair of pliers.
Spare Parts supplied in the plastic
bag: The following parts, which are
exclusively for left hand side fitted
hinge operation are supplied in a
plastic bag with the appliance:
- Upper door top trim hinge covers –
there are 2 different parts, one for each
side of top trim.
- Upper door middle hinge bushing/
door stopper assembly.
We suggest you keep all the parts
supplied in the plastic bag and also
parts, which have been removed when
reversing doors, in a safe place for
possible future, re-use.
IMPORTANT: We suggest you ask
somebody to help you when moving
the appliance around and to hold
doors when removing / re-fitting
hinges and doors to avoid any injury
and damage to the product.
Please refer to diagrams supplied. To
follow numbers in brackets below,
refer to the main diagram.
1. Switch off the appliance at the
socket outlet and pull out the mains
plug.
2. Remove all food, loose items and
fittings from inside the appliance and
door shelves.
3. Carefully tilt the appliance on
its back side. (1) (You may need
somebody to help you.) Take care not
to damage the appliance by laying
on some protective material (e.g. its
original packaging). Make sure that
you tilt the appliance on its back side,
otherwise compressor oil may block
the pipes and you may damage the
appliance.
4. Unscrew and remove the LHS front
feet and bolt (2).
5. Unscrew the bolts and remove the
bottom hinge while holding the door
(3).
6. Remove the door carefully from the
top hinge by sliding down wards (4).
7. Reposition top hinge bushing and
blanking plug on the opposite side and
stand the door safely (5). You may find
it easier to remove the bushing and the
plug with the tip of a small screwdriver.
Take care not to mark the door.
8. Reposition the top hinge on the
opposite side (6 and 7).
9. To refit the door, locate the top
hinge in the door, attach to the cabinet
and hold the door (8).
10. Fit the bottom hinge (9). If
necessary adjust and then tighten the
bolts. Ensure, that the door opens
and closes easily and that there are
no gaps allowing air into the cabinet. If
there are gaps between the door seal
and the cabinet, adjust the door seal
by gently pulling away from the door
using fingers.
9 EN
Downloaded from Fridge-Manual.com Manuals
11. Fit the other front feet (10).
12. Carefully stand your appliance.
(You may need somebody to help you.)
Adjust the front feet (See Installation
Instructions)
13. Put back all, loose items and
fittings.
14. Wait for at least 4 hours to allow
the system to settle before switching
on.
Spare plastic parts supplied with
the appliance are for your future use
during door repositioning.
15. Fit the door handle to the opposite
side of the door and tighten
the bolts.
10 EN
Downloaded from Fridge-Manual.com Manuals
9
7
7
8
6
5
1
6
4
60°
3
2
12
12
10
17
11
14
11
13
60°
16
15
11 EN
Downloaded from Fridge-Manual.com Manuals
4 Before operating
Final Check
Before you start using the fridge/
freezer check that:
1. The feet have been adjusted for
perfect levelling.
2. The interior is dry and air can
circulate freely.
3. Clean the interior as recommended
under “CLEANING AND CARE.”
4. Insert the plug into the wall socket
and switch on the electricity supply.
When the door is open the interior
light will come on.
5. You will hear a noise as the
compressor starts up. The liquid and
gases sealed within the refrigeration
system may also give rise to noise,
whether the compressor is running or
not which is quite normal.
6. Slight undulation of the top of the
cabinet is quite normal due to the
manufacturing process used, so do
not worry, it is not a defect.
7. We recommend that you set the
thermostat knob at 3 (three) and monitor
the temperature to ensure the appliance
maintains desired storage temperatures
(See section Temperature Control and
Adjustment).
8. Do not load the appliance immediately
it is switched on. Wait until the correct
storage temperature has been reached.
We recommend that you check
the temperature with an accurate
thermometer (see; Temperature Control
and Adjustment).
Important Note :Ice formation at the
back is normal, do not worry. (See
Defrosting)
12 EN
Downloaded from Fridge-Manual.com Manuals
5 Using your refrigerator
TEMPERATURE CONTROL AND ADJUSTMENT
Operating temperatures are controlled by the thermostat (see diagram). Settings
may be made from 1 to 5, the coldest position.When the appliance is switched
on for the first time, the thermostat should be adjusted so that after 24 hours, the
average fridge temperature is no higher than +5°C (+41°F ).We recommend you
set the thermostat halfway between the 1 and 5 setting and moni torto obtain the
desired temperature i. e. towards 5 you will ob tain a colder fridge temperature
and vice versa. Some sections of the fridge may be cooler or warmer ( such as the
salad crisper and the top part of the cabinet ) which is quite normal.Over ambient
temperatures of 25°C (77°F) especially in summer turn the thermostat knob towards
5. Under ambient temperatures of 25°C (77°F) turn the thermostat knob to a half
way position.Frequent door opening cause higher internal temperatures, so close
the door as soon as possible after use.In case of a temporary ice build up in the
fridge compartment reduce the thermostat setting to 1, monitoring at the same time
that the fridge temperature is maximum +5 degrees C (41 degrees F). Once the ice
build up disappears and the appliance starts auto defrosting again as normal, then
you may increase the thermostat setting, if required.
SUGGESTED ARRANGEMENT OF FOOD IN THE FRIDGE
Arrangement Examples (See diagram).
1. To freeze fresh food, frozen food, rapid cooling of beverages,
making ice cubes.
2. Baked, chilled cooked food, dairy products,
3. Meat, sausages, cold cuts, cans.
4 .Fruit, vegetables, salads.
5. Tubes, small bottles and cans.
6. Butter, cheese, dairy products..
7. Beverages, large bottles.
The following guidelines and recommendations are suggested to obtain the best
results and storage hygiene.
rated and suitable for the freezing and storage of
1. The freezer compartment is
pre frozen food. The recommendation for
storage as stated on the food packaging
should be observed at all times.
2. The fridge is for the short term storage of fresh food and drinks.
3. Cooked dishes must be stored in airtight covered containers and are best placed on
either of the removable shelves.
4. Fresh wrapped produce can be placed on the shelf. Fresh fruit and vegetables should be
cleaned and stored in the crisper bins.
13 EN
Downloaded from Fridge-Manual.com Manuals
1
5
2
6
2
3
4
7
5. Bottles can be placed in the door
section.
6. To store raw meat, wrap in polythene
bags and place on the lowest shelf. Do not
allow to come into contact with cooked
food to avoid contamination. For safety,
only store raw meat for two to three days.
7. Shelves incorporate rear stops and
tilting for storing bottles. Lift shelf to clear
grooves when adjusting.
8. To tilt a shelf place the back of the
shelf one level below the front of the shelf.
To remove a tilted shelf, first release the
back off the grooves and then pull it.
9. Keep the food packed, wrapped or
covered. Allow hot food and beverages
to cool before placing them in the fridge.
Do not store explosive substances in the
refrigerator. High proof alcohol must be
stored upright in sealed containers. Left
over canned food should not be stored in
the can.
10. Fizzy drinks should not be frozen and
products such as flavoured water ices
should not be consumed too cold.
11. Some fruit and vegetables suffer
damage if kept at temperatures near 0
degrees centigrade. Therefore wrap pineapples,
melon, cucumbers, tomatoes and similar
produce in polythene bags.
12. Shelves, racks, crisper bins, dairy
compartments, drawers, baskets trays, flaps,
bottle grippers are all removable.
13. Always wrap food using a suitable
packaging material before storing in your
appliance to avoid contact with the appliance
surface and food remains for hygiene reasons.
DEFROSTING
A) Fridge compartment
The fridge defrosts automatically.
The defrosting water runs to the drain tube
via a collection channel and is evaporated
in a special container at the back of the
appliance
During defrosting, water droplets may form
at the back of the fridge where a concealed
evaporator is located. Some droplets may
remain on the liner and refreeze when
defrosting is completed. Do not use pointed
or sharp-edged objects such as knives or
forks
to remove the droplets which have
refrozen.
14 EN
Downloaded from Fridge-Manual.com Manuals
If, at any time, the defrost water does
not drain from the collection channel,
check that no food particles have
blocked the drain tube. The drain tube
can be cleared by pushing the special
plastic plunger provided down the
drain tube.
B) Freezer compartment
Defrost twice a year or when a frost
layer of around 7 mm (1/4”) has
formed.
To start defrosting procedure switch off
the appliance at the socket outlet and
pull out the mains plug.
All food should be wrapped in several
layers of newspaper and stored in a
cool place (e.g. fridge or larder).
Containers full of warm water may be
placed carefully in the freezer to speed
up the defrosting.
2
1
15 EN
Downloaded from Fridge-Manual.com Manuals
REPLACING THE INTERIOR LIGHT
BULB (See diagram)
Should the light fail to work switch
off at the socket outlet and pull out
the mains plug. Follow the below
instructions to check if the light bulb
has worked itself loose.
If the light still fails to work obtain a
replacement E14 screw cap type
15 Watt (Max) bulb from your local
electrical store and then fit it as
follows:
1. Switch off at the socket outlet and
pull out the mains plug. You may find
it useful to remove shelves for easy
access.
2. Remove the light diffuser cover as
shown in figure (b-c).
3. Replace the burnt-out light bulb.
4. Reassemble the light diffuser cover
as shown in figure (d).
“Push firmly to ensure cover is fitted
properly.”
5. Carefully dispose of the burnt-out
light bulb immediately.
“Replacement light bulb can easily be
obtained from a good local electrical or
DIY store.”
16 EN
Downloaded from Fridge-Manual.com Manuals
6 Maintenance and cleaning
** We recommend that you switch
off the appliance at the socket outlet
and pull out the mains plug before
cleaning.
** Never use any sharp abrasive
instrument, soap, household cleaner,
detergent and wax polish for cleaning.
** Use luke warm water to clean the
cabinet of the appliance and wipe it
dry.
** Use a damp cloth wrung out
in a solution of one teaspoon of
bicarbonate of soda to one pint of
water to clean the interior and wipe it
dry.
** Any dust that gathers on the
condenser, which is located at
the back of the freezer, should be
removed once a year with a vacuum
cleaner.
** Check door seals regularly to ensure
they are clean and free from food
particles..
** Never :
Clean the worktop with unsuitable
material; eg petroleum based
products.
Subject it to hot temperatures in
any way, Scour, rub etc., with abrasive
material.
** Excess deposit of ice should be
removed on a regular basis using
the handle of a spoon. Large
accumulation of ice will impair the
performance of the freezer.
** If the freezer is not going to
be used for a long period of time
switch it off,remove all food,
clean it and leave the door ajar.
** To remove a drawer, pull it
as far as possible, and then tilt
it upwards, and then pull it out
completely.
17 EN
Downloaded from Fridge-Manual.com Manuals
7 Do's and Don'ts
Don’t- Consume food which has been
Do- Clean your appliance regularly
stored for an excessive time in the
(See “Cleaning and Care”)
larder refrigerator.
Do- Keep raw meat and poultry below
Don’t- Consume food which has been
cooked food and dairy products.
stored for an excessive time in the
Do-Keep food for as short a time
larder refrigerator.
as possible and adhere to ‘Best
Don’t- Store cooked and fresh food
Before’ and “Use By” dates.
together in the same container.
Do- Take off any unusable leaves on
They should be packaged and
vegetables and wipe off any soil.
stored seperately.
Do- Leave lettuce, cabbage, parsley
Don’t- Let defrosting food or food
and cauliflower on the stem.
juices drip onto food in your larder
Do- Wrap cheese firstly in greaseproof
refrigerator.
paper and then in a polythene bag
excluding as much air as possible.
PROBLEM SOLVING
For best results take out of the
If the appliance does not operate when
fridge compartment an hour before switched on, check whether:
eating.
• The plug is inserted properly in the
Do- Wrap raw meat and poultry
socket and that the power supply is
loosely in polythene or aluminium
on. (To check the power supply to the
foil. This prevents drying.
socket, plug in another appliance)
Do- Wrap fish and offal in polythene
• The fuse has blown/circuit breaker
bags.
has tripped/main distribution switch
Do- Wrap food which have a strong
has been turned off.
odour or can dry out in polythene
• The temperature control has been
bags, aluminium foil or place in an
set correctly.
airtight container.
• New plug is wired correctly if you
Do- Wrap bread well to keep it fresh.
have changed the fitted moulded plug.
Do- Chill white wines, beer, lager and
If the appliance is still not operating
mineral water before serving.
after the above checks, please refer
Don’t- Store bananas in your fridge.
to the section on “How To Obtain
Don’t- Store melon in your fridge. It
Service”.
can be chilled for short periods as
Please ensure that above checks have
long as it is wrapped to avoid it
been made as a charge will be made if
flavouring other food.
no fault is found.
Don’t- Leave the door open for long
periods as this will make the larder
refrigerator more costly to run.
Don’t- Don’t- Store poisonous or any
dangerous substances in the larder
refrigerator. Your larder refrigerator
has been designed for the storage
of edible foodstuffs only.
18 EN
Downloaded from Fridge-Manual.com Manuals
8 How To Obtain Service
Please keep your purchase receipt or other proof of purchase in a safe place;
you will need to have it should the product require attention under guarantee.
You should also complete the details below; it will help us assist you when
requesting service. (The model number is printed on the Instruction Booklet and
the serial number is printed on the Rating Label affixed to the appliance)
Model No:
Serial No:
Retailer:
Date of purchase:
For service under guarantee simply telephone the appropriate number
below
UK Mainland & Northern Ireland
Fridges & Freezers
Electric Cookers
Gas & Dual Fuel Cookers
Washing Machines & Dishwashers 0845 6046859
0845 6046859
0845 6046859
0845 6046859
Republic of Ireland
All Refrigeration, All Cookers
Washing Machines & Dishwashers
01 862 3411
Before requesting service please check the trouble-shooting guide in the
Operating Instructions as a charge may be levied where no fault is found even
though your product may still be under guarantee.
19 EN
Downloaded from Fridge-Manual.com Manuals
9 Guarantee Details
Your new BLOMBERG product is guaranteed against the cost of breakdown
repairs for three years from the date of the original purchase.
What is covered?
• Repairs necessary as a result of faulty materials, defective components or
manufacturing defect.
• The cost of functional replacement parts, but excluding consumable items.
• The labour costs of a BLOMBERG approved repairer to carry out the repair.
What is not covered?
• Transit, delivery or accidental damage or misuse and abuse.
• Cabinet or appearance parts, including knobs, flaps, handles or container lids.
• Accessories or consumable items including but not limited to, ice trays, scrapers,
cutlery baskets, filters and light bulbs.
• Repairs required as a result of unauthorised repair or inexpert installation that fails to
meet the requirements contained in the user instruction book.
• Repairs to products used on commercial or non-residential household premises.
• Loss of frozen food in freezers or fridge/freezers. (Food loss insurance is often
included within your household contents insurance policy, or may be available
separately from your retailer).
Important notes.
• Your BLOMBERG product is designed and built for domestic household use only.
• The guarantee will be void if the product is installed or used in commercial or nonresidential domestic household premises.
• The product must be correctly installed, located and operated in accordance with
the instructions contained in the User Instructions Booklet provided.
• Professional installation by a qualified Electrical Domestic Appliance Installer is
recommended for all Washing Machines, Dishwashers and Electric Cookers
• Gas Cookers must only be installed by a Gas Safe (or BORD GAIS) registered Gas
Installer.
• The guarantee is given only within the boundaries of the United Kingdom and the
Republic of Ireland.
• The guarantee is applicable only to new products and is not transferable if the product is resold.
•BLOMBERG disclaims any liability for incidental or consequential damages.
The guarantee does not in anyway diminish your statutory or legal rights.
48 8257 0000
20 EN
Downloaded from Fridge-Manual.com Manuals
Blomberg, 36-38 Caxton Way, Watford, Hertfordshire, WD18 8UF
Tel: 0845 6048340 Fax: 0845 6004922
email: [email protected] www.blomberguk.
Downloaded from Fridge-Manual.com Manuals