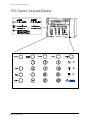
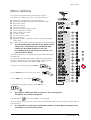
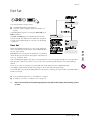
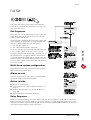
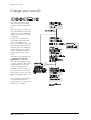
1
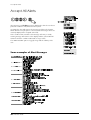
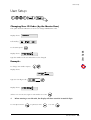
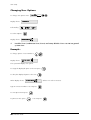
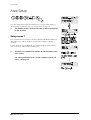
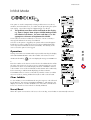
EUROPLEX TECHNOLOGIES.
Company Web Site address: www.europlex.com
Europlex Technologies [Ireland] Ltd.
Europlex Technologies [UK] Ltd.
Clonshaugh Industrial Estate,
Clonshaugh, Dublin 17, Ireland.
Unit 11, Malmesbury Business Park,
Malmesbury SN16 9JU, Wiltshire, England.
Tel: +353 - 1 - 8485111
Fax: +353 - 1 - 8485161
Tel: 01666 825430 Fax: 01666 824423
e-mail: [email protected]
e-mail: [email protected]
Europlex Technologies [USA] Ltd.
Europlex Technologies [Canada] Inc.
Suite 106, 1700 Enterprise Way, SE
Marietta, GA 30067, USA
Unit 6, 70 Dynamic Drive, Scarborough,
Ontario, M1V 2N2, Canada.
Tel: 770 - 426 - 9787.
Fax 770 - 426 - 9790
e-mail: [email protected]
e-mail: [email protected]
WARNING
While this system is an advanced design integrated security system, it does not offer guaranteed
protection against burglary, fire or other emergency. Any alarm system, whether commercial or
domestic, is subject to compromise or failure to warn for a variety of reasons.
Therefore, good installation practices, thorough testing and regular maintenance by the installing
company and frequent testing by the user are essential to ensure continuous satisfactory operation
of the system. It is recommended that the installation company offer a maintenance program and
instruct the user with the correct procedure for use and testing of the system.
Copyright
Europlex Technologies [Ireland] Ltd (hereby referred to as Europlex) 1999. All rights reserved. No
part of this publication may be reproduced, transmitted, stored in a retrieval system, or translated
into any language or computer language in any form or by any means electronic, mechanical,
magnetic, optical, chemical, manual or otherwise without the prior written permission of Europlex.
Disclaimer
Europlex make no representations or warranties with respect to the contents hereof and specifically
disclaim any implied warranties of merchantability or fitness for any particular purpose. Further
Europlex reserve the right to revise this publication and to make changes from time to time in the
contents hereof without the obligation of Europlex to notify any person of any such revision.
3GS Version 4.00: 3GS User Guide - Issue 01 - 1999. Manual Code 6083. June 1999.
2 3GS User Guide
Contents
Contents
Introduction
5
3GS System Keypad/Display
6
Menu options
7
Navigating the Help Menu via the Keypad 8
9
Accept All Alerts
10
Part Set
11
Half Set
12
Full Set
13
Unable to Set
14
Setting Individual Areas
15
Coded Reset
16
Set Date & Time
17
Change your own ID
18
User Setup
19
Area Setup
22
System Log
23
Hour Adjust
24
Inhibit Mode
25
User Option Assignments
26
Typing Text
27
Index
28
User Guide
Unset/Reset
3GS User Guide 3
Introduction
Introduction
This manual is intended as a quick reference User Guide for the 3GS System.
The 3GS is a combined security, radio alarm, and access control system. It controls up to 200 alarm zones,
divided into 8 separate areas, as well as as 64 doors/128 card readers.
User Menu
The User Menu, by which the user programs the system, is accessed via the keypad by keying in your User
Code plus the option key Help:
This will allow you to choose one of the menu options available.
Display
The 3GS system has a two line by 24 character LCD display e.g.
l
l
The first line shows the option
The second line shows how to directly select the option without using the Help function.
Alert Messages
When in normal operation, the system will display the day, date and time on the first line of the display. The
second line will flash any recent system events or information (such as a fault with one of the fuses or battery,
or an alarm condition).
If the condition continues, e.g. Battery Problem, the message displays steadily instead of flashing. This
message will continue to display until you remove the message (See Accept All Alerts on page 10).
If the system is in Full Set mode (see Full Set on page 13), the message will display steadily and the buzzer will
also sound.
Pressing the
key will give information on the areas/zones affected.
Keypad Private Mode
The 3GS is designed to allow only one user at a time to operate the system.
If the display shows:
when you attempt to use the keypad, this means that a user
is operating the system at another keypad. Wait until the system is free before attempting to use the keypad again.
Year 2000
All 3GS systems are Year 2000-compliant.
Alarm Duress Code
3GS has an in-built Alarm Duress Code feature, which allow you to trigger a silent Duress alarm by simply
keying in the first 3 digits of your code, and then the fourth digit plus 1. For example, if your code is 1234,
then by keying in 1235 you will trigger a Duress alarm, which will not display on the panel and will not
sound an alarm, but will send a trigger directly to your central security station.
3GS User Guide 5
User Guide
When you are navigating through the Help menu:
3GS System Keypad/Display
3GS System Keypad/Display
6 3GS User Guide
Menu options
Menu options
The system is programmed using the Help menu options:
In sequence, as a Master User you can use these menus to :
l
l
l
l
l
l
l
l
l
l
l
l
✍
Disarm the system and reset all warning devices
Remove system display messages and silence the buzzer
Part set the system
Half set the system
Full set the system
Reset the system following an alarm
Set the system date and time
Change existing user codes
Set up new users
Set up a new area system
View system log
Adjust the system for summer / winter hour change (Daylight
Saving Time)
Isolate a troublesome zone that is preventing the system from arming
The advanced options Radio PA Assign, Radio PA Test,
Setup Cards, Card Information, and Manual Door
Control are described elsewhere in the 3GS
Programming and System Integration manuals. See
your installer for details.
User Guide
l
All of these options are accessed by pressing the CODE followed by
the HELP key.
By default, the MASTER USER CODE is 1020. The system installer
may have configured your own unique CODE, in which case this
should be entered instead of the default (1020) code.
An option is selected by pressing the YES key
.
Use the UNSET key to move to the next option
Use the PART key to move back
To exit without selecting an option, use the NO key
✍
Only options which have been assigned to a user are displayed.
The Master user will have all options.
The hash button
acts as an ENTER key for the keypad.
Once the help routine is entered a selection must be made within 90 seconds, otherwise the system will exit
from this menu.
✍
It is advisable to assign only the minimum number of system options to general users,
to facilitate ease of use of the system.
3GS User Guide 7
Navigating the Help Menu via the Keypad
Navigating the Help Menu via the Keypad
To navigate the Help menu options use the UNSET, PART, YES, NO,
Their functions are explained below with typical examples.
8 3GS User Guide
keys.
Unset/Reset
Unset/Reset
Select the Unset/Reset option to disarm the system when you
enter the premises, or to cancel alarms, bells etc. after an alarm
activation.
This will put the 3GS into Unset mode (i.e. normal daytime
operation). The system alarm outputs (buzzers etc.) which had
been activated are reset to normal.
After an Alarm Activation
After an alarm activation proceed directly to the control panel
enter the code and press Unset.
User Guide
The display will show:
Followed by:
followed by the cause of the alarm, i.e. which zone has been
opened.
Example:
Alarm alert message:
Zone alert message:
These messages will be flashing.
To clear flashing (Alert) messages key in your code plus 0 (see "Accept All Alerts" on page 10.)
3GS User Guide 9
Accept All Alerts
Accept All Alerts
Alert messages are flashing messages displayed to alert the user that a
particular condition exists/existed on the system.
Accepting the alert will remove the message and silence the buzzer.
When the Alert accept option is selected, all alert messages which are
currently displayed are accepted (removed).
If the condition that caused the alert message still exists, a steady
warning message will remain on the display and the yellow LED will
remain lit until the condition indicated no longer exists.
The ALERT ACCEPT option is logged, along with the identity of the
user.
Some examples of Alert Messages
10 3GS User Guide
Part Set
Part Set
Your system will be set up as either:
l
l
standard alarm with one alarm area,
or 8-area, with 8 separate alarm areas within one
system.
A standard alarm system is set using the Part, Half, and
Full procedures.
The Part and Half options are disabled for the 8-Area
system. Instead, the different areas within the system are
set and unset independently of each other, as described
on page 15.
With a standard alarm system, you can isolate particular
areas of the premises and set these areas independently of
the rest of the system.
Part Set allows you to protect the perimeter of a premises
while allowing free movement through the exit and access
area (e.g. from door, hall).
This would typically apply to the day or evening operation of the system when people are on the premises
and using the common exit. There is free access to the areas being used while the rest of the building is
armed.
There are no entry or exit times associated with this mode and protection is applied instantly.
The display remains blank and will only change to show alert and warning messages.
If selected while entering the building while the entry timer is running, the entry mode is cancelled and the
buzzer is silenced.
l
l
✍
If selected by mistake refer to “Unset/Reset” on page 9.
If unable to set refer to “Unable to Set” on page 14.
Please ensure that you have been properly instructed in the setting and unsetting of your
system.
3GS User Guide 11
User Guide
Part Set
Half Set
Half Set
HALF Set is used to provide full perimeter protection
(including exits) when people are on the premises and all
exits are locked, i.e. night time operation.
This mode immediately arms the perimeter and the Exit
zones.
If selected when entering the building, the entry mode is
cancelled and the buzzer is silenced.
l
l
✍
If selected by mistake refer to “Unset/Reset” on
page 9.
If unable to set refer to “Unable to Set” on page 14.
Please ensure that you have been properly
instructed in the setting and unsetting of your
system.
12 3GS User Guide
Full Set
Full Set
This option will set the entire system. Ensure that all
zones (doors, windows, etc.) which are not on the exit/
entry route are closed.
Exit Sequence
Enter your user code and press FULL. Leave via the exit
route. The buzzer will stop at the end of the exit time
and the system will fully set.
The buzzer will sound during the exit routine. At the end
of the exit time, if all zones are closed, the buzzer will
stop. The system will then become Fully Set if :
1. the exit time expires, or
2. the ‘exit terminator’ button is pressed.
User Guide
If a zone is still open, the system will wait indefinitely for
a clear condition, then set when the zone is closed.
During the exit period the buzzer will sound with one of
two possible tones, a long beep indicates that all zones
are closed and that the system will set correctly when the
exit time expires; a short beep indicates that one or more
zones are open and the system will not SET until all these
zones have closed.
Multi-Area system configuration
In a multi-area system, Full Set has the effect of setting
all areas plus the Common Area.
Alarm on exit
If the user strays from the exit route a local alarm will be
generated, tripping internal/external bells.
Action to take:
l
l
l
l
Return to control panel;
Select ‘UNSET’ (see “After an Alarm Activation” on
page 9).
Remove alert messages (see “Accept All Alerts” on
page 10).
Reselect “Full Set” and exit the premises.
Entry Sequence
When you enter the building, the system will be Fully Set. The entry buzzer sounds and the entry timer
begins. This gives you a specific number of seconds in which to go to the keypad and Unset the system.
Otherwise a full alarm is generated along with the alert message “CODE ENTRY TIMEOUT”. In this case
repeat the Unset procedure to silence the alarm.
3GS User Guide 13
Unable to Set
Unable to Set
If attempts to Part, Half or Full Set the system fail, the system buzzer briefly sounds and the display briefly
shows:
This is normally due to open zones or doors.
The system will display which zones are open.
For example:
Action to take:
l
l
l
Go to the Area concerned and close the zone(s).
Return to the control panel and reselect the required ‘set’ mode.
Leave via the exit route.
The system buzzer will stop when:
1. The Exit time expires or
2. When the ‘exit terminator’ button is pressed (if fitted).
14 3GS User Guide
Setting Individual Areas
Setting Individual Areas
In an 8-Area system, the whole premises is divided into up to 8 separate
alarm areas, which may be set and unset independently of each other.
✍
To set or unset an area you must be assigned the right by the
Master User.
To set an area, key in your code plus the Area number.
For example, to set area 6, key in:
Area 6 will now set.
Common Area
User Guide
The Multi-Area system consists of up to 8 Alarm areas plus a Common Area
(usually the entrance/exit lobby or front door).
The Common Area sets and unsets automatically:
l
l
When all the other areas are set, the Common Area automatically sets.
When one area is unset, the Common Area automatically unsets.
Areas and Full Set
The Full Set option (see page 13) operates in an area system in the same way as in a standard alarm system.
Keying in your code plus FULL will arm all areas plus the Common area and begin the exit timer.
✍
To Full Set the system (all areas) you must be assigned the option by the Master User or
installer.
Reset Area? Message
The system may be configured to display a ‘Reset Area’ message when you attempt to set an area. This has
the effect of clearing any remaining alert messages. Press YES to this prompt. The display will then show ‘Set
Area ?’ again. Press YES again to set the area.
Unsetting an Area
Keying in your code plus the area number will set the area (if it is unset) or unset
the area (if it is set).
When you unset one area, the Common Area automatically unsets, giving
access to and from the Common Area.
3GS User Guide 15
Coded Reset
Coded Reset
Under normal conditions, the system can only be re-armed after an alarm activation by a service/installation
company visit.
The display will show a CALL SERVICE message and the user will not be able to re-arm the system.
When enabled, the Coded Reset option allows you to re-arm the system, avoiding the need to call an
installer to the site.
When you have acknowledged an alarm, the keypad will continue to display the message:
If you attempt to re-arm the system, the keypad will beep, and then briefly display the message:
You should now contact the Security Control Station for a release code. If the Security Control Station is
unable to give you a release code, contact your installer.
User Reset Procedure
Select Coded Reset.
The display will show a random 4-digit number.
Contact the Control Security Station with this random number.
The Central Station operator then converts this number to a 4-digit return
code acceptable to the system.
When you receive your return code from the Central Station operator, return to the keypad, and press the
key.
The display will prompt you to enter the return code:
Key it in at the prompt. If the code is incorrect, the display will show:
When you have keyed in the correct code, the display will show:
You can now re-arm the system by selecting Full Set (see page 13).
✍
All users who have the FULL SET option will automatically be assigned the Coded Reset
option. See User Setup on page 19.
16 3GS User Guide
Set Date & Time
Set Date & Time
The time is set in 24-hour clock notation.
User Guide
To adjust the time for the Summer/Winter
hour change (Daylight Saving Time), see the
"Hour Adjust" option in the User Options.
3GS User Guide 17
Change your own ID
Change your own ID
This option allows the user to
change the ID code normally
assigned to them by the Master
User.
When the option is selected, the
user is prompted to enter a new
4-digit code. To avoid duplicate
codes, a second choice of code
is requested.
Once both codes have been
entered the system will either
reject or accept the user’s
choice. If rejected the user must
repeat the procedure and enter
two new codes. If accepted, the
system will assign one of them
(chosen at random) and will
indicate which code is to be
used.
This option is cancelled after use
so each user has only one
opportunity to change their
own code. The Master user may,
of course, grant the option again
if required. Once chosen the
code is completely private.
Remember the two codes you
have entered! The one chosen
by the system as your new code
will be indicated by either ‘1’ or
‘2’.
Once changed, test your code to
ensure that the system has
accepted it. In not, consult your
Master User or installer.
18 3GS User Guide
User Setup
User Setup
Changing User ID Codes (by the Master User)
This option allows the Master User (user 2) to change individual ID codes.
Display shows:
Followed by:
User Guide
To select ID.s press:
Display shows:
Type the number of the user whose ID is to be changed.
Example:
To change user number 4 press:
Display shows:
Type user four digit code:
Display shows:
(where ‘nnn’ is next user). Type in next number or to exit:
✍
When entering a user ID code, the display will show asterisks instead of digits.
To exit options menu:
To print User Info:
or to exit:
3GS User Guide 19
User Setup
Changing User Options:
To change user options enter:
Display shows:
Followed by:
To Select Options:
Display shows:
✍
Installer (User 1) and Master User (User 2) are factory defaults. Users 3 to 126 are general
system users.
Example:
To change options of user number 4:
Display shows:
The system will display each option.
To assign the displayed option to the user press:
To deny the displayed option to the user:
When display shows:
(where ‘nnn’ is the next user)
Type in next user number or to exit press:
To exit options menu press:
To print user info. press:
20 3GS User Guide
or to exit press:
User Setup
User Names:
Display shows:
To select names press:
Display shows:
Example:
To change / enter the name of user 4 press:
Display shows:
User Guide
Refer to page for instruction on typing text.
After scrolling through the list of available options the display will show:
(where ‘nnn’ is the next user)
Type in next user number or to exit press:
To exit options menu press:
✍
To print user info. press:
or to exit press:
When entering or changing a user ID code, the display will show asterisks instead of digits.
3GS User Guide 21
Area Setup
Area Setup
The Area Setup menu allows the Master User to assign setting rights for
different areas to different users. See Setting Areas on page 14.
✍
The number of areas to be active in the system is configured
by the installer.
Setup areas ?
The system allows for 8 blocks or areas by default. Individual installations
may require less, and the installer customises the number of blocks
needed.
Use this menu to select individual users and assign/deny setting rights to
each of the areas within in the system in turn.
✍
The Full, Part, and Half Set options do not function in an 8area system.
For setting individual areas, or the complete system (all
areas), see page 15.
22 3GS User Guide
System Log
System Log
T 3GS alarm log is a record of all system activity
(keypad input, status alerts, alarm activations
etc.) and this may be viewed or printed if a
hard-copy is required. The detail and length of
the log provides an invaluable record of the
system operation for both fault finding and
alarm analysis.
The alarm log is 1000 events long (the Access
Log is 3000 events) and each event is detailed
with exact date and time to the nearest second.
System events are displayed chronologically
with the most recent events appearing first.
The alarm log gives 4 details for each event,
which are appear on the display in sequence:
l
l
l
the date and time of the event;
the user name or zone number (e.g. Master
User);
the user number or zone description (e.g.
User 2 Selected);
and the action taken (e.g. System Log)
User Guide
l
Alarm and Access Logs
3GS gives 2 types of log: the standard Alarm
Log, which displays all the system events (as
described here); and the Access Log, which
displays only Access Control-related events,
such as Invalid Card Entry, Door Forced, and
Time Zone Setup. The Access Log should be
viewed using 3GS+.
Printing the Alarm and
Access Logs
When the option "PRINT LOG ?" is displayed, if
a serial printer is connected and the serial port
correctly configured, a print-out of the log can be generated by selecting the YES key. Otherwise, any other
key should be pressed and the log will be displayed.
Viewing the Alarm and Access Logs
The log display can be stepped through quickly one line at a time by pressing the
key. The "*" appears
in the centre of the date & time display to make the log easily differentiable from the Standby/Unset mode
display. The date and time remain visible in the display until all information regarding that particular event
has been shown. The PART SET key will ‘rewind’ one entry at a time to the first entry of the date currently
being displayed, the UNSET key will skip to the next entry.
To leave the system log at any point in the record, press the NO key.
3GS User Guide 23
Hour Adjust
Hour Adjust
This option adjusts the system clock to automatically take
account of the Summer / Winter time change (Daylight
Saving Time).
It must be selected during the week prior to the Sunday on
which the hour change is to occur at 2.00am.
A warning message is displayed until the function is
executed - “Hour Change Sunday”.
The system will automatically set the hour forward or back
as appropriate on theSunday morning.
The option toggles on and off – if you selected it in error,
you cancel the hour change by selecting it again.
✍
Hour Adjust should only be selected during
March/April and October.
24 3GS User Guide
Inhibit Mode
Inhibit Mode
This option is used for temporarily isolating troublesome zones (doors,
windows, movement detectors, etc.) which may be preventing the system
from setting. Zones/doors may be inhibited singly or in blocks.
✍
The problem zone/door will be indicated on the display,
e.g. Zone 3 Tamper, Door 4 Open. Inhibit Mode provides
two identical sub-menus, for zones and doors. Use the
appropriate sub-menu to implement the inhibit.
If zones/doors have been inhibited, on selection of FULL set mode, a
message will indicate how many are inhibited.
Selection of this option is logged by the system and an asterisk appears
beside the log entry to indicate the zone has been inhibited manually
(zone may also be inhibited via literal commands). The identity of the
user to select the option is also logged.
User Guide
Operation
Having entered the user CODE and then pressed the NO key, the display
will read "INHIBIT FROM 1". Enter the number of the first zone to be
inhibited followed by
. The next displayed message is "INHIBIT TO
1".
Enter the number of the last zone in the block to be inhibited. This will be
the same as the first zone if only one zone is required. After the second
parameter has been entered the display will show "n INHIBITS" where n
is the number of zones/doors inhibited) and the buzzer will sound briefly
before returning to UNSET mode displaying the date and time.
The INHIBIT function can be re-entered any number of times to inhibit
more zones/doors, existing inhibited zones/doors will not be affected.
Clear Inhibits
To clear inhibits, re-enter Inhibit Mode using the engineer code followed
by the NO key. The message "CLEAR ALL INHIBITS ?" will appear in the
display. Press YES to clear the inhibited zones. Press NO to inhibit more
zones or to view those zones which are already inhibited.
Unset/Reset
When the system is unset after a full set (i.e. the next day), zone inhibits are automatically removed.
3GS User Guide 25
User Option Assignments
User Option Assignments
26 3GS User Guide
Area 8
Area 4
Area 5
Area 6
Area 7
Hour Adjust
Inhibit Mode
Area 1
Area 2
Area 3
User Setup
System Log
Part Set
Half Set
Full Set
Set Date/Time
Change own ID
User User Name
No.
Unset/Reset
Use this table to record the options that have been assigned to the system users.
Typing Text
Typing Text
This is a function normally carried out by the 3GS Installer. Ensure your 3GS system is configured with full
text descriptions for all alarm zones, areas, alarm users and access card holders before it is handed over.
User Guide
Installer
Keypad
Overlay
3GS User Guide 27
Index
Index
Numerics
3GS + Software 27
I
V
ID codes 19
Viewing the log 23
Inhibit mode 25
K
Keypad 6
A
Accept All Alerts 9, 10
L
Access log 23
LCD display 5
Alarm log 23
LED functions 6
Alarm on exit 13
Log, system 23
Alert messages 5, 10
M
Area
Menu time-out 7
Common 15
Reset message 15
unsetting 15
Area Setup 22
Areas
setting 15
Assigning user options 26
N
Navigating menus 8
Not Selected 13
P
Part Set 11
Printing the Log 23
C
Call Service display 16
Printing the log 23
Change ID 18
S
Changing user options 20
Set Date&Time 17
Clearing zone inhibits 25
Setting areas 15
Coded Reset 16
Setting ID codes 19
Common Area 15
Setting the system 13
Standard v. 8-Area system 11
D
Summer/Winter hour change 24
Default codes 7
System Log 23
E
T
Entry sequence 13
Text entry 27
Exit sequence 13
Typing text 27
F
U
Full Set 13
Unable to set 14
H
Half Set 12
Help menu 7
Hour Adjust 24
Unset/Reset 9
Unsetting an area 15
Unsetting the system 9
User ID codes 19
User names 21
User option assignments 26
User options 20
User reset procedure 16
User Setup 19
28 3GS User Guide
Y
Year 2000 5, 17
Z
Zone inhibit 25