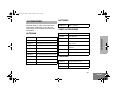
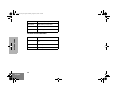
1
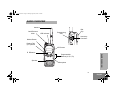
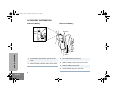
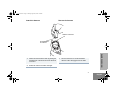
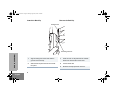
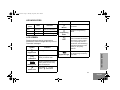
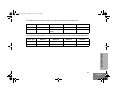
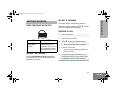
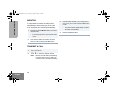
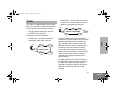
CP125™
Portable Two-Way Radio User Guide
Guide de l'utilisateur de radio bidirectionnelle
EnglishTOC.fm Page 0 Monday, August 22, 2005 1:47 PM
COMPUTER SOFTWARE
COPYRIGHTS
The Motorola products described in this
manual may include copyrighted Motorola
computer programs stored in semiconductor
memories or other media. Laws in the United
States and other countries preserve for
Motorola certain exclusive rights for
copyrighted computer programs including, but
not limited to, the exclusive right to copy or
reproduce in any form the copyrighted
computer program. Accordingly, any
copyrighted Motorola computer programs
contained in the Motorola products described
in this manual may not be copied, reproduced,
modified, reverse-engineered, or distributed in
any manner without the express written
permission of Motorola. Furthermore, the
purchase of Motorola products shall not be
deemed to grant either directly or by
implication, estoppel, or otherwise, any license
under the copyrights, patents or patent
applications of Motorola, except for the normal
non-exclusive license to use that arises by
operation of law in the sale of a product.
EnglishTOC.fm Page 1 Monday, August 22, 2005 1:47 PM
CONTENTS
Safety . . . . . . . . . . . . . . . . . . . . . . . . . . . . . . 3
Product Safety and RF Exposure
Compliance . . . . . . . . . . . . . . . . . . . . . . . . . 3
Radio Overview . . . . . . . . . . . . . . . . . . . . . . 5
Accessory Information. . . . . . . . . . . . . . . . . . 6
Attach the Battery . . . . . . . . . . . . . . . . . . 6
Remove the Battery . . . . . . . . . . . . . . . . . 6
Attach the Antenna . . . . . . . . . . . . . . . . . 7
Remove the Antenna . . . . . . . . . . . . . . . . 7
Attach the Belt Clip . . . . . . . . . . . . . . . . . 8
Battery Information . . . . . . . . . . . . . . . . . . . . 9
Charging Your Battery . . . . . . . . . . . . . . . 9
Wall Charger . . . . . . . . . . . . . . . . . . . . . . . . 10
LED Indicators. . . . . . . . . . . . . . . . . . . . . . . 11
LCD Screen. . . . . . . . . . . . . . . . . . . . . . . . . 11
Programmable Buttons (A, B, C, D) . . . . . . 12
!"Buttons . . . . . . . . . . . . . . . . . . . . . . . 14
Monitor Button. . . . . . . . . . . . . . . . . . . . . . . 14
Scan . . . . . . . . . . . . . . . . . . . . . . . . . . . . . . . 17
Start and Stop Scan . . . . . . . . . . . . . . . . . . . 18
Delete a Nuisance Channel/Talkgroup. . . . . 18
CONTENTS
Computer Software Copyrights . . . inside cover
Select a Channel . . . . . . . . . . . . . . . . . . . . . 15
Receive a Call . . . . . . . . . . . . . . . . . . . . . . . 15
Monitor . . . . . . . . . . . . . . . . . . . . . . . . . . . . . 16
Transmit a Call . . . . . . . . . . . . . . . . . . . . . . . 16
Programming Mode . . . . . . . . . . . . . . . . . . 19
Entering Programming Mode . . . . . . . . . . . . 19
Exiting Programming Mode . . . . . . . . . . . . . 19
Accessing Programming Mode Parameters . 20
Warranty . . . . . . . . . . . . . . . . . . . . . . . . . . . 23
Limited Warranty . . . . . . . . . . . . . . . . . . . . . 23
Accessories . . . . . . . . . . . . . . . . . . . . . . . . 27
Antennas . . . . . . . . . . . . . . . . . . . . . . . . . . . 27
Batteries . . . . . . . . . . . . . . . . . . . . . . . . . . . . 27
Carry Accessories . . . . . . . . . . . . . . . . . . . . 27
Chargers. . . . . . . . . . . . . . . . . . . . . . . . . . . . 27
Audio Accessories . . . . . . . . . . . . . . . . . . . . 28
Getting Started . . . . . . . . . . . . . . . . . . . . . 15
Turn the Radio On or Off. . . . . . . . . . . . . . . 15
Adjust the Volume . . . . . . . . . . . . . . . . . . . . 15
1
English
EnglishTOC.fm Page 2 Monday, August 22, 2005 1:47 PM
CONTENTS
Notes:
2
English
00_SafetyNA.fm Page 3 Monday, August 22, 2005 1:47 PM
SAFETY
PRODUCT SAFETY AND RF
EXPOSURE COMPLIANCE
!
Caution
Before using this product, read the
operating instructions for safe usage
contained in the Product Safety and
RF Exposure booklet enclosed with
your radio.
ATTENTION!
SAFETY
This radio is restricted to occupational use
only to satisfy FCC RF energy exposure
requirements. Before using this product, read
the RF energy awareness information and
operating instructions in the Product Safety
and RF Exposure booklet enclosed with your
radio (Motorola Publication part number
68P81095C98) to ensure compliance with RF
energy exposure limits.
For a list of Motorola-approved antennas,
batteries, and other accessories, visit the
following web site which lists approved
accessories: http://www.motorola.com/cgiss/
index.shtml.
3
English
00_SafetyNA.fm Page 4 Monday, August 22, 2005 1:47 PM
SAFETY
Notes:
4
English
01_Overview.fm Page 5 Monday, August 22, 2005 1:52 PM
RADIO OVERVIEW
Antenna
On/Off/Volume
Knob
Programming
Port
LED Indicator
Belt
Clip
Accessory
Connector
Monitor Button
Push-to-Talk
(PTT) Button
LCD Screen
!"Buttons
Speaker
B
C
D
RADIO OVERVIEW
" !
A
Programmable
Buttons (A, B, C, D)
Microphone
5
English
01_Overview.fm Page 6 Monday, August 22, 2005 1:48 PM
ACCESSORY INFORMATION
Attach the Battery
Remove the Battery
Grooves
RADIO OVERVIEW
Battery
Clasp
Battery
Slots
1
Fit the battery slots with the grooves on the
radio.
2
Slide the battery upwards until a click is heard.
6
English
1
Turn off the radio if it is turned on.
2
Slide the battery clasp away from the radio.
3
Slide the battery downwards.
4
Pull the battery away from the radio.
01_Overview.fm Page 7 Monday, August 22, 2005 1:48 PM
Attach the Antenna
Remove the Antenna
Antenna Connector
Threaded End
of Antenna
Fasten the antenna to the radio by placing the
threaded end of the antenna into the Antenna
Connector.
2
Rotate the antenna clockwise until tight.
1
RADIO OVERVIEW
1
Turn the antenna in a counter-clockwise
direction until it disengages from the radio.
7
English
01_Overview.fm Page 8 Monday, August 22, 2005 1:48 PM
Attach the Belt Clip
Remove the Belt Clip
Release Tab
RADIO OVERVIEW
Mounting Grooves
1
Align mounting rails of the radio with the
grooves of the belt clip.
1
Insert the end of a key between the release
tab and the back surface of the radio.
2
Slide the belt clip downwards until it clicks
into place.
2
Lift the release tab.
3
Slide the belt clip upward to remove it.
8
English
01_Overview.fm Page 9 Monday, August 22, 2005 1:48 PM
BATTERY INFORMATION
Charging Your Battery
This radio is powered by a nickel-metal hydride
(NiMH) rechargeable battery. Charge the
battery before use to ensure optimum capacity
and performance. The battery was designed
specifically to be used with a Motorola charger.
Charging in non-Motorola equipment may lead
to battery damage and void the battery
warranty.
If a battery is new, or its charge level is very
low, you will need to charge it before you can
use it.
Note: Batteries are shipped uncharged from
the factory. Always charge a new
battery 14 to 16 hours before initial
use.
Note: When charging a battery attached to a
radio, turn the radio off to ensure a full
charge.
RADIO OVERVIEW
The battery should be at about 77°F (25°C)
(room temperature), whenever possible.
Charging a cold battery (below 50° F [10°C])
may result in leakage of electrolyte and
ultimately in failure of the battery. Charging a
hot battery (above 95°F [35°C]) results in
reduced discharge capacity, affecting the
performance of the radio. Motorola rapid-rate
battery chargers contain a temperaturesensing circuit to ensure that batteries are
charged within the temperature limits stated
above.
9
English
01_Overview.fm Page 10 Monday, August 22, 2005 1:48 PM
WALL CHARGER
RADIO OVERVIEW
To Charge the Battery:
1
Turn off your radio, if it is turned on. It is
highly recommended that the radio be turned
off while charging.
2
Lift the dust cover to expose the audio
accessory connector.
3
Insert the charging connection of the charger
into the Programming Port.
4
Plug the charging adapter into an electrical
outlet.
5
The radio should be charged at least 16
hours initially before decreasing charging
time to 13 hours.
6
Turn on your radio, when charging is
complete; you should see all 3 bars of the
Battery Level Indicator illuminated.
* Other charging solutions available through
Motorola Accessories (1-800-422-4210).
10
English
Programming
Port
Dust Cover
01_Overview.fm Page 11 Monday, August 22, 2005 1:48 PM
LED INDICATORS
LED
Color
State
Indication
Symbol
Indication
C
The selected channel is being
monitored
Monitor
Red
Illuminated
Radio is transmitting.
Red
Blinking
Battery voltage is low.
Green
Illuminated
Radio is receiving.
K
Programming
Mode
LCD SCREEN
H
Displays selected channel, programming
parameters, status messages and any error or
information messages.
Scan
Symbol
Indication
L
The keypad has been locked.
Keypad Lock
Talkaround
Battery Level
B
Power Level
Bypass the repeater and talk
directly to another radio.
Blinks, without the dot, when
scan is activated. Illuminates
when there is some activity
on a non-priority channel.
Illuminates, with dot blinking,
indicates that there is some
activity on the priority
channel.
The more bars, the stronger
the signal being received by
your radio.
Displays remaining charge in
battery based on how many
bars are displayed.
Low Power “ R ” or High
Power “ S ” is activated.
RADIO OVERVIEW
Signal Strength
J
Radio is in Programming
Mode.
11
English
01_Overview.fm Page 12 Monday, August 22, 2005 1:48 PM
PROGRAMMABLE BUTTONS (A, B, C, D)
Used to select various functions. These functions can be assigned as a short press (press and
release) or a long press (press and hold for 1 second).
Button
Channel
Function
Alias1
Toggles display between Channel Number and Channel Alias.
Backlight
Keypad Lock
Toggles backlight display between On and Off.
1
Locks or unlocks all buttons except PTT, Monitor and On/Off/Volume Knob.
Nuisance Channel
Delete
Removes unwanted channel(s) temporarily from scan list during scan.
PL/DPL Enable2
Enables or disables radio from requiring matching PL/DPL to unsquelch.
Prime Channel
Quick move to the pre-programmed “Prime” channel.
Power Select1
Selects required power level: High or Low.
1
Starts or stops channel scan.
Scan
RADIO OVERVIEW
Squelch Level
Selects desired squelch level. Use the !" buttons to choose desired level (Level
0 will unsquelch radio unconditionally, whereas Level 15 will set tightest squelch).
Talkaround
Enables or disables radio to transmit in Talkaround mode.
No Operation
No function is programmed to this button.
1
Alert Tone Volume
Selects the alert tone volume needed for quiet operations or a noisy environment.
1. Parameter values are preserved, even after the radio is turned off.
2. Turning off the radio or changing the channel restores this setting to the default value of the active channel.
12
English
1
01_Overview.fm Page 13 Monday, August 22, 2005 1:48 PM
The default functions programmed to your radio are described in the table below.
Press Type
Button A
Button B
Button C
Button D
Short Press
Prime Channel
Scan On/Off
Power Select
Backlight On/Off
Long Press
Channel Alias
Nuisance Channel
Delete
Squelch Level
Kepad Lock
Although your radio is programmed with default functions, you have the ability to re-program the
radio’s programmable buttons. You may want to write down the new functions in the table below.
Press Type
Button A
Button B
Button C
Button D
Short Press
Long Press
RADIO OVERVIEW
13
English
01_Overview.fm Page 14 Monday, August 22, 2005 1:48 PM
!"BUTTONS
Used to:
•
select a channel in Normal Mode
•
select a parameter in Programming Mode
•
change the scanning direction.
MONITOR BUTTON
RADIO OVERVIEW
Used to monitor the channel for any activity;
squelch is disabled.
14
English
02_GetStarted.fm Page 15 Monday, August 22, 2005 1:48 PM
Your radio offers 4 conventional channels.
TURN THE RADIO ON OR OFF
! "buttons
To select a channel, press the
or
until you reach the desired channel.
RECEIVE A CALL
ON
Rotate the On/Off/
Volume Knob
clockwise.
OFF
Rotate the On/Off/
Volume Knob counterclockwise until you hear a
click and both the display
and LED indicator turn off.
1
Turn your radio on.
2
Adjust the radio’s volume.
3
!or"to select the desired channel.
•
4
GETTING STARTED
SELECT A CHANNEL
GETTING STARTED
Make sure the PTT button is released.
Listen for voice activity.
•
The LED indicator lights green while your
radio is receiving.
ADJUST THE VOLUME
5
Turn the On/Off/Volume Knob clockwise to
increase the volume, or counterclockwise to
decrease the volume.
To respond, hold the radio vertically 1 to 2
inches (2.5 to 5cm) from your mouth. Press
the PTT button to talk; release it to listen.
15
English
GETTING STARTED
02_GetStarted.fm Page 16 Monday, August 22, 2005 1:48 PM
MONITOR
3
It is important to monitor for traffic before
transmitting to ensure that you do not “talk
over” someone who is already transmitting.
1
Press and hold the Monitor button to access
channel traffic.
•
2
If no activity is present, you will hear “white
noise.”
Once channel traffic has cleared, proceed
with your call by pressing the PTT button.
TRANSMIT A CALL
1
2
Turn your radio on.
!or"to select the desired channel.
Note:
16
English
Monitor for traffic before transmitting
to ensure that you do not “talk over”
someone who is already transmitting
Hold the radio vertically 1 to 2 inches (2.5 to
5cm) from your mouth. Press the PTT button
to talk.
•
4
The LED indicator lights steady red while
the radio is transmitting.
Release the PTT to listen.
04_Scan.fm Page 17 Monday, August 22, 2005 1:49 PM
•
SCAN
Your radio is equipped with the Scan feature,
allows you to monitor multiple channels and
receive calls that are transmitted on them.
•
The Gindicator appears on the LDC
screen while in scan mode.
Priority Scan – allocates 50% of the scanning time to the Priority Channel (the first
channel in the designated scan list).
Start
Ch. 1
Ch. 2
Ch. 1
Ch. 3
Channel 1 Prioritized
Home
Ch. 1
Ch. 4
Two types of scan are supported:
•
Normal Scan – searches all channels
sequentially in the radio’s scan list.
Ch. 1
Ch. 3
Ch. 2
Normal Scan
Home
Ch. 4
SCAN
Start
During scan, when activity is detected that
meets the unsquelch condition, the radio stops
scanning and switches to that channel; the
G indicator and the channel number are
displayed. When no activity is detected for a
pre-set time, the radio resumes scanning.
If your radio has switched to a non-priority
channel during Priority Scan, it still checks for
activity on the priority channel. If activity is
detected there, the radio switches to the
priority channel.
The radio transmits on the Prime Channel, if
the PTT button is pressed during scanning. If
the radio has stopped scanning, and has
changed to a particular channel, all transmit
and receive activity is performed on that
channel.
17
English
04_Scan.fm Page 18 Monday, August 22, 2005 1:49 PM
START AND STOP SCAN G
1
SCAN
2
3
Press the preprogrammed Scan button to
start scan.
Note: The G indicator blinks to indicate
that the radio is scanning. The LCD
Screen shows the Prime Channel
where the scan began.
Press the!button to scan the channels in
incremental order, and the"button to scan in
the opposite order.
Press the preprogrmmed Scan button to stop
scanning.
DELETE A NUISANCE CHANNEL/
TALKGROUP
A channel with unwanted activity is called a
Nuisance Channel. You can temporarily delete
a Nuisance Channel from the scan list.
18
English
To Remove a Nuisance Channel
1
While the radio is on the nuisance channel,
press the preprogrammed Nuisance
Channel Delete button until you hear a tone.
2
Release the Nuisance Channel Delete
button. The nuisance channel is deleted.
Note:
You cannot temporarily delete a
Prime or Priority channel from the
scan list. If attempted, a low-pitched
tone is heard, and no action is taken.
To Restore the deleted channel(s)
Restart scan, or simply turn off your radio and
turn it on again.
05_Programming.fm Page 19 Monday, August 22, 2005 1:49 PM
PROGRAMMING MODE
This mode allows you to change feature
parameters to enhance the use of your radio.
ENTERING PROGRAMMING MODE
1
If your radio is turned on, turn it off.
2
Press and hold the preprogrammed Monitor
button, and turn on your radio.
Note: A ringing tone is heard, indicating that
your radio is in Programming Mode.
The K indicator illuminates and RW
is displayed.
EXITING PROGRAMMING MODE
Turn off the radio, to exit Programming Mode.
PROGRAMMING
MODE
19
English
05_Programming.fm Page 20 Monday, August 22, 2005 1:49 PM
ACCESSING PROGRAMMING MODE PARAMETERS
PROGRAMMING
MODE
Press the PTT button or the preprogramed Monitor button to scroll through the features available in
Programming Mode. Press the !"buttons to scroll through the parameters for each feature.
Feature
Range
Squelch Level
(SQL-XX)
SQL-00, …, SQL-15
Select low level when you need to receive very
weak
signal, and select high level when the
communications distance is near.
Time Out Timer
(TOT-XXX)
TOT-OFF, TOT-001, …, TOT-010
This determines the maximum duration (in
minutes) that you can transmit continuously.
Scan List 1
(SCANLST1)
1-01-XXX, …,
1-16-XXX,
XXX denotes channel number.
Up to 16 members per scan list. First member is
assigned as Priority Channel, if Priority Scan is
started. When scanning is started, only these 16
members will be scanned.
Battery Saver
(BS-XXXX)
BS-OFF,
BS-NORM,
BS-ENH
Battery Saver helps to extend your battery life.
When enabled, it turns off radio receiver circuitry
periodically when no activity is detected. BSNORM (Normal) turns off the radio less
frequently; select this if you want to save battery,
but expect a Selective Call. BS-ENH (Enhanced)
turns off the receiver for a longer duration; select
this if you want to maximize battery saving and
do not expect to receive any Selective Call.
Battery Type
(BT-XXXX)
BT-NIMH,
BT-NICD,
BT-ALK
Selects the type of battery that your radio uses:
NIMH (Nickel Metal Hydride), NICD (Nickel
Cadmium) or ALK (Alkaline).
20
English
Remarks
05_Programming.fm Page 21 Monday, August 22, 2005 1:49 PM
Feature
Range
Remarks
Alert Tone Volume BEEP-OFF, BEEP-1,
(BEEP-X)
BEEP-2,
BEEP-3
Selects the alert tone volume needed. Select
BEEP-OFF, if you require quiet operation, or
BEEP-3, if working in a noisy environment.
Prime Channel
Select
(PRM-XXX)
PRM-OFF, PRM-001, ….,
PRM-XXX,
XXX denotes the highest channel
number supported by your model.
The Prime Channel is the channel that you wish
to spend most of your time monitoring. The radio
will always switch back to the Prime Channel if it
is idle for more than the pre-programmed hangtime in other channel.
Backlight Select
(LGT-XXXX)
LGT-AUTO, LGT-TOGL
Selecting LGT-TOGL makes the Backlight
button a toggle to control the ON/OFF status of
the LCD backlight. Selecting LGT-AUTO causes
the backlight to automatically extinguish, if there
is no keypress for more than 5 seconds. Pressing
the Backlight button prolongs illumination time.
PROGRAMMING
MODE
21
English
PROGRAMMING
MODE
05_Programming.fm Page 22 Monday, August 22, 2005 1:49 PM
22
English
08_Warranty.fm Page 23 Monday, August 22, 2005 1:50 PM
WARRANTY
MOTOROLA COMMUNICATION
PRODUCTS
I. WHAT THIS WARRANTY COVERS AND
FOR HOW LONG:
MOTOROLA INC. (“MOTOROLA”) warrants the
MOTOROLA manufactured Communication
Products listed below (“Product”) against defects
in material and workmanship under normal use
and service for a period of time from the date of
purchase as scheduled below:
CP125 Portable Units
One (1) Year
Product Accessories
One (1) Year
MOTOROLA, at its option, will at no charge either
repair the Product (with new or reconditioned
parts), replace it (with a new or reconditioned
Product), or refund the purchase price of the
Product during the warranty period provided it is
returned in accordance with the terms of this
warranty. Replaced parts or boards are warranted
for the balance of the original applicable warranty
WARRANTY
LIMITED WARRANTY
period. All replaced parts of Product shall become
the property of MOTOROLA.
This express limited warranty is extended by
MOTOROLA to the original end user purchaser
only and is not assignable or transferable to any
other party. This is the complete warranty for the
Product manufactured by MOTOROLA.
MOTOROLA assumes no obligations or liability
for additions or modifications to this warranty
unless made in writing and signed by an officer
of MOTOROLA. Unless made in a separate
agreement between MOTOROLA and the
original end user purchaser, MOTOROLA does
not warrant the installation, maintenance or
service of the Product.
MOTOROLA cannot be responsible in any way
for any ancillary equipment not furnished by
MOTOROLA which is attached to or used in
connection with the Product, or for operation of
the Product with any ancillary equipment, and all
such equipment is expressly excluded from this
warranty. Because each system which may use
the Product is unique, MOTOROLA disclaims
liability for range, coverage, or operation of the
system as a whole under this warranty.
23
English
08_Warranty.fm Page 24 Monday, August 22, 2005 1:50 PM
II. GENERAL PROVISIONS:
WARRANTY
This warranty sets forth the full extent of
MOTOROLA'S responsibilities regarding the
Product. Repair, replacement or refund of the
purchase price, at MOTOROLA’s option, is the
exclusive remedy. THIS WARRANTY IS GIVEN
IN LIEU OF ALL OTHER EXPRESS
WARRANTIES. IMPLIED WARRANTIES,
INCLUDING WITHOUT LIMITATION, IMPLIED
WARRANTIES OF MERCHANTABILITY AND
FITNESS FOR A PARTICULAR PURPOSE, ARE
LIMITED TO THE DURATION OF THIS LIMITED
WARRANTY. IN NO EVENT SHALL
MOTOROLA BE LIABLE FOR DAMAGES IN
EXCESS OF THE PURCHASE PRICE OF THE
PRODUCT, FOR ANY LOSS OF USE, LOSS OF
TIME, INCONVENIENCE, COMMERCIAL
LOSS, LOST PROFITS OR SAVINGS OR
OTHER INCIDENTAL, SPECIAL OR
CONSEQUENTIAL DAMAGES ARISING OUT
OF THE USE OR INABILITY TO USE SUCH
PRODUCT, TO THE FULL EXTENT SUCH MAY
BE DISCLAIMED BY LAW.
III. STATE LAW RIGHTS:
SOME STATES DO NOT ALLOW THE
EXCLUSION OR LIMITATION OF INCIDENTAL
24
English
OR CONSEQUENTIAL DAMAGES OR
LIMITATION ON HOW LONG AN IMPLIED
WARRANTY LASTS, SO THE ABOVE
LIMITATION OR EXCLUSIONS MAY NOT
APPLY.
This warranty gives specific legal rights, and there
may be other rights which may vary from state to
state.
IV. HOW TO GET WARRANTY SERVICE:
You must provide proof of purchase (bearing the
date of purchase and Product item serial
number) in order to receive warranty service and,
also, deliver or send the Product item,
transportation and insurance prepaid, to an
authorized warranty service location. Warranty
service will be provided by MOTOROLA through
one of its authorized warranty service locations. If
you first contact the company which sold you the
Product (e.g., dealer or communication service
provider), it can facilitate your obtaining warranty
service. You can also call MOTOROLA at 1-800927-2744 US/Canada.
08_Warranty.fm Page 25 Monday, August 22, 2005 1:50 PM
V. WHAT THIS WARRANTY DOES NOT
COVER:
B)
C)
D)
E)
F)
G)
Defects or damage resulting from use of the
Product in other than its normal and
customary manner.
Defects or damage from misuse, accident,
water, or neglect.
Defects or damage from improper testing,
operation, maintenance, installation,
alteration, modification, or adjustment.
Breakage or damage to antennas unless
caused directly by defects in material
workmanship.
A Product subjected to unauthorized
Product modifications, disassembles or
repairs (including, without limitation, the
addition to the Product of non-MOTOROLA
supplied equipment) which adversely affect
performance of the Product or interfere with
MOTOROLA's normal warranty inspection
and testing of the Product to verify any
warranty claim.
Product which has had the serial number
removed or made illegible.
Rechargeable batteries if:
1) any of the seals on the battery
enclosure of cells are broken or show
evidence of tampering.
the damage or defect is caused by
charging or using the battery in
equipment or service other than the
Product for which it is specified.
H) Freight costs to the repair depot.
I) A Product which, due to illegal or
unauthorized alteration of the software/
firmware in the Product, does not function in
accordance with MOTOROLA’s published
specifications or the FCC type acceptance
labeling in effect for the Product at the time
the Product was initially distributed from
MOTOROLA.
J) Scratches or other cosmetic damage to
Product surfaces that does not affect the
operation of the Product.
K) Normal and customary wear and tear.
WARRANTY
A)
2)
VI.PATENT AND SOFTWARE PROVISIONS:
MOTOROLA will defend, at its own expense, any
suit brought against the end user purchaser to
the extent that it is based on a claim that the
Product or parts infringe a United States patent,
and MOTOROLA will pay those costs and
damages finally awarded against the end user
purchaser in any such suit which are attributable
to any such claim, but such defense and
payments are conditioned on the following:
25
English
08_Warranty.fm Page 26 Monday, August 22, 2005 1:50 PM
WARRANTY
A) that MOTOROLA will be notified promptly in
writing by such purchaser of any notice of
such claim;
B) that MOTOROLA will have sole control of the
defense of such suit and all negotiations for
its settlement or compromise; and
C) should the Product or parts become, or in
MOTOROLA’s opinion be likely to become,
the subject of a claim of infringement of a
United States patent, that such purchaser
will permit MOTOROLA, at its option and
expense, either to procure for such
purchaser the right to continue using the
Product or parts or to replace or modify the
same so that it becomes non-infringing or to
grant such purchaser a credit for the Product
or parts as depreciated and accept its return.
The depreciation will be an equal amount
per year over the lifetime of the Product or
parts as established by MOTOROLA.
MOTOROLA will have no liability with respect to
any claim of patent infringement which is based
upon the combination of the Product or parts
furnished hereunder with software, apparatus or
devices not furnished by MOTOROLA, nor will
MOTOROLA have any liability for the use of
ancillary equipment or software not furnished by
MOTOROLA which is attached to or used in
connection with the Product. The foregoing
26
English
states the entire liability of MOTOROLA with
respect to infringement of patents by the Product
or any parts thereof.
Laws in the United States and other countries
preserve for MOTOROLA certain exclusive rights
for copyrighted MOTOROLA software such as
the exclusive rights to reproduce in copies and
distribute copies of such MOTOROLA software.
MOTOROLA software may be used in only the
Product in which the software was originally
embodied and such software in such Product
may not be replaced, copied, distributed,
modified in any way, or used to produce any
derivative thereof. No other use including,
without limitation, alteration, modification,
reproduction, distribution, or reverse engineering
of such MOTOROLA software or exercise of
rights in such MOTOROLA software is permitted.
No license is granted by implication, estoppel or
otherwise under MOTOROLA patent rights or
copyrights.
VII.GOVERNING LAW:
This Warranty is governed by the laws of the
State of Illinois, USA.
09_Accessory.fm Page 27 Monday, August 22, 2005 1:50 PM
ACCESSORIES
Motorola offers a number of accessories to
enhance the productivity of your two-way
radio. Many of the available accessories are
listed below.
ANTENNAS
136-155 MHz, Helical Antenna, 9cm
PMAD4013
155-174 MHz, Helical Antenna, 9cm
PMAE4011
435-480 MHz, Helical Antenna, 10cm
PMAD4014
136-155 MHz, Helical Antenna, 14cm
PMAD4027
136-155 MHz, Helical Antenna, 15cm
PMAD4028
148-174 MHz, Helical Antenna, 15cm
PMAD4015
155-174 MHz, Helical Antenna, 14cm
PMAE4003
430-470 MHz, Helical Antenna, 9cm
NAE6483
403-520 MHz, Whip Antenna
NAD6502
146-174 MHz, Heliflex Antnna
PMNN4063
NiMH, 1500 mAH
CARRY ACCESSORIES
4285820Z01
Shoulder Strap
HLN9844
2-inch Belt Clip
RLN4815
Fanny Pack
4280384H01
Radio Pack Replacement Retaining
Strap w/Snap
4280384F89
Radio Pack Belt Lengthener for
RLN4815
HLN9985
Waterproof Bag
JMZN4020
Hand Strap for Radio
ACCESSORIES
PMAD4012
BATTERIES
CHARGERS
PMTN4087
Rapid Charger Kit, 120 V
PMTN4086
Rapid Charger Base
EPNN7994
Rapid Transformer, 120 V
27
English
09_Accessory.fm Page 28 Monday, August 22, 2005 1:50 PM
RLN4940
Slow Desktop Charger Kit, 120 V
WPLN4203
Slow Desktop Charger Base
EPNN7997
Slow Desktop Transformer, 120 V
PMTN4073
Wall Charger, 120 V US NA
ACCESSORIES
AUDIO ACCESSORIES
PMLN4294
Ear Set Mic w/PTT
PMLN4425
Ear Set Boom Mic w/Remote Ring
PTT
HMN9030
Remote Speaker Mic
HMN9013
Lightweight Handset w/Boom Mic
28
English
MOTOROLA and the Stylized M Logo are registered in the
U.S. Patent and Trademark Office. All other product or
service names are the property of their respective owners.
© Motorola, Inc. 2005.
MOTOROLA et le logo stylisé M sont homologués au Patent
and Trademark Office des Etats-Unis. Tous les autres noms de
produits ou services appartiennent à leurs propriétaires respectifs.
© Motorola, Inc. 2005.
*6881098C60*
6881098C60-O