1
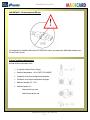
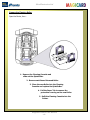
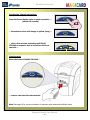
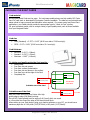
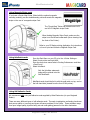
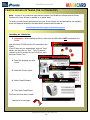
User Manual Document No: 689 Issue 2.03 - 02/2010 Ultra Electronics Ltd CONTENTS Safety Instructions.................................................................................................................................. - 3 Printer installation .................................................................................................................................. - 4 Welcome to Magicard ..................................................................................................................... - 4 Unpacking ....................................................................................................................................... - 4 IMPORTANT – Do not connect USB yet ........................................................................................ - 5 Printer location requirements:......................................................................................................... - 5 Prepare the Cleaning Roller ........................................................................................................... - 6 Install the Dye-Film ......................................................................................................................... - 7 Connect the Power Supply ............................................................................................................. - 7 Load the Driver CD in to your PC ................................................................................................... - 8 Using your PRONTO printer .................................................................................................................. - 9 Printer Parts .................................................................................................................................... - 9 Multi-coloured Button functions .................................................................................................... - 10 Powering ON................................................................................................................................. - 11 Powering OFF............................................................................................................................... - 11 Printing the ‘internal test pattern’ .................................................................................................. - 12 Feeding cards ............................................................................................................................... - 12 Removing printed cards................................................................................................................ - 13 Cancelling a print job .................................................................................................................... - 13 Choosing the right dye-film ................................................................................................................. - 14 Choosing the right cards ..................................................................................................................... - 15 Card material ................................................................................................................................ - 15 Card size....................................................................................................................................... - 15 Card thickness .............................................................................................................................. - 15 To obtain good quality prints the Card must be :.......................................................................... - 15 Printable area of the Card............................................................................................................. - 15 Using Magnetic Stripe cards......................................................................................................... - 16 Using HoloPatch cards ................................................................................................................. - 16 Using Self-Adhesive Cards........................................................................................................... - 16 Using Rewriteable Cards .............................................................................................................. - 17 Printer driver software (the ‘UltraDriver’) ........................................................................................... - 18 Installing the ‘UltraDriver’.............................................................................................................. - 18 The Printer Driver settings ............................................................................................................ - 20 Uninstalling the UltraDriver ........................................................................................................... - 21 Caring for your printer.......................................................................................................................... - 22 Cleaning supplies.......................................................................................................................... - 23 Cleaning the Printer Rollers with the Cleaning Card .................................................................... - 23 Replacing the Cleaning Roller ...................................................................................................... - 24 Cleaning the printhead using the Cleaning Pen ........................................................................... - 25 Available consumables ........................................................................................................................ - 26 Troubleshooting.................................................................................................................................... - 27 Warranty information............................................................................................................................ - 30 Contact us ............................................................................................................................................. - 30 Contact us - Support ............................................................................................................................ - 30 - Magicard Pronto User Manual -2- Ultra Electronics Ltd The information contained in this document is subject to change without notice. Ultra Electronics Limited shall not be liable for errors contained herein or for incidental consequential damages in connection with the furnishing, performance or use of this material. This document contains proprietary information belonging to Ultra Electronics Limited and may not be wholly or partially copied, stored in a data retrieval system,or used for any purpose other than that for which it was supplied, without the express written authority of Ultra Electronics Limited. All rights are reserved. MAGICARD®, UltraCoverplus,, Holokote, Pronto, Ultra Shield is registered as a Trademark with the United States Patent and Trademark Office, Reg. No. 2,197,276 The HoloKote feature of Magicard® Printers is protected by US PATENT No: 5,990,918 and by EUROPEAN PATENT SPECIFICATION EP 0 817 726 B1. Microsoft and Windows 2000, XP and Vista are trademarks of Microsoft Corporation. Copyright © 2008 Ultra Electronics Limited. SAFETY INSTRUCTIONS To prevent electric shock, do not remove covers. Do not attempt to service the Printer yourself. There are no User serviceable parts inside. In the event of malfunction, refer servicing to your nearest MAGICARD® Service Centre. For safety reasons, your Printer should only be used with a Magicard supplied Power source. Take care not to spill any liquid on the Printer. Ensure that the Power Supply cable is not longer than 2 metres in length and includes a properly earthed connection. If using this printer in Germany : To provide adequate short-circuit protection and over-current protection for this Printer, the building installation must be protected by a 16 Amp Circuit Breaker. Bei Anschluß des Druckers an die Stromversorgung muß sichergestellt werden, daß die Gebäudeinstallation mit einem 16 A-Überstromschalter abgesichert ist. When handling the Printer, avoid touching the thermal printing edge of the Print Head. Any grease and contamination will shorten it’s life. Before transporting the Printer, remove the Dye-Film & Card Hoppers and pack the Printer in it’s original packaging. FCC DECLARATION This equipment has been tested and found to comply with the limits for a Class A digital device, pursuant to Part 15 of the FCC Rules. These limits are designed to provide reasonable protection against harmful interference when the equipment is operated in a commercial environment. This equipment generates, uses, and can radiate radio frequency energy and, if not installed and used in accordance with the instruction manual, may cause harmful interference to radio communications. Operation of this equipment in a residential area is likely to cause harmful interference in which case the user will be required to correct the interference at his own expense. NOTE: changes or modifications to this equipment without the express written authority of Ultra Electronics Limited could void the user's authority to operate the equipment. Magicard Pronto User Manual -3- Ultra Electronics Ltd PRINTER INSTALLATION Welcome to Magicard Thank you for choosing the Magicard Pronto printer as your secure ID card Printer. Before setting up your Pronto Printer using the Ultra Driver CD–ROM, please follow the simple steps in this guide on installing your Printer. This guide helps you make your printing experience more enjoyable and secure. Unpacking Please ensure you have all the items listed before you start installation. 1. Pronto Printer 2. USB Cable 2m (do not connect) 3. Multinational Power Adaptor 4. Ultra Driver CD-ROM 5. Cleaning Cards (2 T-cards) 2 3 5 4 Magicard Pronto User Manual -4- Ultra Electronics Ltd IMPORTANT – Do not connect USB yet It is important to install the Ultra driver CD ROM first, before connecting the USB cable between your PC and Pronto Printer. Printer location requirements: Normal Office environment with : A properly earthed Power Supply Ambient temperature +10 to 30OC (50 to 86OF) Protection from direct sunlight and chemicals Protection from abrupt temperature changes Relative Humidity 20 - 70% Sufficient space for : - Opening the top cover - Cable access at the rear Magicard Pronto User Manual -5- Ultra Electronics Ltd Prepare the Cleaning Roller Open the Printer, then : 1. Remove the Cleaning Cassette and slide out the Spindle Bar. 2. Remove and discard the used Roller. 3. Place the new Roller into the Cleaning Cassette and replace the Spindle Bar. 4. Pull the Paper Tab to remove the protective covering on the new Roller. 5. Refit the Cleaning Cassette into the Printer. Magicard Pronto User Manual -6- Ultra Electronics Ltd Install the Dye-Film • Remove the Dye-Film from it’s packaging. • Place the loaded spool into the rear slots and the take-up spool into the front slots. • Close the Printer. Connect the Power Supply Select the correct adapter for your region and connect to Power Supply unit. Plug in and connect to Printer (which will automatically switch on). IMPORTANT : Do not connect the USB until the CD ROM has been installed. Magicard Pronto User Manual -7- Ultra Electronics Ltd Load the Driver CD in to your PC 1. Load the Driver CD ROM into the PC. Note : If the CD does not run automatically, click the “start” button, then click on “run”. Type “D:\autorun”, where D is the Drive letter for your CD Drive, then press the ‘Return’ key. 2. Now follow the on-screen instructions to install the Printer Driver. 3. When the installation is complete, connect your Pronto Printer to the PC via the USB cable (see above). Your Pronto is now ready to print. Magicard Pronto User Manual -8- Ultra Electronics Ltd USING YOUR PRONTO PRINTER Printer Parts 1 1. Lid Latch 2 2. Thermal Print Head 3. Power Button (multi-coloured) 4. Hand feed/Cleaning Card entry slot 5. USB Port 6. DC Power input 3 4 6 5 Magicard Pronto User Manual -9- Ultra Electronics Ltd Multi-coloured Button functions The Pronto is fitted with a multi-coloured Button to indicate the various functions of the Printer. These functions are indicated below : OFF - Button not illuminated – the Printer is powered off. GREEN – Indicates a ‘Ready’ condition - the Printer is ready to accept a print job. YELLOW – Indicates the Printer is busy (such as file downloads, printing etc.) FLASHING YELLOW – Indicates the Printer is waiting for a card to be fed into the Card Feed Slot. FLASHING RED YELLOW – Indicates the Printer is waiting for the card to be removed from the Card Feed Slot. RED – Indicates an error condition. Read the displayed error message from the PC screen (e.g. “out of Dye-Film”) Magicard Pronto User Manual - 10 - Ultra Electronics Ltd Powering ON Press the button once and release ….. x1 …. Printer begins initialising ….. …. after initialising, Printer goes to ‘Ready’ Powering OFF Press and hold ….. (approx 2 seconds) x1 (hold) …. until the colour changes ….. …. then let go! Magicard Pronto User Manual - 11 - Ultra Electronics Ltd Printing the ‘internal test pattern’ Press the Power Button twice in quick succession …. (within 0.5 seconds) … the button’s colour will change to yellow (busy)…. … after a few seconds, the button will FLASH YELLOW to request a card to be fed into the front card slot …. Feeding cards When the button FLASHES YELLOW … … insert a card into the front card slot. Note: See page 16 for correct orientation of magnetic stripe cards and HoloPatch cards. Magicard Pronto User Manual - 12 - x2 Ultra Electronics Ltd Removing printed cards When the button FLASHES RED YELLOW … … remove the card from the front card slot. Cancelling a print job Any print job can be cancelled. This can be done while the printer is downloading the image or printing it ….. x1 …. when the button is yellow, just press once and release. Magicard Pronto User Manual - 13 - Ultra Electronics Ltd CHOOSING THE RIGHT DYE-FILM Note : MA300YMCKO Dye-Film is generally the appropriate choice for colour printing with the Pronto. MA1000K & MA600KO Dye-Film – where running costs are critical, monochrome printing is a fraction of the cost of colour printing. The Table below is a guide to selecting the best Dye-Film to use for any intended application. Ribbon Panel Layout * Part Number 300 (printing on 1 side only) YMCKO MA300YMCKO Pronto Monochrome: Black Red Blue Green Gold Silver White Scratch 1000 (printing on 1 side only) K MA1000K-n (n = colour) Pronto Black + Overcoat 600 (printing on 1 side only) KO MA600KO Printer model Type of images you want to print Pronto Colour (1 side only) Cards per Ribbon * Ribbon Panel Layout Key: Y=yellow, M=magenta, C=cyan, K=resin, O=overcoat (No Colour) Magicard Pronto User Manual - 14 - Ultra Electronics Ltd CHOOSING THE RIGHT CARDS Card material Not all white plastic Cards are the same. For best image quality always use high quality PVC Cards. Pure PVC card stock or laminated PVC/polyester Cards are available. The latter are more durable and better suited to heavy use and heat lamination when required. For access control and Smart Card applications, your Dealer should provide the appropriate type for “direct to Card” printing. For good consistent results, stick to a single variety of good quality cards, such as those available from your Magicard Dealer. Card size CR80 (Standard) = 3.375” x 2.125” (86.50 mm wide x 53.98 mm high). CR79 = 3.03” x 2.051” (83.90 mm wide x 51.0 mm high). Card thickness Minimum - 0.015” ( 0.38mm). Standard - 0.030” ( 0.76mm). Maximum - 0.063” ( 1.60mm). To obtain good quality prints the Card must be : Glossy white. Free from dirt and grease. Free from surface contamination. Free from pits and bumps in the surface. Free from burrs at the edge of the Card. Completely flat. CR80 - 53.98mm (2.125”) CR79 - 51mm (2.051”) CR80 - 1016 pixels CR79 - 990 pixels CR80 - 642 pixels CR79 - 601 pixels ISO Standard Cards Sizes Printable area of the Card Printable area of the Card CR80 - 85.6mm (3.375”) CR79 - 83.9mm (3.303”) Both the Pronto and Pronto Duo Printer offer high quality edge to edge (Full Bleed) printing. Die cut PVC Cards typically have an edge roll off (bevel) which can result in a fine white line around the edge of full bleed printed Cards. When setting up your Card design (using your graphics software on your PC), you should use a maximum page size of 1016 pixels (3.45”/87.5mm) x 642 pixels (2.13”/54mm). Magicard Pronto User Manual - 15 - Ultra Electronics Ltd Using Magnetic Stripe cards If you have a Pronto Mag Printer (fitted with the optional magnetic encoding module) you can simultaneously print and encode the magnetic stripe on the rear of a magnetic stripe Card. The “Pronto Mag” Printer can encode both HI-CO and LO-CO Magnetic stripe Cards. When feeding Magnetic Stripe Cards, make sure the stripe is on the left and underneath (when viewing from the front of the Printer). Refer to your PC Badge printing Application for instructions on how to print and encode a Magnetic Stripe Card. Using HoloPatch cards From the Start Menu on your PC go to the <Printer Settings>. Select Pronto printer and right click. From the drop down menu select <Printing Preferences> and then <Card Front>. Select HoloPatch. Only the HoloKote watermark image will be printed onto the Gold HoloPatch. HoloPatch cards should be fed in with the gold patch on top, and on the Left-hand side (viewed from the front of the printer). Using Self-Adhesive Cards We recommend only using self adhesive cards supplied by Ultra Electronics (via your Magicard Dealer). There are many different types of self-adhesive cards. Thorough investigation and testing has shown that poorer quality or incorrect card types will cause problems in the Printer. These problems range from poor image quality, dye-film being cut and cards getting jammed in the roller mechanism. Magicard Pronto User Manual - 16 - Ultra Electronics Ltd Using Rewriteable Cards ReWriteable Rewriteable Cards use a special heat sensitive layer on the upper surface that can be erased and rewritten (at least 500 times). These Cards are not printed in the conventional sense (where Dye-Film is used), but instead use heat transferred directly from the Thermal Printhead into the card surface. To print on rewriteable cards: 1. Remove the Dye-Film from the printer. 2. Close the lid. 3. Ensure the “Colour Format” (Driver Preferences) is set to “Monochrome (K Only). 4. On your PC, click ‘Print’ in your printing application. 5. Insert a rewritable card in the card feed slot with the mat surface of the card facing up. Should you need to make changes within the Driver, please see “The Printer Driver Settings” on page 20. Heat sensitive layer with embedded dye and developer. PVC or PET substrate PVC layer for full quality colour/Monochrome printing. Magicard Pronto User Manual - 17 - Ultra Electronics Ltd PRINTER DRIVER SOFTWARE (THE ‘ULTRADRIVER’) Note : As part of our continuous improvement program, the UltraDriver software and the Printer Firmware for Pronto Printers is updated on a regular basis. To ensure you get the best performance from your Pronto Printer, we recommend that you regularly check the Magicard website for the latest Driver software and Firmware at :www.magicard.com/support/technical support Installing the ‘UltraDriver’ 1. Important – before loading the Driver, make sure the USB cable is NOT connected to the Printer. Load the Driver CD ROM into the PC connected to the Printer. If the CD does not run automatically, click the “Start” button, and then click on “Run”. Type “D:\autorun” (where D is the Drive letter for your CD Drive), then press the “Return” key. 2. Select the language you wish to use. 3. Select the ‘Pronto’ option. 4. Select ‘Install Software’ 5. Then select ‘Install Driver’ The Driver will now start to install… Please turn to next page… Magicard Pronto User Manual - 18 - Ultra Electronics Ltd … continued from previous page. The ‘Available Platforms’ screen shows which Operating Systems the Driver can be used with : Windows 2000 Windows XP Windows 2003 Server Window Vista If your Operating System is one of the above, click “Next >” The Driver files will now be installed on the PC. Click “Finish” when the “INSTALLATION SUCCESSFUL” screen appears. Note : You are not finished yet ! ! ! The Driver is not fully installed until the Pronto Printer is connected to the PC via the USB cable, and powered ON. When the Printer is detected by the PC, the Driver installation will be completed and the Printer will be ready to use. CAUTION :- If the Computer you are using, has at some time run another manufacturer’s Printer (e.g. Eltron C-Series Printer), a Windows file necessary for the Magicard installation could be missing. (The symptoms of this are that the Computer does not seem to detect the Magicard Printer’s USB connection). Recover the file as follows :1. Navigate to c:\windows\inf (Windows XP) or c:\winnt\inf (Windows 2000). 2. Find the file named usbprint.in, and then rename it to usbprint.inf. 3. Reconnect the USB cable. Magicard Pronto User Manual - 19 - Ultra Electronics Ltd The Printer Driver settings To access the Printer Driver settings in Windows 2000 and XP : 1. On the PC, go to “Start” 1. Right mouse click on the Magicard then “Printers and Faxes” Pronto Printer and select the “Printing Preferences…” option. To access the Printer Driver settings in Windows Vista : 1. On the PC, go to the Windows logo then “Control Panel” 2. Select “Printers” Understanding each individual driver setting : The Printer Driver contains a built-in help file (in HTML format) – this file gives an excellent, clear explanation of each Driver setting. To view the Driver’s Help file, go to the Printer Preferences (as described above), and click on the “Help” button in any of the Tabs. Magicard Pronto User Manual - 20 - 3. Right mouse click on the Magicard Pronto Printer and select the “Printing Preferences…” option. Ultra Electronics Ltd Uninstalling the UltraDriver To uninstall the Printer Driver from Windows 2000 and XP : 1. On the PC, go to “Start” then “Control Panel” 2. In the Control Panel, select “Add or Remove Programs” 3. Select the “Magicard Pronto” entry, and click on “Change/Remove” 4. Now just follow the prompts from the ‘Printer Uninstall’ application. To uninstall the Printer Driver from Windows Vista : 1. On the PC, go to the “Windows” logo then “Control Panel” 2. In the Control Panel : if in ‘Category View’ - select “Uninstall a program” if in ‘Classic View’ – select “Programs and Features” 3. Select the “Magicard Pronto” entry, and click on “Uninstall/Change” 4. Now just follow the prompts from the Printer Uninstall application. Magicard Pronto User Manual - 21 - Ultra Electronics Ltd CARING FOR YOUR PRINTER CLEANING IS IMPORTANT !!! Printer care is an important factor of your Printer’s operation and longevity. Maintaining a regular cleaning routine will give you optimum print quality and prevent “down” time. Magicard recommend that you clean the Rollers and Print Head each time you fit a new roll of Dye-Film, and replace the Cleaning Roller. CLEANING IS EASY AND INEXPENSIVE If you have not already done so, order a Cleaning Kit - see the ‘Cleaning Supplies’ box on the next page. A clean Printer produces better quality Cards, as dust and dirt are not present when the Card is being printed. A clean Printer is much less likely to require Factory maintenance, and the Print Head in your Printer will last for many years of normal use. Remember, large particles of dirt can damage the Print Head. A clean Printer also produces better quality magnetic encoding. THE MAGICARD CLEANING ‘SYSTEM’ There are three main parts to your Printer’s cleaning system : 1. Clean the rollers using the Cleaning Cards : You use a Cleaning Card to remove dirt from the print path. This should be used after every time you replace your Dye-Film (every 250 to 300 prints). If you print only a few Cards a day, we recommend that you clean the Printer more often. 2. Clean your PVC Cards using the Cleaning Roller : There is a disposable Cleaning Roller fitted inside the printer to remove dust & debris from the surfaces of the PVC Cards. This will prolong the life of the Print Head and will help maintain image quality. It should be replaced every time you replace your Dye-Film. A replacement Cleaning Roller is supplied free with every new roll of Dye-Film. 3. Clean the Print Head using the Cleaning Pen : There is also a Cleaning Pen, which is used to clean the Print Head. We recommend you use this if any lines are seen on printed Cards. Magicard Pronto User Manual - 22 - Ultra Electronics Ltd Cleaning supplies Two Cleaning Cards and a Cleaning Roller (sleeve & bar) are bundled with each new Pronto Printer. You can also purchase additional Cleaning Kits, which include Cleaning Cards, Rollers and Pens : Cleaning Kit Cleaning Roller Kit (5 cards, 1 pen) (5 sleeves, 1 roller bar) - Part number Part number - CK1 3633-0054 Cleaning the Printer Rollers with the Cleaning Card To prevent the PVC Cards slipping on the rollers during printing, we recommend that you clean your Printer using a Cleaning Card each time you replace the Dye-Film. A. Remove the Dye-Film. Leave the Lid open. B. Take a new Cleaning Card from it’s foil packaging. C. Start the cleaning routine by selecting the Driver Preferences and then the “Printer” Tab. D. Click “Clean the Printer” Button. Place the narrow end of the Cleaning Card into the front Card Feeder slot. The Card will automatically enter the Printer and the Rollers will be cleaned. When the cleaning cycle is finished, the Cleaning Card will be ejected. For maximum cleaning effect, it is recommended that you turn the Cleaning Card over and then repeat step D. Magicard Pronto User Manual - 23 - Ultra Electronics Ltd Replacing the Cleaning Roller A new cleaning roller is supplied with every new Dye-Film roll. – Open the Printer, remove the used Dye-Film, then :- 1. Pull out the Cleaning Cassette. (This is the positioned towards the front of the Printer – just behind the front Card slot – see below). 2. Slide out the metal bar, then remove and discard the used Cleaning Roller. 3. Slide the metal bar into the new Cleaning Roller. 1 2 4 3 5 A 4. Pull the tab (A) to carefully remove the Cleaning Roller’s protective cover. This will reveal the Roller’s “tacky” surface. 5. Place the new Cleaning Roller into the Cleaning Cassette, and refit the Cleaning Cassette into the Printer. Magicard Pronto User Manual - 24 - Ultra Electronics Ltd Cleaning the printhead using the Cleaning Pen We recommend that you clean the Print Head each time you replace the Dye-Film. Take the Cleaning Pen from your Pronto Cleaning Kit. Open the Printer and carefully run the Pen several times, along the complete length of the Print Head. Magicard Pronto User Manual - 25 - Ultra Electronics Ltd AVAILABLE CONSUMABLES Product Code Description Dye-Film MA300YMCKO MA600KO MA1000K-BLACK MA1000K-WHITE MA1000K-BLUE MA1000K-GREEN MA1000K-GOLD MA1000K-SILVER YMCKO 5 panel Dye-Film 300 images. KO 2 panel Black Resin Dye-Film 600 images. Monochrome Black Resin 1000 images. Monochrome White Resin 1000 images Monochrome Blue Resin 1000 images Monochrome Green Resin 1000 images Monochrome Gold Resin 1000 images Monochrome Silver Resin 1000 images Product Code Description Magicard Cleaning KitS CK1 3633-0054 - Contains 5 Cleaning Cards and 1 Pen. Contains 5 Cleaning Rollers and 1 Roller Bar. Cards All standard PVC ISO CR79/CR80 sized Cards. HoloPatch®/Magstripe cards are available. Card thickness : 0.51mm to 1.02mm (20mil to 40mil). Magicard Pronto User Manual - 26 - Ultra Electronics Ltd TROUBLESHOOTING Table 1 - Printer Error Messages Error Message Lid Open, please close to continue. Code = 01:00 to 01:15 Probable Cause The lid is open either during a print job or when there is a print job pending. Solution - Close the lid to continue Do not open the lid while the printer is printing or if there is a print job being sent to the printer. The printer has not detected a card inserted in the front slot. 1. Ensure the card is being fed into slot in the front when the multi-coloured button flashes YELLOW. 2. Ensure card is inserted far enough into the slot for printer's rollers to grab it. 3. Do not pre-stage a card in the printer before printing. Card Jam, please clear printer mechanism. Code = 06:00 to 06:27 The card has failed to move into the correct position in the printer. 1. Open the lid and remove the card if possible. If not close the lid and see if the card will eject. 2. Once removed make sure your cards are within the printers recommended specification. 3. Clean the printer rollers No film detected please load a new roll of film to continue. Code = 07:00 The printer detects an invalid RFID film tag 1. Make sure you are using genuine Magicard film. 2. Install a new roll of film. While advancing the dye-film to the correct starting position, the printer does not see the film advance. 1. Make sure you are using genuine Magicard film. 2. Check there is dye film installed, if not - install a roll of film. 3. Check whether the dye film has been completely expended, if so - install a new roll. 4. Make sure your dye film gear is meshing with the film teeth. 5. Make sure you have the correct power supply plugged into the printer. 6. Try installing a new roll of ribbon. Hand feed error, please select and try again. Code = 03:00 to 03:01 Out of dye film, please load a new roll of film to continue. Code = 08:00 to 08:12 Unsupported film, please load different film to continue. Code = 09:00 The printer has validated the dye-film but the configuration of colors is unsupported. 1. Make sure you are using genuine Magicard film. 2. This could be a new film type for the printer so a firmware upgrade might be needed. Download the latest firmware from our website and install it. 3. This could be genuine Magicard film, but the incorrect type for your printer Magicard Pronto User Manual - 27 - Ultra Electronics Ltd Table 1 - Printer Error Messages (continued……) Error Message Probable Cause Solution Can arise if sending a color print or overcoat print job to a single color (monochrome) film. 1. Make sure you have the right film type fitted in your printer. 2. Check that your driver settings are correct. 3. Reinstall the printer driver. (Note - If printing prn's to the printer it can bypass the driver settings and can produce this error). Can't find panel. Please check film and printer mechanism, or press cancel to clear print job. Code = 11:00 to 11:02 The printer cannot find the requested color panel within 8 panels of its starting point 1. Make sure you are using genuine Magicard film. 2. Make sure your dye film gear is meshing with the film teeth. 3. Make sure you have the correct power supply plugged into the printer 4. Try installing a new roll of ribbon. RFID PCB Missing. Reconnected PCB to continue. Code = 12:00 The printer does not detect the RFID PCB 1. Make sure you have the correct power supply plugged into the printer. 2. Try installing a new roll of ribbon. The printer detects that the print head cable is not correctly connected. 1. Turn off the power, then make sure the printhead cable is connected. 2. Check to make sure the correct Magicard power supply is connected. Overheat error, switch printer off and allow printhead to cool. Code = 14:00 to 14:01 The print head temperature is out of range or is too hot. Image too dark, Please cancel print job and reduce driver printhead power settings to try again. Code = 15:00 1. Turn off the printer so to allow the printhead to cool down. 2. Check to make sure your room temperature is with in the recommended specifications. 3. Make sure your printer has proper air flow around it. 4. Your printer driver settings for Print Head Power might be set to high. Reset them to 50. Your printer driver settings for Print Head Power are set to high. 1. Reduce the Print Head Power settings in the driver to 50. 2. Make sure the correct Magicard power supply is connected. Can't Lift Head, Check Printer Mechanism. Code = 16:00 to 16:08 The printer is attempting to move internal mechanical parts, but does not detect any movement 1. Check the inside of the printer for obstructions. 2. Check to make sure the correct Magicard power supply is connected. Wrong film type. Please load different film to continue or press cancel to clear print job. Code = 10:00 to 10:06 Print Head Error, switch printer off and reconnect print head. Code = 13:00 to 13:02 Magicard Pronto User Manual - 28 - Ultra Electronics Ltd Table 1 - Printer Error Messages (continued……) Error Message Probable Cause Solution Can't Drop Head, Check Printer Mechanism. Code = 17:00 to 17:01 The printer is attempting to move internal mechanical parts, but does not detect any movement 1. Check the inside of the printer for obstructions. 2. Check to make sure the correct Magicard power supply is connected Mag Verify Fail, Press Retry or Cancel to continue. Code = 19:00 to 19:01 The printer does not detect the RFID PCB 1. Make sure you have the correct power supply plugged into the printer. 2. Try installing a new roll of ribbon. Clean Required, Please clean rollers to avoid deterioration. Code = 21:00 The printer has printed more than 700 cards since the rollers were last cleaned. It needs to be cleaned to prevent deterioration of print performance. 1. Clean the print rollers. The printer detects a low level of output from the Power Supply Unit. 1. Make sure the correct Magicard power supply is connected. Wrong PSU? Please switch printer OFF and check the power supply. Code = 23:00 Table 2 - Card Feed Problems Problem Cards failing to travel correctly through the Printer. Gives error message:“Card not found”. Probable Cause 1. Dirty rollers. 2. Incorrect Card size. Solution 1. Clean the rollers. 2. Fit correct Cards Magicard Pronto User Manual - 29 - Ultra Electronics Ltd Table 3 - Printer Prints but with Image Quality Problems Problem Probable Cause Mis-registration of colours. Solution 1. Card is slipping due to dirty Rollers. 1. Clean all Rollers. (See page 22 of this document). 1. Dust and debris on surface of the Card. (white ovals). Contaminated with oily deposits (darker blotches). Card surface uneven (White patches). 1. Ensure Cards are kept clean, and protected from dust & debris. 2. Replace Cards with clean ones and do not handle print surface. 3. Replace Cards. (Ghosting on Photographs etc.) Small areas of wrong colour. (Small areas where one or more colour layers have been missed from the image). 2. 3. 4. In the Driver, reduce printhead power setting, or determine which end of Card is cutting the Film & adjust image “Start” or “End” position accordingly, in the Driver. 4. Slight cutting of Dye-Film due to Print Head density set too high (Jagged scratches). Dark or lighter vertical lines on Card (always in the same place). 1. Card striking something during the print process. Card not running smoothly along the platen runway. 1. Check print path is clear. Vertical white line down one or both ends of Card. 1. Incorrect Driver setting. 2. Image page size incorrect. 3. Incorrect image “Start” or “End” position settings. Print Head has damaged heating elements. 1. Ensure the Driver is not set to “White Border”. 2. Ensure page size 86.9mm x 54mm with margins at zero (in Badging Application). 3. Adjust settings in Driver. 2. White line along length of all Cards (always in the same place). 1. 2. Contact Magicard Technical Support for advice on clearing the Platen. 1. Contact Magicard Technical Support for advice on Print Head cleaning or replacement. Table 4 - Magnetic Encoding Problems Problem Probable Cause Magnetic Encoding results are inconsistent. 1. Cards do not encode. 1. 2. 2. 3. Solution Card slipping when moving over the Magnetic Head. Incorrect Cards fitted HI-CO / LO-CO. 1. Card incorrectly oriented when fed into Printer. Driver selections are incorrect for encoding. Incorrect or defective Cards. 1. 2. 2. 3. Magicard Pronto User Manual - 30 - Clean all Rollers. (See page 22 of this document). Ensure the correct type of Magnetic Cards are being used. Position card with the stripe underneath and to the left when inserting into Printer. Check the Printer Driver settings are correct. Ensure the correct type of Magnetic Cards are being used. Ultra Electronics Ltd Table 5 - Dye-Film Problems Problem Probable Cause Dye-Film is being cut during the print operation. Solution 1. Ribbon sticking to Card. 1. Ensure Cards are not already used. Then lower Print Head power settings. 2. Image printing over the ends of the Card. 2. Adjust either the image “Start” if cutting at beginning of film panel, or the image “End” if cutting at rear of Film panel. Image is printed outside the colour panels. (Puts a coloured band across one end of Card). 1. A used roll of Dye-Film has been fitted. 1. Fit a new roll of Dye-Film. 2. Take Up Spool wound too loosely. Areas of Dye-Film peeling off card. Dark mosaic like image. 1. Card has been used and has overcoat layer on it. 1. Use only brand new Cards (not ones which failed to print fully). Cards printed incorrectly after switching between YMCK and black Film. 1. 2. Failure to re-set Driver settings A used roll of Dye-Film has been fitted. 1. 2. Remove loose Dye-Film. 2. Set correct the Driver settings for colour format. Replace Dye-Film with a new roll. Table 6 - Driver Related Problems Problem Slow data download from Computer to Printer Probable Cause 1. 2. Solution Computer polling Access Control System in background. Corrupted Driver or Spooler. 1. Operate from a dedicated PC. 2. Update to latest Driver version. 1. Select the correct printer driver (“Magicard Pronto”) in the Windows “Printers & Faxes” window. 2. 3. Check Port selection in Driver properties. Update with latest Printer Driver. Enable the Print Spooler. Clear the Spooler and reset the Printer. Delete the damaged print if necessary, and reset the Printer. No data download between PC and Printer, but Printer can print “Internal Test Cards”. 1. Incorrect Printer Driver selected in the Windows “Printers & Faxes” window. 2. 3. Incorrect Port selected. Driver corrupted. Prints stuck in Print Spooler. 1. 2. 3. Print Spooler paused. Printer communication blocked. Damaged file is at front of print queue. 1. 2. 3. Print Spooler will not automatically ‘enable’ after each print. 1. Corrupted Printer Driver file. 1. Un-install the Printer Driver and then reinstall. Magicard Pronto User Manual - 31 - Ultra Electronics Ltd WARRANTY INFORMATION 1). Coverage : Ultra Electronics Ltd Warrants that the MAGICARD printer shipped with this Warranty statement will conform to the manufacturer’s specifications and be free from defects in materials or workmanship for a period of 2 years in E.U. and USA (1 year elsewhere) from the date of original purchase by the user, but there are additional conditions on the Print Head Warranty (see paragraph 2). 2). Limited Printhead Warranty : Ultra warrants that, under normal use and service, thermal Print Heads will be free from defects in material and workmanship for a period of 2 years in E.U. and USA (1 year elsewhere) from the date of original purchase or for a quantity of 10,000 printed cards, whichever comes first, provided that Ultra-approved Card media is utilised. If a Warranty claim is submitted for a defective Print Head, Ultra will have the right to inspect the Print Head and samples of the printed and blank ID cards used with it for the purpose of verifying that the claimed defect has not been caused by non-Ultra approved media, or by foreign particles or substances which have caused chemical or physical damage. Ultra's decision in any such claims shall be final. 3). Warranty Claims : If the MAGICARD printer proves defective during this period, please contact the Ultra Service Center, at the address and telephone/fax number given below. The Ultra Service Center personnel may first ask you to carry out certain simple checks to confirm the nature of the problem, and if a return is appropriate they will give you a Return Authorisation Number (MRAN) and consignment instructions to the appropriate repair center. Ultra will, at it’s option, repair or replace the defective parts at no charge to the customer. 4). Warranty Limitations : The Warranty does not apply to MAGICARD Printers that have been : Damaged through physical or electrical mishandling. Damaged through operation in environments which are outside normal office conditions in terms of corrosive atmosphere, temperature, humidity, shock or vibration. Improperly installed or interfaced to other products which may exhibit software problems or expose the MAGICARD to improper voltages or control signals. Fitted with Dye-Film rolls from any source other than Ultra Electronics, or have been used to print on anything other than Card surfaces which are approved by Ultra and which will generally be made of PVC, be completely flat, and be free of harmful particles or substances. Serviced or interfered with by anyone other than an Ultra Authorised Service Provider. 5). Shipping : Insurance and shipping costs incurred in sending the MAGICARD Printer for Warranty service are the responsibility of the customer. Whenever possible Ultra Service Centers will use the same class of shipping service selected and paid for by the customer to return the Printer. Return shipping costs from Ultra to the customer will be at Ultra's expense. After obtaining the Return Authorisation Number as described above, the printer should be securely packed in it’s original packaging with proof of date of purchase and a note describing the problem and quoting the Return Authorisation Number. The Printer must be sent to the service center address supplied with the Return Authorisation Number by the main Service Center. This address may be different to the address listed below, but will generally be closer to you. Please also mark the Return Authorisation Number on the outside of the shipping carton. All Customs duties and taxes, if applicable, are the responsibility of the customer. 6). Applicability : The Warranty and remedy provided above are exclusive and in lieu of all other warrants, either express or implied, including but not limited to, implied warranties of merchantability and fitness for a particular purpose. Any statements or representations made by any other person or firm are void. Neither Ultra Electronics Ltd nor its affiliates shall be liable for any loss, inconvenience, or damage, including direct, special, incidental, or consequential damages, resulting from the use or inability to use the Ultra product, whether resulting from breach of Warranty or other legal theory even if Ultra has been advised of the possibility of such damage or loss. 7). This Warranty is governed under English Law. Any dispute arising out of or relating to this Warranty shall be submitted for arbitration of this dispute or disputes pursuant to the rules and regulations of the UK Arbitration Act. This Warranty gives you specific legal rights, and you may also have other legal rights which vary from country to country so the above limitations and exclusions may not apply to all Customers. Magicard Pronto User Manual - 32 - Ultra Electronics Ltd CONTACT US SALES AND SERVICE CENTER FOR NORTH AND SOUTH AMERICA Ultra Electronics Card Systems 6711 - 176th Avenue NE, Redmond, WA 98052, USA. Tel: (425) 556-9708 Fax: (425) 556-3962 Email: Support: [email protected] Sales: [email protected] Web: http://www.magicard.com SALES AND SERVICE CENTER FOR THE UK, EUROPE AND REST OF WORLD Ultra Electronics Card Systems Waverley House, Hampshire Road, Granby Estate, Weymouth, Dorset, DT4 9XD UK. Tel: +44 (0) 1305 784738 Fax: +44 (0) 1305 777904 Email: Support: [email protected] Sales: [email protected] Web: http://www.magicard.com SALES AND SERVICE CENTER FOR CHINA Ultra Electronics Card Systems Room 902 Zhonghuang Tower No. 1007 Second Zhongshan Road (S) Xuhui District Shanghai City, 200030 China Tel: 00 86 21 6457 3509 Fax: 00 86 21 6457 3509 Email: [email protected] Web: http://www.magicard.com Magicard Pronto User Manual - 33 - Ultra Electronics Ltd CONTACT US - SUPPORT www.magicard.com >Support >Supporto >Apollo Ultra Electronics Card Systems Hampshire Road, Weymouth, Dorset DT4 9XD, United Kingdom Tel: +44 (0) 1305 784 738 Fax: +44 (0) 1305 777 904 email: [email protected] Ultra Electronics Card Systems North American Sales & Support Center 6711 - 176th Avenue NE Redmond WA 98052 Toll Free: 877 236 0933 Tel: (425) 556 9708 Fax: (425) 556 3962 email: [email protected] Magicard Pronto User Manual - 33 -