1
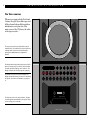
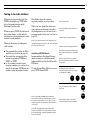
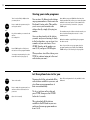
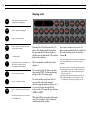
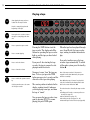
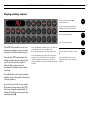
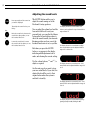
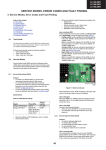
B E O S O U N D
1
C E N T U R Y
BeoSound Century is a fascinatingly
small yet amazingly powerful music
system with built-in speakers and
three integrated audio sources: CD
player, radio and tape recorder.
BeoSound Century unites it all in a
very elegant and individualistic
design, which makes the system easy
to fit in wherever you want music –
either standing in its base, or hanging
on the wall in the specially designed
wall bracket.
The magic glass door, which slides
open whenever you approach the
system, combined with easy and
convenient operation of the music
sources, makes the BeoSound Century
music system a pleasure to operate
and great fun to play.
User’s guide
2
This user’s guide explains the functions offered by
the BeoSound Century music system, and how
they are operated on the system.
Remote operation using the Beo4 remote control
is also possible. See how on pages 26 - 27.
Complete setting-up and maintenance
instructions are found in the separate setting-up
guide, which is also enclosed with the system.
Note: The Beo4 remote control, a wall bracket for
hanging your BeoSound Century on the wall, and
a carrying handle which doubles as an active FM
antenna for the system are all available as
optional extras at your Bang & Olufsen dealer.
3
C O N T E N T S
4 An invitation to play
6 Principles of operation
8 Buttons and display
10 Using the radio
11 Tuning in to radio stations
12 Storing your radio programs
Let the system tune in for you
14 Using the CD player
15 Switching displays
Playing tracks in random order
16 Using the tape recorder
17 Finding tracks or counter positions
Noise reduction
18 Instant recording on tape
19 Recording a specific track on a CD
Cancelling your recording
20 Automatic tape reverse function
21 Using auxiliary sources
22 Sound adjustment
24 BeoSound Century displays
26 Remote control
4
A N
I N V I T A T I O N
T O
Whenever you approach the BeoSound
Century, the glass door slides open, and
all the relevant buttons light up in red.
You are invited in to play!
P L A Y
Note: The next page shows the four operational
stages in which you may find your BeoSound
Century music system.
Pressing a red button makes the system
respond – either by carrying out your
instruction, or by making another set of
buttons available to you - or both.
In this way, the BeoSound Century
engages you in a playful conversation
about its music sources: the CD player,
the radio, or the tape recorder.
LOAD
RADIO
CD
TAPE
APE
AUX
Start
Bang & Olufsen
BANG & OLUFSEN
5
The BeoSound Century system is switched to stand-by,
but it will respond to a brief wave of your hand.
Start
Bang & Olufsen
BANG & OLUFSEN
When you approach the system, it opens up to
you, and the four source buttons light up –
inviting you in to play!
LOAD
RADIO
CD
TAPE
APE
AUX
Start
Bang & Olufsen
BANG & OLUFSEN
Now, try pressing one of the source buttons.
The source starts playing, and the system offers
you all the relevant buttons for that source (here
the CD player).
RADIO
SOUND
MODE
REC
CD
TAPE
APE
AUX
< STEP
STOP
STEP >
1
2
3
4
5
6
Start
Bang & Olufsen
BANG & OLUFSEN
If you leave the BeoSound Century to enjoy the
music, the glass door closes, and the lights go out.
Only the source button and the display remain lit –
keeping you informed about the source playing.
CD
Start
Bang & Olufsen
BANG & OLUFSEN
7
LOAD
8
9
6
P R I N C I P L E S
O F
O P E R A T I O N
The three sources
Whenever you approach the BeoSound
Century, the glass door slides open, and
all the relevant buttons light up with an
invitation for you to play one of the
music sources: the CD player, the radio,
or the tape recorder…
The top section of the system holds the tray for
compact discs. The compact disc is kept in place by
a clamp, which can be raised and lowered by
pressing the LOAD button (top right-hand
button).
The BeoSound Century radio only becomes visible
when it is being used. You will see all the buttons
for radio operation light up, and – with a P – the
display indicates that a radio program is playing.
LOAD
RADIO
CD
TAPE
AUX
The middle-section of the system contains the
display and all the buttons you need for operating
the system. For further information, see pages 8 9.
The bottom section is for tape cassettes. The tape
recorder adjusts automatically to the type of tape
you are using: ferro or chrome.
Start
Bang & Olufsen
BANG & OLUFSEN
7
Loading a CD
Pressing the LOAD button raises the clamp which
holds the CD in place. You can then remove any
CD from the compartment and load the one you
want to play.
husk billede
Always load the CD with the text side facing you!
Pressing LOAD again lowers the clamp. You may
also press the CD button to lower the clamp and
start playing the CD at once.
Loading a tape
The tape cassette must be loaded with the tape
slot facing downwards. Insert the top section of
the cassette first; then push in the bottom half of
the cassette until it is properly seated in the
compartment.
husk billede
To unload the tape, grip the sides of the cassette
– a little below the middle – and gently, but
firmly, pull it outwards.
Headphones
Headphone socket
The headphone socket is placed on the back of
BeoSound Century, as illustrated to the left.
Once you connect your headphones to BeoSound
Century, the sound from the built-in BeoSound
Century speakers is muted. The sound from the
speakers is then demuted when you disconnect
your headphones.
PHONES
Raises and lowers the clamp which
holds the CD in place
8
> Principles of operation
Buttons and display
Pressing a red button makes the
BeoSound Century respond – either by
carrying out your instruction, or by
making another set of buttons available
to you – or both.
SOUND allows you to adjust the sound levels:
volume, balance, bass, treble and loudness
(pages 22 - 23).
●
The display and the red buttons guide
you through any operation you may
wish to carry out, engaging you in a
playful conversation about the
BeoSound Century music sources.
These pages show what the display and
each of the 26 buttons are used for…
STORE allows you to store:
radio stations on program numbers (page 12);
● your favourite sound levels (page 23).
REC allows you to record the source you are
listening to (pages 18-20).
●
●
MODE is used for:
switching AM and FM bands on the radio
(page 11);
switching the CD random play function on
and off (page 15);
● switching the tape Noise Reduction
function on and off (page 17);
● switching the automatic tape reverse
function on and off (page 20).
MODE
REC
STORE
SOUND
The display keeps you informed about what the
system is doing and about any on-going
operation. See the displays throughout this guide
and on pages 24 - 25.
MODE
RADIO
CD
TAPE
AUX
The source buttons switch on the source you wish
to listen to:
● RADIO turns on the radio (pages 10 - 13);
● CD starts the CD player (pages 14 - 15);
● TAPE starts the tape recorder (pages 16 - 20);
● AUX plays any auxiliary source (page 21).
RADIO
CD
TAPE
AUX
<STEP
0
1
2
3
4
9
Note: For a complete description of the various
functions performed by the system, please follow
the references to the relevant pages.
The two step buttons, <STEP and STEP>, are used:
● for stepping through:
– radio programs (page 10),
– tracks on a CD or a tape (pages 14 and 17);
● for searching for radio stations (page 11);
● for rewinding and fast forwarding a tape
(page 17);
● for cancelling a recording (page 19).
STOP is used:
● for pausing playback of a CD or a tape
(pages 14 and 16);
● for pausing and stopping a recording (page 18).
The TUNE button allows you to tune in to
new radio stations (pages 11 - 12).
<STEP
STOP
STEP>
TUNE
The volume buttons allow you to adjust volume
up or down – and to adjust the various sound
levels (pages 22 - 23).
LOAD
The LOAD button raises and lowers
the clamp holding the CD in place
(page 7).
The stand-by button switches the
system to stand-by.
REC
STORE
SOUND
STOP
STEP>
TUNE
5
6
7
LOAD
8
9
The number buttons are used for:
● keying in radio program numbers or radio
frequencies (pages 10 - 11);
●
●
keying in CD track numbers (page 14);
playing a tape from the beginning (page 16).
10
U S I N G
T H E
R A D I O
Listening to radio programs
RADIO
STEP>
Turns on the radio
Press to browse through your radio
programs, forwards...
MODE
REC
STORE
SOUND
RADIO
CD
TAPE
AUX
<STEP
STOP
STEP>
TUNE
0
1
2
3
4
5
6
7
LOAD
or
<STEP
1
...or backwards
Alternatively, key in the exact
program number you want,
for example 12
2
∧
Press to raise the volume
∨
Press to lower the volume
●
Press to switch the system to standby
Selecting another source also turns
off the radio
Pressing the RADIO button makes the
display and all the buttons for operating
the radio light up. At the same time, the
radio starts playing the program you
were last listening to.
The program number is indicated in the
display, for example: P 3.
To switch to another program, you can
either key in its number directly using
the number buttons, 0 - 9; or you can
press the step buttons, <STEP or
STEP>, to browse through all your
programs.
8
9
If you select another source, the radio
stops automatically. To switch off the
entire system, press the stand-by
button, ●.
Note: If you press RADIO again while the radio is
playing, you can see the frequency for the current
radio station in the display. Press RADIO again to
revert to the program number indication.
Note: The REC button makes it easy to record the
radio program you are listening to. See how on
page 18.
The system only makes the necessary
number buttons available. That is, if you
only have stored radio programs on the
numbers 1 to 5, only the buttons 1 to 5
will be lit.
> Selecting radio programs using the method
described on this page requires that you have
tuned in to all your favourite radio stations and
stored them on program numbers of their own.
See how on the next pages.
11
Tuning in to radio stations
Whenever you turn on the radio, the
TUNE button lights up. TUNE is the
key to the tuning function in the
BeoSound Century radio.
When you press TUNE, the buttons on
the system change, so that only the
buttons necessary for tuning in to radio
stations become available.
There are three ways of tuning in to
radio stations:
●
●
●
You can make the system do all the
work for you (see how on page 12).
You can let the system search for
stations by pressing TUNE then
STEP> or <STEP.
Or, if you know a station’s exact
frequency number, you can key it in
directly by pressing TUNE then the
number, using the number buttons.
The display shows the station’s
frequency number as you go along.
When you have found the station you
want, and you are hearing it clearly in
the loudspeakers, you can store it on a
program number of its own (see how on
page 12).
Note: If you have keyed in a false frequency, the
system automatically returns to the radio program
you were last listening to.
Switching AM/FM bands
In some markets, BeoSound Century
music systems are sold which make
tuning available in both the AM and the
FM bands.
To switch from FM to AM or vice versa,
press TUNE then MODE.
RADIO
Turns on the radio
Press to make the system search for
a station
TUNE
then
STEP>
Searches up the frequency band
or
<STEP
Searches down the frequency band
The radio stops automatically at the
first station producing an acceptable
signal
If this is not the station you want,
press the step button again to search
for another
Alternatively, key in the exact
frequency for the station you want,
for example 87.5 MHz
8
Press to switch from FM to AM, or
vice versa
7
TUNE
then
5
TUNE
then
Note: Proper FM (and AM) antenna must be
connected to the BeoSound Century in order to
pick up the radio stations in your area. See the
setting-up guide for information about antenna
connections.
A special carrying handle with an active FM
antenna is available as an optional extra for the
BeoSound Century. Your Bang & Olufsen dealer
has all the details!
MODE
The display changes to show the
lowest frequency in the new band
12
> Using the radio
Storing your radio programs
Tune in to the FM (or AM) station
you want, then...
STORE
Press to make the system ready for
storing the station
then
1
Key in the number you want for the
station,
for example 12
2
then
STORE
Press STORE again to finally store
the station on the program number
You may now start tuning in to the
next radio station (see page 11)
You can store 30 different radio stations
on program numbers of their own in the
BeoSound Century radio. This enables
you to access your favourite radio
stations directly, simply by keying in a
number.
Once you have tuned in to the station
you want, and you are hearing it clearly
in the loudspeakers, you can store it on
a number of your own choice: Press
STORE, then key in the number you
want (1-30), and press STORE again.
Note: When you press STORE the first time, the
display automatically offers you a vacant program
number for the new station. If the number suits
you, you need not key in another – just press
STORE again.
The number may also indicate that the station you
have found has already been stored – on the
number shown.
When the number stops blinking, the program
has been stored.
Note: If you wish to erase a program from its
program number, press TUNE, then STORE, 0,
STORE while you are listening to the program.
When you have stored the station, press
TUNE to continue tuning in to the next
radio station you want…
Let the system tune in for you
RADIO
TUNE
then
STORE
Turn on the radio
Press to make the system tune in toand store all the radio stations in
your area
(Press for 2 seconds)
You may also let the system find all the
radio stations available in your area, and
store them on program numbers of
their own automatically.
To do so, just turn on the radio and
press TUNE, then press the STORE
button for 2 seconds.
The system finds all the stations
available in the FM band in your area
and stores them on program numbers
from 1 to 30.
Note: This tuning method is only available in the
FM band.
13
List the radio stations you have stored here:
1
16
2
17
3
18
4
19
5
20
6
21
7
22
8
23
9
24
10
25
11
26
12
27
13
28
14
29
15
30
Note: Use a pencil – you may wish to change the
list later on!
14
U S I N G
T H E
C D
P L A Y E R
Playing a CD
CD
STOP
CD
STEP>
Starts playing the CD you have
loaded into the CD player
Press to pause the CD player
Press to resume playing
Press to browse through the tracks
on the CD, forwards...
or
<STEP
5
...or backwards
Alternatively, key in the number for
the track you want to hear,
for example track number 5
∧
Press to raise the volume
∨
Press to lower the volume
●
Press to switch the system to standby
Selecting another source also turns
off the CD player
MODE
REC
STORE
SOUND
RADIO
CD
TAPE
AUX
<STEP
STOP
STEP>
TUNE
0
1
2
3
4
5
6
7
Pressing the CD button starts the CD
player: the display and all the buttons
for operating the CD player light up,
and the first track from the CD you have
loaded starts playing.
The track number is indicated in the
display: 1.
You can pause the CD player any time
by pressing STOP. To resume playing,
just press the CD button again.
To select another track from the CD,
you can either key in its number
directly using the number buttons, 0 - 9;
or you can browse through all the
tracks on the CD using the step buttons,
<STEP or STEP>.
When the CD has been played through
once, the CD player stops, waiting for
another instruction to play.
LOAD
8
9
If you select another source, the CD
player stops automatically. To switch off
the entire system, press the stand-by
button, ●.
Note: If the CD player is left paused or stopped for
more than 30 minutes, the system switches to
stand-by.
The other functions offered by the CD player are:
● Switching between various display indications:
track number, track time and remaining disc
time (see page 15).
● Playing tracks in random order (see page 15).
● Recording the CD you are listening to, and
recording specific tracks (see pages 18 - 19).
15
Switching displays
When you start playing a CD, the
display always shows which track
number is playing.
Press while the CD is playing to
change the display indication – from
track number to track time
CD
Press again to change the display
indication – from track time to
remaining disc time
CD
Press a third time to revert to the
original track number indication
CD
then
The CD player is playing track number 12
The current track has been playing for 1 minute
and 47 seconds (track time)
At any time, while the CD is playing,
you can change the indication in the
display by pressing the CD button. The
display then changes – first into
showing the track time, then into
showing the remaining disc time
(minutes and seconds).
then
If you press CD a third time, the display
reverts to showing the track number.
12 minutes and 38 seconds playing time remains
on the CD (remaining disc time)
Playing tracks in random order
The CD random play function is switched off
– the indication in the display is blinking
Pressing the MODE button twice, while
the CD is playing, makes the CD player
play all the tracks on the CD in random
order.
If you wish to cancel your random play
instruction, simply press MODE again –
twice. Switching off the CD player also
cancels the random play function.
The CD random play function is active
– the indication in the display is rotating
Note: The display reverts to showing track number
or track time. While playing tracks in random
order, it cannot be set to showing remaining disc
time.
Note: You can always skip the track you are
listening to by pressing STEP >. The CD player then
continues to the next random track.
Press while the CD is playing to see
the current status in the display
MODE
then
Press to cut the random play
function in or out
MODE
16
U S I N G
T H E
T A P E
R E C O R D E R
Playing a tape
TAPE
Starts playing the tape you have
loaded into the tape recorder
MODE
REC
STORE
SOUND
LOAD
Press 1 to start playing from the
beginning of the tape
TAPE
STOP
TAPE
Press again for 2 seconds to »turn«
the tape to start playing the other
side
CD
TAPE
AUX
<STEP
STOP
STEP>
TUNE
0
1
2
3
4
5
6
7
8
9
Press to pause the tape recorder
Press to resume playing
∧
Press to raise the volume
∨
Press to lower the volume
●
RADIO
Press to switch the system to standby
Selecting another source also turns
off the tape recorder
Pressing the TAPE button starts the
tape recorder. The display and all the
buttons for operating the tape recorder
light up, and the tape you have loaded
starts playing.
If you press 1 after starting the tape
recorder, the tape is rewound to start
playing from the first track.
You may of course ”turn” the tape any
time. To do so, just press the TAPE
button once more for 2 seconds, and the
other side of the tape starts playing.
The counter position is indicated in the
display, counting from 000 whenever
you start playing a new tape, and when
the tape is ”turned”.
You can pause the tape recorder at any
point by pressing STOP. To resume
playing, just press TAPE again.
When the tape has been played through
once (A and B side), the tape recorder
stops, waiting for another instruction to
play.
If you select another source, the tape
recorder stops automatically. To switch
off the entire system, press the stand-by
button, ●.
Note: If the tape recorder is left paused or
stopped for more than 30 minutes, the system
switches to stand-by.
Note: When the tape is ”turned” to play the Bside, this is indicated in the display with a dash
before the counter indication: -000.
The other functions offered by the tape recorder
are:
● Finding specific tracks or counter positions on
the tape (see page 17).
● Noise reduction (see page 17).
● Recording on tape (see pages 18 - 19).
● Automatic tape reverse function (see page 20).
17
Finding tracks or counter positions on the tape
While the tape recorder is playing, you
can make it find the next track simply
by pressing the step button, STEP>.
Or, you can make it play the current
track again by pressing <STEP once.
Press <STEP again if you want to hear
the previous track.
Pressing the step button several times
makes the tape recorder search
forwards or backwards for as many
tracks as you specify.
You can also rewind or fast forward the
tape to a specific counter position.
To do so, you must first pause the tape
recorder by pressing STOP. While the
tape is paused, press <STEP or STEP>
to rewind or fast forward the tape.
When you reach the position you want,
press STOP to pause the tape recorder;
or press TAPE to start playing the tape
directly.
Press to step to the next track on the
tape
STEP>
Press to play the current track again
<STEP
Press <STEP twice to play the
previous track
Press to pause the tape recorder
STOP
then
Rewinds the tape
<STEP
or
Fast forwards the tape
STEP>
Press to stop winding and resume
playing
TAPE
Noise reduction
The display glows steadily when noise reduction is
ON, and blinks when it is OFF
The noise reduction system is set to ON
from the factory. If you wish to change
this setup, you may do so by pressing
the MODE button.
The display then shows the current
noise reduction state: glowing steadily
for ON, blinking for OFF.
Press MODE again to change from ON
to OFF, or vice versa.
Note: The noise reduction system is automatically
reset to ON during recording.
Press to see the current noise
reduction state
MODE
then
Press again to change from ON to
OFF, or vice versa
MODE
18
> Using the tape recorder
Instant recording on tape
REC
You can pause your recording any time
by pressing STOP. The tape recorder
automatically makes a pause of four
seconds on the tape.
Press to make the tape recorder
ready for recording
then
REC
Press again to start recording
The two displays blink alternately to indicate a
recording of, for example, a CD track number
STOP
Press to pause your recording
A pause of four seconds is inserted
on the tape
then
REC
Whenever the BeoSound Century is
playing, you can start recording directly
on the tape you have loaded. Just press
the REC button twice.
Press to resume recording
or
STOP
Then press REC again to resume
recording; or press STOP once more to
turn off the tape recorder.
Press again to stop recording
completely
When you press REC the first time, the
tape recorder gets ready for recording.
The buttons necessary for recording
light up, and the display indicates that
the system is ready by, alternately,
displaying REC and then the number of
the radio program or CD track you are
listening to.
Note: To record a CD from the beginning – start
the CD player, then open the CD clamp by
pressing LOAD, and load the CD you wish to
record. While the CD clamp is still open, press REC,
REC: The clamp closes, recording starts, and the
CD starts playing from the first track.
Note: The REC button only becomes available if
there is a tape in the tape recorder – and provided
the tape is not record protected.
Press REC again, and recording starts
immediately.
> See the next few pages for further information
about recording and the automatic tape reverse
function.
19
Recording a specific track on a CD
The system also allows you to start
recording from a specific track on a CD.
Press STOP to pause the CD player.
Then press the REC button and key in
the track number you wish to record,
using either the number buttons, 0-9, or
the step buttons, <STEP or STEP>. The
track number is indicated in the display.
When you press REC again, the tape
recorder starts recording from the
beginning of the CD track you have
chosen to start from.
Start playing the CD
CD
then
Press to pause the CD player
STOP
To pause or stop recording, just press
the STOP button once or twice.
Press to make the tape recorder
ready for recording
REC
then
Key in the track number you want,
for example track number 4
4
then
Press again to start recording from
the track you have chosen
REC
By the end of the track, pause or
stop your recording in the usual way
Cancelling your recording
If you regret your recording, simply
press the step button, <STEP, while
recording is in progress.
Recording is stopped, and the tape is
rewound approximately to the spot
where your recording started.
When you have found the exact spot,
you may either stop the tape recorder
altogether, by pressing STOP; or
resume recording, by pressing REC.
Note: We recommend that you listen-in on the
tape to find the exact spot before you resume
recording.
Note: If you wish to erase a recording, you may do
so by pressing TAPE, STOP then REC, REC. As no
source other than the tape recorder is active,
nothing is recorded on the tape.
Press, while recording is in progress,
to cancel your recording and return
approximately to the spot where it
started
<STEP
20
> Using the tape recorder
Automatic tape reverse function
REC
Make the tape recorder ready for
recording
MODE
Press to see the current automatic
tape reverse setting
The display shows the current automatic tape
reverse setting – glowing steadily for ON; blinking
for OFF
then
MODE
Press again to change from ON to
OFF, or vice versa
The BeoSound Century tape recorder
always plays through the entire tape
(A and B side) before stopping.
This automatic tape reverse function
can of course be switched off during
recording so that your recording is
only made on one side of the tape at
the time.
After pressing the REC button to start
recording, press the MODE button. A
tape reverse symbol appears in the
display to indicate the current setting –
glowing steadily for ON; blinking for
OFF.
Press MODE again to change from ON
to OFF, or vice versa.
Note: You may, of course, leave the automatic
tape reverse function ON so that your recording is
made on both sides of the tape you have loaded –
if required.
U S I N G
A U X I L I A R Y
21
S O U R C E S
Playing auxiliary sources
MODE
REC
STORE
SOUND
LOAD
Turns on the BeoSound 2000
auxiliary function
AUX
You may now start operating the
auxiliary source in the usual way
RADIO
0
CD
1
TAPE
2
AUX
<STEP
3
4
The AUX button enables you to start
playing any auxiliary source you have
connected to the BeoSound Century.
Pressing the AUX button makes the
display and the relevant buttons light
up. AU is written in the display to
indicate that you may now start
operating the auxiliary source in the
usual way.
You will then hear the sound from the
auxiliary source through the BeoSound
Century speakers.
If you select one of the sources in the
BeoSound Century instead, the AUX
function is stopped automatically. To
switch off the entire system, press the
stand-by button, ●.
STOP
5
STEP>
6
TUNE
7
8
Press to raise the volume
∧
Press to lower the volume
∨
Press to switch the system to standby
●
9
Note: The REC button enables you to record from
the auxiliary source onto the tape in the
BeoSound Century tape recorder (see page 18).
Note: The auxiliary source must be connected to
the AUX-socket on the back of the system. For
further information, please refer to the small
setting-up guide also enclosed with the BeoSound
Century.
Selecting another source on the
system also turns off the auxiliary
function
22
S O U N D
A D J U S T M E N T
Adjusting the sound levels
SOUND
then
Press repeatedly until the sound cue
you want is displayed
Then adjust the sound level to your
liking...
∧
Raises the sound levels; increases the
sound in the right speaker; or cuts
the loudness function in
∨
Lowers the sound levels; increases
the sound in the left speaker; or cuts
the loudness function out
or
The SOUND button enables you to
adjust the sound coming out of the
BeoSound Century speakers.
You can adjust the volume level and the
bass and treble levels to suit your
personal taste; you can alter the balance
between the left and right speakers to
direct the sound towards your favourite
listening position; and you can cut the
loudness function in or out, as you like.
Each time you press the SOUND
button, a cue appears in the display,
indicating which adjustment can be
made, and showing the current setting.
Use the volume buttons, ∧ and ∨, to
adjust as required.
See the next page if you want to store
your new sound levels. If you don’t, the
adjusted levels will be reset to their
original values when the system is
switched to stand-by.
The display shows the current volume level.
Volume can be adjusted in steps of two within a
range of 00 to 72.
The display shows the current balance setting –
here neutral. Balance can be adjusted within a
range of 6 to either side.
The display shows the current bass level – here
neutral. Bass can be adjusted within a range of -5
to +5.
The display shows the current treble level – here
neutral. Treble can be adjusted within a range of
-5 to +5.
The display shows the current loudness setting –
glowing steadily for ON, blinking for OFF.
23
Note: To adjust volume you need not press the
SOUND button first. Simply press the volume
buttons, ∧ and ∨.
Note: The loudness function is used to
compensate for the human ear’s lack of sensitivity
to high and low frequencies when listening to low
volume levels. It ”boosts” the high and low
frequencies so that the music becomes more
dynamic.
Note: The Beo4 remote control also enables you
to silence the BeoSound Century speakers
temporarily; and it enables you to reset your
adjusted sound levels without switching off the
system first. See how on pages 26 - 27.
Storing your new sound levels
You can store your adjusted sound
levels so that the system switches on at
e.g. a lower volume level; or e.g. so that
it always plays with more or less bass or
treble tone than stored from the factory.
All you have to do, to turn your
adjustment into a permanent setting of
the system, is press the STORE button
when you have adjusted the various
sound levels to your liking.
When you press STORE, the display
starts blinking – asking you if you want
to store the setting. Press STORE again
to confirm that you do.
Note: If the STORE button is not lit up in red, press
SOUND again before pressing STORE twice.
Note: All the current sound levels will be stored
simultaneously.
Adjust the sound levels to your
liking, then...
..press to start storing the levels
The display starts blinking
Press again to store the levels
STORE
then
STORE
24
B E O S O U N D
C E N T U R Y
D I S P L A Y S
Radio program number 3 is playing
The radio program playing has not been stored on
a program number of its own
CD track number 12 is playing (see page 15)
Tape side A is playing (counter position 234)
Tape side B is playing (counter position 234)
The source connected to the BeoSound Century
AUX-socket is playing
The STOP button has been pressed, and the CD
player or the tape recorder is paused
The system is waiting for an instruction to play
25
Small lines in the display indicate the number of
digits that can be keyed in - here another three
for a radio frequency number
A small line also appears when you key in a new
program number for a radio program or, as here,
a new track number for a CD
After pressing 1, you may key in another digit,
e.g. 2, to hear track number 12
Note: The displays shown throughout this guide
show the main principles used for illustrating the
various functions in the BeoSound Century system.
26
R E M O T E
C O N T R O L
Using the Beo4
RADIO
CD
A TAPE
LIST
GO
Press to turn on the radio
Press to start the CD player
Press to start the tape recorder
Press to display TURN to play the
other side of a tape
Press to turn the tape
Press to step through your radio
programs, tracks on a tape or a CD
or
Alternatively, key in the exact
number, using the number keys
tt
Press to fast forward a tape
ss
Press to rewind a tape
or
STOP
Although designed primarily for closeup operation, the BeoSound Century
music system can also be operated from
a distance.
The Beo4 remote control operates all
the primary functions offered by the
system such as switching on, selecting
radio programs, selecting tracks on a
CD or a tape, searching on A.tape,
pausing CD and A.tape playback,
recording onto A.tape, adjusting sound,
and switching off.
Even though remote control is available
for recording audio sources onto the
BeoSound Century A.tape recorder, we
recommend that you start and stop your
recordings via the operation panel on
BeoSound Century itself.
Press to pause the CD player or
tape recorder
then
GO
RECORD
TV
LIGHT
RADIO
SAT
AV
CD
V TAPE
RECORD
A TAPE
7
8
9
4
5
6
1
2
3
TEXT
0
MENU
Press to resume playing
Press to make the system ready for
recording
then
GO
RECORD
Press to start recording
A TAPE
Press to pause the recording
then
STOP
LIST
In order to stop recording
completely, you must press the STOP
button on the BeoSound Century
twice or switch the BeoSound
Century to stand-by…
STOP
The Beo4 remote control is available as an
optional extra for the BeoSound Century system
at your Bang & Olufsen dealer.
EXIT
27
With respect to adjusting sound, you
choose the relevant sound elements on
the Beo4 and adjust them accordingly,
see how to do it on the far right of this
page.
At any time, while the BeoSound
Century is playing, you can light the
buttons on the system briefly by
pressing the MENU button on Beo4. If
you press MENU twice, the light
remains on until you switch the system
to stand-by – or until you press MENU
again.
Note: To be able to play any auxiliary source you
have connected to the BeoSound Century AUXsocket, you must press LIST on Beo4 to find
A.AUX in the Beo4 display, then press GO.
*Note: In order to adjust sound and display
A.SETUP, you must add the function to Beo4,
please refer to the below procedure…
Press to raise the volume
Adding functions to Beo4 list of functions…
• Press and hold down the standby button on
Beo4 while you press LIST to get access to the
special Beo4 setup function and let go of both
buttons at the same time. You are now in the
setup mode.
• Then you press LIST to display ADD? and then
GO which calls up the list of cues you want and
the first cue appears on the display.
• Then you keep on pressing LIST until the cue
you want to add is displayed and then you press
GO to add it. When the cue stops blinking it has
been added.
• The addition has now been completed and you
press EXIT to leave the Beo4 setup function.
Press ∧ and ∨ simultaneously to
silence the speakers completely;
press again to recall the sound
or
Press to lower the volume
Sound adjustments…
Press LIST repeatedly to reveal
A.SETUP*
LIST
then
GO
After pressing GO, SOUND is
revealed…
then
Press GO repeatedly to access
the sound cues Volume, Balance,
Bass, Treble, or Loudness; refer to
the BeoSound Century display for
information regarding adjustment
Press ∧ or ∨ to adjust the
individual elements
GO
then
or
Repeat this procedure for the sound
elements you want to adjust…
Then, store your adjustments…
Press LIST to reveal A.SETUP
LIST
then
GO
then
Press LIST repeatedly to display
S.STORE
LIST
then
GO
Switches off
Remote control via the BeoLink 1000 terminal is also
available for the BeoSound Century.
•
28
Date purchased
Contact person
Dealer
Telephone
Address
Record your serial numbers here:
BeoSound Century
Beo4
Dear Customer,
Your needs as the user of our products are always given careful
consideration during the design and development process, and we strive to
make our products easy and comfortable to operate.
We therefore hope that you will take time to drop us a line, telling us about
your experiences with your Bang & Olufsen system. Anything which you
consider important – positive or negative – may help us in our constant
efforts to refine our products.
Thank you!
Please write to:
Customer information dept. 7240
Bang & Olufsen a/s
DK-7600 Struer
Denmark
3501856 0972
Printed in Denmark by
Bogtrykkergården a-s, Struer
BEOSOUND CENTURY 3501856 GB
BEOSOUND CENTURY 3501856 GB
BEOSOUND CENTURY 3501856 GB
BEOSOUND CENTURY 3501856 GB
BEOSOUND CENTURY 3501856 GB
BEOSOUND CENTURY 3501856 GB
BEOSOUND CENTURY 3501856 GB
BEOSOUND CENTURY 3501856 GB
BEOSOUND CENTURY 3501856 GB
BEOSOUND CENTURY 3501856 GB
BEOSOUND CENTURY 3501856 GB
BEOSOUND CENTURY 3501856 GB
BEOSOUND CENTURY 3501856 GB
BEOSOUND CENTURY 3501856 GB
BEOSOUND CENTURY 3501856 GB
BEOSOUND CENTURY 3501856 GB