1
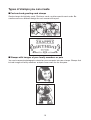
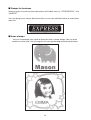
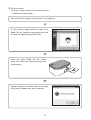
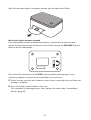
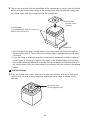
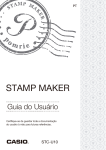
EN
STAMP MAKER
User’s Guide
Be sure to keep all user documentation
handy for future reference.
STC-U10
Unpacking
The shape of the power cord
plug varies according to
country or geographic area.
AD-A12200L
AC adaptor
Printer
Quick Guide
STC-PC10 Application CD-ROM
Ink (Color: Black/Volume: 0.17 fl.oz. (5 ml))
USB cable
Stamp Kit
Sheet holder
Stamp sheet size: 15 mm × 15 mm (3/5" × 3/5")
Stamp
Labels (2)
• Take care to avoid bending or breaking the sheet holder along its perforated line before
printing the stamp (page 29).
• For information about optionally available items, see “Optionally Available Items” (page
48).
1
Contents
Unpacking ...........................................................................................................1
Contents ..............................................................................................................2
Introduction............................................................................................ 4
Safety Precautions..............................................................................................4
Precautions during Use ......................................................................................9
About This Manual ............................................................................................10
Getting Ready ...................................................................................... 12
Printer Features ................................................................................................12
What you can do with the Printer ...................................................................... 12
Types of stamps you can create........................................................................ 13
About the CD-ROM ...........................................................................................15
Computer operating environment (for included stamp making software) ......... 15
Installing the Stamp Making Software............................................................16
Precautions when installing or uninstalling software......................................... 16
Included stamp making software and user documentation .............................. 16
Installing the software ....................................................................................... 17
Uninstalling the stamp making software ........................................................... 19
Names of Parts and Their Functions ..............................................................20
Turning Power On and Off................................................................................22
Connecting to a Computer ..............................................................................23
Creating a Stamp ................................................................................. 25
Stamp Creation Flow ........................................................................................25
Workflow............................................................................................................ 25
Printing a Stamp ..............................................................................................29
Assembling a Stamp.........................................................................................32
Assembly Flow .................................................................................................. 32
Assembling a stamp .......................................................................................... 33
2
Appendix .............................................................................................. 41
Separately Available Stamp Kits .....................................................................41
Types of separately available Stamp Kits .......................................................... 41
Using a Replacement Sheet Holder Set ............................................................ 42
User Maintenance.............................................................................................44
Troubleshooting ................................................................................................46
Specifications ...................................................................................................47
Optionally Available Items ................................................................................. 48
3
Introduction
Safety Precautions
Thank you for purchasing this product. Before using it, be sure to read the Safety
Precautions contained in this User’s Guide. Keep this manual handy in a safe place for
future reference when required.
Warning
This symbol indicates information that, if ignored or applied incorrectly, creates the
possibility of death or serious personal injury.
Caution
This symbol indicates information that, if ignored or applied incorrectly, creates the risk of
personal injury or material damage.
Examples of other markings
Indicates something you should not do. The symbol shown here indicates you
should not try to take something apart.
Indicates something you must do.
4
Warning
Smoke, abnormal odor, overheating, and other abnormalities
Do not continue to use this product while it is emitting smoke or strange odor,
or generating heat. Continued use creates the risk of fire and electric shock.
Immediately perform the following steps whenever any of the above symptoms are
present.
1. Disconnect the USB cable.
2. Unplug the AC adaptor from the wall outlet.
3. Contact your original retailer.
AC Adaptor
Misuse of the optional AC adaptor creates the risk of fire and electric shock.
Make sure you observe the following.
• Use only the specified AC adaptor.
• Use only a power source that is within the input voltage range indicated by INPUT
on the AC adaptor’s rating plate.
• Never plug the power cord into a wall outlet that is shared by other devices, or into
a shared extension cord.
AC Adaptor/USB Cable
Misuse of the AC adaptor/USB cable can cause it to become damaged, creating the
risk of fire and electric shock.
Make sure you observe the points below.
• Never place heavy objects on the AC adaptor/USB cable or subject it to direct heat.
• Never try to modify the AC adaptor/USB cable or subject it to bending.
• Do not twist or pull on the AC adaptor/USB cable cord.
• Do not wrap the cord around the adaptor.
• Should the AC adaptor/USB cable or its plug ever become damaged, contact your
original retailer.
AC Adaptor/USB Cable
• Never touch the AC adaptor/USB cable or plug while your hands are wet. Doing so
creates the risk of electric shock.
• Do not use the AC adapter/USB cable in areas where liquids might spill on them.
Water creates the risk of fire and electric shock.
• Do not place a flower vase or any other liquid container on top of the AC adapter/
USB cable or power cord. Water creates the risk of fire and electric shock.
• Do not cover the AC adaptor/USB cable with a newspaper, tablecloth, curtain,
futon, blanket, or other similar object. Doing so creates the risk of fire.
AC Adaptor
Before going out, be sure to unplug the power cord/AC adaptor from the power
outlet and put it in a place away from objects used by animals and pets. An animal or
pet chewing on the power cord/AC adaptor can cause it short, leading to the risk of
fire and electric shock.
5
Warning
Dropping and Rough Treatment
Continued use of this product after it is damaged by dropping or other rough
treatment creates the risk of fire and electric shock. Immediately perform the steps
below whenever any of the above symptoms are present.
1. Disconnect the USB cable.
2. Unplug the AC adaptor from the wall outlet.
3. Contact your original retailer.
Disassembly and Modification
Never try to take this product apart or modify it in any way. Doing so creates the risk
of electric shock, burn injury, and other personal injury.
Leave all internal inspection, maintenance, and repair up to your original retailer.
Liquids and Foreign Matter
Water, sports drinks, seawater, animal or pet urine, or foreign objects (pieces of
metal, etc.) getting into this product creates the risk of fire and electric shock.
Immediately perform the steps below whenever any of the above symptoms are
present.
1. Disconnect the USB cable.
2. Unplug the AC adaptor from the wall outlet.
3. Contact your original retailer.
Keep Away From Fire
Never throw this product into fire to dispose of it. Doing so creates the risk of
explosion, which can cause fire or personal injury.
Packaging Plastic Bag
Take care never to allow the plastic bag this product comes in to be ingested or
placed over anyone’s head. Doing so creates the risk of suffocation. Particular care is
required in households where small children are present.
6
Caution
AC Adaptor/USB Cable
Misuse of the AC adaptor/USB cable creates the risk of fire and electric shock. Make
sure you observe the points below.
• Never locate the AC adaptor/USB cable near a stove or other heating device.
• When unplugging from the wall outlet, grasp the AC adaptor/USB cable plug. Never
pull on the AC adaptor/USB cable.
• Insert the AC adaptor plug into the wall outlet as far as it will go.
• Insert the USB cable plug into the connector as far as it will go.
• Unplug the AC adaptor from the power outlet and the USB cable from the
connector before leaving this product unattended for long periods, such as when
leaving on a trip, etc.
• After you are finished using this product, unplug the AC adaptor from the power
outlet and the USB cable from the connector.
• At least once a year, unplug the power cord from the wall outlet and use a cloth or
vacuum cleaner to clean any dust build up on the prongs of the power plug and in
the area around the plug.
• Do not use detergent when cleaning the power cord (especially the plug) or the AC
adapter (especially the jack).
• Plug the AC adaptor into a power outlet that is near this product and easily
accessible so you can quickly unplug it in case of problems.
• Store the AC adaptor in a dry place.
• Do not use the power cord that comes with this product with any other device.
Doing so can lead to malfunction.
Connections
Plug only specified devices into the connectors of this product. Non-specified
devices create the risk of fire and electric shock.
Heavy Objects
Do not place heavy objects on this product
Doing so can cause this product to tip over or fall, creating the risk of personal injury.
Locations to be Avoided
Never leave this product in any of the types of locations described below. Doing so
creates the risk of fire and electric shock.
• Areas subject to large amounts of humidity or dust
• Food preparation areas or other locations where oil smoke is present
• Near heaters, on a heated carpet, in areas exposed to direct sunlight, in a closed
vehicle parked in the sun, or other areas subject to very high temperatures.
Unstable Locations
Never place this product on an unstable surface, on a high shelf, etc. Doing so can
cause this product to fall, creating the risk of personal injury.
High-temperature Precautions
The print head and the metal parts around it can become very hot. Do not touch
them. Doing so creates the risk of burn injury.
7
■ Copyrights, registered trademarks, and trademarks
The copyrights of this manual and rights related to the software all
revert to CASIO COMPUTER CO., LTD.
• Microsoft, Windows, and Windows Vista are registered trademarks or trademarks of
Microsoft Corporation of the United States in the United States and other countries.
Other company names and product names used herein are trademarks or registered
trademarks of their respective companies. Note that TM and ® marks are not used within
the text of this manual.
© 2014 CASIO COMPUTER CO., LTD.
Except as required for proper use or for creating backup copy, any reproduction of this
manual and/or the program, either in part or in their entirety, is strictly prohibited without
the express written permission of CASIO COMPUTER CO., LTD.
8
Precautions during Use
To ensure that your Printer provides you with the many years of operation for which
it is designed, be sure to note the important precautions described below.
• Do not use the Printer in any location where any of the following is present: exposure to
direct sunlight, high humidity, static electric charge, extreme temperature fluctuations,
temperature extremes.
• The operating temperature range of this Printer is: 10°C to 35°C (50°F to 95°F).
• Do not subject the Printer to strong shock or force.
• Do not allow paper clips, pins, or other metal objects to get into the sheet holder inlet
slot or outlet slot.
• Do to apply excessive bending force to the sheet holder and do not try to forcible push
it into the Printer.
• Printing will become unclear if the print head is dirty. If this happens, clean the print
head and the rubber roller as described under “User Maintenance” (page 44).
● Kit Precautions
• See page 30 of this manual for information about how to insert the sheet holder into
the Printer.
• Pressing the ink container nozzle tip against and scratching the nozzle tip against the
stamp sheet with strong force can damage the sheet.
• Do not try to take a stamp apart.
• Keep stamp kits out of the reach of small children.
• Store stamp kits in a location away from heat, humidity, and direct sunlight.
● Ink Precautions
• Use only the special separately available ink specified for use with this product. Never
use any other type of ink.
• Never put the ink bottle or its cap in your mouth. Doing so creates a choking risk.
• Should ink ever get into your mouth or eyes, immediately rinse with large amounts of
water.
• Should ink ever get onto your skin, immediately wash the affected area with soap and
water.
• You may not be able to remove ink if it gets onto your clothing or other items.
• Removing the ink bottle cap while squeezing the bottle can cause ink to suddenly eject
out of it.
• Keep ink out of the reach of small children.
• Be sure to replace the cap onto the bottle after you are finished using ink. Store ink in a
location that is not subjected to heat, high humidity, or direct sunlight.
9
About This Manual
This manual covers the topics below.
• What you need to know before using the STC-U10 Printer
• How to install the stamp making software that comes with the Printer.
For information about how to use the stamp making software, refer to STC-PC10
Application User’s Guide.
• How to connect with a computer
• How to print a stamp
• How to assemble a stamp
• The contents of this manual are subject to change without notice.
• The contents of this manual have been checked at each step along the production
process. Feel free to contact us if you notice anything that is questionable,
erroneous, etc.
• Any copying of the contents of this User’s Guide, either in part or its entirety, is
forbidden. Except for your own personal use, any other use of the contents of this
manual without the permission of CASIO COMPUTER CO., LTD. is forbidden under
copyright laws.
• CASIO COMPUTER CO., LTD. shall not be held liable for any damages or losses
suffered by you or any third party due to the use or malfunction of this product.
• CASIO COMPUTER CO., LTD. shall not be held liable for any damages or losses
caused by loss of memory contents due to malfunction or repair.
• Screen shots shown in this manual are based on the English version of Windows 7,
and examples assume that “English” was selected as the display language during
installation. Screens produced by other operating systems or when another display
language is selected may be different from the screen shots shown here.
10
■ Terms used in this manual
This term:
Means this in this manual:
print
Outputting a stamp sheet on a stamp sheet printer
Printer
CASIO STC-U10 Stamp Maker printer
STC-PC10 Application
Computer application for laying out stamp face contents
for output on a Stamp Maker printer.
layout
Arranging text and/or graphics with the STC-PC10
application for output on a Stamp Maker printer.
stamp face
The surface of a stamp that meets the paper (or other
medium) and prints the stamp image.
11
Getting Ready
Printer Features
What you can do with the Printer
Your Printer provides you with the tools you need to create your own personalized
stamps. After you use the stamp making software that comes with the Printer to layout
the stamp on your computer, you can use the Printer to print the stamp (page 29). Then
simply assemble the stamp and you are ready to go!
The application that comes with the printer includes a variety of different stamp faces.
You can create stamp designs that contain images you have stored in your computer
memory, and insert names or other text.
• Stamp Kits are separately available to support creation of a variety of different stamp
sizes (page 48).
• The stamps you create can be used on certain types of paper as described below.
● Supported paper types
• Wood free paper, letter paper, envelopes, Kent paper, postcards, corrugated cardboard,
and other paper absorbs ink.
● Non-supported paper types
• Tracing paper, varnished paper, vinyl coated paper, and other paper that does not
absorb ink.
12
Types of stamps you can create
■ Postcard and greeting card stamps
Create stamps for birthday cards, Christmas cards, or other special event cards. Be
creative and use a different design for each season of the year.
■ Stamps with images of your family members or pets
You can incorporate photographs stored on your computer into your stamps. Stamps that
include images of family members and pets mean more fun for everyone.
13
■ Stamps for business
Create stamps to mark business documents with labels such as “CONFIDENTIAL” and
“URGENT”.
You can design your stamps be businesslike, or you can add illustrations to make them
more fun.
■ Name stamps
You can incorporate your name or other text into a stamp design. You can even
combine a name with a facial image for an even greater degree of personalization.
14
About the CD-ROM
Computer operating environment (for included stamp
making software)
Operating System:
Computer:
Microsoft Windows 8, Windows 7, Windows Vista, Windows XP SP3
PC/AT compatible computer that complies with the following
conditions.
• One of the above operating system pre-installed
• CPU recommended for the operating system being used (at least
1 GHz).
• USB port built in as standard
• CD-ROM drive, keyboard
Memory
At least 1 GB, as recommended for operating system being used.
Hard disk
At least 1 GB of free space available
Display
At least 1024 × 768 pixels of resolution
Pointing device
Mouse or other pointing device
• Other items should conform to the recommendations for the operating system being
used.
• Certain device configurations may make normal operation impossible.
• Operation under Windows XP 64bit versions is not supported.
• Operation under an operating system that has been upgraded or modified from its preinstalled state is not guaranteed.
Warning
The provided disk is a CD-ROM disk. Do not play it on a CD player.
Doing so will produce sound that creates the risk of hearing damage and damage
to speakers.
15
Installing the Stamp Making Software
The example stamp making software installation shown here uses Windows 7.
Refer to the user documentation that came with your computer or Windows package for
details about basic Windows operations.
Precautions when installing or uninstalling software
• If your computer has a previous version of the stamp making software installed, you
need to uninstall it before installing a newer version. Go to your computer’s Control
Panel, and then perform the required operation (such as “Uninstall a program”) to
uninstall the previous version.
• To install or uninstall a program, you will need to log in using a pre-configured
administrator account or an account with administrator privileges.
Included stamp making software and user documentation
• STC-U10 Printer User’s Guide (This Manual)
• STAMP MAKER STC-PC10 Application
• STC-PC10 Application User’s Guide
16
Installing the software
Important!
• Be sure to install the software on your computer before connecting the Printer. You may
experience problems with operation if you install the software after connecting.
• Exit all other programs currently running on your computer before installing the
software. Installation may not be performed correctly if there is another program
running.
The examples in this manual assume that D: drive is the CD drive.
1. Start up Windows and place the CD-ROM into the computer’s CD drive.
• Windows 8, Windows 7, Windows Vista
An AutoPlay menu will appear at this time.
Select Run setup.exe under “Install or run
program from your media” or “Install or
run program”. When the user account
control dialog box appears, click Yes or
Continue.
This displays a screen like the one shown nearby.
• Windows XP
Normally, this should automatically display a screen like the one shown nearby.
• On some computers, the above screen may not appear automatically. If this
happens, press Win+R on your computer keyboard. On the Run… dialog box that
appears, enter D:\setup.exe and then click OK.
17
2. Select the installation language and then click OK.
This starts the installation process. Follow the instructions that appear on the display.
• If your computer is running Windows 8, Windows 7, or Windows Vista, the message
shown below will appear during installation. Click Install to proceed with the
installation.
• If your computer is running Windows XP, the message shown below may appear
during installation. Click Continue Anyway to proceed with the installation.
3. After all installation is complete, click Finish on the install menu.
18
4. If a restart message appears, click Yes (Y).
This restarts your computer.
• To cancel installation, click Cancel.
• Attempting installation while an anti-virus program is running may cause the antivirus program to display an error or warning message on your computer. If this
happens, perform the steps below.
1. After installation is complete, uninstall the stamp making software.
2. Exit the anti-virus program and all other programs that are currently running on
your computer.
3. Re-install the stamp making software.
4. After stamp making software installation is complete, restart the programs you
exited in step 2 of this procedure.
Check to make sure that the stamp making software is installed correctly.
• STC-PC10 Application: Installing this stamp making software on your computer
puts a shortcut icon on your computer’s desktop.
• USB driver: On your Windows Start menu, right-click Computer and then select
Properties on the menu that appears.
On the left side of the screen, click Device Manager. If the USB driver is
installed, you will see CASIO STC Device in Universal Serial Bus Controllers
Uninstalling the stamp making software
On the Windows Control Panel–Add or Remove Programs screen, remove STC-PC10.
19
Names of Parts and Their Functions
Power button
Lamp (LED)
Sheet holder outlet
AC adaptor connection terminal
Connect the supplied AC adaptor.
(Back of Printer)
USB port
Plug in a USB cable when
connecting to a computer.
Sheet holder inlet slot
20
(Bottom of Printer)
RELEASE
PRINT
Release lever
Slide to the RELEASE side when clearing jams or
when cleaning the Printer.
Important!
Except when clearing jams or cleaning, always leave the release lever in the PRINT
position.
21
Turning Power On and Off
Use the procedures below to turn power on or off.
■ To turn on power
Press the power button (page 20) on the top of the Printer. The lamp will light orange to
indicate that power is on.
■ To turn off power
Press the power button (page 20) on the top of the Printer. The lamp will go out to
indicate that power is off.
• You need to connect the supplied AC adaptor before turning on power. For details
about how to do this, refer to steps 2, 3, and 4 under “Connecting to a Computer”
(page 23).
Auto Power Off
An Auto Power Off feature will turn off power automatically if you do not perform
any operation for about 30 minutes.
22
Connecting to a Computer
Important!
Be sure to install the stamp making software on your computer before connecting the
Printer to it.
■ To connect to a computer
1. Start up Windows and then connect the
supplied USB cable to a USB port on the
computer.
1
Important!
Be sure you plug the cable directly into the computer’s USB port. Proper operation
is not guaranteed when the cable is connected to a USB port of another device.
Compatibility issues may result in the Printer not being recognized by your computer
when you connect to one of its USB ports. If this happens, try changing to a different
computer USB port.
2. Plug the AC adaptor plug into the AC
adaptor connection terminal of the Printer.
3. Connect the power cord to the AC adaptor.
4. Plug the AC adaptor into a household
4
2
power outlet.
3
Important!
• Use only the AC adaptor that comes with the Printer.
• Do not use the AC adaptor that comes with the Printer with any other device.
23
5. Connect the USB cable to the Printer’s
USB port.
This will display a USB driver install
wizard on your computer.
5
Important!
When connecting for the first time, remove the label from the Printer’s USB port.
6. A USB driver is required for proper data communication between your computer and
Printer. Follow the instructions that appear on the screen to install.
• If your computer is running Windows XP Service Pack3 (SP3), a message will appear
during installation. Select “No, not this time” and then click Next > to proceed with
the installation.
• If your computer is running Windows XP, the warning message will appear during
installation. Click Continue Anyway to proceed with the installation.
■ To disconnect from a computer
1. Disconnect the USB cable from your computer.
2. Disconnect the AC adaptor from the power outlet and the Printer.
Important!
• Do not disconnect the AC adaptor or USB cable from the Printer while stamp
printing is in progress. Doing so can lead to malfunction.
• Do not touch the AC adaptor plugs and USB cable plugs while a data
communication operation is in progress. Static electricity and other problems can
cause a break in data communication.
24
Creating a Stamp
Stamp Creation Flow
This section explains how to create a stamp design on a computer and then create the
stamp using a Stamp Kit.
[Example Stamp]
Workflow
1. Get ready.
Perform the tasks below to get ready.
Install the software required for designing a stamp
on your computer (page 16).
Connect the Printer to your computer (page 23).
25
2. Design the stamp on your computer.
Here we will use one of the stamp designs built into the stamp maker application.
For information about how to use the stamp making software, refer to the STC-PC10
Application’s User’s Guide.
Start up the stamp maker application.
Select one of the built-in stamp designs. The
Application comes with a number of different
preset stamp designs built-in.
Check the appearance of the stamp.
• You can lay out a stamp using an image you have stored in your computer memory.
26
3. Print the stamp.
Printing a stamp creates the face of the stamp.
• Prepare the sheet holder.
Press the Printer’s power button to turn it on (page 20).
On the stamp making software screen, click
Print. This will send the stamp design you laid
out with the Application to the Printer.
Insert the sheet holder into the Printer
(page 30). Note that stamp printing starts
automatically.
Stamp printing is complete when a message
telling you so appears on your computer.
27
4. Assemble the stamp.
Start assembly of the stamp after stamp printing is complete.
• A Printer stamp is made up of the parts shown below.
Stamp Component Parts
Label
Grip
(Double-sided
tape)
Stamp base
Stamp sheet
Cap
• Refer to page 32 for details about how to assemble a stamp.
Your stamp is complete after you assemble its component parts.
28
Printing a Stamp
Printing a stamp creates the face of the stamp.
A sheet holder is required to print a stamp.
Sheet holder
• Refer to page 25 to see the work flow for stamp printing.
Important!
• Do not use a sheet holder that is bent or otherwise deformed. Doing so can cause
malfunction.
• Use a sheet holder that is the same size as the stamp design you created.
• Do not remove the stamp sheet from the sheet holder before the stamp is printed.
• Take care to avoid damaging the stamp sheet and its transparent cover.
• Keep the surface of the stamp sheet clear of dirt and dust.
• Do not reuse a sheet holder that was already used for printing.
1. Press the Printer’s power button to turn it on.
2. On the stamp making software screen, click Print.
This will cause a sheet printing confirmation message to appear on your computer.
3. On the stamp making software screen, click OK.
A message will appear on your computer prompting you to insert the sheet holder into
the Printer.
29
4. Insert the sheet holder into the Printer.
Insert the sheet holder into the inlet slot on the back of the Printer, and lightly press it
in as far as it will go. The sheet holder will be pulled into the slot and stamp printing
will start automatically.
• Wait until the sheet holder insert prompt appears on your computer before inserting
the sheet holder. Inserting the sheet holder before the prompt appears may cause an
error and make printing impossible.
Sheet holder inlet slot
Cutout
Stamp sheet upwards
Arrow
To sheet holder inlet slot
(Back of Printer)
Sheet holder
Cutout should be to the right when
inserting into the sheet holder inlet slot.
Insert the sheet holder in the direction indicated
by the arrow printed on the sheet holder.
Important!
• Take care to orient the sheet holder correctly when you insert it into the slot.
• Do not try to force the sheet holder into the slot. Doing so can cause malfunction.
• Make sure the stamp sheet is the correct size. Inserting a holder for a sheet that is a
different size from the stamp design you created will cause an error.
• Do not touch or pull the sheet holder while stamp printing is in progress. Doing so
can cause malfunction.
• Make sure that nothing is blocking the front of the Printer while it is in operation.
Anything coming into contact with a sheet holder as it is being ejected from the
outlet slot can cause an error or malfunction.
• The Printer lamp flashes green while stamp printing is in progress.
30
Wait until the sheet holder is completely ejected from the front of the Printer.
● If a sheet holder becomes jammed
If the sheet holder catches on something inside or is not ejected correctly for some
reason, slide the release lever on the back of the Printer towards the RELEASE side and
then pull out the sheet holder.
RELEASE
PRINT
Next, return the release lever to the PRINT side and perform printing again. If you
experience problems using the same sheet holder, use a new one.
5. Check to make sure that your computer screen shows a message to let you know that
printing is complete.
6. Press the Printer’s power button to turn it off.
This completes the printing process. Next, perform the steps under “Assembling a
Stamp” (page 32).
31
Assembling a Stamp
This section explains how to assemble the component parts into a finished stamp.
Assembly Flow
A stamp consists of a number of different component parts. Become familiar with each of
the steps below before actually trying to assemble a stamp.
1 Remove the stamp sheet from the sheet holder.
2 Affix the stamp sheet to the stamp base.
3 Ink the stamp.
4 Affix the label to the grip.
5 Attach the protective cap.
32
Assembling a stamp
1 Remove the stamp sheet from the sheet holder.
1. As shown in the illustration, bend the sheet holder of the printed stamp sheet along its
perforated line.
Sheet holder
Stamp sheet
Perforated line (for removing the stamp sheet)
Break the transparent cover along the perforated line and remove the stamp sheet.
2. Carefully remove the stamp sheet.
Stamp sheet printed surface
When you remove the stamp sheet from the sheet holder, the transparent cover
attached to the sheet holder may adhere to the stamp sheet. If this happens, carefully
remove the transparent cover, taking care not to damage the stamp sheet.
33
Important!
Do not cut the stamp sheet with scissors, a cutter, or any other implement, and take care
not to scratch the printed surface.
2 Affix the stamp sheet to the stamp base.
1. Remove the cap.
Cap
2. Remove the protective paper from the stamp base.
Protective paper
Stamp base
34
3. Taking care to ensure that the orientation of the stamp base is correct (see illustration
below) and that the printed surface of the stamp sheet is facing upwards (away from
the stamp base), affix the stamp sheet to the stamp base.
Stamp sheet
(Printed surface
upwards.)
Rounded edges
The rounded edges indicate the top and
bottom of the stamp face.
Top/bottom
• Note that once you affix a stamp sheet to the stamp base you will not be able to
remove and re-affix it. Take care that the stamp sheet is positioned correctly when
you affix it.
• If you are using an oblong stamp that comes with a separately available stamp kit,
certain types of stamp face layouts may result in the rounded edges of the stamp
base to be positioned differently from the normal top-bottom orientation relative to
the stamp layout. Affix the stamp sheet in accordance with the shape of the oblong
stamp.
3 Ink the stamp.
1. Place the stamp base, which now has a stamp sheet affixed, onto a flat, level work
surface, with the side of the stamp base where the stamp sheet is affixed facing
upwards.
Area to be inked
(Text and graphic area)
35
2. Twist the cap of an ink bottle and remove the cap.
3. Apply ink on top of the lines you want to ink.
Cover the text and graphic lines with ink.
Stamp sheet printed surface
• Ink is separately available in a selection of various colors (page 48). You can also
use multiple colors on a single stamp. If you do, however, be sure to provide space
between different text and illustration items to ensure that two different colors don’t
become mixed together. Color may run over time.
This process also is not suitable fine coloring nuances.
36
Example:
Blue text
Red heart
• Be sure to replace the ink bottle cover after you are finished inking.
4. Wait for a while (about five to ten minutes, depending on the stamp face) to give the
ink a chance to permeate.
Wait until all of the ink on the stamp sheet is absorbed.
• Ink still has not permeated on parts of the stamp sheet that are black.
37
5. Try out the stamp.
Use an old, unneeded piece of paper to stamp about ten times.
Check the stamped images to make sure they are
clear, without any excess ink seepage.
4 Affix the label to the grip.
1. Stamp the label.
Your stamp
Label
Press down carefully, taking care to ensure that the pattern does not slip out of place.
38
2. After the ink dries, remove the protective paper from the label.
Protective paper
3. Position the label correctly as you affix it to the back of the grip.
Grip
Affix the label so its orientation is the same as the stamp face.
• You can also affix a label to the cap, if you want.
39
You are now ready to use your stamp.
● Stamping precautions
• For information about the types of paper that can be used with the stamp, refer to
“Supported paper types” (page 12).
• Stamping works best on smoother surfaces. You may not be satisfied with the
results if you stamp a surface that is uneven or rough.
• Stamping works best on paper that is not glossy and takes ink easily. Some
materials may not accept stamped images well.
• For better stamping results, place paper on a firm surfaces that gives slightly, such
as a rubber sheet, thin magazine, notebook, etc.
5 Attach the protective cap.
Attach the cap whenever storing the stamp.
Cap
• If the stamp starts to dry out and the stamped image becomes dim, perform the
procedure under “Ink the stamp” (page 35) to re-ink it.
40
Appendix
Separately Available Stamp Kits
Optionally available Stamp Kits are available with a selection of different stamp sizes
(page 48).
Types of separately available Stamp Kits
■ Stamp Kit
A Stamp Kit contains a sheet holder, a stamp (stamp base, grip, and cap), and labels.
Sheet holder
Stamp
(stamp base, grip, cap)
Labels (2)
■ Replacement Sheet Holder Set
A Replacement Sheet Holder Set includes two sheet holders, stamp bases, and caps,
and four labels.
Sheet holders (2)
Stamp bases (2)
Caps (2)
Labels (4)
Important!
Note that the Replacement Sheet Holder Set does not include a stamp grip. Use it in
combination with stamp grips you have on hand.
For details see “Using a Replacement Sheet Holder Set” below.
41
Using a Replacement Sheet Holder Set
Use the procedure below when you want to replace your current stamp base with a
different one.
You can replace the stamp base without removing the cap.
1. Remove the current stamp base.
Remove the current stamp base (with cap attached) from your stamp.
Cap
Stamp base
Slide the stamp base (with cap
attached) to the side to remove it.
Grip
2. Attach a new stamp base.
Attach a new separately available stamp base (with cover attached) to the grip.
Bottom of stamp base
With the components oriented in
accordance with the arrows, turn
over the stamp base.
42
Insert into the groove on the stamp base.
k!
lic
C
Grip
Stamp base
Press until the stamp base clicks
securely into place.
43
User Maintenance
A dirty print head or rubber roller will make proper printing impossible. Perform the
procedure below to clean the print head and the rubber roller as required.
Important!
• Use a cotton swab or some other soft object to clean the print head and the rubber
roller. Use of a thin cotton swab is recommended.
• The print head will be hot after performing a print operation. Be sure to allow sufficient
time for it to cool before performing cleaning work.
1. On the bottom of the Printer, slide the release lever to the RELEASE side.
RELEASE
PRINT
44
2. Insert a cotton swab moistened with alcohol into the sheet holder outlet slot, and wipe
the surfaces of the print head and the rubber roller.
• Insert the cotton swab by picking up the Printer and looking into the sheet holder
outlet slot from below so the interior becomes visible.
(Front of Printer)
Rubber roller
Also wipe the upper area
(head) inside the sheet
holder outlet slot.
Cotton swab
Take particular care when wiping the points where the print head and rubber roller
come into contact.
3. On the bottom of the Printer, slide the release lever back to the PRINT side.
• Printing is not possible unless the release lever is in the PRINT position (page 31).
Cleaning the exterior of the Printer
Use a soft cloth moistened with water to clean the exterior of the Printer. Be sure
to completely wring out all excess liquid from the cloth before wiping. Never use
benzene, alcohol, thinner, or other volatile agents, which can damage the Printer.
45
Troubleshooting
This section explains reference information that comes in handy when you experience
problems with Printer operation. If, for any reason, you cannot find the solution to your
problem here, contact your original retailer or nearest authorized CASIO service center.
Symptom
Cause and Required Action
● Printing is unclear.
● Cannot produce goodquality printing.
• Dirt, dust, or other foreign matter on the print head and/
or the rubber roller.
➜ Clean the print head and roller.
● I can’t print.
● Power turns off during
printing.
• You are using the wrong type of AC adaptor.
➜ Use the AC adaptor that came with the product.
● I can’t establish a
USB connection with a
computer.
• The print head is very hot.
➜ Wait for awhile and then try printing again.
• The message "Printing failed. Check the sheet holder"
appears and printing is not performed.
This can be due to any of the causes below.
a) The inserted sheet holder size is different from stamp
face size.
b) The orientation (front-back, top-bottom) of the
inserted sheet holder is not correct.
c) The sheet holder was not inserted far enough to
engage the transport mechanism.
d) Trying to insert a sheet holder before creating a stamp
sheet.
➜ Use the following steps to correct the problem.
1. Pull out the sheet holder.
• If the sheet holder is jammed, shift the release lever
on the bottom of the Printer to the RELEASE side and
then pull out the sheet holder. After removing the sheet
holder, return the release lever to the PRINT side.
2. Referring to "Printing a stamp" (page 29), create the
stamp sheet again.
• The USB cable is not connected securely.
➜ Make sure that the USB cable is connected correctly. If
you still can’t establish a connection, try disconnecting
and re-connecting the cable.
• The USB driver is not installed on the computer.
➜ Install the USB driver on the computer. If the above
steps don’t solve the problem, try connecting the USB
cable to a different USB port on the computer.
Use the USB cable that comes with the Printer.
46
Symptom
Cause and Required Action
● Stamped images are
not clear.
• Stamping certain types of paper may result in unclear
images.
➜ Refer to “Supported paper types” (page 12).
● A sheet holder is
jammed and won’t
come out.
Referring to “If a sheet holder becomes jammed” (page
31), pull out the sheet holder.
Next, return the release lever to the PRINT side and
perform printing again. If you experience problems using
the same sheet holder, use a new one.
Important!
Note the following while printing is in progress.
• Do not allow the sheet holder outlet slot to become
covered.
• Do not touch the sheet holder.
• Do not change the release lever position.
• Do not disconnect or unplug the AC adaptor.
Specifications
Model:
Printing
Printing method:
STC-U10
Fusion melting by thermal head
• Stamp type: Permeation-type stamp
Printing resolution:
200 dpi
Maximum printing width: Approximately 45 mm (13/4")
Maximum printing length: Approximately 90 mm (31/2")
Supported types:
15 mm × 15 mm (3/5" × 3/5"), 15 mm × 30mm (3/5" × 11/6"),
15 mm × 60 mm (3/5" × 23/8"), 30 mm × 30 mm (11/6" × 11/6"),
30 mm × 60 mm (11/6" × 23/8"), 45 mm × 45 mm (13/4" × 13/4"),
45 mm × 90 mm (13/4" × 31/2")
Power Supply, Other
Operation power supply: AC adaptor
AD-A12200L (supplied)
Rated voltage:
12V DC
Rated consumption current: 1 A (12 W)
Dimensions:
82 mm (W) × 123 mm (D) × 59.5 mm (H) (31/4" × 413/16" × 25/16")
(Including rubber feet.)
Weight:
Approximately 305 g (10.76 oz.)
Operating temperature:
10°C to 35°C (50°F to 95°F)
47
Optionally Available Items
● Stamp Kits
Model
STK-1515
Size
15 mm × 15 mm (3/5" × 3/5")
STK-1530
15 mm × 30 mm (3/5" × 11/6")
STK-1560
15 mm × 60 mm (3/5" × 23/8")
STK-3030
30 mm × 30 mm (11/6" × 11/6")
STK-3060
30 mm × 60 mm (11/6" × 23/8")
STK-4545
45 mm × 45 mm (13/4" × 13/4")
STK-4590
45 mm × 90 mm (13/4" × 31/2")
● Replacement Sheet Holder Sets
Model
STH-1515
Size
15 mm × 15 mm (3/5" × 3/5")
STH-1530
15 mm × 30 mm (3/5" × 11/6")
STH-1560
15 mm × 60 mm (3/5" × 23/8")
STH-3030
30 mm × 30 mm (11/6" × 11/6")
STH-3060
30 mm × 60 mm (11/6" × 23/8")
STH-4545
45 mm × 45 mm (13/4" × 13/4")
STH-4590
45 mm × 90 mm (13/4" × 31/2")
• For details about the content of a Stamp Kit and Replacement Sheet Holder Set, refer
to page 41.
● Inks
Model
Color (volume)
STQ-5PBK
Black (0.17 fl.oz. (5 ml))
STQ-5PRD
Red (0.17 fl.oz. (5 ml))
STQ-5PBU
Blue (0.17 fl.oz. (5 ml))
STQ-5PGN
Green (0.17 fl.oz. (5 ml))
STQ-5PBN
Brown (0.17 fl.oz. (5 ml))
STQ-5PPK
Pink (0.17 fl.oz. (5 ml))
STQ-5PPE
Purple (0.17 fl.oz. (5 ml))
STQ-5PYW
Yellow (0.17 fl.oz. (5 ml))
• Certain items may not be available.
• Details about optionally available items are subject to change without notice.
48
CASIO COMPUTER CO., LTD.
6-2, Hon-machi 1-chome
Shibuya-ku, Tokyo 151-8543, Japan
MO1406-A
© 2014 CASIO COMPUTER CO., LTD.