1
CYPRESS GRILL
CERAMIC CHARCOAL GRILL & CART
For Model #500-535 Ceramic Grill
WARNING FOR YOUR SAFETY:
For Outdoor Use Only (outside and 5-Ft. away from any structural enclosure)
DANGER FOR YOUR SAFETY:
1. This unit is HEAVY. Do not lift grill or assemble without help.
2. Some parts may contain sharp edges. Wear protective gloves if necessary.
3. Improper installation, adjustment, alteration, service or maintenance can cause injury or property damage.
4. Read the installation, operation, and maintenance instructions before assembling or servicing this equipment.
5. Failure to follow these instructions could result in fire or explosion, which could cause property damage,
personal injury, or death.
DANGER CARBON MONOXIDE HAZARD
Burning charcoal inside can kill you. It gives off carbon monoxide, which has no odor.
NEVER burn charcoal inside homes, vehicles or tents.
For Questions and Information call us at: 1-800-864-6194
Monday - Friday (8:00am - 5:00pm CST)
B a r b o u r I n t e r n a t i o n a l , I n c . • P. O . B o x 1 8 3 9 • B r a n d o n , M S 3 9 0 4 3
©2010 Barbour International, Inc.
www.thebayou.com
GENERAL SAFETY
SAFETY SYMBOLS will alert you to important SAFETY Information.
Signal words DANGER, WARNING, or CAUTION will be used with the SAFETY SYMBOL.
DANGER will identify the most serious hazard.
Please carefully read and understand this manual before using this product.
DANGER
• Sober adult operation ONLY! The use of alcohol, prescription or nonprescription drugs may impair
your ability to properly assemble or safely operate this grill.
• This grill is designed for OUTDOOR USE ONLY and should NOT be used in a building, garage,
or any other enclosed area.
• This grill is NOT intended for and should never be used for indoor cooking or as a heater.
Toxic carbon monoxide fumes can accumulate and cause asphyxiation and death.
• Do not use grill within 5 feet (1.52 m) of any combustible material. Combustible materials include,
but are not limited to wood or treated wood decks, patios, porches, or roof awnings.
• Never add charcoal starter fluid or charcoal impregnated with charcoal starter fluid to hot or
warm charcoal.
• Do not use gasoline, alcohol or other highly volatile fluids to ignite charcoal.
• Do not use in an explosive atmosphere. Keep grill area clear and free of any combustible materials
such as household chemicals, paint, gasoline and other flammable vapors and liquids.
• Do not store or use gasoline or other flammable liquids or vapors within 25 feet (7.62 m) of
this appliance.
• Do not use grill in high winds. Position grill so wind cannot carry embers to combustible surfaces.
• Never lean over grill when lighting. Do not wear clothing with loose flowing sleeves while lighting
or using the grill.
• Always open grill lid carefully and slowly as heat and steam trapped within grill can severely
burn you. Read about the 2-STEP lid opening process on page 9.
• Do not leave infants, children, or pets unattended near a hot grill, during and after use.
• This is an ATTENDED appliance. DO NOT leave this grill unattended while heating charcoal,
cooking food or when hot after use. Grill can remain at high temperatures long after cooking
has ended.
• Do NOT attempt to move a hot grill when in use. Allow the grill to cool before moving or storing.
• Do not remove the ashes until all charcoal is completely and fully extinguished and cool.
Live hot briquets and coals can create a fire and burn hazard.
• Always wear protective gloves and shoes when adding charcoal to retain desired heat level.
1
WARNING
• Use ONLY on level, flat, stable non-combustible surfaces like concrete. Do NOT use this grill on
any surface that will burn or melt like wood, asphalt, vinyl, or plastic.
• To prevent grill from tipping over, do not roll over uneven surfaces.
• Lift up locking tabs on caster wheels before moving the grill. After moving grill always lock down
caster wheels by pushing the locking tabs down.
• Always put charcoal on top of the charcoal grate and not directly into the narrow bottom of
Fire Bowl.
• Check to make sure the air vents are free of debris and ash before and while you are using
the grill.
• Instant light charcoal can burn at very high temperatures during initial startup. When lighting, make
sure lid is always open until charcoal turns to hot coals.
• To control flare-ups, close the lid on the grill. Do not use water.
• Do not use the grill unless both grill and cart are completely assembled and all parts are securely
fastened and tightened.
• Never touch the cooking food or charcoal grate or the grill to see if they are hot. Do not touch
metal parts of grill until it has completely cooled (about 90 min. after grilling) to avoid burns, unless
you are wearing protective gear (pot holders, gloves, BBQ mittens, etc.).
• Use barbecue mitts or hot pads to protect hands while cooking or adjusting the vents.
• Use proper barbecuing tools with long, heat-resistant handles.
• This grill is NOT intended to be installed in or on recreational vehicles and/or boats.
• Keep all electrical cords away from a hot grill during use. Handle and store hot electric starters
carefully.
• To extinguish the coals, close the lid onto the base then completely close both vents top and bottom.
Do not use water to extinguish coals because it will create a smoke cloud and a spattering mess.
CAUTION
• Do not use lighter fluids or any charcoal starter fluid. The chemical smell can be absorbed into
the ceramic inserts and the odor can transfer into the food.
• When using the water pan for smoking or indirect cooking, be certain that water does not completely
evaporate. The water pan can melt if all water evaporates.
• This grill is NOT intended for use in a commercial setting.
• Do not alter grill in any manner. Use only Barbour International, Inc. factory authorized parts.
The use of any part that is not factory authorized can be dangerous. This will also void your
warranty. Contact 800-864-6194.
• This grill should be thoroughly cleaned and inspected on a regular basis.
• Do not use this grill without reading "Operating Instructions" in this manual.
• Always use a meat thermometer to ensure food is cooked to a safe temperature.
FAILURE TO HEED THESE DANGER, WARNING, AND CAUTION STATEMENTS MAY CAUSE SERIOUS
BODILY INJURY OR DEATH, OR A FIRE OR EXPLOSION RESULTING IN DAMAGE TO PROPERTY.
2
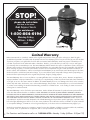
STOP!
If you have a missing or damaged part,
please do not return
this item to the store.
Call
Bayou Classic
for assistance:
1-800-864-6194
Monday-Friday
8:00am - 5:00pm
CST
Limited Warranty
Barbour International, Inc. ("Vendor") warrants to the original retail purchaser of this grill, and no other person, that if this grill is
assembled and operated in accordance with the printed instructions accompanying it, then for a period of five (5) years from the date
of purchase, all parts in such grill shall be free from defects in material and workmanship. Vendor may require reasonable proof of
your date of purchase from an authorized retailer or distributor. Therefore, you should retain your sales slip or invoice and register
your warranty online at www.thebayou.com. This Limited Warranty shall be limited to the repair or replacement of parts, which prove
defective under normal use and service and which Vendor shall determine in its reasonable discretion upon examination to be defective.
Before returning any parts, you should contact Vendor's Customer Service Department using the contact information listed below. If
Vendor confirms, after examination, a defect covered by this Limited Warranty in any returned part, and if Vendor approves the claim,
Vendor will replace such defective part without charge. If you return defective parts, transportation charges must be prepaid by you.
Vendor will return replacement parts to the original retail purchaser, freight or postage prepaid.
This Limited Warranty does not cover any failures or operating difficulties due to accident, abuse, misuse, alteration, misapplication,
improper installation or improper maintenance or service by you or any third party, or failure to perform normal and routine maintenance
on the grill, as set out in this owner's manual. In addition, the Limited Warranty does not cover damage to the finish, such as scratches,
surface chips and cracks, discoloration, rust or other weather damage, after purchase. This warranty does not cover cracks that form
on ceramic inserts including, Fire Bowl and Insulation Ring, as that does not inhibit function. Such cracking of ceramic inserts and
surface glaze is considered normal.
This Limited Warranty is in lieu of all other express warranties. Vendor disclaims all warranties for products that are purchased from
sellers other that authorized retailers or distributors. AFTER THE PERIOD OF THE FIVE (5)-YEARS EXPRESS WARRANTY, VENDOR
DISCLAIMS ANY AND ALL IMPLIED WARRANTIES, INCLUDING WITHOUT LIMITATION THE IMPLIED WARRANTIES OF MERCHANTABILITY
AND FITNESS FOR A PARTICULAR PURPOSE. FURTHER, VENDOR SHALL HAVE NO LIABILITY WHATSOEVER TO PURCHASER OR
ANY THIRD PARTY FOR ANY SPECIAL, INDIRECT, PUNITIVE, INCIDENTAL, OR CONSEQUENTIAL DAMAGES. Vendor assumes no
responsibility for any defects caused by third parties. This Limited Warranty gives the purchaser specific legal rights; a purchaser may
have other rights depending upon where he or she lives. Some jurisdictions do not allow the exclusion or limitation of special, incidental
or consequential damages, or limitations on how long a warranty lasts, so the above exclusion and limitations may apply to you.
Vendor does not authorize any person or company to assume for it any other obligation or liability in connection with the sale, installation,
use, removal, return, or replacement of its equipment, and no such representations are binding on Vendor.
3
For Questions and Information call us at: 1-800-864-6194 • Monday - Friday (8:00am - 5:00pm CST)
Parts List for #500-535 Cypress Grill
NOTICE: Please check Parts List to make sure all components are present before assembly.
1 - Thermometer
1 - Fire Bowl
1 - Lid Lift Mechanism
2 - Fire Bowl
Stabilizers
1 - Grill Body
1 - Grill Lid & Vent Cap
1 - Charcoal Plate
1 - Insulation Ring
1 - Reversible Grate
1 - Ash Rake
1 - Single Grate
1 - Water Pan
1 - Extra Felt Liner
1 - Grill Cover
6 - Utensil Hooks
1 - Grill Support Base
4 - Locking Casters
2 - Side Shelves
4 - Grill Support Struts
1 - Bottom Tray
4 - Cart Legs
Hardware List
NOTICE: Please check Hardware List to make sure all components are present before assembly.
4 - 34 Nuts
(Attached to Caster)
20 - Carriage Bolts
20 -
Nuts
4-
Locking Nuts
(Attached to Band)
4
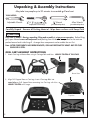
Unpacking & Assembly Instructions
May take two people up to 30 minutes to assemble grill and cart.
TOOLS NEEDED:
Adjustable Wrench
&
3
4
( helpful, but not necessary )
Wrench
( provided with product )
Allen Wrench
( provided with product )
Carefully Unpack - Remove all Packing Material - Wipe down surfaces with Damp Cloth
CAUTION
THIS GRILL IS HEAVY! Moving, unpacking, lifting and assembly is a two person operation. Before lifting
grill, open lid and remove all components and packing from inside. The components for the cart are
packed around and inside the grill. Arrange those components and assemble the cart first.
Note: AFTER COMPONENTS HAVE BEEN REMOVED, GRILL MAY BECOME TOP HEAVY AND TIP OVER
WHEN LID IS OPEN.
GRILL CART ASSEMBLY INSTRUCTIONS
1. Attach Cart Legs to Bottom Base using 4 Carriage Bolts and Nuts. LOOSELY TIGHTEN AT THIS STAGE.
Top View
Bottom View
2. Align Grill Support Base on Cart Legs. Insert 4 Carriage Bolts into
center holes on Grill Support Base connecting it to Cart Legs with Nuts.
LOOSELY TIGHTEN at this stage.
Top View
Bottom View
5
3. Align remaining holes on Grill Support Base with Cart Legs. Insert 4 Carriage Bolts into outer holes
on Top Base connecting it to Cart Legs with Nuts. WRENCH TIGHTEN ALL CONNECTIONS.
Bottom View
Top View
4. Attach Casters to bottom of Cart Legs using 4 Large Nuts. WRENCH TIGHTEN
Locking Tabs
Assembled View
Bottom View
WARNING
Note: Push down tab on locking castors.
Lock down tabs on casters to add stability to the cart while setting the grill on top. After setting grill on
cart and completing all assembly, raise tabs to unlock the wheels and move grill to its final location.
Always keep the tabs locked down during storage and use.
5. Align Grill Support Struts on slots in Grill Support Base using 8 Carriage Bolts and Nuts.
Note: LOOSELY HAND TIGHTEN ONLY. You need to be able to slide Grill Support Struts out before setting
grill on cart, so just loosely tighten the nuts at this stage.
Top View
Bottom View
Slide struts out as shown
CAUTION
Note: Before placing Grill on top of Cart, make sure Struts are pulled out all the way to allow easier placement of Grill.
6
POSITIONING GRILL ON CART
WARNING
THIS GRILL IS HEAVY! Moving, unpacking and assembly is a two person operation.
6. A. Push down wheel locking tabs on cart before setting the grill in place. Make certain that Vertical Support
Struts are pulled out. Carefully lift empty Grill and place on top of Cart. Struts should be about 1- inch
from side of Grill.
B. Align Bottom Vent centered between 2 Struts. Be certain that grill is centered on the support base.
C. Slide each Strut up against side of Grill and WRENCH TIGHTEN all nuts underneath the base.
Repeat this on each Strut.
BEFORE
B
A
Pull Out
Center Bottom
Vent between
Struts
Struts pulled out before
placing grill on base.
Assembled View
AFTER
C
Push In
Slide struts in to touch side of grill.
Wrench tighten all nuts underneath.
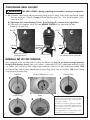
INTERNAL SET UP FOR COOKING
After setting grill on the cart; First, place Fire Bowl into Bottom Grill Body, be sure that the rectangle opening is
facing the Vent Opening. Second, make sure Fire Bowl is stable and DOES NOT wobble back and forth. If there
is a wobble, then insert one or both wedge shaped stabilizers under the Fire Bowl to decrease wobble. Third,
set Charcoal Plate inside Fire Bowl. Fourth, place Insulation Ring so that it rests on Fire Bowl. Fifth, place Cooking
Grate on top of Insulation Ring.
Fire Bowl
1
Fire Bowl Stabilizers (if needed)
2
3
Insulation Ring
4
Charcoal Plate
Grate
5
NOTE: FIRE BOWL STABILIZERS
Sometimes the Fire Bowl will not set perfectly stable
when placed inside the grill. It may rock from
side-to-side, or wobble.
Should this occur, locate the "gap" where it wobbles.
Then insert the wedge shape stabilizer into that
gap. It may be necessary to partially lift the Fire
bowl as you insert the wedge.
Two wedge stabilizers are provided. You may
need one, two, or none; you decide.
7
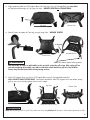
SIDE SHELF PLACEMENT & ATTACHMENT
7. A. Remove both locking nuts from bottom band on grill body where shelf is to be attached.
(Locking nuts may be in poly bag)
B. With shelf in folded position, place shelf slots onto both bolts. Loosely screw nuts on each bolt. Then
slide shelf backwards or forwards on bolts until you find the desired position on grill. Most people prefer
to position shelves close to front side of grill.
C. WRENCH TIGHTEN NUTS.
A
Side Shelf Bolts
B
C
Side Shelf
Side Shelf
Slide shelves laterally to desired position... then wrench tighten locking nuts.
FOLDING SIDE SHELF
8. A. Start with shelf in folded down position.
B. Lift bottom of shelf up to about a 30˚ Angle and push in as far as slot will allow.
C. Then push down to lock shelf under tab. Reverse these steps to fold shelf down when not in use.
PUSH DOWN
AND LOCK
UNDER TAB
IN
PUSH
A
B
SLOT
C
LOCKING TAB
SIDE SHELF UTENSIL HOOKS
9. Utensil Hooks are provided for both side shelves. No tools are needed to attach hooks. Attach as many
hooks as desired on both front and back side of shelf.
12 - Utensil Hooks
COMPLETED ASSEMBLY - READY TO COOK!
WARNING
To prevent grill from tipping over, do not roll over uneven surfaces. Be very careful when moving grill
to the cooking or storage location. Always lock down tabs on caster wheels after moving the grill.
8
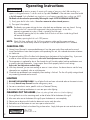
Operating Instructions
DANGER
The heat and moisture retention property of ceramic grills creates a "pressure cooker" effect resulting in a
superior cooking performance. It can also result in a possible "flashback" of fire and steam toward the handle
as the lid is opened. Such a flashback can singe hair on your forearm, especially when cooking over 300˚F.
Flashbacks can be reduced or prevented by following the simple 2-STEP LID OPENING INSTRUCTION:
1) Slowly open the lid a few inches. Pause for a moment to release internal pressure...
2) Then open lid completely.
NOTE: Flashbacks are greater during the time when both top and bottom vents are closed. During
that time the fire is starved for oxygen and is being extinguished. As the lid is
opened, oxygenated air rushes in and is ignited by the hot coals.
By just barely opening the lid, the sudden rush of fresh air will burn inside the grill and
not around the handle.
Remember, opening the lid is a 2-STEP process.
NOTE: Check Felt Liner on Base & Lid. Grill must maintain a tight seal for proper cooking.
Felt Liner will occasionally need to be replaced. A roll of Replacement Felt is included.
CHARCOAL TIPS
1) Natural Lump Charcoal is recommended because it has that great smoky flavor and can be reused.
Lump Charcoal burns hotter than briquettes while producing less ash, thus reduced obstruction at bottom
air intake vent.
2) For general cooking, fill the Fire Bowl with charcoal up to the bottom of the Insulation Ring. If you want
to cook at a slow and lower temperature, refer to Air Vent Adjustments on Back Page.
3) The temperature is regulated by the air flow through the grill, therefore adjust both top and bottom vents
to reach the desired temperature. It may require some time to properly learn the vent settings.
Refer to Air Vent Adjustments on Back Page.
4) With lump charcoal, you can start cooking as soon as it starts to burn. You do not have to wait for lump
charcoal to turn completely white as with briquettes.
5) Close both top and bottom vents completely when cooking is finished. The fire will quickly extinguish and
any remaining charcoal can be reused.
LIGHTING
1) DO NOT USE LIGHTER FLUIDS! Use of lighter fluids can leave a chemical odor on the ceramic inserts.
2) Use only Natural Lump Charcoal found at most grocery stores.
3) You can use an electric starter, paraffin stick or a Charcoal Chimney.
4) Be certain that both top and bottom air vents are open when lighting.
CLEANING OUT THE ASHES ( Clean only when grill and ash are cool, before lighting )
1) Use a grill brush to stir the remaining coals so that all ashes fall to the bottom of the grill.
2) After most ashes are at the bottom of the grill, open the bottom air vent completely.
3) Place a pan or aluminum foil under the bottom air vent to catch the ashes.
4) Rake ashes out of the bottom air vent into a pan or aluminum foil.
5) Do Not remove Fire Bowl or Insulation Ring to clean ashes. Simply slide open air vent and rake out ash.
Open and rake out ash.
9
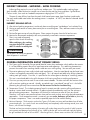
INDIRECT GRILLING - SMOKING - SLOW COOKING
Indirect grilling requires the use of a grill as an outdoor oven. This method enables cooking larger
(pork shoulder, whole chickens) or tougher cuts of meat (brisket and ribs) that would burn if grilled direct.
For best results, slow cook at a moderate temperature ranging from 275˚ to 350˚F.
The pan of water diffuses heat from the coals while heated water vapor keeps food moist and tender.
You may need to add water before the cooking process is complete. At 250˚F, one batch of charcoal should
last all day.
INDIRECT GRILLING SET-UP:
1) After desired cooking temperature is achieved, place reversible grate "upside-down" on Insulation Ring.
2) Having a small amount of water, place water pan on reversible grate. Then, add more water to the pan
until 3/4 full.
3) Position flat grate on top of reversible grate. Place meat on the grate, close the lid and set vents.
4) Monitor the thermometer and adjust the vents periodically to maintain a constant temperature.
There is no need to frequently
open the lid to check the cooking.
500-582
3)
Single Grate
When smoking or slow cooking,
everytime the grill lid is opened
adds 15 minutes to cooking time.
500-588
2)
Water pan
CAUTION
Do not permit all water to evaporate
from the pan as it could melt.
1)
500-581
Reversible Grate
GENERAL INFORMATION ABOUT CERAMIC GRILLS
1) The Cypress grill is formed by firing a special blend of various clays and matter which stabilizes the ceramic.
It is a heat holding ceramic that resists rapid contraction and expansion. This stabilizing characteristic
prevents the ceramic from cracking should a cold rain occur while grilling. You can cook year round.
2) The exterior glaze may have small pin holes and imperfections. Near the metal bands may be found some
surfaces not completely covered by color and glaze. This is all normal and adds to the distinct character
making each grill unique. Over time, it is possible for the surface glaze to develop a "crackling" pattern.
This too is normal and adds to the grills character while having no effect on cooking performance.
3) Over time you may notice a crack in one or both ceramic inserts. This does not harm the function of the
grill so continue cooking as normal. Actually, a cracked insert is considered "normal" as it is the buffer
protecting the grill body from extreme heat. Do Not remove Fire Bowl or Insulation Ring.
4) Temperature Control: The insulating property found in ceramic provides superior grilling performance
because it retains both heat and moisture. By adjusting both top and bottom vents you can achieve a
desired cooking temperature. Temperature will continue to increase even after all vents are closed.
Therefore, it will require some practice to know when and how much to close vents as the desired temperature
approaches. Once temperature control is mastered, you can smoke, barbeque, grill or bake at precisely
the proper temperature. There is no need to repeatedly open the lid to monitor cooking.
5) Moisture Retention: Thick ceramic used on the Cypress Grill retains moisture and heat better than all other
conventional grills. As a result, foods are cooked evenly and completely while retaining natural juices and
flavors, with minimal shrinkage.
The heat and moisture retention property of ceramic grills makes them prone for growth of mold in certain
environments and between long intervals of use. Mold inside the grill can be removed simply by lighting
the grill and bake for half an hour at 450˚F. After the grill cools, remove excess residue with a wire brush.
10
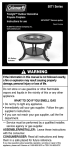
AIR VENT ADJUSTMENTS
A general guide on how to achieve desired cooking temperature.
Actual vent position could var y due to atmospheric conditions at any given location.
TOP DOME
AIR VENT
TEMPERATURE
TYPE OF COOKING/MEAT
200-225˚F
Smoking Temperatures
300˚F
Chicken Tenders
Grilling Hamburgers and Ribs
325˚F
Poultry and Turkey Breast
350˚F
Roast Beef and Pork
450˚F +
Searing Steaks
BOTTOM AIR VENT
Top Air Vent
Bottom Air Vent
OPEN
CLOSED
CYPRESS GRILL - PARTS & ACCESSORIES
500-580
Grill Thermometer
500-587
Replacement Felt
Stainless Steel • 50˚F - 750˚F
Tempered Glass Face
140" Length
Self-Adhesive
www.thebayou.com
500-585
Charcoal Plate
Steel
500-584
Ceramic Fire Bowl
500-583
Ceramic Insulation Ring
Handcrafted Ceramic
Handcrafted Ceramic
500-511
Charcoal Starter
500-586
Ash Rake
Aluminized Steel
Steel
500-582
Grate for Smoking
500-588
Water Pan for Smoking
500-581
Reversible Grate
Stainless Steel
Aluminum
Stainless Steel
For Questions and Information call us at: 1-800-864-6194 • Monday - Friday (8:00am - 5:00pm CST)