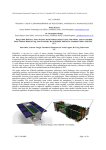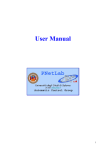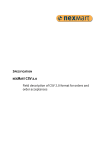
1
AKADEMIN FÖR TEKNIK OCH MILJÖ Bachelor’s thesis in Electronic Engineering 15 Credit points FÖR TEKNIK OCH MILJÖ Wireless Site Survey Site Surveying in Home, Office and Laboratory Environment Haidar Nail Mahmoud [email protected] November 2010 Elektronikingenjörsprogrammet Examinator: José Chilo Abstract Today, Communication has increasing influence on our Daily life. Wireless data Communication services allow people to access the data Network without a physical Connection. This work Studying Wireless Local Area Network WLAN features and describing all technologies and standard necessary to operate this network. This work aims also at comprehensive investigation of wireless network including wireless Local Area Networks implementation and performance analysis. Testing WLAN performance through some practical measurement such as site surveying in different locations, finally measuring the strength of the signals different locations in the coverage area, test results can be used in order to enhance the network performance. Page | 2 Dedication This thesis is dedicated to my mother, who taught me that even the largest task can be accomplished if it is done one step at a time. I dedicate this thesis to my brother in law Mr.Furat Kadhem and My sister Raya Nail for all the support that they gave me along my education period. Page | 3 Acknowledgements I would like to thank my Teacher Mr.Niklas Rothpfeffer for the all work and for providing all the requirements for this project. Page | 4 Table of Contents ABSTRACT ..................................................................................................................................... 2 DEDICATION ................................................................................................................................. 3 ACKNOWLEDGEMENTS .............................................................................................................. 4 ACRONYMS AND ABBREVIATIONS .......................................................................................... 7 LIST OF FIGURES .......................................................................................................................... 8 INTRODUCTION ........................................................................................................................... 9 1. THEORY ................................................................................................................................10 1.1 WIFI ................................................................................................................................................... 10 1.2 Roaming ............................................................................................................................................ 12 1.3 Site Survey ......................................................................................................................................... 13 1.4 Site Survey Considerations ................................................................................................................ 14 2. MEASUREMENTS AND RESULTS ....................................................................................15 2.1 Tools .................................................................................................................................................. 15 2.1.1 Software .................................................................................................................................................... 15 2.1.2 Hardware ...................................................................................................................................................... 16 2.2 Work Implementation and results presentation ................................................................................ 17 2.2.1 Home Environment ................................................................................................................................... 17 2.2.2 Laboratory Environment............................................................................................................................ 23 2.2.3 Office Environment.................................................................................................................................... 28 3. SUMMARY AND CONCLUSIONS .......................................................................................31 3.1 Access point locations ....................................................................................................................... 31 3.2 Results ............................................................................................................................................... 31 3.3 Future Work ..................................................................................................................................... 32 4 REFERENCES ............................................................................................................................33 Page | 5 APPENDIX 1.................................................................................................................................... I Introduction to VisiWave Site Survey Program ......................................................................................... I Creating a new Site Survey File ................................................................................................................. I Collecting Wi-Fi Data versus Spectrum Data ........................................................................................... III Collecting Survey Data ............................................................................................................................ IV Viewing Data point information.............................................................................................................. VI Deleting Data ......................................................................................................................................... VII VisiWave Site Survey Report .................................................................................................................. VII APPENDIX 2.............................................................................................................................. - 1 APPENDIX 3.............................................................................................................................. - 1 - Page | 6 Acronyms and Abbreviations WLAN Wireless Local Area Network WIFI Wireless Fidelity PDA Personal Digital Assistant WAP Wireless Access Point LAN Local Access Network SNR Signal to Noise Ratio AP Access Point ESSID Extended Service Set Identifier MAC Media Access Control Page | 7 List of Figures Figure 1 Wi-Fi mark Figure 2 Wireless Card ................................................ 11 Figure 3: WLAN and LAN Network .................................................................................................................................... 11 Figure 4: Roaming .......................................................................................................................................................................13 Figure 5: Home Map Image .................................................................................................................................................... 18 Figure 6: Home Environment Router.................................................................................................................................. 19 Figure 7: Wi-Fi Strength in home Environment ................................................... 20 Figure 8: Laboratory Environment map image .............................................................................................................. 24 Figure 9: The Strength of HIG Channel in the Laboratory Environment ........................................................... 25 Figure 10: Illustration part from Figure 9 ........................................................................................................................ 26 Figure 11: Office Environment map image ..................................................................................................................... 28 Figure 12: The Strength of HIG Channel in the Office Environment .................................................................. 29 Figure 13: Survey Properties ....................................................................................................................................................II Figure 14: The Main Application Window ...................................................................................................................... III Figure 15: Set Survey Map Scale Window....................................................................................................................... IV Figure 16: VisiWave Site Survey Report Main Screen .............................................................................................. VII Page | 8 Introduction We will study the Wireless Local Access Network (WLAN). How it works. What are the requirements of this network. Where this network is more important to use. We will study also what we can do to make this kind of network better. We will focus also in this work on the WLAN`s strength and how we can test and examine the network strength. It is very important that we have a good WLAN network design, because the performance of the network depends mostly on the design of this network. We will not design a new WLAN network in this work, but we will study how we can improve a designed network, so it is very important to study the WLAN design procedures, and determine the design mistakes if found. There are many options to choose if we are going to check a WLAN network performance, one of these options is Site Survey Method, which we will use it mostly in this work to measure and analyze the wireless internet connection. Using the site survey with a detailed coverage map, would show that the use of Wi-Fi (Wireless Fidelity) would be more efficient, with less time spent searching for acceptable connectivity. The main problem that this work deals with is the weaknesses of the WLAN network strength. During my study period in the University of Gävle and precisely in my education department, we as a university students noticed that there are weaknesses in the internet wireless signal in many places and there are places with a strong signals in a few other places. We as students have always discussed this problem and attempted to find a place with a good signal. Site survey test will be done at home, laboratory, and office environment. We will start with this work from the home environment, because home`s area is not so large and this will make the site survey test easier, and then to get more experience about this test and to learn more about how the program works, then we will do a site survey test in laboratory and office environment. We will use VisiWave Site Survey program to do this work, because this program is available and can be downloaded directly from the internet [1]. We will choose also VisiWave Site Survey because it supports the Wi-Spy Spectrum Analyzer device from MetaGeek [2]. This device is used while collecting Wi-Fi survey data and working simultaneously with VisiWave site survey program. Page | 9 1. Theory This section will deal with the theoretical aspect of our work. We will describe all information that we need to know before we can do or understand our work. In the beginning we will explain the meaning of Wi-Fi technology, and we will also explain the site survey test and site survey considerations. 1.1 WIFI Wi-Fi is an abbreviation of Wireless Fidelity, A wireless transmission highprecision speed. And it is used to identify any of the wireless technologies in the (IEEE 802.11) standard. This technology which most of the wireless networks WLAN upon to it today, it uses radio waves to exchange information rather than wires and the cables etc. They are also able to penetrate walls and barriers, with high-speed transmit and receive data up to 54 Mb ps. There are several standards for wireless networks identified by the Institute of Electrical and electronic engineers (IEEE), most common and best known the (802.11a) standard which was approved before the (802.11b) standard. The latest standards today is (802.11n), and these standards are compatible often with each other, but with different extent and velocities [3]. The Wi-Fi technology is developing quickly and we can see it today in many applications. First of all that we need to use Wi-Fi service, it is a device that supports this technology, which we can know if the device contained Wi-Fi mark or not, WiFi is shown in figure (1). It can be seen in most of mobile computers (laptops, notebooks) and PDA (personal digital assistant) and mobile phones and many other modern devices. These devices came with Wi-Fi mark means that they equipped with Wi-Fi cards. An example of Wi-Fi card is shown in figure (2). It is designed to be integrated with the access points. We can also use USB adapter or wireless card slot to do this work. These devices that came with the wireless card are searching automatically in the area about the access points. These access points transmits the Wi-Fi signals, internet connectivity via Wi-Fi is very easy. Complete WLAN and LAN network is shown in figure (3). Page | 10 Figure 1 Wi-Fi mark Figure 2 Wireless Card Figure 3: WLAN and LAN Network Wireless Access point (WAP) is the second thing that we need in order to use Wi-Fi technology. An access point is a device that transmits and receives data by converting the signal such as internet signal from the wires LAN (local access network) to wireless signal WLAN, with a limited coverage area that gives the ability to the users by connecting to each other or to the data source easily. It can be seen today in many restaurants, libraries, hospitals, schools and other public places to provide wireless connectivity to every visitor that has a portable device. The scope of coverage of these networks range between 32 meters indoors and 95 meters outdoors depending on the type of the access point and the antenna used. These numbers can be increased by using reinforced systems. Page | 11 1.2 Roaming A critical function in a multiple-cell wireless LAN i.e. ESS, as shown in Figure (4), is roaming, which enables wireless users to move from cell to cell (one AP coverage area to another) seamlessly as you go around the office, campus, or home with the laptop with no loss in connectivity. As the 802.11 standard does not provide specification for roaming, it is up to the WLAN vendors to define roaming protocols on their own. Companies that manufacture WLAN access points have their own flavour of roaming. Roaming is based on the ability of the wireless device to determine the quality of the wireless signal to any AP within reach, and decide to switch communication to a different AP if it has a stronger or cleaner signal. This is based primarily upon an entity called Signal-to-Noise Ratio (SNR). In order for wireless devices to determine the SNR for each AP in the network, access points send out beacon messages that contain information about the AP as well as link measurement data. The wireless device listens to these beacons and determines which AP has the clearest and cleanest signal. After making this determination, the wireless device sends authentication information and attempts to re-associate with the new AP. The re-association process tells the new AP which AP the device just came from. The new AP picks up whatever data frames that might be left at the old AP, and notifies the old AP that it no longer needs to accept messages for that wireless device. This frees up resources on the old AP for its oilier clients [4]. In order for roaming to be possible, all your APs need to be from the same manufacturer, they all need to reside on the same physical wired subnet (i.e., on the same IP network, with no intervening routers), and they all must have the same network name, Extended Service Set Identifier(ESSID). In the ESS, roaming is automatically enabled if this is true. If, for some reason, it can be disabling roaming, just give each AP in ESS a different ESSID. The 802.11 standard covers the concepts behind the communication between the AP and the DS; it doesn't define exactly how this communication should take place. This is because there are many different ways this communication can be implemented. Although this gives a vendor a good deal of flexibility in AP/DS design, there could be situations where APs from different vendors might not be able to interoperate across a distribution system due to the differences in how those vendors implemented the AP/DS interaction. There is an 802.11 Working Group (802.11f) developing an Inter-Access Point Protocol. This protocol will be of great help in the future as companies who have invested in one vendor's products can integrate APs and devices from other vendors into their ESSs. Page | 12 Figure 4: Roaming 1.3 Site Survey The main purpose of a wireless site survey is to determine the number and placement of access points that provides adequate signal coverage throughout a facility or city area. With most implementations, “adequate coverage” means support of a minimum data rate or throughput. Right software tool-a full-featured site survey program – can save companies significant amounts of time, money and a great deal of frustration when first installing, expanding or modifying a WLAN. Site surveys help plan a network before it’s installed, determine that it’s operating at peak performance after installation and help to efficiently expand coverage or throughput when the need arises [10]. Page | 13 1.4 Site Survey Considerations If we need to conduct a site survey it is important to consider a Different of factors that could affect the performance of the Wi-Fi network [5]. It is very important to know the following considerations: Understand the wireless concept and requirements and how the Wi-Fi networks work. Obtain the diagrams or maps for the area which will be under test with good resolution with exact scale dimensions. It is very important to walk through the area before performing any testing to verify the accuracy of the area`s diagram or map. Identify the important areas where the coverage of the Wi-Fi signal is needed, also where users will not Wi-Fi coverage is important to avoid losing time when we doing the site survey. Use a comfortable laptop computer not so heavy and contained a good battery life to avoid losing our work. Ask for permission to enter offices or any other personal places to do a few quick measurements and be prepared to explain what you are doing. When doing multi-floor site survey measurements you need to do each floor as its own separate site survey measurements. Page | 14 2. Measurements and results This chapter will deal with the practical aspects of our work; we will start this section by reviewing the tools software and hardware that we will use in our work, we will describe also how we can use these tools and where in our work, and then we will test the Wi-Fi strength in different environments, and which methods we will use to do that, and finally we will review the results [8]. 2.1 Tools We will review in this section the tools that we used in our work. 2.1.1 Software VisiWave Site Survey program was the mainly program that we used in this project, VisiWave Site Survey is the software tools that shows what is going on inside the user`s network, the program collects detailed data on user`s network and surrounding networks and then visualizes data . The program shows even the smallest details of the Wi-Fi signal details in intuitive and informative way The program shows the signal leakage for the area under site survey test, the program also can discover the locations of the access points and determine effects of neighbouring access points, visualize also the overlapping among access points in the coverage area. VisiWave Site Survey program is very simple and fast data collection. The program has powerful report generation property. This property gives the ability to create automatic report with the important data details about the network with few instructions. In Appendix 1 there is a small introduction about how the program works [11]. The second program we used in this project was Chanalyzer program, Chanlyzer is accompanying spectrum analysis software to Wi-Spy 2.4x or Wi-Spy DBx adapter. This program shows Wi-Fi data and the channels names of the network in table or graph according to their strength in the position. The main use of this program in this project was to be sure that the Wi-Spy DBx is working correctly before starting Site Survey test with VisiWave program because Chanalyzer 4 serves as a driver software to Wi-Spy DBx adapter which we going to use in this project. Page | 15 Microsoft Office Picture Manager and Microsoft paint and adobe photo shop have been used also in this project to improve the site map of the coverage area, which we need to do site survey test on it, the map of the coverage area almost coming with image file format (JPG, GIF, BMP, and PNG). It is necessary to do some changes according to our work requirements. These changes such as resizing the files are the first thing we need to do before the VisiWave program can open the file of the map’s image because it has a limited pixels number. The second change we need to do is making the lines of the drawn map darker, in order to recognize the locations such as libratory rooms, offices and classrooms etc after the test. Because the program shows the strength of the Wi-Fi signals in different colures on the map, this will make the visibility of these locations harder. These programs have been used also to draw illustration figures of this project. 2.1.2 Hardware We used Asus laptop X59SR with Microsoft windows 7 professional; the laptop we used is equipped with wireless network adapter with (802.11n) standard. We checked the wireless card before the site survey test, in VisiWave Site Survey website we found a program which called VisiWave CheckAdapter, user can download and install this program for free [1]. This program can easily and quickly test the pc`s wireless adapter to see if it supports all the features required by VisiWave Site Survey program. The program also rates the wireless adapter based on how suitable it is for performing effective site survey. We used also Wi-Spy DBX spectrum analyzer product from MetaGeek, the WiSpy is a USB device, and it continuously monitors either the 2.4 GHz or 5GHzradio spectrum on any radio transmissions or interference sources that occur in this range. VisiWave site survey program records this information and associates it with a location on your survey map image. The Wi-Spy device is also used while collecting Wi-Fi survey data. If we want to accurately graph the signal-to-noise ratio, we should plug in our Wi-Spy device while collecting WiFi data. VisiWave will then automatically query the Wi-Spy device to get accurate noise levels at each survey location. Page | 16 2.2 Work Implementation and results presentation After we presented the tools that we will need in this project, this section we will mainly describe the Wi-Fi testing process in detail in many different environments, and mention the test methods which we will use to the Wi-Fi strength. And finally we will review all results of the test in Home, Laboratory, and Office environment. It is useful to read an introduction about the program that we will use mostly in this section, In Appendix 1 we had written all information about the VisiWave Site Survey Program. 2.2.1 Home Environment The need of Wi-Fi service at home environment increasing today. The wireless internet at home allows people to connect to the internet from almost anywhere at home, through the floors, walls, and even in the garden. Many people today prefer to use the laptops and mobile devices which work with the Wi-Fi technology, so the process of getting an internet by using a wireless connection will be easier if we have a good Wi-Fi network at home, because it will eliminate the needing to the wires and gives a good internet coverage area. Wireless site survey test is very important, in order to obtain a good wireless network in the home environment, and that what we will do in our project. After we have completed the installation procedures of VisiWave Site Survey program, and we confirmed that the program works correctly with Wi-Spy spectrum analyser adapter. We started to do a site survey at the home environment in order to learn more about VisiWave site survey program and how the program works. Page | 17 The home environment site survey test will be done in an apartment, small and for one person apartment, the map image of this apartment is shown in figure (5). Figure 5: Home Map Image Figure (5) taken from SANDVIKENHUS´S (housing company) website. This figure illustrates house sections in Swedish language. Below translating of these words in English: Vardagsrum: Living Room . Kök: Ketchen. Sovalkov: Sleeping alcove. KPR: Corridor. WC: Bath Room. Page | 18 The apartment contains a normal router, wireless –G Router (WGR614) from NETGEAR is shown in figure (6). We checked the router properties and we knew that this router works as an access point sends the internet signal up to 100 feet in range. Figure 6: Home Environment Router We collected data by VisiWave Site Survey program with two methods. These methods are Point to point capture mode by clicking at the location on the survey map image that represent the location of where we standing in the real world, and continuous capture mode by walking in a straight path while we collecting data. When we started the test for the first time the results were strange because the strength of collected data was almost same in every place in the apartment, we tried to go outside the apartment and walking around the building, then we got acceptable results because there was inequality of the signal`s strength, this means that the program is working correctly, we tried to do site survey test more than one time to avoid the mistakes that we got with every test, and examining the results by looking at the differences between two test results. The path that we walked along in the real shown in figure (7), which are coloured pointed lines can be seen on the map image. The strength of the Wi-Fi signal can be seen also on the map by looking at the different colours on the map, every colour represents signal strength. In VisiWave Site Survey program dark blue indicate strongest signal and the colour tends to light blue which means that the strength being weaker. Darker colours indicate a strong signal. Brighter colours indicate weaker signals. The strongest to weakest colours are: blacks, blues, greens, oranges, yellows, and reds. Page | 19 The result of the Wi-Fi strength in the home environment is shown in figure (7). Figure 7: Wi-Fi Strength in home Environment We can see in this figure the location of the access point which appears as a blue and white circle ( ). Dark blue colour on the map image indicates to the stronger Wi-Fi signal strength, in the kitchen the Wi-Fi strength is weaker than other places, because the kitchen contains a lot of home devices and metallic surfaces, these devices affects badly to the Wi-Fi signal strength. The same condition can be seen in the bath room because it contains a lot of mirrors and metallic surfaces which attenuates the Wi-Fi signal [6]. Page | 20 For the home environment we have one access point that sends the signal, the name of this access point is Haidar and here is little information about this access point that the program measured: Access Points Discovered APs “The discovered access points are listed first. Several values are list for each discovered access point. The first column lists the unique identifier assigned to that access point. The next column lists the Media Access Code (MAC) address of the access point. The next column lists the channel used for communication. The next column lists whether WEP encryption is enabled for that access point or not. If the access point either doesn't support WEP (or a more advanced encryption method) or WEP is turned off, then this is set to “No”. The next column lists the mode the access point is working under. For each access point, either “Infra” (for infrastructure mode networks) or “Ad hoc” (for ad hoc or peer-to-peer networks) is listed as the mode. The next two columns list the number of data points collected from each access point. If the client was associated with the access point at the time the data point was collected, then that point is counted under the heading “Assoc.”. If the client was associated with a different access point, but saw the access point while scanning for other access points, then that point is counted under “Unassoc.” (for Unassociated). The last column lists the Service Set Identifier (SSID) recorded for that access point” [7] #0 MAC Ch Security Mode Assoc Unassoc 00:1f:33:45:94:a2 1 WPA2 Infra 426 0 SSID: Haidar Page | 21 Survey Statistics Here is the final site survey test information in the home environment: Total Area 495 sq ft Survey Trail Length 194 ft Number of Strides 393 Ave. Stride Length 0.5 ft Number of Survey Points 426 Wi−Fi Only Points 426 Spectrum Only Points 0 Average Points per Stride 1.1 The total area is a value calculated from the survey data. This value represents the number of square feet inside the outer boundary of the collected data. The outer boundary is the convex hull of the all the collected data The calculated distance that the surveyor walked while collecting survey data. This is a count of all the strides taken while collecting survey data. Each stride is equal to two steps This is the average stride length calculated over all the collected survey data. This value should be similar to the calibrated stride length set during the survey. This value is only included if the Length of Survey Trail option is also included. This is the total number of data points collected during the site survey. This is usually more than the number of strides since data readings are continuously taken even while the surveyor is not moving. This is the total number of data points collected where only WiFi data was collected (no spectrum data) This is the total number of data points collected where only spectrum data was collected (no Wi-Fi data). This is the average number of data points collected per stride. Page | 22 2.2.2 Laboratory Environment After the first test at the home environment, we got more information about the site survey test and how the program that we chose works and what are the difficulties that we may face while doing the test. We tried all options of the program and methods to make the work easier and faster. The start was in the 3rd floor of house 11 in the University of Gävle, electronics laboratories floor [12]. We began to study the map of this site and calculated the numbers of rooms in this floor. We already have good information about this floor because we spent most of the university education period in this floor, we started to collect Wi-Fi signal by site survey test in the corridor of the electronics laboratories floor with continuous mode, by walking along the corridor and recording data, we stopped walking in many different points with respect to where we stopped in the real and clicking on the stop button in the program then clicking on the start button when we start walking again. For example in the corridor there were many doors which we considered them like check points, Stop points when we stop near them while we collecting data, and again like start points when we start walking from them. After we got the results of the collecting data in the corridor, we started to collect data in the classrooms and laboratory rooms, which we asked for permission before we could start the test. The most important places shown in the map image figure (8) in this floor were the corridors ((113:01); (113:14) ;( 113:22)). The students in this area mostly use the wireless internet connection (WLAN), because there is no (LAN) internet connection in the corridors. Most of the students spend a lot of hours by sitting and studying in these corridors, while they use wire internet connection (LAN) in the classrooms and laboratory with stationary computers. The number of access points was increasing whenever the site survey test is progressing. On the right side of the main screen of the program there is a list, by looking at this list we can see the name of these access points and the total number of discovered access points, but not all of these access point channels were public channels, because there are two types of the access points channels, first type is the public network which means that everyone can use the Wi-Fi service directly without needing to enter a password or key, second type is the private network which means personal network, only for the person who has the permission to use this service and this type almost needs a password or key to start using it. In the University of Gävle there are many channels, but the most important one is this channel that can be used by every student in the university, the name of this channel is HIG (Appendix 2 shows the discovered access points for the HIG channel only in the 3rd floor), HIG channel is one kind of the private channels. The students can use HIG Channel easily, by entering their username and Page | 23 password, then connecting to the internet directly, therefore all results of site survey tests in this project will be focused on HIG channel. The map image of the laboratory environment is shown in figure (8): Figure 8: Laboratory Environment map image Like the previous test at the home environment we knew that the darker colours indicate a strong signal. Brighter colours indicate weaker signals. The strongest to weakest colours are: blacks, blues, greens, oranges, yellows, and reds. We will make the test and review the results with respect to HIG channel only. Page | 24 The result of the Wi-Fi strength in the laboratory environment is shown in figure (9). Figure 9: The Strength of HIG Channel in the Laboratory Environment White blue circle ( ) shown in the figure above indicates to the locations of all access points which discovered in all floors in this building. The coloured pointed line represents the real way that we walked in reality when we collected data with continuous capture mode. We can consider the corridor is the most important area in this floor as we mentioned earlier, because the needing of the Wi-Fi internet connection is more important than other parts in this floor, for example The laboratory and class rooms there are a stationary computers with LAN internet connection. In the corridor the Wi-Fi signal strength is different as we can see in the map image after the test. This corridor is very long; this means that we need a wireless network with a good design and a lot of access points, in order to get an acceptable wireless coverage area. The reason of the weakness in this corridor as we can see in figure (9) that we cannot see enough access points which can make a good wireless network, while in the rooms of this floor we can see many of the access points. Most of the access points that the figure shows us are not refer to be located in the same floor, for example if we see the discovered access point near LAB (113:16) door which is shown in figure (10). Page | 25 And marked with yellow circle, we can directly know that the discovered access point is not located in the 3rd floor because the strength of the signal is very weak near this access point. This figure is an illustration part which was taken from the original figure (figure 9): Figure 10: Illustration part from Figure 9 If we want to improve the wireless network in the Laboratory environment, changing the access points´ locations is the best solution for this floor, because to buy new access points will cost a lot of money. The electronic devices and instruments in the classrooms and laboratory affects badly to the wireless signal, and this will prevent the signal to reach the required distance. Page | 26 After the site survey test in the 3rd floor (laboratory environment) we got the information bellow: Survey Statistics Total Area 15344 sq ft Survey Trail Length 880 ft Number of Strides 1572 Ave. Stride Length 0.6 ft Number of Survey Points 1579 Wi−Fi Only Points 1579 Spectrum Only Points 0 Average Points per Stride 1.0 The total area is a value calculated from the survey data. This value represents the number of square feet inside the outer boundary of the collected data. The outer boundary is the convex hull of the all the collected data The calculated distance that the surveyor walked while collecting survey data. This is a count of all the strides taken while collecting survey data. Each stride is equal to two steps This is the average stride length calculated over all the collected survey data. This value should be similar to the calibrated stride length set during the survey. This value is only included if the Length of Survey Trail option is also included. This is the total number of data points collected during the site survey. This is usually more than the number of strides since data readings are continuously taken even while the surveyor is not moving. This is the total number of data points collected where only WiFi data was collected (no spectrum data) This is the total number of data points collected where only spectrum data was collected (no Wi-Fi data). This is the average number of data points collected per stride. The discovered access points of the 3rd floor laboratory environment illustrated in Appendix 2 (for HIG channel only). Page | 27 2.2.3 Office Environment Our last site survey test in this project will be in an office environment, 4th floor of house 11 in the University of Gävle. This floor consists of teachers, professors and other staff rooms. We started to study the map image of this floor first, because we did not have any information about this floor before. It is very important to study the site environment before doing any test. We checked the furniture locations to make our test easier, because the test will be difficult with certain test mode and easy with other. We used continuous capture mode by walking and recording data in places without furniture, because we could walk easily. We also used point by point capture mode by clicking at the location on the survey map image that represent the location of where we standing in the real world in other places where we could not walk. The most important places in this floor are corridors (114:26; 114:01), waiting halls (P1V; P1H) and two group´s rooms (114:26; 114:62), are shown in the map image figure (11). These places are most important than others, because the students or visitors need Wi-Fi service to get an internet connection in these places, while the Wi-Fi service in the professor’s and other staff`s rooms is not so important because they use wire internet connection (LAN). The floor map image is shown in figure 11: Figure 11: Office Environment map image Page | 28 The number of access points was increasing whenever the site survey test is progressing, white blue circle ( ) is shown in the figure (11) indicates to the locations of the access points which discovered in all floors in this building. The results of the Wi-Fi strength at the Office environment is shown in figure (12). The test will review the results with respect to HIG channel only. Figure 12: The Strength of HIG Channel in the Office Environment Like the previous test at the laboratory environment the darker colours indicate a strong signal. Brighter colours indicate weaker signals. The strongest to weakest colours are: blacks, blues, greens, oranges, yellows, and reds. And the coloured pointed line that the figure shows us represent the way that we walked along when we collecting data. The figure shows us that the strength of the signal concentrated near the main access points. In this floor we have two main access points, the first one located in the corridor near (Trappa 1) and the second one located in corridor (number 114:01). The figure shows us also that the WLAN signal strength is weak in the other places. The main reason that the signal not reaching the required distance that both of the main access points located very close to an electric cabinet, this will prevent most of the signal to reach the required distance. Page | 29 Changing the location of the access point is very important if we want to improve the network. For the 4th floor the information about site survey test are:Survey Statistics Total Area 10511 sq ft Survey Trail Length 737 ft Number of Strides 1425 Ave. Stride Length 0.5 ft Number of Survey Points 1480 Wi−Fi Only Points 426 Spectrum Only Points 0 Average Points per Stride 1 The total area is a value calculated from the survey data. This value represents the number of square feet inside the outer boundary of the collected data. The outer boundary is the convex hull of the all the collected data The calculated distance that the surveyor walked while collecting survey data. This is a count of all the strides taken while collecting survey data. Each stride is equal to two steps This is the average stride length calculated over all the collected survey data. This value should be similar to the calibrated stride length set during the survey. This value is only included if the Length of Survey Trail option is also included. This is the total number of data points collected during the site survey. This is usually more than the number of strides since data readings are continuously taken even while the surveyor is not moving. This is the total number of data points collected where only WiFi data was collected (no spectrum data) This is the total number of data points collected where only spectrum data was collected (no Wi-Fi data). This is the average number of data points collected per stride. The discovered access points of the 4th floor Office environment illustrated in Appendix 3 (for HIG channel only). Page | 30 3. Summary and Conclusions 3.1 Access point locations In this thesis we used site surveying as a method for measuring the actual real network performance, by using Visiwave site survey program which shows after collecting data the visualized wireless coverage, which is very important if we need to improve the wireless network. If we need to design wireless network systems, it is very important to know the optimum numbers and locations for the access points. The correct placement of APs is essential. If they are placed too far from each other coverage gaps will be generated, but if they are too close to each other, this will lead to excessive cochannel interferences. 3.2 Results From the results in the chapter three we conclude the following: ●There is reversely relation between the distance and the throughput, and power, when the client moved away from the Access point the throughput and the power will be decreased gradually with his motion away from the access point, until the connection between the client and the access point vanishes. ●If there are some of WLANs operated in the same environment and in the same frequency band the noise level will be increased significantly. ●In designing WLAN, it should be take into account the location of nodes to be networked, must lie on line of sight(LOS), so there are no obstacle facing the path between access point site and client site, these obstacles such as furniture or persons. ●It was noticed that for the same distance between clients and AP is not necessary for these clients to have the same received power, since this situation is also related to other environment parameter like furniture and radio frequency interference RF from other devices that work within the same frequency band. ●End user throughput depends on many factors including the location, antenna gain and noise level. Also the bandwidth was shared between users. Page | 31 3.3 Future Work The main reason of this thesis was to introduce the wireless network principles and site survey method in order to improve the wireless network service especially in the building 11, the electronic engineer department in Gävle University, this can be done with a lot of procedures, one of them is to increase the number of the wireless access points, Since the increasing of the access points will obtain high cost, and by looking at the results that we got from the site survey of this building, the main reason seems to be the location of the access point was not designed correctly. For example if we take the 4th floor we see that the distance between these access points is too long, which make a gap, and they must lie on line of sight (LOS), therefore the Wi-Fi coverage network was not good in this floor, because these access points does not work simultaneously, and one of these access point placed near an electrical switch board which affects badly to the access point work, and these access points was not faced each other in order to give better performance. Changing to the access points places is important if we need to improve the Wi-Fi network without needing to buy many of them [9]. In the 3rd floor the problem was the strength of the Wi-Fi signal not good in the corridor, when this area (3rd floor corridor) is most important area in this floor, because the needing to the Wi-Fi service in this area is most than other area. The students using the Wi-Fi network to get an internet connection, while the needing of Wi-Fi network is not so important if we take another area such us classrooms, laboratories rooms and the staff rooms, because they use LAN network to get an internet connection. If we change the access points places and placed them in an optimum way, and if we focus to design a correct Wi-Fi network in these areas that the needing of the Wi-Fi network is most, we will get a better servicing to our clients and the advantage of the access points that we have will be more useful. Page | 32 4 References [1] http://www.visiwave.com Last Access 2011-01-13 [2] http://www.metageek.net Last Access 2011-01-13 [3] IEEE Standards Association. “http://www.standards.ieee.org” Last Access 2011-01-13 [4] Briere, Danny Hurley, Pat Ferris, Edward. “Wireless Home Networking For Dummies” 2008, Third Edition. Chapter 4, (Planning a Wireless Home Network). [5] Wi-Fi Planet. ”http://www.wi-fiplanet.com/tutorials/article.php/1116311/RF-Site- Survey-Steps.htm” Last Access 2011-01-13. [6] Shahid K.Siddiqui.”Roaming in Wireless Networks”. 09-2005 Chapter 13, (WLAN Roaming). [7] AZO Technologies,Inc. “VisiWave Site Survey User´s Guide” , Version 2.1, October 2009. [8] Cisco Systems,Inc, “Wireless Site Survey FAQ “ , Document ID: 68666, Updated: Jan 21, 2008, [9] AirMagnet, Inc. “Best Practices for Wireless Site Design”, Copyright 2007. [10] S. ZVANOVEC, P. PECHAC, M. KLEPAL, “Wireless LAN Networks Design: Site Survey or Propagation Modelling” DECEMBER 2003 [11] R. Hutchins and E.W. Zegura. “Measurements from a campus wireless network” in: Proceedings of the IEEE International Conference on Communications (ICC), Vol. 5 (IEEE Computer Society Press, New York, April 2002) pp. 3161-3167. [12] Raymond, B. Jason, S. Paul, A. ”choosing the right wireless network A technology challenge for higher education” .volume 2002,Issue 12. June 11, 2002 Page | 33 Appendix 1 This Appendix contain some information about VisiWave Site Survey program, and how the program works in a briefly, depending on VisiWave Site Survey program user guide [7]. Introduction to VisiWave Site Survey Program The first thing that we have to do is to check the wireless network adapter that we use if it is compatible with the VisiWave program. This can be done by using Check Adapter program, and also we need to check the Wi-Spy Spectrum analyzer driver software if it is completely installed and be sure it is working correctly. After installing the program in suitable laptop we can start VisiWave Site Survey just like any other application. Creating a new Site Survey File Before launching the program we must have the location’s map image first, and then we have to do some changes on this image like shrinking the image at least to a size that is 1000 to 2000 pixels on side and we can also making the lines of the drawn map darker to get better result. After launching the program the main screen of the program is displayed and a dialog box appears asking you to supply a survey map image file that shown in figure (13). By clicking on the Browse button and select the map image of the location that we need to do a site survey test on it and giving some information about it that shown in figure (13), such as Name, Location and Notes and clicking on the OK button. Figure 13: Survey Properties The new survey file is loaded and displayed in the main application window, is shown in figure (14). At the bottom of the screen is a status bar which display massages indicating what just done or what needs to be done and various indicators. At the top of the screen is a tool bar, the tool bar contains buttons that are just shortcuts to the menu. Items found under the various menus, to see what function each menu button performs, hold your mouse over the button without clicking it. A description of the button will appear on the screen. On the right side of the screen is the Access Point List. This lists all the access points found in the current survey. You can select one or more of these access points to have a coverage graph overlaid on the survey map. Page | II Figure 14: The Main Application Window Collecting Wi-Fi Data versus Spectrum Data In VisiWave Site Survey program there are two options for collecting data, these two options are Collect Wi-Fi and Collect Spectrum. If we want to collect Wi-Fi data we have to make sure that we are collecting Wi-Fi data, This is done by making sure a checkmark is next to the Collect Wi-Fi menu item under the Survey menu, This means that while we are collecting survey data, our wireless adapter is collecting radio characteristics such as signal strength and communication channels. If we want to collect spectrum data we should make sure Collect Wi-Fi is not checked and that the Collect Spectrum menu item is checked. Also, we should make sure our wireless adapter is disabled on our PC while collecting spectrum data. While we can collect Wi-Fi data and spectrum data at the same time, the wireless adapter will show up as strong interference in the spectrum data. It is best to collect spectrum data and Wi-Fi data in two different passes. We can collect both types in the same survey file, but it is not good for our results and not advisable when we collect them simultaneously. Page | III Collecting Survey Data After these steps that we discussed before, and directly after loading our map image of the Set Survey Map Scale window appears, shown in figure 15, this window asking for the dimension of the site that we want to collect Wi-Fi strength on it, by choosing the first choice Set Interactively and clicking on two locations on the map that we already knew how many feet between these two location, then write it in this dialog with real length in feet the program will convert the number of feet between these two points to a scale in pixels automatically and then we can press OK and start collecting survey data. Figure 15: Set Survey Map Scale Window We are ready to start collecting survey data. It is here that the actual site survey takes place. We can walk the floor of the site collecting signal characteristics. The computer's display gives a graphical representation of where we are and what has been surveyed. Page | IV Before jumping into collecting data, give some thought to where we plan to survey and how we plan on covering that area. Also keep a look out for possible obstacles or difficult areas to reach on foot. We may need to momentarily stop data collection to deal with these problem areas. This won’t be an issue since normally a survey file consists of several segments of collected data. We can easily collect data in one area of the building, stop the data collection, and then re-start collecting data in a different area. It is very important to check the area that we want to collect Wi-Fi strength on it and searching for at least one access point in the real place, then we start collecting Wi-Fi near this access point and checking if the location of this access point on the map image in the software screen in the same position on the real world, by marking the “mark Estimated AP Locations “under the access points list the blue circle appears( ), which indicates the place of the access point , this will help us to be sure that our scale and the length in feet is correct, if not then we need to reset the scale calculations. There are three ways to collects survey data; these different ways of collecting data are referred to as Capture Modes. Each mode has its own advantages and characteristics. We should use the capture mode that works best for the area that we currently surveying. The software supports the following modes: Point-by-Point capture mode To use this mode we should first press on the point to point Capture Mode Button ( ) in the toolbar, then we can click the location on the survey map image that represent the location of where we standing in the real world, the small marker will appear on the map image indicates where we collected that data, we will see also that the program collected the data and stored the information as a part of survey data, we can also continue to click more points on the map image in different locations, each click adds another point to the survey data. Page | V Continuous capture mode To use this mode we should first press on the point to point Capture Mode Button ( ) in the toolbar, Then press the Start Collecting button ( ). We can click then the location on the survey map image that represent the location of where we standing in the real world, the small marker will appear on the map image and start walking at steady pace in a straight line, while we walk a continuous stream of data collected by the software automatically, when we want to turn off or stop in any position we should click on the map image in this position, in order to tell the software the end of our straight path, The application then spreads the collected data evenly over the line between the first click and the second click, after the second click we can continue walking in a new direction and add another segment by continuing to click the screen on every turn or we can press Stop. Note that when you press Stop ( ), all data collected since the last screen click is not saved. GPS Position Tracking Mode by using a GPS device. To use this mode we should first press on the point to point Capture Mode Button ( ) in the toolbar, we will need to click on your current location to tell the program where the longitude and latitude reported by the GPS is in the real world, and we can do almost the same procedures that we did in the Continuous mode. We will not use this mode in our project. Any of these modes can be used with same survey file. And the modes can be freely intermixed. We should use the Capture mode that works best for the area we are currently surveying. Viewing Data point information When we are collecting data with VisiWave Site Survey we can see how things are going. By putting the mouse pointer over any collected data point or clicking on the data point, detailed information about this data point appears, by this operation we can view data point information. Page | VI Deleting Data Any survey data added to survey file can be removed, if we begin to collect survey data and something does not go right, we can click on the screen in the wrong place or we were interrupted while adding several data points along a path, we can use the Clear->Last Data Segment menu item to remove all the data points between two points or by clicking on the “delete last segment” button ( ) in the toolbar. A segment consists of all the points collected between pressing Start and pressing Stop or any single data point added. Once we have deleted the last segment, we can continue to select this option deleting each previous section until there are no more segments. We can also select Clear-> ALL to remove all the survey data related information, but keep the survey properties intact. VisiWave Site Survey Report This program helps us to organize a simplified report by doing some steps, after launching the program the main screen shown in figure 16 appears, I. Figure 16: VisiWave Site Survey Report Main Screen Page | VII VisiWave Site Survey Report program consist of six different items that can be added to the report by clicking on the Global Properties and select Insert, And, since each report type and subtype has many different variations, hundreds of distinct report items can be created these options which can inserts to our report are: Title Page. Details. Graph. Table. Text. Image. The Graph report type has six subtypes: 2D Contour Graph, 3D Contour Graph, Coverage Area Plot, Stretched Survey Trail, Cross Section Graph, and 3D Scatter Graph. To start any report type the first thing we have to do are loading a survey file and survey map image, then we can start adding the report items. Page | VIII Appendix 2 Discovered access points table only for HIG channel in the laboratory environment “The discovered access points are listed first. Several values are list for each discovered access point. The first column lists the unique identifier assigned to that access point. The next column lists the Media Access Code (MAC) address of the access point. The next column lists the channel used for communication. The next column lists whether WEP encryption is enabled for that access point or not. If the access point either doesn't support WEP (or a more advanced encryption method) or WEP is turned off, then this is set to “No”. The next column lists the mode the access point is working under. For each access point, either “Infra” (for infrastructure mode networks) or “Ad hoc” (for ad hoc or peer-to-peer networks) is listed as the mode. The next two columns lists the number of data points collected from each access point. If the client was associated with the access point at the time the data point was collected, then that point is counted under the heading “Assoc.”. If the client was associated with a different access point, but saw the access point while scanning for other access points, then that point is counted under “Unassoc.” (for Unassociated). The last column lists the Service Set Identifier (SSID) recorded for that access point” [7] MAC Ch Security Mode Assoc Unassoc 00:1e:13:1b:6a:b0 00:1e:13:1b:64:30 00:1e:13:1a:85:50 00:1e:13:1a:e2:90 00:1e:13:6c:d1:a1 00:1e:13:1b:6a:b0 00:1e:13:1b:64:30 00:1e:13:1a:85:50 00:1e:13:1a:e2:90 00:1d:a2:c8:f7:e0 00:1e:13:1a:85:50 00:17:df:a6:c2:b0 00:1d:a2:ca:36:81 00:24:97:f1:5c:40 00:1d:a2:ca:3c:50 00:1d:a2:ca:3c:50 00:1d:a2:ca:3c:50 00:1d:a2:ca:3c:50 00:1d:a2:ca:3c:50 1 11 ? 6 1 1 11 ? 6 6 11 1 11 1 5 4 3 13 11 Clear Clear Clear Clear WPA2 Clear Clear Clear Clear Clear Clear Clear Clear Clear Clear Clear Clear Clear Clear Infra Infra Infra Infra Infra Infra Infra Infra Infra Infra Infra Infra Infra Infra Infra Infra Infra Infra Infra 0 0 1 0 0 0 0 1 0 0 204 0 0 71 1 1 1 1 1 0 9 0 95 95 0 9 0 95 77 77 2 73 59 0 0 0 0 0 00:1d:a2:ca:3c:50 00:1d:a2:ca:3c:50 00:1e:13:1b:64:30 00:1e:13:1b:64:30 00:1e:13:1b:64:30 00:1e:13:1b:6a:b0 00:1e:13:1b:6a:b0 00:1e:13:1b:6a:b0 00:1e:13:1b:6a:b0 00:1d:a2:ca:3b:b0 00:1d:a2:ca:3b:b0 00:1d:a2:ca:3b:b0 00:1d:a2:ca:3b:b0 00:1d:a2:ca:3b:b0 00:1d:a2:ca:3b:b0 00:1d:a2:ca:3b:b0 00:1d:a2:ca:3b:b0 00:1d:a2:ca:3b:b0 00:1d:a2:ca:3b:b0 00:1d:a2:ca:3b:b0 00:1e:13:1a:85:50 00:1e:13:1a:85:50 00:1e:13:1a:85:50 00:1e:13:6c:d1:a0 00:1e:13:6c:d1:a0 00:1e:13:6c:d1:a0 00:1e:13:6c:d1:a0 00:1e:13:6c:d1:a0 00:1e:13:6c:d1:a0 00:1e:13:6c:d1:a0 00:1e:13:6c:d1:a0 00:1e:13:6c:d1:a0 00:1e:13:1a:85:50 00:1e:13:1a:85:50 00:1e:13:1a:85:50 00:1e:13:1a:85:50 00:1e:13:1a:85:50 00:1e:13:1a:85:50 00:1e:13:1a:85:50 00:1e:13:1a:85:50 00:24:97:f1:5c:40 00:1e:13:1b:68:b0 00:1e:13:6c:d2:f0 00:17:df:a6:da:50 00:17:df:a6:da:50 00:1e:13:1b:68:b0 10 6 ? 9 2 9 4 11 ? 9 4 8 7 13 12 11 10 5 3 2 2 12 1 ? 9 5 1 3 12 10 6 8 9 5 3 8 4 7 10 13 ? 9 6 6 ? 5 Clear Clear Clear Clear Clear Clear Clear Clear Clear Clear Clear Clear Clear Clear Clear Clear Clear Clear Clear Clear Clear Clear Clear Clear Clear Clear Clear Clear Clear Clear Clear Clear Clear Clear Clear Clear Clear Clear Clear Clear Clear Clear Clear Clear Clear Clear Infra Infra Infra Infra Infra Infra Infra Infra Infra Infra Infra Infra Infra Infra Infra Infra Infra Infra Infra Infra Infra Infra Infra Infra Infra Infra Infra Infra Infra Infra Infra Infra Infra Infra Infra Infra Infra Infra Infra Infra Infra Infra Infra Infra Infra Infra 1 1 2 1 1 0 0 1 1 2 6 2 1 2 3 10 8 4 3 2 8 7 12 1 1 1 1 2 2 1 4 5 7 5 5 9 12 9 12 7 8 2 0 251 23 8 0 0 0 0 0 0 0 0 0 0 0 0 0 0 0 130 0 0 0 0 0 0 0 0 0 0 97 0 0 0 0 0 0 0 0 0 0 0 0 0 0 0 78 36 0 0 Page | - 2 - 00:1e:13:1b:68:b0 00:1e:13:1b:68:b0 00:1e:13:1b:68:b0 00:1e:13:1b:68:b0 00:1e:13:1b:68:b0 00:1e:13:1b:68:b0 00:1e:13:1b:68:b0 00:1e:13:1b:68:b0 00:1e:13:6c:d1:a0 00:1d:a2:ca:36:81 00:1e:13:1b:64:30 00:1e:13:1b:68:b0 00:1e:13:1b:68:b0 00:1e:13:1b:68:b0 00:1e:13:1a:e2:90 00:1d:a2:c8:f7:e0 00:1d:a2:ca:3c:60 00:1e:13:1a:85:50 00:24:97:f1:7a:a0 00:1d:a2:ca:34:f0 00:1e:13:1b:66:a4 00:1e:13:1b:6b:20 00:1e:13:1b:66:a0 00:1e:13:1b:64:30 00:1d:a2:ca:38:80 00:1d:a2:ca:3c:50 00:1d:a2:ca:3b:b0 00:1e:13:1b:68:b0 00:1e:13:1b:6a:b0 00:1e:13:6c:d8:80 00:24:97:f1:5c:40 6 3 10 8 4 2 7 12 11 6 1 13 1 ? 1 11 11 6 6 6 11 1 11 6 1 1 6 11 6 1 11 Clear Clear Clear Clear Clear Clear Clear Clear Clear Clear Clear Clear Clear Clear Clear Clear Clear Clear Clear Clear WPA2 Clear Clear Clear Clear Clear Clear Clear Clear Clear Clear Infra Infra Infra Infra Infra Infra Infra Infra Infra Infra Infra Infra Infra Infra Infra Infra Infra Infra Infra Infra Infra Infra Infra Infra Infra Infra Infra Infra Infra Infra Infra 65 5 13 2 3 9 7 2 68 0 8 5 36 21 0 0 0 227 454 0 0 40 0 1 0 13 154 434 10 26 402 129 0 0 0 0 0 0 0 104 171 0 0 41 0 205 65 137 267 211 95 76 360 106 194 184 155 240 214 184 287 91 (Discovered access points in the third floor (HIG channel only)) Page | - 3 - Appendix 3 Discovered access points table only for HIG channel in the office environment “The discovered access points are listed first. Several values are list for each discovered access point. The first column lists the unique identifier assigned to that access point. The next column lists the Media Access Code (MAC) address of the access point. The next column lists the channel used for communication. The next column lists whether WEP encryption is enabled for that access point or not. If the access point either doesn't support WEP (or a more advanced encryption method) or WEP is turned off, then this is set to “No”. The next column lists the mode the access point is working under. For each access point, either “Infra” (for infrastructure mode networks) or “Ad hoc” (for ad hoc or peer-to-peer networks) is listed as the mode. The next two columns lists the number of data points collected from each access point. If the client was associated with the access point at the time the data point was collected, then that point is counted under the heading “Assoc.”. If the client was associated with a different access point, but saw the access point while scanning for other access points, then that point is counted under “Unassoc.” (for Unassociated). The last column lists the Service Set Identifier (SSID) recorded for that access point” [7] MAC Ch Security Mode Assoc Unassoc 00:1d:a2:c8:fe:80 00:1e:13:1b:66:a0 00:17:df:a6:da:50 00:1d:a2:c8:fe:80 00:1e:13:1b:66:a0 00:17:df:a6:da:50 00:1e:13:6c:d2:f0 00:1d:a2:ca:34:f0 00:1e:13:6c:d8:80 00:1e:13:1b:6a:b0 00:1e:13:1b:64:30 00:1d:a2:c9:7f:60 00:1d:a2:ca:38:80 00:1d:a2:ca:3b:b0 00:1e:13:1b:68:b0 00:1d:a2:ca:3c:50 00:1d:a2:ca:36:81 00:24:97:f1:5c:40 00:1e:13:6c:d1:a0 00:1d:a2:c8:f7:e0 00:1e:13:1b:6b:20 00:1d:a2:ca:3c:60 1 11 11 1 11 11 6 6 1 6 6 6 1 6 11 1 11 1 1 1 11 11 Clear Clear Clear Clear Clear Clear Clear Clear Clear Clear Clear Clear Clear Clear Clear Clear Clear Clear Clear Clear Clear Clear Infra Infra Infra Infra Infra Infra Infra Infra Infra Infra Infra Infra Infra Infra Infra Infra Infra Infra Infra Infra Infra Infra 0 0 0 0 0 0 0 0 0 0 0 0 0 0 0 0 0 0 0 0 0 0 1 1 1 1 1 1 1 26 60 142 15 1 38 174 159 158 56 171 26 48 70 152 00:1e:13:1a:85:50 00:1e:13:1a:e2:90 00:24:97:f1:7a:a0 00:24:97:f1:7a:a0 6 6 1 1 Clear Clear Clear Clear Infra Infra Infra Infra 0 0 0 0 158 92 146 146 (Discovered access points in the fourth floor (HIG channel only)) Page | - 2 -