1
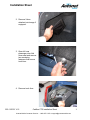
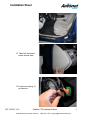
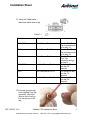
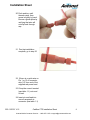
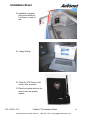
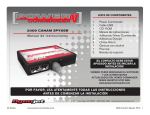
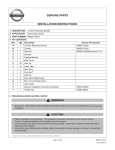
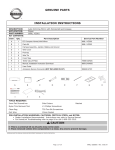
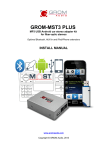
1
Installation
Sheet
Cadillac CTS
2008-2011
In-Car Router
Installation Kit Contents:
Item
1
Description
Power Cable
Qty.
1
2
3
4
5
6
7
8
9
10
11
Nylon Key-Hole Clip
Red Posi-Tap Connector
Black Posi-Tap Connector
8" Nylon Cable tie
2.8 terminal
1.5 terminal
M6 Nut
Dampening Tape
CTS Router Label
Window Decal
4
1
1
4
1
1
1
1
1
1
Installation Procedure:
1. On left wall of trunk,
remove the three
fasteners that secure
the trunk liner.
225-1100-01 V1.5
Cadillac CTS Installation Sheet
Autonet Mobile Customer Service – 1-800-977-2107 or [email protected]
1
1
Installation
Sheet
2. Remove Velcro
attached net storage if
equipped.
3. Open left rear
passenger door fold
down seat and remove
two remaining
fasteners that secure
trunk liner.
4. Remove trunk liner.
225-1100-01 V1.5
Cadillac CTS Installation Sheet
Autonet Mobile Customer Service – 1-800-977-2107 or [email protected]
2
1
Installation
Sheet
5. Using Router Docking
Station as a template,
drill or punch four 1/8”
diameter holes in level
area near rear of trunk
liner. Use cautioninsulation located
behind this area can
bind in drill bit.
6. Attach docking station
using four supplied
nylon Key Hole clips.
7. Drill a 3/8” hole directly
below docking station
for power wire.
8. Run power wire through
hole in trunk liner.
Secure in place with
grommet.
225-1100-01 V1.5
Cadillac CTS Installation Sheet
Autonet Mobile Customer Service – 1-800-977-2107 or [email protected]
3
1
Installation
Sheet
9. Attach black lead of
supplied power cable to
ground stub on rear
wheel well of trunk
using supplied nut.
10. Feed cable through
seat frame into
passenger cabin.
11. Run power cable under
trim to left instrument
panel access area on
the driver’s side of
dash.
225-1100-01 V1.5
Cadillac CTS Installation Sheet
Autonet Mobile Customer Service – 1-800-977-2107 or [email protected]
4
1
Installation
Sheet
12. Open left instrument
power access area.
13. Locate and unplug 14
pin harness
225-1100-01 V1.5
Cadillac CTS Installation Sheet
Autonet Mobile Customer Service – 1-800-977-2107 or [email protected]
5
1
Installation
Sheet
14. Using the Table below,
determine which wire to tap.
Table 1-1
Model Year
Wire/ Pin location
Instructions
2008-2009
Pink Wire on Pin 1
2010
Pink Wire on Pin 13
2011+
Pink Wire on Pin 1
2008-2009
No Pink Wire on Pin 1
2010
No Pink Wire on Pin 13
2011+
No Pink Wire on Pin 1
Use the Red PosiTap connector and
go to step 15
Use the Red PosiTap connector and
go to step 15
Use the Black
Posi-Tap
connector and go
to step 15
Go to step 22 and
use the 2.8
terminal
Go to step 22 and
use the 1.5
terminal
Go to step 22 and
use the 2.8
terminal
15. Unscrew grooved cap
from supplied Posi-Tap
connector, slide Pink
Wire as far is it will go
into the groove in the
cap.
225-1100-01 V1.5
Cadillac CTS Installation Sheet
Autonet Mobile Customer Service – 1-800-977-2107 or [email protected]
6
1
Installation
Sheet
16. Screw tap pin onto cap
and observe that tap is
centered on wire.
Thread by hand until wire
is tightly tapped.
17. Strip 1/8” from end of
power cable
18. Unscrew splice cap from
bottom of Posi-tap
connector and insert
wire.
19. Brush exposed wire
strands with thumbnail
and insert wire strands
into one side of the
metal core.
225-1100-01 V1.5
Cadillac CTS Installation Sheet
Autonet Mobile Customer Service – 1-800-977-2107 or [email protected]
7
1
Installation
Sheet
20. Push and turn until
threads catch, then
screw in tightly by hand.
Ensure a good splice by
verifying that wire will
not slip back through
cap.
21. Posi-tap installation
complete, go to step 25
22. If there is no pink wire on
Pin 1 or 13 of connector,
strip 1/8” from end of the
supplied red power lead.
23. Crimp the correct terminal
(see table 1-1) onto end
of lead.
24. Insert pin and lead into
correct receptacle in
connector (see table 1-1)
225-1100-01 V1.5
Cadillac CTS Installation Sheet
Autonet Mobile Customer Service – 1-800-977-2107 or [email protected]
8
1
Installation
Sheet
25. Reconnect 14 Pin
harness
26. Using supplied cable
ties, secure power lead
in such a way to
prevent any vibration
noise.
27. If Posi-tap connector
was installed, use
supplied vibration
dampening tape to
shield connector from access cover.
28. Replace access cover.
29. In trunk, connect router
docking station cable to
installed power cable.
30. Using supplied cable
ties, secure power
cable is such a way to
prevent any vibration
noise.
31. Replace trunk liner
32. Insert router into
docking station
33. Turn on Key power
and observe blue light
flash - this may take up
to 30 seconds.
225-1100-01 V1.5
Cadillac CTS Installation Sheet
Autonet Mobile Customer Service – 1-800-977-2107 or [email protected]
9
1
Installation
Sheet
34. Installation complete,
the Autonet Mobile InCar Router is ready to
test.
35. Happy Surfing!
36. Place the CTS Router Label
on the router as shown.
37. Place the window decal on the
driver’s side rear quarter
window.
225-1100-01 V1.5
Cadillac CTS Installation Sheet
Autonet Mobile Customer Service – 1-800-977-2107 or [email protected]
10
1
Installation
Sheet
Safety Precautions
WARNING
To prevent injury or fire, take
the following precautions:
• To prevent a short circuit never put
or leave any metallic objects (such as
coins or metal tools) inside the unit.
• If the unit starts to emit smoke
or strange smells, disconnect
immediately and consult the Autonet
Mobile Customer Service Center.
• Do not touch the In-Car Router
during use because the surface of the
unit becomes hot and may cause burns
if touched.
• Mounting and wiring this product
requires skills and experience. For
safety’s sake, leave the mounting and
wiring work to professionals.
CAUTION
To prevent damage to the In-Car
Router, take the following
precautions:
• Be sure the In-Car Router is
connected to a 12v DC power supply
with a negative ground connection.
• Do not open the bottom covers of
the In-Car Router.
• Do not install the In-Car Router in a
spot exposed to direct sunlight or
excessive heat or humidity. Also avoid
places with too much
dust or the possibility of water splashing.
• When replacing a fuse, only use a
new one with the prescribed rating.
Using a fuse with the wrong rating may
cause your unit to malfunction.
• To prevent a short circuit when
replacing a fuse, first disconnect the
wiring harness.
225-1100-01 V1.5
NOTE
• If you experience problems during
installation, consult the Autonet
Mobile Customer Service Center.
• If the In-Car Router does not seem to
be working right, consult the Autonet
Mobile Customer Service Center.
Wiring
• Do not allow the wire to directly
contact the edge of the iron plate by
using grommets.
• Connect the ground wire to a metal
part of the car chassis that acts as an
electrical ground passing electricity to
the battery’s negative terminal. Do not
turn the power on if the ground wire is
not connected.
• Be sure to install the protective fuse
in the power cord.
Cleaning the In-Car Router
If the In-Car Router becomes dirty,
turn off the power and wipe the panel
with a dry silicone cloth or soft cloth.
Do not wipe the In-Car Router with a
hard cloth or a cloth dampened by
volatile solvents such as paint thinner
and alcohol. They can scratch the
surface of the In Car Router and/or
cause the sealant to peel off.
To prevent the battery from
draining please refrain from leaving
the key in the ACC on position. This
powers the In-Car Router up and could
possibly deplete the battery.
Cadillac CTS Installation Sheet
Autonet Mobile Customer Service – 1-800-977-2107 or [email protected]
11
1
Installation
Sheet
FCC WARNING
Exposure to Radio Frequency
Signals
Autonet Mobile is a low power radio
transmitter and receiver. When it is
turned on, it sends out and receives RF
signals. Autonet Mobile complies with
FCC guidelines respecting safe levels of
RF exposure for handled wireless
devices, which in turn are consistent
with the following safety standards
previously set by certain standards
bodies: ·
• ANSI/IEEE C95.1-1999, IEEE Standard
for Safety Levels with Respect to
Human Exposure to Radio Frequency
Electromagnetic Fields, 3 kHz to 300
GHz;
• National Counsel on Radiation
Protection and Measurements
(NCRP) Report 86, - 1986, Biological
Effects and Exposure criterion for Radio
Frequency Electromagnetic Fields; and• International Commission on NonIonising Radiation Protection (ICNIRP)
1988, Guidelines for limiting exposure
to time varying electric, magnetic,
and electromagnetic fields (up to 300
GHz).
To maintain compliance with FCC
exposure guidelines, use only
accessories supplied or approved by
Autonet Mobile, Inc
225-1100-01 V1.5
FCC Compliance Statement
This equipment has been tested and
found to comply with the limits for a
Class A digital device, pursuant to part
15 of the FCC Rules. These limits are
designed to provide reasonable
protection against harmful interference
when the equipment is operated in a
commercial environment. This
equipment generates, uses, and can
radiate radio frequency energy and, if
not installed and used in accordance
with the instruction manual, may cause
harmful interference to radio
communications. Operation of this
equipment in a residential area is
likely to cause harmful interference
in which case the user will be
required to correct the interference at
his own expense.
Specific Absorption Rate Data
Autonet Mobile meets U.S.
government requirements for exposure
to radio waves. Autonet Mobile is a
radio transmitter and receiver. It is
designed and manufactured not to
exceed the emission limits for
exposure to RF energy set by the
FCC. These limits are part of
comprehensive guidelines and
establish permitted levels of
exposure to RF energy for the
general population. These guidelines
are based on standards that were
developed by independent scientific
organizations through periodic and
thorough evaluation of scientific studies.
The standards include a substantial
safety margin designed to assure
the safety of all persons, regardless of
age and health. Changes or
modifications not expressly approved by
the party responsible for compliance
could void the user’s authority to
operate the equipment.
Cadillac CTS Installation Sheet
Autonet Mobile Customer Service – 1-800-977-2107 or [email protected]
2