1
http://www.discproducer.com
TD Bridge
Technical Reference Guide
TD Bridge Overview
Install
Setting
Development Guide for a
Cooperative Application
M00009302
Rev.C
HANTZ
+ PARTNER
The Upgrade Company! www.hantz.com
Deutschland:
Tel.: 0761 / 59 21 00
Fax: 0761 / 58 52 28
Schweiz:
Tel.: 061 / 27 311 - 31
Fax: 061 / 27 311 - 39
Österreich:
Tel.: 01 / 58 55 430
Fax: 01 / 58 55 460
Cautions
• No part of this document may be reproduced, stored in a retrieval system, or transmitted in any form or
by any means, electronic, mechanical, photocopying, recording, or otherwise, without the prior written
permission of Seiko Epson Corporation.
• The contents of this document are subject to change without notice. Please contact us for the latest
information.
• While every precaution has taken in the preparation of this document, Seiko Epson Corporation assumes
no responsibility for errors or omissions.
• Neither is any liability assumed for damages resulting from the use of the information contained herein.
• Neither Seiko Epson Corporation nor its affiliates shall be liable to the purchaser of this product or third
parties for damages, losses, costs, or expenses incurred by the purchaser or third parties as a result of:
accident, misuse, or abuse of this product or unauthorized modifications, repairs, or alterations to this
product, or (excluding the U.S.) failure to strictly comply with Seiko Epson Corporation’s operating and
maintenance instructions.
• Seiko Epson Corporation shall not be liable against any damages or problems arising from the use of any
options or any consumable products other than those designated as Original EPSON Products or EPSON
Approved Products by Seiko Epson Corporation.
Trademarks
EPSON and Disc
countries.
ProducerTM
are registered trademarks of Seiko Epson Corporation in the U.S. and other
Windows, Windows Vista are registered trademarks of Microsoft Corporation in the U.S.A. and other
countries.
For Your Safety
Meaning of Symbols
The following symbols are used throughout this guide in order to draw your attention to important
information for handling the product.
Provides information that must be observed to avoid damage to your equipment or
a malfunction.
Provides important information and useful tips.
Restrictions of Use
When this product is used in a system that must have high reliability and safety level, such as a traffic control
system for aircraft, trains, or ships, a disaster/crime-prevention system, safeguard system, please give due
consideration to ensure overall system high reliability and safety. Employing fail-safe or redundancy design
may be required for incorporating our product.
This product is not intended to collaborate with extremely highly-reliable equipment such as aerospace
equipment, communication equipment for mainline, atomic energy control equipment, medical
equipment. If you are considering the use of this product with those equipment, please make sure to
carefully evaluate the appropriateness of this product to decide whether to use or not.
About This Guide
Purpose
This guide is aimed to provide necessary information for development engineers who take charge of
developing a disc publishing system using PP-100.
Contents
This guide consists of the following chapters.
Chapter 1
TD Bridge Overview
Chapter 2
Install
Chapter 3
Setting
Chapter 4
Development Guide for a Cooperative Application
3
Contents
■ For Your Safety ............................................3
■ Restrictions of Use .......................................3
D e v e l o p m e n t G u i d e fo r a
Cooperative Application ... 37
■ About This Guide ........................................3
■ Functions of a Cooperative Application37
Purpose.................................................................3
Contents................................................................3
■ JDF File ....................................................... 38
Meaning of Symbols .............................................3
■ Contents ......................................................4
TD Bridge Overview .............. 5
■ What is TD Bridge?......................................5
Diagram of Connection .........................................5
System Conceptual Diagram ................................6
System Operation .................................................6
Status Check Method..........................................10
■ System Requirements ...............................11
■ Number of PP-100/PP-100N Units
Connectable11
JDF File Transition..............................................38
JDF File Contents Example ................................39
Setting Item List ..................................................41
Specifying Track Information on Audio CD .........45
Creating Data Discs - Specifying write data file/
folder...................................................................46
Creating a Label File...........................................48
Merge Print of Text..............................................52
Merge Print of Barcodes .....................................56
■ STF File ........................................................ 61
STF File Status Transition...................................62
STF File Status ...................................................63
Error Codes and Remedies ................................65
INFORMATION Code List...................................74
■ JCF File....................................................... 78
■ Available Disc Types .................................12
JCF File Example ...............................................78
■ System Building Examples........................13
■ Log Function ............................................. 79
System Building Example Using PP-100 ............13
System Building Example Using PP-100N .........16
■ Pop-up Message List ................................ 80
■ Added Functions of TD Bridge Ver2.00...19
■ Restrictions.................................................20
Install.................................... 21
■ Install Procedure .......................................21
Installing TD Bridge.............................................21
Starting TD Bridge...............................................24
Setting ................................. 27
■ TD Bridge Settings .....................................27
■ Setting Items List........................................29
Setting EPSON Total Disc Setup ........................30
Setting EPSON Total Disc Net Administrator ......32
Setting the Printer Driver.....................................34
Setting EPSON Total Disc Maker........................35
4
Chapter 1 TD Bridge Overview
TD Bridge Overview
This chapter provides an overview of TD Bridge and explains the functions. In addition to that, the following
information is provided; system requirements, supported disc types, and system examples using TD Bridge
with cooperative applications.
What is TD Bridge?
TD Bridge allows you to interface your system to PP-100/PP-100N for publishing discs by means of HotFolder
method.
TD Bridge allows you to publish CD/DVD discs with write data/print data or print only.
You need to develop a cooperative application for controlling TD Bridge. Then you can publish CD/DVD
discs directly from your system.
EPSON Total Disk Maker is required for using TD Bridge. See PP-100/PP-100N User’s Guide for the details of the
EPSON Total Disk Maker.
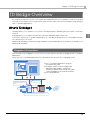
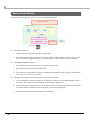
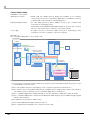
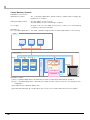
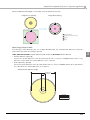
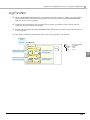
Diagram of Connection
The following shows a diagram of connection in a system that incorporates TD Bridge and a cooperative
application.
In this case, the cooperative application is incorporated in an electronic accounting slip system.
Electronic Accounting System
Electronic Accounting Server
Cooperative Application
Accesses to the existing accounting
system and creates a file to be
burnt onto CDs.ޓ
Computer for connecting with PP-100.
TD Bridge and Total Disc Maker are
installed.
(1) The cooperative application sends job
description files (JDF).
(2) TD Bridge creates CD/DVD images and
label print data (images, characters)
referring to data as instructed by JDF (data
volume available to be referred is limited).
(3) Discs are published.
Network Connection
USB Connection
Monitoring Folder
Write data and print data are sent to PP-100/PP-100N according to the
instructions of the JDF file moved into the monitoring folder.
5
1
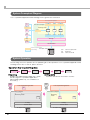
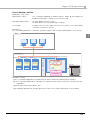
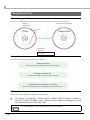
System Conceptual Diagram
Your cooperative application and TD Bridge work together as shown below.
Your Cooperative Application
File
List
In the same computer
Specifying path
Gets status
Creates/Gets status
JDF
STF
JCF
Reads/Updates status
Updates status
Reads/Updates status
Creates/Gets status
Monitoring Folder
Write
data
Specifies
Label
design
TD Bridge
Merge
Merge
print data
Total Disc Maker
Tasks of the cooperative application
PP-100/PP-100N
Tasks of TD Bridge
JDF:
STF:
JCF:
Job Description File
Status File
Job Cancel File
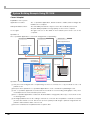
System Operation
The following shows the operation flow for publishing discs and operations of a cooperative application and
TD Bridge in the case of cancel, pause, and error.
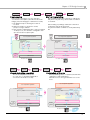
Operation flow for publishing discs
Prepare
Set data
Preprocessing
Preparing
Print
data
End
Move the JDF file into the folder to monitor.
Write
data
Your Cooperative Application
Your Cooperative Application
Print
data
JDF
In the same computer
In the same computer
Monitoring
Folder
Monitoring Folder
STF
STF
JDF
TD Bridge
TD Bridge
Total Disc Maker
Total Disc Maker
PP-100/PP-100N
6
Check during
operation
Setting data
Prepare write data and print data, then create
JDF file using the cooperative application.
(When printing data only, record data is not
necessary.)
Write
data
Starts writing
PP-100/PP-100N
Chapter 1 TD Bridge Overview
Preprocessing
Print
data
When writing is started, the RJD file is changed to
INP (IN Process) file. The job information is written
to a STF file.
When writing or printing is started, the RJD file is
changed to INP (IN Progress) file.
The job information is written to a STF (STatus File)
file.
Write
data
Your Cooperative Application
Print
data
Monitoring
Folder
Monitoring
Folder
Preprocessing
JDF -> RJD
JDF
RJD
Ԙԙ
Ԛ
Start writing
RJD -> INP
RJD
STF
Updated every
5 seconds
TD Bridge
TD Bridge
Disc image
data
Total Disc Maker
㧼㧾㧺
Total Disc Maker
㧼㧾㧺
PP-100/PP-100N
PP-100/PP-100N
Check during
operation
Starts writing
Preprocessing
Set data
Check during the operation
End
Completion of the job
When publishing discs is completed, the INP file is
changed to DON (DONe) file.
DON file moves to a log folder after one or two
hours.
The STF file is updated every five
seconds. The cooperative application
checks the STF file as necessary.
Your Cooperative Application
Your Cooperative Application
Check
as necessary
In the same computer
Check
as necessary
In the same computer
Monitoring Folder
Completed
INP -> DON
Monitoring Folder
INP
STF
INP
Updated every
5 seconds
Total Disc Maker
STF
Job information
is updated
TD Bridge
Disc image
data
㧼㧾㧺
PP-100/PP-100N
DON
Log folder
TD Bridge
Disc image
data
㧼㧾㧺
STF
INP
Job information
is written
Disc image
data
Prepare
1
Your Cooperative Application
In the same computer
In the same computer
Ԛ
End
Start writing/printing
In the preprocessing process, the JDF file is
checked for discrepancy and then a disc burn
image (CD/DVD image) is created if necessary.
(1) TD Bridge keeps monitoring the folder to
monitor.
(2) When a JDF file is found in the folder,
preprocessing is started.
(3) The JDF file is read and preprocessing is started.
At this process, the JDF file is changed to RJD
(Received Job Description) file.
Write
data
Check during
operation
Starts writing
Preprocessing
Set data
Prepare
Total Disc Maker
PP-100/PP-100N
Completed Disc
7
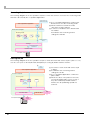
Canceling the job
The following diagram shows the operation sequence when the JCF file is moved to the monitoring folder
and then canceled by the cooperative application.
Specifies JobID to be
created when cancelled
Your Cooperative Application
JCF
In the same computer
Ԙ
Moved into
monitoring folder
Monitoring Folder
DON
STF
INP
Ԛ
JCF
(1) The cooperative application creates a JCF
file and moves it to the monitoring folder.
(2) When a JDF file is found in the folder,
cancel processing is started.
(3) A cancel command is sent to EPSON Total
Disc Maker.
The INP file in the monitoring folder is
changed to DON file.
Cancel
DON <- INP
ԙ
TD Bridge recognizes
JCF file
TD Bridge
Ԛ
Sends cancel command to
Total Disc Maker
Total Disc Maker
PP-100/PP-100N
Pausing the job
The following diagram shows the operation sequence when an event that causes a job to pause occurs,
such as cover open on PP-100/PP-100N, and pause processing by EPSON Total Disc Monitor.
Ԛ
Check
as necessary
(1) Occurrence of an event that causes a job
to pause.
(2) The INP file in the monitoring folder is
changed to STP file.
(3) The cooperative application confirms the
pause status.
(4) When the cause of the pause is removed,
such as PP-100/PP-100N cover is closed, or
the job is restarted by EPSON Total Disc
Monitor, the disc publishing operation is
resumed.
Your Cooperative Application
In the same computer
Monitoring Folder
INP
ԙ
STP
STF
Pausing
INP -> STP
TD Bridge
Ԙ
Total Disc Maker
PP-100/PP-100N
8
Ԙ
Cover
Open
Total Disc Monitor
Stop
Chapter 1 TD Bridge Overview
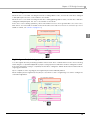
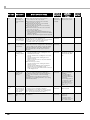
Error handling
When an error occurs while checking the RJD file or writing data to a disc, the RJD file or INP file is changed
to ERR (ERRor) file. The error code is written to the STF file.
When an error occurs while checking the RJD file or writing/printing data to a disc, the RJD file or INP file is
changed to ERR (ERRor) file. The error code is written to the STF file.
In the case of errors during operation, job error information moves to the log folder after one or two hours,
and device error information remains in the STF file unless the reason for the error is removed. (For more
details on STF file, see "STF File" on page 4-61.)
Your Cooperative Application
In the same computer
1
Check
as necessary
Monitoring Folder
JDF
ERR
RJD
INP
STF
Error code
is written
TD Bridge
Disc
image data
PRN
Error during
preprocessing
Total Disc Maker
Error during
operation
PP-100/PP-100N
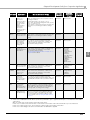
Registering another job during operation
You can register another job during operation. When a JDF file is created and moved to the monitoring
folder using the cooperative application, preprocessing is performed and the JDF file is changed to RJD file.
Then when the preprocessing is completed, the RJD file is changed to INP file and holds the status until the
ongoing job is finished.
Upon completion of the ongoing job, the registered job is automatically started.
When multiple jobs are registered, they are processed in the order of registering. You cannot change the
order after registration.
Write
data 2
Print
data 2
Your Cooperative Application
JDF2
In the same computer
JDF2
Next job becomes INP file
and waits until the
ongoing job is finished
RJD2
INP2
Monitoring Folder
INP1
STF
Error code
is written
Disc
image data 2
PRN 2
TD Bridge
Disc
image data
PRN
Total Disc Maker
PP-100
9
Status Check Method
There are the following three methods to check PP-100/PP-100N status.
Your Cooperative Application
In the same computer
Monitoring Folder
Checks
JDF file
extension
INP
STF
Checks
STF file
Updated every
5 seconds
TD Bridge
Total Disc Maker
Total Disc Monitor
Check
on the screen
PP-100/PP-100N
❏ Checking the STF file
•
See the STF file using the cooperative application.
•
This file contains status information on the job and PP-100/PP-100N, and error code issued
by the cooperative application. We recommend that you use this file for error handling.
❏ Checking the JDF file extension
•
See the JDF file extension using the cooperative application.
•
The status of each job can be checked easily.
•
The extension of the JDF file changes according to the operation status. Only by checking the
extension, you can know the status.
❏ Checking the EPSON Total Disc Monitor screen on the computer
10
•
Activate EPSON Total Disc Monitor on a computer connected to PP-100/PP-100N to check
the status. This cannot be automated by the cooperative application.
•
EPSON Total Disc Monitor allows you to check status of jobs performed directly by EPSON
Total Disc Maker in addition to jobs using the cooperative application.
•
You cannot see the status information over a network.
Chapter 1 TD Bridge Overview
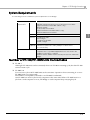
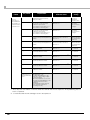
System Requirements
The following shows the minimum system requirements for TD Bridge.
Item
Minimum system
requirements
Specification
OS
Windows Vista SP1
Ultimate/ Enterprise/ Business/ Home Premium/ Home Basic
(Supports Windows Vista 32bit editions only)
Windows XP SP2
Professional/ Home Edition
(Supports Windows XP 32bit editions only)
Windows2000 Professional SP4
CPU
Pentium4 1.4GHz
Memory
For Windows Vista
1GB or larger
For Windows XP/2000
512MB or larger
1
HDD
Disc space half as much again as write data size is required. The
capacity minimum requirement is 1GB. (7200rpm or faster HDD is
recommended)
Software restrictions
EPSON Total Disc Maker Ver 2.00 must be installed on the same
computer. The cooperative application does not need to be
installed on the same computer.
EPSON Total Disc Maker must be used by the user who started TD
Bridge.
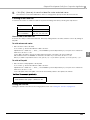
Number of PP-100/PP-100N Units Connectable
❏ PP-100: 1
Although 2 PP-100 units can be connected, when one PP-100 is executing a job, the other PP-100
cannot execute a job.
❏ PP-100N: 10
You can issue a job to 10 PP-100N units at the same time. Operation when connecting 11 or more
PP-100N units is not supported.
The number of computers connected to one PP-100N is unlimited.
One PP-100N can receive jobs from 5 computers at the same time. When a PP-100N receives a
job from a sixth computer or more, TD Bridge on each computer keeps retrying the job.
11
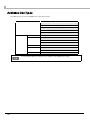
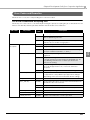
Available Disc Types
The table below shows the available disc types and formats.
Item
Disc types
Specification
CD-R 650MB/700MB
DVD-R 4.7GB (one side, one layer)
DVD+R 4.7GB (one side, one layer)
DVD-R DL 8.5GB (one side, two layers)
DVD+R DL 8.5GB (one side, two layers)
Disc format
Audio CD
Audio CD
Data CD
ISO9660 Level 2
Joliet
UDF1.0.2
VideoCD
VideoCD
Data DVD
UDF1.0.2
UDF1.0.2 + ISO Bridge
DVD-Video
DVD-Video
See PP-100/PP-100N User's Guide for the details of the printable disc types.
12
Chapter 1 TD Bridge Overview
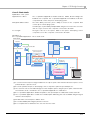
System Building Examples
This section provides examples of system using TD Bridge.
System Building Example Using PP-100
Case 1: Hospital
Explanation of the system
Applications location:
The cooperative application, EPSON Total Disc Maker, and TD Bridge are
installed on a computer connected to PP-100.
Write/print data location:
The write data (medical record) is stored on the medical system server.
The print data (template for merge print) is stored on the computer.
Access right:
The right of access to the data on the medical system server is set on the
computer.
Operation of
the cooperative application: Personnel charged with computerizing
XX department
XX
XX department
department
Server room
Medical System Server
Computer for doctor
Computer for doctor
Medical record
(unique format)
Medical picture
(unique format)
Computer room
Computer for
disc publishing
Cooperative application
Print
data
JDF
Merge
print
Medical record
(general format)
PP-100
Medical picture
(general format)
Monitoring folder
JDF
TD Bridge
Total Disc Maker
Operation scenario
(1) The personnel charged with computerizing receives a commission to copy medical records of a
patient to CD.
(2) The personnel operates the cooperative application to issue commands for publishing the CD.
(3) The cooperative application downloads the medical records including radiograph or any other
medical pictures from the medical system server.
(4) The cooperative application creates JDF file and data for merge print, and copy or move them to the
monitoring folder.
(5) TD Bridge publishes the CD according to instructions of the JDF file. The patient’s medical record and
pictures are written to CD-R. On the CD-R, the hospital special design is printed merged with the
patient’s name and the date of the record.
(6) The CD-R is handed to the patient at the reception desk.
13
1
Case 2: Photo studio
Explanation of the system
Applications location:
EPSON Total Disc Maker and TD Bridge are installed on a computer
connected to PP-100. The cooperative application is installed on another
computer that controls the photo developing system.
Write/print data location:
The write data (customer’s photo data) is stored on the computer that
controls photo developing system.
Several types of print data (multiple label designs from which the customer
can choose) is stored on the computer connected to PP-100.
Access right:
The right of access to the photo data on the photo developing control
computer is set on the computer connected to PP-100.
Operation of
the cooperative application: Photo studio clerk
Photo studio
Photo developer
Customer
Clerk receives photo data
Photos
Order by his/herself
Computer for controlling
photo development
Photo
data
Cooperative application
JDF
Print
data
Merge
print
Order machine
Computer for
disc publishing
Monitoring folder
JDF
PP-100
TD Bridge
Total Disc Maker
Operation scenario
(1) A customer inserts his/her storage medium into the photo print order machine and select photos to be
printed and/or copied to a CD.
(2) The clerk operates the photo developing control computer to print the specified photos.
(3) The customer selects a CD label design from the multiple options using the photo print order machine.
The machine sends commands to the cooperative application to make a CD.
(4) The cooperative application obtains the paths to the specified photo data, and creates a JDF file.
(5) The cooperative application creates the CD label print data using the selected label design merged
with the selected photo.
(6) PP-100 writes selected photo data to a CD.
(7) The created label print image is printed on the CD.
(8) The completed CD is handed to the customer from the clerk.
14
Chapter 1 TD Bridge Overview
Case 3: Backup / Archive
Explanation of the system
Applications location:
The cooperative application, EPSON Total Disc Maker, and TD Bridge are
installed on a backup computer connected to PP-100.
Write/print data location:
The write data is stored on servers.
The print data is stored on the backup computer.
Access right:
The right of access to the data on the server 1, 2, and 3 is set on the backup
computer connected to PP-100.
Operation of
the cooperative application: Automatic operation using the task scheduler (administrator of the servers)
Office
1
Server room
Server 1
Server 2
Computer for data backup
Server 3
Cooperative application
Data to be
backed up
Data to be
backed up
Data to be
backed up
Print
data
JDF
Merge
print
PP-100
Monitoring folder
JDF
TD Bridge
Total Disc Maker
Operation scenario
(1) The cooperative application is activated by the task scheduler and starts backup operation.
(2) The cooperative application calculates the data size and creates a JDF file considering the disc
configuration.
(3) PP-100 writes the backup data to discs.
(4) The backup date and disc number given in the order of the creation are printed on the CD label.
15
System Building Example Using PP-100N
Case 4: Hospital
Explanation of the system
Applications location:
The cooperative application, EPSON Total Disc Maker, and TD Bridge are
installed on a computer.
Write/print data location:
The write data (medical record) is stored on the medical system server.
The print data (template for merge print) is stored on the computer.
Access right:
The right of access to the data on the medical system server is set on the
computer.
Operation of
the cooperative application: Personnel charged with computerizing
XX department
XX
XX department
department
Server room
Medical System Server
Computer for doctor
Computer for doctor
Medical record
(unique format)
Medical picture
(unique format)
Reception desk
Computer room
Computer for
disc publishing
Cooperative application
Print
data
JDF
Merge
print
Medical record
(general format)
PP-100N
Medical picture
(general format)
Monitoring folder
JDF
TD Bridge
Total Disc Maker
Operation scenario
(1) The personnel charged with computerizing receives a commission to copy medical records of a
patient to CD.
(2) The personnel operates the cooperative application to issue commands for publishing the CD.
(3) The cooperative application downloads the medical records including radiograph or any other
medical pictures from the medical system server.
(4) The cooperative application creates JDF file and data for merge print, and copy or move them to the
monitoring folder.
(5) TD Bridge publishes the CD according to instructions of the JDF file. The patient’s medical record and
pictures are written to CD-R. On the CD-R, the hospital special design is printed merged with the
patient’s name and the date of the record.
(6) The CD-R is handed to the patient at the reception desk.
16
Chapter 1 TD Bridge Overview
Case 5: Photo studio
Explanation of the system
Applications location:
The cooperative application, EPSON Total Disc Maker, and TD Bridge are
installed on a computer. The cooperative application is installed on another
computer that controls the photo developing system.
Write/print data location:
The write data (customer’s photo data) is stored on the computer that
controls photo developing system.
Several types of print data (multiple label designs from which the customer
can choose) is stored on the computer connected to PP-100N.
Access right:
The right of access to the photo data on the photo developing control
computer is set on the computer connected to PP-100N.
Operation of
the cooperative application: Photo studio clerk
Photo studio
Photo developer
Customer
Clerk receives photo data
Photos
Order by his/herself
Computer for controlling
photo development
Photo
data
Cooperative application
JDF
Print
data
Merge
print
Order machine
Computer for
disc publishing
Monitoring folder
JDF
PP-100N
TD Bridge
Total Disc Maker
Operation scenario
(1) A customer inserts his/her storage medium into the photo print order machine and select photos to be
printed and/or copied to a CD.
(2) The clerk operates the photo developing control computer to print the specified photos.
(3) The customer selects a CD label design from the multiple options using the photo print order machine.
The machine sends commands to the cooperative application to make a CD.
(4) The cooperative application obtains the paths to the specified photo data, and creates a JDF file.
(5) The cooperative application creates the CD label print data using the selected label design merged
with the selected photo.
(6) PP-100N writes selected photo data to a CD.
(7) The created label print image is printed on the CD.
(8) The completed CD is handed to the customer from the clerk.
17
1
Case 6: Backup / Archive
Explanation of the system
Applications location:
The cooperative application, EPSON Total Disc Maker, and TD Bridge are
installed on a computer.
Write/print data location:
The write data is stored on servers.
The print data is stored on the backup computer.
Access right:
The right of access to the data on the server 1, 2, and 3 is set on the backup
computer connected to PP-100N.
Operation of
the cooperative application: Automatic operation using the task scheduler (administrator of the servers)
Office
Server room
Server 1
Server 2
Computer for data backup
Server 3
Cooperative application
Data to be
backed up
Data to be
backed up
Data to be
backed up
Print
data
JDF
Merge
print
PP-100N
Monitoring folder
JDF
TD Bridge
Total Disc Maker
Operation scenario
(1) The cooperative application is activated by the task scheduler and starts backup operation.
(2) The cooperative application calculates the data size and creates a JDF file considering the disc
configuration.
(3) PP-100N writes the backup data to discs.
(4) The backup date and disc number given in the order of the creation are printed on the CD label.
18
Chapter 1 TD Bridge Overview
Added Functions of TD Bridge Ver2.00
The added functions of TM Bridge Ver2.00 are as follows.
If you are using TD Bridge Ver1.5x or earlier, it is recommended to shift to Ver2.00.
❏ Supports PP-100N.
❏ Can publish DVD-Video. (See "Available Disc Types" on page 1-12.)
❏ Can use a label file made with your other application than EPSON Total Disc Maker.
(See "Creating with another application" on page 4-49.)
❏ Can print a barcode. (See "Merge Print of Barcodes" on page 4-56.)
1
❏ Has a log function. (See "Log Function" on page 4-79.)
19
Restrictions
❏ Pausing a job cannot be made by the cooperative application. Use EPSON Total Disc Monitor to
interrupt the job.
❏ While a job is processed, another job cannot interrupt the ongoing job, and publishing discs
directly from EPSON Total Disc Maker cannot be made.
❏ Status of progress of writing or printing cannot be obtained. A writing complete status also
cannot be obtained when both writing data and printing label jobs are performed.
❏ When confirming the job information of the STF file right after the job is issued, the status may
be shown as STATUS=99 and ERROR=OTH000. In this case, wait for 5 seconds or more, and
then reconfirm the STF file.
❏ TD Bridge does not have a function to obtain job and error logs. Include the function in your
cooperative application if necessary.
❏ Create the JDF file, JCF file, file list file, and text item file in ANSI text format. Other than ANSI
such as Unicode, UTF-8 cannot be used.
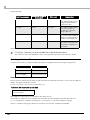
❏ The supported versions of EPSON Total Disc Maker and TD Bridge are as follows.
TD Bridge
Epson Total
Disc Maker
1.00
1.5X
2.0X
1.0X
●
▲
▲
1.5X
▲
●
▲
2.0X
▲
▲
●
●: Supported, ▲: Not supported
❏ PIN Controlled Mode and Security Mode for PP-100N is not supported.
20
Chapter 2 Install
Install
This chapter explains how to install TD Bridge.
Install Procedure
TD Bridge must be installed on the computer on which EPSON Total Disc Maker has already been installed.
2
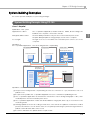
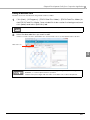
Installing TD Bridge
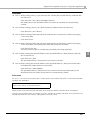
Follow the procedure below to install TD Bridge. Make sure to install TD Bridge as an administrator.
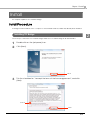
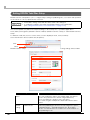
1
2
Double-click on the [setup.exe] icon.
Click [Next].
Click
3
Tick the checkbox for “I accept the terms of the license agreement”, and click
[Next].
Check
Click
21
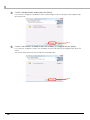
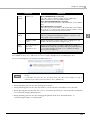
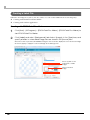
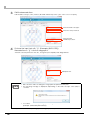
4
Confirm the destination folder and click [Next].
If you need to change the destination folder, click [Change] to browse and specify the target folder,
and click [Next].
Click
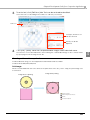
5
Confirm the location of folder to be monitored by TD Bridge and click [Next].
If you need to change the folder, click [Change] to browse and specify the target folder, and click
[Next].
The system folder cannot be selected as a monitorning folder.
Click
22
Chapter 2 Install
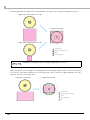
6
Click [Install].
2
Click
7
Click [Finish].
When you do not use TD Bridge immediately after the installation, uncheck the checkbox for “Starts
EPSON TD Bridge”, and click [Finish].
Click
Upgrade installation
You can install a new version of TD Bridge without uninstalling the current TD Bridge.
When upgrading the current TD Bridge, just follow the same procedure for normal installation.
23
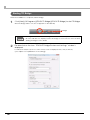
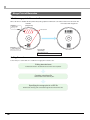
Starting TD Bridge
When the installation is completed, start TD Bridge.
1
Click [Start]-[All Programs]-[EPSON TD Bridge]-[EPSON TD Bridge] to start TD Bridge.
When TD Bridge starts to run, its icon appears on the Task Tray.
TD Bridge
TD Bridge executes various checkings when it starts. If some problem is detected,
an error indication is displayed, and TD Bridge closes itself. See "Checks after
starting TD Bridge" for the details.
2
Double-click on the icon. “EPSON TD Bridge Environment Settings” window is
displayed.
For Windows Vista, the [User Account Control] screen is displayed. Then, click [Continue].
(See chapter 3 for explanation on the settings)
24
Chapter 2 Install
Checks after starting TD Bridge
TD Bridge executes the following checks soon after it starts. If some problem is detected, an error message is
displayed.
• Version check for EPSON Total Disc Maker
Checks the version of EPSON Total Disc Maker, and if it is not supported, the message is displayed
accordingly.
In such a case, install EPSON Total Disc Maker Ver 1.5X or later again.
• Check for the default output equipment
Checks if the default output equipment on the environment settings is [enabled] or not. If it is set to
[disabled], the message is displayed accordingly.
Configure the default output equipment on the environment settings. (See "TD Bridge Settings" on page
3-27 for the environment settings.)
• Check the monitorning folder
Check if the monitoring folder is accessible or not. If not, the message is displayed accodingly.
If the system folder should be set as a monitoring folder, make sure to select a folder other than the
system folder.
If the monitoring folder can not be found, set a monitoring folder on the environment settings again. (See
"TD Bridge Settings" on page 3-27 for environmental settings.)
25
2
26
Chapter 3 Setting
Setting
This chapter explains each of the setting items of TD Bridge, and the other applications settings related to
the cooperative application.
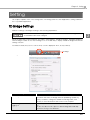
TD Bridge Settings
Make the settings of TD Bridge referring to the following explanations.
Make sure to install TD Bridge as an administrator. Otherwise, the settings can be
checked but can not be changed.
When TD Bridge has not been started, click [Start] - [All Programs] - [EPSON TD Bridge] - [EPSON TD Bridge] to
start TD Bridge. Double-click on the TD Bridge icon on the Task Tray to display “EPSON TD Bridge Environment
Settings” window.
For Windows Vista, the [User Account Control] screen is displayed. Then, click [Continue].
TD Bridge
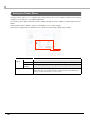
TD Bridge Environment Settings allows you to make the following settings.
Setting Item
Explanation
Monitoring Folder
Specify a folder to be monitored by TD Bridge. (when a JDF file is
moved into this folder, TD Bridge starts disc publishing operation.)
When you want to change the default monitoring folder, click
[Browse] to select a desired folder on the local computer.
Start TD Bridge automatically when
logging on
This allows you to select whether to start TD Bridge automatically or
not.
Tick the checkbox for this option to start TD Bridge automatically
whenever one logs on to Windows.
27
3
Setting Item
28
Explanation
Start EPSON Total Disc Monitor
minimized
This allows you to select whether to minimize the EPSON Total Disc
Monitor window that is displayed when a job is issued.
Tick the checkbox for this option to run EPSON Total Disc Monitor with
its window minimized.
Default output device
When you connecting multiple PP-100/PP-100N duplicators, this allows
you to specify the default one.
If a PP-100/PP-100N other than the default one is specified by the JDF
file, the JDF setting is given priority over the TD Bridge setting.
Default output location in standard
mode
This allows you to specify the default stacker to be used for stacking
ejected discs when the PP-100/PP-100N is used in the standard mode.
The stackers available for ejected discs are Stacker 2 and Stacker 4.
If a stacker other than the default one is specified by the JDF file, the
JDF setting is given priority over the TD Bridge setting.
Print Setting
Label Type
Select label type from the following three options; “CD/DVD Label”,
“CD/DVD Premium Label”, and “EPSON Specified CD/DVD Label”.
Print Mode Setting
Select the print quality from the following two options; “Quality” (for
the best print quality) and “Speed” (for the highest print speed).
Chapter 3 Setting
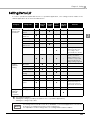
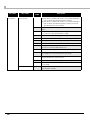
Setting Items List
In order to operate PP-100/PP-100N from the cooperative application, some settings must be made on the
related applications as shown in the table below.
TD Bridge
EPSON
Environment Total Disc
Settings
Setup
Printer
Driver
EPSON
Total Disc
Maker
●
--
--
--
●
--
--
●
--
--
--
--
Drive setting
--
--
●
--
--
Number of retries
--
--
●
--
--
Prints an error
mark or not
--
--
●
--
--
Category
Setting Item
JDF
Settings
related to PP100/PP-100N
operations
Publishing mode
--
--
Disc type in the
stacker
--
Disc type to be
published
Source
--
--
--
▲
Settings
related to
terminal
computers
3
--
TD Bridge automatically
detects the disc type
according to that
specified by the JDF file.
The JDF setting is given
priority over the TD
Bridge setting. If the
stacker is not specified
in the JDF file, the TD
Bridge setting is applied.
Output location
Settings
related to
printing
Remarks
●
●
--
▲
--
Label type
--
●
--
▲
--
Color / Black
--
--
--
●
--
Quality / Speed
--
●
--
▲
--
Bi-directional
printing
--
--
--
●
--
Color setting
--
--
--
●
--
Label size
--
--
--
●
--
Number of
copies
●
--
--
▲
--
Drying time
--
--
--
●
--
--
--
--
--
●
One copy is made
when the number of
copies has not been
specified in the JDF file.
Working folder
● : The setting is required
▲ : Making the setting is possible (not related to the cooperative application)
-- : Making the setting is impossible
The setting items listed above are those available on the listed applications. The JDF file
includes more setting items, but those are omitted here.
For explanation on the working folder, see “Setting EPSON Total Disc Maker”.
29
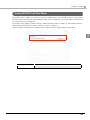
Setting EPSON Total Disc Setup
EPSON Total Disc Setup allows you to configure major setting for publishing discs, such as PP-100 operation
mode selection, source/output stackers selection.
• For PP-100N, settings other than the name cannot be changed.
• To change the settings of PP-100N, use EPSON Total Disc Net Administrator.
(See "Setting EPSON Total Disc Net Administrator" on page 3-32.)
This section explains only about the required settings to be used by the cooperative application.
Click [Start]-[All Programs]-[EPSON Total Disc Maker]-[EPSON Total Disc Setup] to start EPSON Total Disc
Setup.
For Windows Vista, the [User Account Control] screen is displayed. Then, click [Continue].
Select the PP-100 to be used, and click [Properties].
Click
Select
EPSON Total Disc Setup Properties window is displayed. In the window, the following settings can be made.
Setting Item
Name
Stacker
Settings
30
Explanation
You can change the name of PP-100/PP-100N. The name is
used to be specified in the JDF file using Publisher key.
Up to 64 characters can be used for the name.
You cannot register multiple PP-100/PP-100N with the same
name.
Publish Mode
Select the publishing mode from the following three options;
“Standard Mode”, “External Output Mode”, and “Batch
Mode”. See the PP-100 User’s Guide for more information on
the publishing mode.
Chapter 3 Setting
Setting Item
Explanation
Stacker
Settings
Stacker 1,2
When “Standard Mode” is selected:
Select disc type for Stacker 1 that is used for blank discs.
Stacker 2 is used for ejected (published) discs.
When “External Output Mode” is selected:
Select disc type for both Stacker 1 and 2 that are used for blank
discs.
When “Batch Mode” is selected:
Select disc type for both Stacker 1 and 2 that are used for blank
discs. An error occurs if the disc type specified for Stacker 1 and
2 is different from that specified in the JDF file.
Drive
Settings
Drive to Use
Select the drive to be used for writing data to the blank discs.
Select one from the following three options; “Use Both”, “Use
Drive 1 Only”, and “Use Drive 2 Only”.
Number of write
retries
Specify the number of retries in the case of writing errors. The
number can be entered in the range of 0 to 9.
Show error mark on
discs that
experience error
Tick the checkbox when you want to print an error mark on
published discs that may have been improperly burnt (an error
occurs during writing). This helps you to separate the failed
discs from the normal ones.
Printer
Settings
Displaying the confirmation message
If the publish mode is set to “Batch Mode”, the message is displayed before publishing the discs.
This is to avoid using and overwriting the prefabricated discs.
• The confirmation message is displayed only when the publish mode is set to “Batch
Mode”.
• For PP-100N, the next job is not executed unless discs are removed after one job is
finished. (A job can be executed, but no disc is published.)
The messages are displayed in following conditions.
• When publishing the first disc after starting the computer.
• When publishing the first disc after the stacker 2 is removed and re-installation of it is detected.
• When detecting the state that the disc cover is closed after the stacker 2 is removed and re-installation
of it is detected during publishing a disc.
• When publishing the first disc after changing the publish mode from “Standard Mode”, or
“External Output Mode” to “Batch Mode”.
31
3
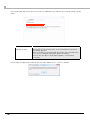
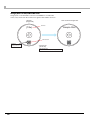
Setting EPSON Total Disc Net Administrator
EPSON Total Disc Net Administrator allows you to configure major setting for publishing discs, such as PP100N operation mode selection, source/output stackers selection.
• EPSON Total Disc Net Administrator is not available for PP-100.
• For more details of EPSON Total Disc Net Administrator , See PP-100N User’s Guide.
This section explains only about the required settings to be used by the cooperative application.
The following procedures should be executed by a user who has the role of administrator.
Click [Start]-[All Programs]-[EPSON Total Disc Maker]-[EPSON Total Disc Setup] to start EPSON Total Disc
Setup.
For Windows Vista, the [User Account Control] screen is displayed. Then, click [Continue].
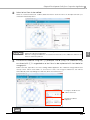
Select the PP-100 to be used, and click [Stat EPSON Total Disc Net Administrator].
Click
Select
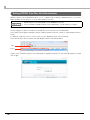
Login screen of EPSON Total Disc Net Administrator is displayed. Input your user name and password, and
click [Login].
32
Chapter 3 Setting
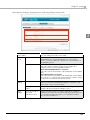
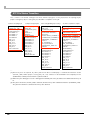
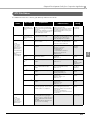
Select [System settings] - [Output device]. Following settings can be made.
3
Setting Item
Explanation
Device name
You can change the name of PP-100N.
Publish
mode
Mode
Select the publishing mode from the following three options;
“Standard Mode”, “External Output Mode”, and “Batch
Mode”. See the PP-100N User’s Guide for more information on
the publishing mode.
Stacker 1, 2
When “Standard Mode” is selected:
Select disc type for Stacker 1 that is used for blank discs.
Stacker 2 is used for ejected (published) discs.
When “External Output Mode” is selected:
Select disc type for both Stacker 1 and 2 that are used for blank
discs.
When “Batch Mode” is selected:
Select disc type for both Stacker 1 and 2 that are used for blank
discs. An error occurs if the disc type specified for Stacker 1 and
2 is different from that specified in the JDF file.
Drive used
Select the drive to be used for writing data to the blank discs.
Select one from the following three options; “Use Both”, “Use
Drive 1 Only”, and “Use Drive 2 Only”.
Number of write
retries
Specify the number of retries in the case of writing errors. The
number can be entered in the range of 0 to 9.
Show error mark on
discs that
experience errors
Tick the checkbox when you want to print an error mark on
published discs that may have been improperly burnt (an error
occurs during writing). This helps you to separate the failed
discs from the normal ones.
Drive
Settings
Printer
Settings
33
Setting the Printer Driver
The printer driver allows you to configure various print settings. This section explains only about the required
settings to be used by the cooperative application.
Click [Start]-[All Programs]-[EPSON Total Disc Maker]-[EPSON Total Disc Maker] to start EPSON Total Disc
Maker.
When EPSON Total Disc Maker is started, click [Publish] - [Tool] - [Print Setting].
Printer driver setting window is displayed. In the window, the following settings can be made.
Setting Item
Mode
Setting
Drying Time
34
Explanation
Color/Black
Select color print or black (monochrome) print.
High Speed
When this is selected, the bi-directional printing method is applied.
Color
Settings
Color tone applied to the printing can be configured.
Specify the time for drying ink (from when label print is finished until
when the disc is moved toward the output stacker). Selectable up to
600 seconds in increments of one second.
Chapter 3 Setting
Setting EPSON Total Disc Maker
On EPSON Total Disc Maker, you need to specify the working folder for the terminal computer connected to
PP-100/PP-100N. Write data and print data are developed to image files in the folder. Make sure that there
is enough space for the image files.
Click [Start]-[All Programs]-[EPSON Total Disc Maker]-[EPSON Total Disc Maker] to start EPSON Total Disc
Maker. When EPSON Total Disc Maker is started, click [Tool] - [Options].
Total Disc Maker setting window is displayed. In the window, the following settings can be made.
3
Setting Item
Working Folder
Explanation
Click [Browse] to specify the working folder.
35
Select [Edit Data] tab. The window shown below is displayed. In the window, the following settings can be
made.
Setting Item
Always show ISO 9660
warning message
Explanation
This setting is applied only when JOLIET or UDF102_BRIDGE format is
specified in the JDF file. When any other format has been specified,
this setting is ignored.
Tick the checkbox to be notified with a message when write data does
not conform to ISO9660. Burning the data is not started.
Uncheck the checkbox to burn data regardless of the ISO9660
conformity.
The following message window will pop up when write data does not conform to ISO9660.
36
Chapter4 Development Guide for a Cooperative Application
Development Guide for a Cooperative Application
This chapter describes necessary information on how to create a cooperative application.
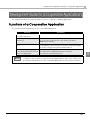
Functions of a Cooperative Application
Incorporate the following functions to the cooperative application.
Functions
Description
Creating a JDF file/Copying to
the Monitoring Folder
Used to print/write to discs. These are necessary functions.
Monitoring a JDF file (Changing
extensions)
You can monitor the job status.
This is not a necessary item since the same information is
obtained from STF files.
Monitoring an STF file/Handling
errors
You can acquire information on such as job status/error code/
the remaining of disc/ink level from STF files. Create and display
necessary messages using the information above.
Creating a JCF file/Copying to
the Monitoring Folder/Monitoring
when cancelling a job
Used when cancelling a job in the middle. The status of
cancelling can be judged with the file’s extension.
These are recommended functions.
It is selectable whether to incorporate your cooperative application in your system side
computer or the computer connected to PP-100/PP-100N. In each case, make sure to
include all required functions in the cooperative application to ensure proper operation.
37
4
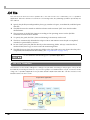
JDF File
The JDF file is an instruction file to publish discs. This file needs to be created by your cooperative
application. When the JDF file is moved into the monitoring folder, disc publishing operation specified by the
file is started.
❏ Specify the job ID (not indispensable), disc type, number of copies, write data file, and label print
data file.
❏ The JDF file must be created in ANSI text format with extension "JDF". Save the file under
desired name.
❏ The extension of the JDF file changes according to the operating status. See the JDF File
Transition section for more details.
❏ To specify the path, the UNC (Universal Naming Convention) can be used.
❏ The file is automatically deleted after a lapse of 60 to 120 minutes since the job is completed,
canceled, or paused due to an error.
❏ Do not create (store) the JDF file directly in the monitoring folder. Always create the file in
another folder, then copy or move it into the monitoring folder.
❏ The JDF file moves from the monitoring folder to the log folder one or two hours after the job is
completed/cancelled/finished abnormally. (See "Log Function" on page 4-79.)
Do not delete the JDF files using your cooperative application.
JDF File Transition
The extension of the JDF file changes according to the job status. Checking on the progress of the job can
be made by monitoring the extension. If you need to grasp more detailed status of a job, monitor the STF file
using your cooperative application. The job status and PP-100/PP-100N status also can be checked on the
EPSON Total Disc Monitor screen.
Cooperative Application
Creating file
Copied to
monitoring folder
JDF
Preprocessing
JDF
Operating
RJD
INP
Finished
abnormally
Monitoring
folder
DON
Pausing
ERR
STP
Automatically
deleted
Cancelling the job can be made from JDF, RJD, INP, and STP.
38
Completed
Automatically
deleted
Chapter4 Development Guide for a Cooperative Application
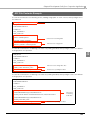
JDF File Contents Example
The JDF file shown below is for burning 10 CDs, making merge print on each of them, and ejecting them to
the Stacker 2.
# Making data CD
Comment line
JOB_ID=001
PUBLISHER=Publisher 0
COPIES=10
OUT_STACKER=2
DISC_TYPE=CD
FORMAT=ISO9660L2
DATA=C:\Datafile\patient1
Instructions for burning data
VOLUME_LABEL=PCdatadisc
LABEL=C:\Datafile\image1.tdd
Instructions for merge print
REPLACE_FIELD=C:\Datafile\print.dat
The JDF file shown below is for burning one Video CD, printing the label, and ejecting the CD to the Stacker
4. Merge print is not specified.
JOB_ID=002
PUBLISHER=Publisher 0
COPIES=1
OUT_STACKER=4
DISC_TYPE=CD
VIDEO=C:\videofile\video.mpg
Instructions for burning video files
VIDEO_TITLE=Educational_video
LABEL=C:\videofile\videoimage1.tdd
Instructions for printing the label
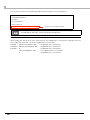
The JDF file shown below is for burning one Audio CD, printing the label, and ejecting the CD to the Stacker
4. Merge print is not specified.
JOB_ID=003
PUBLISHER=Publisher 0
COPIES=1
OUT_STACKER=4
DISC_TYPE=CD
AUDIO_TRACK=PATH:C:\audiodata\musicfile1.wav (TAB) TITLE:music1
(TAB) PERFORMER:Singer (TAB) PREGAP:150
AUDIO_TRACK=PATH:C:\audiodata\musicfile2.wav (TAB) TITLE:music2
Instructions
for burning
audio files
(TAB) PERFORMER:Singer (TAB) PREGAP:150
AUDIO_TITLE=Best_music
LABEL=C:\audiodata\audioimage1.tdd
Instructions for printing the label
39
4
The JDF file shown below is for printing the label, and ejecting the CD to the Stacker 4.
JOB_ID=004
PUBLISHER=Publisher 0
COPIES=1
OUT_STACKER=4
DISC_TYPE=CD
LABEL=C:\labelfile\labelimage1.tdd
Instructions for printing the label
An image file created by another application and converted to PRN file using the PP-100/
PP-100N printer driver also can be specified as the label file.
About comment lines
When writing the JDF file, lines which starts with "#” are regarded as comment lines, and ignored. Lines
which starts with other than “#” are not regarded as comment lines.
Example 1:
40
#DATA=C:¥Data¥test1.dat
← Regarded as a comment line.
Ecample 2: ##DATA=C:¥Data¥test1.dat
← Regarded as a comment line.
Example 3:
← Regarded as a comment line.
← Not regarded as a comment line.
← Regarded as a comment line.
#
DATA=C:¥Data¥test1.dat
#
Chapter4 Development Guide for a Cooperative Application
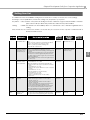
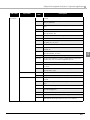
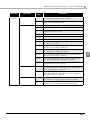
Setting Item List
The table below lists the available setting items in a JDF file. You may not need some of the settings.
Referring to each explanation, include the settings only required for your system.
Key name:
Case sensitive. A key name including lowercase characters is ignored as an invalid command.
Spaces before and/or after a key name also make the key name invalid.
Setting:
Characters written from immediately after "=" to a linefeed code or EOF are regarded as the
setting.
End of instruction: The instructions written on the file are processed from the top and continued until a
linefeed or EOF is found.
Key name
Explanation
How to specify the setting
Maximum
characters
Available
characters
(strings)
Necessary
/Arbitrary
JOB_ID
Specify a job ID
for identification.
Specify a job ID that has not been used for existing
jobs.
(this ID is used in a STF file as hereinafter described,
and for canceling the job using a JCF file.)
When no job ID is specified, TD Bridge will
automatically create the ID.
40
characters
One byte
alphanumeric, "-", "_"
Arbitrary
PUBLISHER
Specify a name
of disc publishing
machine to be
used for the job.
Use the name registered by EPSON Total Disc Setup.
When not specified, the publishing machine
specified in the Environment Setting of TD Bridge will
be used.
If the Environment Setting also has not specified the
machine, the machine registered by EPSON Total
Disc Setup will be used as long as only one machine
has been registered.
(When multiple machines have been registered, an
error will occur)
64
characters
Machine names
registered by EPSON
Total Disc Setup.
Arbitrary
COPIES
Specify the
number of discs
to be published.
[When the publisher is in Standard Mode]
Selectable from 1 to 1,000.
[When the publisher is in External Output Mode]
When the same disc type is specified for stacker 1
and 2
Selectable from 1 to 100.
When the disc type is different for each of stacker
1 and 2
Selectable from 1 to 50.
[When the publisher is in Batch Mode]
Selectable from 1 to 100.
[Common to the all modes]
When not specified, only one disc will be
published.
Four
characters
One bite numbers
Arbitrary
OUT_
STACKER
Specify an output
stacker.
[When the publisher is in Standard Mode]
When selecting the stacker 2 as the output
stacker, specify "2".
When selecting the stacker 4 as the output
stacker, specify "4".
When not specified, the stacker specified in the
Environment Setting of TD Bridge is used.
If the Environment setting also has not specified
the output stacker, the stacker 2 will be used.
[When the publisher is Not in Standard Mode]
Invalid (ignored if a stacker is specified)
One
character
"2" or "4"
Arbitrary
DISC_
TYPE
Specify the type
of disc to be
published.
Specify "CD" when publishing a CD.
Specify "DVD" when publishing a single-layer DVD.
Specify "DVD-DL" when publishing a two-layer DVD.
Six
characters
Any of "CD", "DVD",
"DVD-DL"
Necessary
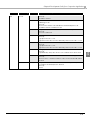
4
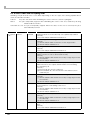
41
Maximum
characters
Available
characters
(strings)
Necessary
/Arbitrary
Key name
Explanation
How to specify the setting
WRITING_SP
EED
Specify the
writing speed
depending on
the specified disc
type.
Specify the write speed [N] (_X write).
[When CD-Rs are set in the source stacker]
Any of "40", "32", "24", "16", "10", "4".
[When DVD-Rs are set in the source stacker]
Any of "12", "8", "6", "4", "2".
[When DVD+Rs are set in the source stacker]
Any of "12", "8", "6", "4", "2.4".
[When DVD-R DLs are set in the source stacker]
Any of "8", "6", "4", "2".
[When DVD+R DLs are set in the source stacker]
Any of "8", "6", "4", "2.4".
[Common to the all disc types]
When a write speed other than listed above is
specified, the next slower speed in the available
settings is applied.
When not specified, the highest speed is applied.
Three
characters
* Periods are
included.
Any of
"40","32","24","16","12",
"10","8","6","4","2","2.4".
Arbitrary
COMPARE
Specify whether
to compare the
written data with
the source data.
Specify "YES" when carrying it out.
Specify "NO" when not carrying it out.
The data are not compared if “YES” is not specified.
In the case of Audio CDs, the data are not
compared even if “YES” is specified.
Three
characters
"YES" or "NO"
Arbitrary
CLOSE_
DISC
Specify whether
to close (finalize)
the burnt disc.
Specify "YES" when closing the disc after burning.
Specify "NO" when not closing the disc after burning.
If not specified, the disc will be closed. This setting
cannot be applied to DVD+R DL and DVD-R DL
(ignored when any of the disc types has been
selected).
Three
characters
"YES" or "NO"
Arbitrary
FORMAT
Specify a disc
format when
creating a data
disc.
[When the disc type is CD]
Specify "ISO9660L2" when creating the CD in
ISO9660 Level 2 format.
Specify "JOLIET" when creating the CD in Joliet
format.
Specify "UDF102" when creating the CD in
UDF1.0.2 format.
When not specified, the CD is burnt in ISO9660
Level 2 format.
[When the disc type is DVD]
Specify "UDF102" when creating the DVD in
UDF1.0.2 format.
Specify "UDF102_BRIDGE" when creating the
DVD in UDF1.0.2 + UDF Bridge format.
When not specified, the DVD is burnt in UDF1.0.2
+ UDF Bridge format.
13
characters
Any of
"ISO9660L2","JOLIET","U
DF102","UDF102_BRID
GE"
Arbitrary
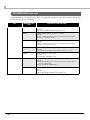
DATA (*1)
Specify folders
and files to be
written to the
data disc.
When creating data discs, specify the directory path
to the source file and that to the destination.
The directory path to the source file must be the
path from the computer on which TD Bridge
installed.
(For explanation on the directory path to the
destination, see "Creating Data Discs - Specifying
write data file/folder".)
511
characters
Up to 128 levels of
directory hierarchy is
available.
The path length to
the target folder or
file must be within 255
characters.
The following symbols
or characters cannot
be used for the file
and folder name: "\",
"/", ":", "?", """, "<", ">",
and "|". (*2)
Arbitrary
DATA_
LIST (*1)
When specifying
write data using a
file list, specify the
directory path to
the file list file.
The directory path must be the path from the
computer on which TD Bridge is installed.
(For explanation on the directory path to a source
file specified in the file list file, see "Creating Data
Discs - Specifying write data file/folder".)
255
characters
Characters valid as a
directory path
Arbitrary
VOLUME_
LABEL (*1)
Specify a Volume
Label of the data
disc.
Specify a Volume Label to set the volume label to
the data disc.
62
characters
English one byte
uppercase
characters
One byte numeric
characters and "_"
also can be used. (*4)
Arbitrary
(*1)
42
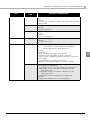
Chapter4 Development Guide for a Cooperative Application
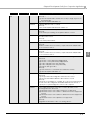
Key name
Maximum
characters
Available
characters
(strings)
Necessary
/Arbitrary
Explanation
How to specify the setting
VIDEO (*3)
When burning
Video CDs,
specify the
directory path to
the video file to
be set as video
track.
When burning
DVD-Video,
specify the
directory path to
the VIDEO_TS
folder.
The directory path must be the Video file path or the
VIDEO_TS folder path from the computer on which
TD Bridge is installed.
When burning Video CDs, specify “CD” for
“DISC_TYPE,” and when burning DVD-Video, specify
“DVD” or “DVD-DL” for it.
When "DATA" or "DATA_LIST" has been specified, this
setting becomes invalid. (ignored if the setting is
made)
255
characters
Characters valid as a
directory path
Arbitrary
VIDEO_
TITLE (*3)
Specify a video
title to set the title
to the Video CD.
Specify a character string as the video title.
When "DATA" or "DATA_LIST" has been specified, this
setting becomes invalid. (ignored if the setting is
made)
32
characters
d characters
Arbitrary
IMAGE (*5)
Specify a
directory path to
an image file
when burning
discs using the
image file.
The image file directory path must be the path from
the computer on which TD Bridge is installed.
When any of "DATA", "DATA_LIST", or "VIDEO" has
been specified, this setting becomes invalid
(ignored if the setting is made)
255
characters
Characters valid as a
directory path
Arbitrary
AUDIO_TRA
CK
When burning
Audio CDs,
specify the track
information.
Specify the track information for all the tracks.
When "DATA", "DATA_LIST", "VIDEO" or "IMAGE" has
been specified, this setting becomes invalid.
(ignored if the setting is made)
See "Specifying Track Information on Audio CD" on
page 4-45 for the details.
520
characters
Music file path:
Not limited
Track title:
Characters
changeable into
multi-byte
characters.
Track artist name:
Characters
changeable into
multi-byte
characters.
Pregap:
Half size values
Arbitrary
4
AUDIO_TITLE
Specify an album
title to set the title
to the Audio CD.
Specify a character string as the Audio CD title.
When "DATA","DATA_LIST","VIDEO" or "IMAGE" has
been specified, this setting becomes invalid.
(ignored if the setting is made)
128
characters
Characters
changeable into
multi-byte
characters.
Arbitrary
AUDIO_PER
FORMER
Specify an artist
name to set the
name to the
Audio CD.
Specify a character string as the Audio CD artist.
When "DATA","DATA_LIST","VIDEO" or "IMAGE" has
been specified, this setting becomes invalid.
(ignored if the setting is made)
128
characters
Characters
changeable into
multi-byte
characters.
Arbitrary
LABEL
When making a
label print,
specify the
directory path to
the label data
file.
The label file directory path must be the path from
the computer on which TD Bridge is installed.
A file made with EPSON Total Disc Maker (.tdd), or a
PRN/ BMP/JPEG/TIFF/PNG file is specified for a label
file.
255
characters
Characters valid as a
directory path
Arbitrary
REPLACE_
FIELD
When making a
merge print,
specify the
directory path to
the text item file.
The text item file directory path must be the path
from the computer on which TD Bridge is installed.
(When a PRN file is specified as the label data file,
merge print cannot be made. For more details on
the merge print, see "Merge Print Settings".)
255
characters
Characters valid as a
directory path
Arbitrary
LABEL_AREA
Specify the
printing area for
the labal image.
Specify the outside and inside diameters
Unless one of these file types: BMP/JPEG/TIFF/PNG
has been specified for the LABEL key, this setting
becomes invalid. (ignored if the setting is made)
For more details, see "Specifying the print area" on
page 4-51.
4 characters
One bite numbers
Arbitrary
*1 Specify this item when creating data discs.
*2 In the case of ISO9660L2 format, directory hierarchy is limited to up to eight levels with up to 31 characters for the folder
or file name.
Only "a" characters can be used for the folder or file name.
In the case of Joliet format, the number of characters for the folder or file name is limited to up to 64 characters.
In the case of UDF format, up to 126 characters can be used for the folder or file name.
In the case of UDF Bridge format, the same limitation as ISO9660L2 is applied.
43
*3 Specify only when creating video CDs.
*4 In the case of ISO9660L2 format, the number of characters is limited to up to 32. Characters other than English one byte
uppercase/numerical characters and "_" cannot be used.
In the case of Joliet format, the number of characters is limited to up to 16. Characters other than English one byte
uppercase/numerical characters and "_" cannot be used.
In the case of UDF format, up to 62 characters can be used.
In the case of UDF Bridge format, the same limitation as ISO9660L2 is applied.
*5 Specify only when burning discs using image files.
44
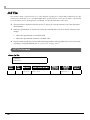
Chapter4 Development Guide for a Cooperative Application
Specifying Track Information on Audio CD
The following explains how to specify the track information on Audio CDs. If you want to write more than
one piece of track information, repeat specification and line feed for the number of tracks you want.
AUDIO_TRACK=PATH:musicfile(TAB)TITLE:tracktitle(TAB)PERFORMER:trackartist(TAB)PREGAP
• Music file path (necessary)
Specify the file to be set for the Audio CD track as a path from the computer on which TD Bridge is
installed. The exention of settable files is either WAV, MP3 or WMA.
Specify one after keyword "PATH:".
• Track title (arbitrary)
Enter the title you want to specify for the Audio CD track.
Specify one after keyword "TITLE:".
The tab character can not be used for a title character.
• Track artist name (arbitrary)
Enter the artist name you want to specify for the Audio CD track.
Specify one after keyword "PERFORMER:".
The tab character can not be used for a track artist name.
• Pregap (arbitrary)
Enter the pregap you want to specify for the Audio CD track by frame.
The range of settable values is from 0 to 269999. (00:00:00 frame to 59:59:74 fame)
Specify one after keyword "PREGAP:".
4
Examples
When specifying a music file only
AUDIO_TRACK=PATH:C:\Audiodata\musicfile1.wav
When specifying all of them
AUDIO_TRACK=PATH:C:\Audiodata\musicfile1.wav(TAB)TITLE:music1(TAB)PERFORMER:Singer(TAB)
PREGAP:150
When specifying only the music file paths to more than one music files
AUDIO_TRACK=PATH:C:\Audiodata\musicfile1.wav
AUDIO_TRACK=PATH:C:\Audiodata\musicfile2.wav
AUDIO_TRACK=PATH:C:\Audiodata\musicfile3.wav
45
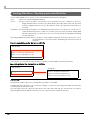
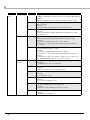
Creating Data Discs - Specifying write data file/folder
The following explains how to specify source write data file/folder and the destination.
Style:
DATA=source file/folder(TAB)destination
Source:
Specify a directory path to the desired source file/folder from the computer on which TD
Bridge installed. When a folder is specified, all files and sub folders under the specified
folder are regarded as the source to be written to a disc. The specified folder itself is not
included.
Destination: Specify an absolute path to the destination file/folder from the root directory of a disc.The "\"
symbol that represents the root directory of a disc is not necessary. And when writing data
directly under the disc root directory, you do not need to specify the destination including
the TAB characters.
Specifying multiple files/folders:When you want to write multiple files/folders at a time, specify the source
and destination for each file/folder separating each instruction with a
linefeed.
Directly specifying write data in a JDF file
JOB_ID=XXX
:
DATA=C:\abc\aaa.txt(TAB)abc\aaa.txt
DATA=C:\abc\bbb.txt(TAB)abc\bbb.txt
DATA=C:\xyz/ccc.pdf(TAB)xyz\ccc.pdf
:
In the JDF file, you can directly write the directory path to the write data, or specify a file list file.
Specifying file list file (list.dat) in a JDF file
JOB_ID=XXX
:
DATA_LIST=C:\abc\list.dat
:
list.dat file
DATA=C:\abc\aaa.txt(TAB)abc\aaa.txt
DATA=C:\abc\bbb.txt(TAB)abc\bbb.txt
DATA=C:\xyz\ccc.pdf(TAB)xyz\ccc.pdf
File list file
The file list file is a file to be used for writing directory paths to write data.
Creating the file list file allows you to minimize changes of JDF file for specifying write data. The file list file
must be written in ANSI text format.
(The following extensions cannot be specified; CDN, CER, DON, ERR, INP, JCF, JDF, and RJD. See above
"Specifying file list file (list.dat) in a JDF file" for how to write the directory paths in the file.)
46
Chapter4 Development Guide for a Cooperative Application
Examples
❏ Case 1: When writing a file (C:\abc\data.txt) into a folder (abc) located directly under the disc
root directory.
Style: DATA=C:\abc\data.txt(TAB)abc\data.txt
The folder (abc) in the destination does not need to be specified. It is automatically
created.
❏ Case 2: When writing a file (C:\abc\data.txt) directly under the disc root directory.
Style: DATA=C:\abc\data.txt
❏ Case 3: When creating a folder (abc) directly under the disc root directory without specifying
source write data.
Style: DATA=abc
❏ Case 4: When creating a folder (abc) directly under the disc root directory without specifying
source write data, and creating sub folder (def) under the abc folder.
Style: DATA=abc\def
You do not need to specify a folder (abc) and folder (abc\def) separately.
❏ Case 5: When writing files and sub folders in the specified folder (C:\data) directly under the
disc root directory.
Style: DATA=C:\data
The specified folder (C:\data) itself is not written to the disc.
❏ Case 6: When writing files and sub folders in the specified folder (C:\data) into a folder (abc)
located directly under the disc root directory.
Style: DATA=C:\data(TAB)abc
The specified folder (C:\data) itself is not written to the disc.The folder (abc) in the
destination does not need to be specified. It is automatically created.
Error cases
An error occurs when the specified file or folder has the same name with a file or folder that is already
existing in the destination.
DATA=C:\abc. (*"abc.txt" is existing in the folder.)
DATA=C:\def. (*"abc.txt" is existing in the folder.)
When a folder is specified, files and sub folders in the folder are written with their names unchanged.
However, the specified folder is not written to the disc. The above example will cause an error because the
file (abc.txt) exit both in the folder (C:\abc) and the folder (C:\def).
47
4
Creating a Label File
Label file is an image file to print on the disc surface. You can create a label file in the following ways.
❏ Creating with EPSON Total Disc Maker
❏ Creating with another application
Creating with EPSON Total Disc Maker
1
Click [Start] - [All Programs] - [EPSON Total Disc Maker] - [EPSON Total Disc Maker] to
start EPSON Total Disc Maker.
2
Click [Label] and select [Background] tab. Select [Image] in the [Type] box, and
specify a folder in where label image files are stored in the [Source] box.
When the folder is specified, all available images in the folder are displayed. Select a desired image
and click [Apply] to apply the selected image as the background.
Directory path to the
folder that contains
images
Select a desired
image
48
Chapter4 Development Guide for a Cooperative Application
3
To enter text, click [Edit Item] tab. Text can be entered and edited.
Select the text icon and drag in the edit box to edit text you entered.
Text icon
Font type, size and color
can be selected
The layout can be
adjusted
4
Click [File] - [Save]. Save the completed label image under a desired name.
The extension of the saved label file is "TDD". Printing the created label image on discs can be made
by specifying the TTD file using the JDF file.
Creating with another application
Create a label file using your other applications than EPSON Total Disc Maker.
Create a file as BMP/JPEG/TIFF/PNG.
Print image
When a created label file size is the same as the print area of the disc (1700 × 1700), the print image is as
shown below.
Image before printing
Image after printing
Print area of the disc
Outside of the print area of the disc
Label file
Cut area of the label file
49
4
When the label file size is different from the print area of the disc (1700 × 1700), it is enlarged or reduced.
Larger than the print area of the disc
Image after printing
Smaller than the print area of the disc
Print area of the disc
Outside of the print area of the disc
Label file
Cut area of the label file
If a label file is enlarged/reduced, its image quality becomes worse.
When the label file is a rectangle, it is enlarged/reduced keeping the aspect ratio, so that the long side
becomes the same as the diameter of the disc print area (1700 × 1700). Also, margins appear on the left,
right, top or bottom of the print area.
Image before printing
Image after printing
Print area of the disc
Outside of the print area of the disc
Label file
Cut area of the label file
Margin
50
Chapter4 Development Guide for a Cooperative Application
When the label file has margins or trim marks, they are printed as they are.
Image before printing
Image after printing
Print area of the disc
Outside of the print area of the disc
Label file
Margin
Specifying the print area
If the file type of the label file is any one of BMP/JPEG/TIFF/PNG, the outside/Inside diameter of the print
area can be specified. This setting is optional.
LABEL_AREA=DiscDiamOut: Outside diameter (tab character) DiscDiamIn: Inside diameter
• Outside diameter (optional)
Specify the outside diameter of the disc print area in units of 1/10 mm. Available area is 700 to 1194.
When it is not specified, the outside diameter is set to 1160 mm.
• Inside diameter (optional)
Specify the inside diameter of the disc print area in units of 1/10 mm. Available area is 180 to 500. When it
is not specified, the outside diameter is set to 450 mm.
Outside/inside diameter image
DiscDiamOut
DiscDiamIn
Print area
Outside of print area
51
4
Merge Print of Text
What is merge print?
Text items of a label file are printed by being replaced with texts written in a text item file.
Print result with merged text
Label file
image1.tdd)
Text item
{Title}
Sample Disc
{User ID}
[AD001]
Text item file
print.dat)
Title=Sample Disc
User ID=[AD001]
Setting Procedure
Follow the procedure below to make the merge print.
Editing text items
Edit text items in the label file and set them to be replaced.
Creating a text item file
Write character strings to be merged into the label file.
Specifying the merge print in a JDF file
Write the full directory path of the label image file and the text item file.
Editing of text item
Edit text item in the label file using EPSON Total Disc Maker.
1
Click [Start] - [All Programs] - [EPSON Total Disc Maker] - [EPSON Total Disc Maker] to
start EPSON Total Disc Maker. Open a label file to be used as the background, and
click [Label] and select [Edit Item] tab.
It is also available to create a new label file or use template file.
52
Chapter4 Development Guide for a Cooperative Application
2
Select a text item to be edited.
When no text item has been created, add a text item. Click the text icon and put text item you
entered in a desired position.
Determine the text item box size considering the size and number of characters to be
put into the box by merge print.
When the merged characters exceed the text item box, the characters that run off
the box cannot be printed.
3
Enclose the character string with "{ }" (example: Title ➔ {Title}). The character string
enclosed with "{ }" is regarded as a text item to be replaced with text data for
merge print.
Edit the font size, type and color. These settings will be applied to the characters merged at the text
item position. When "Automatic" is selected for "size", the merged characters size will be
automatically reduced/enlarged so that they fit into the text item box.
Font type, size and color
can be selected
The layout can be
adjusted
Character strings that are not enclosed with "{ }" will be printed as they are.
53
4
Merge Print Rules
Character strings to
be merged
Text item example
Print result
Explanation
{Title}
Title=Sample
Sample
This is a basic text item.
The character string to be
merged is printed at the
text item position.
{ID} : KEN
ID=001
001 : KEN
The character string that is
not enclosed with "{ }"
remains as it is without
being replaced.
{{Memo}
Memo=Text memo
{Memo}
The first "{{" is replaced with
"{", however, the character
string is not regarded as a
text item to be replaced.
{Address}
-
Blank
When no character string is
specified for the text item,
the text item is replaced
with blank.
When carrying out multiple merge print jobs, perform Step 2 and 3 for each job.
4
Click [File] - [Save as] to save the label file under a desired name.
The extension of the saved label file is "TDD". For merge print, specify the TDD file in the JDF file.
Creating a Text Item File
A text item file is a file of character data to be printed. Arrange the file by following the steps below.
Item
Content
File type
Text (ANSI) format
File name
Optional
File extensions that
are not available
CDN, CER, DON, ERR,
INP, JCF, JDF, RJD, STP
How to write a Text Item File
Enter a text item that is exactly same as that entered in the label file, and enter =, then enter a character
string to be replaced with the text item.
(You do not need to enclose the text item with "{ }".)
Text item file example (print.dat)
Title=Sample Disc
User ID=[AD001]
Tab characters cannot be used. Using them will cause an error.
The number of characters to be merged must be within 1024. Exceeding the limit will cause an error.
("<" is counted as two characters because it is converted into "<<" by the internal processing.)
When no character string is specified for the text item, the text item is replaced with blank.
54
Chapter4 Development Guide for a Cooperative Application
Setting the JDF File
Specify the directory path of the label file and text item file using the JDF file.
The following is an example of JDF file in which a label file (image.tdd) and text item file (print.dat) are
specified.
JDF File (demo.jdf)
JOB_ID=PATIENT00120071100
PUBLISHER=Publisher 0
COPIES=1
OUT_STACKER=4
Specifying the text item file
DISC_TYPE=CD
FORMAT=ISO9660L2
Specifying the label file
DATA=C:\TDBridgeDemoFolder\hospital\ServerRoom\patient1
LABEL=C:\TDBridgeDemoFolder\hospital\uketsuke\LabelImage\image1.tdd
REPLACE_FIELD=C:\TDBridgeDemoFolder\hospital\uketsuke\ReplaceFieldData\print.dat
4
55
Merge Print of Barcodes
What is merge print of barcodes?
Barcode items in a label file are printed by being replaced with barcode values written in a text item file.
Input text
{BARCODE}
Label file
(image2.tdd)
Barcode type : ITF
Print result with merged text
Barcode item
Input text
{BARCODEFILE}
Text item file
print2.dat)
Barcode type : QR CODE
BARCODE=01234567
BARCODEFILE=FILE㧔TAB㧕C:\data\test.dat
Setting Procedure
Follow the procedure below to make the merge print of barcodes.
Editing barcode items
Edit barcode items in the label file and set them to be replaced.
Creating a text item file
Write barcode values and file path.
Specifying the merge print in a JDF file
Write the full directory path of the label image file and the text item file.
56
Chapter4 Development Guide for a Cooperative Application
Editing of barcode item
Edit barcode item in the label file using EPSON Total Disc Maker.
1
Click [Start] - [All Programs] - [EPSON Total Disc Maker] - [EPSON Total Disc Maker] to
start EPSON Total Disc Maker. Open a label file to be used as the background, and
click [Label] and select [Edit Item] tab.
It is also available to create a new label file or use template file.
2
Select the barcode item you want to edit.
If there is no barcode item, add a barcode. Click the barcode icon, and add the barcode item.
Barcode icon
4
Make sure the frame of the barcode item is large enough to input the longest data
available, so it can be printed with no problem.
If data to be input is larger than the frame of the barcode, it cannot be printed.
57
3
Edit the barcode item.
Edit the barcode type, entry method, and HRI character position. (See “Text” for how to input)
Select the barcode type.
Select the entry method.
Select the HRI
character position.
4
Enclose the input text with ”{}”. (Example: {BARCODE})
Barcode item in “{}” is for the merge print.
The barcodes are printed on the disc, though they are displayed as diagonal lines.
Edit input text.
• Barcode items without setting the merge print are printed as they are.
• The following message is displayed depending on the barcode type. Click [OK] to
continue.
• You cannot make multiple merge print settings for one barcode item.
(Example: [BARCODE][BARCODE_2]
If you want to make multiple merge print settings, repeat Steps 2 to 4.
58
Chapter4 Development Guide for a Cooperative Application
5
Click [File] - [Save as] to save the label file under a desired name.
The extension of the saved label file is "TDD". For merge print, specify the TDD file in the JDF file.
Creating a Text Item File
A text item file is a file of character data to be printed. Arrange the file by following the steps below.
Item
Content
File type
Text (ANSI) format
File name
Optional
File extensions that
are not available
CDN, CER, DON, ERR,
INP, JCF, JDF, RJD, STP
How to write a Text Item File
There are two ways to write a text item file. One is by writing a barcode value, and the other is by writing a
file path.
To write a barcode value
• Barcode item = Barcode value
Do not write “{}” before and after the barcode item.
Alphanumeric character, “-,” and “_” are available (case-independent). If you input other characters
than those, an error occurs.
For the barcode value, specify the value that is the base of the barcode to be replaced.
Tab characters are not available for the barcode value. If you use them, an error occurs.
When you want to input a line feed code, specify “\n”. If you want to speciify “\n” itself, specify “\\n”.
To write a file path
• Barcode item = FILE(TAB) Barcode file path
Do not write “{}” before and after the barcode item.
Alphanumeric character, “-,” and “_” are available (case-independent). If you input other characters
than those, an error occurs.
For the file path, write a file path of the file in which binary data to be replaced is written.
Text Item File example (print2.dat)
BARCODE=01234567
BARCODEFILE=FILE (TAB) C:\data\test.dat
Setting the JDF file
Setting the JDF file is the same as the merge print for text. See "Setting the JDF File" on page 4-55.
59
4
Merge print of text/barcode item
Merge print of text and barcode items is available in one label file.
In this case, a text item file is written in together with a barcode item.
Label file
(image3.tdd)
{Title}
Print result with merged text
Text item
Barcode item
Input text
{BARCODEFILE}
Barcode type : QR CODE
Text item file
print3.dat)
Title=Sample Disc
BARCODEFILE=FILE㧔TAB㧕C:\data\test.dat
60
Sample Disc
Chapter4 Development Guide for a Cooperative Application
STF File
The STF file (TDBStatus.txt) is a file for sending PP-100/PP-100N status to your cooperative application.
The STF file includes the following information; job ID, the number of published discs, job status, error code,
the number of discs in the stacker, ink level, and so on.
❏ When a publishing machine has been registered using EPSON Total Disc Setup, TD Bridge
creates the STF file automatically.
❏ The STF file is updated every five seconds while TD Bridge is activating. The update has no
relation to whether your cooperative application is started or not.
❏ Once the STF file is created, the file is not deleted even after exiting TD Bridge.
❏ The STF file cannot be updated while it is opened by another application. Therefore, the STF file
must be closed as soon as the application finished to read the file.
❏ Jobs created from EPSON Total Disc Maker without using TD Bridge are not written in the STF
file.
❏ The ink level information is not suitable for calculating the number of sheets that are printable
with the remaining ink because the information changes each time ink is consumed by
automatic cleaning.
61
4
STF File Status Transition
The contents of a STF file changes four times with the progress of the job; before accepting a job,
preprocessing the job, processing the job, and after completion of the job.
(1) Before accepting a job
[ACTIVE_JOB]
[COMPLETE_JOB]
[PUBLISHER1]
NAME=Publisher 0
STACKER1=16
STACKER2=12
STACKER3=-1
STACKER4=0
INK_C=76
INK_M=76
INK_Y=75
INK_LC=75
INK_LM=76
INK_B=76
INFO1=HST3001
(2) Preprocessing the job
[ACTIVE_JOB]
JOB1=003
[COMPLETE_JOB]
[003]
STATUS=1
ERROR=
[PUBLISHER1]
NAME=Publisher 0
STACKER1=16
STACKER2=12
STACKER3=-1
STACKER4=0
INK_C=76
INK_M=76
INK_Y=75
INK_LC=75
INK_LM=76
INK_B=76
INFO1=HST3001
(3) Processing/Waiting for processing
(4) After completion of a job
[ACTIVE_JOB]
JOB1=003
[COMPLETE_JOB]
[003]
PUBLISHER=Publisher 0
STATUS=2
PUBLICATION_NUMBER=1
COMPLETION_NUMBER=5
ERRORDISC_NUMBER=0
TYPE=3
IN_STACKER=1
OUT_STACKER=4
ESTIMATION_TIME=133
ERROR=
[PUBLISHER1]
NAME=Publisher 0
STACKER1=16
STACKER2=12
STACKER3=-1
STACKER4=0
INK_C=76
INK_M=76
INK_Y=75
INK_LC=75
INK_LM=76
INK_B=76
INFO1=HST3001
[ACTIVE_JOB]
[COMPLETE_JOB]
JOB1=003
[003]
PUBLISHER=Publisher 0
STATUS=4
PUBLICATION_NUMBER=1
COMPLETION_NUMBER=10
ERRORDISC_NUMBER=0
TYPE=3
IN_STACKER=1
OUT_STACKER=4
ESTIMATION_TIME=133
ERROR=
[PUBLISHER1]
NAME=Publisher 0
STACKER1=15
STACKER2=12
STACKER3=-1
STACKER4=1
INK_C=76
INK_M=76
INK_Y=75
INK_LC=75
INK_LM=76
INK_B=76
INFO1=HST3001
(1) The status of the connected PP-100/PP-100N is written under [PUBLISHER1].
(2) When a job is accepted, a job ID (003 in the above example) is created and written under
[ACTIVE_JOB]. While preprocessing the job, only "STATUS=1" and "ERROR=" are displayed. The
[PUBLISHER1] is always listed under the job information.
(3) While the job is being processed or being put in standby, all of the job statuses are added under the job
ID.
(4) The job ID under the [ACTIVE_JOB] is deleted, and then the job ID is added under the [COMPLETE_JOB].
The job ID information is deleted when the job is deleted.
62
Chapter4 Development Guide for a Cooperative Application
STF File Status
The table below lists the contents (job statuses) written in the STF file.
Section
name
Key name
Explanation
Output values that
indicate status
Change
timing
ACTIVE_JOB
JOB[N]
* [N] stands for a
number that starts
from 1.
From the all jobs accepted by TD
Bridge, the job IDs of jobs being
processed or being put in standby
are listed.
Job IDs of jobs being processed are
listed from the top, and job IDs of
newly added jobs follow.
Job IDs of jobs being processed or
being put in standby
When publishing a job from another
TD Bridge, the value which has a
unique identification for the job ID
and TD Bridge.
When a job is
accepted/
completed
COMPLETE_JOB
JOB[N]
* [N] stands for a
number that starts
from 1.
Job ID is written from a job
completed most recently.
Job IDs of completed jobs
(including jobs finished abnormally)
Job IDs for jobs published from
other TD Bridge are not written.
When a job is
completed
[JOB_ID]
PUBLISHER (*1)
The specified publishing machine
name is written.
Publishing machine name. This key
is not written to the file when the
machine name is unknown.
When a job is
started
STATUS
An ID that represents the job status
is written.
Being registered or put in standby:
"1"
Being processed: "2"
Being paused: "3"
Completed: "4"
Completed abnormally: "5"
Being not accepted: "6"
Unknown: "99"
Each time the
job status
changes
PUBLICATION_NUM
BER (*1)
The specified number of discs to be
published is written.
The number of discs to be
published
Unknown: "-1"
When a job is
started
COMPLETION_NUM
BER (*1)
The number of published discs is
written.
The number of published discs
Unknown: "-1"
When a job is
started
Each time a disc
is published
ERRORDISC_NUMB
ER (*1)
The number of published discs that
are completed abnormally is
written.
The number of published discs that
are completed abnormally
Unknown: "-1"
Each time an
error disc is
published
TYPE (*1)
An ID that represents the job type is
written.
Only burning data: "1"
Only printing data: “2”
Burning and printing: "3"
When a job is
started
IN_STACKER (*1)
The specified source stacker is
written.
Stacker 1: "1"
Stacker 2: "2"
Stacker 1 and 2: "1,2"
Unknown: "-1"
When a job is
started
OUT_STACKER (*1)
The specified output stacker is
written.
Stacker 2: "2"
Stacker 4: "4"
Stacker 2,3: "2,3"
Unknown: "-1"
When a job is
started
ESTIMATION_TIME (*1)
An estimated operating time for
completing the job. This is not the
estimated time of completion.
An estimated time period from
when starting the job to when
finishing it is written in increments of
one second.
(This key is not written for
completed jobs and when the time
is unknown.)
When a job is
started
ERROR
This indicates a code of error that is
occurring with the ongoing job.
When the error is cleared, the error
code is deleted when the STF file is
updated.
The "ERROR" always appears even
when no error is occurring.
See "Error Codes and Remedies".
Each time an
error occurs
A job ID
becomes the
section name.
This section is
added for each
registered job.
When publishing
from another TD
Bridge,
completed jobs
are not written.
[JOB_ID]
A job ID
becomes the
section name.
This section is
added for each
registered job.
4
63
Section
name
PUBLISHER[N]
This is an
information of
each PUBLISHER.
Key name
Explanation
Output values that
indicate status
Change
timing
NAME
The publishing machine names
registered by EPSON Total Disc
Setup are written.
Publishing machine name
Always appears
as long as
registered
machine exists
STACKER1
The remaining amount of discs in
the stacker 1 of the specified
publisher is expressed in
percentage. Note that this is not
the number of remaining discs.
The percentage ("0" to "100")
Unknown: "-1"
Each time the
remaining
amount of discs
changes
STACKER2
The remaining amount of discs in
the stacker 2 of the specified
publisher is expressed in
percentage. Note that this is not
the number of remaining discs.
The percentage ("0" to "100")
Unknown: "-1"
Each time the
remaining
amount of discs
changes
STACKER3
The status of the stacker 3 (full or
not full) of the specified publisher is
written.
When the stacker is full: "100"
When the stacker is not full: "0"
Unknown: "-1"
When the
stacker full status
or not-full status is
detected.
STACKER4
The status of the stacker 4 (full or
not full) of the specified publisher is
written.
When the stacker is full: "100"
When the stacker is not full: "0"
Unknown: "-1"
When the
stacker full status
or not-full status is
detected.
INK_C
The cyan ink level of the specified
publisher is written.
The percentage ("0" to "100") (*2)
Unknown: "-1"
Each time the ink
is consumed
INK_M
The magenta ink level of the
specified publisher is written.
The percentage ("0" to "100") (*2)
Unknown: "-1"
Each time the ink
is consumed
INK_Y
The yellow ink level of the specified
publisher is written.
The percentage ("0" to "100") (*2)
Unknown: "-1"
Each time the ink
is consumed
INK_LC
The light cyan ink level of the
specified publisher is written.
The percentage ("0" to "100") (*2)
Unknown: "-1"
Each time the ink
is consumed
INK_LM
The light magenta ink level of the
specified publisher is written.
The percentage ("0" to "100") (*2)
Unknown: "-1"
Each time the ink
is consumed
INK_B
The black ink level of the specified
publisher is written.
The percentage ("0" to "100") (*2)
Unknown: "-1"
Each time the ink
is consumed
INFO[M]
* [M] stands for a
number that starts
from 1.
The hardware status is written by
INFORMATION code.
If multiple INFORMATION codes
exist, the corresponding multiple
codes are written.
When the hardware recovers from
the status, the INFORMATION code
is deleted when the STF file is
updated.
The "INFOR[M]=" always appear
even while the hardware is
operating normally.
See "INFORMATION Code List".
* [N] stands for a
machine number
that starts from 1.
*1 These keys are not written on the lists when the JDF file was not accepted or when publishing has not
been completed.
*2 “0“ indicates that the ink cartridge needs to be replaced.
64
Chapter4 Development Guide for a Cooperative Application
Error Codes and Remedies
When an error occurs, the corresponding error code is recorded.
List of Error Code before Accepting Jobs
When any one of these error occurs while a job is being accepted, accepting the job is cancelled. The JDF
file becomes ERR file, and the job status written in the STF file becomes "STATUS=6".
Job status
Key name
System error
Not
accepted
Error
code
Description
SYS001
Accepting the job is failed.
SYS002
Executing the job failed due to the communication error
with the publishing machine.
SYS003
Executing the job failed because the HDD of the publishing
machine does not have enough space.
JDF0100
The specified job ID already exists.
JDF0101
The specified job ID contains more than 40 characters.
JDF0102
The specified job ID contains characters other than English
one byte characters/numbers, "-", and "_".
JDF0200
The specified publishing machine name has not been
registered.
JDF0201
Multiple publishing machines are detected, but none of
them has not been specified using the PUBLISHER key. Or
no publishing machine has not been specified in the
Environment Setting.
JDF0202
The publishing machine specified by the PUBLISHER key is
set to an unsupported mode, or a mode cannot be
acquired.
JDF0203
There is no publishing machine that has been registered.
COPIES key
JDF0300
The specified number of discs to be published is exceeding
the upper limit of the publisher (the upper limit changes
depending on the selected mode and stacker setting).
OUT_STACKER key
JDF0400
A value other than "2" or "4" is specified.
DISC_TYPE key
JDF0500
The specified disc type is not the same with that has been
specified for the source stacker.
JDF0501
DISC_TYPE key has not been specified.
JDF0502
A value other than "CD", "DVD", or "DVD-DL" is specified.
WRITING_SPEED key
JDF0600
A value other than number is specified.
COMPARE key
JDF0700
A value other than "YES" or "NO" is specified.
CLOSE_DISC key
JDF0800
A value other than "YES" or "NO" is specified.
JOB_ID key
PUBLISHER key
65
4
Job status
Not
accepted
Key name
DATA key
DATA_LIST key
VOLUME_LABEL key
66
Error
code
Description
JDF0900
When any of the followings is detected
(1) The directory path for both the source and destination
has not been specified using the DATA key.
(2) The directory path for both the source and destination
has not been specified using the DATA key in the file
specified by the DATA_LIST key.
JDF0901
The destination for multiple separate source files is the
same.
JDF0902
The specified directory path (including the file name) does
not conform to the specified disc format.
JDF0903
The source file size is too large for the specified disc type.
JDF0904
The destination folder hierarchy is exceeding 128 levels.
JDF0905
The drive that stores the specified source file is not ready.
JDF0907
The specified source file contains a non-existing content.
JDF0908
The specified source file contains a file to which the current
user does not have read/write access.
JDF0909
Some items of the specified source file are being used.
JDF0910
The file specified by the DATA_LIST key does not exist.
(including when a folder has been specified)
JDF0911
The current user does not have read/write access to the
file specified by the DATA_LIST key.
JDF0912
The file specified by the DATA_LIST key is being used.
JDF0913
The drive that stores the file specified by the DATA_LIST key
is not ready.
JDF1000
The specified Volume Label does not conform to the
specified disc format.
Chapter4 Development Guide for a Cooperative Application
Job status
Not
accepted
Key name
VIDEO key
VIDEO_TITLE key
IMAGE key
Error
code
Description
JDF1100
The publisher does not support the specified video file
format.
JDF1101
The video signals of the specified video file do not match
with the all tracks.
JDF1103
The source video file size is too large for the specified disc
type.
JDF1104
The specified video file does not exist.
JDF1105
The current user does not have read/write access to the
specified video file.
JDF1106
The specified video file is being used.
JDF1107
The drive that stores the specified video file is not ready.
JDF1108
The duration of playing time of the specified video file is
less than one second.
JDF1150
The specified VIDEO_TS folder does not exist.
JDF1151
The specified file path is not for the folder named
“VIDEO_TS.”
JDF1152
The current user does not have read/write access to the
specified VIDEO_TS folder.
JDF1153
The drive for the specified VIDO_TS folder is not ready.
JDF1154
The specified VIDEO_TS folder contains a file to which the
current user does not have read/write access.
JDF1155
Some files in the specified VIDEO_TS folder are being used.
JDF1156
The file composition of the specified VIDEO_TS folder is
incorrect.
JDF1157
The source DVD-Video data size is too large for the
specified disc type.
JDF1200
The specified video title is exceeding 32 characters.
JDF1201
The specified video title contains invalid characters.
JDF1300
The publisher does not support the specified image file
format.
JDF1301
The source image file size is too large for the specified disc
type.
JDF1302
The specified image file does not exist.
JDF1303
The current user does not have read/write access to the
specified image file.
JDF1304
The specified image file is being used.
JDF1305
The drive that stores the specified image file is not ready.
JDF1306
The specified disc type for the image file is not the same
with that has been specified for the source stacker.
67
4
Job status
Not
accepted
Key name
FORMAT key
LABEL key
REPLACE_FIELD key
AUDIO_TITLE key
AUDIO_PERFORMER
key
68
Error
code
Description
JDF1400
Disc type CD and data file have been specified, however
setting other than "ISO9660L2", "JOLIET" or "UDF102" has
been specified using the FORMAT key.
JDF1401
Disc type DVD or DVD-DL and data file have been
specified, however setting other than "UDF102" or
"UDF102_BRIDGE" has been specified using the FORMAT
key.
JDF1500
The publisher does not support the specified label file
format.
JDF1501
The specified label file does not exist.
JDF1502
The current user does not have read/write access to the
label file specified by the LABEL key.
JDF1503
The specified label file is being used.
JDF1504
The drive that stores the specified label file is not ready.
JDF1600
The text data file specified using the REPLACE_FIELD key
does not exist.
JDF1601
The current user does not have read/write access to the
data file specified by the REPLACE_FIELD key.
JDF1602
The text data file specified using the REPLACE_FIELD key is
being used.
JDF1603
The drive that stores the file specified by the REPLACE_FIELD
key is not ready.
JDF1604
When any of the followings is detected
(1) The file extension or setting itself contains invalid
characters.
(2) The number of characters of the specified character
string to be merged is exceeding 1024 (upper limit for
the text item).
(3) More than 255 text items have been specified.
JDF1610
The specified barcode value does not conform to the
barcode standard for the barcode to be replaced.
JDF1611
The specified barcode file does not exist.
JDF1612
The current user does not have read/write access to the
specified barcode file.
JDF1613
The specified barcode file is being used.
JDF1614
The drive for the specified barcode file is not ready.
JDF1615
The specified keyword for the barcode item is incorrect.
JDF1700
The value for AUDIO_TITLE key is exceeding 128 half-size
characters (64 two-byte characters).
JDF1701
The value for AUDIO_TITLE key contains characters that can
not be changed into multi-byte characters.
JDF1800
The value for AUDIO_PERFORMER key is exceeding 128 halfsize characters (64 two-byte characters).
JDF1801
The value on AUDIO_PERFORMER key contains characters
that can not be changed into multi-byte characters.
Chapter4 Development Guide for a Cooperative Application
Job status
Not
accepted
Key name
AUDIO_TRACK key
AUDIO_TRACK key
LABEL_AREA key
Others
Error
code
Description
JDF1900
The total size of CD-TEXT is exceeding 3024 byte
(corresponding to 3000 half-size characters).
JDF1901
The total size of music data to be written and pregap is too
large for the specified disc type.
JDF1910
The specified music file format is not supported.
JDF1911
The specified music file does not exist.
JDF1912
The current user does not have the access rights to read/
write the specified music file.
JDF1913
The specified music file is being used.
JDF1914
The drive that stores the specified music file is not ready.
JDF1915
The specified music file is protected by copyright.
JDF1916
The duration of playing time of the specified music file is
less than four seconds.
JDF1920
The specified track title is exceeding 128 half-size
characters (64 two-byte characters).
JDF1921
The specified track title contains characters that can not
be changed into multi-byte characters.
JDF1930
The specified track artist name is exceeding 128 half-size
characters (64 two-byte characters).
JDF1931
The specified track artist name contains characters that
can not be changed into multi-byte characters.
JDF1940
The specified pregap is out of the range from 0 to 269999
(00:00:00 frame to 59:59:74 fame).
JDF2000
Other than a one byte character is specified for the
DiscDiamOut keyword, or the value is out of the range from
700 to 1194 (700 mm to 1194 mm).
JDF2001
Other than a one byte character is specified for the
DiscDiamin keyword, or the value is out of the range from
180 to 500 (180 mm to 500 mm).
JDF0001
DVD or DVD-DL has been specified as the disc type, but file
type (data file or image file) has not been specified.
JDF0000
CD has been specified as the disc type, but file type (data
file, video file or image file) has not been specified.
69
4
List of Error Codes after Accepting Jobs
Handling of a job when an error occurs differs depending on the error type, The following explains about
each error and the remedies.
Cancel:
The job is cancelled. After eliminating the cause of the error, issue the job again.
Pause:
The job is temporarily stopped. After eliminating the cause of the error, restart the job using
EPSON Total Disc Monitor.
Automatic recover: The job is temporarily stopped. When the cause of the error is removed, the job is
automatically resumed.
Job status
Job handling
Error code
Accepted
jobs
Cancel
CAN000
Picking up a disc from the drive tray or the printer tray is failed.
Remedy:
Turn off PP-100/PP-100N and turn it back on.
CAN001
A disc is dropped while being picked up.
Remedy:
(1) Turn PP-100/PP-100N off and remove the dropped disc.
(2) Turn PP-100/PP-100N back on.
CAN002
Releasing a disc is failed.
Remedy:
Turn off PP-100/PP-100N and turn it back on.
CAN003
Setting a disc in the drive tray or the printer tray must have been
made, however, no disc is detected in the tray.
Remedy:
(1) Turn PP-100/PP-100N off and remove any foreign object inside
the machine.
(2) Turn PP-100/PP-100N back on.
CAN004
In Batch mode, the stacker 3 was not empty when the job was
started. Therefore, the output stacker has become full during
processing the job.
Remedy:
(1) Remove all discs from the stacker 3.
(2) Put new blank discs into the stacker 1 and stacker 2, then
restart the job.
CAN005
An error occurs while the robotic arm is moving.
Remedy:
(1) Turn PP-100/PP-100N off and remove any foreign object inside
the machine.
(2) Turn PP-100/PP-100N back on.
CAN006
An auto loader fatal error has occurred. The robotic arm can not
be moved due to overheating of the motor.
Remedy:
(1) Turn PP-100/PP-100N off and remove any foreign object inside
the machine.
(2) Turn PP-100/PP-100N back on.
CAN007
Controlling the drive tray is failed.
Remedy:
(1) Turn PP-100/PP-100N off and remove any foreign object from
the drive tray.
(2) Turn PP-100/PP-100N back on.
CAN008
Processing the job is impossible because of a fatal error of the
drive.
Remedy:
Turn off PP-100/PP-100N and turn it back on.
70
Explanation and Remedies
Chapter4 Development Guide for a Cooperative Application
Job status
Job handling
Error code
Explanation and Remedies
Accepted
jobs
Cancel
CAN009
Controlling the printer tray is failed.
Remedy:
(1) Turn PP-100/PP-100N off and remove any foreign object from
the printer tray.
(2) Turn PP-100/PP-100N back on.
CAN010
A printer fatal error has occurred.
Remedy:
Turn off PP-100/PP-100N and turn it back on.
CAN011
A communication with the printer is failed.
Remedy:
Check if the port setting on the printer driver is correct.
CAN012
A printer name error has occurred. The printer specified by the EPJ
file can not be found.
Remedy:
Check the printer name.
CAN013
A printer maintenance error has occurred.
Remedy:
Please contact the store where you purchased PP-100/PP-100N
or our customer service.
CAN014
The waste ink pads need to be replaced.
Remedy:
Please contact the store where you purchased PP-100/PP-100N
or our customer service.
CAN015
The status error has occurred, and any of the following has been
detected.
(1) The disc on the drive tray disappeared.
(2) The disc on the printer tray disappeared.
(3) A disc was placed on the drive tray.
(4) A disc was placed on the printer tray.
(5) Robotic arm got a disc.
Remedy:
(1) Check if there occurred an error inside the chassis.
(2) Turn PP-100/PP-100N back on.
CAN016
A JOB file error has occurred, and one of the following has been
detected.
(1) The specified disc image file cannot be accessed.
(2) The specified label data file cannot be accessed.
Remedy:
Set an access privilege for “SYSTEM” account to the shared folder
in which the disc image files and label data files are saved, or
specify the copied image file on the local computer.
CAN017
A non-supported version error has occurred, and any of the
following has been detected.
(1) Firmware version of the auto loader is not supported.
(2) Firmware version of the drive 1 is different from the supported
version.
(3) Firmware version of the drive 2 is different from the supported
version.
(4) Firmware version of the printer is not supported.
Remedy:
Upgrade the firmware of the concerning device.
71
4
Job status
Job handling
Error code
Accepted
jobs
Cancel
CAN018
The publishing mode specified by EPSON Total Disc Setup when
issuing the job and the mode selected on the device are different.
Remedy:
Reset the publishing mode using the EPSON Total Disc Setup.
CAN019
Creating a disc image is cancelled due to an invalid source
directory path.
Remedy:
Check the files and folders in the specified directory.
CAN020
A communication error with the publisher occurs.
Remedy:
Check if the power supply cable and USB cable are securely
connected.
STP000
Due to a disc type error or some other reason, the number of write
retries has reached that preset by EPSON Total Disc Setup.
Remedy:
(1) Check the blank discs in the source stacker.
(2) Resume or cancel the paused job using EPSON Total Disc
Monitor.
STP001
Due to a write error, the number of write retries has reached that
preset by EPSON Total Disc Setup.
Remedy:
(1) Check the blank discs in the source stacker.
(2) Resume or cancel the paused job using EPSON Total Disc
Monitor.
When the error still occurs, please contact the store where you
purchased PP-100/PP-100N or our customer service.
RTN000
No disc is set in the source stacker specified for the job.
Remedy:
Set blank discs in the source stacker.
RTN001
The output stacker specified for the job has become full.
Remedy:
Remove the discs from the output stacker.
RTN002
The disc cover is opening.
Remedy:
Close the disc cover.
RTN003
The ink cartridge cover is open.
Remedy:
Close the ink cartridge cover.
RTN004
The specified label print cannot be made because the ink level is
low (the cartridge needs to be replaced).
Remedy:
Replace the ink cartridge(s) with a new one(s).
RTN005
No ink cartridge is detected.
Remedy:
Install the ink cartridges.
Pause
Automatic
recover
72
Explanation and Remedies
Chapter4 Development Guide for a Cooperative Application
Job status
Job handling
Error code
Accepted
jobs
Automatic
recover
RTN006
The job cannot be made because the stacker has been removed.
Remedy:
Install the stacker.
RTN007
The stacker 3 installation status does not match with the specified
publishing mode.
Remedy:
Remove the stacker 3 in Standard or External Output mode.
Install the stacker 3 in Batch mode.
RTN008
The job cannot be made because the stacker 4 is open.
Remedy:
Close the stacker 4.
RTN009
Multiple discs have been transferred to the drive.
Remedy:
(1) Open the disc cover.
(2) Remove the disc from the drive tray, and close the disc cover.
RTN010
Multiple discs have been transferred to the printer.
Remedy:
(1) Open the disc cover.
(2) Remove the disc from the drive tray, and close the disc cover.
RTN012
Picking up a disc from the source stacker is failed.
Remedy:
Separate any sticky discs in the source stacker from each other.
RTN013
The number of discs in the stacker has exceeded the upper limit.
Remedy:
Remove discs so that the number of discs in the stacker falls within
the limit.
OTH000
The job status cannot be obtained because the job history
information has already been deleted.
Remedy:
None
Others
Explanation and Remedies
73
4
INFORMATION Code List
The INFORMATION code represents the status of the registered PP-100/PP-100N. When multiple statuses exist,
the all corresponding codes appear.
Item
Printer
Drive
74
INFORMATION
code
Explanation and Remedies
HPR000
A printer fatal error has occurred.
Remedy:
Turn off PP-100/PP-100N and turn it back on.
HPR001
A printer maintenance error has occurred.
Remedy:
Please contact the store where you purchased PP-100/PP100N or our customer service.
HPR002
The waste ink pads need to be replaced.
Remedy:
Please contact the store where you purchased PP-100/PP100N or our customer service.
HPR003
A communication with the printer is failed.
Remedy:
Check if the port setting on the printer driver is correct.
HPR005
The ink cartridge cover is open.
Remedy:
Close the ink cartridge cover.
HDR000
Controlling the drive tray is failed.
Remedy:
(1) Turn PP-100/PP-100N off and remove any foreign object
from the drive tray.
(2) Turn PP-100/PP-100N back on.
HDR001
Processing the job is impossible because of a fatal error of the
drive.
Remedy:
Turn off PP-100/PP-100N and turn it back on.
Chapter4 Development Guide for a Cooperative Application
Item
Auto loader
Cyan ink
INFORMATION
code
Explanation and Remedies
HAR000
Picking up a disc from the drive tray or the printer tray is failed.
Remedy:
Turn off PP-100/PP-100N and turn it back on.
HAR001
A disc is dropped while being picked up.
Remedy:
(1) Turn PP-100/PP-100N off and remove the dropped disc.
(2) Turn PP-100/PP-100N back on.
HAR002
Releasing a disc is failed.
Remedy:
Turn off PP-100/PP-100N and turn it back on.
HAR003
Setting a disc in the drive tray or the printer tray must have been
made, however, no disc is detected in the tray.
Remedy:
(1) Turn PP-100/PP-100N off and remove any foreign object
inside the machine.
(2) Turn PP-100/PP-100N back on.
HAR004
An error occurs while the robotic arm is moving.
Remedy:
(1) Turn PP-100/PP-100N off and remove any foreign object
inside the machine.
(2) Turn PP-100/PP-100N back on.
HAR005
An auto loader fatal error has occurred. The robotic arm can
not be moved due to overheating of the motor.
Remedy:
(1) Turn PP-100/PP-100N off and remove any foreign object
inside the machine.
(2) Turn PP-100/PP-100N back on.
HAR007
Picking up a disc from the stacker is failed.
Remedy:
(1) Open the disc cover.
(2) Separate any sticky discs in the source stacker from each
other, and close the disc cover.
HAR008
Multiple discs have been transferred to the drive.
Remedy:
(1) Open the disc cover.
(2) Remove the disc from the open drive tray, and close the
disc cover.
HAR009
Multiple discs have been transferred to the drive.
Remedy:
(1) Open the disc cover.
(2) Remove the disc from the open printer tray, and close the
disc cover.
HIKC000
The cyan ink cartridge has been removed.
Remedy:
Install the cyan ink cartridge.
HIKC001
The model number of the cyan ink cartridge is different or the
model number cannot be recognized.
Remedy:
Replace the cyan ink cartridge with a correct one.
4
75
Item
Magenta ink
Yellow ink
Light cyan ink
Light magenta ink
Black ink
Stacker 1
Stacker 2
76
INFORMATION
code
Explanation and Remedies
HIKM000
The magenta ink cartridge has been removed.
Remedy:
Install the magenta ink cartridge.
HIKM001
The model number of the magenta ink cartridge is different or
the model number cannot be recognized.
Remedy:
Replace the magenta ink cartridge with a correct one.
HIKY000
The yellow ink cartridge has been removed.
Remedy:
Install the yellow ink cartridge.
HIKY001
The model number of the yellow ink cartridge is different or the
model number cannot be recognized.
Remedy:
Replace the yellow ink cartridge with a correct one.
HIKLC000
The light cyan ink cartridge has been removed.
Remedy:
Install the light cyan ink cartridge.
HIKLC001
The model number of the light cyan ink cartridge is different or
the model number cannot be recognized.
Remedy:
Replace the light cyan ink cartridge with a correct one.
HIKLM000
The light magenta ink cartridge has been removed.
Remedy:
Install the light magenta ink cartridge.
HIKLM001
The model number of the light magenta ink cartridge is different
or the model number cannot be recognized.
Remedy:
Replace the light magenta ink cartridge with a correct one.
HIKBK000
The black ink cartridge has been removed.
Remedy:
Install the black ink cartridge.
HIKBK001
The model number of the black ink cartridge is different or the
model number cannot be recognized.
Remedy:
Replace the black ink cartridge with a correct one.
HST1000
The number of discs in the stacker 1 has exceeded the upper
limit.
Remedy:
Remove discs so that the number of discs in the stacker 1 falls
within the limit.
HST1001
The stacker 1 has not been installed.
Remedy:
Install the stacker 1.
HST2000
The number of discs in the stacker 2 has exceeded the upper
limit.
Remedy:
Remove discs so that the number of discs in the stacker 2 falls
within the limit.
HST2001
The stacker 2 has not been installed.
Remedy:
Install the stacker 2.
Chapter4 Development Guide for a Cooperative Application
Item
Stacker 3
INFORMATION
code
Explanation and Remedies
HST3000
The number of discs in the stacker 3 has exceeded the upper
limit.
Remedy:
Remove discs so that the number of discs in the stacker 3 falls
within the limit.
HST3001
The stacker 3 has not been installed in Batch mode.
Remedy:
Install the stacker 3.
HST3002
The stacker 3 has been installed in Standard or External Output
mode.
Remedy:
Remove the stacker 3.
Disk cover
HDC000
The disc cover is open.
Remedy:
Close the disc cover
Communication
HNW000
Either one of the following communication errors occur.
• Communication with PP-100/PP-100N is disabled.
• The filter driver has not been attached.
Remedy:
[For PP-100]
(1) Check the power supply of the PP-100.
(2) Check if the USB cable is securely connected.
(3) Connect the publishing machine, and turn on the power.
[For PP-100N]
(1) Check the power supply of the PP-100.
(2) Check if the network cable is securely connected.
HNW001
4
A non-supported version error has occurred, and any of the
following has been detected.
(1) Firmware version of the auto loader is not supported.
(2) Firmware version of the drive 1 is different from the
supported version.
(3) Firmware version of the drive 2 is different from the
supported version.
(3) Firmware version of the printer is not supported.
Remedy:
Upgrade the firmware of the concerning device.
77
JCF File
The JCF file is a file to give instructions for canceling an ongoing job or temporarily stopped job. This file
needs to be created by your cooperative application. Specify a job ID of the job you want to cancel and
move the file into the monitoring folder of TD Bridge. The specified job will be canceled.
❏ The file format is ANSI text format, however, specify JCF for the extension. Save the file under
desired name.
❏ When the specified job is canceled or cannot be canceled due to an error, the file extension will
change.
•
When the specified job is cancelled: CDN
•
When the specified job cannot be canceled: CER
❏ The file automatically moves from the monitoring folder to the log folder one or two hours after
canceling is completed/failed. (See "Log Function" on page 4-79.)
JCF File Example
demo. jcf file
[CANCEL]
JOB_ID=003
Section
name
CANCEL
78
Key
name
JOB_ID
Explanation
How to specify the job ID
ID for identifying
a specific job
Specify the job ID of the job you
want to cancel.
Maximum
number of
characters
40 characters
Available
characters
(strings)
One byte
alphanumeric, "-", "_"
Necessary/
Arbitrary
Necessary
Chapter4 Development Guide for a Cooperative Application
Log Function
❏ When a DON/ERR/CDN/CER file is in the monitoring folder (default: “Order”), the log folder is
automatically created in the monitoring folder in one of two hours, and the DON/ERR/CDN/
CER file moves to the log folder.
❏ Folders of the creation date are created in the log folder, and folders of the creation time are
created in the date folder automatically.
❏ The STF file is copied when the DON/ERR/CDN/CER file moves, and the copied STF file moves
to the log folder.
❏ Date folder is deleted automatically after 7 days. The log folder is not deleted.
Monotoring
folder
Log folder
Order
log
20090101
STF
1059
Moved from the monitoring
folder to the log folder
ERR
STF
Copied and moved
to the log folder
STF
Copied and moved
to the log folder
Order
log
20090101
1059
1159
: Monotoring folder
: Log folder
: Date
: Time
: Time
4
1159
Moved from the monitoring
folder to the log folder
DON
79
Pop-up Message List
Message
Icon
Button
Message
Icon
Button
Cause
TD Bridge is already running.
!
OK
TD Bridge was already running when it
was started up.
Cannot get the supported version information.
Reinstall TD Bridge.
!
OK
The supported version information for
Total Disc Maker cannot be acquired
when starting up TD Bridge.
The application could not start because the
necessary resource file could not be found.
Please reinstall the application.
!
OK
The resource file could not be found
when starting up TD Bridge.
The settings of the default output device are
invalid.
Change the settings to a valid output device.
!
OK
The output device is invalid when
starting up TD Bridge while logging on
to Windows with an administrative
account.
The settings of the default output device are
invalid.
Log on to Windows using an administrator
account and change the settings to a valid
output device.
!
OK
The output device is invalid when
starting up TD Bridge while logging on
to Windows with a limited account.
The monitoring folder is set to a folder which
cannot be written to using a limited account.
Change it to a folder which can be written to
using a limited account.
!
OK
The monitoring folder’s improper
setting is detected when starting up
TD Bridge while logging on to
Windows with an administrative
account.
The monitoring folder is set to a folder which
cannot be written to using a limited account.
Log on to Windows using an administrator
account and change it to a folder which can
be written to using a limited account.
!
OK
The monitoring folder’s improper
setting is detected when starting up
TD Bridge while logging on to
Windows with a limited account.
The monitoring folder does not exist or you do
not have access to it.
Set the monitoring folder.
!
OK
The monitoring folder cannot be
found or you do not have access to it
when handling files while logging on
to Windows with an administrative
account.
The monitoring folder does not exist or you do
not have access to it.
Log on to Windows using an administrator
account and set the monitoring folder.
!
OK
The monitoring folder cannot be
found or you do not have access to it
when handling files while logging on
to Windows with a limited account.
The TD Bridge environment setting file does not
exist or you do not have access to it.
TD Bridge will exit.
!
OK
The ini file does not exist or you do not
have access to it when trying to open
it right after TD Bridge starts up, or
after opening the environment setting
screen.
80
Chapter4 Development Guide for a Cooperative Application
Message
Icon
Button
Cause
Set the monitoring folder.
!
OK
Clicked [OK] in the environment
settings screen without specifying a
monitoring folder.
The changed settings will be enabled when you
next start the program.
!
OK
Changed the settings in the
environment settings screen, and
clicked [OK]
Select a folder on the local computer as the
monitoring folder.
!
OK
Selected a folder outside the local
computer in the folder selecting
dialog in the environment settings
screen, and clicked [OK].
Reboot the computer to enable the settings.
TD Bridge will exit.
!
OK
Cancel
Confirmation to exit TD Bridge to
reflect the changed settings in the
environment settings screen.
Could not write the TD Bridge Environment
Settings file.
!
OK
After clicking [OK] in the environment
settings screen, ini file cannot be
written since you do not have access
to it, though the file exists.
The path specified for the EPSON Total Disc
Maker working folder does not exist.
Start EPSON Total Disc Maker and specify a
working folder with a correct path.
!
OK
The working folder for EPSON Total
Disc Maker cannot be found when a
job is issued.
There is insufficient remaining space for the
EPSON Total Disc Maker working folder (working
folder path).
After changing the working folder or obtaining
the available space, click OK.
Clicking Cancel cancels publishing, and exits
TD Bridge.
!
OK
Cancel
Space in the working folder for EPSON
Total Disc Maker is not sufficient when
a job is issued.
The printer driver has not been set, or it cannot
be found.
Set a printer driver to use with Total Disc Setup
and click OK.
Clicking Cancel cancels publishing, and exits
TD Bridge.
!
OK
Cancel
The printer driver cannot be found
when a job is issued.
The PC is running in battery mode.
If the battery runs out during publishing, the disc
may not be created correctly.
Switch to AC mode and click OK.
Clicking Cancel cancels publishing, and exits
TD Bridge.
!
OK
Cancel
The computer is using a battery
power source when a job is issued.
The process cannot be performed because
there is no XML parser, or it is not installed
correctly.
Install an XML parser correctly and click OK.
Clicking Cancel cancels publishing, and exits
TD Bridge.
!
OK
Cancel
XML parser is not installed when a job
is issued.
The disc cannot be published because the
remaining space at the output device is
insufficient.
Please remove unnecessary job data to
increase the remaining space.
!
OK
Cancel
Space in the HDD in the output
device is not sufficient when a job is
issued.
The process cannot proceed because EPSON
Total Disc Maker cannot be found.
Install EPSON Total Disc Maker.
!
OK
The executable file for EPSON Total
Disc Maker cannot be found when a
job is issued.
81
4
Message
Icon
Button
Cause
You cannot publish from TD Bridge because
EPSON Total Disc Maker is already running.
Exit EPSON Total Disc Maker and click OK.
Clicking Cancel cancels publishing, and exits
TD Bridge.
!
OK
Cancel
EPSON Total Disc Maker is running
when a job is issued.
Cannot publish because the file system of the
drive where the EPSON Total Disc Maker
working folder is does not support the file size of
the write data.
Specify a folder formatted with NTFS for the
working folder.
Clicking Cancel cancels publishing, and exits
TD Bridge.
!
OK
Cancel
Write data is 4GB or more; the disk
format does not support 4GB-writing.
EPSON Total Disc Control Service is not running.
!
OK
Detected that the service of EPSON
Total Disc Maker is not running.
Cannot get the version of EPSON Total Disc
Maker.
Reinstall EPSON Total Disc Maker.
!
OK
Cannot get the version information of
EPSON Total Disc Maker.
This version of EPSON Total Disc Maker is not
supported.
Install a supported version of EPSON Total Disc
Maker.
!
OK
Detected that the version of EPSON
Total Disc Maker is not supported.
There is an unfinished job. Do you want to exit?
!
YES
NO
There is an unfinished job in the
monitoring folder when exiting TD
Bridge.
HANTZ
+ PARTNER
The Upgrade Company! www.hantz.com
Deutschland:
Tel.: 0761 / 59 21 00
Fax: 0761 / 58 52 28
Schweiz:
Tel.: 061 / 27 311 - 31
Fax: 061 / 27 311 - 39
http://www.discproducer.com
82
Österreich:
Tel.: 01 / 58 55 430
Fax: 01 / 58 55 460