1
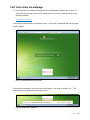
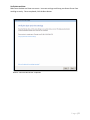
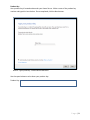
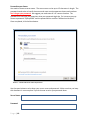
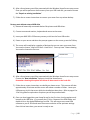
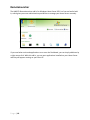
Installation Guide for your
Windows® Home Server 2011 system
An installation guide to getting your new HumuHumu Home Server up and running.
Page |1
Version: September 2011
Page |2
Table of Contents
Quick Start ............................................................................................ 4
Unboxing and powering on ............................................................... 4
First time access via webpage ......................................................... 5
Keyboard and country settings ..................................................... 6
Verify date and time........................................................................ 7
Microsoft Software License Terms ............................................... 8
Product Key ..................................................................................... 9
Personalize your Server............................................................... 10
Updating and preparing your server ........................................... 12
Connecting to your home server................................................. 13
Factory Reset ..................................................................................... 14
Factory reset with external USB drive ........................................ 14
Factory reset without external USB drive .................................. 15
Further Help ........................................................................................ 16
AWIECO Products ............................................................................. 17
DriveInfo............................................................................................ 17
RemoteLauncher ............................................................................. 18
Resources ........................................................................................... 19
Public Resources ............................................................................. 19
Windows Home Server blog: ....................................................... 19
Windows Home Server public forums: ....................................... 19
Installation Instructions: ............................................................... 19
Page |3
Quick Start
HumuHumu would like to thank you for purchasing our Home Server 2011 product. We’re
really excited by what Microsoft has to offer with Windows Home Server 2011 and we think
you’ll love it as well. Below are some simple steps that you need to follow first before you can
start using your new Home Server.
Unboxing and powering on
1) Unbox your Home Server. Inside you should find:
1 x Home Server
1 x Power cable
1 x Network Cable
1 x USB memory stick
1 x Microsoft Getting Start Guide
1 x HumuHumu Quick Start Guide
1 x Official Microsoft Server 2011 DVD and Restore CD
Optional (you may have purchased these items as well)
1 x UPS Power Supply
1 x 2TB External HDD
1 x dLAN AV Plus Starter kit Network Adapters
2) Plug the network cable into your Home Server and the other end into your router. If
you have purchased the optional dLAN network adapters, we suggest setting up and
configuring the server first before connecting it to the dLan adaptors.
3) Plug the power cable into the Home Server. Ensure the power supply is switched on at
the rear of the Home Server. The Home Server should power on automatically. If it
does not, press the power button on the front (larger of the 2 buttons). If you have
purchased the optional UPS power supply, please follow the UPS instructions for how to
connect your Home Server to it. Once the Home Server is setup and configured, you will
find a copy of the UPS software on the shared software folder.
4) The Home Server will take approximately 15 minutes to power on and start up.
Page |4
First time access via webpage
1) Our Home Server products are designed to be used without a keyboard or mouse. To
access the Home Server load up your web browser on your PC or laptop and go to the
following website:
http://server/connect
You will be presented with the following screen. Click on the “Download and run the setup
wizard” button.
Picture 1 – Download and run the setup wizard
You may be prompted to run or save the wizard applet. You need to choose “run”. The
applet will run and display the first setup screen.
Picture 2 – Answer “Run” if prompted
Page |5
Keyboard and country settings
Choose the correct country, time and keyboard settings. For UK users this would be United
Kingdom. Once completed, click the Next button.
Picture 3 – Keyboard and country settings
Page |6
Verify date and time
Make sure the date and time are correct. Incorrect settings could stop your Home Server from
working correctly. Once completed, click the Next button.
Picture 4 – Set correct date and time – Important!!
Page |7
Microsoft Software License Terms
Please read the software license terms. Click the acceptance box and then click the Next
button.
Picture 5 – Agree to the Microsoft License
Page |8
Product Key
Your product key is located underneath your Home Server. Make a note of the product key
number and type this into the box. Once completed, click the Next button.
Picture 6 – Type in product key – located under the Home Server
Use the space below to write down your product key.
Product Key:
Page |9
Personalize your Server
You need to choose a server name. The server name can be up to 15 characters in length. The
password needs to be at least 8 characters and must contain uppercase letters and numbers.
Don’t forget your password. We suggest you make note of it in a secure location. The
password hint can help you remember what your password might be. For instance you may
choose a password “Sydney2000” and the password hint could be “Millennium Vacation”.
Once completed, click the Next button.
Picture 7 – Choose Home Server name and password.
Use the space below to write down your server name and password. Make sure that you keep
this document in a secure place if you do choose to write your password down.
Server Name:
Password:
P a g e | 10
Update your server automatically
We highly recommend that you choose “Use recommended settings”. This ensures your server
always receives the latest updates when they are released from Microsoft. Once completed,
click the Next button.
Picture 8 – Choose software update and protection
P a g e | 11
Updating and preparing your server
Once you have filled in the previous screens, the server will continue to install the software
with your custom settings. This process will take approximately 10 minutes. During this time,
please keep your browser window open so that you can monitor the progress. The server will
automatically restart a number of times before it’s finished.
Picture 9 – Preparing your server
P a g e | 12
Connecting to your home server
The screen below will be displayed once you are ready to connect your first PC to the Home
Server. Click on the connect button and follow the on screen wizard. The wizard installs the
Windows Home Server Connector software on your home computer and joins it to the server.
Your Home Server will then automatically back up your home computer, monitor its health, and
enable you to configure and to remotely administer the Home Server from your home
computer.
Picture 10 – Connecting to your Home Server
P a g e | 13
Factory Reset
Should there ever be a software problem with your Home Server that stops it from working,
you can use the supplied USB memory stick (labeled WHS 2011 OS Recovery) to recover your
server.
IMPORTANT
If you perform the factory reset and don’t have an existing server backup, ALL EXISTING DATA
ON THE HARD DRIVES WILL BE DELETED
Therefore, this factory reset should only be performed when you are sure you have a backup of
your data. If you are not sure, please not do perform this procedure. Contact HumuHumu
support first for assistance.
If you have purchased the optional external USB HDD drive, you can restore your server from
the previous daily backup. If you do not have an external USB HDD drive, jump to the section
below “Factory reset steps without external USB drive”
Factory reset with external USB drive
1) Remove all externally connected devices except for the USB HDD that you use for your
daily backups.
2) Connect an external monitor, keyboard and mouse to the server
3) Insert your WHS 2011 OS Recovery memory stick into the front USB socket.
4) Power on your server and when the prompt appears on the screen, press the F10 key.
You may find that there is a long pause between pressing your key and something
happening. This is normal. The server checks all internal and external HDD before allow
access to any system setups. A quick way to make sure the keyboard is ready to
respond is to wait for the caps lock light to come on. When it does you can then press
the F10 key.
5) The screen will now display a number of devices that you can start your server from.
You need to choose “Internal EFI Shell—Hard Drive”. You may have 2 items showing.
You need to choose the first one.
Choose this
option
P a g e | 14
6) After a few minutes you will be presented with the Windows Home Server setup screen.
Since you will be perform a data recovery from your USB hard disk, you need to choose
the “Repair an existing installation”
7) Follow the on screen instructions to recover your server from a previous backup.
Factory reset without external USB drive
1) Remove all externally connected devices like printers and USB drives.
2) Connect an external monitor, keyboard and mouse to the server.
3) Insert your WHS 2011 OS Recovery memory stick into the front USB socket.
4) Power on your server and when the prompt appears on the screen, press the F10 key.
5) The screen will now display a number of devices that you can start your server from.
You need to choose “Internal EFI Shell—Hard Drive”. You may have 2 items showing.
You need to choose the first one.
Choose this
option
6) After a few minutes you will be presented with the Windows Home Server setup screen.
Choose the “New Installation” option to install the Home Server.
Remember choosing this option will delete all data stored on the hard disk.
7) Follow the on screen instructions to rebuild your home server. This process will take
approximately 40 minutes and the server will reboot a number of times. Leave your
USB memory stick in the server whilst the installation takes place. Refer to pages 6 to
13 of this guide for explanation of options you will be presented with.
8) Once you have logged into your Home Server for the first time, load up explorer and
browse to the USB drive. It is normally the E: Drive. Browse to the OEM folder and
double click on the ApplyOEMSettings.cmd file. This will copy across some OEM
software to your D: Drive and reset the screen resolution to the optimum settings.
Once this has been done, your server is ready to use.
P a g e | 15
Further Help
Microsoft have provided online manuals at
http://onlinehelp.microsoft.com/en-us/windowshomeserver2011
Video tutorials are available at
http://www.youtube.com/user/WindowsHomeSvr2011
If you need any further help, please contact HumuHumu Support on 0845 519 8419
Monday – Friday (10.00am – 5.00pm) or email [email protected]
P a g e | 16
AWIECO Products
HumuHumu are including 2 amazing software add-ins for Windows Home Server 2011. These
are already preinstalled on your Home Server.
DriveInfo
The AWIECO DriveInfo is a free add-in for Windows Home Server 2011. The add-in integrates
itself into the "Server Folders and Hard Drives" area of your Dashboard. It shows a graphical
overview of your hard disks and drives inside the Dashboard.
The AWIECO DriveInfo also picks up all your standard shared folders and user created shares. It
also reveals the usage of the drives as well as folders in a bar chart for every hard disk.
Additionally to the shared folders, you have the possibility to see the usage of the backup drive.
The total overview of your server storage is presented in a pie chart.
P a g e | 17
RemoteLauncher
The AWIECO RemoteLauncher add-in for Windows Home Server 2011 is a free and useful addin, which gives you more administrative possibilities to manage your Home Server remotely.
If you need other tools and applications to run over the Dashboard, you can simply add them by
a right mouse click. With this add-in, you can start applications installed on your Home Server
and they will appear running on your client PC.
P a g e | 18
Resources
Public Resources
Windows Home Server blog:
For more up to date news about Windows Home Server, please visit Microsoft’s Blog
http://go.microsoft.com/fwlink/?LinkId=188746
Windows Home Server public forums:
Microsoft provides public forums where other community members can assist you in resolving
any issues.
http://go.microsoft.com/fwlink/?LinkID=168988
Installation Instructions:
For the most up to date installation instructions, please visit:
http://go.microsoft.com/fwlink/?LinkId=189714
For general help about Windows Home Server 2011:
http://go.microsoft.com/FWLink/?LinkID=165674
For the latest information on Windows Home Server, please visit the product web site at
http://go.microsoft.com/fwlink/?LinkId=100260
AWIECO software products:
http://www.awieco.com
Windows Home Server community websites:
There are lots of resources on the internet for Windows Home Server. Below are some of the
best websites that HumuHumu recommends.
http://usingwindowshomeserver.com
http://wegotserved.com
http://thedigitallifestyle.com
http://mswhs.com
http://www.homeservershow.com
http://homeserverland.com
P a g e | 19