1
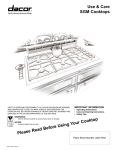
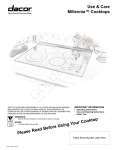
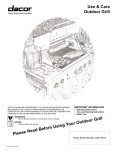
Use & Care PGM Cooktops SAFETY IS EVERYONE’S RESPONSIBILITY. ALL DACOR APPLIANCES ARE DESIGNED AND CONSTRUCTED TO GIVE YOU MANY YEARS OF SAFE OPERATION. THE OPERATION WILL BE FURTHER ENHANCED IF PROPER CARE AND JUDGEMENT ARE EXERCISED IN THE USE AND MAINTENANCE OF THIS APPLIANCE. WARNINGS: IMPORTANT INFORMATION • Operating Instructions • Care and Cleaning Instructions • Safety Tips p o t k o o rC u o Y g n Usi e r o f e B Must be followed carefully to avoid personal injury or damage. NOTES: Contains helpful hints and tips. ave S d n a ad e R e s Plea Part No. 65484 Rev. A Place Serial Number Label Here umer, OR Cons Dear DAC s, ers feature roduct off ACOR p our new D Y . s e c n lia p kitchen ap ry latest in e v e th d e rchas ppliance. u have pu PORTANT ny other a lations! Yo a tu in ra d g n n ad the IM u o re C fo u t this o o y n t e a anc ve th otential of d perform is imperati d the full p It n . ta e c rs n e styling an d lia n u app cedures to your new operating ols and pro tr re n fo o c e b e l a th nu r with ad this ma me familia Please re and beco n o ti thoroughly c e s TIONS ach unit is C E . U s R rd T a S d IN al. This y stan this manu hest qualit ig in h n e o ti t. th c c t e u s mee prod SOLVING ctured to nse of an PROBLEM nd manufa e a th d e and expe k n c e e ig m h s ti c e t d e rs th re fi a u e o s s y ce plea save R applian , however, that may All DACO solutions a problem d e n v a a h s u m o roble ould y possible p tested. Sh ecklist of h c a s d Service in nta Authorize R O section co C A D rest ntact e call. please co t your nea ary servic se contac unnecess tisfaction, a a s le r p u , o m y le m to prob our proble tion to the to solve y d the solu le n b fi a n ily u d a y are not re event the If you can e unlikely th In . e v ti ta Represen ervice. ustomer S C R DACO r.com www.daco Web site: 093 00) 793-0 Phone: (8 2 cific Time ) 441-963 0 P.M. Pa :0 4 Fax: (626 to . 0 A.M Hours: 7:3 Business ervice ustomer S C R O C A D r. ge Gate D 1440 Brid 1765 9 Bar, CA Diamond su n you and e dicated to e d re a e e. W your hom iends. ACOR for mily and fr D fa g r n u ti o c y r le ce fo u for se performan Thank yo tstanding u o f o rs a ye will bring Sincerely, l Joseph S. Michae /CEO Chairman ce in your applian re that this home TABLE OF CONTENTS .................................... 1 Purpose of this Manual ................................ 1 Product Registration .................................... 1 IMPORTANT INSTRUCTIONS ......................... 2 What To Do .................................................. 2 What Not To Do ............................................ 2 What to Do 1. COOKTOP FEATURES ................................. 3-4 Burner Configuration .................................... 3 Sealed Burners ............................................ 3 Smart-Flame™ ............................................. 3 Burner Igniters and Perma-Flame™ ......... 3-4 Knobs and Spill Protector Rings .................. 4 COOKTOP OPERATION .................................. 5 Selecting the Proper Cookware ................... 5 Before Cooking ............................................ 5 Operating the Control Valves ....................... 5 Setting the Burner Flame Heights ................ 5 Using Simmer Plate ..................................... 5 Energy Saving Tips ...................................... 5 Accessories .................................................. 5 CARE AND CLEANING .................................... 5 Cleaning Tips ............................................... 5 Stainless Steel Surfaces .............................. 5 Porcelain Surfaces ....................................... 5 Knobs and Knob Bezels ............................... 5 Burner Bases ............................................... 5 Burner Rings ................................................ 5 Burner Igniters ............................................. 5 2. 3. 4. 5. 6. 7. PROBLEM SOLVING........................................ 5 Troubleshooting ........................................... 5 Product Maintenance ................................... 6 If You Need Service ..................................... 6 PRODUCT WARRANTY ................................... 6 What Is Covered .......................................... 6 What Is Not Covered .................................... 6 Purpose of This Manual 8. This Use & Care Manual is designed to enable you to properly operate and maintain your new cooktop. Please keep this manual handy for easy access and quick reference. 9. Additional information may be requested by e-mailing, writing or phoning the DACOR Customer Service Department. The address and phone number of this department are listed on the inside front cover of this manual. Product Registration Begin by ensuring proper installation and grounding of the appliance by a qualified technician according to the accompanying Installation Instructions. Have the installer show you where the fuse or junction box is located so that you know how and where to turn off power. Also, have the installer show you the location of the gas supply. If you smell gas, do not use the cooktop. Immediately turn off the gas supply at the shut off valve, disconnect electrical power to the unit at the fuse or junction box and contact the gas supplier or qualified appliance technician. Ensure that the cooktop is used only by those individuals who are able to operate it properly. Use the cooktop only for cooking tasks expected of a home appliance as outlined in this manual. Properly clean and maintain as recommended in this manual, cleaning only the parts listed. Use only dry potholders to avoid steam burns when removing hot cookware. In the event that a burner flame goes out and gas escapes, open a window or door. Wait at least 5 minutes before attempting to use the cooktop. Select utensils of the proper size, material and construction for the particular type of cooking being done. Select utensils that are large enough to contain food without boil-overs or spill-overs. Choose pans with easily grasped handles that will stay cool while cooking. Do not use utensils with loose handles. Avoid using pans that are too heavy to lift safely. Use cookware only for its intended purpose. Certain types of glass, ceramic, and earthenware utensils are suitable for use only in an oven and not in cooktop applications. When cooking, set the burner controls so that the flame heats only the bottom of the utensil and does not lick at the sides of the utensil. When deep fat frying, be certain that the pan is large enough to contain the desired volume of food without overflow caused by bubbling of the fat. Never leave a deep fat fryer unattended. Avoid deep fat frying of moist or frost-covered foods. Foods with high water content may cause spattering or spilling of the hot fat. Heat fat slowly and stir together any combinations of oils and fats prior to applying heat. Utilize a deep 10. 11. 12. 13. 14. 15. 16. 17. fat frying thermometer to avoid heating the fat to temperatures above the flash point. Always turn pan handles to the side or back of the cooktop. Do not turn handles towards the room where they are easily hit. Handles should not extend over adjacent burners. Always check the positions of the control knobs to make sure the cooktop is off when you are finished cooking. Before performing any service, turn off the gas supply by closing the gas shut-off valve and disconnect the electrical power supply. Always light each burner prior to placing a utensil on the burner grate. Also, turn the control knob to the “off” position before removing an utensil from the burner grate. Always clean the cooktop cautiously. If using a damp sponge or cloth, wait until the cooktop has cooled sufficiently to prevent steam burns. Also, some cleaners can produce harmful or unpleasant fumes if applied to hot surfaces. Keep any ventilation filters from any adjacent or overhead vent hoods clean to avoid grease fires. Always set utensils gently onto the grates and center them so that they are wellbalanced. Always keep the cooktop surface clean and dry. What Not to Do 1. Do not use the cooktop for warming or heating the room. 2. Do not leave children alone or unattended in the area where the cooktop is in use. Never allow children to sit or stand on any part of the cooktop. Do not let children play with the cooktop. 3. Do not store items of interest to children above the cooktop. Children could be burned or injured while climbing on the appliance. 4. Do not wear loose or hanging apparel while using the cooktop. 5. Do not repair or replace any part of the cooktop unless specifically recommended in literature accompanying this appliance. All other service should be referred to a qualified technician. 6. Do not use water on grease fires. A violent steam explosion may result. Smother any flames with a lid, cookie sheet or flat tray. If you received a damaged product, immediately contact your dealer or builder. Do not install or use a damaged appliance. Please enter the information requested in the spaces provided below. This information will be required in the unlikely event that a service call becomes necessary: Model No. Serial No. Date Purchased Date Installed Purchased From Address Phone 1 7. 8. 9. 10. 11. 12. 13. 14. Flaming grease can be extinguished with baking soda or a multi-purpose chemical or foam extinguisher. Do not allow potholders to touch gas burners. Do not use a towel or bulky cloth as a potholder. Do not block or obstruct the holes beneath the control knobs. Blocking these holes may affect burner operation and may result in a hazard. When using the cooktop, do not touch the grates, burner caps, burner bases, or any other parts in proximity to the flame. These components may be hot enough to cause burns. If the cooktop is near a window, do not use long curtains as a window treatment. They can blow over the cooktop and create a fire hazard. Do not cover the burners and grates with anything except properly selected utensils. Decorative covers should not be used. Do not heat unopened food containers such as baby food jars and cans. Pressure build-up may cause the container to burst and cause injury. Do not use abrasive or caustic cleaners or detergents on this appliance, as these may cause permanent damage. Do not use aerosol cleaners, as these may be flammable or cause corrosion of metal parts. Do not use or attempt to use this appliance in the event of a power failure. Burner Configuration On PGM304 Cooktops, there are a total of four burners, including one burner rated at a maximum output of 15,000 BTU/HR, one burner rated at a maximum of 12,500 BTU/HR and two burners rated at a maximum output of 9,500 BTU/HR. The knobs are grouped in twos. The front two knobs operate the front two burners, and the rear two knobs control the two rear burners Single Burner 9,500 BTU Single Burner 12,500 BTU Single Burner 9,500 BTU Single Burner 12,500 BTU Single Burner 9,500 BTU Dual Burner Cap Dual Burner Head Cross Ring Skirt Dual Burner Cross Ring Dual Burner 18,000 BTU w/simmer Dual Burner 12,500 BTU w/simmer PGM365 Top View Sealed Burners Single burners and dual burners are attached to the cooktop by retaining screws. Gaskets around the underside of the single burner bases and around the top of the dual burner bases ensure that the burners are sealed, thereby preventing any liquid spills from entering the cooktop chassis. All spills remain on the surface of the cooktop. The brass burner heads spread the flame evenly around the burner perimeters. The burner heads must seat properly in the burner cross rings or burner bases to enable proper cooktop operation. To ensure proper seating, positioning tabs have been placed on the bottom of each burner cross ring or burner head to slide into corresponding notches in the fixed burner base. Smart-Flame™ Each burner head features Smart-Flame™ technology. When oriented properly by the burner head positioning tabs, Smart-Flame™ prevents direct flame impingement on the fingers of the porcelain grate. This reduces temperatures on the grate and improves flame and performance characteristics, as well as increasing longevity of the porcelain enamel coating on the grate. Burner Igniters & Perma-Flame™ Dual Burner 15,000 BTU w/simmer Single Burner 9,500 BTU PGM304 Top View On the PGM365 Cooktop, there are a total of five burners, including one burner rated at a maximum of 18,000 BTU/HR with a minimum of 500 BTU/HR simmer, one burner rated at a maximum of 12,500 BTU/HR with a minimum of 650 BTU/HR simmer, one burner rated at a maximum of 12,500 BTU/HR, and two burners rated at a maximum of 9,500 BTU/HR. The knobs are positioned to correspond with the burner layout. Dual Burner Cap Cover A burner igniter is located on each gas burner base. When a control knob is rotated more than 90˚ counterclockwise, only the selected burner will spark. Additionally, due to the PermaFlame™ reignition feature, the igniters will spark automatically if a flame should blow out or be severely distorted by a draft or by a cooktop ventilation system. Burner igniters must always be kept clean and dry to function properly. Dirty or wet igniters will result in constant sparking, even if there is a flame present. Single Cap Cover Single Burner Head Single Burner Base Single Burner Assembly 2 Dual Burner Assembly Knobs and Spill Protector Rings The control knobs provided with this cooktop are designed for ease of use and longevity. The “D” shaped design of the knob shaft ensures proper orientation when re-installing the knob. The PGM knobs have a triangular shape with a blue indicator light located on point of the knob for reference when setting the burner. Beneath each knob, a spill protector ring is inserted into the opening in the cooktop. These rings prevent liquid spills from entering the chassis beneath the cooktop and they also show heat control information. The control knobs and spill protectors are made of a composite plastic material that is resistant to staining. On the dual burners, the spill protector ring shows the simmer setting and frames the blue simmer indicator light. See “Operating the Control Valves” for further information. Selecting the Proper Cookware Utensils will affect the overall safety and performance of cooktop cooking, so it is important to select them carefully. An improperly selected utensil will not cook efficiently or evenly. For best results, follow these guidelines: 1. Use medium to heavy gauge metal cookware with flat and smooth bottoms for greatest efficiency 2. Use utensils with tight fitting lids to retain heat, odors, and steam. Before Cooking Ensure that the cooktop has been installed by a qualified individual who has tested the operation of the cooktop in accordance with the Installation Instructions. The brass burner heads, cross rings, burner caps, grates, knobs, and spill protectors must be in place for the cooktop to operate properly. All cooktop components must be clean. Be certain that the gas and electrical power supplies to the cooktop are operational. Read this Use and Care Manual in its entirety prior to operating the cooktop. 2. Operating the Control Valves To light a particular burner, press down on the corresponding control knob, then immediately rotate the knob counterclockwise from the “OFF” (Ø) position to the “HIGH” position (the thickest part of the flame indicator line). Only the selected burner will spark continuously until the gas ignites on that burner. The igniters will stop sparking as soon as the burner ignites. 3. Once the burner is lit, reduce the flame height if desired by rotating the control knob further counterclockwise, then place the utensil on the grate. The flame indicator lines indicate progressively lower flame height as the lines get thinner. Knob position indicator 4. Light & high position Area of operation 5. Low position PGM Single Burner Control Valve On the dual burners of the PGM, there are two indicator lines. The knob light is for higher heat settings. Both the outer and inner burners operate when in this setting. Turning the knob further counterclockwise reduces the flame to the Simmer setting. Once in the simmer mode, only the small inner burner is operational and the simmer indicator light comes on. Again, moving counterclockwise will reduce the heat out of the simmer burner. Knob position indicator Light & high position 6. Burner igniters must always be kept clean and dry to function properly. Due to the Perma-Flame™ reignition feature, dirty or wet igniters will result in constant sparking, even if there is a flame present. Additionally, igniters will spark automatically if the flame is distorted by a draft or by a cooktop ventilation system. Eliminate the draft or reduce the ventilation blower speed in this case. When the cooktop is cool and/or more than two burners are in use, the igniters may continue to spark if the control knob is set to the “LOW” position. This is normal until the burner warms up. The tendency to spark under these conditions can be reduced by operating the burner at a higher flame setting for a short period of time (normally 60 seconds or less), then adjusting the control knob down to the “LOW” setting. The burner will also warm up faster if a utensil is placed on the grate. The flame should be steady and blue in color. Foreign material in the gas line, especially in new construction, may cause an orange flame during initial operation. This will disappear with further use. The flame should burn evenly around the perimeter of the burner, except underneath each grate support finger where the flame height is reduced by the Smart-Flame™ feature. If the flame is uneven, ensure that the brass burner head is properly positioned, then check for any foreign material in the burner head or on the burner cap. Remove any foreign material with a straightened paper clip, wire, or needle. Do not use a toothpick to remove clogs, as it could break off. Do not damage the brass or distort the shape of the burner head ports. Only handle burners when cold. Never light the burners with a match or other open flame. If a burner does not ignite, refer to the Troubleshooting Guide. Setting the Burner Flame Area of operation Area of operation Low position Low position High position PGM Dual Burner Control Valve WARNING: Do not touch any burner cap, burner base, or igniter while the igniters are sparking, as an electrical shock could result. IMPORTANT: 1. If the gas does not ignite within four seconds, once the gas reaches the burner ports, turn off the valve. Allow at least five minutes for any gas to dissipate, then repeat the lighting procedure. Setting the proper burner flame height for the desired cooking process and selected utensil will result in superior cooking performance, while also saving time and energy. Follow these recommendations for best results: 1. Use low or medium flame heights when cooking in utensils that are poor conductors of heat, such as glass, ceramic, and cast iron cooking vessels. Reduce the flame height until it covers approximately 1/3 of the utensil diameter. This will ensure even heating within the utensil and reduce the likelihood of burning or scorching of food. 2. Reduce the flame if it is extending beyond the bottom of the utensil. A flame that licks along the sides of the utensil is potentially dangerous, heats the utensil handle and kitchen instead of the food, and wastes energy. 3 3. Reduce the flame height to the minimum level necessary to perform the desired cooking process. Remember that food cooks just as quickly at a gentle boil as it does at a vigorous, rolling boil. Maintaining a higher boil than is necessary wastes energy, cooks away moisture, and causes a loss in food flavor and nutrient level. Energy Saving Tips • • • • • • • Always use utensils with flat, smooth bottoms and tight-fitting lids to retain heat and moisture. Minimize the amount of liquid or fat to reduce cooking times. Select cookware of the proper size, material and construction for the cooking process being performed. Adjust the flame height to fit the utensil size. After liquid reaches a boil, reduce the heat to maintain a simmer rather than a rolling boil. Use a timer rather than repeatedly removing the lid to check food. Thaw foods prior to cooking to reduce cooking time. Accessories (Order Separately) • • • Wok Ring (AWR) - the wok ring is a safe, convenient way to stir fry. Just place it on top of the grate, aligning the wok ring feet with the grate fingers. It will hold most standard sized wok. Griddle (AG13) - The AG13 easy clean griddles are coated with a non-stick finish. Wonderful for pancakes, eggs and various other foods. It is designed to sit on top of your cooktop burner grates. A maximum setting of medium is recommended to avoid damage to the cooktop. See instructions included in griddle carton for further information. Simmer Plate - The Simmer Plate has been specifically designed for simmering and holding food at the lowest safe temperature. Simply align plate with the five longest fingers on the cooktop grate then set on top of the grate. When correctly installed, the Simmer Plate will rest about 1/2 inch above the top surface of the grate and will be locked in place to prevent turning. WARNING: To avoid electrical shock or burns, turn off all controls and ensure the cooktop is cool before cleaning. 4. 5. IMPORTANT: Do not use harsh or abrasive cleaning agents, waxes, polishes, or commercial cooktop cleaners to clean the cooktop. Read and follow the CARE AND CLEANING INSTRUCTIONS to ensure that proper cooktop operation and appearance will be maintained throughout the lifetime of the product. Several materials and finishes are used in the cooktop. Each material and finish must be properly cleaned according to the following recommendations. Failure to follow these recommendations may result in permanent damage to the cooktop. Cleaning Tips WARNINGS: 1. 2. 3. Before cleaning the cooktop, ensure that all burners are turned off and that all components are cool enough to safely touch. After cleaning, reassemble all components before attempting to operate the cooktop. Burner ports must be dry for proper operation Proper cleaning is necessary to maintain cooktop performance and appearance, while also ensuring safe operation. The cleaning effort necessary to maintain the cooktop varies according to the type and amount of cooking. For example, more frequent cleaning is required if the cooktop is used often for frying or other high temperature operations. Clean the cooktop thoroughly prior to operating it the first time. For initial and everyday cleaning, use a soft cloth or sponge lightly dampened with a solution of warm water and hand dishwashing liquid to clean all components. IMPORTANT: 1. 2. 3. To keep the cooktop looking its best, clean it after every use as soon as all components are cool enough to safely touch. Also, quickly wipe up spills that occur while cooking, being careful not to touch any hot areas. Spills that remain on hot burner components will be very difficult to clean, especially if allowed to burn on. Spills of certain foods, such as tomatoes, citrus juices, vinegar, alcohol, and milk, are very harmful if allowed to stand for any length of time. Therefore, save time while also maintaining a new appearance by cleaning regularly and shortly after spills occur. Use the mildest cleaner or procedure available to perform the cleaning operation. Use only a sponge, soft cloth, fibrous or plastic brush, and nylon pad for cleaning. Avoid the use of abrasive cleaners such as steel wool. Always dry components completely before using the cooktop. The use of brand names is intended only to indicate a type of cleaning agent or cleaning implement. All products listed by name must be used in accordance with the manufacturer’s recommendations. Use of a brand name does not constitute an endorsement, nor does omission of a particular brand imply that a product is inferior. Recommendations for cleaning specific cooktop components are summarized below: The grates, burner covers, burner heads, burner caps, and spill-over areas on the cooktop, unlike other porcelain enamel appliances in your home, are exposed to extremely high temperatures in a matter of seconds. In addition to this extreme thermal shock, the grates are subjected to mechanical shock when utensils are placed on or slid across them. Finally, spillovers introduce foods with high acidity to all of the porcelain components. Due to these severe operating conditions, all porcelain enamel components on the cooktop will undergo an inevitable change in appearance with use. Meticulous care and cleaning will slow but not eliminate this natural and expected aging process. Treating the porcelain components with care will slow the natural deterioration that takes place with cooktop use. Please follow these guidelines to keep the porcelain parts looking their best: 2. 3. 4. Stainless Steel Surfaces Clean these surfaces with the provided Elco Stainless Steel Cleaner. Rinse and dry with a soft lint-free cloth. IMPORTANT: IMPORTANT: 1. Mildly abrasive cleaners or applicators, such as S.O.S. Pads, soap-filled steel wool pads, Soft Scrub, or Bon-Ami may be used with extreme care on occasion to remove the most serious stains. Exercise caution – extensive use of abrasives will eventually damage the porcelain enamel surface. Do not use utensils having rough bottoms, as this can result in permanent damage to the top surfaces of the porcelainized grates. Do not drop utensils onto the grates or drag heavy pots across the tops of the grates. Set the grates into the locating dimples gently. Do not drop the grates into place. Use caution when cooking to avoid spills as much as possible. Porcelain is acidresistant but not acid-proof, so some foods can cause permanent damage if allowed to remain on porcelain surfaces. Daily cleaning of the grates, burner covers, burner heads, and burner caps is best accomplished with a soft cloth or sponge dampened in a solution of warm water and hand dishwashing liquid. Grates, burner covers, burner heads, and burner caps should not be cleaned in the dishwasher. Stubborn stains may be removed by applying full-strength sprays such as Simple Green, Ajax All-Purpose Cleaner, Formula 409, or Scotch Guard. Metal polishing compounds such as Luneta or Flitz may also be used. (If you are unable to locate these cleaning compounds, please phone the DACOR Customer Service Department for a referral.) 4 If commercially available stainless steel cleaners are used, it is important to read the labels for chlorine compounds. Chlorine is a corrosive substance. If these compounds are present, rinse thoroughly and dry with a soft lint-free cloth. Always wipe stainless steel surfaces with the grain. Porcelain Surfaces Clean this surface with a solution of mild detergent and hot water. Rinse with a soft cloth. Do not use abrasives or commercial oven cleaners. Stubborn stains may be removed by applying full-strength sprays such as Simple Green, Ajax All-Purpose Cleaner, Formula 409, or Scotch Guard. IMPORTANT: 1. 2. 3. 4. Never use the cooktop surface as a cutting board. Do not use abrasive cleaners or applicators on the cooktop. Do not try to remove heavy spills with a sharp object such as a knife or metal spatula. Sharp objects may scratch the cooktop. A small amount of baby oil may be applied to stainless steel tops to restore the lustre. Knobs and Knob Bezels The control knobs provided with this cooktop are designed for ease of use and longevity. The “D” shaped design of the knob shaft ensures proper orientation when re-installing the knob. IMPORTANT: Never block the holes in the control panel beneath the knobs, because this will impair the flow of combustion air and adversely affect burner operation, possibly creating a hazardous condition. The knobs are made of a composite plastic. These components should be washed regularly in warm, soapy water. Hand dishwashing liquid is excellent for this task. Knobs should be removed by gently pulling them straight out and off of the valve shafts. The spill protectors should be cleaned in place. Use caution to avoid introduction of moisture into the control panel behind the bezels. To replace knobs, align the “D-shaped” opening at the bottom of the knob with the “D-shaped” valve shaft, then carefully press the knob onto the valve. IMPORTANT: 1. 2. 3. 4. 5. Turn the knobs to the “OFF” position prior to removing them from the valve stems. The cooktop should never be operated without the knobs in place. Do not soak the knobs in water or place them in the dishwasher. Do not expose the knobs to direct flame, hot utensils, or other sources of heat. Do not use abrasive or corrosive cleaners or applicators, as these could cause permanent damage. Burner Igniters Under certain cooking or cleaning conditions, your cooktop igniters may become coated with or corroded by food deposits, splattered grease or cleaning agents. This condition can cause erratic or continuous sparking. Keeping the igniters clean and dry will help to reduce this problem. To avoid unnecessary and costly service calls, the homeowner should perform periodic cleaning of the igniters. An Igniter Cleaning Brush is enclosed for your use in cleaning the cooktop igniters. To clean the igniters: 1. 2. Single Burner Bases The single burner base is permanently attached to the cooktop. The base should be wiped clean using a soft cloth or sponge that has been lightly dampened with warm water and hand dishwashing liquid. Dual Burner Cross Rings The dual burner skirts and cross rings are removable from the cooktop. The skirts should be wiped clean using a soft cloth or sponge that has been lightly dampened with warm water and hand dishwashing liquid. The igniters, located in the burner base, should be wiped clean using a soft cloth, or sponge, that has been lightly dampened with warm water and hand dishwashing liquid. Burner Heads The brass burner heads spread the flame evenly around the burner perimeters. The burner heads must seat properly in the burner bases or cross rings to enable proper cooktop operation. To ensure proper seating, positioning tabs have been placed on the bottom of each burner ring to slide into corresponding notches in the fixed burner base. 3. 4. 5. Be sure burners are cool to the touch. Remove the grate, burner cap and burner heads. Brush completely around the igniter, including over and under the edge of the metal cap and base. Use care while cleaning here. Parts of the igniter are porcelain and can be fragile. DO NOT USE WATER when cleaning the igniters. If a liquid must be used to clean the igniter effectively, use only a small amount of rubbing alcohol. After cleaning, reinstall the burner head, head cover, burner cap cover, burner cap and grate. Make sure caps on dual burners are properly seated into the burner base. Test the burners. If erratic clicking is still present, make sure the igniter is completely dry. If the unit still exhibits problems after drying, call your local DACOR Authorized Servicer. Burner Covers For this surface, nonabrasive cleaners should be used. First, try hot, soapy water and the soft side of a sponge to clean the burner covers. Then, proceed to the oven cleaners for tougher stains. Recommended cleaners are Easy-Off FumeFree or Mr. Muscle. Spray the cleaner onto a soft cloth and rub onto the part. Leave the cleaner on for about 30 minutes, wipe clean, then rinse thoroughly with water and dry with a soft cloth. To remove the burner head, first remove the grate. The burner head may then be removed from the burner base. Soak the burner ring in a warm solution of hand dishwashing liquid and water, then rinse well with clean water. Dry the burner thoroughly before placing it back on the burner base or cross ring. Stubborn stains may be removed by applying a metal polishing compound such as Luneta or Flitz. (If you are unable to locate this type of polishing compound, please phone the DACOR Customer Service Department for a referral.) 5 Troubleshooting Unnecessary service calls may be expensive, frustrating and time consuming. Before you call for service, please review the potential problems, possible causes and remedies shown in the table below. Problem Possible Cause Remedy 1. Nothing works. Cooktop is not connected to electrical power. Have cooktop connected to the electrical power supply by a qualified electrician following the specifications outlined in the installation instructions. 2. Burner lights but continues to click. Burner components are not properly seated. Confirm that the burner components are properly seated. 3. Sparking, but no ignition. Gas shut-off valve is on “off” position. Turn shut-off valve to “on” position. 4. No spark. Inner burner area and burner cap are coated with cooking residue or wet. Confirm that inner burner and burner cap are clean and dry. Cooktop not connected to power supply. Check incoming power. Power supply is not grounded. Have power supply properly grounded. 5. Burner Flame goes out at low setting. Low gas pressure. Have incoming gas pressure tested. Contact gas company. 6. Igniters spark continuously after flame ignition. Power supply polarity is reversed. Have polarity corrected. Igniters are wet, dirty or damaged. Clean and dry igniters. Burners ignite, but flame is extremely large, distorted or yellow Burner Ring ports are clogged. Clean burner ring ports with straightened paper clip, needle or wire. Burner ports or burner caps are not positioned properly. Remove and carefully re-install burner rings and caps. Cooktop is being operated on the wrong type of gas. Ensure the cooktop is correct for the gas supply - (Natural Gas or LP, the PGM is not a convertible cooktop). Regulator is either not installed, is faulty, or is set for the wrong type of gas. Check installation, replace regulator or set regulator for the proper gas type. 7. Troubleshooting Guide 6 Product Maintenance No maintenance, other than the CARE AND CLEANING INSTRUCTIONS identified in this Use & Care Manual, should be attempted by the owner/operator. All other maintenance and service must be performed by a qualified appliance technician. If You Need Service… First, review the recommended checks listed in the preceding Troubleshooting Guide. Then, be certain that the appliance has been installed properly and is being operated correctly. Familiarize yourself with the warranty terms and conditions listed in the PRODUCT WARRANTY section. If the above checks have been completed and the problem has not yet been remedied, call your local authorized DACOR service representative. Your dealer can normally provide the name and telephone number of the nearest service company. DACOR works diligently to ensure your satisfaction when service is necessary. However, if you are not completely satisfied with the service provided, contact the company that performed the service and express why you are not pleased. Normally, they will be willing and able to resolve the problem. If the service agency is not able to respond effectively, call or write the DACOR Customer Service Department. The phone number and address of this department are listed on the inside front cover of this manual. Please include your telephone number if you choose to write. We will then do our utmost to assure your happiness and satisfaction. What Is Covered CERTIFICATE OF WARRANTIES DACOR COOKTOPS WITHIN THE FIFTY STATES OF THE U.S.A., THE DISTRICT OF COLUMBIA AND CANADA*: FULL ONE-YEAR WARRANTY If your DACOR product fails to function within one year of the original date of purchase, due to a defect in material or workmanship, DACOR will remedy the defect without charge to you or subsequent users. The owner must provide proof of purchase, upon request, and have the appliance accessible for service. * Warranty is null and void if non-CUL approved product is transported from the U.S. OUTSIDE THE FIFTY STATES OF THE U.S.A., THE DISTRICT OF COLUMBIA AND CANADA: LIMITED FIRST YEAR WARRANTY If your DACOR product fails to function within one year of the original date of purchase, due to a defect in material or workmanship, DACOR will furnish a new part, F.O.B. factory, to replace the defective part. All delivery, installation and labor costs are the responsibility of the purchaser. The owner must provide proof of purchase, upon request, and have the appliance accessible for service. What Is Not Covered • • • • • Service calls to educate the customer in the proper use and care of the product. Failure of the product when used for commercial, business, rental or any application other than for residential consumer use. Replacement of house fuses or fuse boxes, or resetting of circuit breakers. Damage to the product caused by accident, fire, flood or other acts of God. Breakage, discoloration or damage to glass, metal surfaces, plastic components, trim, paint, or other cosmetic finish, caused by improper usage or care, abuse, or neglect. THE REMEDIES PROVIDED FOR IN THE ABOVE EXPRESS WARRANTIES ARE THE SOLE AND EXCLUSIVE REMEDIES. THEREFORE, NO OTHER EXPRESS WARRANTIES ARE MADE, AND OUTSIDE THE FIFTY STATES OF THE UNITED STATES, THE DISTRICT OF COLUMBIA AND CANADA, ALL IMPLIED WARRANTIES, INCLUDING BUT NOT LIMITED TO, ANY IMPLIED WARRANTY OF MERCHANTABILITY OR FITNESS FOR A PARTICULAR USE OR PURPOSE, ARE LIMITED IN DURATION TO ONE YEAR FROM THE DATE OF ORIGINAL PURCHASE. IN NO EVENT SHALL DACOR BE LIABLE FOR INCIDENTAL EXPENSE OR CONSEQUENTIAL DAMAGES. NO WARRANTIES, EXPRESS OR IMPLIED, ARE MADE TO ANY BUYER FOR RESALE. Some states do not allow limitations on how long an implied warranty lasts, or do not allow the exclusion or limitation of inconsequential damages, so the above limitations or exclusions may not apply to you. This warranty gives you specific legal rights, and you may also have other rights that vary from state to state. 7 NOTES: 8 fold here NO POSTAGE NECESSARY IF MAILED IN THE UNITED STATES BUSINESS REPLY MAIL FIRST-CLASS MAIL PERMIT NO. 4507 DIAMOND BAR CA POSTAGE WILL BE PAID BY ADDRESSEE ATTN: WARRANTY PROCESSING DEPT DACOR 1440 BRIDGEGATE DR STE 200 PO BOX 6532 DIAMOND BAR CA 91765-9861 Please visit www.dacor.com to activate your warranty online. WARRANTY INFORMATION IMPORTANT: Please rest assured that under no conditions will Dacor sell your name or any of the information on this form for mailing list purposes. We are very grateful that you have chosen Dacor products for your home and do not consider the sale of such information to be a proper way of expressing our gratitude! (Please Print or Type) Owner’s Name: Street: Last First City: Purchase Date: Middle State: Email: cut here Your warranty for this product CANNOT BE ACTIVATED until this form has been returned to Dacor. If you have purchased more than one Dacor product, Please return all forms in one envelope. Zip: Telephone: Dealer: City: State: Zip: Your willingness to take a few seconds to fill in the section below will be sincerely appreciated. Thank you. 1. How were you first exposed to Dacor products? (Please check one only.) A. T.V. Cooking Show F Builder B. Magazine G. Architect/Designer C. Appliance Dealer Showroom H. Another Dacor Owner D. Kitchen Dealer Showroom I. Model Home E. Home Show J. Other 2. Where did you buy your Dacor appliances? A. Appliance Dealer B. Kitchen Dealer C. Builder Supplier D. Builder E. Other 3. For what purpose was the product purchased? A. Replacement only B. Part of a Remodeled C. New Home D. Other 4. What is your household income? A. Under $75,000 B. $75,000 – $100,000 C. $100,000 – $150,000 D. $150,000 – $200,000 E. $200,000 – $250,000 F. Over $250,000 6. Would you buy or recommend another Dacor product? Yes Comments: cut here 5. What other brands of appliances do you have in your kitchen? A. Cooktop C. Dishwasher B. Oven D. Refrigerator No Thank you very much for your assistance. The information you have provided will be extremely valuable in helping us plan for the future and giving you the support you deserve. Place Serial Number Label Here Web Site: www.dacor.com For a Dealer/Service: (800) 772-7778 Corporate Phone: (800) 793-0093