1
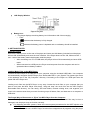
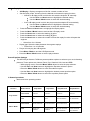
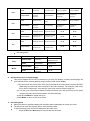
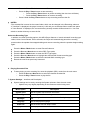
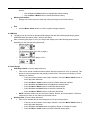
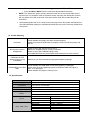
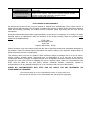
MP3 Player Models MP101 & MP102 INSTRUCTION MANUAL User Manual for ETEC MP101/102 MP3 Players This MP3 player is a new generation of multi-function, portable digital devices that plays multiple music formats: MP3 & WMA, and operates as a high-quality digital voice recorder and USB Flash Drive. Unique Features Multiple Music Formats: o Supports: MP3 & WMA Backlit LCD Display ID3 and LRC Support for Displaying Lyrics and Title Information 7 Preset Equalizer Settings o Normal, Rock, Pop, Classical, Soft, Jazz and DBB Multiple Repeat Modes o Normal, Repeat One, Folder, Repeat Folder, Repeat All, Random, and Intro. Automatic Power Off Timer o You may set a Sleep Timer or use the Off Time mode for added battery saving convenience. Record/ Replay o High-quality digital voice recordings are easy to make with the built-in microphone. USB 2.0 High Speed Data transmission Driver Free USB Storage Disk o Manage your files without installing additional drivers. Declaration Thank you for choosing one of our ETEC products. We recommend you carefully read the entire manual carefully prior to using to avoid damaging your Player or music files. Functions and performance may change without prior notice. 1. GETTING TO KNOW THE PLAYER Controls Play / Stop / Pause Prev / Menu / Mode / Next Mini USB Drive Port Ear Buds Jack Volume + / - Hold LCD Display Window Battery Icon The player displays remaining battery level information with 9 icons ranging o From: Indicates that the battery is fully charged o To: Indicates the battery power is depleted and a new battery should be installed 2. GETTING STARTED Install the battery Remove the battery cover on the rear of the player and insert one AAA battery (included) and the player will turn ON automatically and enter the main interface. If the Player does not turn ON, make sure the „+‟ and „-„ends of the battery match the diagram inside the player. o After connecting to a PC via USB cable, the player will turn ON automatically and enter USB mode. o When connected to a USB port, the Player receives power from the computer and can be operated without a battery installed. Loading Music Files on the MP3 Player: Connect the MP3 Player to a USB port on your computer using the included USB Cable. Your computer will automatically recognize the MP3 Player as a “Removable Disk” in your System Tray (lower-right corner of the desktop) and in the “My Computer” directory. Connecting to the Player to a USB port turns the power ON to the Player unit. Loading music files into the MP3 Player is very easy. Locate the music files on your computer that you want to load onto the MP3 Player and simply, “drag and drop” the music files into the MP3 Players‟ Removable Disk directory. You can easily; add new folders, rename existing ones, and organize your music in the same manner that you would for other groups of folders, files, and data sets on a computer or USB drive. The Proper Way to Disconnect or “Eject” the MP3 Player from the Computer If the MP3 Player is not properly „Ejected” from the computer; music & recorded files may be lost or damaged, and the player may not function correctly. For Windows and MAC systems, follow the normal system procedures for the SAFE ejection of a “USB DEVICE”. o First, make sure all MP3 Player functions have stopped and all programs using the player o o on your computer (i.e. Media Player or others) are closed. WINDOWS: right-click on the USB icon in the bottom right (system tray) of your computer screen and a box with the message, “Safely Remove Hardware” will appear. Click on the “Safely Remove Hardware” message and your computer will indicate that it is OK to remove the device. MAC: right-click on the icon that appears on the screen or in the “Finder” menu to “EJECT” the unit. The unit can be safely be removed. The Controls Again Play / Stop / Pause Prev / Menu / Mode / Next Mini USB Drive Port Ear Buds Jack Volume + / - Hold Turning the Player ON & OFF Press & Hold the Play button to turn the player ON, repeat to turn it OFF. Using the Controls PRESS: Press and release the indicated key quickly PRESS & HOLD: Press and hold the indicated key for about 3 seconds Menu / Mode Button o Press & Hold the Menu / Mode button to enter the main menu / submenu systems, make selections, or enter the desired operating mode. Prev / Next Buttons o Press the Prev and Next buttons to highlight desired files and menu options. o To Rewind or Fast forward the playing file Volume Control o Press the Vol + / - buttons to increase or decrease the volume level. Playing your Music – Basic Operation Plug the Ear Bud Headphones into the headphone jack on the player Make sure the HOLD switch is set to the OFF position (to the right) Press & Hold the Play / Pause button to turn the player ON Use the Prev and Next buttons to highlight the Music Mode Press the Menu / Mode button to select the operating mode Press the Play / Pause button to begin playing Use the Prev and Next buttons to select different songs Vol + / - buttons to set desired listen volume level Control Lock/ Hold Slide the Hold switch to the left to turn the Hold feature ON. Slide it to the right to turn it OFF. When playing music or recording, turning the Hold feature ON will lock the control buttons and prevent unwanted settings or function changes. This feature is very useful, for example; to keep the Player from being accidently stopped or turned OFF when listening to music while the Player is in your pocket with other items that may come in contact with the control buttons. When the Hold feature is ON, basic Player and USB functions cannot be performed including, turning the power ON / OFF and moving files to / from a PC. Play & Stop (or Pause when recording) Press the Play / Pause key to toggle between play and pause. Operating Modes Press the Menu / Mode button to select desired operating mode from the main menu. o Main Menu: o Music mode: o Record mode: o Voice mode: o System Setting: o USB Mode: Playing Modes & Submenu When playing music and recorded files, different playing modes can be selected from the play submenu. The player will continue to play files according to the mode selected until it is changed. Repeat Mode: Select the repeat mode from the following options: o Normal: Plays all files in order one time o Repeat One: Repeat plays one file o Folder: Plays all files in current folder in order one time o Repeat Folder: Repeat plays all files in current folder o Repeat All: Repeat plays all files in order o Random: Plays all files in current folder in a random pattern o Intro: Plays the first 10 seconds of each file Replay Mode In Music or Voice mode, Press the Menu / Mode button to enter the play submenu A-B Replay - Replays a segment of the file a certain number of time Set the replay mode, choosing from the Manual and Automatic replay functions o Manual: A-B replay mode in which the user sets the endpoint “B” manually o Use the Prev and Next buttons to highlight the desired setting Use the Menu / Mode button to select the desired setting Auto: A-B replay mode in which the player sets the endpoint “B” automatically Use the Prev and Next buttons to highlight the desired setting Use the Menu / Mode button to select the desired setting Press the Prev and Next buttons to highlight the Replay option Press the Menu / Mode button to activate the A-B replay mode Press the Next button o select the starting (A) point Press the Next button to select the ending (B) point Press the Next button to select the number of times the replay function will repeat the segment o Select from 2 to 10 times Replay gap: Select the delay between the segment replays o Select from 1 to 10 seconds Player will now play the A-B segment Press Menu / Mode to end the A-B Repeat mode Press the Menu / Mode button to exit the play submenu Preset Equalizer Settings This MP3 Player features 7 different preset equalizer options to enhance your music listening pleasure. These options are: Normal, Rock, Pop, Classical, Soft, Jazz and DBB o While playing music, Press the Menu / Mode button to enter the play submenu o Use the Prev and Next buttons to highlight the Equalizer submenu option o Press the Menu / Mode button to enter the submenu option o Use the Prev and Next buttons to highlight the desired preset equalizer option o Press the Menu / Mode button to select the equalizer preset option 3. Button Operations Music and Voice operating modes: Function Button Action Stop Status Play Status Play-Submenu Stop-Submenu Press & Hold TURN OFF TURN OFF TURN OFF TURN OFF Press PLAY STOP EXIT FROM MENU EXIT FROM MENU Press & Hold ENTER MAIN MENU ENTER MAIN MENU ENTER MAIN MENU ENTER MAIN MENU Press ENTER STOP SUBMENU ENTER PLAYINGSUBMENU CONFIRM CURRENT OPTION OR ENTER NEXT SUBMENU CONFIRM CURRENT OPTION OR ENTER NEXT SUBMENU Play / Pause Menu / Mode Press NEXT SONG PLAY NEXT SONG SWITCH SUBMENU SWITCH SUBMENU Press & Hold CONTINUOUS FORWARD BROWSING FAST FORWARD CONTINUOUS FORWARD CONTINUOUS FORWARD Press PREVIOUS SONG PLAY PREVIOUS SONG SWITCH SUBMENU SWITCH SUBMENU Press & Hold CONTINUOUS REVERSE FAST REVERSE CONTINUOUS REVERSE CONTINUOUS REVERSE Next Prev BROWSING Press INCREASE VOLUME INCREASE VOLUME N/A N/A Press & Hold INCREASE VOLUME CONTINUOUSLY INCREASE VOLUME CONTINUOUSLY N/A N/A Press DECREASE VOLUME DECREASE VOLUME N/A N/A Press & Hold DECREASE VOLUME CONTINUOUSLY DECREASE VOLUME CONTINUOUSLY N/A N/A Vol + Vol - Recording Mode Function Action Press & Hold Play press Press & Hold Mode Press Stop Status TURN OFF START RECORDING ENTER MAIN MENU ENTER RECORD SUBMENU Record Status STOP RECORDING AND SAVE FILE PAUSE RECORDING N/A N/A 4. Synchronous Lyric and Title Display This player supports ID3 & LRC Synchronous Lyric and Title Display, a feature that displays the lyrics and title of the currently playing song across the LCD screen display. This feature will only works if the LRC (lyrics) file shares the exact same name as the MP3/ WMA song file and if both files are stored in the same directory. For example, if the music file is named “Angel.mp3”, then the LRC (lyrics) file must be named “Angel.lrc”. To use the Lyric Synchronous Display Feature once both lyric and music files for the same song are correctly named and located in the same directory Press & Hold Mode to display the lyrics Press Mode to return to the music mode 5. Recording Voice Make sure there is significant battery life remaining before attempting to record voice files. The player can save 99 recording files in each directory folder. To start recording enter the Record Mode from the main menu: o Press the Prev and Next buttons to select the Record mode o o o Press the Menu / Mode button to enter Record mode Press the Play / Pause button to start recording Press the Play / Pause button to pause recording (the time icon will flicker) Press the Play / Pause button to resume recording Press & Hold the Play / Pause button to stop recording and save the file NOTES: -The recorded file is saved in the current folder, which can be changed in the Recording submenu -If “Overflow” is displayed, the player‟s memory is full and you must delete files to make free space -If “Over Record” is displayed, the current directory already contains 99 files stored in it. You must switch to another directory to store the file. Select the Recording Type In addition to normal recording options, this MP3 Player features a “sound activated” recording type called; Voice Control Record. When selected, the Player will automatically pause the recording process when the speaker has stopped talking and resume recording when the speaker begins talking again. Press the Menu / Mode button to enter Record Submenu Press the Prev and Next button to select REC Type option Press the Menu / Mode button to enter the REC Type option Press the Prev and Next button to highlight the desired WAV format recording type Press the Menu / Mode button to select the desired WAV recording type Record the new file as previously instructed 6. Playing Recorded Files To start playing a voice recording file, enter the playback (RPL) mode from the main menu o Press the Prev and Next button to select the desired recorded file o Press the Play / Pause button to play the file 7. System Settings – Interface and Description System settings can be set by entering the System submenu from the main menu o Options may vary slightly depending on the firmware version being used Menu Option Description System Time Set the system date and time information Record Type Select only WAV file recording Backlight Set the length of time in seconds that the Backlight stays on when idle Language Set the displayed language Power off Set the Power Off and Sleep Timers Replay mode Contrast Set Replay Mode Set the brightness/contrast level of LCD display Memory info Exit Show memory capacity and percentage that being used Exit the system settings interface Changing the System Settings To Change the Settings Options, Press the Menu / Mode button to select the settings option System Time Set the Date and Time for the player o Use the Vol + / - buttons to select the Date or Time items to set o Use the Prev and Next buttons to adjust the setting Voice Recording Type Select WAV recording o Use the Prev and Next buttons to highlight the desired recording option; Sound Activated or Normal o Use the Menu / Mode button to select the desired setting Backlight Timer Set the length of time the backlight remains ON after the system becomes idle o Select from 0 to 30 seconds in 3 second intervals o Use the Prev and Next buttons to highlight the desired setting o Use the Menu / Mode button to select the desired setting Backlight Color Selection Set the backlight color or color combinations of the display screen o Use the Prev and Next buttons to highlight your desired color setting o Use the Menu / Mode button to select the setting Language Set the Language for the player to display o Use the Prev and Next buttons to highlight the desired language setting o Use the Menu / Mode button to select the desired setting Power OFF and Sleep Timer Settings Power Off Timer: Set the length of time in seconds (10, 20, 30, 40, 50, or 60 seconds) that the player will wait before automatically turning OFF after becoming idle o Use the Prev and Next buttons to highlight the desired setting o Use the Menu / Mode button to select the desired setting Sleep Timer: Set the length of time in minutes (from 0 to 120 in 10 minute intervals) that the player will wait before turning OFF automatically after becoming idle o Use the Prev and Next buttons to highlight the desired setting o Use the Menu / Mode button to select the desired setting Brightness Set the brightness level of the LCD display from 1 to 16: the higher the number, the darker the screen o Use the Prev and Next buttons to highlight the desired setting o Use the Menu / Mode button to select the desired setting Online Mode Select from Multi Drive, Normal Only, and Encrypted Only modes The Multi Drive option assigns a driver letter to both the built-in Flash and the Encrypted memory partitions, however some operating systems (Windows 2K SP4 and older) may not recognize USB drives with 2 drive letters. In this case, select Normal or Encrypted Only options. o Use the Prev and Next buttons to highlight the desired setting o Use the Menu / Mode button to select the desired setting Memory Information o Display the current amount of total and used percentage of the Flash memory Exit Use the Menu / Mode button to exit the system settings submenu 8. USB Disk The player can be used as a standard USB storage disk with the following operating systems; WNDOWS 2000 and above, MAC: OS10.3 and above After connecting the player to a PC, the Player will display one of the following three screens depending on the function being performed: o Standby Mode (idle) o File Download Mode (from PC to player) o File Upload Mode (from player to PC) 9. Folder Usage Selecting Folders (From the Stop Submenu) Files can be saved in different folders (which should be created on a PC in advance). This allows for easy management and playing of stored files. The player can identify up to 99 Folders in a directory. o From the current function mode “Stop” interface, Press the Menu / Mode button to enter Stop state Submenu o Press the Menu / mode button to enter the Folder selection interface o Press the Prev and Next buttons to highlight the desired folder o Press the Menu / Mode button to select the desired folder o Press the Prev and Next buttons to select the desired file o Press the Menu / Mode button to select the desired file NOTE: Different folders can be used for the Music, Record, and Voice Modes. The three modes do not have to use folders of the same names Deleting Files (From the Stop Submenu) Files can be deleted directly from the player to free up memory space o From the current function mode “Stop” interface, Press the Menu / Mode button to enter Stop state Submenu o Press the Prev and Next buttons to highlight “Delete” or “Delete All” option o Press the Menu / mode button to enter the desired delete option o Press the Prev and Next buttons to toggle between “YES” or “NO” o Press the Menu / Mode button to select the desired delete operation NOTE: The “Delete All” option will only delete all of the files in the current folder for the current mode. For example: while in the Music mode, executing the “Delete All” function will only delete- all of the music files in the open folder, while the recorded files will be untouched. When deleting files from a PC, safely remove the player from the system and disconnect the USB cable after deleting is complete otherwise files may not be correctly deleted from the system. 14. Trouble Shooting No Power Check whether the battery has been inserted properly Check to be sure the USB cable is properly connect to both the player and the PC No sound is heard in headphones Check to see if the Volume level is set “0” Make sure headphone jack is firmly connected Check to see if the headphone plug is dirty Corrupted MP3 files may create static noise and that cuts out the sound Characters in LCD appear strange or are unreadable Make sure you have selected an appropriate display language Downloading music files fails. Check whether the USB cable is connected properly or damaged Check to be sure the operating system is Windows: 2000 and higher or Mac: 10.3 and higher Check whether the player‟s memory is full 15. Specifications Dimension 82 x 28 x 20.5mm Weight 25g (without battery installed) LCD Window 128 x 32 LCD, LED backlight PC connection USB2.0 (FS) Flash Memory 1GB, 2GB Battery Record MP3、WMA、WAV (Read: 1000K Byte, Write: 1000--900K Byte) 1 x AAA Alkaline battery Max Play time: 10 hours (using power save features) Sample rate 8KHz Recording format .wav (32K bps) .act (8K bps) Recording time Max output of headphone MP3 bit rate WMA bit rate Frequency response SNR Distortion 35Hrs 19Min 38Sec (.act format) 10mW - 32Ohm in both Left and Right 8K bps – 320K bps 5K bps – 384K bps 20Hz to 20KHz 85dB ≦0.1% Music Formats Working temperature Multi- language display Operating System MP1, MP2, MP3, WMA 41°F to 104°F Simple Chinese, Trad Chinese, Japanese, Korean, Russian, Hebrew, Thai, English, French, German, Italian, Dutch, Portuguese, Spanish, Swedish, Czechish, Polish, Finland, Denmark, Hungarian, Slovak Windows; SE/ME/2K/XP, Mac OS 10.3 ETEC LIMITED 90-DAY WARRANTY We warrant this product to be free from defects in material and workmanship under normal use for a 90-day period after purchase. We will repair or replace the unit free of charge should it become defective under this warranty, providing you submit proof of purchase (sales slip) along with the unit and all accessories. During the initial 90-day period after original purchase, we will service or exchange, at no charge. To obtain warranty service or replacement within the duration of the 90-day warranty, return the product freight prepaid to the address below. ETEC USA 823 Old Settlers Trail Suite 100 Hopkins, Minnesota 55343 Please enclose a copy of the sales receipt with the date of purchase and provide a detailed description of the problem. Failure to enclose required information will result in delay of your shipment. Please allow 4-6 weeks for product service or replacement. This warranty does not cover any product, which has been subject to damage due to an act of nature, misuse, neglect, accident, abuse, commercial use, or modification of, or to, any part of the product, including the antenna. Damage to external devices such as speakers and other memory devices are not covered nor is the cost incurred in shipping the unit for warranty repair. Under no circumstances shall ETEC USA, be liable for any loss (direct, indirect, incidental, foreseen, unforeseen, special or consequential) or for any damage arising out of, or in connection with, the use of this product. UNDER NO CIRCUMSTANCES WILL ETEC USA BE LIABLE FOR ANY INCIDENTAL OR CONSEQUENTIAL DAMAGES. This warranty does not cover re-manufactured units, or product sold „As Is‟. This warranty is valid only in the United States and grants specific legal rights.