1
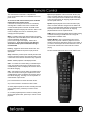
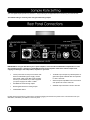
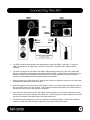
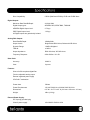
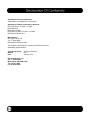
CD2
CD Transport/Player
T A B L E
O F
C O N T E N T S
Safety Information
2
Certifications/Standards 3
Warranty
4
Unpacking
4
Power Connection
4
Setup and Placement
5
Design Features
5
Conditioning
5
Care and Warnings
6
Single Knob Controls and Display 6
Remote Control
7
Sample Rate Setting
8
Rear Panel Connections 8
Connecting the LNS1
9
Tips for Operation
10
Operation as Transport or Player 10
Specifications
11
Declaration of Conformity 12
Copyright © 2012 Bel Canto Design Ltd.
Bel Canto Design Limited
st
221 North 1 Street
Minneapolis, MN 55401
United States
All rights reserved. No part of this publication may be reproduced, stored in a retrieval system, or transmitted, in any form or by
any means, electronic, mechanical, photocopying, recording, or otherwise, without the prior written permission of the publisher.
The content of this manual is furnished for information use only, is subject to change without notice, and should not be
construed as a commitment by Bel Canto Design Limited. Bel Canto Design Limited assumes no responsibility or liability for
any errors or inaccuracies that may appear in this manual. Trademarks used in this publication: Bel Canto and the Bel Canto
logo are registered trademarks of Bel Canto Design Limited. CD2 is a trademark of Bel Canto Design Limited. Bel Canto
Design Limited disclaims any proprietary interest in trademarks and trade names other than its own. Printed in the United
States.
Explanation of symbols used in this manual or on the
rear/underside of the apparatus:
The Lightning Flash with arrowhead symbol
within an equilateral triangle is intended to
alert the user to the presence of uninsulated
"dangerous voltage" within the product
enclosure that may be of sufficient magnitude
to constitute a risk of shock to persons.
The exclamation point within an equilateral
triangle is intended to alert the user to the
presence of important operating and
maintenance (servicing) instructions in the
literature accompanying the product.
•
Read, keep and follow these instructions.
•
Heed all warnings.
•
Do not use the apparatus near water, ie near a
bathtub, kitchen sink, laundry tub, in a wet
basement, near a swimming pool etc.
•
Clean only with dry cloth.
•
Do not block any ventilation openings. Install in
accordance with the Manufacturer’s instructions.
Site the apparatus so that its location or position
does not interfere with its proper ventilation. For
example, the apparatus should not be situated on
a bed, sofa, rug, or similar surface that may block
the ventilation openings, or placed in a built in
installation such as a bookcase or cabinet that
may impede the flow of air through the ventilation
openings.
•
Do not install near any heat sources such as
radiators, heat registers, stoves, or other
apparatus that produce heat.
•
Do not defeat the safety purpose of the polarized
or grounding type plug. A polarized plug has two
blades with one wider than the other. A
grounding type plug has two blades and a third
grounding prong. The wide blade or the third
prong is provided for your safety. If the provided
plug does not fit into your outlet; consult an
electrician for replacement of the obsolete outlet.
TO COMPLETELY DISCONNECT THIS APPARATUS
FROM THE AC MAINS, DISCONNECT THE POWER
SUPPLY CORD PLUG FROM THE AC RECEPTACLE.
THE MAINS PLUG OF THE POWER SUPPLY CORD
SHALL REMAIN READILY ACCESSIBLE.
Disconnect supply cord before changing fuse.
Refer servicing to qualified service personnel.
WARNING: TO REDUCE THE RISK OF FIRE OR
ELECTRIC SHOCK, DO NOT EXPOSE THIS
APPARATUS TO RAIN OR MOISTURE AND OBJECTS
FILLED WITH LIQUIDS, SUCH AS VASES, SHOULD
NOT BE PLACED ON THIS APPARATUS.
•
Protect the power cord from being walked on or
pinched particularly at plugs, convenience
receptacles, and at the point where they exit from
the apparatus.
•
Unplug this apparatus during lightning storms or
when unused for long periods of time.
•
Refer all servicing to qualified service personnel.
Servicing is required when the apparatus has
been damaged in any way, such as power-supply
cord or plug has been damaged, liquid has been
spilled or objects have fallen into the apparatus,
the apparatus has been exposed to rain or
moisture, does not operate normally, or has been
dropped.
•
Mains plug: Use the mains plug to disconnect the
apparatus from the mains supply. The mains plug
must be accessible at all times. Use the mains
switch (if applicable) when the apparatus is not in
use.
•
Objects and liquid entry: Do not let objects or
liquids fall into the apparatus. Do not expose the
apparatus to dripping or splashing. Do not place
a vessel containing liquid on top of the apparatus.
•
No naked flame sources, such as lighted
candles, should be placed on the apparatus.
•
The apparatus has been designed for use in
moderate and tropical climates
Fuse replacement:
This appliance is fitted with a non-rewireable 10 amp
mains plug. The plug contains a 10 amp fuse. If the fuse
has blown it can be replaced as follows:
a) Pull out the black fuse cover/carrier.
b) Remove and dispose of the blown fuse.
c) Fit a new 10 amp BS1362 approved fuse into the carrier
and push the carrier back into the plug.
Note: This equipment has been tested and found to
comply with the limits for a Class B digital device, pursuant
to Part 15 of the FCC Rules. These limits are designed to
provide reasonable protection against harmful interference
in a residential installation. This equipment generates,
uses and can radiate radio frequency energy and, if not
installed and used in accordance with the instructions,
may cause harmful interference to radio communications.
However, there is no guarantee that interference will not
occur in a particular installation. If this equipment does
Always ensure the fuse cover is fitted. If the fuse cover is
missing do not use the plug. Contact your Bel Canto
retailer to obtain a replacement fuse cover. Fuses are for
fire protection and do not protect against electric shock.
WARNING: THIS APPLIANCE MUST BE
GROUNDED.
cause harmful interference to radio or television reception,
which can be determined by turning the equipment off
and on, the user is encouraged to try to correct the
interference by one or more of the following measures:
•
Reorient or relocate the receiving antenna.
•
Increase the separation between the equipment and
receiver.
•
Connect the equipment into an outlet on a circuit
different from that to which the receiver is connected.
•
Consult the dealer or an experienced radio/TV
technician for help.
Bel Canto products are automatically covered by a 90 day factory warranty that covers all internal parts and labor.
Register online (http://www.belcantodesign.com/Belcanto_Warranty.html) within 30 days of purchase from an
authorized dealer to automatically extend your warranty for 2 years starting from the date of purchase. If you do
not have web access, please contact your dealer for assistance. Upon fully completing registration, within 5
business days you will receive an email that officially validates your warranty. Your information will be used for
internal use only and will not be sold or released outside Bel Canto. Your comments and suggestions are
appreciated and help us continually improve our products and services.
The warranty is only valid to the original owner and is non-transferable. Damage caused by unauthorized
modification, abuse, or neglect of product will void your warranty. Any cost associated with return of product is
the sole responsibility of the owner. All returns require a return authorization number issued after completing the
RMA form in the support section of our website. If you have any questions, please feel free to contact us online at
[email protected].
CD2 packaging contains the following:
1 (one) – CD2 CD Player
1 (one) – Magnetic Puck and Pouch
1 (one) – BNC to RCA Adapter for the SPDIF output
1 (one) – CD2 User’s Guide and Warranty Sheet
1 (one) – Power Supply and Power Cord
1 (one) – Remote Control
Carefully unpack each piece and check for shipping
damage. If there is any damage, or if anything is
missing, please contact your dealer, distributor or
Bel Canto Design.
NEVER pack the CD2 with the Magnetic
Puck on the Turntable.
The power supply on the CD2 is preset for the
proper power voltage. The power cable should have
the correct plug for your local power system. If you
believe this to not be true, please contact your
dealer immediately.
IMPORTANT: Save all packing materials as it is
specially designed to protect the unit during
transportation or shipping. If the packing becomes
lost or damaged, please contact your dealer,
distributor or Bel Canto before attempting to
transport your unit.
This product, like any electrical component, can be
dangerous and cause injury unless correct handling
procedures are observed and used. Before
powering this product, it is necessary to read and
follow proper setup and procedures.
WARNING!
Do not connect power
to this product yet!
Because the CD2 runs cool, it can be placed in
many system locations without compromise. We do
not recommend placing weights or other objects
directly on the CD2. This may scratch or mar the
chassis finish. Do not use harsh chemicals when
cleaning the outside of your CD2.
Placement on top of your furniture or on a shelf with
at least 6 inches of clearance above the CD2 will
ensure that you can access the top loading CD
transport mechanism. Placement in a relatively
sheltered environment will ensure that the CD2 can
operate un-impeded by dust or animals.
IMPORTANT!
Make all connections before
powering your unit!
The Bel Canto CD2 is designed to recover the digital audio data from a CD error-free and with extremely low jitter:
TM
•
Ultra-Clock architecture recovers the
data with minimal clock jitter
•
CD-PRO2 top load mechanism for
quality and longevity
•
Ultra low noise second stage
independent regulation for the analog
sections
•
High speed isolation transformers on
AES and SPDIF digital outputs for
optimum interface to outboard DAC
•
Selectable Fixed or Variable analog
outputs can drive amplifier directly
•
4Vrms Balanced and 2Vrms single
ended analog outputs
Outboard regulated power supply
provides firm foundation for multiple
local regulators
•
Single front panel control for simple
operation
•
Multi-stage power supplies for precise
power to the sensitive analog circuitry
•
Comprehensive drive functions available
from full-system remote control
•
24/192 integrated DAC with 112dB
of dynamic range
•
Ultra-efficient Green Technology design
with 5W operating power dissipation
•
24/192 upsampling maximizes dynamic
range potential from inboard DAC
•
4-layer PC board design for superior
signal routing, grounding and power
supply routing
•
The sonic performance of the CD2 will begin to stabilize after 100 hours of continuous power up.
DO NOT OPERATE the CD2 WITHOUT a CD in PLACE
If you attempt to take the CD2 out of Wait State when no
CD is present, it will go back into Wait State. The CD
Laser is inactive whenever the CD2 is in Stop mode or
Wait State. The Laser will not operate without a CD and
the Magnetic Puck on the turntable. You can ONLY take
the CD2 out of Wait State with a CD in place and the
Magnetic Puck on the CD.
NEVER REMOVE the PUCK while the CD is SPINNING
NEVER PRESS DOWN on the CD2 turntable as this
will damage the turntable mechanism.
NEVER DROP the PUCK or ANY OTHER OBJECT on
the TURNTABLE.
NEVER PACK or SHIP the CD2 with the PUCK on the
TURNTABLE.
Undue pressure or shock to the turntable will damage the
mechanism. Repair of the mechanism for this damage is
not covered under the CD2 warranty.
Several Operating Modes are displayed using the leftmost 7-segment display:
•
•
•
Two Vertical Lines Indicate Pause
a Square indicates Stop
a Blinking Segmented Square indicates Play
Also, NEVER TOUCH the LENS of the CD MECHANISM.
Only clean it with a cloth designed for cleaning Optical
Disc player lenses. You can use a small puff of clean air to
remove minor dust buildup or just play a CD and the
motion of the CD should keep the lens clear of dust. If you
are concerned about dust buildup in your environment you
can leave a blank CD in place to cover the mechanism
when not using the CD2.
REPAIR of the CD2 MECHANISM DUE to
MISHANDLING is NOT COVERED by the CD2
WARRANTY.
There are no user serviceable parts inside the CD2
chassis. Opening the chassis will void the warranty.
There are no fuses inside the CD2.
Use only with the supplied Bel Canto CD2 desktop power
supply, the LNS1, or the VBS1. Using a power supply not
provided by Bel Canto will void the warranty.
A 01 display indicating track 1 with 2 vertical dashes ( || )
in the left hand mode indicator display will indicate that the
CD2 is in Pause mode and is ready to play the CD.
Initiate Play by pressing the front panel knob once. Scan
to a new track by rotating the control. This works while in
Pause, Play or Stop modes.
CD2 in Fixed Output Mode (Fixed/Variable IN):
To Pause while playing press the knob once.
The Fixed/Variable button is located to the right of the
RCA outputs. See Page 10 for the back panel diagram.
To Stop at any time press the knob twice. The CD2 will
remain on the current track and re-start the track when
Play is resumed. A center press on the control will be
acknowledged by the display brightening momentarily.
When in Play mode the mode indicator shows a square
with sequenced blinking segments. Stop is indicated by a
stationary square. The CD will be stopped. In Play and
Pause modes the CD will continue to rotate.
When powering up, CD2 goes through a display check
and comes up in Wait State indicated by four dashes on
the display: - - - -.
Place a CD on the CD2 and then place the magnetic puck
on the CD. It will automatically center and clamp itself in
place.
Press the center of the front panel knob for 2-3 seconds.
You will then see the firmware revision displayed for a
couple of seconds and the CD will spin while 4 dashes are
displayed. Once the CD Table of Contents is read the
display will indicate the total CD time and the number of
tracks.
CD2 in Variable Output Mode (Fixed/Variable OUT):
Operation will be the same as above except that rotating
the front panel knob while in Stop or Play mode will
indicate the volume level and then change
the volume up or down as the knob is rotated.
Rotating the knob in Pause mode will change the track
number to be played. The volume display will stay lit for
several seconds before going back to the mode
indicator/track number display
The CD2 Remote Control has a comprehensive
set of control features that are not available on the front
panel control.
To access all CD2 control features press the button
marked CD on the remote control.
e.One DAC or Preamp functions can be controlled by
selecting DAC or PRE on the remote. The Main CD
controls will still operate in the DAC and PRE modes.
Display: Toggles the Display ON and OFF. When in OFF
mode, the Display will come on momentarily when
changing the CD2 operation.
Mute: In variable output mode this will switch the analog
outputs from Soft to Hard Mute and Un-muted modes. Soft
mute is indicated by two decimal
points in the far right of the display. Hard mute is
indicated by 4. If you are not using your CD2 and
would like to keep it powered ON, Hard muting is
recommended.
Pause ||: Toggles the Pause mode ON and OFF. The
Mode Indicator will show the pause or play mode as
appropriate.
Stop: Indicated by a solid square and will place the CD2
in Stop mode when pressed. The CD2 will remain on the
current track and re-start the track when Play is pressed.
PLAY>: Initiates playback of the displayed track.
VOL+ : Increases the volume setting in Variable Output
mode. This will Punch Through to any Bel Canto unit in
Variable Output mode. The display will show the volume
level while changing.
VOL- : Decreases the volume setting in Variable Output
mode. This will Punch Through to any Bel Canto unit in
Variable Output mode. The display will show the volume
level while changing. See Page 7 for an explanation of
Fixed/Variable output modes.
|<<: Track Decrement to reduce the track number.
>>|: Track Increment to increase the track number.
<<: Slow playback speed in real time. Pressing twice will
reduce speed further, press Play to resume normal
playback.
>>: Increase playback speed in real time. Pressing twice
will increase speed further, press Play to resume normal
playback.
Rpt1: Repeat playback of the current track while in play
mode. The Mode Indicator changes from the bottom left
corner to the top left corner to indicate mode. Press Rpt1
to turn the repeat mode off. Stopping playback will also
turn the repeat mode off.
Rpt All: Repeat playback of the entire CD while in play
mode. The Mode Indicator changes from the bottom left
corner to a full height Mode Indicator to indicate this mode.
Press Rpt All to turn the repeat mode off. Stopping
playback will also turn the repeat mode off.
TIME: Shows the track time played while the CD is playing
or Paused. Pressing the TIME button will change the
Display back to standard mode.
Number Buttons: The 1-9 and 0 buttons are used to
directly select any track number for playback. Track 10
and above are directly selected by keying in the number. If
you select a track beyond the number of tracks on the CD
no action will result and the current track will continue
playing.
No other remote buttons are active for use with the CD2.
The CD2 digital outputs operate only at 16/44.1. Any processing of the digital data will be handled by your external DAC.
The 192kHz setting is used only when using the CD2 analog outputs.
IMPORTANT: If using the CD2 directly into a power amplifier, ensure that the Fixed/Variable Output button is in the
OUT (variable) position. Operation in Fixed Mode directly into the amplifier could cause extreme output levels,
clipping and damage to the loudspeakers, amplifiers or your ears!
•
12VDC power interconnect jack to interface with
either the CD2 desktop power supply, the Bel
Canto LNS1 or Bel Canto VBS1 power supplies.
Contact your local dealer if you wish to upgrade
your power supply to the LNS1 or VBS1
•
XLR Balanced 4Vrms analog outputs
•
RCA Single Ended 2Vrms analog outputs
•
Fixed/Variable button
•
TOSLINK output accepts any standard plastic or
glass fiber optical TOSLINK cable and operates
to 16/44.1 data rate
•
SPDIF output accepts BNC or RCA connections
and operates at a 16/44.1 data rate
•
AES/EBU output transmits a 16/44.1 data rate
Double check all connections to and from the unit before plugging the CD2 into the power source. The CD2 will come up in
Wait State, indicated by four dashes on the front panel: - - - -
•
The CD2 must be powered by either the desktop power supply, the VBS1 or the LNS1. If using the
VBS1, please refer to the VBS1 User’s Guide for connectivity. If using the LNS1, please read the
following:
•
The LNS1 is designed to power Bel Canto CD2 or VB equipped products only. Use of any cable other
than the supplied power interconnect may damage either the LNS1 or VB equipped unit and will void any
warranty. Certain non-VB equipped Bel Canto units can be factory upgraded. To begin the upgrade
process, fill out the RMA form in the Support Section of our website.
•
When connecting your CD2 to the LNS1, be careful to observe the alignment notches on the LNS1 power
receptacles and the power interconnect cable.
•
When inserting the power interconnect cable, align the notch on the cable end and the alignment teeth on
the outer sleeve to the 12 o’clock position. This will allow the interconnect cable to fully seat and ensure
that the plug mates correctly with the power receptacle.
•
Once the power interconnect cable is fully seated in the receptacle, lock in the power interconnect cable
by turning the outer sleeve clockwise one quarter turn. Proper seating of the LNS1 cable will ensure safe
and secure operation of the LNS1 and all connected components.
•
The LNS1 has been designed to run on non-regulated, non-filtered AC Mains. Usage of any additional
isolation or filtration from the AC Mains supply may compromise LNS1 performance.
•
The precision machined and polished turntable axis is designed to center the magnetic puck for stable rotation,
minimizing a potential source of low frequency jitter. This axis is polished to prevent scratching of the CD surface
because of contact with the axis when placing or removing a CD from the turntable.
•
The magnetic puck can be stored either on the top surface of the CD2 top cover or on the turntable axis when not
playing a CD.
•
A blank CD-ROM can be used as a cover over the CD mechanism when not using the CD2.
•
There will be low level pops on the analog outputs when disconnecting or reconnecting the external power supply.
The CD2 incorporates a hard mute circuit to minimize these pops but there is some residual level. To avoid any pops
mute the preamplifier or power down the amplifier that the CD2 is connected to whenever connecting or
disconnecting the power supply for the CD2.
•
Note that mechanical noises from the CD2 linear tracking mechanism are normal when changing tracks and that
there is a very low level motor noise while playing the CD. The CD rotating speed also will change as the CD plays to
the outside tracks. The CD rotation slows on the higher numbered tracks.
•
Volume Control Punch Through: The Volume Up and Down functions on the remote control will affect any Bel
Canto unit in Variable Output mode regardless of whether PRE, DAC, CD or TUNER is selected. It is recommended
that only the device with volume control closest to the power amps be in Variable Output mode. Any other devices
that are capable of volume control should be in Fixed Volume mode.
•
The CD2 produces a low jitter data-stream from any of the 3 digital outputs.
•
110 ohm AES/EBU balanced, 75 ohm BNC SPDIF or the TOSLINK output can be used as required. Any or all of the
outputs can be connected to any digital playback device.
•
While using the CD2 as a Digital Source you can disable the analog output section by selecting Variable Output,
scrolling the Volume control level to 0.0, and then pressing the Fixed/Variable button IN to select the Fixed position.
•
A BNC to RCA female adapter is included for use with RCA terminated cables on the SPDIF digital output.
•
The high dynamic range analog outputs of the CD2 can be used to drive an amplifier directly. This is best achieved
by using the 4Vrms balanced XLR outputs directly into the balanced inputs of your power amplifier.
•
Place the Fixed/Variable button OUT to select the Variable position. You can then control the volume level of your CD
playback through the volume control of the CD2.
•
The RCA outputs can also be used directly into the RCA jack of an amplifier. The output level of the RCA outputs are
6 dB lower than the balanced XLR outputs.
•
For use into an analog preamplifier scroll the volume level to 100.0 and press the Fixed/Variable button to the IN
Fixed position and use the volume control on the analog preamplifier to control system level.
Disc Compatibility:
CD-DA (Red Book IEC908), CD-R and CD-RW discs
Digital Outputs
Maximum Data Rate/Bit Depth:
44.1kHz/16bit
Digital Output types:
AES/EBU XLR, SPDIF BNC, TOSLINK
AES/EBU Digital Output Level:
2.7V p-p
PDIF Digital Output Level:
1.2V p-p
All Digital outputs are galvanically isolated
Analog DAC Outputs
Data Rate/Bit Depth:
192kHz/24bit
Output Levels:
Single Ended RCA 2Vrms, Balanced XLR 4Vrms
Dynamic Range:
112dB A-Weighted
THD+N:
<0.002%
Output Impedance:
RCA 100 ohms, XLR 200 ohms
Frequency Response:
20Hz-20Khz +/-0.1 dB
Ultra-Clock
Accuracy:
0.0001%
Jitter:
2 ps rms
Features:
Slow roll-off linear phase digital filter
Fixed or adjustable analog output
External regulated power supply
CD-Pro2LF mechanism
Power draw:
5 Watts
Power Requirements:
120 VAC 50-60 Hz or 220-240 VAC 50-60 Hz
Dimensions:
8.5” W x 12.5” D x 4.5” H (216 mm x 318 mm x 115 mm)
Weight:
18lbs. (8.2 kg)
External Power Supply:
IEC 3-prong grounded plug
Class II power supply:
100-240VAC 50/60 Hz 0.5A
Application of Council Directive(s):
2004/108/EC and 2006/95/EC, as amended
Standard(s) to Which Conformity Is Declared:
EN 55013:2001 + A1:2003 + A2:2006
EN 55020:2007
EN 61000-3-2:2006
EN 61000-3-3:1995 + A1:2001 + A2:2005
EN 60065:2002/A12:2011
Manufacturer:
Bel Canto Design, Ltd.
st
221 1 Street North
Minneapolis, MN 55401 USA
The equipment identified here conforms to the Directive(s) and
Standard(s) specified above.
Type of Equipment:
Models:
Date:
CD Player/Transport
CD2
January, 2012
Bel Canto Design, Ltd.
st
221 1 Street North
Minneapolis, MN 55401 USA
Tel: 612-317-4550
Fax: 612-359-9358
version 5.0