1
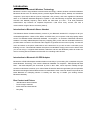
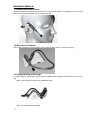
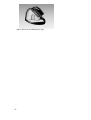
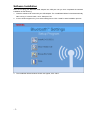
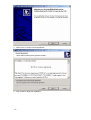
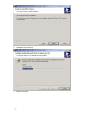
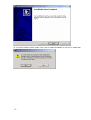
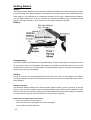
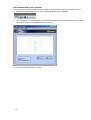
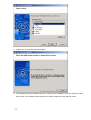
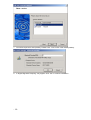
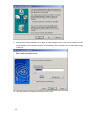
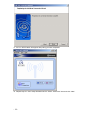
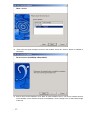
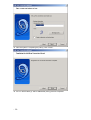
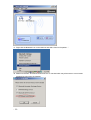
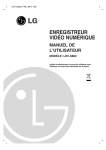
User Manual
For
Cellink Bluetooth Stereo Headset +
Bluetooth 2.0 EDR USB Dongle
BTST-9000-A
-1-
Introduction
Introduction to Bluetooth Wireless Technology
Bluetooth is a short- range wireless communication technology. It allows wireless connections between
Bluetooth devices such as cellular phones, personal digital assistants (PDA), desktop and notebooks
computers, input-output devices (mouse, keyboards, and printers), and home appliances. Bluetooth
refers to a worldwide standard designed to operate in the internationally recognized ISM (Industrial
Scientific and Medical) frequency band. Within the ISM band (2.4 GHz – 2.48 GHz) Bluetooth
transmissions hop between 79 separate frequencies 1,600 times every second, and with a
communication range of about 10 meters (class II).
Introduction to Bluetooth Stereo Headset
This Bluetooth Stereo Headset wirelessly connect to your Bluetooth enabled PC or laptops for all your
multimedia applications. Listen to CDs, MP3s, and DVDs from your computer in full-range quality stereo
sound. This Headset model is Bluetooth Standard 1.2 compliant -- an evolution of Bluetooth. Bluetooth
standard 1.2 notably added Adaptive Frequency Hopping (AFH), which reduces unwanted interference,
provides faster connection and extends audio supports to generate the best sound quality. It mutes the
music and switch to the phone mode while a call is answered. So you will not miss a call while you’re
listening to music. This attached headset microphone is extendable. Simply push it back to hide it while
you are not using it. It supports both headset, hands-free and two new Bluetooth profiles for audio: the
one for receiving stereo broadcast and the other for controlling audio devices.
Introduction to Bluetooth 2.0 EDR Adapter
Bluetooth 2.0 EDR USB Adapter enables wireless connectivity of your existing PC or notebook using the
latest Bluetooth Technology. This model is Bluetooth Standard 2.0 compliant + EDR (Enhanced Data
Rate – the latest adoption just announced by SIG on Nov. 2004, which improves usability through
smoother multi-device scenarios, up to 3 times faster file transfer rate and longer battery life to emphasize
Bluetooth technologies. Before Bluetooth become a standard to most consumer electronics products, the
latest Bluetooth 2.0 Adapting solution is certainly the best way to enable your existing devices
Bluetooth-wirelessly.
Box Content and Picture
-
Mini Bluetooth stereo headset
-
Travel charger 100/240V
-
Quick Guide and User Manual
-
Carry Bag
-2-
Hardware Basics:
1.1 Headset unfold and Put-on
Unfold the headset’s headband and put it on like a regular wired headset. The headband is on your back
head. The Operational speaker is at your right hand side.
1.2 Microphone Extension
Pull out the microphone and start talking. Push it back to hide it while you are done using it.
1.3 Headset folding and storage
For easy storage of the Headset, gently fold the headband as the diagram shown and store it in its carry
bag.
Step 1: Gently bend the joints of the headband in half.
Step 2: Squeeze speakers together.
-3-
Step 3: Store it in the attached carry bag.
-4-
Software Installation
Note: Do not plug your Bluetooth USB Adapter into USB port until you have completed the software
installation as the following:
1. Insert the software CD comes with your USB adapter. The “InstallShield Wizard” should automatically
start running. If it doesn’t load, run its “Setup.exe” file.
2. A menu window appears for you to select settings items. Click “Install” to start installation process.
3. The InstallShiel Wizard window should now appear, Click “Next”.
-5-
4. Select “Yes” to accept License Agreement.
5. Click “Install” to begin the installation.
-6-
6. InstallShiel is processing.
7. Wait for the setup.
-7-
8. Now plug the EDR USB adapter onto an available USB port and click “OK” to continue installation.
9. Click “Finish” to finish the installation.
-8-
10. You will be asked to restart system. Click “Yes” to restart immediately or click “No” to restart later.
-9-
Getting Started
Notice!
The Bluetooth Stereo Headset can be used with any Bluetooth enabled PCs, PDAs, MP3 Players, mobile
phones and other music players. Besides, those devices must support stereo audio transition (Bluetooth
A2DP profile). If your audio device is not Bluetooth enabled, you can plug a “Bluetooth Stereo Adapter”
into the regular headset port. Or if your computer is not Bluetooth enabled, plug in a “Bluetooth USB
Adapter” will make it happen. In short, make sure music player is Bluetooth enabled.
Buttons
Charge battery
This Stereo Headset embedded with rechargeable battery. To fully charge battery, it takes about 4 hours
for the first time and 2 hours afterwards. With battery fully charged, the talk-time is about 6.5 hours, and
the stand-by time is 230 hours. The headset is in charging status as long as it is properly connected to the
travel charger with AC power adapter.
Pairing
Pairing is a process of associating Bluetooth devices with each other. It will establish a permanent
security link between the devices and enable quick access to the services provided without the need to
enter passkeys.
Bluetooth Passkey
The Bluetooth Stereo Headset has a default passkey 1234 for pairing, which is stored in its internal
memory. You are usually required to enter the passkey 1234 in a pairing process with a Bluetooth mobile
phone or other devices, however it depends on the kind of Bluetooth device that the headset is connected
to. Please refer to the users’ manual of the devices for the specific operation.
Paired devices remain paired even when:
-
One of the devices is not powered on.
-
A service connection is interrupted or the service stopped.
-
One or both devices are rebooted.
- 10 -
Pair Headset with your computer
You are required to pair the Headset with PCs, PDAs, mobile phones or other devices before using it.
1. Open Bluetooth Manager main window by clicking Bluetooth icons on task bar.
2. Give a long press of the pairing button on the headset (about 6 seconds till LEDs flashes). Click “New
Connection” button to start Bluetooth device searching.
3. Select “Custom Mode” and click “Next”.
- 11 -
4. System is searching Bluetooth devices. Select “BTST-9000” on the Bluetooth device list and click
“Next”. If you can’t find the item, try to click “Refresh” for searching again until you find the right item.
- 12 -
5. System now is connecting with the headset.
6. The headset provides two different services – Audio Sink and Headset. Users are required to setup
both of them. First, setup the Audio Sink service. Select “Audio Sink” item and click “Next”.
- 13 -
7. You will be required to enter passkey. Please enter “1234” which is the default passkey.
8. A “Digital Signature Requiring” may appear. Click “Yes” to continue installation.
- 14 -
9. Enter a name for the Headset or click “Next” to use the default name. If you want to create a shortcut
on the desktop, check “Create a shortcut on the desktop”. Click “Change Icons” to select other image
of the icon.
10. Now the system is competing the pairing. Click “Finish”.
- 15 -
11. An icon “BTST-9000” will appear after pairing process completed.
12. Repeat step #2 ~ #6 to setup Headset service. Select “Audio Sink” item and click “Next”.
- 16 -
13. Users will hear signal reception tone from the headset. Press the “Answer” button to establish a
connection.
14. Enter a name for the Headset or click “Next” to use the default name. If you want to create a shortcut
on the desktop, check “Create a shortcut on the desktop”. Click “Change Icons” to select other image
of the icon.
- 17 -
15. Now the system is competing the pairing. Click “Finish”.
16. An icon “BTST-9000 (1)” will be added after pairing process completed.
- 18 -
17. Right click the Bluetooth icon on the task bar and select “Service Properties…”
18. Make sure the item “AV Remote Control Service” is checked which may allow users to control music
playback functions from the headset.
- 19 -
Pair Headset with your cellular phone
Press pairing button of the headset for 6 seconds to set it into pairing mode. To properly perform pairing
procedure on your cellular phone, please refer to the manual of your mobile phone for its own pairing
instruction. This device name is set to be “Bluetooth Stereo Headset”. If you are asked to enter pin-code
during pairing, please enter 1234. (Note: The 1234 is default pin-code pre-stored in this Headset.)
- 20 -
Music Operation
Connect the headset
Bluetooth Stereo Headset provides two different services – “stereo audio service” and “headset service”.
Please connect the “stereo audio service” before playing music on PC or PDA.
1. Open Bluetooth Settings. Move the cursor on the “BTST-9000” icon and right click it. Select “Connect”
to connect the headset.
2. The icon of the headset will be changed to connecting status.
- 21 -
Play music
1. Launch music players, for example – Windows Media Player, on your PC or PDA. Play music as
usually you do.
2. Users can also control music playback from the headset. Be noticed that functions below are
available on Windows Media Player only.
1. Volume Control Button: press to adjust the volume.
2. Answer Buttons: Press to play, press again to stop.
3. Track control / Paring wheel: Wheel back and forward to change or skip tracks. Press the wheel
to stop music.
- 22 -
Chat on VoIP
Connect the headset
Bluetooth Stereo Headset provides two different services – “stereo audio service” and “headset service”.
Please connect “headset service” before launching VoIP software such as Skype, MSN Messenger,
Yahoo Messenger etc.
1. Open Bluetooth Settings. Move the cursor on the “BTST-9000 (1)” icon and right click it. Select
“Connect” to connect the headset. If the service of “BTST-9000” is connecting, please disconnect it.
2.
Users will hear ring tone from the headset. Press “Answer” button to continue the connection.
3. The icon of the headset will be changed to connecting status.
- 23 -
Chatting
1. Launch VoIP software after the headset had been connected.
2. If you can’t hear voice from headset, try to check configuration of audio device setting in the software.
Make sure “Bluetooth Audio” is selected.
3. Pull out the extendable microphone to get a better chatting quality.
- 24 -
Phone Call Operation:
Make sure the headset had been paired with your mobile phone.
Make a Call:
1. Enter the number you wish to dial on your Cellular phone keypad.
2. Voice is automatically transferred to headset.
Receive a Call:
1. When you hear the ring tone for incoming call, press the answer button to pick-up. The music mutes
when a call is answered on your headset.
2. Press the Volume control button to adjust the volume.
3. When you’re done talking, press again the answer button to hang up your call. The headset
automatically switches back to play more music.
- 25 -
CE Statements
This device has been tested and found to comply with the requirements set up in the council directive on
the approximation of the law of member states relating to EMC Directive 89/336/EEC, Low Voltage
Directive 73/23/EEC and R&TTE Directive 99/5/EC.
FCC Safety Statements
This device complies with Part 15 of the FCC rules. Operation is subject to the following two conditions:
(1) This device may not cause harmful interference.
(2) This device must accept any interference received, including interference that may cause undesired
operation.
The radiated output power is far below the FCC Radio frequency exposure limits. Nevertheless, this
device should be used in such a manner that the potential for human contact during normal operation is
minimized.
Warning: Changes or modifications made to this equipment not expressly approved by the manufacturer.
May void the FCC authorization to operate this equipment.
Important! Please note the following:
This equipment has been tested and found to comply with the limits for a Class B digital device, pursuant
to part 15 of the FCC Rules. These limits are designed to provide reasonable protection against harmful
interference in a residential installation. This equipment generates, uses and can radiate radio frequency
energy and, if not installed and used in accordance with the instructions, may cause harmful interference
to radio communications. However, there is no guarantee that interference will not occur in a particular
installation. If this equipment does cause harmful interference to radio or television reception, which can
be determined by turning the equipment off and on, the user is encouraged to try to correct the
interference by one or more of the following measures:
-
Reorient or relocate the receiving antenna.
-
Increase the separation between the equipment and receiver.
-
Connect the equipment into an outlet on a circuit different from that to which the receiver is
connected.
-
Consult the dealer or an experienced radio/TV technician for help.
Copyright and Trademark Notices
Products and brand names may be the trademarks or registered trademarks of their respective owners.
- 26 -