1
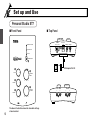
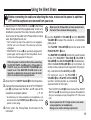
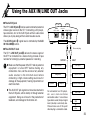
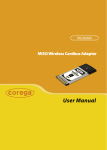
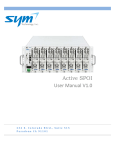
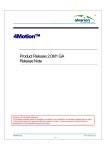
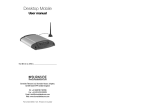
Yamaha Silent Brass
Personal Studio ST7
Thank you for purchasing the Yamaha Silent
Brass Personal Studio ST7. In order to obtain
the maximum performance and enjoyment from
your ST7, we urge you to read this Owner’s
Manual thoroughly before using. Please keep
this Owner’s Manual, and the warranty in a safe
place for later reference.
Contents of Set
● Personal Studio ST7
* Pickup Mute are not included.
11
● Owner’s Manual
Disconnecting the cable while the power
is ON may result in damage to the unit.
The sudden noise may also may result in
hearing impairments.
PLAYER
Signal path
REHEARSAL ROOM
When playing in a
standing position,
the hook on the
back of the ST7 is
convenient for
clipping the unit
onto a belt.
CONCERT HALL
CHURCH
From PHONES 1
REVERB MODE
AUX IN
REVERB
LEVEL
PLAYER 2
MASTER
VOLUME
PLAYER 1
To PICKUP MUTE 1
Personal Studio ST7
Frequency Characteristics
PLAYER 1/2
: 200Hz to 16KHz, includes an
internal equalizer
AUX IN
: 20Hz to 16 KHz
Input/Output Levels
PICKUP MUTE 1/2 : –38dBm (0dBm=0.775Vrms)
AUX IN
: –10dBm
PHONES 1/2
: –10dBm (150Ω impedance)
LINE OUT
: –10dBm (10Ω impedance)
Reverb
Digital Converter
: Sampling Frequency 32kHz
AD/DA Converter 15 bits
Mode
: 3 types (REHEARSAL ROOM,
CONCERT HALL, CHURCH)
Jacks and Terminals (all mini jack type except DC10-12V)
PICKUP MUTE 1/2 : Pickup Mute exclusive (power
(mono)
supply and line signal combined)
PHONES 1/2
: Impedance 8 to 150Ω
(stereo)
(accommodates headphones)
LINE OUT (stereo) : Output impedance 1kΩ
AUX IN (stereo)
: Input impedance 30kΩ
DC10-12V
: AC adaptor PA-1D (PA-1 for Great Britain)
Control
MASTER VOLUME, PLAYER 1/2 Volume, AUX IN Volume,
REVERB MODE Button and lamps, REVERB LEVEL, POWER
Switch, Belt Hook
Power Supply
AC adaptor PA-1D
six AAA size 1.5V batteries. (Operation with Manganese batteries
last about 3 hours, Alkaline batteries last about 7 hours.)
Dimensions (W x D x H)
111 x 159 x 41 mm
(4-3/8") x (6-1/4") x (1-5/8")
Weight
* Pickup Mute, exclusive connection cable and stereo earphone
are not included.
250 g (0.55 lbs.) without batteries
* Specifications and design are subject to change without notice.
12
Your ST7 will give you years of reliable service if you follow the
simple rules given below:
■ Location
Do not expose it to the following conditions to
avoid deformation, discoloration, or more
serious damage.
• Direct sunlight (e.g. near a window).
• High temperatures (e.g. near a heat
source, outside, or in a car during the
daytime).
• Excessive humidity.
• Excessive dust.
• Strong vibration.
■ Power Supply
• Turn the power switch OFF when not in use.
• If you use an AC power adaptor, unplug
the adaptor from the AC outlet if not to be
used for an extended period of time.
• Unplug the AC power adaptor during
electric storms.
• Avoid plugging the AC power adaptor into
the same AC outlet as appliances with
high power consumption, such as electric
heaters or ovens. Also avoid using multiplug adaptors since these can result in
reduced sound quality and possibly damage.
■ Turn Power OFF When Making Connections
• To avoid damage to the Personal Studio
and other devices to which it is connected
(a sound system, for example), turn the
power switches of all related devices OFF
prior to connecting or disconnecting audio
cables.
13
■ Handling and Transport
• Never apply excessive force to the
controls, connectors or other parts.
• Always unplug cables by gripping the
plug firmly, not by pulling on the
cable.
• Disconnect all cables before moving
the unit.
• Physical shocks caused by dropping,
bumping, or placing heavy objects on
the unit can result in scratches and
more serious damage.
■ Cleaning
• Clean the cabinet and panel with a
dry soft cloth.
• A slightly damp cloth may be used to
remove stubborn grime and dirt.
• Never use cleaners such as alcohol
or thinner.
• Avoid placing vinyl objects on top of
the unit (vinyl can stick to and
discolor the surface).
■ Electrical Interference
• This unit contains digital circuitry and
may cause interference if placed too
close to radio or television receivers.
If this occurs, move it further away
from the affected equipment.
YAMAHA is not responsible for damage
caused by improper handling or operation.
SPECIAL MESSAGE SECTION
This product utilizes batteries or an external power supply
(adaptor). DO NOT connect this product to any power
supply or adaptor other than one described in the manual,
on the name plate, or specifically recommended by
Yamaha.
This product should be used only with the components
supplied or; a cart, rack, or stand that is recommended by
Yamaha. If a cart, etc., is used, please observe all safety
markings and instructions that accompany the accessory
product.
SPECIFICATIONS SUBJECT TO CHANGE:
The information contained in this manual is believed to be
correct at the time of printing. However, Yamaha reserves
the right to change or modify any of the specifications
without notice or obligation to update existing units.
Do not attempt to service this product beyond that
described in the user-maintenance instructions. All other
servicing should be referred to qualified service personnel.
This product, either alone or in combination with an
amplifier and headphones or speaker/s, may be capable of
producing sound levels that could cause permanent
hearing loss. DO NOT operate for long periods of time at
a high volume level or at a level that is uncomfortable. If
you experience any hearing loss or ringing in the ears, you
should consult an audiologist.
IMPORTANT: The louder the sound, the shorter the time
period before damage occurs.
NOTICE: Service charges incurred due to a lack of
knowledge relating to how a function or effect works
(when the unit is operating as designed) are not covered
by the manufacturer’s warranty, and are therefore the
owner’s responsibility. Please study this manual carefully
and consult your dealer before requesting service.
ENVIRONMENTAL ISSUES: Yamaha strives to
produce products that are both user safe and environmentally friendly. We sincerely believe that our products and
the production methods used to produce them meet these
goals. In keeping with both the letter and the spirit of the
law, we want you to be aware of the following:
Battery Notice: This product may also use
“household” type batteries. Some of these may be
rechargeable. Make sure that the battery being charged
is a rechargeable type and that the charger is intended
for the battery being charged.
When installing batteries, do not mix old batteries with
new, or with batteries of a different type. Batteries
MUST be installed correctly. Mismatches or incorrect
installation may result in overheating and battery case
rupture.
Warning: Do not attempt to disassemble or incinerate
any battery. Keep all batteries away from children.
Dispose of used batteries promptly and as regulated by
the laws in your area. Note: Check with any retailer of
household type batteries in your area for battery disposal information.
Disposal Notice: Should this product become
damaged beyond repair, or for some reason its useful
life is considered to be at an end, please observe all
local, state, and federal regulations that relate to the
disposal of products that contain lead, batteries, plastics,
etc. If your dealer is unable to assist you, please contact
Yamaha directly.
NAMEPLATE LOCATION: The nameplate is
located on the bottom of the product. The model
number, serial number, power requirements, etc., are
located on this plate. You should record the model
number, serial number, and the date of purchase in the
spaces provided below and retain this manual as a
permanent record of your purchase.
Model
FCC INFORMATION (U.S.A.)
1. IMPORTANT NOTICE: DO NOT MODIFY THIS UNIT!
This product, when installed as indicated in the instructions contained in this manual, meets FCC
requirements. Modifications not expressly approved by Yamaha may void your authority, granted by
the FCC, to use the product.
2. IMPORTANT: When connecting this product to accessories and/or another product use only highquality shielded cables. Cable/s supplied with this product MUST be used. Follow all installation
instructions. Failure to follow instructions could void your FCC authorization to use this product in
the USA.
3. NOTE: This product has been tested and found to comply with the requirements listed in FCC
Regulations, Part 15 for Class “B” digital devices. Compliance with these requirements provides a
reasonable level of assurance that your use of this product in a residential environment will not result
in harmful interference with other electronic devices. This equipment generates/uses radio frequencies
and, if not installed and used according to the instructions found in the user’s manual, may cause
interference harmful to the operation of other electronic devices. Compliance with FCC regulations
does not guarantee that interference will not occur in all installations. If this product is found to be the
source of interference, which can be determined by turning the unit “OFF” and “ON”, please try to
eliminate the problem by using one of the following measures:
Relocate either this product or the device that is being affected by the interference.
Utilize power outlets that are on different branch (circuit breaker or fuse) circuits or install AC line
filter/s.
In the case of radio or TV interference, relocate/reorient the antenna. If the antenna lead-in is 300 ohm
ribbon lead, change the lead-in to co-axial type cable.
If these corrective measures do not produce satisfactory results, please contact the local retailer
authorized to distribute this type of product. If you cannot locate the appropriate retailer, please contact Yamaha Corporation of America, Electronic Service Division, 6600 Orangethorpe Ave, Buena
Park, CA 90620
The above statements apply ONLY to those products distributed by Yamaha Corporation of America
or its subsidiaries.
CANADA
Serial No.
Purchase Date
PLEASE KEEP THIS MANUAL
92-BP
THIS DIGITAL APPARATUS DOES NOT EXCEED THE “CLASS B” LIMITS FOR RADIO NOISE
EMISSIONS FROM DIGITAL APPARATUS SET OUT IN THE RADIO INTERFERENCE REGULATION OF
THE CANADIAN DEPARTMENT OF COMMUNICATIONS.
LE PRESENT APPAREIL NUMERIQUE N’EMET PAS DE BRUITS RADIOELECTRIQUES DEPASSANT
LES LIMITES APPLICABLES AUX APPAREILS NUMERIQUES DE LA “CLASSE B” PRESCRITES DANS
LE REGLEMENT SUR LE BROUILLAGE RADIOELECTRIQUE EDICTE PAR LE MINISTERE DES COMMUNICATIONS DU CANADA.
• This applies only to products distributed by Yamaha Canada Music Ltd.
• Ceci ne s’applique qu’aux produits distribués par Yamaha Canada Musique Ltée.
14
Set up and Use
Personal Studio ST7
■ Top Panel
■ Front Panel
REHEARSAL ROOM
POWER
OFF
ON
LINE OUT AUX IN
q
CONCERT HALL
CHURCH
DC10 -12V
t
!3
!2
REVERB MODE
!1
o
AUX IN
AC Adaptor PA-1D
!0
REVERB
LEVEL
i
PLAYER 2
y
u
MASTER
VOLUME
PICKUP MUTE
1
2
PHONES
1
2
w
r
PLAYER 1
The above illustration shows the standard settings
of each control.
15
Claw
Insert the batteries as shown below.
Belt hook
Attaching the battery cover is easier if
you press down on the notched portion
(4 lines) and the claw simultaneously.
16
Power Supply
The Personal Studio ST7 can be operated with battery or AC power.
Always turn the power OFF when making AC power connections or replacing batteries.
Using a Power Adaptor
Please use the supplied power adaptor. *(adaptor not included in some countries)
1. Plug the DC output cable from the adaptor into the
DC10-12V jack q on the top panel. (See the Illus. above)
2. Plug the AC adaptor into a convenient wall AC power
socket.
Using Batteries
1. Open the battery compartment, located on the back
panel of the ST7.
2. Insert six AAA size 1.5V batteries taking careful
note of the polarity markings as shown in the
illustration above.
Place the batteries on top of the ribbon for easy
removal at a later date.
3. Replace the battery compartment cover.
When the AC adaptor is connected, battery power
is automatically disconnected. However, poor
connection of the AC adaptor or power cable will
result in power being drawn from the batteries.
17
When using an AC adaptor, use the supplied AC
adaptorPA-1D to power the ST7. The use of an
incompatible adaptor may result in irreparable
damage, or cause fire. The use of an incompatible
adaptor may also void the warranty. Please use
caution.
It is recommended that batteries be replaced early.
Run down batteries will result in the following:
1 Reverb does not function properly.
2 Earphone sound is unstable.
3 Noise becomes audible.
When one of these symptoms appears, take note of the
cautions below and replace the used batteries with a
complete set of new batteries.
● Make sure to follow polarity indications on the battery compartment
when replacing batteries. Improper insertion may result in fire.
● Always replace worn batteries with a complete set of new batteries. NEVER
mix old and new batteries! Do not mix different types of batteries (alkaline,
manganese), or batteries from different makers, or different battery types
by the same maker. Doing so may result in fire!
● To prevent possible damage to the unit due to battery leakage and
unnecessary power drain, remove the batteries from the unit if it is not to
be used for an extended period of time.
Using the Silent Brass
Before connecting the cable and attaching the mute, make sure the power is switched
OFF and the earphones are removed from your ears.
1. Connect the ST7 PICKUP MUTE 1 Jack w to the Pickup
Mute’s Output Jack with the supplied cable. A lock nut is
attached to one end of the cable. Securely attach the
lock nut end of the cable to the Pickup Mute’s Output
Jack, then tighten the lock nut.
* Don’t connect the end of the cable that is not equipped
with the lock nut to the mute. The cable may easily be
unplugged.
* PICKUP MUTE 1/2 Jacks w are specifically designed with
power supply and line signal for the Pickup Mute. Do not
connect any other equipment to the jacks.
When the power is switched ON, before connecting
the PICKUP MUTE Jack w and the Pickup Mute’s
OUTPUT Jack, turn the MASTER VOLUME u to its
lowest level. If the MASTER VOLUME level is not
lowered, a sudden burst of sound or noise will result
which could lead to hearing impairments.
2. Slide the ST7’s ON/OFF Switch t to the ON position.
3. Connect the Stereo Earphones to the ST7’s PHONES 1
jack r, and make sure that the L and R sides of the
earphones are properly placed.
(mP. 12)
* An optional pair of stereo earphones (or headphones) can
be connected to the PHONES 2 jack r enabling a second
person to listen along.
4. Firmly
insert the Pickup Mute into the bell of the
instrument.
Make sure the Pickup Mute is firmly inserted into
the bell of the instrument before playing.
5. Use
the PLAYER 1 VOLUME y and the MASTER
VOLUME u to adjust the volume to a comfortable
playing level.
The PLAYER 1 VOLUME y controls the level of the
PICKUP MUTE 1 w Jack.
The MASTER VOLUME u controls the overall volume
of the ST7 (PLAYER 1 VOLUME y , PLAYER 2
VOLUME i and AUX IN VOLUME o) simultaneously.
(When the AUX IN VOLUME o is set to minimum, no
sound will be produced from equipment (CD player,
etc). connected to the AUX IN jacks !2).
For optimum use of the PLAYER 1
VOLUME y and PLAYER 2 VOLUME i
use the 3 o'clock position as a reference
(see illustration on the right).
* The PLAYER 2 VOLUME i controls the level of the PICKUP
MUTE 2 Input w. By connecting an optional Pickup Mute to
this jack, two people can play through the ST7 at the same
time.
Do not operate the ST7 at high volume levels when
using earphones (or headphones).
Doing so can lead to hearing impairments.
18
About the Reverb
The ST7’s internal processor includes 3 reverb types.
Reverb is added to the input signal received by the
PICKUP MUTE 1/2 w inputs.
1. Set the REVERB
LEVEL Dial !0 to about the mid level
point.
2. Pressing the REVERB MODE button !11
will cause the
REVERB MODE to cycle through its 3 REVERB
MODES.
● REHEARSAL ROOM
Simulates the natural reverberation of a rehearsal
room.
● CONCERT HALL
Duplicates the longer reverberation time of a concert
hall.
● CHURCH (This setting gives the longest reverb time)
Simulates the natural reverberation of a church.
3. Turn the REVERB LEVEL control
!0 to adjust the
amount of the reverb effect. Turn the control to the
right (clockwise) to increase the effect, turn the
control to the left (counter clockwise) to decrease
the effect. Set the REVERB LEVEL to a pleasing level
and try playing.
19
REHEARSAL ROOM
CONCERT HALL
CHURCH
REVERB MODE
!1
!0
REVERB
LEVEL
Using the AUX IN/LINE OUT Jacks
■ The AUX IN jack
The ST7’s AUX IN jack !2 can be used to connect an external
stereo signal source to the ST7. Connecting a CD player,
tape recorder, etc. to the AUX IN jack with an audio cable
allows you to play along with an external audio source.
POWER
OFF
ON
DC10 -12V
LINE OUT AUX IN
!3
The AUX IN jack’s !2 signal level is controlled by the AUX
IN VOLUME o control.
Stereo mini plug
■ The LINE OUT Jack
The ST7’s LINE OUT jack !3 delivers the stereo signal of
the ST7 for connection to a stereo mixing console or tape
recorder for listening by external speakers or recording.
● Make sure that the power of the ST7 and any external
equipment is turned OFF before making any
connections. Also, set the volume of any external
audio sources to the minimum level before
connecting. A high volume setting could result in
damage to the equipment, hearing impairments or
electrical shock.
● The AUX OUT jack signal must never be returned to
the AUX IN jacks, either directly or through external
equipment. Doing so will result in the production of
feedback, and damage to the internal unit.
!2
OUTPUT
Speakers
INPUT
Tape recorder
CD Player
Tuning Meter
Tape recorder
Amplifier
For connection to a CD player,
etc. use a non-resistance
connection cable. If a resistance
type cable is used, the input signal
level (volume) is extremely low.
Please make sure of this point
when buying a connection cable.
Electronic Metronome
Silent Piano
VCR
Video
20