1
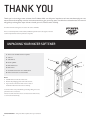
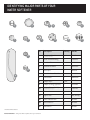
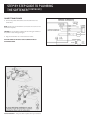
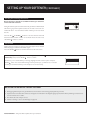
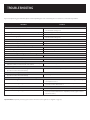
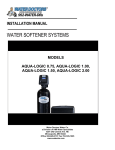
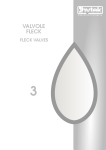
INSTALLATION
MANUAL
ESM9+ / ESM11+ / ESM15+
THANK YOU
Thank you for choosing a water softener from EcoWater. With over 80 years’ experience we have manufactured your new
water softener from quality corrosion resistant materials to give you many years of trouble-free softened water. This manual
will guide you through the steps of how to install your unit. Please read it carefully.
An owner manual covering the care of the unit is also available.
Due to continued product enhancement, EcoWater Systems reserve the right to alter the
technical specification of their products at any time.
UNPACKING YOUR WATER SOFTENER
1 Valve Cover and Electronic Faceplate
1
2 Salt Lid
5
3 Salt Cabinet
8
4 Resin Cylinder
5 Brine Well Cover
7
6 Brine Valve
2
7 Overflow Connection rear of Brinetank
8 Drain Connection on Control Valve
Notes
1 Serial Number is inside the valve cover.
2 Remove all packaging parts from inside the unit.
3 If you need to remove the valve cover for ease of
installation follow the instructions carefully.
To remove valve cover pull towards you slowly, taking care not to
pull off the wire connections.
Please note that the valve cover is connected to the valve motor,
so cannot be removed fully.
Please Remember – Only use tablet or pellet salt in your softener!
2
3
4
6
IDENTIFYING MAJOR PARTS OF YOUR
WATER SOFTENER
1
7
2
3
8
9
No.
14
15
4
1
5
6
11
12
10
Description
Quantity
Part No.
Easy Install Tees*
1 pair
GO817
(incorporates check value)
2
Drain/ Overflow Tubing
1
7208718
3
Overflow Elbow
1
1103200
4
Overflow Grommet
1
9003500
5
Hose Clips
2
900431
6
Water Hardness Test Kit
1
800005
7
Transformer
1
98124612
8
Adaptor Clips
1 pair
1205500
9
Adaptor ‘O’ Rings (spares)
2
7170288
10
Adaptor Elbows (3/4”)
‘O’ rings pre-fitted (see page 7)
2
7255583
11
Silicone Grease
1
N/A
12
Bypass Set*
1
B25, B39(2)
13
Inlet/ Outlet Hoses*
2
803186
14
Hose Gaskets*
2
803188
15
Filter Discs*
2
803187
13
*If ordered with softener.
Please Remember – Only use tablet or pellet salt in your softener!
IMPORTANT: INSTALLATION AND
SAFETY INFORMATION
Follow the installation instructions carefully. Failure to install the EcoWater
softener properly may void the warranty.
Use care when handling the EcoWater softener. Do not turn upside down,
drop, or set on sharp protrusions.
Before you begin installation, read this entire manual. Then obtain all the
materials and tools you will need to make the installation.
Check local plumbing and electrical regulations and byelaws.
The installation must conform to them.
Do not locate the EcoWater softener where freezing temperatures occur.
Do not attempt to treat water over 49ºC. Freezing or hot water damage
will void your warranty.
Avoid installing in direct sunlight. Excessive sun heat may cause
distortion or other damage to non-metallic parts.
Maximum allowable inlet water pressure is 4.76 bar.
If the daytime pressure exceeds 4.76 bar, a pressure reducing valve is
recommended (adding a pressure reducing valve may reduce the flow).
The EcoWater softener works on 24 volt 50 Hz electrical power only.
Be sure to use the supplied transformer and plug it into a normal 240V,
50Hz household outlet that is in a dry location only, grounded and properly protected by an over current device such as a circuit breaker
or fuse.
This softener is not intended to be used for treating water that is
microbiologically unsafe or of unknown quality without adequate
disinfection before or after the system.
Please Remember – Only use tablet or pellet salt in your softener!
4
LEAD PIPEWORK
Where lead pipework exists downstream of the proposed location of the
water softener, we advise you ask the local water authority for advice on
the replacement of lead pipework. Grants may be available. Homes built
since 1976 will not have lead pipework.
NOTE: This equipment has been tested and found to comply with the limits
for a Class B digital device, pursuant to Part 15 of the FCC Rules. These
limits are designed to provide reasonable protection against harmful
interference in a residential installation. This equipment generates, uses
and can radiate radio frequency energy and, if not installed and used in
accordance with the instructions, may cause harmful interference to radio
communications. However, there is no guarantee that interference will
not occur in a particular installation.
If this equipment does cause harmful interference to radio or television
reception, which can be determined by turning the equipment off and on,
the user is encouraged to try to correct the interference by one or more
of the following measures:
• Reorient or relocate the receiving antenna.
• Increase the separation between the equipment and receiver.
• Connect the equipment into an outlet on a circuit different from that
to which the receiver is connected.
• Consult the dealer or an experienced radio/TV technician for help.
Changes or modifications not expressly approved by EcoWater Systems
could void the user’s authority to operate the equipment.
European Directive 2002/96/EC requires all electrical and
electronic equipment to be disposed of according to Waste
Electrical and Electronic Equipment (WEEE RM05711)
requirements.
INSTALLATION OF YOUR WATER SOFTENER
PLANNING AND SITING THE INSTALLATION
The installation of a water softener is relatively easy, but we
recommend that this work is undertaken by an authorised EcoWater
agent. Where possible the water softener should be sited close to the
rising main, allowing for any required hard water draw off points, i.e.
drinking tap and outside tap. Keep the drain run as short as possible
and allow for ease of service and salt access. If installed next to a boiler
or hot water cylinder you may have to protect against condensation.
When siting the softener please consider space for accessing the unit
for servicing etc. Sufficient space should be left behind the unit to allow
easy access for repairs and cleaning.
FLOW RATES
The water flow must be at least 1 litre per minute for the water
softener to work as originally designed.
FREEZING
The installation of all water fittings should be in accordance with
regional WRC regulations. The water softener, and all associated
pipework must be protected against freezing. Take special care where
the drain runs outside. Freezing will prevent recharge and cause
overflowing.
WARNING: FAILURE TO MEET THE FOLLOWING REQUIREMENTS
CAN CAUSE DAMAGE TO THE WATER SOFTENER, OR RESTRICT ITS
OPERATION.
SPECIFICATION REQUIREMENTS
Maximum water temperature 49 °C (120 °F)
Maximum daytime working pressure 4.76 BAR (70 psi)
Minimum working pressure 1.7 BAR (25 psi)
Minimum system flow 0.06m3/hr
Maximum system flow 3.18m3/hr
If a pressure-reducing valve is required this may be ordered
from EcoWater:
Quote Part No.800220 for 1/2'' or 15mm pipework
Quote Part No.800223 for 3/4'' or 22mm pipework
UNVENTED OR DIRECT SYSTEMS
Connection to the water softener should be made with 22mm or 28mm
copper pipe and not with flexible hoses supplied, to ensure that a
satisfactory flow rate is maintained.
You will also require a suitably sized bypass set and check valve. Full
flow valves are recommended. High Flow Installation Kit is available
with large bore flexible hoses from EcoWater Part No. 803222.
DRAIN HOSE
We recommend that the maximum length of drain hose is 1 metre before
entering an air gap. The maximum drain height above the softener should
be no more than 1 metre.
ELECTRICAL REQUIREMENTS
The water softener requires a 240 volt 50 Hz electrical supply taken off
a power supply, not a lighting circuit. Power is supplied via a 24 volt 50 Hz
transformer.
HARDWATER TAP
New WRC regulations currently state that a hard water tap is always
recommended. However, where the water hardness is below 400ppm
calcium carbonate there is NO mandatory requirement for a separate
hard water drinking tap because softened water complies with the
drinking water regulations. Where the water hardness exceeds 400ppm
calcium carbonate, the sodium level will be above the 200ppm
maximum set by the drinking water regulations so a separate hard
water drinking tap becomes mandatory.
It is also recommended that the garden tap is left with hard water
supply. Always check current regulations and seek advice from your
authorised EcoWater agent.
PRESSURE
Low or high pressure could lead to damage or non-operation of the water
softener. If the daytime pressure exceeds 4.76 BAR (70 psi)a pressurereducing valve should be fitted. If daytime pressure is less than 1.7 BAR
(25 psi) a pressure pump is required. Talk to an EcoWater agent.
Note: Night-time pressure will be much higher than daytime.
Please Remember – Only use tablet or pellet salt in your softener!
STEP BY STEP GUIDE TO PLUMBING
THE SOFTENER
PLUMBING
Turn off the water supply at the incoming main and begin plumbing as per
the installation instructions on pages 5.
FIT THE BYPASS KIT (IF INCLUDED)
Cut off the rising main and install the inlet tee with check valve.
Next, plumb the bypass, inlet and outlet valves so that the water supply
can be turned back on. Use the blue valve for the inlet, the blue valve for
the outlet and the grey valve as the bypass. Before turning the water back on,
make sure the bypass is open and the inlet and outlet valves are closed.
This will allow water to pass directly to the household system without
it diverting to the water softener. (The use of the plastic plumbing
fittings with copper pipe may affect the electrical earthing or
bonding of the copper pipe. If in doubt, we advise that you contact a
qualified electrician for advice).
To bypass softener, ensure bypass is open (horizontal) as per right hand
diagram below.
SECURE THE ADAPTOR ELBOW
Ensure o-rings are lubricated and in place before snapping the two large
hold clips into place, from the top down (see top illustration opposite).
Be sure they snap firmly into place so that the adaptors will not pull out.
Pull on the adaptors to assure a tight fit has been achieved.
INLET AND OUTLET CONNECTIONS:
(For unvented or direct systems refer to page 5).
Use the connecting hoses provided with the elbow unions to make the
inlet and outlet connections. For ease of connection the straight ends
may be connected to isolating valves or elbow unions. Fit the filter discs
into the straight union end of the inlet/outlet hoses.
DRAIN OUTLET/OVERFLOW CONNECTION:
Insert the rubber grommet into the overflow socket situated 2/3 of the
way up the rear of the water softener cabinet. Only insert the overflow
adaptor using the silicone grease provided once the grommet is secure.
Cut two lengths of hose as required to make the drain and overflow
connections.
Please Remember – Only use tablet or pellet salt in your softener!
6
Fit one length of hose onto the overflow adaptor and one length onto the
drain line adaptor.
Turn the drain line adaptor so that a straight connection can be made.
The drain hose and overflow hose must be secured with the supplied
metal clamps(see illustration opposite). Pass the overflow hose
through a hole in an outside wall so that its end can be seen. The drain
hose may be connected directly into an open drain, and air gap of
20mm must always be maintained. The drain and overflow must not be
kinked.
STEP BY STEP GUIDE TO PLUMBING
THE SOFTENER (CONTINUED)
CONNECT TRANSFORMER
1. Connect the power cable leads to the two terminals on the
transformer.
NOTE: Check to be sure all lead wire connections are secure on the
back of the faceplate.
CAUTION: Be sure all wiring is away from the valve gear and motor
area, which rotates during recharges.
2. Plug the transformer into a house electrical outlet.
THE UNIT WORKS ON 24V ONLY. DO NOT CONNECT WITHOUT
THE TRANSFORMER.
Please Remember – Only use tablet or pellet salt in your softener!
SETTING UP YOUR SOFTENER
LEFT
Button
UP
Button
SELECT
Button
DOWN
Button
Display
SET UP PROCEDURE
RIGHT
Button
When the EcoWater ESM+ softener is plugged in for the first time, a beep
will sound and the display briefly shows the EcoWater logo, followed
by product information.
Next, six setup screens will prompt you to enter basic operating information.
Follow this next 6 simple steps:
E.A.S.E.
Port
Language 1/6
English is the default language, please press the SELECT
confirm and move to the next screen.
button to
Language
1/6
English
Espagñol
System Units 2/6
Select ‘metric’ by use of the arrow buttons then press the SELECT
button to confirm and then press SELECT
button again to move to
the next screen.
Français
Systems units
2/6
English
Metric
Current time 3/6
Press the DOWN ( ) or UP ( ) buttons to set the current time.
To rapidly advance, hold the button down continuously. The clock will
be in 24-hour format. Press the SELECT
button to confirm and move
to the nextscreen.
Current time
3/6
15:45
The softener will retain its settings in the event of a short power failure.
Setting Hardness 4/6
Press the UP ( ) or DOWN ( ) buttons to set the value of your water’s
hardness according to the results of your test below. Press the
SELECT button to confirm and move to the next screen.
Hardness
4/6
150 PPM
Step by step guide to identifying your water hardness
Begin by testing your water hardness using the EcoWater test kit provided (instructions on label) with your softener, as follows:1. Remove the reagent from the vial.
2. Fill the vial up to the 10ml mark with a sample of hard water.
3. Add one drop of hardness reagent at a time, being sure to mix up the water after each drop. The water sample colour will change from red
to blue. Count the number of drops added.
4. When the colour changes to blue, this provides your indication of your current water hardness. Now use the following calculation:ppm (mg/l) = number of drops x 20 (Example: 16 drops x 20 = 320 ppm).
5. Make a note of your current water hardness below.
The property’s water hardness is
Please Remember – Only use tablet or pellet salt in your softener!
8
SETTING UP YOUR SOFTENER (CONTINUED)
Checking Salt and Setting Salt Level 5/6
Now is the time to add salt if not added and check your softener’s
current salt level as follows:
Salt level
5/6
4
Facing the softener, open the salt lid. To the left you will see a black vertical
tube with a grey lid and yellow sticker. On the side of this tube is a
numbered decal – note the lowest visible number you can see above
the salt.
Press the UP ( ) or DOWN ( ) buttons to set the salt level. It should
match the lowest visible number on the decal above the salt. Press
the SELECT button to confirm.
Iron Level 6/6
Please leave the setting for the Iron Level at 0.0ppm unless advised
differently by your authorised EcoWater agent.
Press the SELECT button to confirm and move to the next screen.
If, at this point, you want to go back and make changes, press the DOWN ( ) button to scroll to
“Redo setup”, then press the SELECT button to confirm.
If, however, you are satisfied with your settings, highlight the “Run softener” option and press
SELECT button. The softener will now begin normal operation (i.e. you will now see a selection
of rolling screens which is what you should expect to see in the future).
Setup completed
Run softener
Redo setup
NOTES FOR THE INSTALLER – BEFORE YOU LEAVE
1. Having programmed your unit you will wish to ensure that it is functioning properly before you leave.
2. Open the inlet and outlet valve and close the bypass as indicated in the diagram (page 6). Check that all the plumbing connections are
secure and there are no leaks.
3. Check that the time of day is correct.
4. Initiate a recharge – See To Set Recharge on page 10.
Please Remember – Only use tablet or pellet salt in your softener!
SETTING UP YOUR SOFTENER (CONTINUED)
RECHARGING THE SOFTENER
Your softener recharge will currently be set to automatic.
To set a recharge at the scheduled time
1. Press SELECT button to enter the Main Menu.
2. Recharge is the first available option – press SELECT
to select it.
button
Main menu
Recharge
Salt settings
Basic settings
3. Press DOWN ( ) to highlight “schedule”.
Recharge
6. Press UP ( ) or DOWN ( ) buttons to change the recharge time in
one hour increments. To rapidly advance, hold the button down continuously.
7. Press the SELECT button to confirm.
8. This returns you to the “Basic Settings” menu and if no other
adjustments are required, press LEFT ( ) button twice to return
to the rolling screen.
Please be aware hard water will be passed to service during
recharging, this is normal.
The following settings should always read:
Time format – 24 hour
Hardness units – PPM
Weight units – kilograms
Automatic
Recharge now
Schedule
4. Press SELECT button to confirm.
5. Press LEFT ( ) button twice to return to the rolling screen.
Please be aware hard water will be passed to service during
recharging, this is normal.
To set a recharge immediately (Recharge now)
1. Press SELECT button to enter the Main Menu.
2. Recharge is the first available option – press SELECT
button
to select it.
3. Press DOWN ( ) to highlight “recharge now”.
4. Press SELECT button to confirm.
The softener will automatically commence recharging.
5. Once the full recharge process is completed, the Main Menu will
reappear. Press LEFT ( ) button twice to return to the rolling screen.
SETTING/CHANGING TIME
1. From any of the rolling status screens, press the SELECT button
to display the Main menu.
2. Press the DOWN ( ) button to scroll through the menu options until
Basic settings is highlighted.
Main menu
Recharge
Salt settings
Basic settings
3. Press the SELECT
button to display the Basic settings menu.
Basic settings
Current time
Hardness
Iron level
Please be aware hard water will be passed to service during
recharging, this is normal.
Setting/changing recharge time
The softener’s default time for starting an automatic charge is 2:00am.
This is a good time for most households because water is not being
used. To change this time:
1. From any of the rolling status screens, Press the SELECT button
to enter the Main Menu.
2. Press the down button to scroll through the menu options until “Basic
settings” is highlighted.
3. Press the SELECT button to display the “Basic settings” menu.
4. Press the DOWN ( ) button to scroll through the menu options until
“Recharge time” is highlighted.
5. Press SELECT button to display the “Recharge time” screen.
Please Remember – Only use tablet or pellet salt in your softener!
10
4. Make sure Current time is highlighted.
5. Press the SELECT button to display the Current time screen.
Current time
18.45
6. Press the UP ( ) or DOWN ( ) buttons to change the time. Hold the
button down to rapidly advance.
7. Press the SELECT button. The display will go back to the Basic
settings menu.
8. Press the LEFT ( ) button twice to return to the rolling status
screens.
TROUBLESHOOTING
If you are experiencing poor water flow, please check all plumbing first as it is extremely rare for a softener to cause flow rate problems.
Checklist
PROBLEM: Hard water or intermittently hard water
1. Is the salt level above level 2?
2. Is the bypass valve closed and the inlet and outlet valves open?
3. Is the hardness setting correct?
4. Is the salt warning displayed?
PROBLEM: No water
1. Is the water mains open?
2. Are the inlet and outlet valves open?
PROBLEM: Unit recharges at incorrect time of day
1. Is the present time correct?
2. Is the recharge time correct?
3. Has there been a power cut? (over 72 hours)
PROBLEM: No recharge occurring or, little or no salt usage
1. Is the water soft?
PROBLEM: Excessive salt usage
1. Check the Hardness.
PROBLEM: No water in cabinet or very low
1. This is quite normal. Unlike conventional water softeners only a
few inches of water is at the bottom of the cabinet.
PROBLEM: High water level in cabinet
1. Is the water level in the salt cabinet high?
(i.e. above 2 on the salt level indicator.)
PROBLEM: Water running down the overflow
1. Is the water level in the salt cabinet high?
(i.e. above 2 on the salt level indicator.)
PROBLEM: Water running down the drain line constantly
1. Is the unit in recharge mode?
2. Does an error code appear, e.g. “ERR01”?
PROBLEM: Electronic faceplate
1. Is the faceplate blank?
2. Does an error code appear, e.g. “ERR03”?
Solution
1. Fill the cabinet with salt and 2 litres of water.
Set salt level & recharge now.
2. Close the bypass valve and open the inlet and outlet valves.
3. Reset unit.
4. Fill the cabinet with salt and 2 litres of water.
Set salt level & recharge now.
1. Open water mains.
2. Open the inlet and outlet valves. Ensure by-pass valve is closed.
1. Reset the clock.
2. Reset the recharge time.
3. Reset the clock.
1. If yes, no action is required.
1. Reduce the unit hardness setting if incorrect.
1. No action necessary.
1. Initiate an immediate recharge. If the problem returns, call for service.
1. If yes, bypass the water softener and call for service.
1. If yes, wait until it finishes, check the clock and recharge time settings
and adjust if incorrect.
2. Check all electrical connections are secure. Turn the power off for ten
seconds, and then switch back on.
1. Check the power is turned on and all connections are secure.
2. Check all electrical connections are secure. Turn the power off for ten
seconds, and then switch back on. If problem persists, bypass softener
and call for service.
Important Notes: If problem persists, bypass softener and call for service (please see diagram on page 6).
EcoWater Systems
Mill Road, Stokenchurch, High Wycombe, HP14 3TP
T: 01494 48 48 48
E: [email protected]
W: www.ecowater.co.uk
400497 01/11