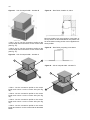
1
39 HQ AiroVision Installation, Operation and Maintenance Instructions Code No: B.8.1.3.i Revision No: 08082011 Publication Date: 08082011 39 HQ AiroVision Installation, Operation and Maintenance Instructions Contents 1 - SAFETY CONSIDERATIONS.................................................................................. 5 1.1. General................................................................................................................... 5 1.2. Applications............................................................................................................ 5 1.3. Instruction Types.................................................................................................... 5 1.4. Disposal of Parts/Materials .................................................................................... 6 2. TRANSPORT AND LIFTING INSTRUCTIONS......................................................... 6 2.1. General .................................................................................................................. 6 2.2. Transport and Storage............................................................................................ 6 2.3. Roof edge protection during transport (outside installation)................................... 7 2.4. Offloading and Hoisting.......................................................................... 7 2.5. Horizontal Transport............................................................................................... 7 3. PREPARATION for ASSEMBLY............................................................................................. 8 4. LIFTING INSTRUCTIONS.......................................................................................................8 4.1. General................................................................................................................... 8 4.2. Lifting Bar Certification........................................................................................... 8 4.3. Fastening of the Lifting Bars................................................................................... 8 5. ASSEMBLY.............................................................................................................................8 5.1. AHU Assembly........................................................................................................ 9 5.2. Connectiong Casings of Equal Width and Height.........................................................10 5.3. Connecting Casings of Different Height........................................................................12 6. STACKED CASING SECTIONS.................................................................................................... 12 6.1 Unit without Intermediate Base Frame (Equal Width)....................................................12 6.2. Unit with Intermediate Base Frame (Equal Width)........................................................14 6.3. Units with Different Width..............................................................................................16 7. FRESH AIR INLET HOOD............................................................................................................. 19 8. ROOF COVER............................................................................................................................... 19 9. CHECKLIST of START-UP CHECK POINTS................................................................................ 20 9.1. Checklist of Start-up Check Points ...............................................................................20 10. START-UP INSTRUCTIONS..........................................................................................22 10.1. Casing.........................................................................................................................22 10.2. Casing Panels.............................................................................................................22 10.3 Doors and Access Covers............................................................................................22 10.4. Flexible Connections..................................................................................................22 10.5. Earthing......................................................................................................................22 10.6. AHU Installation and Connection................................................................................22 10.7. Dampers......................................................................................................................23 10.8. Air Filters.....................................................................................................................23 10.9.1. General.....................................................................................................................23 10.9.2. Electric Heaters........................................................................................................23 10.9.3. Steam Heaters............................................................................................................... 23 10.10. Siphone........................................................................................................................... 24 10.11. Coolers............................................................................................................................ 24 10.12. Heat Recovery Wheel..................................................................................................... 25 10.13. Plate Heat Exchanger..................................................................................................... 25 10.14. Direct Steam Humidification............................................................................................ 25 10.15. Electrical Steam Humidification....................................................................................... 25 10.16. Water Humidifiers............................................................................................................ 26 10.16.1. Spray Humidifiers......................................................................................................... 26 10.16.2. Infrasonic Humidifier..................................................................................................... 26 10.17. Fan.................................................................................................................................. 26 10.18. Sound Attenuator............................................................................................................. 26 10.19. Lighting............................................................................................................................ 26 11. MAINTENANCE CHECKLIST.............................................................................................. 27 11.1. Checklist for Check Points and Maintenance Intervals...................................................... 27 12. MAINTENANCE AND OPERATING INSTRUCTIONS......................................................... 29 12.1. General.............................................................................................................................. 29 12.2. Casing Panels................................................................................................................... 29 12.2.1. Inside Installation............................................................................................................ 29 12.2.2. Outside Installation......................................................................................................... 29 12.3. Doors and Access Covers................................................................................................. 29 12.4. Flexible Connections......................................................................................................... 29 12.5. Earthing............................................................................................................................. 29 12.6. Dampers............................................................................................................................ 29 12.7. Outside Air Intake.............................................................................................................. 29 12.8. Filters................................................................................................................................. 29 12.9. Heaters.............................................................................................................................. 29 12.9.1. Water, Glycol and Steam Heat Exchangers................................................................... 29 12.9.2. Electric Heaters.............................................................................................................. 30 12.10. Coolers............................................................................................................................ 30 12.11. Heat Recovery Wheel...................................................................................................... 30 12.12. Plate Heat Exchanger..................................................................................................... 30 12.13. Water Humidification....................................................................................................... 30 12.13.1. Steam Humidifier.......................................................................................................... 30 12.13.2. Spray Humidifier........................................................................................................... 30 12.13.3. Infrasonic Humidifier..................................................................................................... 31 12.14.3. Transmission................................................................................................................ 31 12.14.2. Bearings....................................................................................................................... 31 12.14.1. General......................................................................................................................... 31 12.14. Fan.................................................................................................................................. 31 12.15. Sound Attenuator............................................................................................................. 31 Appendix-1................................................................................................................................. 32 Appendix-2................................................................................................................................. 33 Appendix-3/1.............................................................................................................................. 38 Appendix-3/2.............................................................................................................................. 39 5 1 - SAFETY CONSIDERATIONS 1.1. General 1 - SAFETY CONSIDERATIONS 1 SAFETY CONSIDERATIONS 1 - SAFETY CONSIDERATIONS The 39HQ air handling units (AHUs) has been de1.1 - General signed and manufactured in accordance with the 1.1 -- General General 1.1 CE machine directive EN292. In order to guarantee The 39HQ air handlingand units (AHUs) has been designed safeair operation use of the has unit,been please carefully The 39HQ handling units (AHUs) designed The air handling units (AHUs) has been designed and 39HQ manufactured in accordance with the CE machine read and observe the instructions in this document and manufactured inorder accordance with the the CEoperation machine and and manufactured accordance with CE machine directive EN292. Inin to guarantee safe and pay special attention to thesafe warnings thatand apply directive EN292. In order to guarantee operation directive EN292. In order to guarantee safe operation and use of to the unit, please carefully read and observe the and/or this unit. Any modifications in the design use of the the unit, unit, please carefullyand read and observe the to use of please carefully read and observe the instructions in this document pay special attention installation of the AHUand that are carried out without instructions in this document pay special attention to instructions inthat thisapply document payAny special attention to the warnings to thisand unit. modifications in discussion with Alarko Carrier and without advance the warnings that apply to this unit. Any modifications in the that apply to thisof unit. Any modifications in the warnings design and/or installation the AHU that are carried written agreement willofresult in thethat lossareofcarried the right the design and/or installation the Carrier AHU the and/or installation of the AHU that carried outdesign without discussion with Alarko andare to any warranty claims and any claim for to out without discussion with Alarko Carrier Carrier andin theinjury out without discussion with Alarko and without advance written agreement will result loss of personnel as a result of these modifications. without advance written agreement agreement will result infor theinjury loss of ofto without written the loss the rightadvance to any warranty claims andwill anyresult claimin the right to any warranty claims and any claim for injury toby Maintenance procedures mayany only be carried outto the right toasany warranty claims and claim for injury personnel a result of these modifications. personnel as a result of these modifications. qualified personnel. personnel as a result of these modifications. Maintenance procedures may only be are carried out by Heating and cooling elements manufactured and Maintenance procedures may only be be carried carried out by by Maintenance procedures may only out qualified personnel. supplied in accordance with guidelines of the Presqualified personnel. personnel. qualified sure Equipment Directive (PED). Heating and cooling elements are manufactured and Heating and cooling elements elements areismanufactured manufactured and CE ofwith AHUs givenofAnnex-4. Heating and cooling are and supplied indeclaration accordance guidelines the Pressure supplied in accordance with guidelines of the Pressure supplied in accordance with guidelines of the Pressure Equipment Directive (PED). 1.2. Applications Equipment Directive (PED). (PED). Equipment Directive 1.2 - Applications The AHU is designed for the movement and con1.2 -- Applications Applications 1.2 ditioning of air, unless otherwise agreed during the The AHU is designed for the movement and conditioning design stage. for The AHU is designed designed the movement movement and conditioning The AHU is the conditioning of air, unless otherwisefor agreed during theand design stage. of air, unless otherwise agreed during the design stage. of air, unless otherwise agreed during the design stage. 1.3. Instruction Types 1.3 - Instruction types 1.3 -- Instruction Instruction types 1.3 types The following warning pictograms and labels with text are warning used. pictograms and labels with text are The following The following warning warning pictograms pictograms and and labels labels with with text text are are The used.following used. used. Lifting point Lifting point point Lifting Lifting Point This label shows where the AHU can be lifted with support beams. Support beams shall be used with This pictogram shows where the AHU must be lifted and is cranes. Ifshows forklifts are the used for lifting, support beams This pictogram where AHU must be be lifted and and is This pictogram shows where the AHU must lifted is positioned on the support beam. cannot be used. positioned on on the the support support beam. beam. positioned LiftingTransporting prohibited From Side Base Lifting prohibited prohibited Lifting It is forbidden tothat place devices for transport and This pictogram shows nolifting horizontal transport devices This pictogram shows that no horizontal transport devices storage under side profiles. This pictogram shows that no horizontal transport devices must be placed under this frame section, such as pallet must beorplaced placed under this frame frame section, such as pallet to must under this section, pallet liftersbe the forks of fork lift trucks. It issuch also as forbidden lifters or the forks of fork lift trucks. It is also forbidden to lifters or the forks offor fork lift trucks. is also forbidden place lifting devices transport andItstorage under thisto place lifting devices for transport and storage under this place devices for transport and storage under this framelifting element. frame element. element. frame Earthing This pictogram indicates where the AHU must be Earthingand is on one of the support beams beneath earthed Earthing Earthing Thiscasing pictogram where the AHU must be earthed the in theindicates fan section. This pictogram indicates where the AHU AHU must becasing earthed This pictogram where the must earthed and is on one ofindicates the support beams beneath thebe in -and The electrical components in the AHU must be in and is on one of the support beams beneath the casing in is onsection. one of the support beams beneath the casing the fan earthed, exceptcomponents for components double insulathe fanelectrical section. the fan section. - The in thewith AHU must be earthed, tion and/or components with a supply voltage -- The The electrical components in the AHU must be earthed, electrical components indouble the AHU must bebelow earthed, except for components with insulation and/or 50 V. for except for components components withvoltage doublebelow insulation and/or except with double insulation components with a supply 50 V.and/or components with a supply voltage below 50 V. with a supply voltage below 50 V. The electrical components must installed inin accordance -- components The components mustbebe installed acThe electrical components must be be installed installed in in accordance accordance -- The components must withelectrical national and localand regulations. cordance with national local regulations. with national national and and local local regulations. regulations. with Rotating Parts Rotating parts This that there there are arerotating rotating parts partsbehind Rotating parts indicates Rotating parts This pictogram pictogram indicates that behind this access cover, door or panel which may This pictogram indicates that there aremay rotating parts behind This pictogram indicates there are rotating parts behind this access cover, door orthat panel which cause injury. The cause injury. The components that include rotating this access cover, door or panel which may cause injury. The this access cover, door or panel which may cause injury. The components that include rotating parts are the fan and heat parts arewheel. thethat fan and recovery wheel. there components that include rotating parts are the theIffan fan and heat heat components rotating parts are and recovery Ifinclude thereheat are special customer-specific are special customer-specific components behind recovery wheel. If there are special customer-specific recovery wheel. If there are special customer-specific components behind doors, access covers or panels that doors, covers or panels include rotating components behind doors, accessathat covers or panels panels that components behind doors, access covers or that includeaccess rotating parts and pose potential risk, this is also parts and pose a potential risk, this is also indicated include rotating parts and pose a potential risk, this is also also include rotating parts and pose a potential risk, this is indicated by this pictogram. by this pictogram. indicated by this this pictogram. pictogram. indicated by Hot Surfaces Hot surfaces Hot surfaces Hot This pictogram that there thereare arecomponents components Thissurfaces pictogram indicates indicates that behind This pictogram indicates that there are components behind This pictogram indicates there are components behind behind thiscover, access door or panel that can this access doorcover, orthat panel that can cause serious burns this access cover, doorwhen or panel panel that can can cause cause serious serious burns burns this access cover, door or that cause serious burns touched. when touched. when touched. touched. when The components that may have hot surfaces are The components that may have hot surfaces are the steam the steam humidifier, steam heater and theare electric The components that may have hot surfaces the steam The components may have surfaces are the steam humidifier, steamthat heater and thehot electric heater. If there are heater. If there are special customer-specific comhumidifier, steam heater and the electric heater. If there are humidifier, steam heater and the components electric heater. If there are special special customer-specific behind doors, ponents behind doors, access covers or panels that special special customer-specific components behind doors, special special customer-specific doors, access covers or panels that havecomponents hot surfacesbehind and pose a have hot surfaces andthat pose a potential risk,and this is a access covers or panels have hot surfaces pose access covers panels that have hotby surfaces and pose a potential risk,orthis is also indicated this pictogram. also indicated by this pictogram. potential risk, this this is also also indicated by by this this pictogram. pictogram. potential risk, is indicated Electrical voltage Lifting and transport This pictogram indicates that there are electrical components An instruction is attached to t behind this access cover, door or panel that may be dangerous procedures that must be follow 6 for the user/installer. Only personnel qualified in accordance The following chapter contain with NEN 3140 is permitted to carry out work on these 1.4 - Disposal of parts/mat components. The pictogram attached the access cover Electrical Voltage beforeisstarting upto the AHU. for the electric heater control box. This pictogram indicates that Unit Matching Label - The packaging material must there are electrical components manner and in accordance w behind this access cover, door This label shows that matching surfaces -ofComponents AHU units that are replace or panel that may be dangerous for assembly. It exists at bottom right and left corner of described above. for the user/installer. Only perunits. Sample label is as follows. sonnel qualified in accordance 2 - TRANSPORT AND LIFT with EN50110 is permitted to carry out work on these compo2.1 - General nents. The pictogram is attached to the access cover Removal of transport brackets for the electric heater control box. Transport and lifting of the A This pictogram is located at the bottom of the fan section. It Removal of Transport Brackets indicates that the transport brackets must be removed during accordance with the instructio are not observed, irreparable d commissioning before the fan is started up. and people in the immediate v This pictogram is located at the bottom of the fan endangered. Alarko Carrier do section. It indicates that the transport brackets must Lifting and Transport .before the responsibility be removed during commissioning fan is An instruction Verwijder transportbeugels voor opstarten ventilator. is attached to the AHU that describes if these instructio and lifting must be carried ou started up. Remove transport brackets before starting up the fan. the procedures that must be followed for lifting and AHU must Retirer les fixations de transport avant démarrage. transport.The following chapter contains furtheronly be lifted with Alarko Carrier. Lifting must b details. accordance with local regulati certified lifting aids. 1.4. Disposal of Parts/Materials Central data This label contains the data for the AHU, such as order - The packaging material must be disposed of in a 2.2 - Transport and storage number, position number etc. If present, the label is normally responsible manner and in accordance with local located on the access cover or the door of the fan assembly. Central Data regulations. Lifting of the AHU is only pe lifting points. Lifting under th disposed This label contains the data for the AHU, such as - Components that are replaced, must be This applies to transport as w order number, position number etc. If present, the of as described above. on the cross beam with the fol label is normally located on the access cover or the 2. TRANSPORT AND LIFTING INSTRUCTIONS door of the fan assembly. 2.1. General Transport and lifting of the AHU must always be in Opening the fan door accordance with the instructions below. If these instructions areoutside not observed, irreparable damage may This pictogram is positioned on the of the door or to the unit, and people in the access cover of the fan occur assembly. This pictogram warns thatimmediate vicinity the unitoff areand also endangered. the fan must have beenof switched deenergised for aAlarko Carrier does notbefore acceptthe any responsibility if these minimum of two minutes door or access cover is instructions are not observed. Transport and lifting must be carried out opened. by qualified personnel. The AHU must only be lifted with lifting bars supplied by Alarko Carrier. Lifting must be carried out in accordance with local regulations ! WARNING! andswitch with the certified the lifting aids. Before opening doors, offhelp and of deenergise fan, and ensure that it has stopped rotating. 2.2. Transport and Storage (minimum of 2 minutes) Opening the Fan Door Lifting of the AHU is only permitted under the desig- nated lifting methods. For transporting, marked This pictogram is positioned on theCaution: outside All of the door doors andpoints accessshall covers beIfclosed before bemust used. it is not possible to u s e or access cover of the fan assembly. Thisup pictogram starting the AHU. marked points due to the loading conditions, transwarns that the fan must have been switched off and porting from side profiles can only be done by forklift deenergised for a minimum of two minutes before (cranes cannot be used). This applies to transport as the door or access cover is opened. well as storage, and is indicated on the side profiles by Caution: All doors and access covers must be closed warning label. Air Handling Units deliver to the side by sections. Moving the plastic cover will let the dirt and particulates enter to the unit from openings. Do not move the protection cover unless you complete the installation of the unit. 2.3. Roof edge protection during transport (outside installation) Roofedge transport protection During transport by truck the units are attached to the loading surface with tie ropes, pulled across the unit towards the side edges of the truck. On external units, to protect the roof edge from distortion by the tie ropes protection plates are added. For safety reasons these protection plates must be fixed.This is done by attaching them with self-tapping screws to the roof edge. Make sure that the protection plates are removed after arrival on site before the AHU is lifted. Figure 1. Roofedge transport protection instructions in this document and pay special attention to the warnings that apply to this unit. Any modifications in the design and/or installation of the AHU that are carried out without discussion with Alarko Carrier and without advance written agreement will result in the loss 7 of the right to any warranty claims and any claim for injury to personnel as a result of these modifications. For offloading as well as hoisting lifting cables can be attached to the lifting bars. Evenly positioned Maintenance procedures may only be carried out by spacer qualified personnel. bars should be used between the lifting cables to prevent damage to the top of the unit and ensure Heating and cooling elements manufactured andpanels. that no excess pressure is are applied to the side supplied in accordance with guidelines of weight the Pressure For hoisting please ensure that the is evenly Equipment Directive (PED). distributed. Figure 2. Lifting bars and lifting cables 1.2 - Applications The AHU is designed for the movement and conditioning of air, unless otherwise agreed during the design stage. The following warning pictograms and labels with text are used. Lifting point positioned on the support beam. Figure 3. Label for not to lifted or moved areas Lifting prohibited 2.4. Offloading and Hoisting Before proceeding with the transport and installation of the casing sections, always consult the applicable dimensional drawing that give the dimensions and weights of the sections, as well as the installation sequence. The weight is given on each transport section (See Appendix 1). Each transport section is equipped with a subframe with four lifting points.These points are marked by the label shown below. Rotating pa This pictog this access component recovery wh component include rota indicated b 1.3 - Instruction types The AHU should not be lifted or moved under the cross beams. shows This iswhere indicated by must the label below. This pictogram the AHU be lifted and is Depending on the dimensions of the AHU and the situation on site, the AHUs are supplied in previously agreed transport sections. with natio This pictogram shows that no horizontal transport devices 2.5. Transport must Horizontal be placed under this frame section, such as pallet lifters or the forks of fork lift trucks. It is also forbidden to For movement pallet lifters under or transport placehorizontal lifting devices for transport and storage this skids can be placed under the installation frame or frame element. under the lifting bars. It is important that these support the lifting points. At no time should the cross beams at the ends of the unit sections be used for jacking or tracking the AHU. FOR HORIZONTAL TRANSPORT ALWAYS PROVIDE SUPPORT UNDER THE LIFTING POINTS. The use of bars as rollers can result in damage to the installation frame. 4 Figure 4. Hot surface This pictog this access when touch The compo humidifier, special spec access cove potential ri 8 3. PREPARATION for ASSEMBLY 4. LIFTING INSTRUCTIONS The following material is supplied as standard by Alarko Carrier: 4.1. General • Installation, maintenance and operating instructions • Installation, operation and maintenance manual • II A declaration • Connecting parts • Material list The following material is supplied as an option by Alarko Carrier: • Anti-vibration mats • Outside air suction grille • Heat recovery wheel control • Steam generator and accessories Check that all necessary parts are supplied with the AHU. Measure the location and make sure it is tidy. The floor of the installation area should be level and flat to avoid connection problems. Any uneven surfaces should be evened out with infill plates. Determine the correct assembly sequence of the AHU sections. Use the most logical sequence, taking the location into account. Begin with the casing section that must be positioned on the highest part of the floor, so that the other casing sections can be added around it. There are transport and lifting instructions attached to the AHU. 4.2. Lifting Bar Certification The lifting bars supplied are for single use and certified in accordance with Machinery Directive 2006/42/ EC, annex II-A. Selection. 4.3. Fastening of the Lifting Bars • Remove the bolt and the locking plate on one side of the lifting pipe. Figure 5. Fastening the lifting bars - 1 • Slide the lifting bar into the hole in the subframe intended for that purpose. 9 Figure 6. Fastening the lifting bars - 2 the lifting bars are too long. It would be possible to remove them from the left-hand side, if the third AHU section has not yet been placed. Ensure that the bolt and the locking plate are removed from the right-hand side of the lifting bar, when the 6th AHU section has been positioned. Figure 9. Location Diagram • After inserting the lifting bar, re-insert the bolt and locking plate in the correct position. Figure 7. Fastening the lifting bars - 3 Wall Lifting bar • Position the lifting cables on the lifting bars (4 or 6 off). Evenly positioned spacer bars should be used between the lifting cables to prevent damage to the top of the unit and ensure that no excess pressure is applied to the side panels. Figure 8. Vertical transport using spacer bars 5. ASSEMBLY 5.1. AHU Assembly • Place the anti-vibration mats where the first casing section will be positioned. • Place the first casing section on the anti-vibration mats, and then remove the lifting bars. Figure 10. Anti-vibration mats - For hoisting ensure that the weight is evenly distributed and that all previous steps are carried out correctly. If there is not enough space it may not be possible to remove the lifting bars. In the example below, the lifting bars can not be removed on the right-hand side of the 6th AHU section, as the wall is too close and 10 • Then place the anti-vibration mats where the next casing section will be positioned and then place this section. • Before placing the sections against each other, fix the sealing tape supplied between the sections. This should be done in four places, and the sealing tape should overlap at the corners See Figs 17 and 21. 5.2. Connecting Casings of Equal Width and Height Figure 13. Unit of equal width and length The labels which show the matching surfaces are for making easy the matching of unit surfaces correctly during assembly of AHU. Same numbers should be side by side. NOTE: Attach the sealing tape supplied to only one of the two assembled sections. - Place the sections as close together as possible. Ensure that both sections can still be moved. Insert a lifting bar into both sections, so that they can be pulled closer towards each other. There are two methods for pulling the sections towards each other: Method 1 Pull the sections against each other, using the pull ropes attached to the lifting bars. Pull evenly on both sides of the AHU. Figure 11. Linking the casing sections with pull ropes To connect the AHU sections use one of the following methods. The method depends on the AHU construction. Method 1 This method applies for sections that end in joint mullions: • Check that the four corners are attached. Figure 14. Joint mullions with linking corner places Method 2 Insert a bar with threaded ends through both lifting bar holes. Screw a nut onto the threaded ends of the bar and tighten it. Tighten it evenly on both sides of the AHU. Figure 12. Linking the casing section with a bar - Ensure that the sealing tape supplied is fixed to one of the two sections, before moving the sections against each other. NOTE: Before connecting the sections, they should be horizontally and vertically aligned, using infill plates. If the floor is not completely level, first place the casing section that will be on the highest part of the floor. 11 Figure 15. Fixing the sealing tape to the joint mulli- Figure 18. Corner posts with coupling profile ons - Use the pre-mounted corners for the final positioning of the sections and secure the corners with a bolt. The sections must be fully aligned. Figure 16. Corner connection - Ensure that the sealing tape supplied is fixed to one of the two sections, before moving the sections against each other . Figure 19. Fixing sealing tape to the corner posts - Link the sections by connecting the pre-mounted corner posts with bolts and nuts (M6). Figure 20. Connecting the corner posts - Remove the first two corners and mount the aluminium connection strip to the base. Remove the next two corners and mount the connection strip against the side wall. Repeat this for the other AHU corners. Figure 17. Fixing the connection strip - If there are more than two sections, repeat the procedure above. For an outdoor installation all external joints should be sealed. Method 2 This method applies for sections that end with corner posts. 12 For an outdoor installation the plastic roof cover must be finished as described in chapter 8. NOTE: If the AHU needs to comply with air tightness class L1 (LuKa C), the internal connection strip joints and/or profiles should also be sealed. 6. STACKED CASING SECTIONS 6.1 Unit without Intermediate Base Frame (Equal Width) Figure 23. Unit without intermediate base frame 5.3. Connecting Casings of Different Height Figure 21. Unit of different height After the internal connection of the sections an indoor installation requires no further finish (see chapter 5.2). For the external finish of an outdoor installation use following method: • Check if the cover strip has been applied at the correct height on the projecting section. • Fix the plastic finish layer to cover strip above with the screws provided. • Add a second cover strip over these screws. • Position the sections against each other so that the corner posts of both casings are touching and first connect the sections internally, as described in chapter 5.2. • Attach the projecting strip of the plastic roof foil over the connection profile of the lower casing section with a blow dryer. Figure 22. Roof finish, units of differing height - 1 Indoor Installation • Position the casing sections on top of one another so that the corner posts are in the same plane. • Mount the profiles supplied as described below. For sections of equal length, these profiles should be mounted all round the unit. • For shorter or longer upper sections the ends need no further finish. NOTE: All resulting external joints should be sealed. 13 Figure 24. Mounting profile, indoor location, unit without intermediate base frame Figure 25. Mounting profile, outdoor location, unit without intermediate base frame • If the top section is shorter than the bottom section, the ends should be finished as described below. Outdoor Installation • Position the casing sections on top of one another so that the corner posts are in the same plane. • Mount the profiles supplied as described below. For sections of equal length, mount the profiles all round the unit. Figure 26. Unit with shorter top section without intermediate base frame 14 Figure 27. roof finish, unit with shorter top section without intermediate base frame 6.2. Unit with Intermediate Base Frame (Equal Width) Figure 29. Unit with intermediate base frame • A longer top section needs no further finish at the ends. Figure 28. Unit with longer top section without intermediate base frame Indoor Installation For indoor installation connection profiles of 240 mm length are supplied. • Position the casings on top of one another so that the corner posts are in the same plane. The base frame of the top section should be slightly back compared to the bottom casing section. If stacking units in an indoor installation the connection profiles should be placed between the different unit sections. Use the following assembly method: NOTE: For outdoor installation seal all jonts resulting from the mounted profiles. This applies to both corner and butt joints. • Install a connection profile to the end of the casing section, stopping at the module line (A). • Install a connection profile at the joint (B). •Install a connection profile against the adjacent section (C). 15 Figure 30-1. Stacking, indoor location with intermediate base frame Figure 30-2. Fixing profile, indoor location with intermediate base frame Figure 31. Stacking, outside location Bear in mind that different connection profiles are used for the length and width directions of the cabinet. • Length direction: Cut the connection profile supplied to the correct length and mount it as described below. Figure 32. Fixing profile, length direction, unit with intermediate base frame Cross section of length direction (A-A) There is no need for a connection profile at the ends of the unit. NOTE: The maximum distance between two connection profiles is 960 mm. For greater distances connection profiles should be installed on the operation side and non-operation side. Outdoor Installation For an outdoor installation, the connection profiles supplied need to be cut to the correct length. These profiles should be mounted over the entire unit length and width. • Width direction: Cut the supplied connection profile to the correct length and mount it in the way given below. 16 Figure 33. Fixing profile, width direction, unit with intermediate base frame Figure 35. Roof finish, shorter top section with intermediate base frame View of width direction, equal casing length (B) • A longer top section needs no further finish at the top. Figure 36. Unit with longer top section with intermediate base frame • If the top section is shorter than the bottom section, the unit ends should be finished as described below. Figure 34. Unit with shorter top section with intermediate base frame NOTE: For an outdoor installation, seal all joints resulting from the mounted profiles. This applies to both corner and butt joints. 6.3. Unit with Different Widths For units with different widths, there are four different situations. For an indoor installation the method described below applies to all situations. Indoor Installation The top section includes a projecting cross beam that is effectively as wide as the bottom section. • Check that the cover strip at the ends of the bottom section is installed in the correct place. • Position the top section as indicated in the dimensional drawing. • Cut the connection profile supplied to the correct length and mount it to the unit ends as described below View of width direction if the top section is shorter • Screw the projecting cross beam of the top section to the corner posts of the bottom section. 17 Cross section of width direction Figure 39. - Unit of unequal width - situation A Figure 37. - Width direction view, unit of unequal width 3 1 2 4 • Side 1: Cut the connection profile to the correct length and mount it on the correct side (see Fig 36). Cross section of length direction Figure 38. - Length direction view, unit of unequal width • Side 2: Cut the connection profile to the correct length and mount it on the correct side as described below. Figure 40. - Roof finish, situation A, side 2 Outdoor Installation The top section includes a projecting cross beam that is effectively as wide as the bottom section. For an outdoor installation the connection profiles supplied need to be cut to the correct length. These profiles should be mounted over the entire unit length and width. • Position the top section as indicated in the dimensional drawing. The position of the top section can be as described in one of the four situations below: • Side 3 and 4: Cut the connection profiles to the correct length and mount them on the correct sides (see Fig 37). 18 Figure 41. - Unit of unequal width - situation B Figure 43. - Roof finish, situation C, side 4 • Side 1 and 2: Cut the connection profiles to the correct length and mount them on the correct sides (see Fig 44). • Side 3 and 4: Cut the connection profiles to the correct length and mount them on the correct sides (see Fig 37). Mount Z-profiles over the projecting cross beam of the top section as described below. The plastic roof foil of the bottom casing section can be applied over these profiles. Figure 44. - Roof finish, projecting cross beam Figure 42. - Unit of unequal width - situation C 1 3 Figure 45. - Unit of unequal width - situation D 1 4 3 2 • Side 1: Cut the connection profile to the correct length and mount it on the correct side (see Fig 36). • Side 2: Cut the connection profile to the correct length and mount it on the correct side (see Fig 44). • Side 3: Cut the connection profile to the correct length and mount it on the correct side (see Fig 37). • Side 4: Cut the connection profile to the correct length and mount it on the correct side as described below. 4 2 19 • Side 1 and 2: Cut the connection profiles to the correct length and mount them on the correct side (see Fig 44). • Side 3: Cut the connection profile to the correct length and mount it on the correct side (see Fig 37). • Attach the roof cover strip with a blow dryer over the entire length of the joint up to the roof edge. • Remove any excess roof foil up to the underside of the roof edge. Figure 47. - Roof finish. method 1 • Side 4: Cut the connection profile to the correct length and mount it on the correct side (see Fig 47). • Mount Z-profiles over the projecting cross beam of the top section as shown in Fig. 48 of this chapter. The plastic roof foil of the bottom casing section can be applied over these profiles. 7. FRESH AIR INLET HOOD The fresh air inlet hood may be supplied loose with the AHU. In this case the air inlet hood must be attached in the correct position as follows: • Install the inlet hood with the screws supplied in the correct location. • The bottom wire grille should then be attached to the corner post. Figure 46. - Fresh air inlet hood Method 2 • Fix sealing tape to the connection profiles. Drill 160 mm holes with a 10 mm diameter through the connection profiles. Be sure to remove the drill shavings after drilling. • Attach the casing sections to each other using bolts and nuts (M8). • Seal the seam on the top of the connectiong profiles. Figure 48. - Roof finish. method 2 SEAL M8x25 BOLT DIN 933 SEALING TAPE 6x15 mm NOTE: The connection between the outdoor air suction grille and the corner post should be sealed. 8. ROOF COVER ÜNİTE 2 UNIT 2 For outdoor installations the roof cover should be provided with a finish. If the casing section has a flat top use one of the following two methods: 6x15 UNIT 1 SEAL M8x25 BOLT DIN 933 SEALING TAPE 6x15 mm Method 1 • Shorten the plastic roof foil strip supplied to the correct length. Ensure that the strip projects enough to attach it to the side of the roof edge with a blow dryer. • Ensure that the roof cover already attached to the two casing sections to be connected is clean and dust-free. ÜNİTE UNIT 22 6x15 PVC SIZDIRMAZLIK BANTI 6x15 UNIT 1 20 9. CHECKLIST OF START-UP CHECK POINTS 9.1. Checklist of Start-up Check Points The table below shows a general overview of the planning required to facilitate the installation of the AHU. The following pages give a more detailed description of the individual components. !CAUTION! Before starting up the AHU ensure that the components have the correct connection voltage and connect them in accordance with the regulations. The doors and access covers must be closed and the AHU must be earthed. 21 22 4 - START-UP INSTRUCTIONS 4.1.5 - AHU installation and connection 4.1 - Casing The floor in the room where the AHU is installed must be water-tight and flat to prevent connection problems. Before the units are placed against or on top of each other, the sealing tape supplied must be attached between the casing sections. 10. START-UP INSTRUCTIONS The label with the unit data, such as order number, position number etc. is ususally located on the acccess cover or door of the fan compartment. 10.1. Casing The label with the unit data, such as order number, position number etc. is usually located on the acccess cover or door of the fan compartment. 10.6. AHU Installation and Connection The floor in the room where the AHU is installed must be water-tight and flat to prevent connection problems. Before the units are placed against or on top of each other, the sealing tape supplied must be attached between the casing sections. 4.1.1 - Casing panels Check the AHU panels for any damage. Any dirt or stains must be removed from the surface to prevent possible longterm damage. Building debris left on the roof must be removed. Dirt can be removed with water and a mild household soap solution. Damage can be repaired by thoroughly cleaning the affected surface, then treat and paint as necessary. If applicable check the sealing joints and repair if required. 4.1.2 - Doors and access covers Check the operation of door handles, locks and movement of the hinges. For outside installation of the AHU check the storm cord. Caution: Doors and access covers must always be closed 10.2. Casing Panelsbefore starting the unit. Check the panels for any damage. Any dirt or 4.1.3AHU - Flexible connections stains must be removed from the surface to prevent that all flexible connections are attached theon AHU. possibleCheck long-term damage. Building debristoleft the If necessary, tighten loose screws. roof must be removed. Dirt can be removed with water 4.1.4 - Earthing soap solution. Damage can be and a mild house-hold repaired by thoroughly cleaning the affected surface, Ensure that the AHU has been earthed correctly and in then treat and paint necessary. applicable check accordance withas local regulations. AIflabel on the support framejoints indicates where the unit be earthed. the sealing and repair if should required. 10.3 Doors and Access Covers Check the operation of door handles, locks and movement of the hinges. For outside installation of the AHU check the storm cord. Place the casing as close possible together beforeropes Figure 49. -sections Pulling the as sections with pull assembly. Pull the casing sections towards each other by placing the lifting bars first in one and then in the other casing section. pull both parts towards each other Place the Then casing sections as close as possible using pull ropes. together before assembly. Pull the casing sections towards eachare other by placing the and lifting bars first in The casing sections connected with the frames fixing elements supplied. thethe AHU is installed outside, the roof Then pull one and thenIf in other casing section. connecting plate provided must be installed on the roof and both parts towards each other using pull ropes. sealed. The casing sections are connected with the frames and fixing elements supplied. If the AHU is installed outside, the roof connecting plate provided must be Sealant installed on the roof and sealed. !CAUTION! Doors and access covers must always be closed before starting the unit. 10.4. Flexible Connections Check that all flexible connections are attached to the AHU. If necessary, tighten loose screws. 10.5. Earthing Ensure that the AHU has been earthed correctly and in accordance with local regulations. A label on the support frame indicates where the unit should be earthed. 9 1 - SAFETY CONSIDERATIONS Earthing This pictogram indicates where the AHU must be earthed 23 the casing in 1.1 - General and is on one of the support beams beneath the fan section. The 39HQ air handling units (AHUs) has been designed - The electrical components in the AHU must be earthed connections for leakage. 10.7. Dampers and manufactured in accordance with -Check the CE machine except for components with double insulation and/or directive EN292. In order to guarantee safe operation and components with a supply voltage below 50 V. -Ensure supply heat to must pre-be installed in accordan -Check if the actuator motor in accordance use is of installed the unit, please carefully read and observe that the the heater - Thecan electrical components vent frost formation when the fan is started. instructions in this document and pay special attention to with national and local regulations. the supplier’s instructions. 4.2with - Dampers - Ensure that the heater can supply heat to prevent frost the warnings that apply to this unit. Any modifications in the fan is started. formation when -Caution: When the coils are drained, no water -Check if the correct angle the has designbeen and/orset. installation of the AHU that are carried - Check if the actuator motor is installed in accordance - must Caution: Wheninthe coils are drained, no water must remain the circuits to prevent freezing out without discussion with Alarko Carrier and with the supplier’s instructions. remain the circuits to prevent freezing at temperatures -Check if the dampers close properly. without advance written agreement will result ininthe loss of below at temperatures zero. - Check if the correct angle hasthebeen below rightset. to any warranty claims and any claimzero. for injury to -Check if the damper open to the required an- Check if the dampers closecan properly. personnel as a result of these modifications. 10.9.2. Electric Heaters gle. if the damper can open to the required angle. 4.4.2 - Electric heaters - Check Maintenance - Check operation after the power has beenprocedures restored may only be carried out by -Check operation after the powerpersonnel. has been restored- -Ensure that the heater has been connected in acfollowing a power cut. Some qualified dampers must be open, - Ensure that the heater Rotating has beenparts connected in accordance following a power cut. Some dampers must be open, cordance with the of instructions thediagram supplier. This indicates that there are rotating parts beh others must be closed. with the instructions thepictogram supplier.of The is The and others must be closed. Heating and cooling elements are manufactured this access cover, door or panel which may cause injury. T diagram isthe located on the inside ofmodule. the connection located on inside of the connection supplied in accordance with guidelines of the Pressure components that include rotating parts are the fan and he - module. Check the heater current. Equipment Directive (PED). recovery wheel. If there are special customer-specific 4.2 - Dampers - Ensure that the -heater canifsupply heat to preventshown frost in the wiring diagram Check the safety devices components behind doors, access covers or panels that -Check the heater current. formation when the fan is started. have been installed. include rotating parts and pose a potential risk, this is als 1.2 - Applications - Check if the actuator motor is installed in accordance - Caution: When the coils are no has water mustearthed in accordance with - -Check Check ififdrained, the been theheater safety devices shown in the wiring diaindicated by this pictogram. with the supplier’s instructions. the circuits to conditioning prevent freezing at temperatures local instructions. The AHU is designedremain for thein movement and gram have been installed. - Check if the correct angle has been set. of air, unless otherwise below zero. agreed during- the design stage. The electric heater may only be switched on if the - Check if the dampers close properly. -Check if the heater earthed accordance minimum specified airhas flowbeen rate across the in heater exists. 4.4.2 - Electric heaters - Check if the damper can open to the required angle. 1.3 - Instruction types The electric heater must be switched off at least 5 minutes with local instructions. - Check operation1after the power has been restored - SAFETY CONSIDERATIONS Earthing before the AHU is switched off. following a power cut. Some dampers must be open, - Ensure that the heater has been connected in accordance This pictogram where the AHU be earthed The following warning pictograms and-The labels with textindicates are electric heater may only bemust switched on if the - and Ensure nothe objects have been left in thecasing heaterin section. others must be closed. with the instructions of thethat supplier. The diagram is beneath 1.1 - General is on one of support beams the used. specified air flow rate across the heater located on the inside of the connection module. - minimum The following warning pictograms are attached to the the fan section. - Check the heater exists. The 39HQ air handling units (AHUs) -current. The electrical components in the AHU must be earthed, panel: electrical voltage and hot surface. Lifting point has been designed Hot double surfacesinsulation and/or Check if the safetyexcept devicesfor shown in the wiring diagram and manufactured in accordance with the CE- machine components with This pictogram indicates thatatthere are 5 components behin -The electric heater must bebelow switched least have been installed. directive EN292. In order to guarantee safe operation and components with a supply voltage 50 V. off Figure 50.the- unit, Manual Figure 51.- operation - Actuatorthismust access cover, door or panel that can cause serious bur Check has electrical beenbefore earthed in accordance with minutes the AHU is be switched off. Manual Actuator-assisted use ofoperation please carefully read and observe the if the heater - The components installed in accordance when touched. Electrical voltage Lifting and transpo operation local instructions. instructions in this document andassisted pay specialoperation attention to with national and local regulations. This indicates that there are been electrical components An instruction is at -Ensure no objects have left in the heater - The electric maypictogram onlythat be switched on if the the warnings that apply to this unit. Any modifications in heater The components that may have hot surfaces are the steam behind this access cover, door or panel that may be dangerous procedures that mu minimum specified air flow rate across the heater exists. 4.310.8. - Airthe filters Air Filters section. design and/or installation of the AHU that are carried humidifier, steam heater and the electric heater. If there a the be user/installer. personnel qualified in accordance The following chap - The electric heaterfor must switched offOnly at least 5 minutes out without discussion with Alarko Carrier and special special customer-specific components behind door with NEN 3140 is permitted to carry out work on these -The following warning pictograms are attached to before the AHU is switched off. without advance written agreement will result in the loss of - Check if the correct filters have been installed. -Check if the correct filters have been installed. This pictogram shows where that the AHU musthave be lifted and is 1.4 - Disposal covers ortohot panels that cover have hot surfaces and poseof a components. The is attached the surface. access - Ensure been leftpictogram in the access heater section. the panel: electrical voltage and to anyhave warranty claims and correctly. any claim for injury tono objects - Checkthe if right the filters beenpositioned installed on the support beam. warning for the electric heater control box. potential -correctly. The following are attached to therisk, this is also indicated by this pictogram. 4.4.3 -pictograms Steam heaters -Check if the filters have been installed personnel as a result of these modifications. - Absolute filters are supplied separately, to prevent - The packaging ma panel: electrical voltage and hot surface. contamination during and start-up. Insert the Lifting prohibited manner and in ac -Absolute filters aretransport supplied separately, tobyprevent Steam heaters have surface temperatures above 100ºC. Maintenance procedures may only be carried out absolute filters only after the unit has and been start-up. cleaned. Insert Components that contamination during transport Steam supply Rotating partsmust be checked by qualified personnel. Manual operationqualified personnel. operation - Set pressure switches orActuator-assisted used. described above. the absolute filters filter onlyindicators, after theif unit has been This pictogram indicates that there are rotating parts behind - Close Heating the inspection door. door or panel which may cause - this Theaccess steamcover, heater may only be switched on ifinjury. the The cleaned. and cooling elements are manufactured and 2 - TRANSPORT 4.3 - Air filters supplied in accordance with guidelines of the Pressure components that include parts are the fan and heat minimum specified airrotating flow rate exists across the heater. (PED). -Set Equipment pressureDirective switches or filter indicators, if used. If objects there arehave special customer-specific - recovery Ensure wheel. that no been left in the heater section. 2.1 - General - Check if the correct filters have been installed. components behind doors, access covers or panels that - 10.9.3. The steam heater must be switched off at least 5 minutes - Check if the filters been installed correctly. Removal of transport brackets -Close the inspection door. 1.2have - Applications Steam Heaters include rotating parts and pose a potential risk, this is also 4.4.3 - Steam heaters pictogram shows that no horizontal transport devices before the AHU is switched off. of the fan section. It Transport and liftin - Absolute filters are supplied separately, to This prevent This pictogram is located at the bottom indicated by this pictogram. must be placed under this frame section, such as pallet -Filter installation details shown in Appendix 2. contamination during transport and start-up. Insert the indicates that thewarning transportpictogram brackets must be removed The following is attached to during the panel:accordance with th The AHU is designed for lifters the movement and conditioning Steam haveItsurface temperatures above 100ºC. or the forks of fork heaters lift trucks. is also forbidden to have are not observed, i absolute filters only after the unit has been cleaned. Steam heaters surface temperatures above commissioning before the fan is started up. hot surface. of air, unless otherwise agreed during the design Steam supply must be checked bythis qualified personnel. lifting devices for stage. transport and storage under to the filter and application type number and people in the i - Set pressure-According switches or filter indicators, if place used. 100ºC. Steam supply must be checked by qualified frame element. 3. endangered. Alarko - Close the inspection door. of filters usual with listed in Appendix 1.3 - Instruction types - The steam heaterpersonnel. may . only be switched on if the responsibility if the Verwijder transportbeugels voor opstarten ventilator. minimum specified air flow rate exists across the heater. and lifting must be Remove transport brackets before starting up theon fan.if the -The steam heater be switched The following warning pictograms and labels- with textthat are no objects Ensure have been left in themay heateronly section. AHU must only be Retirer les fixations de transport avant démarrage. used. - The steam heaterminimum must be switched off at least minutes specified air5 flow rate exists across the Alarko Carrier. Lif before the AHU is switched off. heater. accordance with lo Lifting point - The following warning pictogram is attached to the panel: Hot surfaces certified lifting aid Central data hot surface. -Ensure that indicates nothe objects have left inbehind the heater This that arebeen components This pictogram label contains data forthere the AHU, such as order this access cover, number door oretc. panel that canthe cause burns section. 2.2 - Transport an number, position If present, labelserious is normally Figure 52. 4 when touched. located on the access cover or the door of the fan assembly. -The steam heater must be switched off at least Lifting 5 of the AHU 4.4 - HEATERS The components that may have is hotswitched surfaces areoff. the steam minutes before the AHU lifting points. Liftin humidifier, steam heater and the electric heater. If there are This applies to tran 4.4.1 - General -The warning pictogram attached specialfollowing special customer-specific componentsisbehind doors,to the on the cross beam This pictogram shows where the AHU must be lifted and is access covers or panels that have hot surfaces and pose a panel: hot surface. on the beam. potential risk, this is also indicated by this pictogram. - Checkpositioned connections in support accordance with the dimensional drawing. prohibited 10.9.Lifting Heaters - Check connections for leakage. 4.4 - HEATERS 10.9.1. General 4.4.1 - General -Check connections in accordance with the dimensional drawing. - Check connections in accordance with the dimensional drawing. - Check connections for leakage. 10 This pictogram shows that no horizontal transport devices must be placed under this frame section, such as pallet Opening the fan door This pictogram is positioned on the outside of the door or access cover of the fan assembly. This pictogram warns that the fan must have been switched off and deenergised for a minimum of two minutes before the door or access cover is opened. 24 10.10. Siphon It is advised to use siphon to have a constant water drain at all the outlets of the cooling coil, humidifier and other wet areas of the Air Handling Units. Siphon application is very important not to have air suction or leakage from these outlets and also draining the water without overflow which may move inside the unit. Fo the sizing of the siphon, static pressure of the location must be considered. For the positive and negative pressures it is mandotary to use different siphons (See Figure 53 and 54). Figure 55. Water drain direction marked with an arrow on the negative pressure siphon. Application types according to the pressure and siphon types are shown in Figure 56. PRESSURE Figure 53. - Negative pressure siphone R=(P/10) - 30 Figure 56. yaplmal. P [Pa] : Cihaz içi negatif basnç. (-) işareti kullanlmadan hesap R [mm] : Yoğuşma tavas boru çkşnda, borunun alt noktasndan zemine olan mesafe. Air Handling Unit base frame height can either be 62 mm. or 160 mm. There is no needyoktur. to make an extra Formülle bulunan R değerinin daha büyük olarak ayarlanmasnda herhangi bir saknca base for the AHUs with 160 mm. base frame. For 62 mm. base frames, a base shown in Figure 54 is necessary. The constructed base should be leveled and balanced For AHU with NPU profile concrete base requirement and height must be checked and AHU installation area must be prepared acoording to the above explanations. 10.11. Coolers -Check the connections in accordance with the dimensional drawing. Figure 54. - Positive pressure siphone -Control the connections for leaks. Before start up the unit fill, the positive pressure siphon with water. -Check drain trap. If Alarko Carrier standard siphon trap is used,check it has been correctly installed. Check if siphon cover and ball have been correctly installed. -Check if the droplet eliminator after the cooler has been correctly installed. Negative pressure siphon may only be applicable for negative drainage. Negative pressure siphon can be set up as in Figure 53. In Figure 55, parts and montage order of siphon are given. The ball inside the negative pressure siphon provides drained water fill the siphon by preventing air suction. -Check if fins have been bent during transport. Correctly straighten the fins. designed machine eration and ve the ttention to fications in are carried d n the loss of for injury to ut by d and Pressure onditioning n stage. with text are lifted and is port devices as pallet orbidden to under this Earthing 25 This pictogram indicates where the AHU must be earthed 1 - SAFETY CONSIDERATIONS Earthing and is on one of the support beams beneath the casing inThis pictogram indicates where the AHU must be earthed the 1.1 -section. General and is onDirect one of the supportHumidification beams beneath the casing in -If afan cooling coil is incorporated, after several days 10.14. Steam the fan section. -ofThe electrical components in the AHU must be earthed, cooling operation check the condensate drain and The 39HQ air handling units (AHUs) has been designed - The electrical components in the AHU must be earthed, except forof components with double insulation and/or operation the plastic siphon. If the necessary clean -Check the fixing of with the steam pipe. and/or and manufactured in accordance with CE machine except for components double insulation components with a supply voltage below 50 V. the siphon.EN292. directive In order to guarantee safe operation and components with a supply voltage below 50 V. drain pipes. -Check the steam supply and condensate - The components must in accordance useelectrical of the unit, please carefully readbe andinstalled observe the - The electrical components must be installed in accordance with nationalinand regulations. -For install an extra condensate pan in instructions this local document and pay special attention to withlonger nationalpipes and local regulations. 10.12. Heat Recovery Wheel the warnings that apply to this unit. Any modifications in accordance with the instructions of the supplier. the design and/or installation of the AHU that are carried -Check that the wheel is rotating in the correct direc- -Check if the pollution trap has been installed. out without discussion with Alarko Carrier and tion.This indicated byagreement an arrowwill onresult the in casing. withoutisadvance written the loss of -The condensate drain should not be without pressure the right to any warranty claims and any claim for injury to -Check if the wheel seals are fitting correctly. in accordance with the manufacturer’s instructions. personnel as a result of these modifications. Refer to the instructions of the supplier. -Check if belt tension is correct. Maintenance procedures may only be carried out by -If the AHU has negative pressure, install a special -Check if the motor and the rotation monitor have siphon qualified personnel. Rotating ahead parts of the condensate drain. been correctly connected. This pictogram indicates that there are rotating parts behind Rotating parts Heating and cooling elements are manufactured and -Before starting the which steam steam this access cover, door up or panel mayhumidifier cause injury. The -Check if the has been connected This pictogram indicateswith that therecorrectly are rotating parts behind supplied in controller accordance guidelines of the Pressure must be introduced slowly parts into are thethe system bring components that include rotating fan andto heat Directive andEquipment set incover, accordance instructions the The recovery wheel. If to there special customer-specific this access door(PED). or with panelthe which may causeofinjury. the humidifier thearecorrect operating temperature. components behind doors, access or panels that supplier. Once the condensate pipe covers has reached the operatcomponents that include rotating parts are the fan and heat 1.2 - Applications include rotating partsstart and pose potential risk, thiselectrically is also 1 - SAFETY CONSIDERATIONS Earthing ing temperature, the aactuator motor recovery wheel. If there are special customer-specific -Check if the rotor speed has been set correctly. indicated by this pictogram. This pictogram indicates where the AHU must be earthed components behind doors, covers panels that or pneumatically and set the desired humidity level. The is designed for theaccess movement andor conditioning 1.1 -AHU General and is on the support beams beneath the casing in Refer toone theofinstructions of the supplier. -Theof following warning pictogram is attached to include rotating parts and pose a potential risk, thisthe is also air, unless otherwise agreed during the design stage. the fan section. panel:rotating indicated by this pictogram. -A few days after starting upAHU the unit the sieve The 39HQ airparts. handling units (AHUs) has been designed - The electrical components in the mustclean be earthed, 1.3 Instruction types and -manufactured in accordance with the CE machine for components with check double insulation and/or drain. ofexcept the pollution trap and the condensate directive EN292. In order to guarantee safe operation and components voltage below 50the V. operation of For casingswith witha supply negative pressure Theof following pictograms withthe text are use the unit,warning please carefully readand andlabels observe - Thenegative electrical components must be must installed incontrolled accordancewith the pressure system be used. instructions in this document and pay special attention to with national and local regulations. the check valve. the warnings that apply to this unit. Any modifications in Lifting point the design and/or installation of the AHU that are carried out without discussion with Alarko Carrier and without advance written agreement will result in the loss of the right to any warranty claims and any claim for injury to 10.13. Plate Heat Exchanger personnel as a result of these modifications. Hot surfaces This pictogram indicates that there are components behind this access cover, door or panel that can cause serious burns when touched. Hot The components that may have hot surfaces are the steam Usedsurfaces if dampers are installed. be are carried out by ThisMaintenance pictogram procedures indicates may thatonly there components behind humidifier, steam heater and the electric heater. If there are -Check if the actuator beencause installed inburns qualified personnel. special special components behind doors, Rotating parts customer-specific this access cover, door ormotor panel has that can serious -The following warning pictogram is attached to the This pictogram shows where the AHU must be lifted and is accordance with the instructions of the supplier. access covers or panels that have hotare surfaces and pose a This pictogram indicates that there rotating parts behind when touched. panel:hot surface. positioned oncooling the support beam. Heating and elements are manufactured and potential risk, this is also indicated by this this access cover, door or panel which may pictogram. cause injury. The -Check if the correct angle has been supplied in accordance with guidelines of set. the Pressure components that include rotating parts are the fan and heat TheEquipment components that (PED). may have hot surfaces are the steamrecovery wheel. If there are special customer-specific Lifting prohibited Directive -Check if the dampers close correctly. humidifier, steam heater and the electric heater. If there are components behind doors, access covers or panels that 1.2 -special -Check ifApplications the damper can open tocomponents the correct behind position.doors, include rotating parts and pose a potential risk, this is also special customer-specific indicated by this pictogram. access covers or panels that have hot surfaces and pose a -Check operation afterforthe hasand been restored The AHU is designed thepower movement conditioning potential risk, this is also indicated by pictogram. of air, unless otherwise agreed during the this design stage. following a power cut. Some dampers must be open, others must be closed. 1.3 - Instruction types This ifpictogram noduring horizontal transport devices -Check fins haveshows beenthat bent transport. Correctly mustfollowing be the placed under this frame section, such with as pallet The warning pictograms and labels text are straighten fins. lifters or the forks of fork lift trucks. It is also forbidden to used. placeiflifting deviceshas for transport and storage under this -Check the siphon been correctly installed. Check frame element. Liftingcover point and ball have been correctly installed. if siphon This pictogram shows where the AHU must be lifted and is 4 positioned on the support beam. Lifting prohibited This pictogram shows that no horizontal transport devices must be placed under this frame section, such as pallet lifters or the forks of fork lift trucks. It is also forbidden to 10.15. Electrical Steam Humidification -Check the fixing of the steam generator. -Check the steam supply and condensate drain pipes. Hot surfaces -Thepictogram condensate drain not be without pressure This indicates thatshould there are components behind in accordance with instructions. this access cover, door or the panelmanufacturer’s that can cause serious burns when touched. Refer to the instructions of the supplier. -If the AHU has pressure, install a special The components thatnegative may have hot surfaces are the steam humidifier, steam heater the electric heater. siphon ahead of theand condensate drain.If there are special special customer-specific components behind doors, -Check theorvoltage and access covers panels that havemeasure hot surfacesthe andtotal pose acurrent potential draw. risk, this is also indicated by this pictogram. 1 - SAFETY CONSIDERATIONS - Connect the humidifier in accordance with the instructions of the supplier. - The following warning pictogram is attached to the panel: 1.1 - General 26 hot surface. Earthing - Check the direction of rotation of the impeller. The This pictogram where AHU must be earthed direction is indicatedindicates on the casing by anthe arrow. - Separately measure current drawbeams of the electric motor and is on one ofthethe support beneath the casing in forthe all fan phases. The current draw of all phases must be section. approximately the same and agree with the AHU data onmust the be earthed, - The electrical components in the name plate. Set the motor protection deviceand to theagree with the must be approximately the same except for components with double insulation and/or nominal value. data on the name plate. Set the motor protection The 39HQ air handling units (AHUs) has been designed 10.16. Water Humidifiers and manufactured in accordance with the CE machine directive EN292. In order to guarantee 10.16.1. Spray Humidifiers safe operation and use of the unit, please carefully read and observe the instructions in this document and pay special attention to Refer that to the instructions supplied by the supplier. the warnings apply to this unit. Any modifications in the design and/or installation of the AHU that are carried 4.10 - WATER HUMIDIFIERS 10.16.2. Infrasonic Humidifier out without discussion with Alarko Carrier and - Spray humidifier without4.10.1 advance written willfrom result the loss of -Carefully read theagreement instructions theinsupplier. The the right to any warranty claims andattention. any claim for injury to following need extra Refer to thepoints instructions supplied by the supplier. personnel as a result of these modifications. -Check if connection voltage agrees with the unit 4.10.2 - Infrasonic humidifier voltage. Maintenance procedures may only be carried out by - Carefully read the instructions from the supplier. The qualified personnel. -Connect the unit according to the diagram supplied. components with a supply voltage below 50 V. to the nominal value. -device The electrical components must be installed in accordance -The type, belt parts tension, number of Caution: The airfor flowthe maybelt cause stationary to move withdata national and local regulations. (even a fan that of is switched off)! belts, size and type pulley is indicated on a label attached to the fan housing. -Check thebelt flexible connection is correctly The data forifthe type, belt tension, number of belts,installed. size typecheck of pulley is indicated onswitch a label attached -Ifand used the pressure and setto the cortherect fan pressure. housing. Check if the flexible connection is correctly installed. If -Check used check theoperation pressure switch andmain set theswitch. correct the of the pressure. Caution: Whileofworking the Caution: fan the switch has to Check the operation the mainon switch. While Electrical voltage Rotating parts working on the fan the switch has to be locked open. be locked open. This pictogram indicates that there are electr following points need extra attention. - The warning pictograms on rotating This pictogram indicates that parts, thereelectrical are rotating parts behind --Check Check ifthat connection voltage agrees with the unit voltage. behind this access cover, door or panel that m -The warning pictograms on rotating parts, electricalthe drain isare correctly connected. voltage and opening to the door. Heating- Connect and cooling elements manufactured and this access cover,doors doorareorattached panel which mayThe cause injury. The the unit according to the diagram supplied. for the user/installer. Only personnel qualif label to remove the transport brackets is located on the voltage and opening doors are attached to the supplied in accordance with guidelines of the Pressure pipes. components that include rotating parts are the fandoor. and heat --Check Check that drain is correctly connected. thethe connections of the high-pressure floor oflabel the fan section. with NEN 3140 is permitted to carry out w The to remove the transport brackets located Equipment Directive (PED). -After Check the connections the high-pressure pipes. do After customer-specific starting the unitofensure that the pipes not rub recovery wheel. If there are special components. The pictogram is attached to t on the floor of the fan section. starting the unit ensure that the pipes do not rub against components behind doors, access covers or panels that against anything. for the electric heater control box. anything. 1.2 - Applications include rotating parts and pose a potential risk, this is also --Check Check ififthe jetsjets workwork correctly. thespray spray correctly. indicated by this pictogram. - Check the operation of the pressostats and the pressure. The AHU is designed for the movement and conditioning the operation of the pressostats and the --Check Check the water quality. of air, unless otherwise agreed during the design stage. pressure. 4.11 - Fan -Check thetypes water quality. 1.3 - Instruction ! Warning ! The following pictograms and labels with text are 10.17. warning Fan used. Lifting point Remove before transport Before opening doors, switch off and deenergise the fan, and ensure that it has stopped rotating. Removal of transport brackets (minimum !WARNING! of 2 minutes) This pictogram is located at the bottom of t Hot surfaces indicates that Before opening doors, switch offthe andtransport brackets must b This pictogram indicates that there are components behind commissioning deenergise the fan, and ensure that itbefore has the fan is started up. 4.12this - Sound attenuator access cover, door or panel that can cause serious burns stopped rotating (minimum of 2 minutes) when touched. - Check the splitters for damage. . Verwijder transportbeugels voor opstar components that may have hot surfaces are the steam 10.18. Sound Attenuator 4.13The - Lighting Remove transport brackets before star Figure 58. humidifier, steam heater and the electric heater. If there are Retirer les fixations de transport avant -Check the splitters for damage. - Check the special connection voltage. special customer-specific components behind doors, Check the operation of the switch. The must be and pose a This pictogram shows where the AHU must be lifted and is access covers or panels that haveswitch hot surfaces connected in accordance with local regulations. 10.19. Lighting positioned on the support beam. potential risk, this is also indicated by this pictogram. Central data - Remove the transport brackets. This is indicated by a label -Check the connection voltage. on the door. -Remove the transport brackets. This is indicated by This label contains the data for the AHU, su Lifting -prohibited fandoor. can move freely without obstructing the a Check label ifonthethe number etc. If present, the l -Check the operation of thenumber, switch.position The switch must frame, flexible connection or wiring. located on the access cover or the door of th -- IfCheck the connection voltage. fan-motor assembly is constructed with Al profiles; beconnected in accordance with local regulations. -remove Check and/or connect the motor in accordance with local the square nuts in Al profile channels, after instructions and the data of the supplier. dismantling Z brackets. -Check if the fan can move freely without obstructing the frame, flexible connection or wiring. This pictogram shows that no transport devicestho -Check the direction ofhorizontal the connection according must bethe placed under this frame section,turn suchthe as pallet pulley position. If required connection lifters or the forks of fork lift before connecting thetrucks. wiring.It is also forbidden to 12 place lifting devices for transport and storage under this -Check the connection voltage. frame element. -Check and/or connect the motor in accordance with local instructions and the data of the supplier. -Check the direction of rotation of the impeller. The direction is indicated on the casing by an arrow. -Separately measure the current draw of the electric motor for all phases. The current draw of all phases 4 Opening the fan door This pictogram is positioned on the outside access cover of the fan assembly. This pictog the fan must have been switched off and dee minimum of two minutes before the door o opened. ! WARNING! Before opening doors, switch off and d fan, and ensure that it has stopped (minimum of 2 minutes) 27 11. MAINTENANCE CHECKLIST 11.1. Checklist for Check Points and Maintenance Intervals The checklist contains a general overview of the planning that facilitates the inspections and maintenance of the AHU. On the following pages there is a more detailed description of the individual components. !WARNING! Remember to deenergise all components and to ensure that the fan has stopped rotating,before the doors and access covers are opened before inspections and maintenance take place. 28 29 12. MAINTENANCE AND OPERATING INSTRUCTIONS 12.1. General 12.6. Dampers The AHU(s) require little maintenance. The smooth inside and outside finish of the panels makes maintenance very simple. All damper hinges are equipped with plastic bearingbushings, so that no lubrication is required. Remove excess contamination by cleaning it with compressed air. Clean aluminium parts with water and a mild household soap solution. Check adjusting bolts and linkage and if necessary tighten. Ensure that the Earthingblades run free of the casing and do not touch damper Thisflexible pictogram indicates where the AHU must be earthed the connection. and is on one of the support beams beneath the casing in 12.7. Outside Air Intake the fan section. - The electrical the AHU must be earthed, Especially thecomponents outside air inintake is contaminated for components with insulation and/or byexcept pollution taken in with thedouble air. The maintenance components with a supply as voltage below 50 V. interval must be observed, irreparable damage of - The electrical components beClean installed accordance the panels might otherwise must occur. thein outside with national regulations. air intake well and andlocal repair damage as described in point 10.2.1. For dry sections: once a year thoroughly check the insideand outside of the AHU casing. For maintenance of wet CONSIDERATIONS sections (coolers and humidifiers) please refer 1 - SAFETY to the airhandling section concerned. 1.1 - General 12.2. Casing Panels The 39HQ air handling units (AHUs) has been designed 12.2.1. Inside Installation and manufactured in accordance with the CE machine directive EN292. In order to guarantee safe operation and a) Internal inspection theand casing of double-skin use of the unit, please carefullyofread observe the panel sand of all dry parts. instructions in this document and pay special attention to the warnings that apply to this unit. Any modifications in Remove contamination with water and a mild housethe design installation of the AHU that arepaint carried holdand/or soap solution. Where damage of the finish out without discussionif with Alarkoremove Carrier rust and and touch up has occurred, necessary withoutwith advance agreement willprimer result in thepaint. loss of good written quality anti-corrosive and The the right to anyair warranty claims and claim forofinjury to outside intake sections canany show signs corrosion personnel as a result of these modifications. as they contain wet parts and are affected by mist, rain and air pollutants. Maintenance procedures may only be carried out by b) personnel. Outside inspection of the coating. qualified If damage to the paint treatment has occurred, remove Heatingthe and cooling elements and are manufactured and quality rust (if necessary), touch up with good supplied in accordance with guidelines anti-corrosive primer and paint.of the Pressure Equipment Directive (PED). 12.2.2. Outside Installation 1.2 - Applications Check the sealed joints ofAHUs installed outside and if required seal again with a UV-resistant and paintThe AHU designeddamage for the movement andinstallation. conditioning ableiskit.Treat as for inside of air, unless otherwise agreed during the design stage. 12.3. Doors and Access Covers 12.8. Filters The filters must be inspected once a month for excess pollution, pressure loss, damage and seating of the slide-in filters or built-in frames. With slide-in filters ensure that the filters have been correctly positioned and have been pushed well against each other from Rotating partsreplacing built-in filters you must ensure below. When This pictogram indicates that there rotating that the filter has been pushed wellare against theparts seal-behind this access cover, door or panel which may cause injury. The ant and that the clips have been correctly installed. components that include rotating parts are the fan and heat Filters must be replaced at the required intervals. recovery wheel. If there are special customer-specific The timing of the replacement depends on the type components behind access of covers or panels that of filter, quality anddoors, the degree contamination of include rotating parts and pose a potential risk, this is also the air. The pressure loss across the contaminated indicated pictogram. filter can by bethis measured with a pressure differential gauge. Maintenance instructions of special filters are available on request. 1.3 - Instruction types 12.9. Heaters Check locks and hinges ofall doors and access covThe following labels text are ers. Forwarning outsidepictograms installationand check thewith storm cord. used. 12.9.1. Water, Glycol and Steam Heat Exchangers 12.4. Flexible Connections Lifting point Check the flexible connections for damage. 12.5. Earthing Ensure that the unit is earthed and installed in the correct manner. This pictogram shows where the AHU must be lifted and is positioned on the support beam. Lifting prohibited This pictogram shows that no horizontal transport devices must be placed under this frame section, such as pallet Check the air intake once a year for contamination, and if necessary clean with compressed air against Hot direction surfaces of the air flow or clean the air intake the This pictogram there components behind with a vacuum indicates cleaner. that Check forare leakage. Check this operation access cover, or panel that can cause serious the of door the frost protection thermostat and burns when touched. check the correct control sequence when the themostat trips. Glycol-charged heat exchangers must Thechecked components that may hot surfaces are the of steam be annually for have the actual percentage humidifier, heater and the electric heater. If there are glycol in thesteam water. The following warning pictogram special special customer-specific components behind doors, is located on the panel of the steam heat exchanger: access covers or panels that have hot surfaces and pose a hot surface. potential risk, this is also indicated by this pictogram. text are 30 1 - SAFETY CONSIDERATIONS Earthing This pictogram indicates where the AHU must be earthed Hot surfaces 1.1 - General and is on one of the Exchanger support beams beneath the casing in This pictogram that there are components behind 12.9.2. Electricindicates Heaters 12.12. Plate Heat the fan section. this access cover, door or panel that can cause serious burns The 39HQ handling units (AHUs) hasvoltage been designed - The electrical components in the AHU must be earthed, whenair touched. Electrical Lifting and transport Check onceina accordance year for contamination, and if neces- Check the plate heat exchanger once a year for conand manufactured with the CE machine except for components with double insulation This pictogram indicates that there are electrical components An instruction isand/or attached to the AHU t sary clean with compressed air. Check the connectamination and if necessary clean with compressed directive EN292. In order to may guarantee safeaccess operation components with a supply voltage below 50 The components that have this hot surfaces areand the steam cover, door or panel that may dangerous procedures thatV.must be followed for lift tions in the control box.behind Check the operation of the air against thebe direction of the air flow. If dampers are use of the unit, please carefully read and observe the The electrical components must be installed in accordance humidifier, steam heater for andthe theuser/installer. electric heater. If there are Only personnel qualified in accordance The following chapter contains further d thermostat. used, follow the instructions in section 10.6. instructions this document and pay special attention to doors, without national and local regulations. specialinspecial customer-specific components behind with NEN 3140 is permitted to carry work on these that apply to thispictograms unit. Anyhot modifications inpose The following warning are located on theis aattached Check condensate andofclean ted andthe is warnings access covers or panels that have surfaces and 1.4 - Disposal parts/materials components. The pictogram to the access pan coverfor contamination the design and/or installation of the AHU that are carried panel:electrical voltage and hot surface. if necessary. potential risk, this is alsofor indicated by this pictogram. the electric heater control box. out without discussion with Alarko Carrier and 12.13. Water Humidification- The packaging material must be dispose without advance written agreement will result in the loss of manner and in accordance with local r the right to any warranty claims and any claim for injury to 12.13.1. Steam Humidifier - Components that are replaced, must be personnel as a result of these modifications. described above. Clean the pollutant trap in the steam supply of the control valve once a year. If a pollutant trap is installed, Maintenance procedures may only be carried out by 2 - TRANSPORT AND LIFTING INST clean theparts condensate drain valve and the inside of qualified personnel. Rotating the pan at the same time.rotating parts behind 12.10. Coolers Thiscondensate pictogram indicates that there 2.1 -are General Heating and cooling elements are manufactured and this access cover, doorvalve, or panel which may cause Inspect the control condensate draininjury. and The Removal of transport brackets Check once a year forguidelines contamination if necessary components that include rotating supplied in accordance with of theand Pressure t devices parts are the fan and Transport lifting of heat the AHU must distribution a year. steamand distribution This pictogram is located at the bottom of thebox fantwice section. It With cleanDirective with compressed (PED). air against the direction of the pipes allet Equipment recovery wheel. If there are special customer-specific accordance with the instructions below. in be negative pressure systems (air-side) there indicates that the transport brackets must removed during air flow or clean with a vacuum cleaner. The elimina- components behind doors, access bidden to covers or panelsirreparable that arethe notcondensate observed, damage m may beup. excess water present, as may commissioning before the fan tor assembly after the cooler is removable. Check foris started er this 1.2 - Applications include rotating parts and pose a potential risk, this is also vicinity of and people thesome immediate not drain from the steam distribution pipe.inFor leakage. Check the fins of the droplet eliminator after indicated by this pictogram. endangered. Alarko Carrier does not acc brands a special siphon with a check valve is supplied. the is coil. Cleanfor thethe siphon its operation. The AHU designed movement and conditioning . and check responsibility if these instructions are not Check the operation of this valve twice a year. Verwijder transportbeugels voor opstarten ventilator. Checkotherwise the condensate pan for of air, unless agreed during thecontamination design stage. and and lifting must be carried out by qualif Remove transport brackets before starting up the fan. At the periodical checks of the steam humidifier the clean if necessary. AHU must only be lifted with lifting ba Retirer les fixations de transport avant démarrage. casing sections after the humidifier facilitate the 1.3 - Instruction types Alarko Carrier. Lifting must be carried 12.11. Heat Recovery Wheel checking of the humidification level. Viewed in the accordance with local regulations and w Earthingwarning pictograms and labels with text are direction of the air flow there should not be any The following certified lifting aids. Central data Check the rotor once a year for contamination, and if used. This pictogram indicates where the AHU must be earthedsteam plume at the end of the steam humidification This label contains the data for the AHU, such as order necessary clean with compressed air. Check the rotor and is on one of the support beams beneath the casing insection. 2.2 - Transport and storage number, positiondata. number etc. If present, the label is normally speed compare it with the design fan and section. Liftingthe point The electric humidifier capacity is strongly affected by Hot surfaces located on the access cover or the door of the fan assembly. signed -Check The electrical components in the AHU mustDependbe earthed, the operation of the rotation monitor. contamination the steam and the electrodes. Lifting the AHU is only permitted u This pictogramof indicates thatboiler there are of components behind hine except for components with double insulation ing on the rotor material the wheel can absorband/or mois- This is indicated on the LED.lifting If necessary replace points. Lifting under this access cover, door or panel that can cause serious burnsthe cross be ion and components with a supply voltage 50 V. ture. When stationary the wheel willbelow become moist on steam boiler. This applies to transport as well as stora when touched. he -one Theside electrical components installed accordance and thus heavier.must The be rotor speedincan be on the cross beam with the following lab further operation and maintenance details on the ntion to with national and local regulations. set to intermittent in the controller so that the wheel For The components that may have hot surfaces are the steam steam humidifier refer to the documentation provided tions in will rotate “x”times per time unit. humidifier, steam heater and the electric heater. If there are by the supplier. e carried The rotor bearings are lubricated for life and do not special special customer-specific components behind doors, This pictogram shows where the be is lifted and is The following warning located onpose the a access covers or panels pictograms that have hotare surfaces and require maintenance. TheAHU drivemust motor accessible he loss of positioned on the support beam. panel:hot surface. potential risk, this is also indicated by this pictogram. via an inspection cover. injury to Opening the fan door V-belt is automatically tensionedisby a spring-on the outside of the door or LiftingThe prohibited This pictogram positioned loaded rocking base onaccess whichcover the motor is installed. of the fan assembly. This pictogram warns that by New belts expand a lot in the beginning. Check after off and deenergised for a the fan must have been switched Rotating two daysparts if the belt still has enough tension. After this the door or access cover is minimum of two minutes before This pictogram indicatesweekly that there are rotating parts behind check the belt tension during the first month opened. nd this cover, itdoor which may cause injury. The and access then check onceorapanel month. sure components that include rotating parts are the fan and heat For further operation and maintenance details on the recovery wheel. If there are special customer-specific 12.13.2. Spray Humidifier heat recovery wheel/controller refer to the documenta! WARNING! components behind doors, access covers or panels that This pictogram shows that no horizontal transport devices tion provided by the supplier. The opening followingdoors, warning Before switchFor off maintenance and deenergise the on the spray humidifier refer details include parts and section, pose a potential risk, this is also must be placedrotating under this frame such asensure pallet pictogram is located on the panel:rotating parts. fan, and that it has stopped rotating. the documentation provided by the supplier. indicated byofthis pictogram. lifters or the forks fork lift trucks. It is also forbidden to of 2tominutes) (minimum itioningplace lifting devices for transport and storage under this age. frame element. text are Caution: All doors and access covers must be closed before starting up the AHU. Hot surfaces This pictogram indicates that there are components behind 31 12.13.3. Infrasonic Humidifier -First carefully read the instructions from the supplier. The following points require extra attention. -Check the connections of the high-pressure pipes. -Ensure that the pipes do not rub against anything. -Check if the spray banks work well. -Check the operation of the pressostats and the pressure. -Check the water quality. -Check the contamination of the rinse filter. -Check the operating pressure weekly. Higher pres1 - SAFETY CONSIDERATIONS sure indicates an increase in contamination. 1.1 - General 12.14. Fan The 39HQ air handling units (AHUs) has been designed 12.14.1. General and manufactured in accordance with the CE machine -Caution: air flow may cause directive EN292. The In order to guarantee safestationary operationparts and to move (even a fan that isread switched off)! the use of the unit, please carefully and observe instructions in this document and attention to to -Caution: While working onpay thespecial fan, the switch has the warnings that apply to this unit. Any modifications in be locked open. the design and/or installation of the AHU that are carried -The discussion data for the beltAlarko type, Carrier belt tension, out without with and number ofsizewritten and type of pulley is result indicated onloss a label withoutbelts, advance agreement will in the of attached to the fanclaims housing. the right to any warranty and any claim for injury to personnel as a result of these modifications. 12.14.2. Bearings Maintenance procedures may only be carried out by The bearings of the smaller fan types cannot be lubriqualified personnel. cated. If the larger fans are of the relubricated type, should be lubricated every six and months. For Heatingthen andthey cooling elements are manufactured higher temperatures increased contamination the supplied in accordance with and guidelines of the Pressure lubrication interval should be adjusted as required. Equipment Directive (PED). The standard lubricant is Shell Alvania R3. For higher temperatures and a higher degree of humidity use a 1.2 - Applications lubricant recommended by the supplier. The AHU designedmotors for theare movement andwith conditioning Theiselectric equipped roller bearof air, unless otherwise agreed during the design stage. are ings. Depending on the motor size the bearings The CORRECT BELT TENSION depends on: -the belt type; -power to be transmitted; -belt velocity. The belt tension is calculated for each transmission. If the belt tension is too high this can result in bearing wear and vibration, if it is too low this can result in belt slippage and belt wear. Sequence for installation of new belts: -Ensure that the pulleys are correctly aligned. If necessary re-align. Earthing This pictogram indicates where the AHU must be earthed -Position all belts loosely on the pulleys, do not pulland is on one of the support beams beneath the casing in tensioned belts over the pulleys. the fan section. the belts and check tension a --Tension The electrical components in thethe AHU must bewith earthed, SonicTension Meter. with double insulation and/or except for components components a supply voltage below 50 V. -Re-check thewith alignment. - The electrical components must be installed in accordance Ifwith the fan speed changes or if a motor with different national and local regulations. power specifications and/or speed is installed, the manufacturer must be informed. The supplier must re-calculate the bearing load as well as the impeller load. If this is not done, irreparable damage to the fan may incur. The supplier does not accept any responsibility for modifications that have not been approved. See chapter 1.1. Rotating parts Electrical voltage This pictogram indicates that there are rotating parts behind This pictogram that thereThe are electrica this access cover, door or panel which indicates may cause injury. behind this access cover, door or panel components that include rotating parts are the fan and heat that ma user/installer. Only personnel qualified recovery wheel. If therefor arethe special customer-specific with NEN 3140 is permitted to carry out wor -The warning pictograms indicating parts, components behind doors, access coversrotating or panels that components. The pictogram is to th electrical voltage andand opening doors are attached include rotating parts pose aofpotential risk, this isattached also for the electric heater control box. to the door. indicated by this pictogram. lubricated for life or are equipped with a grease nip1.3 - Instruction types interval and type of lubricant are ple. The lubrication as above. The following warning pictograms and labels with text are used. 12.14.3. Transmission Lifting point After starting up the unit, but also after replacing the belts the belt tension has to be checked within one week and then after two weeks and further tensioned if required. After that check the belt tension and inspect the condition of the belts every three months. This pictogram shows where the AHU must be lifted and is positioned on the support beam. Lifting prohibited 12.15. Sound Attenuator Removal of transport brackets Hot surfaces Under normal conditions the sound dampers are This pictogram iscomponents located at the bottom of the This pictogram indicates that thereitare behind maintenance-free. Nevertheless is recommended indicates that can the transport brackets must be r this access cover, door or panel that cause serious burns to check the attenuators once a year for possible commissioning before the fan is started up. when touched. damage and loose fibres, in order to prevent further contamination of the system. The components that may surfaces are the steam . have hottransportbeugels voor humidifier, steam heaterVerwijder and the electric heater. If there areopstarte Remove components transport brackets before startin special special customer-specific behind doors, Retirer access covers or panels that haveles hotfixations surfaces de andtransport pose a avant d potential risk, this is also indicated by this pictogram. Central data This label contains the data for the AHU, suc number, position number etc. If present, the lab located on the access cover or the door of the CELL NO: 1 HÜCRE 1 1 1 2 CELL NO: 2 HÜCRE 1 2 MH......... 2 Agirlik / Weight (kg): ........ Hücre No / Cell No: 1 Hücre No / Cell No: Agirlik / Weight (kg): ........ Sip. No / Order No: MH......... Sip. No / Order No: 3 2 3 CELL NO: 3 HÜCRE 2 3 MH......... Agirlik / Weight (kg): ........ Hücre No / Cell No: Sip. No / Order No: 3 3 4 MH......... CELL NO: 4 HÜCRE Agirlik / Weight (kg): ........ Hücre No / Cell No: Sip. No / Order No: 32 APPENDIX-1 33 APPENDIX-2 FRONT WITHDRAWAL FILTERS INSTALLATION ÖNDEN SÜRMELI FILTRE DETAYI DETAIL PANEL FILTERB=48mm KASET FILTRE BAG FILTER TORBA FILTRE BAG + PANELFILTRE FILTER TORBA+KASET (WHEN PRESSURE DIFFERENCE (FILTRE BASINÇ FARKI ÖLÇÜMÜ YAPILDIGINDA) MEASUREMENT REQUIRED) BAG + PANEL FILTER TORBA+KASET FILTRE Note: (*) located area and distance needed for BAG FILTER Not: (*) measurement ile gösterilen yerde ve mesafede ölçüm noktasi için point bosluk birakilacak. PANEL FILTER KASET FILTRE B=95mm Insulation SizdirmazlikBand Banti 6x20 (2 adet) 34 FRONT WITHDRAWAL DETAIL ÖNDEN SÜRMELIFILTERS TORBA INSTALLATION FILTRE MONTAJ VIEW ÜSTTOP GÖRÜNÜS DOOR KAPI PANEL PVC PVC BAND BANT 6x15 6x15 PVC PVC BAND BANT 6x15 6x15 PVC PVC BAND BANT 6x15 6x15 DETAIL DETAYA A DETAIL DETAYBB DETAIL C C DETAY PVC PVC BAND BANT 6x15 6x15 FILTER SPRING FILTREHOLDING TUTUCU YAY DETAIL DETAYDD DETAIL EE DETAY 35 COMBINED SIDE WITHDRAWAL FILTER MONTAGE 36 F8 – F9 SIDE WITHDRAWAL FILTER MONTAGE 37 F7 SIDE WITHDRAWAL FILTER MONTAGE 10 10 10 10 10 11 11 11 11 11 39HQ 39HQ 39HQ 39HQ 39HQ 39HQ 39HQ 39HQ 39HQ 39HQ 14 14 14 14 39HQ 39HQ 39HQ 39HQ 15 15 15 15 16 16 16 16 16 39HQ 39HQ 39HQ 39HQ 39HQ 39HQ 39HQ 39HQ 39HQ 15 14 39HQ 39HQ 13 39HQ 14 13 39HQ 15 13 39HQ 39HQ 13 39HQ 39HQ 13 13 39HQ 39HQ 12 09 39HQ 39HQ 09 39HQ 12 09 39HQ 12 09 39HQ 39HQ 09 39HQ 39HQ 08 39HQ 12 08 39HQ 12 08 39HQ 12 08 39HQ 39HQ 07 39HQ 39HQ 07 39HQ 39HQ 07 39HQ 06 39HQ 06 05 39HQ 06 05 39HQ 06 05 39HQ 39HQ 04 39HQ 39HQ 04 39HQ 39HQ 04 W 14 12 10 08 06 16 14 12 10 08 06 16 14 12 10 08 06 16 14 12 10 08 06 14 12 10 08 06 04 12 10 08 06 04 12 10 08 06 04 12 10 08 06 04 10 08 06 04 08 06 04 08 06 04 02 06 04 02 06 04 02 H MODUL MODÜL 39HQ W: Weight H: Height - - - - - - - - - - - - 1 - 1 - 1 - - - - - - - - - - - - - - - - - - 1 - 1 - - - - - - - - - - - - - - 1 - 1 1 - - - - - 287x287 - - - - - - 1 - 1 - 1 - - - - - - - - - - - - - - - - - - - 1 - 1 - - - - - - - - - - - - - - - - 1 - - - - - 1 - - - - - - - - - - 4 3 3 2 2 1 - - - - - - 4 3 3 2 2 1 - - - - - - 3 2 2 1 1 - - - - - 3 2 2 1 1 - - - - 2 1 1 - - - - 1 1 - - - - 437x592 4 - 4 - 4 - 3 - 3 - 3 4 6 3 5 2 4 4 5 3 4 2 3 3 - 3 - 3 - - 2 - 2 - 3 4 2 3 1 3 3 2 2 1 2 - 2 - - 1 - 2 2 1 1 1 1 1 1 - 1 592x287 PANEL PANELFILTER FİLTRE 437x287 12 12 8 8 4 12 9 9 6 6 3 12 9 9 6 6 3 8 6 6 4 4 2 9 9 6 6 3 3 6 4 4 2 2 6 4 4 2 2 3 2 2 1 1 4 4 2 2 2 1 1 2 1 1 - - - - 1 1 - 592x592 - - - - - - - - - - - - 1 - 1 - 1 - - - - - - - - - - - - - - - - - - 1 - 1 - - - - - - - - - - - - - - 1 - 1 1 - - - - - 287x287 - - - - - - - - - - - 4 3 3 2 2 1 4 3 3 2 2 1 - - - - - - - - - - - 3 2 2 1 1 3 2 2 1 1 - - - - - - - 2 1 1 - 1 1 - - - - 287x592 - - - - - - 1 - 1 - 1 - - - - - - - - - - - - - - - - - - - 1 - 1 - - - - - - - - - - - - - - - - 1 - - - - - 1 - - - - - - - - - - 4 3 3 2 2 1 - - - - - 4 3 3 2 2 1 - - - - - - 3 2 2 1 1 - - - - - 3 2 2 1 1 - - - - 2 1 1 - - - - 1 1 - - - - 437x592 BAG FILTER TORBA FİLTRE 437x287 4 - 4 - 4 - 3 - 3 - 3 - 3 - 3 - 3 - 2 - 2 - 2 3 - 3 - 3 - - 2 - 2 - - 2 - 2 - - 1 - 1 - 2 - 2 - - 1 - - 1 - 1 - - 1 1 - 1 592x287 12 12 8 8 4 12 9 9 6 6 3 12 9 9 6 6 3 8 6 6 4 4 2 9 9 6 6 3 3 6 4 4 2 2 6 4 4 2 2 3 2 2 1 1 4 4 2 2 2 1 1 2 1 1 - - - - 1 1 - 592x592 39HQ 39HQ 39HQ 39HQ 39HQ 39HQ 39HQ 39HQ 39HQ 39HQ 39HQ 39HQ 39HQ 39HQ 39HQ 39HQ 39HQ 39HQ 39HQ 39HQ 39HQ 39HQ 39HQ 39HQ 39HQ 39HQ 39HQ 39HQ 39HQ 39HQ 39HQ 39HQ 39HQ 39HQ 39HQ 39HQ 39HQ 39HQ 39HQ 39HQ 39HQ 39HQ 39HQ 39HQ 39HQ 39HQ 39HQ 39HQ 39HQ 39HQ 39HQ 39HQ 39HQ 39HQ 39HQ 39HQ 39HQ 39HQ 39HQ 39HQ 39HQ 25 25 25 25 25 25 24 24 24 24 24 24 24 23 23 23 23 23 23 23 22 22 22 22 22 22 22 21 21 21 21 21 21 21 20 20 20 20 20 20 20 19 19 19 19 19 19 18 18 18 18 18 18 18 17 17 17 17 17 17 16 W 20 18 16 14 12 10 20 18 16 14 12 10 08 20 18 16 14 12 10 08 20 18 16 14 12 10 08 20 18 16 14 12 10 08 20 18 16 14 12 10 08 18 16 14 12 10 08 18 16 14 12 10 08 06 16 14 12 10 08 06 16 H MODUL MODÜL - - - - - - - - - - - - - - - - - - - - - 1 - 1 - 1 - - - - - - - - - - - - - - - - - - - - - 1 - 1 - 1 - 1 - - - - - - - 287x287 - - - - - - - - - - - - - - 1 - 1 - 1 - - - - - - - - - - - - - - - - - - - - - - 1 - 1 - 1 - - - - - - - - - - - - - - - 5 4 4 3 3 2 - - - - - - - 5 4 4 3 3 2 2 - - - - - - - 5 4 4 3 3 2 2 - - - - - - - 4 4 3 3 2 2 - - - - - - - 4 3 3 2 2 1 - 437x592 5 9 4 8 3 7 - 6 - 6 - 6 - - 5 - 5 - 5 - 5 9 4 8 3 7 2 5 8 4 7 3 6 2 - 5 - 5 - 5 - 4 - 4 - 4 - 8 4 7 3 6 2 5 4 6 3 5 2 4 - 592x287 PANEL PANELFILTER FİLTRE 437x287 25 20 20 15 15 10 30 24 24 18 18 12 12 25 20 20 15 15 10 10 25 20 20 15 15 10 10 20 16 16 12 12 8 8 25 20 20 15 15 10 10 16 16 12 12 8 8 16 16 12 12 8 8 4 12 9 9 6 6 3 16 592x592 - - - - - - - - - - - - - - - - - - - - - 1 - 1 - 1 - - - - - - - - - - - - - - - - - - - - - 1 - 1 - 1 - 1 - - - - - - - 287x287 5 4 4 3 3 2 - - - - - - - - - - - - - - 5 4 4 3 3 2 2 5 4 4 3 3 2 2 - - - - - - - - - - - - - 4 4 3 3 2 2 1 4 3 3 2 2 1 - 287x592 - - - - - - - - - - - - - - 1 - 1 - 1 - - - - - - - - - - - - - - - - - - - - - - 1 - 1 - 1 - - - - - - - - - - - - - - - 5 4 4 3 3 2 - - - - - - - 5 4 4 3 3 2 2 - - - - - - - 5 4 4 3 3 2 2 - - - - - - - 4 4 3 3 2 2 - - - - - - - 4 3 3 2 2 1 - 437x592 BAG FILTER TORBA FİLTRE 437x287 - 5 - 5 - 5 - 6 - 6 - 6 - - 5 - 5 - 5 - - 5 - 5 - 5 - - 4 - 4 - 4 - - 5 - 5 - 5 - 4 - 4 - 4 - 4 - 4 - 4 - 4 - 3 - 3 - 3 - 592x287 25 20 20 15 15 10 30 24 24 18 18 12 12 25 20 20 15 15 10 10 25 20 20 15 15 10 10 20 16 16 12 12 8 8 25 20 20 15 15 10 10 16 16 12 12 8 8 16 16 12 12 8 8 4 12 9 9 6 6 3 16 592x592 38 APPENDIX-3/1 Side Withdrawal Filter BOYUT ve ADETLERİ FILTER FİLTRE DIMENSION and QUANTITIES 6 6 6 6 7 7 7 8 8 8 8 9 9 9 9 39HQ 39HQ 39HQ 39HQ 39HQ 39HQ 39HQ 39HQ 39HQ 39HQ 39HQ 39HQ 39HQ 39HQ 39HQ 10 10 10 11 11 11 11 11 12 12 12 12 12 12 13 13 13 13 13 13 14 14 14 14 14 14 15 15 15 15 15 15 16 16 16 16 16 39HQ 39HQ 39HQ 39HQ 39HQ 39HQ 39HQ 39HQ 39HQ 39HQ 39HQ 39HQ 39HQ 39HQ 39HQ 39HQ 39HQ 39HQ 39HQ 39HQ 39HQ 39HQ 39HQ 39HQ 39HQ 39HQ 39HQ 39HQ 39HQ 39HQ 39HQ 39HQ 39HQ 39HQ 39HQ 39HQ 39HQ 10 5 39HQ 39HQ 5 39HQ 9 5 39HQ 10 4 39HQ 39HQ 4 39HQ 39HQ 4 39HQ 14 12 10 8 6 16 14 12 10 8 6 16 14 12 2 - - 1 - - - - - - - - - - - - - - 1 - - - - 1 2 - - - - - 2 - 2 - - - 3 - - - - - 3 - - - - - - - - - - - - 3 - - - - - - 1 1 - - - - - - - - 2 2 - - - - - - - - 3 - - - - - - - - - - - 3 - - - - - - - 1 - - 1 1 - - - - - - 2 - 2 - - - - - 2 - - - - - 4 3 3 2 2 1 8 6 6 4 4 2 12 9 9 6 6 3 - - - - - - 3 2 2 1 1 6 4 4 2 2 9 6 6 3 3 - - - - 2 1 1 4 2 2 - 1 1 - - - - 437x592 4 - 4 - 4 - 3 - 3 - 3 - 2 - 2 - 2 - 1 - 1 - 1 3 - 3 - 3 - - 2 - 2 - - 1 - 1 - - - - - - 2 - 2 - - 1 - - - - - 1 1 1 2 2 - 597x292 PANEL PANELFILTER FİLTRE 450x300 292x292 12 12 8 8 4 12 9 9 6 6 3 8 6 6 4 4 2 4 3 3 2 2 1 9 9 6 6 3 3 6 4 4 2 2 3 2 2 1 1 - - - - - 4 4 2 2 2 1 1 - - - - - - - - - - 592x592 - - - - - - - - - - - - - - - - - - - - - - - - - - - - - - - - - - - - - - - - - - - - - - - - - - - - - - - - - - - - - 287x287 - - - - - - - - - - - - - - - - - - - - - - - - - - - - - - - - - - - - - - - - - - - - - - - - - - - - - - - 1 1 - 2 2 - 287x592 - - - - - - 1 - 1 - 1 - 2 - 2 - 2 - 3 - 3 - 3 - - - - - - - 1 - 1 - - 2 - 2 - - 3 - 3 - - - - - - 1 - - 2 - 2 1 - - - - - - - - - - 4 3 3 2 2 1 8 6 6 4 4 2 12 9 9 6 6 3 - - - - - - 3 2 2 1 1 6 4 4 2 2 9 6 6 3 3 - - - - 2 1 1 4 2 2 - 1 1 - - - - 437x592 BAG FILTER TORBA FİLTRE 437x287 4 - 4 - 4 - 3 - 3 - 3 - 2 - 2 - 2 - 1 - 1 - 1 3 - 3 - 3 - - 2 - 2 - - 1 - 1 - - - - - - 2 - 2 - - 1 - - - - - - - 1 - - - 592x287 12 12 8 8 4 12 9 9 6 6 3 8 6 6 4 4 2 4 3 3 2 2 1 9 9 6 6 3 3 6 4 4 2 2 3 2 2 1 1 - - - - - 4 4 2 2 2 1 1 - - - - - - - - - - 592x592 39HQ 39HQ 39HQ 39HQ 39HQ 39HQ 39HQ 39HQ 39HQ 39HQ 39HQ 39HQ 39HQ 39HQ 39HQ 39HQ 39HQ 39HQ 39HQ 39HQ 39HQ 39HQ 39HQ 39HQ 39HQ 39HQ 39HQ 39HQ 39HQ 39HQ 39HQ 39HQ 39HQ 39HQ 39HQ 39HQ 39HQ 39HQ 39HQ 39HQ 39HQ 39HQ 39HQ 39HQ 39HQ 39HQ 39HQ 39HQ 39HQ 39HQ 39HQ 39HQ 39HQ 39HQ 39HQ 39HQ 39HQ 39HQ 39HQ 39HQ 39HQ 25 25 25 25 25 25 24 24 24 24 24 24 24 23 23 23 23 23 23 23 22 22 22 22 22 22 22 21 21 21 21 21 21 21 20 20 20 20 20 20 20 19 19 19 19 19 19 18 18 18 18 18 18 18 17 17 17 17 17 17 16 W 20 18 16 14 12 10 20 18 16 14 12 10 8 20 18 16 14 12 10 8 20 18 16 14 12 10 8 20 18 16 14 12 10 8 20 18 16 14 12 10 8 18 16 14 12 10 8 18 16 14 12 10 8 6 16 14 12 10 8 6 16 H MODUL MODÜL - - - - - - - - - - - - - - - - - - - - - - - - - - - - - - - - - - - 3 - 3 - 3 - - - - - - - - 1 - 1 - 1 - - 2 - 2 - 2 - - 3 - 3 - 3 - - - - - - - - - - 1 - 1 - 1 - 2 - 2 - 2 - 2 - 3 - 3 - 3 - 15 12 12 9 9 6 - - - - - - - 5 4 4 3 3 2 2 10 8 8 6 6 4 4 15 12 12 9 9 6 6 - - - - - - - 4 4 3 3 2 2 8 8 6 6 4 4 2 12 9 9 6 6 3 - 437x592 - 4 - 4 - 4 - 6 - 6 - 6 - - 5 - 5 - 5 - - 4 - 4 - 4 - - 3 - 3 - 3 - - 5 - 5 - 5 - 4 - 4 - 4 - 3 - 3 - 3 - 3 - 2 - 2 - 2 - 597x292 PANEL PANEL FILTERFİLTRE 450x300 - - - - - - - - - - - - - - - - - - - - - - - - 292x292 20 16 16 12 12 8 30 24 24 18 18 12 12 25 20 20 15 15 10 10 20 16 16 12 12 8 8 15 12 12 9 9 6 6 25 20 20 15 15 10 10 16 16 12 12 8 8 12 12 9 9 6 6 3 8 6 6 4 4 2 16 592x592 - - - - - - - - - - - - - - - - - - - - - - - - - - - - - - - - - - - - - - - - - - - - - - - - - - - - - - - - - - - - - 287x287 - - - - - - - - - - - - - - - - - - - - - - - - - - - - - - - - - - - - - - - - - - - - - - - - - - - - - - - - - - - - - 287x592 - 3 - 3 - 3 - - - - - - - - 1 - 1 - 1 - - 2 - 2 - 2 - - 3 - 3 - 3 - - - - - - - - 1 - 1 - 1 - 2 - 2 - 2 - 2 - 3 - 3 - 3 - 437x287 15 12 12 9 9 6 - - - - - - - 5 4 4 3 3 2 2 10 8 8 6 6 4 4 15 12 12 9 9 6 6 - - - - - - - 4 4 3 3 2 2 8 8 6 6 4 4 2 12 9 9 6 6 3 - 437x592 BAG TORBA FILTERFİLTRE - 4 - 4 - 4 - 6 - 6 - 6 - - 5 - 5 - 5 - - 4 - 4 - 4 - - 3 - 3 - 3 - - 5 - 5 - 5 - 4 - 4 - 4 - 3 - 3 - 3 - 3 - 2 - 2 - 2 - 592x287 16 12 12 8 8 12 12 9 9 6 6 3 8 6 6 4 4 2 16 592x592 20 16 16 12 12 8 30 24 24 18 18 12 12 25 20 20 15 15 10 10 20 16 16 12 12 8 8 15 12 12 9 9 6 6 25 20 20 15 15 10 10 16 FILTER and QUANTITIES FİLTREDIMENSION BOYUT ve ADETLERİ 10 8 6 16 14 12 10 8 6 14 12 10 8 6 4 12 10 8 6 4 12 10 8 6 4 12 10 8 6 4 10 8 6 4 8 6 4 8 6 4 2,5 6 4 2,5 6 4 2,5 H MODUL MODÜL W 39 APPENDIX-3/2 Front Withdrawal Filter 40 APPENDIX-4 41 BSI TSEK BSI S AS 180 01 D GI STER 0 S EN I SO 1 40 E B 1 E OH STER RE RE GI D KA SE L ‹T RT E S ‹S T EM BE LG K-Q TSE-ISO 9001 ‹F ‹K A ES ‹ 94 N O KG 1 . / 22 ALARKO CARRIER VESan. TÝCARET : GOSB - SANAYÝ Gebze Org. Bölgesi, A.Þ. Ş. Bilgisu Cad. 41480 Gebze-KOCAELİ İSTANBUL Tel: (0262) 648 60 00 - Fax:Bölgesi, (0262) 648 60 08 GOSB - Gebze Organize Sanayi : Sedat Simavi Sok. No: 48, 06550 Çankaya - ANKARA ANKARA Þ. Bilgisu Cad. 41480 Gebze - KOCAELÝ Tel: (0312) 409 52 00 - Fax: (0312) 440 79 30 Phone: (0262) 648 60 00 Fax: (0262) 648 60 08 : Şehit Fethibey Cad. No:55, Kat:13, 35210 Pasaport - İZMİR İZMİR Tel: (0232) 483 25 60 - Fax: (0232) 441 55 13 : Ziyapaşa Bulvarı Çelik Ap. No : 25/5-6, 01130 ADANA web: www.alarko-carrier.com.tr ADANA Tel: (0322) 457 62 23 - Fax: (0322) 453 05 84 e-mail: [email protected] : Metin Kasapoğlu Cad. Küçükkaya Sitesi A Blok No: 1 D. 4, ANTALYA ANTALYA MDH Tel: (0242) 322 00 29 - Fax: (0242) 322 87 66 : 444 0 128 web: www.alarko-carrier.com.tr e-posta: [email protected]