1
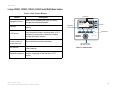
SPA IP Phone
User Guide
Model No.
SPA921, SPA922, SPA941, SPA942, SPA962 and SPA932
SPA IP Phone
Table of Contents
Chapter 1: Introduction
Welcome
IP Telephony System Overview
Chapter 2: Installing
Assembling the Phone and Connecting to the Network
Attaching the Desk Stand
Turning on the Phone
Chapter 3: Using Your Phone
Using the Handset, Speakerphone or Headset
Using the Handset
Using the Speaker
Using the Headset
Switching Between the Handset/Headset/Speakerphone During a Call
Linksys SPA921, SPA922, SPA941, SPA942 and SPA962 Basic buttons
Basic Soft button features
Making Telephone Calls
Dialing From the Redial List
Speed Dialing
Receiving Calls
Multiple Calls on a Single Line (SPA921 and SPA922)
Multiple Calls on a Multiple Lines (SPA941, SPA942 and SPA962)
Special Features
Accessing the Voice Mailbox
Muting a Call
Placing a Call on Hold
Three Way Conference Calls
Attended Transfer
Unattended Transfer
Ending a Call
1
1
2
3
3
4
5
6
6
6
6
6
6
7
8
9
9
9
10
10
10
10
10
10
10
11
11
11
12
SPA IP Phone
Setup
1. Directory (Setup button, 1)
2. Speed Dial (Setup button, 2)
3. Call History (Setup button, 3)
4. Ring Tone (Setup button, 4)
5. Preferences (Setup button, 5)
6. Call Forward (Setup button, 6)
7. Time/Date (Setup button, 7)
8. Voice Mail (Setup button, 8)
9. Network
10. Product Info
11. Status
12. Reboot
13. Restart
14. Factory Reset
15. Phone Password (Setup, 15)
16. LCD Contrast (Setup, 16)
17. Call Park Status (Setup, 17)
18. Login (Setup, 18)
SPA932 Features and Functions
Appendix A: Regulatory Information
Appendix B: Warranty Information
Appendix C: Contact Information
13
14
15
16
16
16
17
18
19
19
19
19
19
19
20
20
20
20
20
21
22
26
28
SPA IP Phone
Copyright and Trademarks
Specifications are subject to change without notice. Linksys is a registered trademark or trademark of Cisco
Systems, Inc. and/or its affiliates in the U.S. and certain other countries. Copyright © 2007 Cisco Systems, Inc. All
rights reserved. Other brands and product names are trademarks or registered trademarks of their respective
holders.
WARNING: This product contains chemicals, including lead, known
to the State of California to cause cancer, and birth defects or other
reproductive harm. Wash hands after handling.
How to Use this User Guide
Look for the following items when reading this User Guide:
This checkmark means there is a note of interest and
is something you should pay special attention to while
using the SPA IP phone.
This exclamation point means there is a caution or
warning and is something that could damage your
property or the SPA IP phone.
This question mark provides you with a reminder about
something you might need to do while using the SPA IP Phone.
In addition to these symbols, there are definitions for technical terms that are presented like this:
word: definition.
Also, each figure (diagram, screenshot, or other image) is provided with a figure number and description, like
this:
Figure 0-1: Sample Figure Description
SPA921,922,941,942, SPA962-SPA932-UG-7120410NC DF
SPA IP Phone
Chapter 1: Introduction
Welcome
Linksys SPA921, SPA922, SPA941, SPA942 and SPA 962 are full-featured VoIP (Voice over Internet Protocol)
phones that provide voice communication over an IP network. The phones have traditional features, such as call
forwarding, redialing, speed dialing, transferring calls, conference calling and accessing voice mail. Calls can be
made or received with a handset, headset or over a speaker.
The differences between the models are shown below.
Table 1: Linksys IP Telephone Comparison Chart
Voice Lines
Ethernet Ports
Power over
Ethernet Support
Works with
SPA932
SPA921
1
1
N
No
SPA922
1
2
Y
No
SPA941*
2-4
1
N
No
SPA942*
2-4
2
Y
No
SPA962
6
2
Y
Yes
SPA Model
* The SPA941and SPA942 ships with two lines enabled. A two line upgrade is available via a
software license key installed locally using the SPA941 web interface, or installed remotely via a
secure profile update.
Chapter 1: Introduction
Welcome
1
SPA IP Phone
IP Telephony System Overview
While your phone has traditional features, it uses the Voice over Internet Protocol (VoIP) for communications with
other phones. Your phone is based upon industry standard VoIP and will work with Session Initiation Protocol
(SIP) compliant VoIP networks. The diagram below provides an example of a VoIP network design with 16 IP
phones.
7HOHFRP
1 H WZ R U N
3671
9R,3
1 H WZ R U N
$QDORJ'HYLFHV
,QWHUQHW
%URDGEDQG
0RGHP5RXWHU
Chapter 1: Introduction
IP Telephony System Overview
63$
,37HOHSKRQ\
6\VWHP
2
SPA IP Phone
Chapter 2: Installing
NOTE: Before you can install the phone, your system administrator must prepare the network. If a technician is
not installing your phone, verify with your System Administrator that the network is ready for the phone, read the
safety notice, and install the phone.
Assembling the Phone and Connecting to the Network
1 Find the end of the coiled phone cord that has the longer straightened end. Plug that end
into the back of the phone base (phone symbol).
2 Plug in short straightened end of the handset cord into the jack at the bottom of the handset
(not shown).
3 If you are using an external power source, push the power cord into the power supply, and
plug the power supply into the phone base unit. Use only the power supply that came with
the phone. SPA922, SPA942 and SPA962 can be configured without external power, if
connecting to an IEEE powered ethernet switch. See Linksys.com for details.
6.
3.
5.
4 Plug the ethernet cable into the back of the base station. Plug the other end of the ethernet
cable into your already prepared network connection. If the phone is configured using an
optional POE (Power over Ethernet) adapter, see that device’s instructions to properly set up.
4.
1.
5 For SPA922, SPA942 and SPA962 a second ethernet port can be used to connect a PC.
6 The AUX RJ-11 port is reserved for connection to the SPA932, designed for use with the
SPA962. It is not for use as a telephone line port. If you are installing the SPA932 expansion
module, refer to the SPA932 Quick Installation for more information.
DO NOT PLUG IN A TELEPHONE LINE CORD INTO THE AUX PORT.
Figure 2-1: attaching the phone cords and network cables
(steps 1 through 6)
2: Installing
Assembling the Phone and Connecting to the Network
3
SPA IP Phone
Attaching the Desk Stand
1 Complete the assembly instructions (page 2).
2 Line up the tabs on the desk stand with the slots on the back of the phone.
3 Slide the bottom tabs into the slots
4 Lightly press down on the top of the desk stand. It should easily slide into the top slots. Do not force.
Figure 2-2: desk stand attached to phone (step 5)
Mounting the Phone to the Wall
NOTE: To mount the phone to a wall, do not attach thed desk stand as mentioned above.
1 Complete the assembly instructions (page 2).
2 Attach two appropriate screws to the wall. leave 1/4” distance from the wall. This allows you to slide the
mounting brackets on to the screws. Push down slightly to lock the phone in place.
You can also purchase an optional wall mount kit from your retailer or Linksys.com
Figure 2-3: attaching the phone to the wall
2: Installing
Attaching the Desk Stand
4
SPA IP Phone
Turning on the Phone
This section assumes that the correct connections have been made.
Plug in the AC power adapter to an electrical outlet. Use only the adapter that came with the phone.
• The phone will execute a boot-up sequence when the power source is connected.
• During this sequence, the display will first show LINKSYS® and then “Initializing Network”.
• All of the lights on the phone will flash.
• After the sequence, which should take about five seconds, the phone will display the standard menu for
the phone.
• The date, name and number of the phone will display on the top line of the LCD screen.
At the bottom of the LCD screen redial, dir, cfwd and dnd are displayed over their associated soft buttons. A small
arrow appears next to dnd indicating that more menus can be accessed by pushing the right side of the
navigation button.
IP Phone SPA942
Figure 2-4: SPA941/942 LCD screen display
If the phone does not provide this screen, re-confirm installation and connections. If these are correct, try
unplugging the phone and plugging it back in again. If you still don’t see the display, then contact your Phone
Administrator or service provider.
2: Installing
Turning on the Phone
5
SPA IP Phone
Chapter 3: Using Your Phone
The phone can be used as soon as it is operational (see Chapter 2, Installing). To customize the phone options,
see Setup later in this chapter.
Using the Handset, Speakerphone or Headset
Calls can be made or received using the handset, speakerphone or headset and you can switch audio devices
during a call. Adjust the volume for the device you are using with the volume adjustment bar.
Using the Handset
To place and answer calls using the handset, simply lift the handset.
Using the Speaker
Figure 3-1: Volume adjustment bar
To place and answer calls using the speaker, press the speaker button. The green light behind the button will
illuminate.
Using the Headset
Plug an approved headset with a 2.5mm connector into the headset port on the right side of the phone.
Press the headset button and the green light behind the button will illuminate.
Figure 3-2: Speaker button
For information on the exact models of headsets that are supported, see the IP phone information on http://
www.linksys.com
Switching Between the Handset/Headset/Speakerphone During a Call
Any of the audio devices can be used during a call. Only one device at a time can be used.
The handset can be on the hook when using the speakerphone or headset function. If switching from the
handset, make sure the speakerphone or headset light is illuminated before placing the handset back on the
hook.
Chapter 3: Using Your Phone
Using the Handset, Speakerphone or Headset
6
SPA IP Phone
Linksys SPA921, SPA922, SPA941, SPA942 and SPA962 Basic buttons
Table 1: Basic Feature Buttons
Feature
Description
Navigation button
Allows you to navigate (left, right, up, down)
through the soft button features.
Dial pad
Use to enter numbers, letters or characters (not
shown).
LCD Screen
The phone display screen. It shows the date,
time, the phone number, incoming caller ‘s ID (if
available), line/call status, extension numbers
and the soft button features .
LCD screen
Lines
Soft button
features
Soft buttons
IP Phone SPA942
Lines
(SPA941, SPA942 and
SPA962 models only)
Shows extension number and status
Navigation button
(left, right, up, down)
Soft buttons
Press to select an feature shown in the soft
button features .
Soft button features
Shows available choices based on current phone
function. Displayed on the last line of LCD
screen.
Chapter 3: Using Your Phone
Linksys SPA921, SPA922, SPA941, SPA942 and SPA962 Basic buttons
Figure 3-3: Button locations
7
SPA IP Phone
Basic Soft button features
The soft buttons below the LCD screen allow you to easily select phone functions. For basic soft button feature
definitions, see the table below. Other buttons are explained in the Setup section of this chapter.
Table 2: Soft button features (alphabetical, not as they appear on the phone)
Label
Description
cfwd
Forwards calls, with 4 options: All, When the line is busy, When there is no answer, or
When there is no answer after a time delay
dir
Access the phone’s directory (see item 2 in Setup for details)
dnd
Do not disturb. Sends incoming calls to voice mail, or gives a busy signal if
voice mail is not available (see item 5 in Setup for details)
grPick
Allows you to pickup a call from an extension outside your group
lcr
last call return: dials the last call received
park
park a call at a designated “park” number. The call is active until you unpark it,
or the caller disconnects (Must be configured by your Phone Administrator.)
pickup
pickup a call from another phone in your group
redial
displays a list of recently called numbers
unpark
use to pick up a call from the number where it was parked
Chapter 3: Using Your Phone
Basic Soft button features
8
SPA IP Phone
Making Telephone Calls
NOTE: You may need to dial an access code to reach an outside line. Talk to your Phone Administrator about your
company’s specific dialing rules/plan.
Using a Telephone Number
You can place a call by:
• Lifting the handset and dialing immediately, or
• Connect the headset, press the headset button and dial, or
• Press the speaker button and dial.
(for SPA941, SPA942 and SPA962, you can also select a different line)
You will see Called person Ringing and Connected in sequence as the call is being connected.
At the end of the call, hang up the phone to disconnect. For headset or speaker, you must also push the button to
end the call.
Dialing From the Redial List
• To redial the last number called, press the soft button below redial twice, or
• Press the soft button under dir to see the phone’s directory choices. Use the navigation button to highlight
your choice. Lift the handset and the number will automatically be dialed.
To set up a personal directory see item 2 in Setup.
Speed Dialing
Speed dial numbers must already be programmed into the phone (see item 3 in Setup)
• Dial the speed dial number and then lift the handset, or
• Lift the handset (or enable the headset or speaker) and dial the speed dial number, followed by the #
button on the phone.
The entry in the speed dial memory will be dialed automatically.
Chapter 3: Using Your Phone
Making Telephone Calls
9
SPA IP Phone
Receiving Calls
Multiple Calls on a Single Line (SPA921 and SPA922)
Multiple calls can be received on a single line.
To access more than one simultaneous call, use the hold and/or conference features.
Multiple Calls on a Multiple Lines (SPA941, SPA942 and SPA962)
Calls will come into the phone on the first available line.
When a call is incoming, the associated line button will flash and the phone will ring.
If there are multiple lines ringing, caller information for each call will display on the LCD screen.
Special Features
Accessing the Voice Mailbox
Access the voice mailbox by pressing the mailbox button, or by dialing the voicemail extension. To enter the
voice mailbox number, see item 8 in Setup. Voice mail service must be available on your voice network.
Figure 3-4: Mailbox button
Muting a Call
Mute the handset, headset or speakerphone by pressing the Mute button. This prevents the person on the
active call from hearing what you or someone else in the room is saying.
Figure 3-5: Mute button
To cancel the Mute function, press the Mute button again.
Placing a Call on Hold
Press the hold button to put the active call on hold.
If there is another incoming call, you can now answer the 2nd call or line.
For multiple lines (SPA941, SPA942 and SPA962), the line button of the call on hold will, by default, flash red.
Figure 3-6: Hold button
Chapter 3: Using Your Phone
Receiving Calls
10
SPA IP Phone
Resume the 1st call by pressing the line button associated with the 1st call.
If the 2nd call is still in progress it will automatically go into a “hold” state when the 1st call goes active.
Three Way Conference Calls
To initiate a conference call, press the soft button under conf during an active call.
The first call is placed on hold, and you will hear a dial tone.
Dial the second person’s telephone number.
To start the conference call, press the soft button under conf again; all three parties will be participating in a
conference call.
When you hang up, the other two parties will be disconnected.
Attended Transfer
To initiate a transfer, press the soft button under xfer during an active call.
This places the first call on hold and you will hear a dial tone.
Dial the second person’s telephone number. When the second person answers, you can have a private
conversation with the second person without the first person hearing it.
To connect the call to the second person, press the soft button under xfer again to complete the transfer.
You will be disconnected from the call.
If you hang up during the call with the second person before pressing xfer, the transfer is not completed, this only
ends the call with the second person.
Unattended Transfer
To initiate an unattended (blind) transfer, press the soft button under xfer during an active call.
The first call is placed on hold and you will hear a dial tone. You can now dial the second person’s telephone
number.
After the second person’s phone is ringing, press the soft button under xfer again to complete the transfer.
Chapter 3: Using Your Phone
Three Way Conference Calls
11
SPA IP Phone
You will be disconnected from the call.
If you hang up before the second call is ringing, the blind transfer will fail and the first person will be
disconnected.
NOTE: For SPA941, SPA942 and SPA962, if you misdial when calling the second number, press the line button
again and you will receive a dial tone. You can dial the number.
Ending a Call
To end a handset call, hang up the handset.
To end a speakerphone call, press the speaker button.
To end a headset call, press the headset button.
Chapter 3: Using Your Phone
Ending a Call
12
SPA IP Phone
Setup
Customize the phone ysing the Setup options, at any time. Access this menu by pressing the Setup button on the
phone. The table below describes all of the possible soft button features. Not all choices are available for every
setup option.
Table 3: Soft button features for Setup
Figure 3-7: Setup button
Label
Description
< < or > >
move left or right through entry without deleting characters
add
allows you to add an entry
alpha, IP, num
Use with Directory and Speed dial to enter a URL, IP address or number.
Press the soft button repeatedly to change selection
cancel
cancels any changes you have made, if pressed before ok or save
change
change ring tone feature
clear
clears the entire entry
copy
in a directory, use the navigation button to highlight an entry, then press to
copy an entry
delChr
deletes the last character you entered
delete
delete an entry
dial
place a call to the number highlighted on the LCD screen
edit
edit part of an entry
ok
confirms your choice
paste
using the navigation button, highlight the entry in you personal directory
and press paste to place the entry you copied
play
allows you to hear ringtones before saving
save
saves your choice
select
choose the item you want to change or review
y/n
toggle between yes or no
Chapter 3: Using Your Phone
Setup
Helpful Hints for Setup:
instead of using the navigation button to
highlight a selection, you can also use the dial
pad to enter the number that is next to an
entry to select it.
Press cancel to return to the previous menu
without saving changes.
For most choices, you must press save or ok to
confirm your choice.
13
SPA IP Phone
1. Directory (Setup button, 1)
To view your phone’s directory options, press the Setup button, then 1, then the soft button under select.
• Using the navigation button, move up or down to highlight a New Entry, Corporate Directory (if available) or
Personal Directory.
Adding a New Entry to Your Personal Directory (Setup button, 1,1)
Setup button
For numbers that you call often, you may want to set up a personal directory.
Press the soft button under add.
The last soft button feature allows you to choose num, IP or URL.
Use the dial pad to enter a phone number, IP address or URL, then press the soft button under ok,
Use the navigation button to move up and down between entries.
If you enter the wrong information, press delChr to delete one character at a time or clear to erase the entry.
To copy an existing entry, use the navigation button to select an entry from your personal or corporate
directory and press copy. Then go to your personal directory and press paste to enter the information.
To select a specific ring tone, move the navigation button to Ring:Default, then select feature and choose a
tone
Press save and the entry will be added to your personal directory.
Using a Corporate Directory (Setup button, 1,2)
A corporate directory is available only if the phone is hosted by a Linksys IP PBX system.
To view the corporate directory, press the Setup button, then 1, 2, then the soft button under select.
Helpful Hints for Setup:
instead of using the navigation button to
highlight a selection, you can also use the dial
pad to enter the number that is next to an
entry to select it.
Use the navigation button to highlight a name, and you will see a list of choices.
You can dial, cancel, copy or paste an entry by pressing the soft button beneath your choice.
Press cancel to return to the previous menu
without saving changes.
For most choices, you must press save or ok to
confirm your choice.
Chapter 3: Using Your Phone
1. Directory (Setup button, 1)
14
SPA IP Phone
Using a Personal Directory (Setup button, 1,3)
If you entered at least one name in New Entry, you have a personal directory.
To view the directory, press the Setup button, then 1.
Entries will be listed next to number 3. Use the navigation button to highlight your choice.
Setup button
You can dial, delete, edit, cancel, copy or paste an entry by pressing the soft button beneath your choice.
2. Speed Dial (Setup button, 2)
Enter up to 8 speed dial numbers. Each one can be a phone number, IP address or URL.
To setup or edit Speed Dial, press the Setup button, then 2.
• To enter a new Speed Dial number, use the navigation button to move to a <Not Assigned> slot.
• To edit a previously entered choice, highlight the entry with the navigation button.
Press the soft button under edit.
The last soft button feature allows you to choose num, IP or URL.
Use the number buttons to enter a phone number, IP address or URL, then press the soft button under ok, or
enter a name from a directory. As you start to enter the name, you will see a list of choices.
Highlight the number and press ok to save.
Helpful Hints for Setup:
If you enter the wrong information, before you press ok, press delChr to delete one character at a time or clear to
erase the entry.
instead of using the navigation button to
highlight a selection, you can also use the dial
pad to enter the number that is next to an
entry to select it.
Press cancel to return to the previous menu
without saving changes.
For most choices, you must press save or ok to
confirm your choice.
Chapter 3: Using Your Phone
2. Speed Dial (Setup button, 2)
15
SPA IP Phone
3. Call History (Setup button, 3)
You can view lists of recently received (up to 60) incoming calls in Call History. Choose from Redial List,
Answered Calls or Missed Calls.
To view the phone’s Call History lists, press the Setup button, then 3.
Setup button
To review a list, use the navigation button to highlight it and press select.
To redial a number from the list, press dial. You can also choose to delete, edit or cancel entries from these
lists.
4. Ring Tone (Setup button, 4)
Each extension of your phone can have a different ring tone. You can download up to 10 ring tones at Linksys.com
To change a ring tone, press the Setup button, then 4.
Use the navigation button to highlight the extension you want to change the ring tone for and press change.
You will see several choices. Press play to hear the tone, press select to choose it.
5. Preferences (Setup button, 5)
You can set six different preferences for your phone.
To select a preference, press the Setup button, then 5.
Use the navigation button to highlight the preference to change, then press the soft button under edit.
1 Block Caller ID - Your phone number will not appear to the person you call.
Choose yes or no (y/n). After making your choice, press ok.
2 Block Anonymous Call - Calls that do not show Caller ID are not received by your phone (this blocks ALL calls
without Caller ID).
Helpful Hints for Setup:
instead of using the navigation button to
highlight a selection, you can also use the dial
pad to enter the number that is next to an
entry to select it.
Press cancel to return to the previous menu
without saving changes.
Choose yes or no (y/n). After making your choice, press ok.
3 Do Not Disturb - Sends incoming calls to voice mail, or gives a busy signal, if voice mail is not available.
Chapter 3: Using Your Phone
3. Call History (Setup button, 3)
For most choices, you must press save or ok to
confirm your choice.
16
SPA IP Phone
Choose yes or no (y/n). After making your choice, press ok.
4 Secure Call - The active call is encrypted so that others cannot eavesdrop. Before trying to enable, ask your
service provider if Secure Call is available, as the phone must have a mini certificate installed by your service
provider.
Setup button
Choose yes or no (y/n). After making your choice, press ok. When you dial you will hear a tone before the call.
5 Dial Assistance - If you choose yes, when you place calls the LCD will display phone numbers based on the best
matched entries in the Directory and Call History lists.
To enable this choice select yes (y/n), then press ok. To disable this feature select no (y/n), then press ok.
If enabled, when placing calls, use the navigation button to highlight a phone number on the LCD screen and
press dial to complete the call.
6 Preferred Audio Device - Designates the headset or speaker phone as the preferred audio device when the
handset is not used.
Press feature once or twice to select headset or speaker phone. After making your choice, press ok.
6. Call Forward (Setup button, 6)
You can forward all calls, calls when the phone is busy or calls when there is no answer:
To change a ring tone, press the Setup button, then 6.
Use the navigation button to highlight the call forwarding feature that you want to use.
1. CFWD All Number – Forwards all calls to a single number.
Select edit and then enter a number to forward all calls to. Choose your voice mail box, another extension or
an outside line. If an outside phone, be sure to enter 10 digits (1+area code + seven digit number).
Press ok to confirm.
To stop forwarding all calls, press the Setup button, then 6. Use the navigation button to highlight 1 CFWD All
Number. Select edit and clear.
2 CFWD Busy Number – Forwards calls to another number when the phone is busy.
Chapter 3: Using Your Phone
6. Call Forward (Setup button, 6)
Helpful Hints for Setup:
instead of using the navigation button to
highlight a selection, you can also use the dial
pad to enter the number that is next to an
entry to select it.
Press cancel to return to the previous menu
without saving changes.
For most choices, you must press save or ok to
confirm your choice.
17
SPA IP Phone
Select edit and then enter a number to forward calls to when your phone is busy. Choose your voice mail box,
another extension or an outside phone. If an outside line, be sure to enter 10 digits (1+area code + seven
digit number).
Press ok to confirm.
Setup button
To stop forwarding calls, press the Setup button, then 6. Use the navigation button to highlight 2 CFWD Busy
Number. Select edit and clear.
3 CFWD No Ans Number – Forwards calls to another number if there's no answer at your phone.
Select edit and then enter a number to forward calls to when there is no answer at your phone. Choose your
voice mail box, another extension or an outside phone. If an outside line, be sure to enter 10 digits (1+area
code + seven digit number).
Press ok to confirm.
To stop forwarding calls, select Call Forward from Setup then highlight 3 CFWD No Ans Number. Select edit
and clear.
4 CFWD No Ans Delay – Forwards calls to the number you selected in 3 (CFWD No Ans Number) after a time delay,
if there is no answer at your phone.
To enable this option, enter the number of seconds that will elapse before the call will be forwarded.
Select edit, enter the number of seconds for the delay (up to 999) and then press ok.
Press ok to confirm. To stop forwarding calls, select Call Forward from Setup then highlight 4 CFWD No Ans
Delay. Select edit and clear.
Helpful Hints for Setup:
7. Time/Date (Setup button, 7)
Use this feature to enter the correct time, date and am or pm.
To change the time or date, press the Setup button, then 7.
Enter the date in the following format: mm*dd*yy (this will display as m/d)
Enter the time in the following format: hh*mm*ss (this will display as (h:mm)
If the time does not display am (a) or pm (p) correctly, you can adjust with Offset. To change from a.m. to p.m.,
enter *12*00*00, to change from p.m. to a.m., enter #12*00*00.
Chapter 3: Using Your Phone
7. Time/Date (Setup button, 7)
instead of using the navigation button to
highlight a selection, you can also use the dial
pad to enter the number that is next to an
entry to select it.
Press cancel to return to the previous menu
without saving changes.
For most choices, you must press save or ok to
confirm your choice.
18
SPA IP Phone
Press the soft button under save to confirm your choice.
You can set just one of these choices, if necessary.
8. Voice Mail (Setup button, 8)
Voice mail service must be available on your network, to use this feature.
To access your voice mail box, press the Setup button, then 8.
Enter the extension number for the phone’s voice mail box, then select save.
Your Phone Administrator can provide this number to you.
9. Network
This setting is to configure and troubleshoot the network. You should not change this settings unless directed to
by your Administrator as this can seriously alter your phone’s functions.
10. Product Info
This setting displays the product name, serial number, software version, hardware version, MAC address and
Client Certificate.
11. Status
This setting displays the status of the phone, extension and line buttons.
12. Reboot
This setting is to configure and troubleshoot the network. You should not change this settings unless directed to
by your Administrator as this can negatively affect your phone’s function.
13. Restart
This setting is to configure and troubleshoot the network. You should not change this settings unless directed to
by your Administrator as this can negatively affect your phone’s function.
Chapter 3: Using Your Phone
8. Voice Mail (Setup button, 8)
19
SPA IP Phone
14. Factory Reset
This setting is to configure and troubleshoot the network. You should not change this settings unless directed to
by your Administrator as this can negatively affect your phone’s function.
IMPORTANT: If you choose factory reset, you will return the phone to the original factory settings and will erase
ALL current settings, including the directory and call logs. It is also possible that your phone extension will
change.
15. Phone Password (Setup, 15)
This setting allows you to set or change the password for your phone, to prevent unauthorized use.
To access this option, press the Setup button and 15.
Press select to set or change your password, then press save.
Setup button
Enter up to a 12 character password. You will be required to enter the same password twice.
16. LCD Contrast (Setup, 16)
This setting allows you adjust the contrast of the LCD screen.
To access this option, press the Setup button and 15.
Press select, then use the navigation button to adjust the screen contrast.
Press save to confirm your choice.
Moving the navigation button to the left will increase the contrast and to the right will decrease the contrast,
17. Call Park Status (Setup, 17)
See the status of a call that has been parked.
18. Login (Setup, 18)
If you set up a password using Setup, 15, use this feature to log in to the phone.
Chapter 3: Using Your Phone
14. Factory Reset
Helpful Hints for Setup:
instead of using the navigation button to
highlight a selection, you can also use the dial
pad to enter the number that is next to an
entry to select it.
Press cancel to return to the previous menu
without saving changes.
For most choices, you must press save or ok to
confirm your choice.
20
SPA IP Phone
SPA932 Features and Functions
The SPA932 Attendant Console is used only with the SPA962 IP phone. For configuration information, contact your
System Administrator.
Managing Calls with the SPA932
Any active line (or extension) on the SPA932 can be managed in the following manner:
• Direct Station Select (DSS). Press an active (green LED) button to directly call another line (or extension).
• One Touch Call Transfer. While you are on a call, press an active (green LED) button and hang up your
receiver to transfer the call to another line (or extension).
• Status Monitoring. Monitor line status based on the button’s LED color/behavior on the SPA932.‘
LED Status
Each of the 32 buttons on the SPA932 can have any one of four different states:
• Green - the line associated to the button is correctly configured and is active.
• Red - the line is in use (busy).
• Blinking Red - the line is receiving an incoming call (ringing).
• Amber - the line associated to the button is not configured correctly.
• Null (no light) - the line is not configured.
Chapter 3: Using Your Phone
SPA932 Features and Functions
21
SPA IP Phone
Appendix A: Regulatory Information
FCC STATEMENT
This product has been tested and complies with the specifications for a Class B digital device, pursuant to Part 15 of the
FCC Rules. These limits are designed to provide reasonable protection against harmful interference in a residential
installation. This equipment generates, uses, and can radiate radio frequency energy and, if not installed and used
according to the instructions, may cause harmful interference to radio communications. However, there is no guarantee
that interference will not occur in a particular installation. If this equipment does cause harmful interference to radio or
television reception, which is found by turning the equipment off and on, the user is encouraged to try to correct the
interference by one or more of the following measures:
Reorient or relocate the receiving antenna
Increase the separation between the equipment or devices
Connect the equipment to an outlet other than the receiver's
Consult a dealer or an experienced radio/TV technician for assistance
FCC Radiation Exposure Statement
This equipment complies with FCC radiation exposure limits set forth for an uncontrolled environment. This equipment
should be installed and operated with minimum distance 20cm between the radiator and your body.
Appendix A: Regulatory Information
22
SPA IP Phone
INDUSTRY CANADA
The use of this device in a system operating either partially or completely outdoors may require the user to obtain a license
for the system according to the Canadian regulations.
This device complies with Industry Canada ICES-003 and RSS210 rules.
IC Statement
Operation is subject to the following two conditions:
1. This device may not cause interference and
2. This device must accept any interference, including interference that may cause undesired operation of the device.
L'utilisation de ce périphérique dans un système utilisé partiellement ou totalement en extérieur peut conduire l'utilisateur
à l'obtention d'une licence pour ce système conformément aux règles en vigueur au Canada.
Cet appareil est conforme aux normes NMB-003 et RSS210 d'Industrie Canada.
Déclaration d'Industrie Canada
Le fonctionnement est soumis aux conditions suivantes :
1. Ce périphérique ne doit pas causer d'interférences;
2. Ce périphérique doit accepter toutes les interférences reçues, y compris celles qui risquent d'entraîner un
fonctionnement indésirable.
EC DECLARATION OF CONFORMITY (EUROPE)
Linksys declares that this product conforms to the specifications listed below, following the provisions of the European
R&TTE directive 1999/5/EC:
EN 301 489-1, 301 489-17 General EMC requirements for Radio equipment.
EN 609 50 Safety
EN 300-328-1, EN 300-328-2 Technical requirements for Radio equipment.
Appendix A: Regulatory Information
23
SPA IP Phone
Caution: This equipment is intended to be used in all EU and EFTA countries. Outdoor use may be restricted to certain
frequencies and/or may require a license for operation. Contact local Authority for procedure to follow.
Note: Combinations of power levels and antennas resulting in a radiated power level of above 100 mW equivalent isotropic
radiated power (EIRP) are considered as not compliant with the above mentioned directive and are not allowed for use
within the European community and countries that have adopted the European R&TTE directive 1999/5/EC.
For more details on legal combinations of power levels and antennas, contact Linksys Corporate Compliance.
Linksys vakuuttaa täten että dieses produkt tyyppinen laite on direktiivin 1999/5/EY oleellisten vaatimusten ja sitä
koskevien näiden direktiivien muiden ehtojen mukainen.
Linksys Group déclare que le produit est conforme aux conditions essentielles et aux dispositions relatives à la directive
1999/5/EC.
Belgique:
Dans le cas d'une utilisation privée, à l'extérieur d'un bâtiment, au-dessus d'un espace public, aucun enregistrement n'est
nécessaire pour une distance de moins de 300m. Pour une distance supérieure à 300m un enregistrement auprès de l'IBPT
est requise. Pour une utilisation publique à l'extérieur de bâtiments, une licence de l'IBPT est requise. Pour les
enregistrements et licences, veuillez contacter l'IBPT.
France:
2.4 GHz Bande : les canaux 10, 11, 12, 13 (2457, 2462, 2467, et 2472 MHz respectivement) sont complétement libres
d'utilisation en France (en utilisation intérieur). Pour ce qui est des autres canaux, ils peuvent être soumis à autorisation
selon le départment. L'utilisation en extérieur est soumis à autorisation préalable et très restreint.
Vous pouvez contacter l'Autorité de Régulation des Télécommunications (http://www.art-telecom.fr) pour de plus amples
renseignements.
SAFETY NOTICES
Caution: To reduce the risk of fire, use only No.26 AWG or larger telecommunication line cord.
Do not use this product near water, for example, in a wet basement or near a swimming pool.
Avoid using this product during an electrical storm. There may be a remote risk of electric shock from lightning.
FCC PART 68 STATEMENT
Appendix A: Regulatory Information
24
SPA IP Phone
This equipment complies with Part 68 of the FCC Rules. A label is attached to the equipment that contains, among other
information, its FCC registration number and ringer equivalence number. If requested, this information must be provided to
the telephone company.
This equipment uses the following USOC Jack: RJ-11.
An FCC compliant telephone cord and modular plug is provided with this equipment. This equipment is designed to be
connected to the telephone network or premises wiring using a compatible modular jack, which is FCC Part 68 compliant.
Connection to the telephone network should be made by using the standard modular telephone jack.
The REN is useful to determine the quantity of devices that may be connected to the telephone line and still have all of
those devices ring when your telephone number is called. In most, but not all areas, the sum of RENs should not exceed 5.
To be certain of the number of devices that may be connected to the line, as determined by the total RENs, contact the
telephone company to determine the maximum REN for the calling area.
If this equipment causes harm to the telephone network, the telephone company may discontinue your service temporarily.
If advance notice is not practical, the telephone company will notify the customer as soon as possible. Also, you will be
advised of your right to file a complaint with the FCC if you believe it is necessary.
The telephone company may make changes in its facilities, equipment, operations, or procedures that could affect the
operation of the equipment. If this happens, the telephone company will provide advance notice in order for you to make
the necessary modifications in order to maintain uninterrupted service.
In the event this equipment should fail to operate properly, disconnect the unit from the telephone line. Try using another
FCC approved device in the same telephone jack. If the trouble persists, call the telephone company repair service bureau.
If the trouble does not persist and appears to be with this unit, disconnect the unit from the telephone line and discontinue
use of the unit until it is repaired. Please note that the telephone company may ask that you disconnect the equipment
from the telephone network until the problem has been corrected or until you are sure that the equipment is not
malfunctioning. The user must use the accessories and cables supplied by the manufacturer to get optimum performance
from the product.
No repairs may be done by the customer. If trouble is experienced with this equipment, please contact your authorized
support provider for repair and warranty information. If the trouble is causing harm to the telephone network, the
telephone company may request you remove the equipment from the network until the problem is resolved. This
equipment cannot be used on telephone company provided coin service. Connection to Party Line Service is subject to
state tariffs.
Appendix A: Regulatory Information
25
IP Telephony System
Appendix B: Warranty Information
LIMITED WARRANTY
Linksys warrants this Linksys hardware product against defects in materials and workmanship under normal use for the
Warranty Period, which begins on the date of purchase by the original end-user purchaser and lasts for the period
specified for this product at www.linksys.com/warranty. The internet URL address and the web pages referred to herein
may be updated by Linksys from time to time; the version in effect at the date of purchase shall apply.
This limited warranty is non-transferable and extends only to the original end-user purchaser. Your exclusive remedy and
Linksysf entire liability under this limited warranty will be for Linksys, at its option, to (a) repair the product with new or
refurbished parts, (b) replace the product with a reasonably available equivalent new or refurbished Linksys product, or (c)
refund the purchase price of the product less any rebates. Any repaired or replacement products will be warranted for the
remainder of the original Warranty Period or thirty (30) days, whichever is longer. All products and parts that are replaced
become the property of Linksys.
EXCLUSIONS AND LIMITATIONS
This limited warranty does not apply if: (a) the product assembly seal has been removed or damaged, (b) the product has
been altered or modified, except by Linksys, (c) the product damage was caused by use with non.Linksys products, (d) the
product has not been installed, operated, repaired, or maintained in accordance with instructions supplied by Linksys, (e)
the product has been subjected to abnormal physical or electrical stress, misuse, negligence, or accident, (f ) the serial
number on the Product has been altered, defaced, or removed, or (g) the product is supplied or licensed for beta,
evaluation, testing or demonstration purposes for which Linksys does not charge a purchase price or license fee.
ALL SOFTWARE PROVIDED BY LINKSYS WITH THE PRODUCT, WHETHER FACTORY LOADED ON THE PRODUCT OR CONTAINED
ON MEDIA ACCOMPANYING THE PRODUCT, IS PROVIDED gAS ISh WITHOUT WARRANTY OF ANY KIND. Without limiting the
foregoing, Linksys does not warrant that the operation of the product or software will be uninterrupted or error free. Also,
due to the continual development of new techniques for intruding upon and attacking networks, Linksys does not warrant
that the product, software or any equipment, system or network on which the product or software is used will be free of
vulnerability to intrusion or attack. The product may include or be bundled with third party software or service offerings.
This limited warranty shall not apply to such third party software or service offerings. This limited warranty does not
guarantee any continued availability of a third party’s service for which this product’s use or operation may require.
TO THE EXTENT NOT PROHIBITED BY LAW, ALL IMPLIED WARRANTIES AND CONDITIONS OF MERCHANTABILITY,
SATISFACTORY QUALITY OR FITNESS FOR A PARTICULAR PURPOSE ARE LIMITED TO THE DURATION OF THE WARRANTY
PERIOD. ALL OTHER EXPRESS OR IMPLIED CONDITIONS, REPRESENTATIONS AND WARRANTIES, INCLUDING, BUT NOT
26
Appendix B: Warranty Information
IP Telephony System
LIMITED TO, ANY IMPLIED WARRANTY OF NON-INFRINGEMENT, ARE DISCLAIMED. Some jurisdictions do not allow
limitations on how long an implied warranty lasts, so the above limitation may not apply to you. This limited warranty gives
you specific legal rights, and you may also have other rights which vary by jurisdiction.
TO THE EXTENT NOT PROHIBITED BY LAW, IN NO EVENT WILL LINKSYS BE LIABLE FOR ANY LOST DATA, REVENUE OR PROFIT,
OR FOR SPECIAL, INDIRECT, CONSEQUENTIAL, INCIDENTAL OR PUNITIVE DAMAGES, REGARDLESS OF THE THEORY OF
LIABILITY (INCLUDING NEGLIGENCE), ARISING OUT OF OR RELATED TO THE USE OF OR INABILITY TO USE THE PRODUCT
(INCLUDING ANY SOFTWARE), EVEN IF LINKSYS HAS BEEN ADVISED OF THE POSSIBILITY OF SUCH DAMAGES. IN NO EVENT
WILL LINKSYS’ LIABILITY EXCEED THE AMOUNT PAID BY YOU FOR THE PRODUCT. The foregoing limitations will apply even if
any warranty or remedy provided under this limited warranty fails of its essential purpose. Some jurisdictions do not allow
the exclusion or limitation of incidental or consequential damages, so the above limitation or exclusion may not apply to
you.
OBTAINING WARRANTY SERVICE
If you have a question about your product or experience a problem with it, please go to www.linksys.com/support where
you will find a variety of online support tools and information to assist you with your product. If the product proves
defective during the Warranty Period, contact the Value Added Reseller (VAR) from whom you purchased the product or
Linksys Technical Support for instructions on how to obtain warranty service. The telephone number for Linksys Technical
Support in your area can be found in the product User Guide and at www.linksys.com. Have your product serial number
and proof of purchase on hand when calling. A DATED PROOF OF ORIGINAL PURCHASE IS REQUIRED TO PROCESS
WARRANTY CLAIMS. If you are requested to return your product, you will be given a Return Materials Authorization (RMA)
number. You are responsible for properly packaging and shipping your product to Linksys at your cost and risk. You must
include the RMA number and a copy of your dated proof of original purchase when returning your product. Products
received without a RMA number and dated proof of original purchase will be rejected. Do not include any other items with
the product you are returning to Linksys. Defective product covered by this limited warranty will be repaired or replaced
and returned to you without charge. Customers outside of the United States of America and Canada are responsible for all
shipping and handling charges, custom duties, VAT and other associated taxes and charges. Repairs or replacements not
covered under this limited warranty will be subject to charge at Linksys’ then-current rates.
TECHNICAL SUPPORT
This limited warranty is neither a service nor a support contract. Information about Linksys’ current technical support
offerings and policies (including any fees for support services) can be found at: www.linksys.com/support. This limited
warranty is governed by the laws of the jurisdiction in which the Product was purchased by you. Please direct all inquiries
to: Linksys, P.O. Box 18558, Irvine, CA 92623
27
Appendix B: Warranty Information
SPA IP Phone
Appendix C: Contact Information
Need to contact Linksys?
Visit us online for information on the latest products and updates
to your existing products at:
http://www.linksys.com or
ftp.linksys.com
Can't find information about a product you want to buy
on the web? Do you want to know more about networking
with Linksys products? Give our advice line a call at:
Or fax your request in to:
800-546-5797 (LINKSYS)
949-823-3002
If you experience problems with any Linksys product,
you can call us at:
Don't wish to call? You can e-mail us at:
800-326-7114
[email protected]
If any Linksys product proves defective during its warranty period,
you can call the Linksys Return Merchandise Authorization
department for obtaining a Return Authorization Number at:
(Details on Warranty and RMA issues can be found in the Warranty
Information section in this Guide.)
Appendix B: Contact Information
949-823-3000
28