1
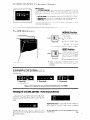
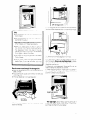
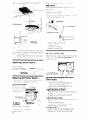
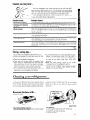
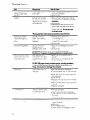
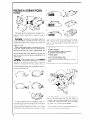
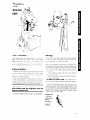
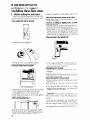
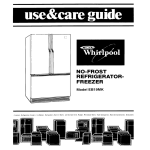
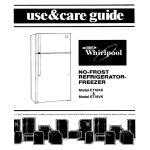
NO-FROST
REFRIGERATORFREEZER
Model ED26SS
yers. freezers,
Refrigerator-Freezers.
Ice Makers,
Dishwashers.
Bwlt-In
Ovens
and Surtace
Unlls,
Ranges,
Microwave
Ovens,
Trash Compactors,
Room Au Condnlloners.
Dehumbdlf
Please read this
Use and Care Guide
before you do anything
else.. .
This booklet
tells you how to start your refrigerator,
clean it, move shelves and adjust controls.
It even
tells you what to do if symbols
appear
on the Performance
Monitor and if unfamiliar
sounds are
heard.
Treat your new refrigerator
with care. Use It only to
do what home refrigerators
are designed
to do.
Parts and features
SYSTEMS SENTINEL’”
, Performance
Monitor
AUTO SCAN
Switch
IIll
Air Control
Freezer
-
II IllI
Light ’
Ice Maker
Utility
Compartment
_ _
-
Ice Bln AdjustableShelves
Llght Crisper with
Humidity Control
-
Meat Pan with
Cold Control
\
Bin
Magnetic
4 zr!/
r’II
’
Copy your Model and Serial Numbers
When you need
have this Information
1. Complete
plate
2.
located
Purchase
service
ready:
01 call
Model and Serial
as shown).
date
with
here...
a question,
Model
Numbers
Number
(rrom the
Serial
Number
from sales slop.
Purchase
Copy this information
in these
book,
your warranty
and sales
handy place.
I
2
and Serial
Number Plate
Base Grille
Date
spaces.
Keep this
slop together
in a
Service
Company
and Telephone
Number
Door
Sensors
Contents
BEFORE YOU PLUG IT IN
Removing
Freezer Shelves
Removing
the Freezer Basket
Removing
the Crisper, Meat Pan and
Covers
Changing
Light Bulbs
Sounds You May Hear
Energy Saving Tips
Removing
the Base Grille
3
Install Properly
Level Refrrgerator-Freezer
Remove Sales Labels
Clean It
Plug It In
4
4
4
4
4
USING YOUR REFRIGERATOR
Setting the Controls
Power Saving Control
Changrng
the Control Settrngs
SYSTEMS SENTINEL Performance
Monrtor
The AUTO SCAN Switch
Reading
the Performance
Monitor
Adjusting
Meat Pan Temperature
Adjusting
Crisper Humidrty Control
AdlustIng
Shelves
Cold Water and ice Disper,ser
Removing
the Roll-Out Shelf
5
5
5
5
6
6
6
8
8
8
a
IO
CLEANING
Cleaning
YOUR REFRIGERATOR
Chart
FOOD STORAGE GUIDE
Storing Fresh Food
Freezing and Storrng
Frozen
Food
VACATION AND MOVING CARE
IF YOU NEED SERVICE OR ASSISTANCE
1 Before Calling
for Assistance
2 If You Need Assrstonce
3 If You Need Service
4 If You Have a Problem
c 1983 Whirlpool
10
10
10
10
11
11
11
11
12
13
13
14
17
18
18
19
19
19
Corporatron
Before you plug it in
IMPORTANT
Before using your refrigerator,
you are personally
responsible
for making
sure that it
l IS installed
and leveled
on a floor that will hold
the weight,
and In an area suitable
for its size
and use
l IS connected
only to the right kind of outlet, with
the right electric
supply and grounding.
l
IS used
only
for jobs
expected
of home
refrigerators
l IS not near
an oven, radiator
or other heat source.
‘TMK.
l
l
l
l
l
l
is properly
maintained
IS out of the weather.
IS used in an area
where the room temperature
will
not fall below 60” F (16’ C).
IS not run where there are explosive
fumes.
IS not used by children
or others who may not
understand
how it should be used.
IS not loaded
with food before
it has time to get
properly
cold.
3
Install
properly..
.
Clean it...
,iT=TfI-l
Clean your refrigerator
ing instructtons
on page
before
11
using
it See clean-
Plug it in...
J-prong
grounding
type
wall receptacle
1 Allow ‘/2” [ 2 cm) space
ease of lnstallatlon
on each
side and at top for
2. If the refrigerator
is to be against
a wall, you must
leave
enough
space
for the SERVA-DOOR’
to
clear the wall (114 inches - 3.1 cm).
3
The refrigerator
wall
back
can
be
Level refrigerator-freezer..
flush
against
Refrigerator
Power Cord
Recommended
Grounding
Method
the
A 115 Volt, 60 Hz, AC only. 15 or 20 ampere
fused
electrical
supply IS required
It IS recommended
that
a separate
circuit
serving
only this appliance
be provided
Do not use an extension
cord Use a receptacle
.
Use Screwdriver
which cannot be turned off with a switch or pull
chain. See Individual
electrlcal
requirements
and
grounding
package
instructton
sheet
in
your
literature
When you plug In the refrigerator...
l
l
1
2
3.
4
Remove base grille (see page
11)
To raise front, turn each screw to the right.
To lower front, turn each screw to the left
Check with level.
Symbols on the Performance
Monitor ~111glow
You may hear a soft beeping
sound (8 beeps
every 2 minutes)
This IS normal
Remove sales labels.. .
Remove
the Consumer
Buy Guide label and
Inside sales labels before
using the refrigerator
move any left over glue with rubbing
alcohol.
any
Re-
1
Note: DO NOT REMOVE the two labels InsIde
the Uttlllty Compartment.
They are permanent
InstructIons
for using the SYSTEMS SENTINEL‘
Performance
Monitor.
To stop the beeplng,
I. Open the refrigerator
door.
2. Locate the AUTO SCAN Switch (top of door]
3. Move the switch to RESET.
When the refrigerator
has cooled,
move the AUTO
SCAN Switch back to NORMAL.
[See page
b for
more information
on the AUTO SCAN Switch and the
SYSTEMS SENTINEL* Performance
Monitor.)
(Own1
4
Sl
Permanent
lnformatlcn
Labels
‘TMK
Using your refrigerator
Temperature
Control
Air Control
Power Saving
Air Outlet
Setting
the controls..
.
The Temperature
Control IS in the refrlgerotor
and
the AIM Control
IS In the freezer sectron
Wh,er’ the
refrigerator
IS plugged
in for the first time
Give the refrigerator
pletely
before adding
!g5
3
1 Set the TEMPERATURE CONTROL to 3
2 Set the AIR
TROL to 3
Power Saving Control..
CON-
These settings should
household
retrigerator
right for normal
be set about
right when mrlk or
as you lrke and when Ice cream
OFF
Condoor
from
Changing
.
settings..
If you need to adjust temperatures
in the refriger
ator or freezer,
use the settings
ilsted in the chart
below
QUESTIONS?
call your
COOL-LINE ’
service
assistance
telephone
number
(page 19).
will
be about
usage.
Do not block the alr outlet on the control panel
Blocking
tt con slow the ar movement
needed
to
keep temperatures
at the level you set
.
The Power Saving Control on the Control
sole operates
eiectrrc
heaters
around
the
openings
These heaters
help keep moisture
formlng
on the outside of the refrigerator
the control
time to cool down comfood. (Thus may take sev-
eral hours )
The controls
juice IS as cold
IS firm
54@21
Control
ml
1
l
l
l
Use the “OFF
settlng when humiditvIS iow
2
Use the ‘ON’ setting
If moisture forms
on the outslde of the
refrigerator
Adjust the Temperature
Control first
Wait ot least 24 hours between
adjustments
Then adjust the Air Control,
If needed.
CONDITION:
REASONS:
RECOMMENDED
SETTINGS:
Temperature
Air Control
Control
4
3
TOO WARM
Door opened
often
Large amount
of food added
Room temperature
too warm
Temperature
Air Control
Control
3
4
TOO WARM
Door opened
often
Larae amount of food added
Vei cold room temperature
If Refrlaerator
Sectlo;
IS
TOO COLD
Controls not set correctlv
for vour condrtrons
Temperature
Air Control
Control
2
3
If ICE Isn’t
MADE FAST ENOUGH
Heavv ice usaae
Very cold room temperature
Temperature
Air Control
Control
3
4
If BOTH SECTIONS
are TOO WARM
Door opened
often
Large amount
of food added
Very warm or very cold
room temneratrlres
Temperature
Arr Control
Control
3
2
5
SYSTEMS-SENTINEL”
Performance
Monitor..
.
What It does...
The SYSTEMS SENTINEL, Performance
Monrtor IS deslgned
to monrtor
check
points in the refrigerator
to help you operate
the refrigerator
effectively
and economically
Glowing
or flashing
symbols
and soft
beeps w~li
l let
you know that refrigerator
check points are betng monitored
l
Remlnd you to clear, the condenser
co11 (behind
the base grille)
l Alert
you that somethng
s not or wos not OS it should
be
Please read the following
handy foe later reference
InformatIon
carefully
The AUTO SCAN Switch...
Then keep
this book
NORMAL Position
l
NORMAL
RESET
.
A light will move
the drsplay
OK WIT qlow
across
If the OK aoesn t alow.
a symbol
(or symvbols]
other than OK WIII glow
about a certain
condition
l
AUTO
grvlng
SCAN
Information
RESET Position
Check
ootnts
are
not
RESET monitored
when the AUTO
SCAN Switch IS on RESET
Move the Swatch to RESET
AUTO
to
SCAN
a Stop the beeprng
I
l
AUTO SCAN Switch
To demonstrate
or Test the
swatch to RESET The Performance
the followrng
Display,
Monitor
B
1. 8 seconds;
beeping
sound
symbol.
Once
Switch
back
to
move the
WIII show
B
B
2. 15 seconds
3. 30 seconds
as long as the AUTO SCAN Switch
the SYSTEMS SENTINEL* Performance
is on RESET.
Monitor
DOOR OPEN Symbol -Glows
door IS open for more than
sound starts
The OK Light-When
the “OK” glows, refrrgerotor check
pornts are OK The “moving” light shows that check points
are being monrtored.
6
flashing
SCAN
sound
Steps 2 and 3 repeat
Reading
Clear
a glowrng
or
cleared
move
AUTO
NORMAL
To clear the symbol
close the door.
and
when any door IS open If o
three minutes
a beeprng
to stop the beeping
sound,
‘TMK
To stop
the beeping,
‘“cVe “#Y b ,X “CA% Swlich 10
RESET After ‘m? refrmqeralor
react>es a c,)r’ I: P’ -010 temper
oture. move the switch back to NORMAL.
‘r+Yl’ c ~ef~‘3e~a’Or was too
FLASHING TOO WARM ,fTbC
~arrr
but ‘i 2
‘-;a Check for possible
food spoilage. 5 clesr she s~:vno r- .- ; _- , .-SW Stiitch tc
RESET and
bacv
‘c “~c?‘;lS_
30OR
OPEN
DOOR [or doors
+o CHECK C’;‘I
‘,)PEY
comes w Ace’ “e refr#gerotor
nos
been TOO WARM or +?ere has beer
a DSGR OPEN for 10
or more hours Check for possible
food spoilage.
DOOR [o( doors)
TOO WkRV
OPEN for 10 or Tore
DOOR (or doors; OPEN for 10 or Tore
TOO W’ARM + ?-le to ZrECK
COIL
DOOR
outage?
l
l
RESETand
the symbol
Iher
back
Other combinations
Power
WARM
time
hours
refrigerator
was
hours
refrlgerCI’Or
WOS
[or
y;):,rs)
IjPE”4
llme
tc
C+iECK
COIL
power
glows
Every 2 rno~ths to remind you ‘c check fcr 3ust and l~r’i or,
the condenser
co11 behlnd
ibe base grl’ e ‘See page
11
for cleaning
instructIon
,
If the power hlas beep off
To clear
&as ‘00
ALER’
The ALERT Symbol
The CHECK COIL Symbol
refrigerator
pave
the AclTC. SCAN
Swctch
DOOR (or ao3zrs) OPEN for 10 or more
COIL
power
,u’age’
holJrs
time
to CHECK
to
tG “\iOCV4L
DOOR
(or do:,rsj
OPEN
refrlgeraior
DOOR
CHtCK
jar CO&
CPEN refrlgerotor
COIL
poner
outage’
IS TOO WARM
of symbols:
IS TOO WARM
time
tc
IS off
3CsR
[or d~,~,ri‘
r-cre hours
%PE”d
,efrlgerator
TX
WARM
for 10 or
7
Adjusting
meat pan temperature...
the
Co;d ar f OAS ogorst
meat par I+r :iu@ ar- opening
betweer’
trlp freezer ano the
refrigerator
-h s Wc;s
keep
the
meat
pan
calfier
of !he refrlgerotor
Set the cxtrol
ieSS
rol to Adjust
Adjusting
Cod
01’
Meat
tbor
‘tie
rest
to et more
or
‘7rTJgk
Pan Temperatures
To remove
crisper
Control...
You can cxtrol
tre amount
of humidity
In the mol.ture sealed crlsc:er no:
1 icy cc,r *’ ), ,: 3’, i;t- :J jousted to any setting be:.\eer, LC and *il
2 LO (Zpen! ,ets mo sT
01r c&t 3f crisper for
best storage
cjf fr.,l’s
ar!a vegetob:es
‘hllth sk!ns
3. HI (closed)
keeps
moist ar ,n the crlsper for best storage
of fresh leafy vege~
tables
shelves...
Shelves can be adjusted
to mnotcn ‘be way you use
your refrigerator
Glass shelves are strong enough
to
hold bottles,
milk and other heavy food ‘terns The
roil oat
sqeif
arfongement
Adjusting
Humidity
sPou/d
De
the
bottom
she/f
n fotir
To remove
SERVA-DOOR’
. Lift up and
shelves:
out
To replace:
l Insert hooks
. Push down
into gtildes
‘on both
sides
glass shelves:
1 Tilt UD at front
1 Guide
the rear hooks into the slots IC the shelf
supporfs
2 Ilt up front of shelf unti! nooks drop ln+o slot Lower
front of shelf to level postIon
Cold Water and Ice Dispenser...
FOR ICE:
Press o sturdy
glass
against
FOR CHILLED WATER:
Press a sturdy gloss ogalnst
the
water
dispenser
bar [Pressure
car, break
o fraglle
glass)
Rep
move
the
g/OSS
i0
Stop
the
Ice dispenser bar (Pressure and
jurnbliqg
car break a froglie
gloss ) Remove
the glass to stop
dlspenslng
The first few botches
of ice from
the Ice maker may hove a bad
taste Throw them’ away
This IS
from new plumbing
and parts
’
dlspenslng
If the dispenser
IS not used reg-
ularly
dispense
enough
Neck to freshen the supply
2 3 hours for chilling
Ice Dispenser
every
Allow
Bar
The small troy beneath the dispenser ISdesigned to hold small spills There IS no drain
In this tray. Do not pour water into It. Water from small spills WIII evaporate
Ice Is dispensed
from the Ice maker storage
bin
In the freezer
When the drspenser
bar IS pressed,
o
trapdoor
opens In a chute between
the drspenser
and the ice bin Ice IS moved from the b/n and falls
through
the chute
When the dispenser
bar IS released,
a faint buzzing
sound may be heard for a
few seconds
Chllled
water comes from o tank behlnd
the
meat pan It holds about 50 ounces (1 5 L)
When the refrigerator
IS first hooked
up, press the
water dispenser
with a glass or a jar until you have
drawn and discarded
2 or 3 quarts (1 9 to 2.8 L)
Only air WIII come out to start with The water
you
draw and discard
WI/I rinse the tank and pipes
Allow about 24 hours to chill the first tankful
2 Lift the signal arm so It clicks Into the OFF positIon
Ice can still be dispensed.
but no more WIII De made
TIPS
l
The dispersers
door closed
l
The ice dispenser
will work
pushed all the way In
l
Use only ice crescents
Other
shapes
l
only
of the bin IS
from the ice maker.
dspense
properly
When you need more ice than a glass or
two, scoop It from the bin or remove the bin
The dispenser
motor
may stop if the d~spenser bar IS held in too long It WIII be ready
to run again In about 3 minutes
l
Ice stored too long
Throw It away
can
go stale
Ice can shrink Cold moving
orates them
If you use ice
never notlce the change.
Plan to remove
l
won’t
only with the freezer
l
l
l
WIII work
and empty
llke water
air slowly evapoften
you may
the storage
bin:
If the Ice dispenser
has not, or ~111not be used for a
week or more,
If a power failure causes Ice In the bin to melt and
freeze together,
If the rce dispenser
IS not used regularly
Slide
3
Lift the fror?t of the storage
4
Empty
the b/n
Ice If necessary
bin
Use hot or warm
Never use anything
water
to melt tht
sharp to break
up Ice In the bin This can damage
the bin ant
dispenser
mechanism
5 Wash wltl? mild detergent
Rinse well Do not use
+arsh or abrasive
cleansers
or solvents
6 When replacing
the bin. make sure it IS pushed tn
all the way Push the slqnal arm down to the ON
position to restart ice production
Back
The night light uses a heavy-duty
1 Pull the covering
slide It to the rear
Pull tt out
panel
out from
the bottom
and
should last about
purchase
another
IO-watt bulb It
10,000 hours When It burns out,
from your dealer
Removing
the Roll-Out
Removing the crisper,
and covers...
Shelf...
meat pan
Slide crisper ana meat pan straight
Lift the front
l Slide
the rest of Ihe way out
o Replace
In reverse order
l
@ut 1:: s[op
l
Roll Out the Shelf
l
Zove;s ore helC ,n place by two pegs
and tbo notepied tabs IV front
01 the back
Push the lab
to Clear the Cover
Lift Out the Troy
Snap Back Into Place
Tilt the Front;
Lift the Back
~ Press front
~- Lift cover
~ Lift back
-~ Replace
The troy rests on a frame thct slides out for
easy loodlng
or unloading
It should be the bottom
shelf In your orrongement
The troy lifts out of the frame The frame Itself IS
removed
ond replaced
just llke rhe shelves
Removing
Changing
tabs out of the way
front
ofi the pegs
IP reverse order
right bulbs...
Before removing
o light shield for cleonipg
replacing
a bulb unpiug the refrigerator.
oilonce
0uibs onii
or fof
Use op
freezer shelves.. .
Lift front slightly
Lift bock off supports
Replace
In reverse order
l
l
l
Lilt the Front
Removing
the freezer basket.. .
For prorxx
01’ movement
r zxace uhler’ the refrlgerotcr
To remove
l
l
Pull Off the Dial
Pull Out at the Bot
keep the freezer
15operatlrlg
boskeT
Light bulbs behind
control consoles:
-
the basket:
Slide out tc Ibe 900
Lift Ihe frort to clear
=
l
l
Slide out ti?e res!
of the \niov
retrigerator
and treezer
Pull control knob straight off
Pull bottom
of control panel straight out
Lift top of panel off supports
Replace
with a 40.watt
appliance
bulb
Replace
panel In reverse order
light
bulb behind
ice maker:
- Remove
the Ice bin [see ice maker instructions
page 8 1
- Replace
with a 40.watt
appliance
bulb
- Replace
Ice bin
l
light bulb above crisper:
- Pull top of the light shield
away
from
the back
WOll
- Lift shield off base supports
- Replace
with o 40-watt
appliance
- Replace
shield In reverse order
To replace
the basket:
l
l
l
10
Place basket on the sllues
Make
sure the wre stops
clear the frorlt of tDe sildes
Slide bcsket IT\
l
Dispenser
bulb
light:
- Reach the bulb through the dispenser
area
- Replace
with CI heavy-duty
IO-watt bulb
Sounds you may hear.. .
Your new refrigerator
may make sounds that your old one didn’t.
Because
the sounds are new to you. You mrght be concerned
about
them Don’t be. Most of the new sounds are normal. Hard surfaces
llke
the floor, walls and cabinets
can make the sounds seem louder.
The following
chart describes
the kinds of sounds that mrght be new
to You, and what may be making
them.
Possible Sounds:
l
Slight Hum, Soft Hiss:
Clicking
Sounds:
l
or Snapping
Probable
Causes:
Your refrigerator
has two fans; you may
hear the fan motors
and
The defrost timer makes a definite
clrck when the refrigerator
also makes a sound when the refriaerator
starts.
moving
air
stops running.
lt
l
Water Sounds:
When the refrigerator
stops running, You may hear gurgling
in the tubing for a
few minutes after it stops. You may also hear defrost water running Into the
defrost water pan
l
Ice Maker
You may hear a buzzing (from the water
of ice dumped
Into the bin
l
Running
l
Beeping
Sounds:
valve),
trickling
water
and the clatter
Sounds:
Your refrigerator
has a high-efftciency
compressor
and motor.
than older designs. It may even seem to run most of the time.
It WIII run longer
Sounds:
The SYSTEMS SENTINEL* Performance
Monrtor is designed
to make a beeping
sound when something
IS not as it should be. See pages 6 and 7 for more
information
‘TMK.
Energy saving tips.. .
You can help your refrigerator
use less electricrty.
Check door gaskets for a tight seal. Level the
lnet to be sure of a good seal
l Clean
the condenser
coil regularly.
l Open
the door as few times as possible.
about
what You need before
you open the
Get everything
out at one time. Keep foods
nrzed so you won’t have to search
for what
want. Close door as soon as food is removed.
l Go
ahead
and fill up the refrigerator,
but
overcrowd
it so air movement
IS blocked
l
l
cab-
Think
door.
orgayou
don’t
l
l
It is a waste of electricity
to set the refrigerator
and
freezer to temperatures
colder
than they need to
be. If ice cream IS firm rr- the freezer and drinks are
as cold
as Your family
likes them, that’s cold
enough.
Keep the Power Saving
Control
on OFF unless
moisture forms on the refrigerator
exterior.
Make sure Your refrigerator
is not next to a heat
source
such as a range,
water heater,
furnace.
radiator,
or in direct sunlight.
Cleaning your refrigerator..
Both the refrigerator
and freezer
sections
defrost
automatrcally
But both should be cleaned
about
once a month to help prevent
odors from building
up Of course, spills should be wiped up right away
Removing
Open
l
.
I
To clean your refrigerator,
unplug it, turn the Temperature
Control
to OFF, take out all removable
parts,
and clean
It according
to the following
dlrectlons
the base grille.. .
the doors.
l
Pull grille
outwards
l
Do not remove
as shown
Tech sheet fastened
To replace:
behind
grille
l
l
l
Line up grtlle support tabs with metal
Push firmly to snap Into place
Close the doors
Support Tabs
clips
11
Cleaning
chart.. .
Part
What to use
How to clean
Removable
parts
(shelves, crisper, meat
pan etc.)
Mild detergent
warm water.
Outside
Sponge, cloth or paper
towel, mild detergent;
appliance
wax (or good
auto paste wax]
and
Wash removable
parts with warm
and a mild detergent
Rinse and dry
l
l
Wash wrth warm water and a mild detergent
Do not use abrasive
or harsh
l
cleansers.
Rinse and dry
Wax painted
metal surfaces at least
twice a year with appliance
wax or a
good auto paste wax. Apply wax with
a clean, soft cloth. Do not use wax
l
l
on plastic
Waxing
Inside walls (Freezer
should be allowed
to
warm up so cloth won’t
stick )
painted
metal
Sponge, soft cloth or
paper towel, bakrng
soda, warm water, mild
detergent
surtaces
Sponge, soft cloth or
paper towel, mild
detergent,
warm water
DO NOT USE Cleaning
bleaches
or cleansers
Servo-Door
back, slideout tray, utilrty door, and
other dark panels
Mrld detergent
and
warm water, soft, clean
sponge
and soft. clean
cloth
parts.
provides
rust
p~teCtlOf’I.
Wash with warm water and
-mild
detergent
or
-baking
soda (2 tablespoons
1 quart [ 95 I] warm water.
Rinse and dry
l
l
Door loners and gaskets
water
Wash with mild detergent
water
Rinse and dry
l
l
[ 26 g] to
and warm
waxes, concentrated
detergents,
containing
petroleum
on plastic
parts.
Wash with a soft grit-free cloth or
sponge
Rinse and dry with a damp grittfree
cloth or chamois
l
l
DO NOT USE paper towels, wlndow sprays, scouring cleansers,
or solvents llke acetone,
benzlne, carbon tetrachlortde,
etc.
These can scratch or damage
the material.
Defrost
Warm water
detergent
pan
and
mild
Remove base grille (See page 11 )
To remove defrost pan, lift pan over wire
brace [remove
tape. if any)
Wash defrost pan with warm water and
mild detergent
Rinse and dry
Replace
with notched
corner to the rear
Push It all the way In
Make sure defrost drain tube IS pointing
into pan
Replace
base grille.
l
l
l
l
l
l
l
l
Condenser
Co11
Vacuum
cleaner.
using
the extended
narrow
attachment
l
Remove
l
Clean dust and lint from condenser
when CHECK COIL Symbol glows (every
2 months]
Replace
base grille
l
Floor under
refrigerator
Usual floor
cleaners
l
l
l
l
12
base
grille
Roll refrigerator
out only as far as water
supply line~allows
Wash floor
Roll refrrgerator
back
Check to see If the refrigerator
IS level
Food storage guide
iTORlNG FRESH FOOD
Cured or Smoked Meat and Cold Cuts. Ham.
bacon,
sausage,
cold cuts, etc
keep best In orlglnal wrapprngs
Once
opened,
trghtly
re-wrap
in
plasttc wrap or alumrnum
foil
Canned
Ham. Store in refrrgerator
unless the label says It’s okay to store on the shelf Do not freeze
Fresh Poultry
Loosely wrap in waxed
paper
or
plastic
wrap
The plastic
wrap on poultry,
as purchased,
may be used for storage
_-
There is a right way to package
and store refrlgerated or frozen foods. To keep foods fresher. longer.
take the time to study these recommended
steps
Leafy Vegetables..
Remove store wrapptng
Trim
3r tear off bruised
and drscolored
areas
Wash In
cool water, drain and store In crrsper Cold. morst air
nelps keep leafy vegetables
fresh and crisp The
crisper has sealing
gaskets to help keep humid air
In It also has a control to help adjust the amount
of
numrdrty in the crisper
Vegetables
with Skins (carrots, peppers)
Store
in crisper, plastrc bags or plastrc container
Wash, tet dry and store In refrigerator
In
Fruits
plastic
bags or crisper
Do not wash or hull berries
until thev are readv to use Sort and keep berries In
STORAGECHART FOR FRESHAND CUREDMEAT*
Approxlmate
Time
rVw
(days)
Variety Meats . . . . . . . . . . . . . . 1 to 2
1 to2
Chicken
.
...
..
Ground Beef . . . . .
.
. . . . 1 to 2
Steaks and Roasts . . .
. . . . . 3 to 5
7 to 10
Cured Meats . . . . . . .
... .
Bacon . . . . . . . . . . . . . . . . . . . . . . . . . . . . 5to7
ColdCuts
. . . . . . . . . . . . . . . . . . . . . . . . 3to5
*If meat is to be siored longer than the times given.
follow the directions for freezing.
NOTE: Fresh fish and
same
day
as
purchased
shellfish
should
be used
the
Eggs Store without washrng in the origrnal carton or use the Ut~I~ty Brn that came
with your
refrigerator
Milk Wrpe milk ccrtons
For best storage.
place
you
Meat IS perishable
and expensrve
Meat’
mrlk on Interior shelf or bottom
door shelf
won’t want to waste an ounce of It through
careless
Beverages
Wipe bottles
and cans Store on a
handling
The followrng
list and chart grve you packdoor shelf or Inside the refrrgerator
aging
hints and time limits. Store meat In the meat
Butter ..Keep opened
butter In covered
dsh or in
pan.
the Utility Compartment.
When storing an extra supFresh, Prepackaged
Meat. Store fresh meat In ply, wrap In freezer packaging
and freeze
the store wrapping.
Vacuum
packaged
meat can
Store In the orlgrnal
wrapping
untrl
Cheese
be frozen for as long as one month If the seal IS not you are ready
to use it Once
opened,
re-wrap
broken
If YOU Want to keep
It frozen longer.
You tightly ,n plastic wrap or alumrnum
foil
should wrap It with special freezer wropprng
materrol
Condlments
.Store small tars and bottles (catFresh Meat, Not Prepackaged.
Remove
the sup, mustard, jelly, olives) on the door shelves where
marKet
wrapprng
paper
and re-wrap
loosely
In they are in easy reach
waxed paper or aluminum
forI for storing It unfrozen
leftovers
Cover
leftovers
with plastrc
wrap or
Cooked
Meat. Wrap or cover cooked
meat with aluminum
foil to keep food from drying
out and
waxed
paper,
plastic
wrap or aluminum
foil Store t ransferrlng
food odors Plastic containers
with trght
rmmedrately.
lids are fine, too
13
FREEZING & STORING FROZEN
FOODS
6
3
The freezer section IS designed
for storage of commercrally
frozen foods and for freezing
foods
at
home
Packaglng-The
secret of successful
freezlng
IS
in the packaging.
The wrap you use must be arr,
moisture
and vapor
proof
The way you close and
seal the package
must not allow
arr. mctsture
or
vapors In or out
Rrgid polyethylene
[plastic)
containers
with trghtfitting
lids, straight-sided
canntng
1 freezing
jars.
heavy-duty
aluminum
foil, plastrc-coated
paper and
non-permeable
plastic
wraps [such as saran) are
recommended.
Note, Heat-sealed
boiling bags are
easy to use and can be used by themselves
or as
carton
liners.
SealingWhen sealing
out the air (liquids need
foods In bags
headspace
to
expansion.)
Twist the top and turn It back
securely
around
the doubted-over
tail Put
Inside transparent
bags, use self-adhesive
outside of opaque
ones
squeeze
allow
for
Fasten tre
the label
label on
over twtce
Finish package
and tape closed
NOTE
With unboned
meats, pad sharp edges
with extra
wrap or use stockrnette
to protect
the wrap from
punctures
DO NOT USE:
Bread wrappers
l Non-polyethylene
plastic containers
l Containers
without tight lids
l Waxed
paper
0 Wax-coated
freezer wrap
l Thin, semi-permeable
wrap
None of these are totally moisture, air or vapor
proof.
l
J
5
Air-tight
wrapping
calls for “drugstore”
wrap
Cut
the sheet about one-thrrd
longer than the distance
around the food Bring the ends together
and fold in
(toward the food) at least twce to seal out air Crease
ends close to food, press air from package
Fold tips
14
Freezing Fruits - Select rrpe, blemish-free
fruits
Be sure they taste as good as they look Wash 2 to
3 quarts (liters) at a time and drain Fruit that stands
In water may lose food value and become,
soggy
Sort, peel, trim, pit and slice as needed.
Pack IE rigid wide-mouthed
containers
or other
recommended
materrol
Leave head space to aIlow liquids to expand
during freezlng
Freezing Vegetables
~ Freeze orly fresh highquality
vegetables
plcked
when barely
mature
For best results, freeze no more than 2 to 3 hours
after picking
Wash lrl colu water sort and cut Into
opproprlate
sizes Blanch or scald
Pack In recommended
container
and freeze
Do not freeze lettuce,
celery
carrot sticks potatoes or fresh tomatoes
All WIII become
IImp or
mushy Tomatoes
will collapse
when thawed
Freezing
Cooked
Food ~ Prepare
cooked
foods as you would for the table
shorten cooking
time 10 to 15 minutes toallow
for additional
cooking
during reheating
Omlt seasonings
and part of the
‘lqutd
Plan to add them at reheating
time Potatoes should also be added
to soup and stew at
heating
time Add crumb and cheese topplngs
at
heating
time
Cool as rapidly
as possible
and freeze at once
Liquid or semi-Ilquid
dishes may be frozen In recommended
containers
with head space
Cosserales and other more solid foods may be frozen In
the baking
contolner
If you don t want to leave
your casserole
dish in the freezer, line it with foil
Bake, cool, freeze, lift out the foil package,
bag it
and return to freezer
Freezing Meats -The meat you thaw can only
be as good
as the meat you freeze
“Drugstore”
wrap In meal-size
packages
Flat cuts or patties
should be wrapped
lndlvldually
or In layers separated by a double
thickness
of freezer wrap
Make sure store wrappings
are moisture and vapor proof
If not, re-wrap
meats with one of the
wraps recommended
under “Pockagtng”
Freezing Baked Goods -Wrap
baked
breads
in recommended
materlal
Thaw In wrapping
Unbaked
yeast breads
can be frozen after the first
rising. Punch down, wrap and freeze
Bake cookies
as usual Cool and freeze on trays,
then pack in recommel-ided
freezer bags or cartons Unbaked
cookies
may be dropped,
molded
or rolled and frozen on cookie trays Store In bag or
carton,
bake
wthout
thawing
Refrigerator-type
cookies
can be wrapped
and frozen in roll form.
Thaw only encugh
to slice when ready to bake
Fruit pies are best frozen unbaked
Bake without
thawing
Bake pecan
and similar
pies before
freezing
rich fillings do not freeze solld Cut steam
vents in top crusts when ready to bake
15
IMPORTANT:
Do not expect
your
freezer
to quick-freeze
any large
quantity
of food. Put no more un,.
frozen food into the freezer than will
freeze within 24 hours. (No more than
2 to 3 pounds of fresh meat or 3 to 4
pounds of vegetables
per cubic foot
of freezer
space.)
leave
enough
space
for air to circulate
around
packages.
Be careful
to leave
enough room at the front so the door
can close tightly.
FOOOSTORAGECHART
Storage
times*
will vary according
to the
quality
of the food, the type of packaging
or
wiop used (moisture
and vapor-proof),
and
ihe storage
temperature
which
should
be
0” F ( -17~3°C).
Food
Storage tlmeFRUITS
Fruit juice concentrate
.
12 months
Commercially
frozen fruit . 12 months
Citrus fruit and juices. . . . 4 to 6 months
Others
... . ...
. 8 to12 months
VEGETABLES
Commercially
frozen
.
8 months
Home frozen . . . . . . . . . . 8 to 12 months
MEAT
4 weeks or less
Bacon
.
Cornedbeef
. . . . . . . . . . . . . . 2weeks
Cured ham
1 to 2 months
(Saltlng meat shortens freezer life)
Frankfurters
. . . . . . . . . . . . . . . 1 month
Ground beef, lamb, veal 2 to 3 months
Roasts:
Beef . . . . . . . . . . . . . . 6 to 12 months
Lamb and veal . . . . . . . 6 to 9 months
Pork . .
. . . . . . . . . 4 to 8 months
Sausage, fresh
. . . 1 to 2 months
Steaks and chops:
Beef
...
. .
. 8 to 12 months
Lamb, veal, pork . . . . . . 3 to 4 months
FISH
Cod, flounder, haddock
Sole.......................
6months
Blue fish, salmon
. . . . . . . . 2 to 3 months
Mackerel,
perch . .
.
2 to 3 months
Breaded
fish [purchased)
. . . 3 months
Clams, oysters, cooked
fish, crab, scallops
. . . 3 to4 months
Alaskan king crab
. . . . . . . 10 months
Shrlmp. uncooked
. . . . . . 12 months
POULTRY
Whole chicken or turkey . . . . 12 months
Duck . . . . . . . . . . . . . . . . . . . . . . . . 6months
Giblets
. . .
2 to 3 months
Cooked
poultry w/gravy
6 months
Slices (no gravy)
. .. ..
. 1 month
Food
Storage time
MAIN DISHES
Stews; meat, poultry
and fish casserole
2 to 3 months
TV dinners.
3 to 6 months
DAIRY PRODUCTS
Butter
.
6 to 9 months
Margarine
2 to 9 mcnths
Cheese:
Camembert,
brick,
Mozzarella,
farmer’s
3 months
Creamed
cottage
DO NOT FREEZE
Cheddar,
Edam, Gouda.
Swiss, etc.
6 to 8 weeks
Freezing can change texture of
cheese.
Ice cream, ice milk
sherbet
_. _. _. _. _. 4 weeks
EGGS
Whole (mixed)
9 to 12 months
Whites
9 to 12 months
Yolks
9 to 12 months
[Add sugar
eggs1
or salt to yolks or whole
mlxed
BAKED GOODS
Yeast breads and rolls
3 months
Baked Brown ‘N Serve
rolls
.._.....
3 months
Unbaked
breads..
1 month
Quick breads
. . . . 2 to 3 months
Cakes, unfrosted
2 to 4 months
Cakes, frosted
.
8 to 12 months
Fruit cakes
. 12 months
Cookie dough
.
3 months
Baked cookies
8 to12 months
1 to 2 months
Baked pies..
Pie dough only
....
4 to 6 months
‘Bated
on US DA
suggesred
slaoge
and Michtgon
limes
If the electricity
Cooperol~ve
Erlenr~cn
Service
goes off.. .
ask the power company
hqw long It WI;I be off
1 If less thar\ 24 hours, keep the doors closed.
Most foods ~111slay frozen
2 If more than 24 hours
l Store all froze7
food lr a locker
Or
l Put about
20 pounds
of dry Ice on top of the
food
Use pieces
as big as possible
Wear
gloves for protection
l Use or con
perishables
at once If neither locker
ror dry Ice IS avallable
3 A full freezer
WIII stay cold longer than o par
tlally filled one
Meat stays cold
longer
than
baked
goods
If focd still has Ice crystals In it. it
can be refrozen
although
the quality and flavor
may be affected
Use refrozen
food first If you
hove any doubts about the food. dispose
of it
4 When the power
comes
back
on, the TOO
WARM Symbol WIII glow prcvided
the refrlgerotor temperature
IS too high The CHECK COIL
Symbol may also glow See pages 6 and 7 for
information
on these
Vacation
and
Short vacations.
..
Moving.. .
No need to shut off the refr gerator
r you *#III be
away
for less than four Necks
.,se bc’ per\sbables
freeze other Items Turn oft your Ice maker
snut OP
the water supply
empty the Ice bar a-d moke sure
ali Ice cubes are dispensed
out o+ the --echor,lsm
Long vacations.
..
Remove
all the food if You are going for a month
or more
At least a day ahead,
turn off the water
supply to the Ice maker
When the last load of Ice
drops, turn off the ice maker
Unplug
the refrrgerator
and clean
It rtnse well
and dry Tape rubber or wood blocks to both doors
keeping
them open far enough
for air io get rn
This will keep odor and mold from bullcrna
UD
Tape the blocks out of a child’s reach...do
allow children
near the refrigerator
when
doors are blocked
open.
To restart
refrtgerator,
see “Using
Your Refrigerator
not
the
”
Shut off the Ice maker water supply a day ahead
of trrne Drcconnect
the water lrne After the last supply of ice drops turn off the Ice maker
Remove
all food
Pack frozen foods In dry Ice
Unplug the refrrgerator
and clean It thoroughly
Rem
move everything
that comes out Wrap all parts well
and tapetnem
together
sothey don’t shaft and rattle
Also, remove
the water supply tank behrnd
the
meat pan by
1 Dlsconnectrng
water Inlet and outlet tubes at
the top of the tank
2 Removing
three mounting
screws from the tank
3 Draining
the tank
Re-install
the empty tank, and remember
to
check for tight water connections
when the refrtgerup at your new location
ator IS hooked
Screw In the levelltng
rollers, tape the doors shut,
tape the electrtc
cord to the cabinet.
When you get
to your new home, put everything
back, and refer to
page 4 Don’t forget to reconnect
the water supply
line if you hove an icemaker.
QUESTIONS?
. ..call your
COOL-LINE”
servce
assrstance
telephone
number
@we
19).
17
If you need service or
assistance, we suggest
you follow these four steps:
1. Before calling
for assistance..
.
Performance
problems
often result from lrttle thongs
You can find and IIX Yourself without tools of any kind
if your refrigerator
will not operate:
Is the TOO
display?
l
if the check
l
Is a fuse blown or a circurt
Is the Temperature
Control
l
if your ice maker
plugged
is water
breaker
turned
tripped?
ON?
Check
fuses
plugged
In
See instructions
Use appliance
If the motor
l
l
Signal
Arm
’
Has the freezer had enough time to get cold? With
a new refrigerator,
this might take overnight
Is the signal arm ON...in the down posrtron?
Is the water valve turned on, and is water getting
to the ice maker?
if there
is a Beeping
Sound:
rj=$@
l
l
18
noise,
or other
pan:
working:
and
if a bulb is burned
l
l
or jingling
Clear
In hot, muggy weather,
this is normal
The pan can
even be almost full. Make sure the refrrgerator
is
level so the pan doesn’t overflow.
l
l
l
on too often:
interruptrons’
in the defrost
if the lights aren’t
l
comes
power
in the
in’
will not operate:
OFF/ON;
OPEN symbol
Is something
on top or behind the refrigerator
making noise when the refrigerator
is runnrng?
New features
on Your new refrigerator
make new
sounds. You may be hearing
air flowing
from the
fan, timer clicks for the defrosting
cycle,
defrost
water drainrng
Into the defrost pan, or water filling
the molds and ice dropping
into the bin
if there
cord
coil symbol
if there is a rattling
unfamiliar
sounds:
l
Is the electric
or DOOR
Have there
been
symbol from display.
l
l
l
WARM
Was the AUTO SCAN Switch just placed
In RESET?
Is AUTO SCAN Switch in RESET? Beeping
Sound is
heard when a door is opened
or closed.
l
crrcurt
breakers.
Make
sure
It’s
out:
for changing
bulbs only
light bulbs on page
10
seems to run too much:
Is the condenser,
behind
the base grrlle, free of
dust and lint?
On hot days, or if the room is warm,
the motor
naturally
runs longer
If the door has been opened
a lot. or if a large
amount of food has been put in, the motor WIII run
longer to cool down the interior.
Remember:
Motor running time depends
on different things: number
of door openings,
amount
of
food stored, temperature
of the room, setting of the
controls.
And, Your new refrigerator
may be larger than
Your old one so It has more space
to be cooled.
It
also has a regular
freezer instead
of a frozen focd
compartment.
All this means better refrigeration
and
may require more running time than your old one
2. If you need assistance
“...
4. If you have a problem’.‘...
Call Whirlpool
COOL-LINE Q service
assistance telephone
number. Dial free from:
Continental
U.S. . . . . . . . . . (BOO) 253-1301
Michigan..
. . . . . . . . . . . . (800) 632-2243
Alaska (Ir Hawaii
. . . . . . . . . . . (800) 253-1121
and talk with one of our trained
Consultants
The
Consultant
can Instruct you In how to obtain satlsfac~
tory operation
from you: appliance
or of service
IS
necessary
recommend
a quaIlfled
service
company in your area
Call our COOL-LINE service assistance
telephone
number [see Step 2) and talk with one of our Consultants, or I( you prefer, write to
Mr Guy Turner Vice President
Whirlpool
Corporation
Admlnlstrative
Center
2000 US-33 North
Benton Harbor Ml 49022
If you must call or write. please
provide
mcdel
number
serial number.
date of purchase.
and a
complete
descrlptlon
of the problem
This lnforma~
tion IS needed
In order to better
respond
to your
request for assistance
0
FSP
R
FSP 15 o reg~steredtrodemak
of WhIrlpool
corporation
for quolihi
parts
Look forth6
svmbol
of quollbv
whenever
you need o replacement
pafl for your Whirlpool
appliance
FSP
replOCement
parts
4f1t
rlghl and work rIghI
because
they are mode
lo the some exacting
spec~hcot~ons
used lo bblld every new
WhIrlpool
appliance
3. If you need service- . . .
Whirlpool
has a notlonwlde
network
of
franchised
TECH-CARE3
Service
Companies
TECH,-CARE
service
technicians
are tralned
to fulfill
the product
warranty
and provide
after-warranty
service.
FRANCHISED
SERVICE
anywhere
In the United
States
To
locate
TECH-CARE servlce In your area. call our COOL-LINE
service assistance
telephone
number [see Step 2) or
look in your telephone
directory
Yellow Pages under
7zwxARE
APPLIANCES-HOUSEHOLOMAJOR-SERVICE8
WHIRLPOOLAPPLIANCES
FRANCHISEDTECH-CARESERVICE
SEHI~IC‘E
XYZSERVICECO
123 Maple
ELECTRICALAPPLIANCESMAJOR-REPAIRING
REPAIR
OR
(‘O.Wf’A.VIES
.S;EH \‘I(‘.!,’
XYZSERVICECO
123 Maple
999.9999
(L PARTS
WHIRLPOOLAPPLIANCES
FRANCHISEDTECH-CARESERVICE
(‘O.WP.4 .V,E.S
999 9999
OR
WASHING MACHINES,
a IRONERS-SERVICING
DRYERS
WHIRLPOOLAPPLIANCES
FRANCHISEOTECHKARESERVICE
SER \‘I( ‘E (‘O.W/‘A VIES
XYZSERVICECO
123 Maple
999.9999
19
Maklng your world a llttle easier.
Part No. 944014 Rev. Ei
,C1983 Whirlpool Corporation
ce Makers
DIshwashers
BUM-In
Ovens
and Surlace
Printed in U.S.A
Unlls
Ranges
Microwave
Ovens.
Trash Compactors
Room Air Condllloners.
Oehumldlfwrs.
Automallc
Washers.
Clothes
Or