1
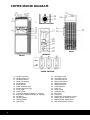
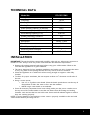
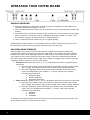
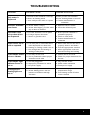
Coffee Maker
EP-COFCOM1
OWNER’S MANUAL
EPICUREANIST COFFEE MAKER
The Epicureanist Coffee Maker combines style with functionality while dispensing
the perfect cup of instant coffee. It offers hot or cold coffee and features
adjustable coffee strength settings.
PLEASE READ ALL INSTRUCTIONS BEFORE USE
-SAVE INSTRUCTIONS-
IMPORTANT SAFETY INSTRUCTIONS
To reduce the risk of fire, electrical shock or injury when using
your appliance, follow these basic precautions:
• Do not operate this or any other appliance with a damaged cord.
• Connect to properly polarized outlets only. It is recommended that a separate circuit,
serving only your appliance be provided. Use receptacles that cannot be turned off by
a switch or pull chain. Be sure that the plug is fully inserted into the receptacle.
• Replace all panels before operating.
• Exercise caution and use reasonable supervision when appliance is used near children.
Never allow children to operate, play with or crawl inside the appliance. Keep packing
materials away from children.
• Before performing any maintenance or cleaning, ensure that the unit is unplugged or
that the power line is disconnected.
• Do not clean appliance with flammable fluids. Do not store or use gasoline or other
flammable vapors and liquids in the vicinity of this or any other appliance. The fumes
can create a fire hazard or explosion.
• When disposing of refrigerated appliances, special handling is often required. It is the
consumer’s responsibility to comply with federal and local regulations when disposing of
this product.
• Locate the unit away from direct sunlight and sources of heat (stove, heater, radiator,
etc). This unit is intended for indoor use only and must be installed in an area protected
from the elements.
• Place the appliance on a solid, level surface. It is important that the unit be level for
proper performance and adjustments to level it should be made.
• Do not attempt to repair or replace any part of your appliance unless it is specifically
recommended in this manual. All other servicing should be referred to a qualified
technician.
• To protect against electric shock, do not immerse appliance, plug or cord in water or
other liquids. Avoid locating the unit in moist areas.
• Do not use this appliance for other than its intended purpose.
• The unit is an electrical appliance. To avoid injury or death from electrical shock, do not
operate the unit with wet hands, while standing on a wet surface or while standing in
water.
• Do not use solvent-based cleaning agents or abrasives on the interior of the unit. These
cleaners may damage or discolor the interior.
WARNING: This appliance is not intended for use by persons (including children) with
reduced physical, sensory and mental capabilities, or lack of experience and knowledge,
unless they have been given supervision or instruction concerning the use of the appliance by a
person responsible for their safety.
22
ELECTRICAL CONNECTION
Improper use of the grounded plug can result in the risk of electrical shock.
If the power cord is damaged, frayed or shows cracks or abrasions across
its length, have it replaced at an authorized service center.
For your protection, this unit is equipped with a 3-conductor cord set that has a molded 3prong grounding-type plug, and should be used in combination with a properly connected
grounding-type outlet.
• Do not under any circumstances cut or remove the third ground prong from the power
cord supplied. For personal safety, this appliance must be properly grounded.
• The cord should be secured behind the unit and not left exposed or dangling to prevent
accidental injury.
• A standard electrical supply (110V AC only, 60Hz), properly grounded in accordance
with the National Electrical Code and local codes and ordinances, is required.
• Never unplug the unit by pulling the power cord. To disconnect the appliance, always
grip the plug firmly and pull straight out from the wall outlet. When moving the unit, be
careful not to damage the power cord.
• The unit should always be plugged into its own individual electrical outlet with a voltage
rating that matches the rating label on the unit. It is strongly recommended that you do
not use an adapter or an extension cord with this unit.
3
3
COFFEE MAKER DIAGRAM
VENTILATION FAN
REAR
FRONT
INTERIOR
POWER SWITCHES
1.1
1.2
1.3
1.4
1.5
1.6
1.7
1.8
1.9
2.0
2.1
2.2
2.3
2.4
2.5
2.6
44
Powder Container
Powder Outlet Cup
Ventilation Mouth
Water Inlet Hopper
Powder Mixer
Drinks Nozzle
Water Selecting Light
Powder Selecting Light
Power Light
Heating Light
Left Drinks Dispense Button (L. working)
Right Drinks Dispense Button (R. working)
Set Button
Adjusting Button
Cleaning Button
Upper Door
2.7
2.8
2.9
3.0
3.1
3.2
3.3
3.4
3.5
3.6
3.7
3.8
3.9
4.0
4.1
4.2
Hot Water Faucet
Cold Water Faucet
Left Drinks Faucet
Right Drinks Faucet
Water Receptacle
Refrigerator Door
Power Switches
Drain Lid
Power Cable
Ventilation Fan
Fan Cover
Condenser
Refrigerator Temperature Control
Cooling Power Switch (Green)
Heating Power Switch (Red)
Main Power Switch (Yellow)
TECHNICAL DATA
Model No.
Voltage
Frequency
EP-COFCOM1
AC 110V
60 Hz
Heating Power
550W x 2
Cooling Power
90W
Water Heating Capacity (10 liters/hr)
194°F
Water Cooling Capacity (2 liters/hr)
50°F
Drink Making Capacity (fl. oz)
4.06-5.41
Powder Discharge Tolerance
5%
Water Discharge Tolerance
10%
Refrigerant
Climate Class
Drink Dispatching Speed
Electrical Shock Protection
Ambient Temperature Range
R134a, 1.59oz
SN-T
1 cup/6 seconds
I
50°F-100°F
INSTALLATION
IMPORTANT: The unit should be transported carefully, right side up, without any exposure to
moisture or rain. Always drain any water from inside the unit before transportation.
• Remove all packing material and tape before using your coffee maker. Check to be
sure that the appliance is in good condition.
• This unit is designed for free standing installation and indoor use only. Position the unit in
a cool, dry place. Avoid placing the unit near any source of heat or moisture.
• Place the appliance on a solid level surface strong enough to support it when fully
loaded.
• To allow for proper circulation, the unit requires at least a 4" clearance on all sides of
the unit.
• Using a water source:
o Use a 3 or 5 gallon water bottle. Place the bottle upside down onto the top of
the machine to allow the water to flow into the machine.
o NOTE: Large water bottle is not included.
• Once all necessary connections have been safely made, turn the power switches on at
the top rear of the coffee maker to test the unit. Ensure that all heating and cooling
functions work and test the hot and cold water faucet and all indicator lights to confirm
they are working properly.
NOTE: To avoid damage to the machine, ensure water is properly available to hot and cold
water faucets before powering unit on.
5
5
OPERATING YOUR COFFEE MAKER
ADDING POWDER/MIX
• Open the Upper Door and lift the Powder Container carefully out of the cabinet. The
container can hold a maximum of 24.7 oz.
• Turn or rotate the Powder Outlet Cup so its mouth is upward to prevent the powder from
leaking.
• Open the powder container lid and pour the powder into it. Do not press powder tightly
into the container as that may lead to a blockage. Once the powder is in place, cover
the container properly and put it back in its original position.
• Turn or rotate the Powder Outlet Cup to its original position.
NOTE: Coffee grounds cannot be used with this unit. For coffee, instant power must be used.
Hot chocolate or other instant powdered drink mixes may also be used.
ADJUSTING DRINK STRENGTH
Drink strengths have been preset onto the unit. The strength can be further adjusted by
changing the amount of powder being fed into each drink or by altering the water quantity.
Use the “Set” button and “Adjusting” button to adjust powder and water quantity. Press the
“Set” button on the control panel more than once within 5 seconds to alternate between the
left water column, left powder column, right water column and right powder column. Press the
“Adjusting” button to choose a level in each column.
1. Powder Level: The Powder level (1, 2 or 3) determines the amount of powder mix in
each drink.
a. Press the “Set” button on the control panel to reach the desired powder column
(left or right). The indicator light will show which column is being adjusted.
b. Press the “Adjusting” button to select the desired powder level. The powder
levels are designated by the numbers 1, 2 and 3, with powder quantity
increasing with each level.
1. Minimum (Light)
2. Medium (Normal)
3. Maximum (Strongest)
2. Water Level: The Water level (1, 2 or 3) determines the amount of water in each drink.
a. Press the “Set” button on the control panel to reach the desired water column
(left or right). The indicator light will show which water column is being adjusted.
b. Press the “Adjusting” button and select your desired water level quantity. The
water levels are designated the numbers 1, 2 and 3, with water quantity
increasing with each level.
1. Minimum
2. Medium
3. Maximum
To dispense the strongest drink, set the Powder Level to 3 (maximum amount of powder) and
set the Water Level to 1 (least amount of water).
66
NOTE: If your drink is too light or strong, check if:
o The correct strength level is selected.
o The motor for feeding powder is working properly.
o The spiral shaft for feeding the powder is working properly.
o There is powder left in the container.
HOT AND COLD DRINKS
The coffee maker has Heating and Cooling switches, which heat and chill water, are located at
the top rear of the unit. When dispensing hot drinks, the heating power switch must be on, and
for cold drinks, the cooling power switch must be on. The unit requires approximately 15
minutes when initially switching from cold to hot drinks, and 30 minutes when switching from hot
to cold.
DISPENSING DRINKS
Once the desired level of powder and water is set, press the “L. working” or “R. working”
button to dispense a drink.
REFRIGERATOR
IMPORTANT: Clean the interior of the refrigerator with lukewarm water using a soft cloth
before first use.
• Store your creamer and other coffee condiments in the refrigerator located below the
coffee dispenser.
• You can adjust the temperature of the fridge by turning the Refrigerator Temperature
Control Knob to set to the desired temperature.
• Turn off the refrigerator without turning off the entire unit, turn the knob to “off”.
NOTE: The Main Power Switch also controls the power of the refrigerator. If the Main Power
Switch is off, then the refrigerator will not have power.
7
7
CARE AND MAINTENANCE
CLEANING
IMPORTANT: Always unplug the unit before cleaning or performing maintenance. It is
important to follow daily cleaning procedures to maintain optimum performance. All the parts
connected or in contact with the powder should be washed and disinfected on a daily basis.
Keep the powder outlet cup dry and clean.
1. Cleaning and Disinfection of the Powder Container.
a. Take out the Powder Container and open its cover.
b. Pull out the Powder Mixing Wheel.
c. Turn the Powder Outlet Cup and remove the top cover.
d. Turn the black knob at the rear of the Powder Container and remove.
e. Pull out the gear spring.
f. Pull out the Powder Feeding Shaft.
g. Soak the dismantled components in warm water and wash them with sterilizing
solutions until they are clean.
h. Dry them and replace parts in the Powder Container before placing it in its
original position.
2. Dismantling and Cleaning the Interior
a. Turn the Powder Outlet Cup and remove it from the Powder Container.
b. Remove the protective cover.
c. Pull down the Ventilation Mouth.
d. Remove the Water Inlet Hopper.
e. Remove the Powder Mixer and all joints and couplings.
f. Remove the Water Receptacle by slightly pulling upward. The protective
screen can also be removed.
g. Soak the parts in warm water and wash them with sterilizing solution until clean.
h. Dry all parts and replace them in original position.
3. Auto-cleaning
a. Press the “Cleaning” button and the cleaning light will flash.
b. Press the “L. Working” button if the left system is to be cleaned, or the “R.
Working” button to clean the right system.
c. Press the cleaning button again once the unit stops running.
NOTE: Place a cup under the drink faucet to collect water dispensed during the Auto-cleaning
process. This procedure should be repeated until the water dispensed is clear.
4. Ventilation Fan
a. The exhaust fan and cover should be cleaned regularly.
b. Press the button downward on the fan cover and remove it.
c. Remove the ventilation fan from the unit.
d. Clean the dust off the ventilation fan with a brush or dry cloth.
e. Replace the ventilation fan and cover.
88
TROUBLESHOOTING
PROBLEM
POSSIBLE CAUSE
POSSIBLE SOLUTION
Only water is
dispensed
a. Powder in the container is used up
b. Unit is in cleaning mode
c. Issue with powder motor or system
a. Insert powder into container
b. Press cleaning button to turn off
c. Contact manufacturer or
technician
No drinks available
from faucet
a. Water bottle is empty
b. Water inlet hopper, powder outlet
cup or mixer is blocked
a. Replace with new bottle
b. Clean the affected parts
Unit makes loud
noise when drinks
are dispensed
a. Powder container is out of place
b. Foreign object in the mixer
c. Motor or gearbox issue
a. Ensure powder container is
positioned properly
b. Wash or clean mixer
c. Contact manufacturer or
technician
Drinks not as hot or
cold as expected
a. Too many hot or cold drinks have
been dispensed in a short time
b. Heating or Cooling switch is not on
c. Not enough time for heating or
cooling to take place
a. Allow some time for the unit to
properly heat or cool drinks
b. Turn the appropriate switch on
c. Allow appropriate wait time
between heating and cooling
Coffee Maker makes
noise or vibrates
a. Unit may not be level
b. Unit is positioned without proper
clearance on all sides
a. Position unit so it is level
b. Check for proper clearances for
the unit
Coffee Maker light
indicates Power is
not on
a. Unit not plugged in
b. Improperly connected to socket
c. No power supply
a. Plug unit into socket
b. Check socket connection
c. Check power supply
Cooling and/or
Heating lights are
not on
a. Ambient temperature is too low
b. Water boiling point is too low
because of location with high
elevation
a. Locate unit in proper ambient
temperature range
b. Turn Heating switch off when
water is boiled
9
9
TERMS OF SALE & WARRANTY
Epicureanist LLC (“Seller”) and the person or entity that acquires these goods from Seller (“Purchaser”) hereby fully agree to
the following terms and conditions of the sale: Shipping fees are the responsibility of the Purchaser whether freight prepaid or
freight collect. Seller assumes no responsibility for the goods sold to the Purchaser once the goods have left the Seller’s
premises, including, but not limited to, late delivery by the moving carrier, or for events caused by any difficulty carrier incurs in
attempting to fit the goods into the Purchaser’s place of business or residence due to the size of the goods or otherwise.
Purchaser assumes all responsibility for delivery, payment of freight, access, measurement, installation, hook-up, wiring,
moving and storage of the goods. The transportation of all goods is subject to the terms and conditions which the moving
carrier imposes on Purchaser including, but not limited to, additional charges imposed per flight of stairs, and/or additional
charges resulting from the carrier’s inability to safely and/or adequately use the building elevator to lift the goods to an upper
floor. Any claim for damages incurred during shipment by the carrier of the goods are insured and handled directly with the
carrier and must be noted at time of delivery. Any damages due to manufacture defects will be handled directly with
Epicureanist, subject to the limited warranty.
All sales are final, and unless authorized in writing by the Seller, Purchaser may not return the goods, under any circumstance.
If Purchaser refuses to accept the goods, under any circumstance, the Purchaser is liable for the return and cost of freight both
ways, and if Seller does take back the goods, there will be a restocking charge that is 35% of the purchase price of the goods.
Built-to-Order products (including Cabinets, Racking, and Accessories) are non-returnable. Purchaser must notify Seller of nonconforming goods within four days of delivery, after which time all goods are deemed accepted. If an order has been placed
and production has started, cancellation of your order will be a 15% charge.
If Purchaser tenders payment with a check that has insufficient funds (NSF), or stops payment on a check or credit card for any
reason, Purchaser agrees to pay for all costs associated with the Seller’s connection or litigation of such a claim, including
without limitation extra damages, court costs and attorneys’ fees. Finance charges begin the date of invoice. Collection fees
plus NSF fee of $50 will be added to your invoice, which you agree to promptly pay. Title to the goods does not pass until
payment is received in full by Seller and Seller retains a security interest in the goods until they are paid for in full.
LIMITED WARRANTY: Seller warrants that the goods will be free of defects in materials and workmanship as follows:
Furniture style (wood) wine units: all cooling unit parts for a period of 5 (five) years; cabinetry and labor (uninstalled) for a
period of 12 (twelve) months from date of sale. For the metal cabinet wine units: parts and labor for cooling system and
cabinetry for a period of 12 (twelve) months from date of sale. Thermoelectric Units: 90 (ninety) days from the date of sale.
(This includes Wine Coolers, Beer Dispensers, Humidor, Portofino Wood Cellars, and Refrigerators). Wine-Mate Split Systems
and installed products are parts only for 1 year, no labor. Other Wine-Mate Cooling Systems are 5 years parts, 1 year labor.
Element Grills (via Element Products LLC) have a 1-year comprehensive parts warranty on entire product. Three years limited
parts warranty covering the stainless burner and a thirty day limited parts warranty on grill accessories. Wine Accessories and
Racking Systems are not warranted. For a scratch and dent/refurbished unit, warranty is 3 months from your dated invoice
(parts for function only, not cosmetic). There is no warranty on parts purchased separately. Removal and re-installation of unit
is not included in warranted labor. Purchaser’s exclusive remedy is limited, at Seller’s option; to repair or replace defective
part[s] with either new or factory reconditioned part[s]. Purchaser is responsible for shipping the unit pre-paid to designated
facility and Seller will pay return shipping charges in the continental United States for items repaired under warranty within 12
(twelve) months from da e of sale. Since the natural variation in texture, density, grain, color, tone and shade of wood is
unavoidable; Seller does not guarantee the texture, color, tone or shade of the wood: nor does seller guarantee the
colorfastness of wood or against peeling, chipping, cracking or scratching. Note: Unfinished wood is subject to warping; all
wood surfaces must be sealed before placing cellar into service. Improper placement of the unit will void the warranty. This
limited warranty does not cover damage due to such things as accident, misuse, abuse, mishandling, neglect, acts of God,
fires, earthquakes, floods, high winds, government, war, riot or labor trouble, strikes, lockouts, delay of carrier, unauthorized
repair, or any other cause beyond the control of the Seller, whether similar or dissimilar to the foregoing. Seller is not
responsible for any damages caused to Seller’s property resulting from the good. This limited warranty applies only inside the
Continental US. (Alaska, Puerto Rico and Hawaii are not warranted.)
Purchaser understands and acknowledges that the goods sold here are wine cellars, cigar humidors, and/or other similar units
which house wine or cigars. Purchaser assumes all risk of using these units, including risk of spoilage, humidity variations,
temperature variations, leaks, fire, water damage, mold, mildew, dryness and similar and any other perils that might occur.
Seller is not responsible for incidental or consequential damages, and there are no warranties, expressed or implied, which
extend beyond the Limited Warranty described above. The implied warranties of merchantability and of fitness for a particular
purpose are hereby expressly disclaimed. Some states do not allow the exclusion of incidental or consequential damages, or a
waiver of the implied warranties of fitness and/or merchantability, so the above limitations may not apply to you. This warranty
gives you specific legal rights and you may also have other rights which vary from state to state.
In the event of any dispute between Seller and Purchaser arising out of or relating to these terms and conditions or to the
goods sold generally, Purchaser must first file a written claim with Seller within ten days of the occurrence giving rise to the
claim and wait an additional thirty days for a response before initiating any legal action. The sale and all terms are subject to
California law. Any legal proceeding arising out of or relating to these terms and conditions or to the goods sold generally shall
be brought solely and exclusively in the County of Los Angeles. In no event may Purchaser initiate any legal proceeding more
than six months after the occurrence of the event giving rise to the dispute.
The above terms and conditions are the only ones governing this transaction and Seller makes no oral representations of any
kind. These Terms and Conditions can only be modified in writing, signed by both Purchaser and Seller. 2/11
1 10
11
11
Contact [email protected] with any questions or visit
www.epicureanist.com
Costa Mesa, CA 92627
www.epicureanist.com
SERVICE & IMPORTANT NOTICE:
The manufacturer has a policy of continuous improvement on its products
and reserves the right to change materials and specifications without
notice.
WARNING:
Please do not place the unit within reach of children.
For adult use only.
Epicureanist is a trademark of Epicureanist LLC. All products, features, and services are subject to
change without notice. We cannot guarantee the accuracy of the contents of this document. We
disclaim liability for errors, omissions, or future changes.
©2010 Epicureanist LLC. All rights reserved.
1 12
Epicureanist LLC, 1835 Newport Blvd A109, Suite 334, Costa Mesa, CA 92627