1
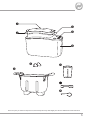
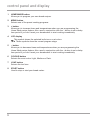
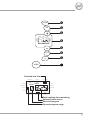
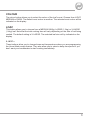
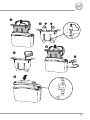
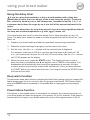
product safety
READ CAREFULLY AND KEEP FOR FUTURE REFERENCE
This product can be used by children aged 8 years and above, and persons
who require supervision, provided:
• they are familiar with the hazards associated with the product, and,
• they receive instruction by a competent person on how to safely use the
product.
Children must not play with the product. Cleaning and user maintenance
must not be done by children unless they are aged 8 or older and are
supervised.
Keep the appliance and its cord out of reach of children less than 8 years old.
Bread can burn therefore do not use the appliance near or below combustible
materials such as curtains. Never use the appliance below wall cupboards or
shelves.
Never operate the appliance by means of an external timer or separate
remote-control system.
Do not touch the metal parts of the appliance during use as they may become
very hot.
If the supply cord is damaged, it must be replaced by the manufacturer, its
service agent or similarly qualified persons in order to avoid a hazard.
!!Never use this appliance for anything other than its intended use. This appliance is for
household use only. Do not use this appliance outdoors.
!!Always ensure that hands are dry before handling the plug or switching on the appliance.
!!Always use the appliance on a stable, secure, dry and level surface.
!!This appliance must not be placed on or near any potentially hot surfaces (such as a gas
or electric hob).
!!Do not use the appliance if it has been dropped or if there are any visible signs of
damage.
!!Ensure the appliance is switched off and unplugged from the supply socket after use,
before fitting or removing parts and before cleaning.
!!Always allow the appliance to cool before cleaning or storing.
!!Never immerse any part of the appliance or power cord and plug in water or any other
liquid.
!!Never let the power cord hang over the edge of a worktop, touch hot surfaces or become
knotted, trapped or pinched.
!!Never leave the appliance unattended when in use.
!!This appliance generates heat during use. Adequate precaution must be taken to
prevent the risk of burns, scalds, fires or other damage to persons or property caused
by touching the bread pan and other surfaces whilst in use or during cooling.
!!Never leave the appliance unattended when in use.
!!Do not restrict or cover the steam vents in the lid and sides of the appliance. Ensure
that there is adequate ventillation around the bread maker during operation.
!!Do not touch moving parts.
!!Do not use the appliance when it is empty as serious damage may result.
2
before first use
Do not immerse the bread maker or power cord and plug in water or any other
liquid.
Before using your breadmaker for the first time, wash the inside of the bread pan and the
kneading paddles with hot, soapy water. Rinse and dry thoroughly.
Using a damp cloth or sponge, wipe the interior of the breadmaker, the inside of the lid
and the exterior of the breadmaker. Use only a mild detergent solution.
Wash the measuring spoon and measuring cup with hot, soapy water, then rinse and dry
them thoroughly.
3
features
1
Viewing window
Allows you to check on the progress of your bread during ccoking.
2
Bread pan handles
Cool touch bread pan handles make the bread pan easy and safe to fit and remove.
3
Control buttons and LCD display
4 Body
5
Kneading/mixing paddle (x 2)
Twin kneading/mixing paddles for optimum performance.
6
Removable bread pan
7
Measuring cup
8
Measuring spoon
Measure for 1 tablespoon or 1 teaspoon
9Hook
Sometimes the kneading/mixing paddles can become stuck in the bottom of the loaf
after baking. This hook can be used to remove them.
4
q
w
e
w
r
t
u
y
o
Due to our policy of continuous improvement, the actual product may differ slightly from the one illustrated in these instructions.
5
control panel and display
1
HOME MADE button
Allows you to program your own bread recipes.
2
MENU button
Selects one of the preset cooking programs.
3
+ button
Allows you to increase times and temperatures when you are programming the
Home Made recipe feature. Also used in conjunction with the – button to set a delay
time period if you don’t want your breadmaker to start cooking immediately.
4
LCD display
This symbol shows the selected loaf size or crust colour
◄ ► These symbols show the current program stage
5
– button
Allows you to decrease times and temperatures when you are programming the
Home Made recipe feature. Also used in conjunction with the + button to set a delay
time period if you don’t want your breadmaker to start cooking immediately.
6
COLOUR button
Selects the crust colour Light, Medium or Dark.
7
LOAF button
Selects the loaf size.
8
START button
Used to stop or start your bread maker.
6
q
w
e
HOME MADE
MENU
MEDIUM
TIMER
LARGE
X LARGE
RISE
TIMER
MENU
PREHEAT
BAKE
WARM
KNEAD
END
REST
LIGHT
MEDIUM
r
DARK
t
y
u
COLOUR
LOAF
START
Selected loaf size
MEDIUM
TIMER
PREHEAT
LARGE
X LARGE
RISE
TIMER
MENU
BAKE
WARM
KNEAD
END
REST
LIGHT
MEDIUM
DARK
Total cooking time remaining
Selected crust colour
Selected program
Current program stage
7
control panel and display
START
This button is used for starting and stopping the selected program. To start a program,
press the START button once. A short beep will sound, the colon (:) in the time display
will flash and the program will start. All the other buttons on the control panel will be
deactivated except the START button when the program has begun.
To stop the program, press and hold the START button for approximately two seconds. A
beep will sound indicating that the program has been stopped.
MENU
This button is used to select the different programs. Each time it is pressed a short beep
will sound and the selected program will change. If you press and hold the button, the
menus will cycle through quickly.
1. White: This program is primarily used for breads that use white flour, although some
recipes may include small quantities of whole wheat flour.
2. White Fast Bake: As above but with a reduced cooking time. This program only
makes a large size loaf with a medium colour crust.
3. Whole-wheat: This program is used for recipes which contain significant amounts of
whole wheat or rye flour, oats or bran.
4. Whole-wheat Fast Bake: As above but with a reduced cooking time. This program
only makes a large size loaf with a medium colour crust.
5. Crusty White: This program makes a light crusty loaf in 3 sizes.
6. Sweet Bread: Suitable for sweet breads such as raisin, cinnamon, apricot, etc.
7. Gluten Free: This program should be used when making gluten free, and yeast free,
bread.
8. Cake: Make a variety of sweet and savoury home-made cakes with this program. You
can use this program to mix and bake cakes.
9. Dough: This program only makes the dough and will not bake the final bread. This
dough setting is suitable for pizza bases, doughnuts, etc. Remove the dough to
shape it then bake it in a conventional oven (or, in the case of doughnuts, deep fry).
10. Pasta Dough: This program uses the mixing and kneading function of your bread
maker to make pasta dough for use in your own recipes.
11. Jam: Use this program to make sweet and savoury jams. The process is a simple
case of mixing and heating.
12. Extra Bake: This program provides an extra period (10 minutes) of baking. This
setting can only be used after a bread making program.
13. Home Made: This program allows you to configure each step in the baking cycle so
that you can create your own recipes.
8
COLOUR
The colour button allows you to select the colour of the loaf’s crust. Choose from LIGHT,
MEDIUM or DARK. The default crust colour is medium. The selected crust colour will be
indicated on the display.
LOAF
This button allows you to choose from a MEDIUM (900g), LARGE (1.2kg) or X LARGE
(1.4kg) loaf. Note that the total cooking time will vary depending on the size of loaf being
cooked. The default setting is X LARGE. The selected loaf size will by indicated on the
display.
+ and –
These buttons allow you to change times and temperatures when you are programming
the Home Made recipe feature. They also allow you to select a delay time period if you
don’t want your breadmaker to start cooking immediately.
9
using your bread maker
Never exceed the maximum capacity of your bread maker (1.5kg). Place your
bread maker away from direct sunlight, draughts, or heating appliances and
radiators. These can adversely affect the operation of your bread maker and spoil
the results.
1. Lift the bread pan out of the bread maker using the handles.
2. Fit the kneading/mixing paddles onto the shaft in the bottom of the bread pan. Each
shaft has a flattened side to grip the paddle when it is rotating. Align each paddle with
the flat on the shaft and press it down.
3. Pour the liquid ingredients into the bread pan. Add the rest of the ingredients to the
bread pan in the order listed in the recipe. Weigh all of your ingredients accurately
because incorrect measures will produce poor results.
Do not let the yeast come into contact with the salt or water prior to mixing because
this will prevent the dough from rising properly (the water will activate the yeast
before the ingredients are properly mixed and kneaded).
When using the delay timer, make a small hollow in the mound of flour and put the
dry yeast into the hollow.
4. Fit the bread pan into the bread maker and push it down to lock it into position. Close
the bread maker lid.
5. Plug your bread maker in to the mains supply socket. Your bread maker will beep
and select the default program (program 1).
6. Press the MENU button until the required program is selected. If the program
permits, select the loaf size and crust colour using the LOAF and COLOUR buttons.
7. Press the START button. Your bread maker will start to run the selected program.
To stop or cancel the program press the START button for approximately 2 seconds.
Your bread maker will beep and the program will be cancelled.
8. At the end of the baking cycle your bread maker will beep. Unplug your breadmaker
and, using oven gloves, lift the bread pan out of your bread maker.
9. Turn the bread out onto a wire rack and leave it to cool for at least 30 minutes.
10. Clean the bread pan and kneading/mixing paddle immediately after use—see
cleaning.
10
q
w
r
e
t
y
HOME MADE
MENU
COLOUR
LOAF
START
11
using your bread maker
Using the delay timer
If you are using the breadmaker in hot or humid weather with a delay time
greater than 2 hours, there is a danger of the bread rising too quickly. To prevent
this, reduce the liquid by one or two tablespoons, increase the salt by ⅛ to ¼ of
a teaspoon and reduce the sugar by up to one half of the amount indicated in the
recipe.
Don’t use the delay timer for long delay periods if you are using ingredients that do
not keep well at room temperatures e.g. milk, eggs, cheese, etc.
Your bread maker has a built in timer that allows you to delay operation for up to 15
hours. The delay timer cannot be used on certain programs such as the Ultra Fast, Jam,
Bake, etc.
1. Prepare your bread maker and add the ingredients as previously described.
2. Make the required settings for program, loaf size and crust colour.
3. Set the timer. Use the + or – buttons until the required time is displayed.
For example, if the time is 8:30 p.m. and you want the bread to be ready at 7.00
a.m., you need to set the timer for a 10 hour 30 minute delay. Use the + or – buttons
until 10:30 appears on the display.
4. When the timer is set, press the START button. The display will start to count
down the time to completion and ◄ will appear next to TIMER on the display. The
breadmaker will automatically start mixing the ingredients at precisely the right
moment and your bread will be ready at the desired time. Once you have pressed
the START button you cannot alter the timer. If you forget to press the START button,
the timer will not work.
Keep warm function
The automatic keep warm function prevents the bread from getting soggy by keeping the
baked bread warm for up to one hour after the program has ended. The function stops
when the START button is pressed or the breadmaker is unplugged from the supply
socket.
Power failure function
If the power to your bread maker is interrupted, for example, by a temporary power cut,
your bread maker will keep the program in its memory for up to 8 minutes. If the power is
restored within 8 minutes, your bread maker will carry on the program where it left off.
12
using the home made feature
The Home Made feature allows you to create your very own bread making programs. A
bread making program consists of 15 programmable steps. You can program each step
and control precisely what your bread maker does.
Once you have created your own program it will stay in your bread maker’s memory until
you change it in some way (e.g. by reprogramming it).
We will use a granary bread recipe to show you how to program your own recipes. The
table below shows what we will be setting for each of the 15 stages for our program. Note
that stages where the values are set to 0 will be skipped over.
Step
Function
Value
1
Preheat time
5 mins
2
1st kneading cycle time
5 mins
3
Rest period time
3 mins
4
2nd kneading cycle time
20 mins
5
1st rise cycle time
0 mins
6
3rd kneading cycle time
0 mins
7
2nd rise cycle time
0 mins
8
4th kneading cycle time
0 mins
9
3rd rise cycle time
90 mins
10
Bake cycle time
40 mins
11
Warm cycle time
60 mins
12
1st rise cycle temperature
0ºC
13
2nd rise cycle temperature
0ºC
14
3rd rise cycle temperature
35ºC
15
Bake cycle temperature
135ºC
To enter this program:
1. Press the HOME MADE button once. Your bread maker will beep and the display will
show 13 under MENU.
2. Press and hold the HOME MADE button until your bread maker beeps. You are now
in program mode and at step 1 (preheat time). The step you are at in the program is
shown on the left in the display. ◄ ► around the edge of the display will show the
step’s function.
3. Use the + or – buttons to enter 5 in the display. Maximum time you can enter is 60
minutes.
13
using the home made feature
4. Press the MENU button once to move on to step 2 (1st kneading cycle time). Use the
+ or – buttons to enter 5. Maximum time you can enter is 10 minutes.
5. Press the MENU button once to move on to step 3 (rest period time). Use the + or –
buttons to enter 3. Maximum time you can enter is 30 minutes.
6. Press the MENU button once to move on to step 4 (2nd kneading cycle time). Use
the + or – buttons to enter 20. Maximum time you can enter is 30 minutes.
7. Press the MENU button once to move on to step 5 (1st rise cycle time). Use the + or
– buttons to enter 0. Maximum time you can enter is 90 minutes.
8. Press the MENU button once to move on to step 6 (3rd kneading cycle time). Use the
+ or – buttons to enter 0. Maximum time you can enter is 59 minutes.
9. Press the MENU button once to move on to step 7 (2nd rise cycle time). Use the + or
– buttons to enter 0. Maximum time you can enter is 90 minutes.
10. Press the MENU button once to move on to step 8 (4th kneading cycle time). Use the
+ or – buttons to enter 0. Maximum time you can enter is 59 minutes.
11. Press the MENU button once to move on to step 9 (3rd rise cycle time). Use the + or
– buttons to enter 90. Maximum time you can enter is 90 minutes.
12. Press the MENU button once to move on to step 10 (bake cycle time). Use the + or –
buttons to enter 40. Maximum time you can enter is 90 minutes.
13. Press the MENU button once to move on to step 11 (warm cycle time). This is the
keep warm period that your bread maker will automatically enter after your bread
is made. Use the + or – buttons to enter 60. Maximum time you can enter is 60
minutes.
14. Press the MENU button once to move on to step 12 (1st rise cycle temperature).
Here, we are going to enter the temperature for the 1st rise cycle (programmed at
step 5). Our example program is set to 0 mins so use the + or – buttons to enter 0ºC.
The temperature range you can enter is from 20ºC to 50ºC.
15. Press the MENU button once to move on to step 13 (2nd rise cycle temperature).
Enter the temperature for the 2nd rise cycle (programmed at step 7). Our example
program is set to 0 mins so use the + or – buttons to enter 0ºC. The temperature
range you can enter is from 20ºC to 50ºC.
16. Press the MENU button once to move on to step 14 (3rd rise cycle temperature).
Enter the temperature for the 3rd rise cycle (programmed at step 9). Use the + or –
buttons to enter 35ºC. The temperature range you can enter is from 20ºC to 50ºC.
17. Press the MENU button once to move on to step 15 (bake cycle temperature). Enter
the temperature for the bake cycle (programmed at step 10). Use the + or – buttons
to enter 135ºC. The temperature range you can enter is from 70ºC to 160ºC in 5ºC
increments.
18. Press and hold the HOME MADE button until your bread maker beeps. Your program
has now been entered into your bread maker’s memory. To run your program, follow
the instructions on page 10 and use the MENU button to select menu number 13 at
step 6.
14
Notes
You can use the MENU button during programming (and before you press the HOME
MADE button at step 18) to step through and check each stage of your program.
If you want to change any step in your program before you have finished programming,
use the MENU button to go to that step then make your change.
If you want to change any step in your program after it has been programmed, do the
following:
1. Press the HOME MADE button once. Your bread maker will beep and the display will
show 13 under MENU.
2. Press and hold the HOME MADE button until your bread maker beeps. You are now
in program mode and at step 1 (preheat time).
3. Use the MENU button to go to step you want to change.
4. Use the + or – buttons to make your change.
5. When you have finished, press and hold the HOME MADE button until your bread
maker beeps. Your new program has now been entered into your bread maker’s
memory.
The table below shows the ingredients for the granary bread program used in our
example if you would like to try out your new programming skills!. We have also included
a home made chutney recipe in the recipe section that you can program and try out too.
Granary Bread
Menu (program) number
13 (Home Made)
Total cooking time
2:50
Water, tepid
275ml
Butter or margarine
25g
Salt
1¼ tsp
Sugar
2 tsp
Granary bread flour
500g
Dried yeast
1½ tsp
15
program times
Menu
(Program)
Number
Description
MEDIUM (900g)
LIGHT
MEDIUM
DARK
1
White
3:25
3:30
3:35
2
White Fast Bake
-
-
-
3
Whole-wheat
3:55
4:00
4:05
4
Whole-wheat Fast Bake
-
-
-
5
Crusty White
4:05
4:10
4:20
6
Sweet Bread
3:15
3:19
3:23
7
Gluten Free
-
2:45
-
8
Cake
Total cooking time 1:30
9
Dough
Total processing time 1:30
10
Pasta Dough
Total processing time 0:14
11
Jam
Total cooking time 1:00
12
Extra Bake
Additional 10 minutes
This table shows the maximum cooking or processing times for each program.
Times are given in hours and minutes e.g. 3:35 is 3 hours and 35 minutes.
Timer delay is up to 15 hours.
16
LARGE (1.2kg)
X LARGE (1.4kg)
Keep warm
Timer Delay
LIGHT
MEDIUM
DARK
LIGHT
MEDIUM
DARK
3:30
3:35
3:40
3:35
3:40
3:45
60 min
Yes
-
1:20
-
-
-
-
60 min
No
4:05
4:10
4:15
4:10
4:15
4:20
60 min
Yes
-
1:35
-
-
-
-
60 min
No
4:10
4:15
4:25
4:15
4:20
4:30
60 min
Yes
3:19
3:23
3:27
3:21
3:25
3:29
60 min
Yes
-
-
-
-
-
-
60 min
No
17
hints and tips
General
If your bread isn’t coming out the way you like, try changing the recipe slightly. Don’t be
afraid to experiment and before long you’ll be baking perfect loaves each and every time.
Always add the ingredeients in the order shown in the recipe. It’s important to keep the
yeast away from the liquids. Use the ingredients at room temperature (20º to 25ºC). The
temperature can affect yeast activity and will affect the quality of the bread.
Important measuring tips
Each ingredient in the loaf of bread plays a specific role, so it is extremely important to
measure the ingredients correctly to get the best results.
Always use the measuring spoon supplied with your bread maker. Never use household
cutlery becasue they can vary greatly in size and will lead to the inaccurate measuring of
ingredients.
Wherever possible we recommend weighing bulk ingredients such as flour on a kitchen
scale. Other dry ingredients can be measured using the spoon and cup provided, and
some butter wrappers provide weight guidelines.
Liquids
Fill the spoon or cup provided to the level indicated. Check your cup measurements by
placing the measuring cup on a flat surface and reading the measurement at eye level.
Solid Fats
When using butter and margarine it is important to chop the ingredients into cubes before
adding to the bread pan. Butter and margarine should be added at room temperature.
Use unsalted butter or margarine.
Add Ingredient Alert
If you are baking bread which requires the addition of other ingredients, such as dried fruit
or nuts, a beep will sound at the appropriate point in the cycle. The add ingredient alert is
only available on programs 1, 3, 6 and 9.
Dry Ingredients
Use the spoon provided (don’t use tableware spoons or cups). Put the dry ingredients
loosely into the spoon and level off with a flat knife. This is particularly important with flour.
Do not pack dry ingredients down into the spoon.
18
Freshness
Ensure all ingredients are fresh and used before the specified use-by-date. Avoid using
perishable ingredients such as milk, yoghurt, eggs or cheese with the time delay function.
Store dry ingredients in airtight containers, to prevent drying out.
Slicing Bread
For best results, wait at least 10 minutes before slicing, as the bread needs time to cool.
Place your loaf on its side and cut it with a sawing motion using a serrated bread knife.
For easy and even slicing we recommend using a bread knife or electric knife.
Freezing Bread
Make sure the bread has completely cooled. Slice and wrap the bread in plastic, before
freezing.
Toppings
Ingredients such as herbs, sesame seeds and chopped bacon can be added to the top of
the bread during the baking stage. Open the lid of the Breadmaker, gently brush the top
of the loaf with a little milk or egg yolk and sprinkle with topping (do not allow ingredients
to fall outside the pan). Close the lid and allow baking to continue.
This step needs to be done quickly to prevent the bread from sinking. The
Breadmaker gets very hot during baking, always use caution to prevent injury.
Using Bread Improver
The use of Bread improver is recommended to achieve optimum results, but is not an
essential ingredient. Bread improver will increase the gluten content of the flour mix. It
will also influence the structure, size and texture of the bread, so that it does not collapse
when baking.
19
ingredients used in bread making
Yeast
Yeast is a vital ingredient when bread making, without it the bread will not rise. Your bread
maker maintains the optimum temperature for the yeast to take effect, during the bread
making process.
Only use dried yeast that is suitable for bread making machines.
Some yeast may require the use of a bread improver. A bread improver will provide
additional gluten to the flour to produce a better loaf. If the weather is hot and humid, try
reducting the amount of yeast by ¼ of a teaspoon to prevent the dough from over-rising.
Flour
In order for the bread to rise, the flour used has to have a sufficiently high protein content.
We recommend the use of a good quality strong plain or bread flour.
Liquids
When liquids are mixed with flour, gluten is formed. Gluten is necessary for the bread to
rise. Most recipes use dried milk and water, but other liquids such as fresh milk and fruit
juice can be used.
Salt
In small amounts salt adds flavour and controls yeast action. Too much salt will inhibit the
yeast and the bread will not rise properly.
When adding ingredients to the bread pan, yeast and salt should be kept separate.
Other ingredients used in bread making;
•
Bread improver
•
Dried fruit and nuts
•
Fats (i.e. butter, margarine, oil)
•
Sugar
•
Dried powder milk
•
Eggs
20
recipes
Important note
If your bread isn’t coming out the way you like, try changing the recipe slightly. Don’t be
afraid to experiment and before long you’ll be baking perfect loaves each and every time.
Always place the ingredients into the bread pan in the order listed in the recipe. Keep the
yeast away from the liquid and salt.
Basic White Bread - Program 1
MEDIUM
Water (tepid)
Margarine
LARGE
X LARGE
330ml
400ml
470ml
1½ tbsp
2 tbsp
3 tbsp
Salt
1 tsp
1½ tsp
2 tsp
Sugar
2 tbsp
2½ tbsp
3 tbsp
Dried milk powder
2 tbsp
2½ tbsp
3 tbsp
525g
675g
900g
1½ tsp
2 tsp
2½ tsp
Strong white bread flour
Dried yeast
Multiseeded White Bread - Program 1
Water (tepid)
380ml
Olive oil
1½ tbsp
Salt
1½ tsp
Sugar
3 tsp
Dried milk powder
2 tbsp
Strong white bread flour
600g
Poppy seeds
3 tsp
Sesame seeds
3 tsp
Pumpkin seeds
3 tsp
Sunflower seeds
Dried yeast
3 tsp
1½ tsp
21
recipes
Sundried Tomato and Parmesan bread - Program 1
Water (tepid)
310ml
Oil (from the sun dried tomatoes)
1½ tsp
Salt
1 tsp
Sugar
1 tbsp
Parmesan cheese (finely grated)
70g
Strong white bread flour
525g
Wholemeal bread flour
75g
Dried yeast
1 tsp
Sun dried tomatoes, drained and
roughly chopped
70g
Add the sun dried tomatoes when your bread maker beeps (2:55)
White Fast Bake Bread - Program 2
The fast bake programs require the water to be at a temperature between 45ºC - 50ºC.
Water
440ml
Oil
2 tbsp
Salt
1½ tsp
Dried milk powder
3 tbsp
Sugar
2½ tbsp
Strong white bread flour
600g
Dried yeast
4 tsp
22
Whole-wheat Bread - Program 3
MEDIUM
LARGE
X LARGE
Water (tepid)
380ml
410ml
530ml
Oil
2 tbsp
2 tbsp
3 tbsp
Salt
1 tsp
1½ tsp
2 tsp
Sugar
2 tbsp
2½ tbsp
3 tbsp
1½ tbsp
2 tbsp
2½ tbsp
Strong white bread flour
300g
350g
500g
Whole wheat bread flour
300g
350g
400g
Dried yeast
1 tsp
1¼ tsp
1½ tsp
Dried milk powder
Whole-wheat Bread Fast Bake - Program 4
The fast bake programs require the water to be at a temperature between 45ºC - 50ºC.
Water
440ml
Vegetable oil
3 tbsp
Salt
1½ tsp
Sugar
2½ tbsp
Dried milk powder
3 tbsp
Whole wheat bread flour
300g
Strong white bread flour
300g
Dried yeast
4 tsp
23
recipes
Crusty White Bread - Program 5
MEDIUM
LARGE
X LARGE
Water (tepid)
300ml
375ml
410ml
Olive oil
1 tbsp
1½ tbsp
2 tbsp
Salt
1½ tsp
1½ tsp
2 tsp
Sugar
2 tbsp
2¼ tbsp
2½ tbsp
Strong white bread flour
400g
500g
600g
Plain white flour
55g
80g
80g
Dried yeast
1 tsp
1¼ tsp
1½ tsp
Sweet Bread - Program 6
Large Plain Brioche
Spicy Orange Brioche
Strong white bread flour
450g
450g
Salt
¾ tsp
½ tsp
Caster sugar
2 tbsp
55g
Butter
115g
150g
Eggs
3
3
Milk
150ml
3 tbsp
Vanilla extract
1 tsp
-
Dried yeast
1½ tsp
1½ tsp
Orange zest
-
1 tbsp
Mixed spice
-
1 tsp
24
Fruit Loaf - Program 6
Water (tepid)
375ml
Margarine
2 tbsp
Strong white bread flour
440g
Dried milk powder
2 tbsp
Sugar
2½ tbsp
Salt
1½ tsp
Mixed spice
1½ tsp
Dried yeast
2 tsp
Dried fruit
110g
Add the mixed fruit when your bread maker beeps (2:45)
Gluten Free - Program 7
Milk
310ml
Cider vinegar
1 tsp
Olive oil
6 tbsp
Eggs (medium, beaten)
2
Salt
1 tsp
Gluten free white bread
flour
460g
Sugar
2 tbsp
Dried yeast
2 tsp
25
recipes
Citrus Sponge Cake - Program 8
Butter, softened
200g
Caster sugar
200g
Eggs (medium, beaten)
4
Self raising flour
200g
Baking powder
1 tsp
Orange
1 (zest only)
Lemon
1 (zest only)
Sticky Gingerbread Cake - Program 8
Demerara sugar
30g
Butter
90g
Golden syrup
60g
Black treacle
90g
Milk
Eggs (medium, beaten)
Plain flour
180ml
1
270g
Ground ginger
2½ tsp
Baking powder
2 tsp
Bicarbonate of soda
2 tsp
Salt
½ tsp
26
Melt together and add to
the pan
Sieve together and add to
the pan
Rich Fruit Cake - Program 8
In this recipe, the dry ingredients are mixed together in a bowl before adding to the bread
pan, then the wet ingredients are added.
Eggs (medium, beaten)
Melted butter
Vanilla/almond extract
4
100g
A few drops
Mixed fruit
275g
Chopped dates
50g
Walnut pieces
50g
Halved glacé cherries
50g
Mixed spice
2 tsp
Dark brown soft sugar
100g
Plain flour
250g
Bicarbonate of soda
Orange
2 tsp
1 (zest only)
Pizza Dough - Program 9
Water
200ml
Olive oil
2 tbsp
Caster sugar
1 tsp
Salt
1 tsp
Strong white bread flour
300g
Dried yeast
1 tsp
Place the prepared dough onto an oiled baking tray and top it with your favourite pizza
toppings. Bake it in a preheated (220ºC) oven for approximately 20 minutes until the
cheese is melted and the crust is golden.
For dough balls, roll the dough into small balls and place them onto an oiled baking tray.
Cook in the oven until golden. Serve with melted garlic butter for dipping.
27
recipes
Garlic and Coriander Naan Bread - Program 9
Milk, warm
130ml
Olive oil
2 tbsp
Salt
1 tsp
Ground cumin
2 tsp
Ground coriander
2 tsp
Garlic
2 cloves, crushed
Strong plain white flour
300g
Dried yeast
1 tsp
Pre-heat the oven to 210ºC. When the dough is ready, remove it from the bread pan.
Place it on a floured surface. Break it into quarters and roll it in to a flat circular shape,
approximately 1 to 1 ½ cm in width. Lightly oil both sides and place it on a baking tray in
the pre-heated oven for approximately 10 minutes until it is golden and puffed up.
Remove and keep warm in a clean tea-towel until all the dough is cooked.
Pasta Dough - Program 10
Water
2 tbsp
Eggs (medium, beaten)
3
Olive oil
Strong plain flour
2 tbsp
1½ cups
Salt
½ tsp
Wholewheat Pasta Dough - Program 10
Water
Eggs (medium, beaten)
2 tbsp
2
Olive oil
2 tbsp
Semolina
½ cups
Wholewheat bread flour
1 cup
Salt
½ tsp
Both of these doughs will last for two days in the refridgerator wrapped in oiled cling film.
Alternatively, both doughs can be frozen.
28
Strawberry Jam - Program 11
Strawberries, washed hulled and halved
300g
Jam sugar
260g
Lemon juice
2 tbsp
Our jam recipe uses jam sugar which is readily available in most good supermarkets.
Jam sugar contains pectin which allows jams and jellies made using soft fruits to set
successfully. Fruits lower in pectin include strawberries, raspberries, blackberries,
elderberries, apricots, blueberries, cherries, pears, peaches, rhubarb and loganberries.
For fruits high in pectin such as blackcurrants, damsons, cranberries, plums,
gooseberries, redcurrants, cooking apples, etc., use a preserving sugar. This type of
sugar has larger crystals which create less froth, requires less stirring and produces a
clearer set preserve.
Before making your jam, please ensure all jars and lids are thoroughly sterilised and dry,
This will prolong the life of your jam or preserve. The high volume of sugar present in jam
will also act as a preserving agent.
Jars can be easily sterilised in a dishwasher or in a hot oven.
Make sure that a clean knife is used each time you use your jam. Any butter or margarine
on the knife you use to spread your jam will contaminate the jar and cause your jam to
deteriorate faster.
29
recipes
Chunky Tomato and Apple Chutney - Program 13 (Home Made)
Tomatoes, skinned and coarsely chopped
Apples, finely grated
Onion, finely chopped
1kg
2
1
Cider vinegar
150ml
Jam sugar
350g
Mixed raisins and sultanas
75g
Salt
1½ tsp
Ground black pepper
½ tsp
Mustard powder
½ tsp
Ground allspice
½ tsp
Ground cumin
½ tsp
Cayenne pepper
Lemon juice
¼ tsp
1 lemon
Preparation method
1. Score a cross in each tomato and place them into boiling water for 4-5 mins until the
skins begin to peel. Next, place in cold water, and leave them until they cool enough
to handle. Peel then roughly chop the tomatoes and add them to bread pan.
2. Peel and core the apples. Finely grate them using food processor then add them to
the bread pan.
3. Finely chop the onion using a food processor and add it to the bread pan.
4. Add the jam sugar and all the liquids, then add all the remaining ingredients to the
bread pan.
5. Referring to the instructions on using the Home Made function on page 13, program
your bread maker according to the table opposite.
6. When the program has finished put the chutney into sterilised jars, seal and store in a
cool area until ready to use.
30
Step
Function
Value
1
Preheat time
15 mins
2
1st kneading cycle time
10 mins
3
Rest period time
5 mins
4
2nd kneading cycle time
5 mins
5
1st rise cycle time
0 mins
6
3rd kneading cycle time
0 mins
7
2nd rise cycle time
0 mins
8
4th kneading cycle time
0 mins
9
3rd rise cycle time
0 mins
10
Bake cycle time
90 mins
11
Warm cycle time
0 mins
12
1st rise cycle temperature
0ºC
13
2nd rise cycle temperature
0ºC
14
3rd rise cycle temperature
0ºC
15
Bake cycle temperature
150ºC
The total program running time is 2:05.
31
troubleshooting
Dough does not rise enough
•
Liquids are too hot (above 105°F/40°C).
•
Inactive yeast or not enough yeast.
•
Ingredients are too cold.
•
Too much salt. Salt can be used to control the effect of the yeast within the dough.
Too much salt may make the yeast inactive.
•
Check brand and type of flour.
Bread flops over sides of bread pan
•
Too much dough.
•
Bread has over-risen (reduce amount of yeast slightly).
•
Not enough sugar.
Crust pale in colour
•
Not enough sugar.
•
Adjust crust setting.
Loaves spread out or lose shape instead of rising
•
Dough too soft.
Bread falls during bake cycle
•
Bread over-risen (reduce amount of yeast slightly).
Bread has coarse texture; crumbly
•
Bread over-risen (reduce amount of yeast slightly).
Bread has unusual aroma
•
Stale ingredients used.
•
Too much yeast.
32
troubleshooting
Sticky bread which slices unevenly
•
Always use a serrated bread knife.
•
Allow bread to cool longer before slicing.
Bread shape and height varies with each use
•
Ensure accurate measurement of ingredients.
•
Room temperature and length of the timer cycle not constant.
The bread has a floured corner
•
Sometimes flour in the corner of the bread pan may not have been completely
kneaded into the dough. Scrape it off with a wooden or plastic utensil.
The bread rises too high and comes into contact with the lid
•
Too much yeast/water or flour.
•
Too little salt. Salt can be used to control the effect of the yeast. However too much
salt may make the yeast inactive.
Bread is heavy and dense in texture
•
Too much flour.
•
Not enough water or liquid.
•
Check type and brand of flour.
•
Check type of yeast.
Bread is not baked in center
•
Too much liquid.
•
Not enough flour.
•
Check type and brand of flour.
33
cleaning
Always ensure the bread maker is switched off, has cooled down and is
unplugged from the mains supply before cleaning. Do not immerse the bread
maker or power cord and plug in water or any other liquid.
Do not use abrasive cleaning materials (e.g. steel wool) or cleaning agents, to
clean any part of this bread maker.
Exterior
•
Wipe the body with a damp cloth and dry thoroughly.
Interior
•
After use, ensure the interior has cooled and use a damp cloth to wipe out any
crumbs or flour. Note that it is normal for the inside area to become slightly
discoloured during the lifetime of your bread maker.
Bread pan
•
Wipe the bread pan with a damp cloth, then dry thoroughly.
•
If necessary fill the bread pan with warm, soapy water and leave it to soak for an
hour. Rinse and dry thoroughly.
•
Alternatively, wash the bread pan and kneading paddles in the dishwasher.
Measuring cup and spoon
•
34
To make cleaning easier, rinse the measuring spoon and cup in warm, soapy water
immediately after use.
connection to the mains supply
This appliance must be earthed.
This appliance is fitted with either a moulded or rewirable BS1363, 13 amp plug. The fuse
should be rated at 13 amps and be ASTA approved to BS1362.
If the fuse in a moulded plug needs to be changed, the fuse cover must be refitted. The
appliance must not be used without the fuse cover fitted.
If the plug is unsuitable, it should be dismantled and removed from the supply cord
and an appropriate plug fitted as detailed below. If you remove the plug it must not be
connected to a 13 amp socket and the plug must be disposed of immediately.
The wires of the mains lead are coloured in accordance with the following code:
GREEN/YELLOW = EARTH
BLUE = NEUTRAL
BROWN = LIVE
The wire which is coloured GREEN/YELLOW must be connected to the terminal in
your plug which is marked with an E or by the earth symbol ( ) or coloured GREEN or
GREEN /YELLOW.
The wire which is coloured BLUE must be connected to the terminal in your plug which is
marked with the letter N or coloured BLACK.
The wire which is coloured BROWN must be connected to the terminal in your plug which
is marked with the letter L or coloured RED.
If any other plug is used, a 13 amp fuse must be fitted either in the plug or adaptor or at
the distributor board.
Plug should be BS1363 approved
Fit a 13 Amp Fuse
GREEN/YELLOW
(Earth)
BLUE
(Neutral)
13 Amp
Fuse
BROWN
(Live)
Ensure that the outer sheath of the cable
is firmly held by the clamp
35
after sales service
These appliances are built to the very highest of standards. There are no user serviceable
parts. Follow these steps if the unit fails to operate:
1. Check the instructions have been followed correctly.
2. Check that the fuse has not blown.
3. Check that the mains supply is functional.
If the appliance will still not operate, return the appliance to the place it was purchased for
a replacement. To return the appliance to the Customer Service Department, follow the
steps below:
1. Pack it carefully (preferably in the original carton). Ensure the unit is clean.
2. Enclose your name and address and quote the model number on all correspondence.
3. Give the reason why you are returning it.
4. If within the guarantee period, state when and where it was purchased and include
proof of purchase (e.g. till receipt).
5. Send it to our Customer Service Department at the address below:
Customer Service Department
Jarden Consumer Solutions (Europe) Limited
Middleton Road
Royton
Oldham
OL2 5LN, UK.
Telephone: 0161 621 6900 Fax: 0161 626 0391
e-mail: [email protected]
36
guarantee
Please keep your receipt as this will be required for any claims under this guarantee.
This appliance is guaranteed for 1 year after your purchase as described in this
document.
During this guaranteed period, if in the unlikely event the appliance no longer functions
due to a design or manufacturing fault, please take it back to the place of purchase, with
your till receipt and a copy of this guarantee.
The rights and benefits under this guarantee are additional to your statutory rights, which
are not affected by this guarantee. Only Jarden Consumer Solutions (Europe) Limited
(“JCS (Europe)”) has the right to change these terms.
JCS (Europe) undertakes within the guarantee period to repair or replace the appliance,
or any part of appliance found to be not working properly free of charge provided that:
•
you promptly notify the place of purchase or JCS (Europe) of the problem; and
•
the appliance has not been altered in any way or subjected to damage, misuse,
abuse, repair or alteration by a person other than a person authorised by JCS
(Europe).
Faults that occur through, improper use, damage, abuse, use with incorrect voltage, acts
of nature, events beyond the control of JCS (Europe), repair or alteration by a person
other than a person authorised by JCS (Europe) or failure to follow instructions for use
are not covered by this guarantee. Additionally, normal wear and tear, including, but not
limited to, minor discoloration and scratches are not covered by this guarantee.
The rights under this guarantee shall only apply to the original purchaser and shall not
extend to commercial or communal use.
If your appliance includes a country-specific guarantee or warranty insert please refer
to the terms and conditions of such guarantee or warranty in place of this guarantee or
contact your local authorized dealer for more information.
Waste electrical products should not be disposed of with Household waste. Please
recycle where facilities exist. E-mail us at enquiries [email protected] for further
recycling and WEEE information.
Jarden Consumer Solutions (Europe) Limited
Middleton Road
Royton
Oldham
OL2 5LN
UK
37
38
39
VBM015_Iss_6
10/13
93461-5