1
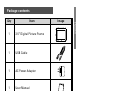
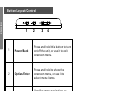
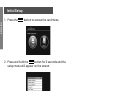
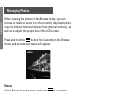
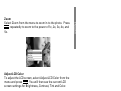
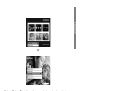
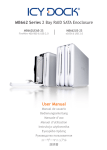
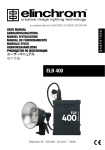
cenOmax F350
3.5” Digital Photo Frame
User Manual
使用手冊
ユーザーマニュアル
Revision 1.0a
ENGLISH
FCC compliance statement
Note: This equipment has been tested and found to comply with the limits
for a Class B digital device, pursuant to Part 15 of the FCC Rules. These
limits are designed to provide reasonable protection against harmful
interference in a residential installation. This equipment generates, uses,
and can radiate radio frequency energy and, if not installed and used in
accordance with the instructions, may cause harmful interference to radio
communications. However, there is no guarantee that interference will not
occur in a particular installation.
If this equipment does cause harmful interference to radio or television
reception, which can be determined by turning the equipment off and
on, the user is encouraged to try to correct the interference by one of the
following measures:
• Reorient or relocate the receiving antenna.
• Increase the separation between the equipment and receiver.
• Connect the equipment into an outlet on a circuit different from that to
which the receiver is connected.
• Consult the dealer or an experienced radio/ TV technician for help.
FCC Caution: To assure continued compliance, (example – use only
shielded interface cables when connecting to computer or peripheral
devices). Any changes or modifications not expressly approved by the party
responsible for compliance could void the user’s authority to operate this
equipment.
This device complies with Part 15 of the FCC Rules. Operation is subject
to the following two conditions: (1) this device may not cause harmful
interference, and (2) this device must accept any interference received,
including interference that may cause undesired operation.
2
Package contents
Item
Image
1
3.5” Digital Picture Frame
1
USB Cable
1
AC Power Adapter
1
User Manual
3
ENGLISH
Qty
ENGLISH
Button Layout/Control
1
2
3
4
1
Power/Back
Press and hold this button to turn
on/off the unit, or use it to exit
onscreen menu.
2
Option/Enter
Press and hold to show the
onscreen menu, or use it to
select menu items.
3
Left/Previous
Used for menu navigation, or
to move to the previous image
in the slideshow and browse
modes.
4
Right/Next
Used for menu navigation, or to
move to the next image in the
slideshow and browse modes.
4
Getting Started
2. On the card menu, insert a memory card (Secure Digital™
/ MultiMediaCard™) with the desired pictures, and a
slideshow will start immediately. Note: Please insert
memory card with its label facing toward the LCD screen.
3. To power on/off the picture frame, press and hold down
the
button for 3 seconds.
5
ENGLISH
1. Assemble the AC adapter by attaching the USB cable to
the AC adapter. Connect the mini connector of the cable
to the digital picture frame, and the adapter into a power
outlet. The picture frame will power on automatically and
begin charging the battery.
Initial Setup
button to access the card menu.
ENGLISH
1. Press the
2. Press and hold the
button for 3 seconds and the
setup menu will appear on the screen.
3. Use the
or
to navigate the menu. Use the
to make a selection, and use the
previous screen.
The following setup options are available:
6
to exit to the
Slideshow Transition: Choose from 6 options and select
the desired transition.: Normal, Random, Top Bottom,
Curtain, Open Door, Cross Comb
Slideshow Speed: Select the desired photo display length.
Options are 5 seconds, 10 seconds, and 30 seconds.
Language: Select this to choose the desired screen
language option. Options are English, German, French,
Spanish, Portugal, Italian, and Dutch
Connect PC: Select this to enter the USB Transfer mode
when connected to a PC.
Power Saving: Select this to enable the Power Saving
feature. When enabled, the LCD screen will turn off when
it’s been inactive for the set amount of time. The options
are 5 minutes, 10 minutes, 30 minutes, and No Power
Saving
Factory Default: Select this to restore all options to factory
default settings.
7
ENGLISH
Display Image Size: Select “Original” to display photos
in full height in normal aspect ratios. Select “Optimal”
to allow the frame to display photos with optimized
properties. Photos will enlarge to fit the full screen.
ENGLISH
Picture Slide Show and Browse
There are three viewing modes available: Slideshow mode,
Browse mode and Thumbnail mode.
Slideshow mode: On the card menu, select the picture
, and
source (internal memory/memory card) and press
you will enter the slideshow mode.
Browse mode: During the slideshow mode, press the
button to pause the slideshow and access the Browse mode.
8
buttons to navigate between pictures.
9
and
ENGLISH
Thumbnail mode: While in the Browse mode, press
button and you will enter Thumbnail mode. Use the
ENGLISH
Managing Photos
When viewing the photos in the Browse mode, you can
choose to rotate or zoom in to the currently displayed photo,
copy (to internal memory)/delete (from internal memory), as
well as to adjust the properties of the LCD screen.
button for 3 seconds in the Browse
Press and hold the
mode, and an onscreen menu will appear.
Rotate
Select Rotate from the menu and press
to rotate the
repeatedly to
photo by 90 degrees clockwise. Press
rotate the photo by 180, 270, and 360 degrees.
10
Adjust LCD Color
To adjust the LCD screen, select Adjust LCD Color from the
menu and press
. You will then see the current LCD
screen settings for Brightness, Contrast, Tint and Color.
Press
or
to decrease or increase the current setting.
or
button to
Press and hold down 3 seconds the
switch between the Brightness, Contrast, Tint and Color
settings. Press
when finish.
11
ENGLISH
Zoom
Select Zoom from the menu to zoom in to the photo. Press
repeatedly to zoom to the power of 1x, 2x, 3x, 4x, and
5x.
ENGLISH
Copy/Delete
This picture frame has internal memory to store up to 45
photos. You can copy photos from a memory card to the
internal memory, or you can delete photos from the internal
memory. Note: that in order to delete photos from the
memory card, you need to connect the digital picture frame
to a computer. Please see the Connect to PC section for
details.
Press and hold the
button for 3 seconds in the
Thumbnail or Browse mode, and an onscreen menu will
appear.
Select Copy Photo from the menu (when viewing photos
from the memory card) to copy the current photo to the
internal memory.
12
ENGLISH
or
Select Delete Photo from the menu (when viewing photos
from internal memory) to delete the photo from the internal
memory.
13
ENGLISH
Connect to PC
1. Use the USB cable to connect the digital picture frame to
an available USB port on the PC.
2. Press the
button to access the card menu.
3. Press and hold down the
Menu will be displayed.
for 3 seconds and the Setup
4. Select Connect PC and press
. The screen will
display the message: “PC Connection established. Key is
temporarily inoperative.”
14
ENGLISH
5. The digital picture frame will now be recognized by the
PC as a memory card reader. You can use windows
explorer to access and manage the photos on the memory
card. Note that you will not have access to the internal
memory of the picture frame while it is connected to a PC.
15
ENGLISH
Technical Specifications
Product
CenOmax 3.5” Digital Picture Frame
Model
F350
Resolution
320 x 240
Contrast ratio
400:1
Supported Flash Memory
SD/SDHC, MMC
USB Interface
USB 2.0 Device
Internal Memory
Up to 45 photos
File Format
JPEG
Dimensions
95 x 77 x 13 (mm)
16
Frequently Asked Questions
Answer
Why can’t I display
some photos?
Please make sure your photos are in JPEG
format.
Why can’t I select a
memory card?
Please make sure the memory card is
properly inserted, and that the memory
card is not defective. For micro-/mini- SD
and users, please use the proper adapter.
Can I delete photos
from internal
memory?
Yes. Please refer to the Managing Photos
section of this document.
How can I switch
to the internal
memory?
What do I do if
the unit is not
responsive?
twice to enter the card menu.
Press
Note that the internal memory is not
selectable in the card menu if it is empty.
Lift up the stand on the back, and push the
Reset button underneath to reset the unit.
17
ENGLISH
Question
ENGLISH
Important safety instructions
1. All the safety and operating instructions should be read
before the product is operated.
2. Do not place this product in direct sunlight or near any
source of heat. It will cause malfunction, change color, or
damage if the surface is hot.
3. Do not use this product near water (e.g., near a bath tub,
kitchen sink, laundry tub, in wet basements, or near a
swimming pool and the like).
4. If you are unable to insert the plug fully into the power
outlet, try reversing the direction of the plug. If the plug
should still fail to fit, contact an electrician to replace the
outlet.
5. Power supply cords should be routed so that they are not
likely to be walked on or pinched by items placed upon or
against them.
6. For added protection for this product, unplug it from
the wall outlet during a lightning storm or when it is left
unattended and unused for long periods of time. This will
prevent damage to the product due to lightning or powerline surges.
7. Do not attempt to service this product yourself as
opening or removing covers may expose you to
18
Specifications and manual are subject to change without
notice.
cenOmax Technical Support:
Hours: Monday to Friday
9:00am – 6:00pm PST
Email: [email protected]
Phone: 510-824-9696
Website: www.cenomax.com
19
ENGLISH
dangerous voltage or other hazards. Refer all servicing to
qualified service personnel.
Cleaning and care tips
ENGLISH
√ Please power off the Digital Photo Frame before cleaning.
√ DO NOT spray or pour liquid cleaning agents directly on
the screen or frame.
√ DO NOT use ammonia, alcohol, or abrasive detergent
cleaning agents.
Cleaning the Screen:
1. Wipe screen with a clean, soft, lint-free cloth to
remove dust and loose particles.
2. If further cleaning is required, apply an appropriate
cleaning agent (approved for LCD displays) to a clean,
soft, lint-free cloth and wipe the screen.
• NOTE: do not apply too much pressure on the screen
to avoid damaging it.
20