1
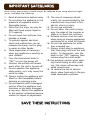
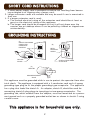
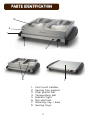
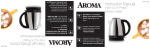
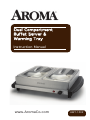
Dual Compartment
Buffet Server &
Warming Tray
Instruction Manual
www.AromaCo.com
AWT-1202
Congratulations on your purchase of the Aroma Stainless Steel Buffet
Server and Warming Plate! In no time at all you’ll be enjoying the ease and convenience of serving fresh, hot meals and appetizers without having to re-heat.
With your new buffet server, foods stay warm for hours so you can focus on
more important things, like family and friends.
The stainless steel base doubles as a warming tray for appetizers, finger
foods and keeping whole plates warm. Fully adjustable temperature controls
allow you to customize the heat to suit a wide array of dishes. Use your new
buffet server for a party, family gathering, or everyday mealtime. The serving
trays and lids are dishwasher-safe for easy cleanup.
This manual contains instructions for using this appliance as well as
some helpful serving hints. For recipe suggestions or more kitchen solutions,
please visit us online at www.AromaCo.com
Please read all the instructions before first use.
Published By:
Aroma Housewares Co.
6469 Flanders Drive
San Diego, CA 92121
U.S.A.
1-800-276-6286
www.aromaco.com
© 2007 Aroma Housewares Company All rights reserved.
IMPORTANT SAFEGUARDS
Basic safety precautions should always be followed when using electrical appliances, including the following:
1.
2.
Read all instructions before using.
Do not place the appliance in the
presence of explosive and/or
flammable fumes.
3. Note that the trays can only be
filled with food and/or liquid to
2/3 capacity.
4. Do not touch hot surfaces. Use
handles or knobs.
5. To protect against electrical
shock and malfunction, do not
immerse the body, cord or plug
in water or other liquids.
6. Close supervision is necessary
when any appliance is used by or
near children.
7. Turn the thermostat knob to
“OFF” to turn the power off.
8. Caution: the surface will remain
warm after the unit is turned off.
9. Do not operate this appliance
while empty, as it may cause the
metal to warp.
10. Always unplug the appliance and
allow to cool completely before
cleaning or removing parts.
11. Do not operate with a damaged
cord or after the appliance malfunctions or has been damaged
in any way. Return the appliance
to the nearest authorized service
station for repair or adjustment.
12. The use of accessory attachments not recommended by the
manufacturer may result in fire,
electric shock or injury.
13. Do not use outdoors.
14. Do not allow the cord to hang
over the edge of the counter or
table or to touch hot surfaces.
15. Extreme caution must be used
when using or moving appliances
containing oil or other hot liquids.
16. Do not use appliance for other
than intended use.
17. Always attach plug to appliance
first, then plug cord into the wall
outlet. To disconnect, turn the
knob to the “OFF” position, then
remove plug from wall outlet.
18. Use extreme caution when opening the lid during or after cooking. Hot steam will escape and
could cause burns.
19. To reduce the risk of electric
shock, place food only in the provided removable container.
SAVE THESE INSTRUCTIONS
1
SHORT CORD INSTRUCTIONS
1. A short power-supply cord is provided to reduce risk resulting from becoming entangled in or tripping over a longer cord.
2. Longer extension cords are available and may be used if care is exercised in
their use.
3. If a longer extension cord is used:
a. The marked electrical rating of the extension cord should be at least as
great as the electrical rating of the appliance.
b. The longer cord should be arranged so that it will not drape over the
counter top or tabletop where it can be pulled by children or tripped over
unintentionally.
GROUNDING INSTRUCTIONS
(A)
CIRCUIT GROUNDING
CONDUCTOR
CONNECTED
PROPERLY
(B)
METAL
MOUNTING
SCREW
GROUND
PRONG
COVER OF GROUNDED
OUTLET BOX
(C)
ADAPTER
GROUNDING MEANS
AA22D
This appliance must be grounded while in use to protect the operator from electrical shock. The appliance is equipped with a 3-conductor cord and a 3-prong
grounding-type plug to fit the proper grounding-type receptacle. The appliance
has a plug that looks like sketch A. An adapter, sketch B, should be used for
connecting sketch-A plug plugs to two-plugs to two-prong receptacles. The
grounding tab, which extends from the adapter, must be connected to a permanent ground such as a properly grounded outlet box as shown in sketch C using
a metal screw.
This appliance is for household use only.
2
PARTS IDENTIFICATION
3
1
2
6
5
4
8
7
1.
2.
3.
4.
5.
6.
7.
8.
Cool touch handles
Serving tray support
Clear plastic lids
Temperature dial
Indicator light
Non-skid feet
Warming tray / base
Serving trays
3
USING BUFFET SERVER
Before First Use:
1. Read all instructions and important safeguards.
2. Remove all packaging materials and make sure items are received in good condition.
3. Tear up all plastic bags as they can pose a risk to children.
4. Wash the lids, trays and serving tray support with warm soapy water using a
sponge or soft cloth. Rinse and dry thoroughly.
5. Wipe the warming base with a clean damp cloth. Do not use abrasive cleaners
or scouring pads. Do not immerse the base in water.
6. Heat the warming base without food for about 10 minutes. This will seal the
coating on the warming tray.
NOTE: The appliance itself may give off smoke or odors when heating for the
first time. This is normal.
HOW TO OPERATE:
1. Place warming tray/base on a sturdy, level surface.
2. To Operate as Warming Tray: Do not add serving tray support or serving trays.
To Operate with Serving Trays: Place the serving tray support and the serving
trays on to the base.
3. Plug the power cord into a wall outlet.
4. Place food in the trays and turn the temperature dial to “LOW”. The indicator
light will illuminate to show you that the appliance is on.
5. If using the warming tray, DO NOT turn the temperature above “LOW.”
6. If using the buffet server, turn the temperature dial to “LOW”, “MED”, or
“HIGH” to adjust the temperature. NOTE: For best results turn the knob to the
“HIGH” setting to quickly reach your temperature and then turn it down to the
desired temperature.
7. Place lids over food as needed.
8. When finished using, turn the temperature knob to “OFF” and unplug the cord
from the wall outlet.
9. Food will be kept warm for a period of time after the appliance has been
turned off. Do not touch, disassemble, or clean the appliance until it has
cooled completely.
4
HOW TO CLEAN
Always unplug unit and allow to cool
completely before cleaning.
1. Make sure the temperature dial is in the “OFF” position and unplug the
power cord from the wall outlet.
2. Allow the appliance to cool completely.
3. Wash the lids, trays, and serving tray support with warm soapy water using
a sponge or soft cloth.
4. Rinse and dry thoroughly.
5. Wipe the base and handles with a clean damp cloth.
* DO NOT use abrasive cleaners or scouring pads.
* DO NOT immerse the base in water.
5
COOKING GUIDE
Tips for Getting Started
• Do not fill serving trays more than 2/3 full.
• Food should be fully cooked and hot when put in the buffet server or on
the warming base.
• Use the buffet server to keep food warm while preparing other foods.
• Foods containing little or no liquid should be kept on the “LOW” setting and
stirred occasionally.
• When using the appliance as a warming tray, do not turn the temperature
above the “LOW” setting.
• When using the appliance as a warming tray, be sure to use containers that
are heat proof. NOTE: The warming tray is not designed to keep large,
deep pots of food or liquid warm.
• The warming tray is ideal for keeping shallow pans warm right from the
oven.
• After a period of use, the warming tray may develop some discoloration
around the heating element. This is normal and does not pose a health
risk.
6
LIMITED WARRANTY
Aroma Housewares Company warrants this product free from defects in
material and workmanship for one year from provable date of purchase
in the continental United States.
Within this warranty period, Aroma Housewares Company will repair or
replace, at its option, defective parts at no charge, provided the product
is returned, freight prepaid with proof of purchase and U.S. $8.00 for
shipping and handling charges payable to Aroma Housewares Company.
Before returning an item, please call the toll free number below for a
return authorization number. Allow 2-4 weeks for return shipping.
This warranty does not cover improper installation, misuse, abuse or
neglect on the part of the owner. Warranty is also invalid in any case
that the product is taken apart or serviced by an unauthorized service
station.
This warranty gives you specific legal rights and which may vary from
state to state and does not cover areas outside the United States.
AROMA HOUSEWARES COMPANY
6469 Flanders Drive
San Diego, California 92121
1-800-276-6286
M-F, 8:30 AM - 5:00 PM, Pacific Time
Website: www.aromaco.com
7