1
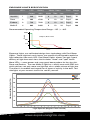
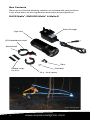
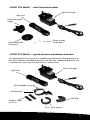
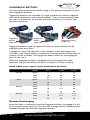
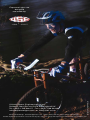
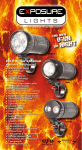
2009 Owner’s Manual
Features
• CFD Cable Free Design
• Super LED light source
• Memory free Li-ion batteries
• Hardwired batteries
• Smart Port Technology
• “Smart” recharging
• “PiggyBack” plug in battery option
• Remote switch available
• RedEye rear light available
• RedEye Micro light available
• One size fits all QR bracket
• Fuel gauge battery life indicator
• Light mode indicator
• Long burn times
• Reserve fuel tank
• Collimated lenses
• Dual beam optics (DBO)
• Lightweight
• Forged alloy quick release bracket
• Thermal protection circuit
• Fully weatherproof
• CNC machined aluminium bodywork
• Anodised finish
• Laser graphics & rider info
• Soft-shell packaging
• British designed & made
• 2 year standard warranty
• Versatile & multisport
EXPOSURE LIGHTS SPECIFICATION
LED’s
LED
Output
Battery
mAh
Mode - Hours
MaXx Ride Low
Flash
Weight
gms
Joystick
1
240
2350
3
10
24
Days!
76
Race
2
480
4700
3
10
24
Days!
190
Enduro
3
720
7050
MaXx-D
4
960
9400
3
10
24
Days!
230
3
10
24
Days!
298
Recommended Operating Temperature Range: -15C / + 40C
Output
MaXx
Output / Burn Time
Ride
Low
3
10
Hours
24
Exposure Lights use collimated design Lens technology with Dual Beam
Optics. These high-tech resin lenses are specifically designed to optimise
light collection from each LED. Dual Beam Optics means you get a great
delivery of light from each Lens that includes “flood” and “spot” beam
Luminous Intensity (lux) at 2 m
More LEDs = more power and same great beam pattern for the Joystick,
Race and Enduro. The new MaXx-D light has a totally new multi-DBO lens
which delivers not only more raw light but also a wider volume of light too.
The effect is incredible and superb for all types of activity in the dark. Test
ride lights at your nearest stockist to see for yourself.
0
Light Spread (degrees from centre)
2
www.exposurelights.com
Please read all instructions before using your
EXPOSURE LIGHT
EXPOSURE LIGHTS - the lightest high output production sports lights.
Designed for high performance applications, EXPOSURE LIGHTS combine
the latest LED technology with a powerful Lithium Ion battery. Before using,
please familiarise yourself with this manual, so that you understand how to
operate and care for your EXPOSURE LIGHT.
Warning
EXPOSURE LIGHTS are a very powerful lighting system. Always use care
when operating. Do not look directly into the light. This may cause serious
injury. Do not shine directly at others.
EXPOSURE LIGHTS/USE accepts no liability for any injuries or other
damages arising from the use of this product.
Important Information
EXPOSURE LIGHTS are very weatherproof (under normal conditions).
DO NOT SUBMERGE UNDER WATER. If water does get into the unit do not
use, and contact the place of purchase.
Do not attempt to disassemble the light unit. This will invalidate your
warranty.
Do not attempt to use any other chargers or batteries with the unit. This will
cause damage and may be dangerous.
Long periods of non-use will lower the voltage of the battery. Please follow
the charging instructions and top-up the charge monthly when not in use.
Warranty
Please register your EXPOSURE LIGHTS to activate this additional warranty.
Fill in the form at the back of this manual or register online at
www.exposurelights.com. IMPORTANT: keep your proof of purchase.
EXPOSURE LIGHTS will give a 2-year warranty to the original owner for the
light unit & charger. This warranty covers material or workmanship defects.
Accidental damage and neglect are not covered by warranty. Modifications
or improper use also void the warranty.
The EXPOSURE LED’s are covered by our lifetime warranty, in accordance
with proper use.
Registered warranties are only valid from date of purchase, and to the
original owner (proof of purchase may be required).
Register your EXPOSURE LIGHT at www.exposurelights.com
or fill in the form at the back of this manual and mail to USE Ltd.
3
Box Contents
Please ensure that the following contents are included with your purchase.
If any of the items are missing please contact your place of purchase.
RACE MaXx2, ENDURO MaXx2 & MaXx-D
Smart Charger
Light Unit
QR Handlebar bracket
Bracket bolt
Cleat
Rubber strips
for 31.8
Cleat bolt
25.4 – 26.0 spacer
Photo: Geoff Waugh
4
www.exposurelights.com
JOYSTICK MaXx2 – with helmet bracket
Smart Charger
Light Unit
Helmet bracket
upper
Helmet bracket
lower disc
Short & long
nylon blots
JOYSTICK MaXx2 – quick release handlebar bracket
For 2009 models the Joystick is supplied with either the Helmet Bracket or
the Quick Release handlebar bracket and QR Clip. Additional brackets are
available from your place of purchase as accessories.
Smart Charger
Light Unit
QR Handlebar bracket
Bracket bolt
QR Clip
Rubber strips
for 31.8
25.4 – 26.0 spacer
5
How to Mount the EXPOSURE Race & Enduro MaXx2
models to the bar
• Mounting to a 31.8mm bar - Peel off backing of the rubber protection
strips and attach the pads to the inside of the clamp. Attach the bracket
to the bar. Tighten the clamp with a 4mm hex key. (Maximum 2.5Nm)
DO NOT OVER TIGHTEN!
• Mounting to a 25.4 or 26mm bar - Clip the bracket spacer over your bar,
attach the bracket over the spacer and tighten the clamp with a 4mm hex
key. (Maximum 6 Nm) DO NOT OVER TIGHTEN!
• Attach the cleat to the light unit using
the provided bolt.
• Locate the cleat into the V section of
the bracket - the sprung loaded pin
will depress as it is pushed into place.
• To adjust the angle of the light beam
release the cleat bolt. A hole in the
bracket enables access to the bolt
head. Use a 4mm hex key to adjust
the light and tighten the bolt securely
(Maximum 2.5Nm)
• To release the light from the bracket
push away and down on the red
button and gently pull back the light
with your hand. This is a simple onehand operation.
• Warning - Make sure that brake and gear cables cannot catch on or
interfere with the light or the bracket or release button.
• Warning: Racers beware - check number boards do not interfere with
bracket button.
6
www.exposurelights.com
How to Mount the EXPOSURE Joystick MaXx2.
Helmet mounted
The highly acclaimed Joystick helmet bracket works as a ball joint. Follow
these instructions for set up and position the light for riding. The clamp
is made up of three parts: Lower clamp disc, upper clamp with ball joint
socket and a nylon clamp bolt.
•Put the shorter plastic bolt through the lower clamp disc and align with a
selected vent on the inside of your helmet.
• Place the upper clamp through the top of the
vent to meet the bolt.
• Tighten the bolt. Take care not to damage your
helmet.
Use the shorter bolt first and if not long enough
then go to the longer bolt. Do not use the long bolt
on thinner section helmets, as this will stop the
ball joint working or possibly pop it out.
•Clip the Joystick body into the top part of the clamp
•The Joystick can be adjusted by rotating the ball joint when holding the
light and is easy to do when you are riding to get the best position.
If you are worried about losing your Joystick in a crash or when riding
under low objects then we suggest you attach a lanyard through the holes
provided at the back of the light unit and loop the lanyard through a vent in
your helmet or round the handlebar if using it there.
Handlebar mounted
The new Joystick QR Clip now allows you to mount your Joystick to the
same Quick Release bracket as used by the rest of the light range.
Simply press the Joystick into the QR clip
with the point of the clip towards the front of
the light
Now engage the clip and light into the
QR bracket as previously shown for other
models.
EXPOSURE LIGHTS/USE accepts no liability for any injuries or other
damages to person or equipment arising from the use of the clamps.
7
LIGHT OPERATION
Function Button
Located on the back of the
light unit is the function button.
This operates the light unit
and informs you of the mode
setting and the battery power
status.
Function
button
When the light is on and function button is pressed, the colour of the
button for the first two seconds informs you which mode has been
selected. Thereafter the colour of the button is your fuel gauge.
Mode Function
•To turn on the light, double click the button; the light is now operating in
the brightest MaXx mode.
•To switch between the constant settings, press the button once.
•To activate the flashing mode, press and hold the button for 1 flash
(approx 1 second) and release. The flashing mode can be activated
from any of the constant modes. To return to the MaXx mode, press the
button once.
•To turn off the light, press and hold the button down. After 2 flashes
(approx 2 seconds) the light will turn off. The function button will rapid
flash red as the circuit board shuts down.
The colour of the function button will show which light mode you are in for
the first two seconds after the button is pressed.
Green (MaXx) – Amber (Ride) – Red (Low).
Fuel Gauge Function
After two seconds the function button becomes the fuel gauge. The colour of
the button now indicates the approximate percentage of battery power left.
Button
Battery
Green
100% - 50%
Amber
50% - 25%
Red
25% - 5%
Red Flash
5% - Empty
When the battery has only 5% charge remaining in whichever mode,
the light will automatically switch to the low setting. Modes available are
restricted to Ride and Low. The function button will flash red. Light output
will slowly dim over 3 hours and this is the extended burn time on reserve
power.
8
www.exposurelights.com
Smart Charging MaXx2 light
Before riding with your Exposure MaXx2 light please charge it fully. Follow
the recharging instructions below.
Use only genuine Exposure Lights chargers. International socket chargers
are available, also in-car charger.
EXPOSURE LIGHTS use the highest quality Lithium Ion batteries, which
have no charge memory. This allows them to be recharged at any point
during the discharge cycle. Burn times will not be affected by multiple
re-charging.
re-charging instructions
•Ensure the light unit is turned off.
•Plug the MaXx Smart Charger into the wall socket and switch on the wall
socket. The LED on the charger will show green (operational).
•Insert the charger connection plug into the charge port,
located on the back of the light.
The charger LED will
show red when the light
unit is charging.
function button
The function button on the
light will continuously flash
green to inform you that the
charger is connected and
functioning.
charge port
From empty the light unit will rapid charge to
approximately 90% capacity - at this point the LED on
the charger will go from red to green.
To 100% charge the light leave the charger plugged in and turned on for
a further 1 to 4 hours depending on the model (see below). You can leave
the light on charge for longer if you like and it will not be a problem. Just
like your mobile phone.
Charge Capacity
Rapid (red)
Trickle (green)
90%
Final 10%
Joystick
3 Hrs
1 Hrs
Race
6 Hrs
2 Hrs
Enduro
9 Hrs
3 Hrs
MaXx-D
12 Hrs
4 Hrs
Long periods of non-use will lower the voltage of the battery. If the unit
is being stored for long periods, please ensure the battery is periodically
charged. We suggest once per month.
All the Exposure MaXx models use the same Smart chargers.
9
PIGGYBACK BATTERY
An outstanding feature of the MaXx range is the ability to extend burn times
with Piggyback batteries.
Piggyback batteries are available as single or triple cells and are supplied
with velcro attachment strap and fitting block. They can be mounted under
the stem, to the helmet, on the light unit itself (walking) or carried in your
pocket or backpack.
Piggyback
battery
triple cell
Piggyback
battery
single cell
Piggyback battery
single cell
Piggyback batteries give you peace of mind for safety and security by
extending your burn times.
If plugged in when the light unit is fully charged, all the light modes are
available. If the internal battery is below 50% charge then only Ride and Low
settings will be available. The Piggyback battery works by recharging the
light as you use it.
When the Piggyback battery is plugged in the fuel gauge will not be
operative; the function button will only flash green as when charging.
BURN TIMES (hours approx) WITH PIGGYBACK BATTERY
Joystick
Race
Enduro
MaXx-D
Mode
CFD
1 Cell
MaXx
3
6
3 Cell
12
Ride
10
20
40
Low
24
48
96
MaXx
3
4.5
7.5
Ride
10
15
25
Low
24
36
60
MaXx
3
4
6
Ride
10
13.3
20
Low
24
32
48
MaXx
3
3.75
5.25
Ride
10
12.5
17.5
Low
24
30
42
Remote Recharging
When the light is switched off and the Piggyback battery is plugged in it will
pass charge into the light unit. The cells will average out the available power
between the light unit and the Piggyback battery.
10
www.exposurelights.com
Remote Switch
New for 2009 Exposure lights come with Smart Port Technology. This is the
option to run various accessories from the Power Port such as the Remote
Switch.
Available to purchase as an accessory, the remote switch simply plugs into
the power port on the back of the light unit. Using the Velcro strap supplied,
attach the Switch to your handlebar near the grip or were you want it. You
can now turn the light on/off and switch between modes as normal, without
having to touch the light itself. The Function and Fuel Gauge indicators on
the button remain operative when using the Remote Switch.
Use the Remote Switch for easier switching in the dark, especially when
wearing winter gloves, taking advantage of the larger button on the Remote
Switch.
Dip your lights. Just as cars dip their headlights for oncoming traffic and
cyclists, we recommend that Exposure Light users respect others in the
same way. On the road or on the bike path our lights are so bright in MaXx
mode that it is recommended to “dip” down to Low light mode when
someone is coming towards you. With the Remote Switch this can be easily
and quickly done with two clicks of the button. One more click and you are
back up to MaXx mode. Be seen but also respect others and be safe in the
dark.
Warning: Do not plug in the Remote Switch when with the Power Port active
as the light will not function. You will need to switch off, switch on and then
plug in the Remote Switch.
Remote
Switch
Power Port for Remote Switch
Remote Switch fits MTB
and Road handlebars
11
redeye rear light
New for 2009 Exposure lights come with Smart Port Technology. There is the
option to run various accessories from the Power Port such as the RedEye
rear light or the RedEye Micro light. These are available to purchase from your
Exposure dealer.
If you are a cyclist using the Exposure Light you will be aware of how
important it is to be seen from behind as well as from the front to remain
safe from other road users. A feature of Smart Port Technology is to activate
the Charge Port to become a Power Port and to power the new RedEye
rear lights.
To activate Power Port: When the light unit is off, press and hold the function
button for 5 seconds. The main LEDs will rapid flash to indicate you have now
powered up the port.
You can not operate the RedEye without turning on the main light unit as well.
Turn on the light unit in the normal way with double click. Again a rapid flash
shows as the light turns on. This indicates you now have the light on with the
Power Port activated.
Now plug in RedEye or RedEye Micro and you will get a bright, constant
output of red light from the accessory.
With Power Port activated you can use all the front LED light modes as normal.
When you turn off the light unit it will reset itself and you will need to repeat
the switch-on procedure to activate the Power Port again. You cannot run
two Smart Port Technology accessories at the same time. You choose either
Charge the Light, or Piggyback Battery, or Remote Switch or RedEye lights.
RedEye rear light: Encased in a tough CNC machined aluminium body
and fully waterproof, the RedEye is possibly the brightest rear light on the
market. It uses the same 240Lumen P4 LED as the Joystick MaXx-2 but in red.
Because it’s so bright it is designed to run at approximately one third of MaXx
setting. Burn times will be slightly reduced on your front light when running the
RedEye. See web for details.
The RedEye is Velcro attached to helmets, seat posts or racks where you like
and is provided with power cable to reach from post to handlebars. Excess
cable is wound round the light body.
Be clearly seen from the rear both Day and Night. RedEye comes highly
recommended to road cyclists even in daylight hours. It is so bright you can
easily be seen with this accessory.
12
www.exposurelights.com
redeye micro
RedEye Micro: Designed as a affordable plug-in rear light for the Joystick
the Micro is a must have accessory for all Joystick MaXx2 owners. Activate
the Power Port as described on page 12 and plug in the RedEye Micro
directly. The LED is angled so rotate to angle down to allow for helmet
position when riding. There is minimal drain on burn time for main light
when using RedEye Micro.
Spares and Accessories
See your dealer for additional accessories to enhance your night time
experience.
EXPRS
EXPRE
EXPREMIC
EXPQRBK
EXPMHMJ
EXPMHBJQRCLIP
EXPMHBJQRSET
EXPMAXXHEAD
EXPPB1
EXPPB3
EXP/CHARGER/CAR
EXP/CHARGER/UK
EXP/CHARGER/EURO
EXP/CHARGER/US
EXP/CHARGER/ASIA
In-Car Charger
REMOTE SWITCH with cable
REDEYE rear light with cable
REDEYE MICRO red rear plug-in LED
QR Handlebar bracket 25.4-31.8mm
HELMET-MOUNT for JOYSTICK MaXx
HANDLEBAR QR CLIP JOYSTICK MaXx
HANDLEBAR QR SET for JOYSTICK MaXx
HEADBAND for JOYSTICK MaXx
PIGGY BACK BATTERY - Single Cell
PIGGY BACK BATTERY - Triple Cell
MaXx IN-CAR SMART CHARGER
MaXx SMART CHARGER UK3pin
MaXx SMART CHARGER EURO2pin
MaXx SMART CHARGER US2pin
MaXx SMART CHARGER ASIA2pin
QR Bracket with clip
Piggy Back
Batteries
EU Charger
13
MAINTENANCE
Inspect and test your EXPOSURE light before every outing.
Keep your EXPOSURE light clean, and the lenses free of debris. The
collimated lenses are made of hi-tec plastic but can be scratched. Be
careful when cleaning any mud or dirt from the lens. Never use a high
pressure spray or hose on your EXPOSURE light. Do not use harsh
abrasive or corrosive materials to clean your EXPOSURE light.
Follow all charging instructions. If the unit is being stored for long periods,
please ensure the battery is periodically charged fully. We suggest once
every month. The same applies to Piggyback batteries.
THERMAL protection circuit
EXPOSURE LIGHTS are equipped with a thermal protection circuit. If the
unit detects that it is getting too warm, it will dip to next lowest setting and
then back to your chosen setting when temperature is correct. This is to
protect the circuitry inside the unit, as well as the LED’s. It is not normal for
this to ever happen at night when air temperature is low. It may happen if
running the light unit on MaXx inside a warm room.
We design them. We make them. We are here to help.
If you are experiencing any problems with your Exposure Light or
accessories please contact us directly at:
Tel: Exposure/USE +44 (0)1798 344477
e-mail: [email protected]
Alternatively contact your Exposure Dealer/Distributor - check web for
details www.exposurelights.com
Troubleshooting
Problems
Possible Cause
Remedy
LEDS do not light up / unit does
not appear to turn on
Over discharged
battery
Follow charging
procedure
Battery not charging
Power socket
not on
Check charger
connections
Short burn times
New battery
Discharge &
recharge light
3 times
Heavily used
battery
Contact Exposure
Lights/USE
Extremely
cold temp.
Keep battery/light
warm
14
www.exposurelights.com
EXPOSURE WARRANTY
Quick and simple - register your EXPOSURE LIGHTS at
www.exposurelights.com
If this is not possible please fill in the form below and return it to
Exposure Lights at USE.
Name:
E Mail:
Address:
City/Town:
County / State:
Country:
Post / Zip Code
Model Purchased:
MaXx-D
Enduro MaXx2
Race MaXx2
Joystick MaXx2
Serial Number:
Date of Purchase: /
/
Dealer
Contact Details
EXPOSURE LIGHTS
ULTIMATE SPORTS ENGINEERING
Units 6 & 7 Hampers Common Ind. Est.
Petworth, West Sussex, GU28 9NR, UK
[email protected]
www.exposurelights.com
15
Ultimate Sports Engineering Limited
Petworth, West Sussex GU28 9NR England UK
Tel:+44(0) 1798 344477 Fax:+44(0) 1798 344499
[email protected] or [email protected]
Photo: Geoff Waugh www.waughphotos.com Riders: 69er Collective, Trippy Tucker and Shaggy
Printed Sep08. All specifications correct at time of print, subject to change and improvement. Check www.exposurelights.com
Design & Print by PPG Ltd
Exposure Lights are
designed
and made by: