1
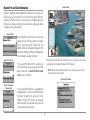
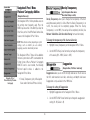
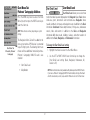
Platinum™ Cartography
Accessory Manual
Platinum™ Cartography
Thank You!
Thank you for choosing Humminbird®, America's #1 name in fishfinders. Humminbird® has built its reputation by designing and manufacturing top-quality,
thoroughly reliable marine equipment. Your Humminbird® is designed for trouble-free use in even the harshest marine environment. In the unlikely event that
your Humminbird® does require repairs, we offer an exclusive Service Policy - free of charge during the first year after purchase, and available at a reasonable
rate after the one-year period. For complete details, see the separate warranty card included with your accessory. We encourage you to read this operations
manual carefully in order to get full benefit from all the features and applications of your Humminbird® product.
Contact our Customer Resource Center at either 1-800-633-1468 or visit our website at www.humminbird.com.
WARNING! This device should not be used as a navigational aid to prevent collision, grounding, boat damage, or personal injury. When the boat is moving, water depth may
change too quickly to allow time for you to react. Always operate the boat at very slow speeds if you suspect shallow water or submerged objects.
CAUTION: Platinum™ Cartography is designed to supplement the use of authorized government charts, not be used instead of them. You should use official government
charts for the most up to date information to ensure safe navigation.
Platinum™ Cartography is a registered trademark of Navionics®.
800 Series™, 900 Series™, 1100 Series™, Cannon®, CannonLink™, Humminbird®, HumminbirdPC™, InterLink™, X-Press™ Menu, Structure ID®, SmartCast®, UniMap™ and WeatherSense® are
trademarked by or registered trademarks of Humminbird®.
© 2010 Humminbird®, Eufaula AL, USA. All rights reserved.
i
Table of Contents
How Platinum™ Cartography Works
1
Multi-Media Card (MMC)/SD Slot
2
Navigation X-Press™ Menu Platinum™ Cartography Addition
16
(Navigation Views only)
Overlay Transparency (only in Navigation Views when Chart Aerial Overlay is visible) ...... 16
Exaggeration (only in Navigation Views, 1100 Series™ models only) ................................ 16
Software Updates .................................................................................................... 2
Additional Platinum™ Cartography Key Functions
3
Chart Menu Tab Platinum™ Cartography Additions
VIEW Key .................................................................................................................. 3
MENU Key ................................................................................................................ 3
4-WAY Cursor Control Key ...................................................................................... 4
EXIT Key .................................................................................................................... 4
INFO Key .................................................................................................................. 5
GOTO Key .................................................................................................................. 5
ZOOM [+/-] Keys ...................................................................................................... 6
Views
Platinum™ Menu Tab (only with Platinum™ Cartography MMC/SD card)
19
Chart Aerial Overlay .............................................................................................. 19
3D Aerial Overlay .................................................................................................... 19
Platinum 3D ............................................................................................................ 19
Troubleshooting
6
20
Fishing System Doesn’t Power Up ........................................................................ 20
Fishing System Defaults to Simulator with a Transducer Attached .................. 20
Display Problems .................................................................................................... 21
Finding the Cause of Noise .................................................................................. 22
Chart/Pilot Book Combo View ................................................................................ 7
How to Use the Pilot Book ...................................................................................... 8
Moving Through the Pilot Book .............................................................................. 8
Bird’s Eye View........................................................................................................ 11
Chart View .............................................................................................................. 13
Nearest Port and Chart Information...................................................................... 14
How Platinum™ Cartography Affects The Menu System
17
Chart Detail Level .................................................................................................. 17
Map Borders............................................................................................................ 18
15
ii
Humminbird® Accessories
23
Glossary
24
Contact Humminbird®
30
531598-2EN_E
The user interface will change to show the following Platinum™ Cartography
features when you install a Navionics® Platinum™ Cartography MMC/SD card:
How Platinum™ Cartography Works
Platinum™ Cartography is only available in the 858c, 898c, 955c, 957c, 958c,
967c, 997c, 998c and 1100 Series™ models if you have an optional-purchase
Navionics® Platinum™ Cartography MMC/SD card installed. Platinum™
Cartography provides:
• A new Platinum™ main menu tab will appear that contains the Chart
Aerial Overlay, 3D Aerial Overlay, and Platinum 3D menu choices;
• The Chart/Pilot Book View is added to the Views Menu, and to the
views rotation after the Chart View (The Chart/Pilot Book View is
hidden by default);
• a photographic overlay on certain views,
• additional icons for ports and other landmarks,
• The Bird’s Eye View changes to show charts loaded with 3D
representations for a new 3D Bird’s Eye View that has the following
added functionality:
• pilot books that provide commentary from captains for certain ports,
• panoramic photos of some ports (such as marinas), and
- The zoom level will affect how much space is taken up in the view
and how much white space is shown.
• 3D Platinum™ Cartography.
- Platinum™ Navaids (navigational aids) are displayed as long as the
Chart Detail Level is set to Navigation or higher.
3D Platinum™ Cartography displays a 3 dimensional rendered view of both
the water where you are navigating and the ports and land masses in the
area surrounding the boat's position. Land is shown in varying shades of
yellow, with the color changes indicating the relative height above sea level.
Water and submerged objects are shown in varying shades of blue, with the
color changes indicating the relative depth.
- An aerial photo overlay is shown on the 3D representation of the
Bird's Eye View.
NOTE: You must be zoomed in enough, but not too close, to be able to see the
3D overlay.
NOTE: If you cannot see any Platinum™ information, the MMC/SD card installed
in your control head may not have any Platinum™ data for the area you are
viewing. In this case, zoom out far enough to see the dotted gridlines on the
Bird’s Eye View, which indicate areas where 3D data is available. Then, using the
4-WAY Cursor Control key, move into the center of the dotted gridlines, and press
the Zoom + key to zoom in again. See Bird’s Eye View for more information.
• Chart views will display Navionics® Platinum™ items, depending on the
Chart Detail level set; when All is selected, all of the Platinum™ icons
that are available on a particular part of the map will be displayed.
- When Chart Aerial Overlay is set to Visible on the Platinum™ Main
Menu, you'll see a photo on top of your chart, and the Overlay
Transparency X-Press™ Menu that allows you to adjust the
transparency via a slider will be added to the Chart views.
NOTE: It may take a moment for the Platinum™ information to load.
1
• INFO key functionality:
Multi-Media Card (MMC)/SD Slot
- Port Info has new functionality. The following three selections come
up as a submenu:
Your Humminbird® Fishing System also has a
multi-media card (MMC)/SD slot that is used
to insert optional-purchase cards containing
additional detailed maps. If you insert an
MMC/SD that contains a more detailed
chart for a particular location, your
Humminbird® Fishing System will retrieve
that chart and display it automatically. Use
the illustration to locate the position of the
Inserting an MMC/SD
MMC/SD slot cover, remove the MMC/SD
into the Card Slot
slot cover, then insert the MMC/SD into the
slot. The label on the MMC/SD should face toward the left side of the unit.
Press down on the card until it clicks into place and replace the slot cover.
Then, replace and tighten snugly - do NOT overtighten, as this will not
improve water resistance, and may damage the cover.
Port Information
Pilot Book (see How to Use the Pilot Book for more information)
Panoramic Photo: (see Nearest Port and Chart Information for more
information)
NOTE: Each selection is displayed only if it is actually available for the port, and
if only one selection is available, it is displayed without any submenu selection.
NOTE: Choosing any of these options cursors to the item of interest.
Software Updates
Use the MMC/SD slot to update the software version of your control head.
To update the software in your control head, plug in the appropriate
MMC/SD card that contains a software update file; the unit will recognize it,
will tell you what software version your control head is currently running,
and will ask you if you want to update the software in the unit to match that
on the MMC/SD card. You can obtain software updates from the
www.humminbird.com website.
2
Additional Platinum™ Cartography Key Functions
VIEW Key
Your user interface consists of a set of easy-to-use keys that work with
various on-screen views and menus to give you flexibility and control over
your fishing experience. Your control head operations manual contains full
descriptions of the functions of these keys, but the following keys have
additional Platinum™ Cartography functionality when a Platinum™
Cartography MMC/SD card is installed:
The VIEW key is used to cycle through all available views.
Press the VIEW key to advance to the next view. Repeatedly
pressing VIEW cycles through all views available. Views can be hidden to
optimize the system to your fishing requirements.
• When you have the Platinum™ MMD/SD card installed, the view
rotation will include the Chart/Pilot Book View.
• VIEW key
NOTE: Use the Views tab under the Main Menu to change each view to Hidden
or Visible.
• MENU key
• 4-WAY Cursor Control key
MENU Key
• EXIT key
The MENU key is used to access the menu system.
• INFO key
X-Press™ Menu - Press the MENU key once for the X-Press™ Menu. The
X-Press™ Menu displays the new Overlay Transparency Platinum™ X-Press™
Menu choice in any of the Chart navigation views when Chart Aerial Overlay
is set to Visible. See Navigation X-Press™ Platinum™ Cartography Additions:
Overlay Transparency (only in Navigation Views when Chart Aerial Overlay
is visible) for more information.
• GOTO key
• ZOOM [+/-] keys.
Main Menu - Press the MENU key twice for the tabbed Main Menu System.
The Main Menu System is organized under tabbed headings to help you find a
specific menu item quickly: Alarms, Sonar, Navigation, Chart, Setup, Views,
Accessories, and Platinum™ tabs are part of your tabbed Main Menu System.
3
4-WAY Cursor Control Key
EXIT Key
The 4-WAY Cursor Control key has multiple Platinum™
Cartography functions, depending on the situation:
The EXIT key has one function specific to Platinum™
Cartography:
Pilot Book Selection - Use the 4-WAY Cursor Control keys to select a
port icon (shown as a sailboat within a white square), then press the
INFO key to display the Port Info menu. When a pilot book is
available, you can use the 4-WAY Cursor Control keys to select a pilot book,
then use the 4-WAY Cursor Control keys to navigate through the pilot book,
in combination with the GOTO key. See How to Use the Pilot Book for more
information.
• If you are viewing a panoramic photo in a Bird's Eye or Chart view,
pressing EXIT will exit the panoramic photo and return you to the
normal view with the cursor active.
NOTE: You can also view the pilot book by pressing the VIEW key until the
Chart/Pilot Book View appears.
Change 3D Perspective - Use any arrow key to change the perspective in the
3D Bird's Eye View. Subsequent presses of arrow keys rotate and tilt the 3D
representation.
4
INFO Key
NOTE: Not all menu choices will be displayed, as they are dependent on what
information is available from your MMC/SD card at that point in the map.
Press the INFO key while in any navigation view
to display information about objects that are
nearest to an active cursor.
NOTE: The built-in UniMap™ does not contain Port, Tide or Current information.
This information is only available from optional purchase MMC/SD cards.
NOTE: You can use the INFO key to obtain extra information about specific
Navionics® icons.
NOTE: If a Chart Information text box appears instead of one of the Info menus,
this means that there is no additional pilot book or panoramic photo information
available near your cursor's location.
NOTE: Your control head will have one of the keys shown here. Both keys
function in the same way.
Chart Info menu:
If the cursor is not active, pressing the INFO key
will highlight the Chart Info menu. Use the 4-WAY
Cursor Control key to highlight Nearest Port,
Nearest Tide Station or Nearest Current Station,
then use the RIGHT Cursor key to display the
requested information.
Port Info menu:
If the cursor is active, pressing the INFO key will
display the Port Info menu. From the Chart Info menu,
if you choose Nearest Port using the 4-WAY Cursor
Control keys, the Port Info menu will also be
displayed. Use the 4-WAY Cursor Control key to
highlight Port Information, Pilot Book or Panoramic
Photo (some of these may not be present, depending on what is actually available
for the map at this location), then use the RIGHT Cursor key to display the
requested information.
GOTO Key
The GOTO key has additional Platinum™ Cartography
functionality in the pilot book, where it is used to move from
screen to screen in the pilot book hierarchy. See the
Chart/Pilot Book View section for more information.
5
Sonar
Views
ZOOM (+/-) Keys
Press the - or + ZOOM keys while in any of the Navigation
Views or the Sonar Zoom View to change the scale of the view
to appear closer or farther away.
Views
Combo
View
Bird's
Eye
View
Track
View
NOTE: Platinum™ information, such as a 3D or photographic overlay,
will not be displayed if you are zoomed out too far, or zoomed in too
far. Use the ZOOM keys to adjust your perspective until you can see
the Platinum™ information.
Chart/Pilot Book Combo View will be added to the
View Rotation when a Platinum™ Cartography
Multi-Media Card (MMC)/SD Card is installed in
the Fishing System. In addition, the following views
will have additional Platinum™ Cartography features
added to them:
New Platinum™ Cartography View:
• Chart/Pilot Book Combo View
Navigation Views Affected by Platinum™ Cartography:
• Bird's Eye View
• Chart Views
6
Chart/Pilot Book Combo View
Chart/Pilot Book Combo View
The pilot book is a collection of captain's log entries, displayed in book form,
that is associated with certain ports. Chart/Pilot Book Combo View shows
both the Chart and Pilot Book views in a combination split screen. You can
perform any of the functions for either of these views, but only when the
view you want to control is selected as the active side.
1
NOTE: Press the MENU key once to access the Navigation X-Press™ Menu, and
using the 4-WAY Cursor Control Key, change the Active Side of the Combo View
to right or left.
NOTE: The Chart/Pilot Book Combo View defaults to Hidden; you must make it
Visible using the Chart/Pilot Book View menu on the Views Main Menu tab.
However, if you select Pilot Book from the Port Info menu, you will be taken to
the Chart/Pilot Book Combo View automatically, regardless of how the view is set
to display. See View Main Menu and Nearest Port and Chart Information for
more information.
2
1 Use the UP and DOWN 4-WAY Cursor Control
Keys to scroll up and down in the display
2 Highlighting the left arrow icon and pressing
NOTE: See Chart View for more information about the Chart side of this view.
the GOTO Key takes you to the previous page.
3
4
Highlighting the Home icon and then pressing 3
the GOTO Key takes you back a level - this icon
is inactive if you are in the Pilot Book Index.
Highlighting the right arrow icon and pressing 4
the GOTO Key takes you to the next page.
When you select Pilot Book from the Nearest Port submenu, or from the
selected port if your cursor is active, the pilot book will open to the selected
port on the Chart/Pilot Book Combo View. If you then change to a different
view on the view rotation (using the VIEW key), then re-display the
Chart/Pilot Book Combo View, the pilot book will remain open to the last
page displayed until you power down the unit. If you have not yet selected
a port when you go to the Chart/Pilot Book Combo View in the view rotation,
the pilot book will open to the pilot book index. See Moving Through the
Pilot Book for more information.
7
How to Use the Pilot Book
NOTE: If the Chart Information text box appears, a pilot book might not be
available. Check your cursor position first. Unless you are in the Chart/Pilot Book
Combo View, you must have your cursor positioned inside one of the Platinum™
map borders, and directly over a port that has a pilot book associated with it, to
view a pilot book.
There are three ways to access the pilot book:
Chart Info Menu
The first way is to press the INFO key with the
cursor inactive anywhere on the Bird's Eye or
Chart View in order to display the Chart Info
menu, then select Nearest Port to view the Port
Info Submenu and choose Pilot Book.
NOTE: The Chart Info menu is available when the
cursor is inactive or in Bird's Eye View.
Port Info Sub-menu
The second way to access the pilot book is to use the
4-WAY Cursor Control keys to move directly over the
desired port (which will have a port icon indicating
port information) and press the INFO key to view the
Port submenu, then choose Pilot Book.
Moving Through the Pilot Book
Use the UP and DOWN arrows on the 4-WAY Cursor Control keys to scroll up
and down in the pilot book index. The scroll bar will indicate your position.
NOTE: The Port Info Submenu is available when
the cursor is active and over a port icon on a
chart view.
Use the LEFT or RIGHT arrows on the 4-WAY Cursor Control keys to move the
highlight to different items. To activate a highlighted selection, press the
GOTO key.
When you select Pilot Book from either of these submenus, the view
changes to the Chart/Pilot Book Combo View. If this view is hidden in the
view rotation, it will automatically be made visible when you select Pilot
Book from either of the submenus, and will remain visible until you remove
the Platinum™ Cartography MMC/SD card or hide the Chart/Pilot Book
Combo View using the View main menu tab (see your Fishing System
Operations Manual for more information).
As you scroll up or down, the first item to appear on the new page of the
pilot book will be automatically highlighted.
Highlight the previous or next arrows at the bottom of the screen and press
the GOTO key to move to another page in the pilot book.
When you highlight the Home icon and press the GOTO key, the page that is
the next level up in the hierarchy will be displayed (this may be the Index page).
The third way is to make sure that Chart/Pilot Book View is turned to Visible
using the View Main Menu, then rotate to it using the VIEW key.
If you try to move past the available choices, an error beep will sound.
8
The pilot book is divided into the following categories:
Chapter Table of Contents: Displays the chapters available in the selected
pilot book.
Index: Displays the various pilot books available for this map.
Pilot Book Chapter Table of Contents
Pilot Book Index
1. Use the 4-WAY Cursor Control keys to move through this Table of
Contents and to select a particular chapter for viewing.
1. When you are viewing a pilot book, and are at the top level (the
index), you can scroll through the index using the UP and DOWN
4-WAY Cursor Control keys.
2. If you continue to press the LEFT or RIGHT 4-WAY Cursor Control
keys, and highlight the Home icon at the bottom of the screen, you
may press the GOTO key to move back to the pilot book index.
2. Use the LEFT or RIGHT 4-WAY Cursor keys to highlight items in the
list of books available, then press the GOTO key to move into the
Table of Contents for the selected pilot book.
9
Heading Table of Contents: Displays the headings available in the selected
chapter.
Page View: Displays the actual pages of the selected heading in the chapter
of the pilot book.
Pilot Book Heading Table of Contents
Pilot Book Page View
1. Use the 4-WAY Cursor Control keys to move through this Table of
Contents and to select a particular heading for viewing.
1. Use the UP and DOWN 4-WAY Cursor Control keys to scroll up and
down within the first page, or use the LEFT or RIGHT 4-WAY Cursor
Control keys to highlight the previous or next arrows at the bottom
of the page, then press the GOTO key to advance to another page.
2. If you continue to press the LEFT or RIGHT 4-WAY Cursor Control
keys, and highlight the Home icon at the bottom of the screen, you
may press the GOTO key to move back a level to the Chapter Table
of Contents.
2. If you continue to press the LEFT or RIGHT 4-WAY Cursor Control
keys, and highlight the Home icon at the bottom of the screen, you
may press the GOTO key to move back to the Heading Table of
Contents.
10
Bird’s Eye View
NOTE: Platinum™ information, such as a 3D overlay or photographic data, will not
be displayed if you are zoomed out too far, or zoomed in too far. Use the ZOOM
keys to adjust your perspective until you can see the Platinum™ information.
Bird's Eye View - This view shows a 3D, perspective view of the track from
a point above and behind the boat (the eye point). As the boat turns, the eye
point moves to follow the boat.
See Platinum™ Menu Tab: 3D Aerial Overlay for more information.
When you press the 4-WAY Cursor key in the Bird’s Eye View, the position of
the eye point will shift. This allows you to move and turn the eye point so
that you can look off to the sides, or even behind the boat. Pressing the
RIGHT or LEFT arrow keys on the 4-WAY Cursor key turns the eye point right
or left, while pressing the UP arrow key moves the eye point forward, and
pressing the DOWN arrow key moves the eye point backward.
Platinum™ gridlines will only be displayed appropriately on the Bird's Eye
View if Map Borders is set to MMC/SD Only or All Visible. See Chart Menu
Tab; Platinum™ Cartography Additions: Map Borders for more information.
Bird’s Eye View, Showing 3D and Photographic Data and Navaids
1
Pressing the EXIT key moves the eye point back to its original position behind
and above the boat.
2
You can use the INFO key to get information on the objects near the boat.
See Nearest Port and Chart Information for more information.
5
3
3D View: Once Platinum™ Cartography is added to your Fishing System, the
Bird's Eye View changes to a 3D View. When you are zoomed out, it will
appear as if you are in normal Bird's Eye View. Press the Zoom + key to see
the view in 3D.
6
4
Photographic Overlay: Once Platinum™ Cartography is added to your Fishing
System, and 3D Aerial Overlay is set to Visible using the Platinum™
Main Menu, the Bird's Eye View changes to show a photographic overlay.
When you are zoomed out, it will appear as if you are in normal Bird's Eye
View. Press the Zoom + key to zoom in and view the photographic data
(when photographic data is available in the map).
1 Depth
2 Course: Direction that boat is traveling
relative to North Reference
3 Latitude and Longitude Position of Boat
Speed of Boat 4
Land Contours 5
Boat Icon 6
NOTE: The entire view may not be completely filled up with information,
depending on the zoom level.
11
Bird's Eye View Zoomed Out Too Far - No 3D or Photographic Data Visible
Bird's Eye View Zoomed In Too Far - No 3D or Photographic Data Visible
1
1
2
2
3
3
7
6
5
4
4
5
1 Depth
2 Course: Direction that boat is traveling
relative to North Reference
3 Latitude and Longitude Position of Boat
1 Depth
2 Course: Direction that boat is traveling
Speed of Boat 4
Land Contours 5
relative to North Reference
3 Latitude and Longitude Position of Boat
Boat Icon 6
3D Data Gridlines 7
12
Speed of Boat 4
Boat Icon 5
Chart View
Chart View shows cartography from the built-in UniMap™ or an optional
MMC/SD map for the area surrounding your current position. The current
track (also known as the position history or breadcrumb trail) showing where
the boat has been, along with saved tracks, waypoints, and the current
route (when navigating), are overlaid on the chart.
See Chart Menu Tab; Platinum™ Cartography Additions: Map Borders for
more information. See Chart Menu Tab; Platinum™ Cartography Additions:
Chart Detail Level and Nearest Port and Chart Information for more
information.
Chart View
You can use the 4-WAY Cursor Control key to shift/pan the chart to another area.
You can use the ZOOM (+/-) keys to zoom in and out.
1
4
You can use the INFO key to get information on the chart objects near the cursor.
2
Photographic Overlay: Once Platinum™ Cartography is added to your Fishing
System, and Chart Aerial Overlay is set to Visible using the Platinum™ Main
Menu, the Chart View changes to show a photographic overlay. When you are
zoomed out, it will appear as if you are in normal Chart View. Press the Zoom +
key to zoom in and view the photographic data (when photographic data is
available in the map).
3
See Platinum™ Menu Tab: Chart Aerial Overlay and Navigation X-Press™
Menu; Platinum™ Cartography Addition: Overlay Transparency for more
information.
1 Depth
2 Course: Direction that boat is traveling
relative to North Reference.
3 Map Scale
In addition, the Chart View will display Platinum™ Cartography data and
icons if Chart Detail Level is set to All.
Map borders will only be displayed appropriately on the Chart View for
Platinum™ Cartography if Map Borders is set to MMC/SD Only or All Visible.
13
5
Cartography 4
Boat Icon 5
Nearest Port and Chart Information
Panoramic Photo
Platinum™ Cartography provides additional information when you press the
INFO key on a part of the Bird's Eye or Chart Views that contains Platinum™
information. Whether the cursor is active or inactive will determine exactly
what you see, as well as whether there are pilot books or panoramic photos
available for your specific location.
Chart Info Menu
Pressing the INFO key when the cursor is not active
displays the Chart Info menu, which in turn allows
you to select Nearest Port. Nearest Port has
additional Platinum™ Cartography functionality (Port
Information, Pilot Book, and Panoramic Photo) when
that information is available for the port:
Nearest Port Submenu
When you press the INFO key when the cursor is active, you will see the
same choices, but without the Nearest Port submenu.
• If you select Pilot Book from this submenu, the
Chart View changes to a new view, the Chart/Pilot
Book Combo View. See Chart/Pilot Book Combo
View for more information.
NOTE: If no pilot book or panoramic photos exist for your location, only the Chart
Info data window will be displayed.
Chart Info Data Window
Nearest Port Submenu:
Panoramic Photo
• If you select Panoramic Photo, a new window will
be displayed that is similar to the Tide Station Box,
that covers the width of the screen, but not the
readouts. Pressing EXIT removes the panoramic
photo image from the screen and returns you to the
Chart View with the cursor active.
14
Main Menu Tabs - When a Platinum™ Cartography
MMC/SD card is installed, the following tab
headings will appear: Alarms, Sonar, Navigation,
Chart, Set Up, Views, Accessories, and Platinum™.
How Platinum™ Cartography Affects The Menu System
The menu system is divided into easy-to-use menu modules. The components
of the menu system that are affected by Platinum™ Cartography are:
Main Menu System
Normal User Mode
X-Press Menu - When a Platinum™ Cartography
MMC/SD card is installed, the X-Press™ Menu will
change to include the following menu item
(depending on the view you are in): Overlay
Transparency. See the Navigation X-Press™ Menu;
Platinum™ Cartography Addition (Navigation
Views only) for more information.
X-Press™ Menu
15
NOTE: See your Fishing System Operations Manual
for information on the full menu choices.
Navigation X-Press™ Menu
Platinum™ Cartography Addition
Overlay Transparency
(only in Navigation Views when
Chart Aerial Overlay is visible)
(Navigation Views only)
Overlay Transparency allows you to change the transparency of the chart
aerial photo overlay when it is visible. When the Overlay Transparency is set
to 0%, the overlay will be completely opaque. When the Overlay
Transparency is set to 100%, the overlay will be completely invisible. (See
Platinum™ Main Menu Tab: Chart Aerial Overlay for more information).
The Navigation X-Press™ Menu provides access to
the settings most frequently used. Press the
MENU key once while in the Bird's Eye View, the
Chart View, or the Chart/Pilot Book Combo View,
to access the Navigation X-Press™ Menu.
To change the transparency of the chart aerial overlay:
NOTE: Menu choices will vary depending on system
settings, such as whether you are currently
navigating, as well as what model you have.
1. Highlight Overlay Transparency on the Navigation X-Press™ Menu.
2. Use the RIGHT 4-Way Cursor Control key to change the transparency
of the overlay. (0% - 100%, Default = 30%)
The Navigation X-Press™ Menu will be added to
the menu system when a GPS is connected to the
Fishing System. When a Platinum™ Cartography
MMC/SD card is also installed, the following
Platinum™-specific choice is added to the
Navigation X-Press Menu:
Exaggeration
(Navigation Views, 1100 Series™ models only)
Exaggeration allows you to stretch the highs and lows on the 3D view so
that hills and mountains look taller, and valleys and depths look lower.
Exaggeration is only available for the 1100 Series™.
™
Navigation X-Press
Menu Affected By Platinum™
Cartography
• Overlay Transparency (only in Navigation
Views when Chart Aerial Photo is visible).
To change the setting of Exaggeration:
1. Highlight Exaggeration on the Navigation X-Press™ Menu.
2. Use the RIGHT 4-WAY Cursor Control key to change the exaggeration
setting. (0 - 10, Default = 0)
16
Chart Menu Tab
Platinum™ Cartography Additions
Chart Detail Level
Chart Detail Level allows you to select how
much chart detail you want displayed on the Navigation Views. Basic shows
land areas, ports, obstructions and restricted areas. Navigation shows
navaids, landmarks, ferryways and navigation routes in addition to the Basic
information. Underwater shows depth contours, fishing areas, underwater
wrecks, tides and currents in addition to the Basic and Navigation
information. All shows roads, buildings, railways, and other notations in
addition to the Basic, Navigation, and Underwater information.
Press the MENU key twice to access the Main
Menu System, then press the RIGHT cursor key to
select the Chart tab.
NOTE: Menu choices will vary depending on system
settings.
Chart Menu Tab
Affected by Platinum™
Cartography
The Navigation Menu Tab will be added to the
menu system when a GPS Receiver is connected
to your Fishing System. The following Chart menu
choices will have additional functionality when a
Platinum™ Cartography MMC/SD card is also
installed:
To change the Chart Detail Level setting:
1. Highlight Chart Detail Level on the Chart Main Menu.
2. Use the LEFT or RIGHT 4-WAY Cursor Control keys to change the
Chart Detail Level setting. (Basic, Navigation, Underwater, All,
Default = All)
• Chart Detail Level
NOTE: Some chart details are only available with optional-purchase MMC/SD cards.
If you have a Platinum™ Cartography MMC/SD card installed, selecting All will add
all of the new business, wreck, road, and other Platinum™ icons to the Chart views.
• Map Borders
17
Map Borders
Map Borders, shown with
Optional-Purchase Navionics® Platinum™ Cartography on the Chart View
Map Borders allows you to display or hide
map borders or gridlines when Platinum™ data is available. A Map Border
indicates an area which contains a different map. If you have an optionalpurchase Platinum™ Cartography MMC/SD card installed, selecting MMC/SD
Only or All Visible will display Platinum™ map borders on the Chart Views, and
3D gridlines on the Bird's Eye View. The gridlines outline the 3D tiles to show
where 3D renderings are available on the Bird's Eye View.
To change the Map Borders setting:
1. Highlight Map Borders on the Navigation Main Menu.
2. Use the LEFT or RIGHT 4-WAY Cursor Control keys to change the
Map Borders setting. (Hidden, MMC/SD Only, All Visible, Default =
MMC/SD only)
Map Borders
Grid Lines Showing 3D Tiles Controlled by Map Borders with OptionalPurchase Navionics® Platinum™ Cartography on the Bird's Eye View
NOTE: Some map borders are only available with optional-purchase MMC/SD
cards.
Grid Lines Showing 3D Tiles
18
Platinum™ Menu Tab
3D Aerial Overlay
(only with Platinum Cartography MMC/SD card)
™
™
Platinum Menu Tab
3D Aerial Overlay allows you to make the
Aerial Overlay visible on the Bird's Eye View.
From any view, press the MENU key twice to
access the Main Menu System, then use the
4-WAY Cursor Control keys to choose the
Platinum™ menu tab.
To change the visibility of the 3D Aerial Overlay:
1. Highlight 3D Aerial Overlay on the Platinum™ Main Menu.
2. Use the LEFT or RIGHT 4-WAY Cursor Control keys to change the 3D
Aerial Overlay setting. (Hidden, Visible, Default = Visible).
The Platinum™ main menu tab will appear, and the following menu choices
will be added to your Platinum™ menu tab when a Platinum™ Cartography
MMC/SD card is installed in the Fishing System:
Platinum 3D
• Chart Aerial Overlay
Platinum 3D allows you to view normal
Bird's Eye information without having to switch back and forth between 3D
and Bird's Eye View.
• 3D Aerial Overlay
• Platinum 3D.
To change the setting of Platinum 3D:
Chart Aerial Overlay
1. Highlight Platinum 3D on the Platinum™ Main Menu.
Chart Aerial Overlay allows you to choose
what is shown when the Aerial Overlay is visible on the Chart views.
2. Use the LEFT or RIGHT 4-WAY Cursor Control keys to change the
Platinum 3D setting. (Hidden, Visible, Default = Visible).
To change the visibility of the Chart Aerial Overlay:
1. Highlight Chart Aerial Overlay on the Platinum™ Main Menu.
2. Use the LEFT or RIGHT 4-WAY Cursor Control keys to change the
Chart Aerial Overlay setting. (Hidden, Land, Land + Water.
Default = Land).
19
Troubleshooting
Fishing System Defaults to Simulator with a Transducer Attached
A connected and functioning transducer will cause the newly-started
Fishing System to go into Normal operating mode automatically. If, when
you power up the Fishing System, it goes into Simulator mode automatically,
even though a transducer is already connected, this means that the control
head is not detecting the transducer. Perform the following troubleshooting
tasks:
Before contacting the Humminbird® Customer Resource Center, please read
the following section. Taking the time to review these troubleshooting
guidelines may allow you to solve a performance problem yourself, and
therefore avoid sending your unit back for repair.
Fishing System Doesn’t Power Up
If your Fishing System doesn’t power up, use the Installation Guide that also
comes with it for specific confirmation details, making sure that:
• Using the Installation Guide that also comes with your Fishing
System, check to make sure that the transducer cable is securely
connected to the Fishing System. Reconnect if necessary, and power
up the Fishing System again to see if this fixes the problem.
• the power cable is properly connected to the Fishing System control
head,
• Replace the non-functioning transducer with a known good
transducer if available and power up the control head again.
• the power cable is wired correctly, with red to positive battery
terminal and black to negative terminal or ground
• Check the transducer cable. Replace the transducer if the cable is
damaged or corroded.
• the fuse is operational
• the battery voltage of the power connector is at least 10 Volts.
Correct any known problems, including removing corrosion from the battery
terminals or wiring, or actually replacing the battery if necessary.
20
Display Problems
There are several main conditions or sources of possible interference that may cause problems with the quality of the information displayed on the control head.
Look in the following table for some symptoms of display problems and possible solutions:
Problem
Possible Cause
The control head loses power at
high speeds.
If the power output of your boat’s engine is unregulated, the control head may be protecting itself using its over-voltage protection
feature. Make sure the input voltage does not exceed 20 Volts.
When the boat moves at higher
speeds, the bottom disappears or
suddenly weakens, or the display
contains gaps.
The transducer position may need to be adjusted. A mix of air and water flowing around the transducer (cavitation) may be
interfering with the inter-pretation of sonar data. See your Installation Guide for suggestions on adjusting the transducer
position.
Electrical noise from the boat’s engine may be interfering with sonar reception. See Finding the Cause of Noise for more
information.
There are no fish detected, even
when you know they are in the
water under the boat, or sonar
readings seem weak or faulty.
Sonar readings may be affected if the transducer is not positioned correctly (i.e. mounted at an angle, not straight down), or there
is some kind of mechanical interference, either because it is mounted inside a hull that is too thick for proper sonar transmission,
the bond between the transducer and the hull is not airtight, or because the transducer is dirty. Check with your Installation Guide
for guidance on re-positioning the transducer, and make sure the transducer is clean.
Low battery voltage may be affecting the power of signal transmission.
Electrical noise from the boat’s engine may be interfering with sonar reception. See Finding the Cause of Noise for more
information.
Map Data is Slow to Load
Platinum™ map data, especially the 3D data, can take a while to load. This is normal, especially when it is first installed.
NOTE: Platinum™ information, such as a 3D overlay or aerial view, will not be displayed if you are zoomed out too far, or
zoomed in too far. Use the ZOOM keys to adjust your perspective until you can see the Platinum™ information.
21
Finding the Cause of Noise
Electrical noise usually affects the display with many black dots at high speeds, and high sensitivity readings. One or more of the following sources can cause
noise or interference:
Possible Source of Noise
Isolation
Other electronic devices
Turn off any nearby electronic devices to see if the problem goes away, then turn them on one at a time to
see if the noise re-appears.
The boat’s engine
To determine whether the boat’s engine is the source of the noise, increase the RPMs while the boat is in
neutral and stationary to see if the noise increases proportionately; if noise appears when you rev the
engine, the problem could be the spark plugs, alternator, or tachometer wiring. Replace the spark plugs with
resistor plugs, install an alternator filter, or route the control head power and transducer cables away from
the engine wiring.
Cavitation from the boat’s propeller
Turbulence created by the propeller can cause noise; make sure the transducer is mounted at least 15” (38
cm) from the propeller, and that the water flows smoothly over the face of the transducer at all times.
22
when using the Cannon™ Speed-n-Temp. You’ll never be shorthanded again,
just make adjustments from the helm, while your mate rigs the lines and
brings in the fish!
Humminbird® Accessories
Accessories customize your Fishing System to your needs and enable you to
stay on the edge of new technology. When an accessory is connected to the
Fishing System, additional menus and readouts are added automatically to
the Main Menu System. Accessories available today that are supported by
your Fishing System include:
With the new InterLink™ Network Connection, you can now share GPS
position, waypoints, routes and your current track between two
Humminbird® Fishing Systems in real time. Mark a waypoint at the console,
and it’s instantly available on the second unit. No matter where you’re at on
the boat, you’ll have access to your critical fishing and navigation
information. Plus, daisy chain InterLink™ with other System Modules and
you’ll have a network that lets you share digital data around the boat. It’s a
simply, clearly, better networking solution!
WeatherSense® Fishing Condition Monitor: purchase and plug in the
WeatherSense® accessory to your Fishing System to obtain barometric
pressure readouts and trend data in real time.
Wireless Sonar Link (WSL): purchase the Wireless Sonar Link (WSL)
accessory to receive remote sonar signals from a SmartCast® Remote Sonar
Sensor (RSS). Radio signals from the RSS are received by the WSL and are
transmitted over the Accessory Bus to the Fishing System.
Be sure to check out our website www.humminbird.com for additional new
and exciting accessories to grow your Fishing System!
NOTE: Each accessory requires a separate purchase. You can visit our website
at www.humminbird.com or contact our Customer Resource Center at
1-800-633-1468 for additional details.
PC Connect Cable: Purchase the PC Connect Cable to connect the Fishing
System to a PC in order to upload product software updates and new
features obtained from www.humminbird.com. This accessory requires the
MSWindows-compatible HumminbirdPC™ software downloaded from our
website to your PC in order to communicate with the Fishing System.
Downriggers are the key to catching fish you otherwise couldn’t even touch.
And now Humminbird’s CannonLink™ Downrigger Controller makes
operation of up to six Cannon™ Mag 20 DT or Mag 20 DT/HS downriggers
incredibly easy. Using the controls on your Fishing System, deploy or retrieve
downriggers, hold a specific distance off the bottom, cycle downriggers
between two depths, and adjust the Positive Ion Control. Even see
temperature and water clarity at depth and speed at the ball right on-screen
23
Glossary
GPS & Navigation Terms
Acquisition Time: The length of time that a GPS receiver typically takes to
determine a position from at least three satellites. Humminbird® GPS
receivers provide very fast acquisition times (under one minute), permitting
users to get out on the water faster.
Cold Start: Cold Start refers to the procedure that a GPS receiver must perform
when it does not have historical information regarding its current location. This
procedure typically lasts for several minutes, and may be experienced upon first
power up of the receiver, or if the receiver has been moved a great distance.
Alarm, Arrival: The audible alert that sounds when the boat is equal to or less
than the alarm setting (25 feet – 3000 feet) from the location of the destination
waypoint.
Course Over Ground (COG): Course Over Ground is the current direction the
boat is traveling measured in degrees from North (i.e. 321°, where 000° is North,
090° East, 180° is South, 270° is West). When the Course Over Ground is equal
to Bearing, the boat is said to be “On Course” and will arrive at the destination
in the most efficient manner. COG is often confused with Heading. See Heading.
Alarm, Drift: Drift Alarm is an audible alert that sounds when the boat is equal
to or over the alarm setting (25 feet – 3000 feet) from the location where the
alarm was turned on.
Cross Track Error (XTE): Cross Track Error is the straight-line distance of the boat
from the intended Track. XTE measures how far the boat is off course, and also
triggers the Off Course Alarm. See Track.
Alarm, Off-Course: Off-Course Alarm is an audible alert that sounds when the
boat’s distance from the intended Track, (Cross Track Error), is equal to or over
the alarm setting (25 feet – 3000 feet). See Track and Cross Track Error.
Differential GPS (DGPS): Differential GPS is a system to improve the position
accuracy of the Department of Defense GPS through the use of secondary
“correction signals” broadcast from ground stations around the coastal United
States and on some inland waterways. These correction signals are provided by
the USCG and received by an auxiliary Differential Beacon Receiver (DBR) that
connects to the GPS receiver. The advent of WAAS has largely negated the need
for the added expense of a DBR in the United States.
Altitude: Altitude measures height above sea level. Altitude is a measurement
that can be provided by GPS.
Bearing (BRG): Bearing is the direction to a destination waypoint measured in
degrees from North (i.e. 321°, where 000° is North, 090° East, 180° is South,
270° is West).
Distance To Go: Distance To Go is the straight-line distance between Present
Position and the Destination Waypoint. DTG and SOG (Speed Over Ground) are
used to calculate Time To Go. See Time to Go and Speed Over Ground.
Chartplotter: Chartplotter describes a navigation device that shows Present
Position on a Map, along with Tracks, Waypoints, and Routes. All Chartplotters
are also considered Trackplotters. All Humminbird® GPS Combo units are
Chartplotters. See Trackplotter.
24
Glossary
GPS & Navigation Terms
This mathematical model is the Map Datum. Historically, many different Map
Datums have been used around the world to create maps; often a reference to
the Map Datum can be found in the legend of a paper map. It is important to
select the correct Map Datum setting in your fishfinder when comparing GPS
position to a paper chart to avoid slight position inaccuracies. Almost all
electronic charts use the WGS84 Map Datum and therefore, they do not require
setting changes.
Estimated Position Error (EPE): Estimated Position Error is a calculation that
indicates the potential position inaccuracy the user may experience due to a
variety of GPS factors which include satellite position in the sky, signal strength
and others factors.
Fix Type: Fix Type indicates whether the GPS receiver is providing 2D fix or 3D
fix. A 2D fix requires only three satellites and provides only latitude and
longitude. A 3D fix requires four or more satellites, and provides latitude,
longitude and altitude.
MMC: MMC is an acronym for Multi Media Card. An MMC is a postage stampsized memory device used to store electronic data such a maps, waypoints,
routes and other information. MMC is a very rugged format suitable for the
marine environment, but it is not waterproof. The MMC is removable from
Humminbird® products, and can be used in a PC that is equipped with an
appropriate card reader. MMC is the same format that many digital cameras use.
See SD.
GPS: GPS is an acronym for Global Positioning System. GPS provides accurate
position (latitude, longitude, altitude) information virtually anywhere on the
earth through satellite technology and personal receivers on the ground. A series
of geosynchronous satellites broadcast a unique signal toward the earth once
per second. A GPS receiver, such as that included with many Humminbird®
products, receives the signals from these satellites and is able to determine
position based on very slight differences in the time each signal is received and
the receiver’s knowledge of the location of each of the satellites.
North, Magnetic: North is the principle reference point of the compass (i.e.
North is 000°). Magnetic North relies on the earth’s magnetic field to align a
metal pointer generally towards True North. However, due to local variations in
the earth’s magnetic field around the globe, the difference between True North
and Magnetic North can be greater than 10°. See True North.
Heading: Heading describes the direction the boat is pointing and is measured
in degrees (i.e. 321°, where 000° is North, 090° East, 180° is South, 270° is
West). Due to wind and waves, the boat is often traveling in a slightly different
direction than it is heading, and therefore Heading is often confused with Course
Over Ground. See Course Over Ground.
North, True: North is the principle reference point of the compass (i.e. North is
000°). True North uses the axis of the rotation of the earth as the reference for
North and is constant for all points on the earth. Most GPS units default to True
North as the setting. The GPS heading may vary from the boat compass heading
because the compass uses Magnetic North. Humminbird® GPS units provide the
option of selecting True or Magnetic readouts by using the North Reference
menu. See Magnetic North.
Map Datum: A Map Datum refers to a particular survey of the earth’s surface
that was referenced when creating a chart (i.e. WGS84). Since the earth is not
flat, and not even consistently round, a mathematical model must be used to
translate coordinates from the sphere of the earth to the flat surface of a chart.
25
Glossary
GPS & Navigation Terms
by GPS. An alternate, Speed Through Water, is provided by a speed
paddlewheel, and is the measurement of the flow past the boat, which may vary
depending on current speed and direction. Speed Over Ground is optimal for
navigation because accurate destination times can be derived from this
measurement. Humminbird® products allow for input and display of both speed
measurements.
Present Position: Present Position is the current location (latitude, longitude)
determined by GPS. The Present Position is indicated on-screen by a directional
boat icon if the boat is moving, or a round symbol if the boat is stationary.
Route: A Route is series of waypoints linked together in a specific sequence to
define a navigation path between two points, and saved in the fishfinder’s
memory. Routes are often used when frequently traveling between two or more
locations because it is a faster and more accurate method than repeatedly
selecting individual waypoints each time one travels through the same area.
Routes consist of a Start Waypoint, an End Waypoint, and a series of waypoints
in between. Users can begin navigation at the beginning, the end (to run the
route in reverse) or at any waypoint in between. See Waypoint.
Time To Go (TTG): Time To Go is the estimated time required to reach the
destination waypoint. TTG is calculated using the SOG and DTG. See SOG and DTG.
Track: A Track is a series of saved points that define the past path of the boat.
These Track Points are saved at regular time intervals. Tracks are a useful and
quick method to see where you’ve been, and an easy guide to follow to get you
back to the starting point. Generally, all GPS units have a limited number of Track
Points that can be saved before the unit runs out of memory and begins erasing
the first track points saved. Because of this, the user can adjust the Track Point
Interval menu to increase the amount of time between when points are saved,
and thus extend the distance covered by a track. Tracks can also be permanently
saved to memory, and re-displayed at the user’s option.
SD: SD is an acronym for Secure Digital. An SD card is virtually identical in
function to an MMC; however, the speed at which information can be accessed
is generally faster, the storage capacity is generally larger, and the card has
security features which can be used to prevent extracting the data from the card.
SD is the same format that many digital cameras use. See MMC.
Selective Availability: Selective Availability (SA) is a GPS system “feature” that
can be implemented by the U.S. Department of Defense (DoD) to degrade the
accuracy of GPS positioning information. With SA active, the GPS is accurate to
within 100 meters 95% of the time. With SA inactive, the GPS is accurate to
within 45 meters 95% of the time. Currently, SA is inactive and the consumer can
enjoy the greater precision GPS provides; however, the DoD reserves the right to
activate SA at any time.
Track Line (TRK): The Track Line is the desired line of travel between two
waypoints, and represents the most efficient path between the two points
because it is a straight line. The TRK is measured in degrees (i.e. 321°, where
000° is North, 090° East, 180° is South, 270° is West). See Cross Track Error
and Course Over Ground.
Trackplotter: Trackplotter describes a navigation device that shows Present
Position, along with Track, Waypoint, and Routes, but NO MAP in the
background. See Chartplotter.
Speed Over Ground (SOG): Speed Over Ground is the measurement of the
boat’s progress across a given distance, and is the speed measurement provided
26
Glossary
GPS & Navigation Terms
Trolling Grid: Trolling Grid is a Humminbird® feature that displays a precise
reference grid around a waypoint. This grid is used as a guide pattern for trolling
around a specific area to assure a more efficient and complete coverage of that
area. Trolling Grid resolution be changed by zooming in or out on the chart. The
Trolling Grid can also be rotated on the display to orient it for optimal boat course
for wave and wind conditions.
Waypoint Target: Waypoint Target is a Humminbird® feature that displays a
precise “bull’s eye” around a selected waypoint. This bull’s eye is used to easily
monitor boat position relative to a waypoint, and is useful for fishing over
submerged structure. With Waypoint Targets, a quick look at the screen lets you
know how far off the waypoint the boat has drifted.
UTC: UTC is an acronym for Universal Time Constant. UTC is the “standard time”
used in navigation, and is the local time in Greenwich England. (UTC is
equivalent to Greenwich Mean Time (GMT)). To display the correct Local Time in
a Humminbird® GPS unit, the user must use the Local Time Zone menu and select
the time zone (i.e. EST, CST).
WAAS: WAAS is an acronym for Wide Area Augmentation System. WAAS is
complementary technology to GPS that provides enhanced accuracy through
correction signals broadcast from Federal Aviation Administration WAAS
satellites stationed over the USA. These secondary signals are automatically
received by the standard Humminbird® GPS Receiver. With WAAS signal, GPS
accuracy is improved to within 3 meters 95% of the time. Outside the United
States, regional governmental coalitions have created similar systems such as
EGNOS (Europe) and MSAS (Japan).
Waypoint: A Waypoint is the saved location (latitude, longitude) of a point of
interest that is stored in a GPS receiver’s memory. This can include a marker
buoy, dock, fishing hole or anywhere else the user may want to return to.
Humminbird® products offer the ability to name and assign a symbol to the saved
location. Depth, Date and Time of Day when the waypoint was created is also
saved.
27
Notes
28
Notes
29
Contact Humminbird®
Contact the Humminbird® Customer Resource Center in any of the following ways:
By Telephone:
(Monday - Friday 8:00 a.m. to 4:30 p.m. Central Standard Time):
1-800-633-1468
By e-mail:
(typically we respond to your e-mail within three business days):
[email protected]
For direct shipping, our address is:
Humminbird
Service Department
678 Humminbird Lane
Eufaula, AL 36027 USA
30