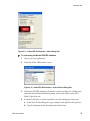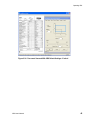
1
VirtualReScan® 3.5
User’s Manual
10300409-000
Revision A
Copyright
Copyright © 2004 Kofax Image Products. All Rights Reserved. Printed in the U.S.A.
The information contained in this document is the property of Kofax Image Products.
Neither receipt nor possession hereof confers or transfers any right to reproduce or
disclose any part of the contents hereof, without the prior written consent of Kofax
Image Products. No patent liability is assumed, however, with respect to the use of
the information contained herein.
Trademarks
VirtualReScan, Kofax, ImageControls, and Adrenaline are registered trademarks of
Kofax Image Products.
ISIS and PixTools are trademarks of Pixel Translations, a division of Captiva Software
Corporation.
TWAIN is a registered trademark of the TWAIN Working Group.
All other product names and logos mentioned herein are the property of their
respective companies.
Disclaimer
The instructions and descriptions contained in this document were accurate at the
time of printing. However, succeeding products and documents are subject to change
without notice. Therefore, Kofax Image Products assumes no liability for damages
incurred directly or indirectly from errors, omissions, or discrepancies between the
product and this document.
An attempt has been made to state all allowable values where applicable throughout
this document. Any values or parameters used beyond those stated might have
unpredictable results.
Contents
How to Use This Guide . . . . . . . . . . . . . . . . . . . . . . . . . . . . . . . . . . . . . . . . . . . . . . . . . vii
Introduction . . . . . . . . . . . . . . . . . . . . . . . . . . . . . . . . . . . . . . . . . . . . . . . . . . . . . . . . . . . . . vii
How this Guide is Organized . . . . . . . . . . . . . . . . . . . . . . . . . . . . . . . . . . . . . . . . . . . . . . vii
Related Documentation . . . . . . . . . . . . . . . . . . . . . . . . . . . . . . . . . . . . . . . . . . . . . . . . . . viii
Technical Support Information . . . . . . . . . . . . . . . . . . . . . . . . . . . . . . . . . . . . . . . . . . . . . .ix
1
Overview . . . . . . . . . . . . . . . . . . . . . . . . . . . . . . . . . . . . . . . . . . . . . . . . . . . . . . . . . . . . .
Introduction . . . . . . . . . . . . . . . . . . . . . . . . . . . . . . . . . . . . . . . . . . . . . . . . . . . . . . . . . . . . . .
Standard Features . . . . . . . . . . . . . . . . . . . . . . . . . . . . . . . . . . . . . . . . . . . . . . . . . . . . . . . . .
Certified Scan Applications . . . . . . . . . . . . . . . . . . . . . . . . . . . . . . . . . . . . . . . . . . . . . . . . .
Certified vs. Non-Certified Scanners . . . . . . . . . . . . . . . . . . . . . . . . . . . . . . . . . . . . . . . . .
2
Operating VRS. . . . . . . . . . . . . . . . . . . . . . . . . . . . . . . . . . . . . . . . . . . . . . . . . . . . . . . . . 5
Introduction . . . . . . . . . . . . . . . . . . . . . . . . . . . . . . . . . . . . . . . . . . . . . . . . . . . . . . . . . . . . . . 5
Scanning with VRS Default Settings . . . . . . . . . . . . . . . . . . . . . . . . . . . . . . . . . . . . . . . . . . 5
Starting VRS . . . . . . . . . . . . . . . . . . . . . . . . . . . . . . . . . . . . . . . . . . . . . . . . . . . . . . . . . . 5
Kofax VRS Scan Interfaces . . . . . . . . . . . . . . . . . . . . . . . . . . . . . . . . . . . . . . . . . . . . . . . . . . 8
Kofax VRS TWAIN Interface . . . . . . . . . . . . . . . . . . . . . . . . . . . . . . . . . . . . . . . . . . . . 8
Kofax VRS ISIS Interface . . . . . . . . . . . . . . . . . . . . . . . . . . . . . . . . . . . . . . . . . . . . . . . 11
Configuring VRS Before You Scan . . . . . . . . . . . . . . . . . . . . . . . . . . . . . . . . . . . . . . . . . . 15
Using the VRS Taskbar Icon . . . . . . . . . . . . . . . . . . . . . . . . . . . . . . . . . . . . . . . . . . . . 15
VRS Menu . . . . . . . . . . . . . . . . . . . . . . . . . . . . . . . . . . . . . . . . . . . . . . . . . . . . . . . . . . . 16
Preview . . . . . . . . . . . . . . . . . . . . . . . . . . . . . . . . . . . . . . . . . . . . . . . . . . . . . . . . . . 16
Profile . . . . . . . . . . . . . . . . . . . . . . . . . . . . . . . . . . . . . . . . . . . . . . . . . . . . . . . . . . . 16
Admin Utility . . . . . . . . . . . . . . . . . . . . . . . . . . . . . . . . . . . . . . . . . . . . . . . . . . . . . 17
QC Modes . . . . . . . . . . . . . . . . . . . . . . . . . . . . . . . . . . . . . . . . . . . . . . . . . . . . . . . . 17
VRS Administration Utility . . . . . . . . . . . . . . . . . . . . . . . . . . . . . . . . . . . . . . . . . . . . . 19
Warnings Tab . . . . . . . . . . . . . . . . . . . . . . . . . . . . . . . . . . . . . . . . . . . . . . . . . . . . . 21
Errors Tab . . . . . . . . . . . . . . . . . . . . . . . . . . . . . . . . . . . . . . . . . . . . . . . . . . . . . . . . 23
Accelerated Scanning Tab . . . . . . . . . . . . . . . . . . . . . . . . . . . . . . . . . . . . . . . . . . 26
Updating the VRS Administration Utility Dialog Box . . . . . . . . . . . . . . . . . . 27
Using the Auto Resolve Manager . . . . . . . . . . . . . . . . . . . . . . . . . . . . . . . . . . . . . . . 29
Previewing Images . . . . . . . . . . . . . . . . . . . . . . . . . . . . . . . . . . . . . . . . . . . . . . . . . . . . 30
VRS User’s Manual
1
1
2
3
3
iii
Contents
Using VRS While You Scan . . . . . . . . . . . . . . . . . . . . . . . . . . . . . . . . . . . . . . . . . . . . . . . . . 31
When Does VRS Come into Play? . . . . . . . . . . . . . . . . . . . . . . . . . . . . . . . . . . . . . . . . 31
Using the VRS Viewer . . . . . . . . . . . . . . . . . . . . . . . . . . . . . . . . . . . . . . . . . . . . . . 32
Using the Zoom Menu to Adjust the View . . . . . . . . . . . . . . . . . . . . . . . . . . . . 33
Using Mouse Buttons to Adjust the View . . . . . . . . . . . . . . . . . . . . . . . . . . . . . 33
Updating Image Properties . . . . . . . . . . . . . . . . . . . . . . . . . . . . . . . . . . . . . . . . . . . . . 34
VRS Interactive Properties Dialog Box Tabs . . . . . . . . . . . . . . . . . . . . . . . . . . . 35
VRS Interactive Properties Dialog Box Buttons . . . . . . . . . . . . . . . . . . . . . . . . . 36
Using the Clarity Tab . . . . . . . . . . . . . . . . . . . . . . . . . . . . . . . . . . . . . . . . . . . . . . . . . . 37
Automatic Image Enhancement . . . . . . . . . . . . . . . . . . . . . . . . . . . . . . . . . . . . . . 38
Understanding Contrast, Brightness, and Gamma Settings in VRS . . . . . . . . 39
Manual Image Adjustment . . . . . . . . . . . . . . . . . . . . . . . . . . . . . . . . . . . . . . . . . . 46
Using the Noise Tab . . . . . . . . . . . . . . . . . . . . . . . . . . . . . . . . . . . . . . . . . . . . . . . . . . . 49
Using the Skew Tab . . . . . . . . . . . . . . . . . . . . . . . . . . . . . . . . . . . . . . . . . . . . . . . . . . . 51
Using the Profile Tab . . . . . . . . . . . . . . . . . . . . . . . . . . . . . . . . . . . . . . . . . . . . . . . . . . 54
Selecting, Creating, and Deleting Profiles . . . . . . . . . . . . . . . . . . . . . . . . . . . . . 55
Using the Options Tab . . . . . . . . . . . . . . . . . . . . . . . . . . . . . . . . . . . . . . . . . . . . . . . . . 58
Using the Analysis Tab . . . . . . . . . . . . . . . . . . . . . . . . . . . . . . . . . . . . . . . . . . . . . . . . . 60
Using the About Tab . . . . . . . . . . . . . . . . . . . . . . . . . . . . . . . . . . . . . . . . . . . . . . . . . . . 61
VRS Advanced Properties Dialog Box Overview . . . . . . . . . . . . . . . . . . . . . . . . . . . . . . 62
Endorser Tab . . . . . . . . . . . . . . . . . . . . . . . . . . . . . . . . . . . . . . . . . . . . . . . . . . . . . . . . . 62
Text Definition Dialog Box . . . . . . . . . . . . . . . . . . . . . . . . . . . . . . . . . . . . . . . . . . 64
Color Tab . . . . . . . . . . . . . . . . . . . . . . . . . . . . . . . . . . . . . . . . . . . . . . . . . . . . . . . . . . . . 69
Picking Rectangle Tab . . . . . . . . . . . . . . . . . . . . . . . . . . . . . . . . . . . . . . . . . . . . . . . . . 71
Rotation Tab . . . . . . . . . . . . . . . . . . . . . . . . . . . . . . . . . . . . . . . . . . . . . . . . . . . . . . . . . . 72
About Tab . . . . . . . . . . . . . . . . . . . . . . . . . . . . . . . . . . . . . . . . . . . . . . . . . . . . . . . . . . . . 73
A
VRS Restore Default Values Utility . . . . . . . . . . . . . . . . . . . . . . . . . . . . . . . . . . . . . . . .75
Overview . . . . . . . . . . . . . . . . . . . . . . . . . . . . . . . . . . . . . . . . . . . . . . . . . . . . . . . . . . . . . . . . 75
Installation Instructions . . . . . . . . . . . . . . . . . . . . . . . . . . . . . . . . . . . . . . . . . . . . . . . . . . . . 75
Restoring VRS Settings . . . . . . . . . . . . . . . . . . . . . . . . . . . . . . . . . . . . . . . . . . . . . . . . . . . . 77
Changing the Default VRS Scanner . . . . . . . . . . . . . . . . . . . . . . . . . . . . . . . . . . . . . . . . . . 78
B
Long Paper Support . . . . . . . . . . . . . . . . . . . . . . . . . . . . . . . . . . . . . . . . . . . . . . . . . . . .79
Overview . . . . . . . . . . . . . . . . . . . . . . . . . . . . . . . . . . . . . . . . . . . . . . . . . . . . . . . . . . . . . . . . 79
Activating Long Paper Support . . . . . . . . . . . . . . . . . . . . . . . . . . . . . . . . . . . . . . . . . . . . . 79
C
VRS Non-Interactive Mode. . . . . . . . . . . . . . . . . . . . . . . . . . . . . . . . . . . . . . . . . . . . . . .81
Using Non-Interactive Mode vs. Interactive Mode . . . . . . . . . . . . . . . . . . . . . . . . . . . . . 81
iv
VRS User’s Manual
Contents
D
Enhanced Bar Code Engine . . . . . . . . . . . . . . . . . . . . . . . . . . . . . . . . . . . . . . . . . . . . . 83
Overview . . . . . . . . . . . . . . . . . . . . . . . . . . . . . . . . . . . . . . . . . . . . . . . . . . . . . . . . . . . . . . . . 83
Standard vs. Enhanced Bar Code . . . . . . . . . . . . . . . . . . . . . . . . . . . . . . . . . . . . . . . . 83
How to Switch Between Bar Code Engines . . . . . . . . . . . . . . . . . . . . . . . . . . . . . . . 85
Accessing the Bar Code Properties Dialog Box . . . . . . . . . . . . . . . . . . . . . . . . . . . . 86
Using the Bar Code Properties Dialog Box . . . . . . . . . . . . . . . . . . . . . . . . . . . . . . . . 87
Recognition Group . . . . . . . . . . . . . . . . . . . . . . . . . . . . . . . . . . . . . . . . . . . . . . . . 87
Interpret Bar Code Group . . . . . . . . . . . . . . . . . . . . . . . . . . . . . . . . . . . . . . . . . 88
Bar Size Group . . . . . . . . . . . . . . . . . . . . . . . . . . . . . . . . . . . . . . . . . . . . . . . . . . . . 88
Search Direction Group . . . . . . . . . . . . . . . . . . . . . . . . . . . . . . . . . . . . . . . . . . . . 89
Quality Group . . . . . . . . . . . . . . . . . . . . . . . . . . . . . . . . . . . . . . . . . . . . . . . . . . . . 89
Checksum Group . . . . . . . . . . . . . . . . . . . . . . . . . . . . . . . . . . . . . . . . . . . . . . . . . . 89
E
Patch Code Recognition. . . . . . . . . . . . . . . . . . . . . . . . . . . . . . . . . . . . . . . . . . . . . . . . 91
Overview . . . . . . . . . . . . . . . . . . . . . . . . . . . . . . . . . . . . . . . . . . . . . . . . . . . . . . . . . . . . . . . . 91
Using the Patch Code Properties Dialog Box . . . . . . . . . . . . . . . . . . . . . . . . . . . . . . 92
Enable . . . . . . . . . . . . . . . . . . . . . . . . . . . . . . . . . . . . . . . . . . . . . . . . . . . . . . . . . . . 92
Left Offset to Center of Patch Code . . . . . . . . . . . . . . . . . . . . . . . . . . . . . . . . . . 92
F
Advanced Color Processing . . . . . . . . . . . . . . . . . . . . . . . . . . . . . . . . . . . . . . . . . . . . 93
Overview . . . . . . . . . . . . . . . . . . . . . . . . . . . . . . . . . . . . . . . . . . . . . . . . . . . . . . . . . . . . . . . . 93
Automatic Color Detection . . . . . . . . . . . . . . . . . . . . . . . . . . . . . . . . . . . . . . . . . . . . . 93
Color Content Aggressiveness . . . . . . . . . . . . . . . . . . . . . . . . . . . . . . . . . . . . . . 94
Small Color Object Detection . . . . . . . . . . . . . . . . . . . . . . . . . . . . . . . . . . . . . . . . 94
Color Background Saturation . . . . . . . . . . . . . . . . . . . . . . . . . . . . . . . . . . . . . . . . . . . 94
Color Saturation Aggressiveness . . . . . . . . . . . . . . . . . . . . . . . . . . . . . . . . . . . . 94
Color Selection . . . . . . . . . . . . . . . . . . . . . . . . . . . . . . . . . . . . . . . . . . . . . . . . . . . . . . . 95
Using the Color Tab . . . . . . . . . . . . . . . . . . . . . . . . . . . . . . . . . . . . . . . . . . . . . . . . . . . . . . . 96
Color Confidence Out of Range Warning . . . . . . . . . . . . . . . . . . . . . . . . . . . . . . . . . . . . 99
Color Information on the Analysis Tab . . . . . . . . . . . . . . . . . . . . . . . . . . . . . . . . . . . . . 100
Index. . . . . . . . . . . . . . . . . . . . . . . . . . . . . . . . . . . . . . . . . . . . . . . . . . . . . . . . . . . . . . . 103
VRS User’s Manual
v
Contents
vi
VRS User’s Manual
How to Use This Guide
Introduction
The VRS User’s Manual, which gives instructions for using VirtualReScan (VRS), is
intended for all potential scan operators. Whether you are an expert at image
processing or have no special knowledge of scanning, this manual provides the
information you need to make the best use of VRS features and functionality.
How this Guide is Organized
This manual consists of the following chapters and appendices:
Chapter 1 - Overview gives a general description of the VRS product and
summarizes the standard features.
Chapter 2 - Operating VRS explains how to start, configure, and use VRS with
your scan application. This chapter includes instructions on how to use the Kofax
VRS scan interfaces, the VRS menu, the VRS Administration Utility, the VRS
Interactive Properties dialog box, and the VRS Auto Resolve Manager dialog box.
This chapter also describes how you can access optional features, such as
endorsing support.
Appendix A - VRS Restore Default Values Utility describes the VRS Restore
Default Values Utility, which is included in every VRS installation.
Appendix B - Long Paper Support explains how to configure VRS for long paper
scanning with production class scanners.
Appendix C - VRS Non-Interactive Mode provides information on using the
VRS Non-Interactive Mode, which is available only for Böwe Bell + Howell
Spectrum series scanners.
Appendix D - Enhanced Bar Code Engine gives an overview of how to
implement and use the Kofax Enhanced Bar Code engine.
VRS User’s Manual
vii
How to Use This Guide
Appendix E - Patch Code Recognition covers VRS patch code support.
Appendix F - Advanced Color Processing explains how to use advanced color
processing options that are available if your scanning application is set to color
mode and you are using VRS with a Böwe Bell + Howell Spectrum II series
scanner.
Related Documentation
The VRS User’s Manual is just one piece in the VRS documentation set. Your VRS
product package also includes related documentation, as outlined in this section.
VRS Installation Guide
The VRS Installation Guide includes instructions for installing and testing VRS. The
manual is intended for system administrators who are responsible for installing the
application and configuring VRS.
VRS Online Help
VRS online help provides online assistance with your application. You can access the
online help by pressing F1 from any VRS dialog box.
VRS Quick Reference
The VRS Quick Reference contains screen shots, shortcuts, and basic user tips.
VRS Release Notes
Late-breaking product information is available from the release notes. You should
read the release notes carefully, as they contain information that may not be available
in the other VRS documentation.
viii
VRS User’s Manual
How to Use This Guide
Technical Support Information
For additional technical information about Kofax products, visit the Kofax Web site at
www.kofax.com and select an appropriate option from the Support menu. The Kofax
Support pages provide product-specific information, such as current revision levels,
the latest drivers and software patches, online documentation and user manuals,
updates to product release notes (if any), technical tips, and an extensive searchable
knowledgebase. You can find VRS FAQs on the VRS Support pages.
The Kofax Web site also contains information that describes support options for Kofax
products. Please review the site for details about the available support options. If you
need to contact Kofax Technical Support, please have the following information
available:
•
•
•
•
•
•
•
VRS software version
Scanning application
Operating system
Scanner make and model
Scanner engine (board) type
SCSI Scanner controller (if applicable)
Special/custom configuration or integration information
VRS User’s Manual
ix
How to Use This Guide
x
VRS User’s Manual
Chapter 1
Overview
Introduction
VirtualReScan (VRS) works with a wide range of scanning applications in a variety of
settings—from single-user desktop systems to large-scale enterprise solutions. VRS is
an extremely effective and versatile imaging tool that is easy to use for beginners and
experts alike. VRS works hand-in-hand with your scan application. By giving you
access to the VRS Interactive Interface and QC Modes, VRS gives you the ability to
drive your image processing with true power. VRS keeps it simple, though. Basically,
VRS can be used in three ways:
1
Default Settings—You can use VRS to scan documents and accurately
capture data effortlessly using the default settings. These default settings
have been carefully chosen to allow VRS to excel at a wide range of
documents without adjustments.
2
Automatic Image Enhancement—VRS also monitors images, detecting poor
image quality and performing automatic image enhancements that greatly
reduce image quality and recognition errors with the assistance of usercreated profiles. You determine the best settings for the documents you scan.
VRS does the rest.
3
Manual Image Enhancement—For cases in which you want the ability to
modify an image manually, VRS provides an interactive settings control that
eliminates the guesswork with easy, real-time image correction.
Whether you choose to let VRS work completely on its own using its superior default
settings, or make image adjustments yourself, you can be certain that every scanned
image meets the highest standards.
Note VRS is equipped with context-sensitive help. Press F1 to view screen-specific
information that helps you perform crucial tasks, without leaving the application.
VRS User’s Manual
1
Chapter 1
Standard Features
VRS is designed to ensure that every scanned image meets your quality standards.
While VRS products are designed to make high-volume scanning easier and more
cost-effective, VRS provides the same advantages for low-volume scanners.
Key VRS features include the ability to scan batches that consist of multiple document
sizes or varying degrees of quality, as well as the ability to automatically assign
brightness settings that are optimal for your document type. It is not necessary to presort mixed batches. During image optimization VRS suppresses any background or
noise, which keeps image file sizes to a minimum. VRS detects paper jams and
equipment conflicts. In addition to the time savings, post-processing accuracy is
increased and storage requirements are reduced.
For batch scans in which Optical Character Recognition (OCR) precision is crucial,
low-contrast documents traditionally pose significant problems. With VRS, you can
enable “Auto-Brightness,” and by selecting a high contrast value (greater than 50),
process the batch with confidence, knowing that every low-contrast image will be
adjusted automatically to the acceptable level of quality required for OCR.
Also critical for OCR is the VRS ability to perform an automatic deskew without
character deformation. Traditional deskew software produces jagged edges, but with
VRS, character edges remain smooth and precise even after deskew, as shown in
Figure 1-1.
Figure 1-1. Traditional Deskew vs. VRS
In addition to contrast enhancement, brightness adjustment, and high quality deskew
correction, VRS offers a range of other features to help you ensure the highest level of
quality for every scanned image:
• Automatic image cropping or Auto Crop (available only on scanners that
produce black borders)
• Despeckling
• Gamma correction
2
VRS User’s Manual
Overview
•
•
•
•
Character smoothing
Character dilation/erosion
Accelerated scanning
Advanced color processing (scanner dependent)
Certified Scan Applications
As part of the certification process, Kofax tests VRS compatibility with a wide range of
scan applications. While the list of certified scan applications is updated on a regular
basis, it is important to know that VRS is designed to work with any application that is
based on ImageControls, ISIS, or TWAIN.
Certified vs. Non-Certified Scanners
When a scanner is certified for VRS, it goes through a rigorous testing process during
which the best default settings are identified and selected. For this reason, we
recommend that you use VRS only with certified scanners. You can use the product
page on the Kofax Web site to view the list of VRS-certified scanners. In addition to
listing the scanner name and manufacturer, the VRS product page includes the
following information:
• Driver used for VRS 3.5 (TWAIN, ISIS, or Kofax SCSI)
• Black or white background (black borders are necessary for automatic
cropping)
• Additional memory required for optimal performance (if applicable)
• Interface certified by VRS (SCSI, USB, or FireWire)
VRS is also capable of working with certain non-certified “compatible” scanners,
provided that they have been configured with the Kofax Source Manager (KSM). It is
important to be aware that you may experience less than optimal image quality when
using a non-certified scanner with VRS.
Not every scanner can be used with VRS. To be configured as compatible with VRS, a
non-certified scanner must meet the following requirements:
• Ability to output a 256-level grayscale image as a single image.
• Provide a TWAIN driver or an ISIS driver. While VRS works best with an ISIS
driver, it also supports some scanners with TWAIN drivers.
Note For more information about using non-certified scanners with VRS, refer to
“Configuring Non-Certified Scanners” in the VRS Installation Guide.
VRS User’s Manual
3
Chapter 1
4
VRS User’s Manual
Chapter 2
Operating VRS
Introduction
This chapter explains how to operate VRS using the default settings, how to set up
custom profiles, and how to configure and use the manual image enhancement
features.
Scanning with VRS Default Settings
With VRS, you can scan documents and accurately capture data in the shortest time
possible using the default settings. These default settings have been carefully chosen
to allow VRS to excel at a wide range of documents without adjustments. In order to
take advantage of VRS, simply start VRS using the instructions below and scan.
Starting VRS
Once VRS is installed and you have opened your scan application, select VRS, as
described in the following procedure.
X To start VRS
1
Power on your scanner and switch on your PC.
2
Start your scan application.
3
From the scan application, select a VRS scan source. The format for the dialog
box used to select the VRS scan source and the name of the scan source will
vary, according to your scan application (ImageControls-based, ISIS-based, or
TWAIN-based). Generally, the name of the VRS scan source will follow one of
these three formats:
• <Your Scanner Model> with VRS (ImageControls-based applications)
• Kofax VRS Scanner (ISIS-based applications)
• Kofax VRS – TWAIN (TWAIN-based applications)
Refer to Figure 2-1 through Figure 2-3 for examples.
VRS User’s Manual
5
Chapter 2
Figure 2-1. Select Scan Source Dialog Box (ImageControls-based application)
Figure 2-2. Select TWAIN Source Dialog Box (TWAIN-based application)
Figure 2-3. Scanner Selection Dialog Box (ISIS-based application)
6
4
Click the OK or Scan button, as applicable to your scan application.
5
For ImageControls-based applications, the VRS icon (Figure 2-4) will appear
on your Windows taskbar. For ISIS and TWAIN applications that do not use
the VRS ISIS or TWAIN interfaces, the VRS taskbar icon should appear after
scanning starts. See Kofax VRS Scan Interfaces on page 8 for more information.
VRS User’s Manual
Operating VRS
VRS Icon
Figure 2-4. VRS icon on Windows Taskbar
The scanner associated with the Kofax VRS ISIS or Kofax VRS TWAIN source
is the default scanner. The default VRS scanner is set in three ways:
• When you select a scanner during the VRS installation process
• When you select a scanner as the default scanner from the Kofax Source
Manager
• When you select a default scanner using the Restore Default Values (RDV)
utility
Note For more information about the VRS installation process or the Kofax
Source Manager, refer to the VRS Installation Guide. For information about the
RDV utility, refer to VRS Restore Default Values Utility on page 75 of this
manual.
6
VRS User’s Manual
Follow your scan application instructions and scan as usual.
7
Chapter 2
Kofax VRS Scan Interfaces
Kofax VRS TWAIN Interface
The Kofax VRS TWAIN interface is designed to serve as a liaison between your
TWAIN scan application and VRS. In most cases, the Kofax VRS TWAIN interface
will automatically appear whenever you select the Kofax VRS TWAIN scanner
source.
Figure 2-5. Kofax VRS TWAIN Interface
Some TWAIN applications may hide the Kofax VRS TWAIN interface and use their
own interface instead. For several of these applications, the TWAIN interface includes
a More button that typically gives you access to the VRS user interface.
You can use the Kofax VRS TWAIN interface to control scanner features made
available via the TWAIN scanner driver. The Kofax VRS TWAIN interface is divided
into two groups: the Profiles group and the General group.
You can use the Profiles group to create and manage configuration settings (scanner
presets). You can use the list box to type in the name of a new profile which can then
be saved, restored, or deleted using the Save, Restore, or Delete buttons. You can
establish multiple profiles to accommodate different scanning situations. Although
you can create an unlimited number of profiles, only seven profiles at a time will be
visible in the Profiles window.
8
VRS User’s Manual
Operating VRS
Note The profiles that you create from the Kofax VRS TWAIN interface are different
from the profiles created from the Profile tab of the VRS Interactive Properties dialog
box.
The General group consists of the following options:
• Source (Paper Source) – Select between the available input paper sources:
Flatbed or ADF.
• Resolution (DPI) – Select an option for scan resolution or DPI (dots per inch).
• Color Mode – Select from the color modes supported by the scanner, which
may include Black/White, Grayscale, or RGB (color).
• Paper Size – Select a paper size, such as Letter, A5, etc.
• Orientation – Select the paper orientation (portrait/landscape).
• Simplex/Duplex – Select single-sided or double-sided scanning.
A Preview check box, located in the lower left corner of the interface, allows you to
not only view the image as it is being scanned, but also to make changes to the image
in real time using the VRS Interactive Properties dialog box.
You can select the About button to view installation location and version information.
Figure 2-6. Kofax TWAIN Interface - About Dialog Box
X To scan using the Kofax VRS TWAIN interface
1
Open your scan application.
2
Select the Kofax VRS TWAIN scan source and click OK.
VRS User’s Manual
9
Chapter 2
Figure 2-7. Kofax VRS TWAIN Interface – Select Source
3
The Kofax VRS TWAIN interface will launch. Make your selections from the
General group, such as the Source, DPI, Color Mode, Paper Size, etc.
4
If desired, click Save to create a profile to save the settings for future use.
a At the Save Profile dialog box, type a name for the profile.
b Click OK. In the future, you can load a profile by selecting it and clicking
the Restore button, or erase it by clicking the Delete button.
Figure 2-8. Kofax VRS TWAIN Interface - Save Profile Dialog Box
5
10
Click Scan to scan, or click Cancel to exit without making any changes.
VRS User’s Manual
Operating VRS
Kofax VRS ISIS Interface
The Kofax VRS ISIS interface is designed to serve as a liaison between your ISIS scan
application and VRS. In most cases, the Kofax VRS ISIS interface will automatically
appear whenever you select the Kofax VRS scanner source.
Figure 2-9. Kofax VRS ISIS Interface
Some ISIS applications hide the Kofax VRS ISIS interface and use their own interfaces
instead.
You can use the Kofax VRS ISIS interface to control scanner features made available
via the ISIS driver. The interface is divided into two groups: the Scanner Presets
group and the General group.
You can use the Scanner Presets group to create and manage configuration settings
(scanner presets). You type in the name of a new preset which can then be saved,
restored, or deleted using the New, Save, Restore, or Delete buttons.
Note The Profiles (Scanner Presets) that you create on the Kofax VRS ISIS interface
are different from the profiles created on the Profile tab of the VRS Interactive
Properties dialog box.
The General group consists of the following options:
• Source (Paper Source) – Select between the available input paper sources:
Flatbed or ADF.
VRS User’s Manual
11
Chapter 2
• Resolution (DPI) – Select an option for scan resolution or DPI (dots per inch).
• Color Mode – Select from the color modes supported by the scanner, which
may include Black/White, Grayscale, or RGB (color).
• Paper Size – Select a paper size, such as Letter, A5, etc.
• Orientation – Select the paper orientation (portrait/landscape).
• Simplex/Duplex – Select single-sided or double-sided scanning.
For situations in which you want to adjust image settings, you can access the VRS
Interactive Properties dialog box by clicking on the Advanced button. An option to
detect the page size being scanned is available by selecting Options | Special
Features, and then selecting the Detect Page Length check box from the Advanced
Settings dialog box.
Figure 2-10. Kofax VRS ISIS Interface - Advanced Settings Dialog Box
And finally, you can select the About button to open the About dialog box where
installation location and version information is listed.
12
VRS User’s Manual
Operating VRS
Figure 2-11. Kofax VRS ISIS Interface - About Dialog Box
X To scan using the Kofax VRS ISIS interface
1
Open your scan application.
2
Select the Kofax VRS Scanner source.
Figure 2-12. Kofax VRS ISIS Interface – Select Source Dialog Box
3
The Kofax VRS ISIS interface will launch, as shown in Figure 2-9. Make your
selections from within the General group, such as the Paper Source, DPI,
Mode, Paper Size, etc.
4
If desired, click New to create a profile to save the settings for future use.
a At the New Profile dialog box, type a name for the profile in the text box.
b Type the filename for the document into the text box.
VRS User’s Manual
13
Chapter 2
Figure 2-13. Kofax VRS ISIS Interface - New Profile Dialog Box
5
14
Click OK to close the Kofax VRS ISIS interface, or click Cancel to exit without
making any changes. In the future, you can change a profile by changing the
information in the General group, selecting it and clicking on the Save button.
You may also load a profile by clicking on the Restore button, or erase it by
clicking the Delete button.
VRS User’s Manual
Operating VRS
Configuring VRS Before You Scan
VRS is designed so that, if desired, it can be customized to suit a particular kind of
document or batch of documents. In addition, you can customize responses to
scanner events (out of paper, cover open, etc.). You may want to adjust the VRS
settings before you scan. This section gives an overview of the options that you can
use to adjust VRS to suit your scanning preferences.
Using the VRS Taskbar Icon
The VRS taskbar icon, shown in Figure 2-14 is located in the Windows taskbar (the
lower right corner of your Windows desktop). When you position your mouse cursor
over the icon, the ToolTip text displays as “VirtualReScan.”
VRS Icon
Figure 2-14. VRS Taskbar Icon
Figure 2-15. VRS ToolTip
Right-click on the VRS taskbar icon to access a VRS menu where you can set your
responses to potential errors and events (exception conditions) in the VRS
Administration Utility, preview and update image properties, select or change a
profile, or choose an operating (QC) mode.
When the VRS menu is enabled, it will appear as in Figure 2-16.
Figure 2-16. VRS Menu Enabled
VRS User’s Manual
15
Chapter 2
The VRS menu is not available while scanning is in progress (even though the VRS
taskbar icon is still visible). When the VRS menu is unavailable, it will appear as it
does in Figure 2-17.
Figure 2-17. VRS Menu - Unavailable
X To open the VRS menu
1
While scanning is not in progress, right-click on the VRS icon on the
Windows taskbar.
2
Select one of the four commands of the VRS menu:
•
•
•
•
Preview
Profile
QC Modes
Admin Utility
If you want to optimize VRS for a particular document type, begin by
selecting the Preview command. For more information, refer to Previewing
Images on page 30.
VRS Menu
This section explains each command that is available from the VRS menu.
Preview
Selecting Preview from the VRS menu opens the VRS Interactive Properties dialog
box in Preview mode. Use this command to open a sample image that you can use to
test image property settings.
Profile
Selecting Profile from the VRS menu displays a submenu that lists available profiles.
A profile is a user-defined set of options for image processing. The Profile submenu
indicates the currently loaded profile (also called the active profile) with a check
mark. When you select a profile, the settings from the VRS Clarity tab, Noise tab, and
16
VRS User’s Manual
Operating VRS
Skew tab are loaded from permanent storage into operational memory. The newly
loaded profile becomes the active profile, which is indicated by a check mark on the
tray menu. VRS remembers the active profile designation across sessions. For more
information, refer to Using the Profile Tab on page 54.
Admin Utility
Selecting Admin Utility from the VRS menu opens the VRS Administration Utility
dialog box, which is used to define exception condition parameters. For more
information, refer to the VRS Administration Utility section on page 19.
QC Modes
Selecting QC Modes from the VRS menu displays a submenu of available QC Modes.
The QC Modes control the conditions under which the VRS user interface opens for
image inspection and interactive updates. The default QC Mode is On Errors. The
default value of the Hardware Warnings setting is on (checked).
Once selected, a QC mode or the Hardware Warnings setting stays in effect until it is
changed, even across scanning sessions. The currently selected QC Mode or
Hardware Warnings setting is indicated by a check mark.
Figure 2-18. QC Modes Menu
By selecting the QC Modes command from the VRS menu, you can request that the
VRS user interface display under the following conditions:
On Errors
VRS dialog boxes open only when exception conditions occur during the scanning
process. This is the default setting after installation.
First Page
VRS dialog boxes open when you scan the first page of a batch and when exception
conditions occur. This mode gives you the ability to set a VRS profile or enable a
specific feature for all the documents in a batch. The first page in the batch is used as a
sample image to adjust VRS settings.
VRS User’s Manual
17
Chapter 2
Every Page
VRS dialog boxes open after each document scans, or with duplex scanning, after
each document side scans. This mode can be used for extremely complex documents
that require individual adjustments. This is an unusual condition because VRS has the
ability to handle a wide range of document types without any adjustments.
Disabled
VRS dialog boxes remain out of view, even if exception conditions occur.
Hardware Warnings
You can use the Hardware Warnings option to specify how to respond to hardware
conditions such as Paper Jam, Out of Paper, and Cover Open on a global scale.
Selecting the Hardware Warnings option means that you are choosing to handle these
errors exactly as defined by the Actions in the Administration Utility. When this
option is not selected, it is the equivalent of choosing to Return Error (see the Action
Options section on page 25 for a description) as your Action for all hardware error
conditions in the Administration Utility.
Note If you have a Böwe Bell + Howell Spectrum series scanner and you selected
VRS Non-Interactive mode during the installation process, your default QC Mode is
Disabled and the default value of the Hardware Warnings setting is off (unchecked).
VRS Non-Interactive mode only applies to Böwe Bell + Howell Spectrum series
scanners. For more information, refer to VRS Non-Interactive Mode on page 81.
X To change the QC mode
18
1
From the Windows taskbar, right-click on the VRS taskbar icon.
2
From the VRS menu, select QC Modes.
3
From the QC Modes submenu, select an operating mode.
VRS User’s Manual
Operating VRS
VRS Administration Utility
The VRS Administration Utility dialog box consists of three tabs:
• Warnings tab: settings related to image quality conditions
• Errors tab: settings that affect the VRS response to errors that occur in
connection with equipment conflicts and paper transport issues
• Accelerated Scanning tab: settings that you can use to maximize the speed of
your scanner
Figure 2-19. VRS Administration Utility Dialog Box
The default settings for VRS provide optimal scanning and accurate data capture for a
wide range of documents. For most situations, it should not be necessary to adjust the
default settings, which are listed in Table 2-1.
Table 2-1. VRS Administration Utility Dialog Box Default Settings
Tab
Warning/Error
Type
Warnings
Action
Setting
Brightness Out of 30
Range
Interactive
NA
Warnings
Contrast Out of
Range
40
Ignore Error
NA
Errors
Paper Jam
NA
Auto Resolve
NA
Errors
Out of Paper
NA
Auto Resolve
NA
Errors
Cover Open
NA
Auto Resolve
NA
VRS User’s Manual
Threshold
Ignore Error1
19
Chapter 2
Table 2-1. VRS Administration Utility Dialog Box Default Settings (continued)
Tab
Warning/Error
Type
Threshold
Action
Setting
Errors
Multifeed1
NA
Auto Resolve
NA
Errors
Scanner Offline1
NA
Auto Resolve
NA
Errors
Feeder Timeout1
NA
Auto Resolve
NA
Errors
Scanner Stop
Key1
NA
Auto Resolve
NA
Errors
Scanner Page
Sensor Error1
NA
Auto Resolve
NA
Accelerated
Scanning
NA
NA
NA
Image quality: Best
Acceleration: None
NA1
1
Böwe Bell + Howell Spectrum series scanners only
If desired, you can modify the VRS Administration Utility settings. Before scanning,
set up parameters that define your requirements for image quality and exception
handling. To set the parameters, open the VRS Administration Utility dialog box by
selecting the Admin Utility command from the VRS menu.
From the Warnings and Errors tabs, you define settings that tell VRS exactly how to
respond when it detects an exception image, an equipment conflict, or a paper
transport issue. You can use the default settings on the Warnings and Errors tabs, or
customize how VRS handles each exception type. Once you are satisfied with the
settings, click Save. Changes that you have made on any of the tabs are saved
permanently (until changed) and they take effect at the start of the next scan
operation. When you use the Cancel button to dismiss this dialog, changes made on
any of the tabs are automatically discarded.
For detailed information on how to modify settings on the VRS Administration
Utility, refer to the next section, Warnings Tab, the Errors Tab section on page 23, or the
Accelerated Scanning Tab section on page 26. A listing of the default VRS
Administration Utility settings is also available from the online help system.
20
VRS User’s Manual
Operating VRS
Warnings Tab
The Warnings tab lists exception conditions associated with image quality. For each
condition, you may set a Threshold value. This threshold value defines the “margin of
error” that VRS tolerates for brightness or contrast. VRS intercepts any image with
values that fall outside the margin of error, and then handles the image according to
the response selected from the Action column. For details on selecting an action type,
see the Action Options section on page 25.
Note If your scanning application is set to color mode and you are using VRS with a
Böwe Bell + Howell Spectrum II series scanner, an additional Color Confidence Out of
Range warning will appear on the Warnings tab. For more information, refer to
Advanced Color Processing on page 93.
Figure 2-20. Warnings Tab
Table 2-2 lists the types of warnings and their causes.
Table 2-2. Warning Types
Warning
Cause
Brightness Out of Range
Brightness value for the image falls outside the
acceptable range.
Contrast Out of Range
Contrast value for the image falls outside the acceptable
range.
VRS User’s Manual
21
Chapter 2
Brightness Out of Range
Use the Brightness Out of Range threshold to define the valid range for brightness
values. When a document is scanned, VRS evaluates the resulting image to determine
its brightness. Then, VRS compares it to the user-defined acceptable range
determined by 50 plus or minus the value in the Brightness Out of Range threshold
setting in the Warnings tab. Based on this real-time evaluation, VRS either accepts the
image and allows it to be passed on to the scan application, or intercepts it and
responds according to the user-defined action in the Warnings tab. The detected value
for brightness is reported on the Analysis tab.
Note VRS uses the detected brightness value from the Analysis tab, rather than the
brightness value on the Clarity tab, to determine if an image should be passed on to
the scan application without generating an exception. When setting the threshold for
Brightness Out of Range, you should use the information on the Analysis tab to
determine the appropriate value.
For example, if the threshold is 10 on the Warnings tab, VRS accepts any image with a
detected brightness value ranging from 40 to 60. The range starts at 40, which is 10
less than 50, and it ends at 60, which is 10 more than 50. Therefore, an image with a
brightness value of 70 would fall outside the valid range. VRS would respond by
taking the action listed on the Warnings tab for Brightness Out of Range.
Contrast Out of Range
Use the threshold to define the valid range for contrast values. When a document is
scanned, VRS evaluates the resulting image to determine its contrast. Then, VRS
compares it to the user-defined acceptable range determined by 50 plus or minus the
value in the Contrast Out of Range threshold setting in the Warnings tab. Based on
this real-time evaluation, VRS either accepts the image and allows it to be passed on
to the scan application, or intercepts it and responds according to the user-defined
action in the Warnings tab. The detected contrast value is listed on the Analysis tab.
Note VRS uses the detected contrast value from the Analysis tab, rather than the
contrast value on the Clarity tab, to determine if an image should be passed on to the
scan application without generating an exception. When setting the threshold for
Contrast Out of Range, you should use the Analysis tab to set the appropriate value.
For example, if the threshold is 15 on the Warnings tab, VRS accepts any image with a
contrast value ranging from 35 to 65. The range starts at 35, which is 15 less than 50,
and it ends at 65, which is 15 more than 50. Therefore, an image with a contrast value
of 25 would fall outside the valid range and generate a warning. VRS would respond
by taking the action listed on the Warnings tab for Contrast Out of Range.
22
VRS User’s Manual
Operating VRS
Errors Tab
The Errors tab lists exception conditions such as errors caused by equipment conflicts
or paper transport issues, along with the VRS response to each condition.
Note The list of error types on the Errors tab may vary, according to the scanner that
you are using with VRS.
In the Action column, select the desired VRS response for each error type. To change
the setting, click in the Action box and select the new setting from the drop-down list.
For details, see the Action Options section on page 25.
Figure 2-21. VRS Administration Utility - Errors Tab
Table 2-3. Error Types
Error
Description
Paper Jam
Paper jam occurs in the scanner paper path.
Multifeed1
Multiple pages were pulled into the transport.
Out of Paper
No paper is available to scan.
Cover Open
Scanner cover is not closed securely.
Scanner Offline1
The scanner is not ready to scan.
VRS User’s Manual
23
Chapter 2
Table 2-3. Error Types (continued)
Error
Description
Feeder Timeout1
The document feeder tried but was unable to move the page for a
period of time that exceeded the ADF timeout setting.
Scanner Stop Key1
The user pressed the OI STOP key, causing an immediate transport
stop, and pages are left somewhere in the transport.
Scanner Page Sensor1
The sensor detects an unexpected page sensor transition during
scanning, such as a hole in the document or a ragged page edge. The
transport continues to run until clear and all pages are in the exit
tray.
Auto Crop Failure Page Info
Due to excessive skew or other condition, VRS is unable to detect the
edges of the scanned document.
Note: Auto Crop is only supported on black background scanners.
Auto Deskew Failure
1
24
The image does not contain sufficient horizontal or vertical lines to
perform a correct deskew. Use the Skew tab to make a manual
correction.
Böwe Bell + Howell Spectrum series scanners only
VRS User’s Manual
Operating VRS
Action Options
Use the Action list to define how you want VRS to handle each exception condition on
the Warnings tab and the Errors tab. To specify the VRS response, click in the Action
column on the Warnings tab or the Errors tab, and select a response from the list. The
action choices vary, according to the type of warning or error.
Figure 2-22. Action Drop-Down List
Table 2-4. Action Types
Action Type
Description
Ignore Error
VRS does not notify the user of the error or take any action to correct it. VRS
accepts the image “as is,” passes it to the host application, and resumes the
scanning session.
Return Error
VRS notifies the user of the error, but does not send the image to the host
application. The scan session is then terminated.
Intervention
VRS launches the Auto Resolve Manager in manual mode so the user can
select from a range of options to manually handle the error. Refer to Using
the Auto Resolve Manager on page 29.
Auto Resolve
VRS opens the Auto Resolve Manager in automatic mode. As a result, the
scanner automatically attempts to retry the scan until the user resolves an
equipment or paper transport impediment, such as a paper jam or out of
paper condition. Refer to Using the Auto Resolve Manager on page 29.
Interactive
The VRS Interactive Properties dialog box opens and displays the image in
the VRS viewer, so that the user can apply new settings to the current image.
VRS User’s Manual
25
Chapter 2
Accelerated Scanning Tab
While high-resolution settings have a positive impact on image quality, they can slow
down the scanning process. With Accelerated Scanning in effect, VRS achieves the
quality of a high-resolution image without compromising speed. To maintain speed,
VRS scans the image at a rate that is lower than the DPI (dots per inch) rate defined in
your scan application. Then, VRS performs an internal translation so that the image is
output at the desired DPI setting.
Note The Accelerated Scanning setting has no effect on the Böwe Bell + Howell
Spectrum series scanners.
Figure 2-23. The Accelerated Scanning Tab
For example, suppose you select 300 DPI in your scan application and enable the first
level of Accelerated Scanning in VRS. The image scans at 200 DPI to accelerate scan
speed and VRS translates it to 300 DPI to achieve the desired resolution. Table 2-5 lists
the DPI settings VRS uses for the Fujitsu M3091DC and M3092DC. Use this table as an
example of how VRS treats DPI settings defined in a scan application.
26
VRS User’s Manual
Operating VRS
Note When you select the first level of accelerated scanning, the image quality is
virtually equivalent to non-accelerated scanning. However, higher levels of
acceleration affect the image quality. Not all scanners increase in speed when you
select accelerated scanning. If your scanner does not feature lower resolutions than
the resolution selected in your scan application, accelerated scanning will have no
effect.
Table 2-5. Accelerated Scanning DPI Settings for the Fujitsu M3091DC and M3092DC
DPI Setting as
Defined in Scan
Application
Actual Scan DPI Actual Scan DPI Actual Scan DPI
Setting Level 1
Setting Level 2 Setting Level 3
Acceleration
Acceleration
Acceleration
Image Output
DPI Setting
300
240
150
100
300
240
200
150
100
240
200
150
100
75
200
150
150
75
75
150
100
75
75
75
100
75
75
75
75
75
Updating the VRS Administration Utility Dialog Box
Use these instructions to update the settings on the VRS Administration Utility tabs.
X To update the VRS Administration Utility settings
1
Right-click on the VRS taskbar icon to open the VRS menu.
2
From the VRS menu, select Admin Utility.
3
Select and adjust the settings for the following tabs:
• Warnings tab—Threshold. Type directly into the Threshold text box, or
click the arrows to select a new threshold setting. For more information,
refer to Warnings Tab on page 21.
• Warnings tab/Errors tab—Action. Define a VRS response to each
exception type by clicking in the Action option and selecting from the list.
For more information, refer to Action Options on page 25.
• Accelerated Scanning tab. Click and drag the slider to make your
selection. For details, refer to Accelerated Scanning Tab on page 26.
VRS User’s Manual
27
Chapter 2
4
28
Once you are satisfied with the settings, click Save. Changes that you have
made on any of the tabs are saved until changed and will take effect at the
start of the next scan operation.
VRS User’s Manual
Operating VRS
Using the Auto Resolve Manager
You can use the Auto Resolve Manager to handle VRS exception conditions such as
errors caused by equipment conflicts or paper transport issues. VRS opens the Auto
Resolve Manager dialog box for each occurrence of an exception condition specified
as an Auto Resolve or Intervention action type on the Errors tab in the VRS
Administration Utility. When Auto Resolve is the selected action, the Auto Resolve
Manager opens in automatic mode. When Intervention is the selected action, the Auto
Resolve Manager opens in manual mode.
Figure 2-24. VRS Auto Resolve Manager - Automatic Mode
Figure 2-25. VRS Auto Resolve Manager - Manual Mode
The Auto Resolve Manager displays text indicating the exception condition and
operator instructions for dealing with the condition. The Auto Resolve Manager
dialog box may also display the image that triggered the exception, depending on the
exception. The options on the Auto Resolve Manager will vary, according to the active
mode (automatic or manual):
• OK - Automatic Mode: When the Auto Resolve Manager opens in automatic
mode (when the Action selection is Auto Resolve), the OK button is disabled.
VRS automatically will attempt to retry the scanning process, which will
resume once you physically resolve the exception condition.
• OK - Manual Mode: When the Auto Resolve Manager opens in manual mode
(when the Action selection is Intervention), you need to resolve the equipment
or paper transport issue. Then select OK to accept the image “as is,” send it to
the scan application, and proceed with the scanning process.
VRS User’s Manual
29
Chapter 2
• Cancel: Stop the batch or cancel the scanning process. When you select Cancel,
any error information is passed to your scan application. The images that
caused the errors are not sent to the scan application.
• Rescan (Manual Mode only): Rescan a sheet after you have reloaded a
document into the scanner.
Previewing Images
The preview process gives you an opportunity to test image property settings with
the aim of meeting quality standards. Use the Preview feature before you scan a batch
of documents, or adjust the settings between batches.
When you select Preview, VRS opens the most recently scanned image in the VRS
Viewer. For this reason, the Preview function is available only if a scanned image
exists in the VRS cache. As you apply property changes from the VRS Interactive
Properties dialog box, the Preview image is refreshed so you can evaluate the
adjustments. Be aware that the changes to the preview image are not sent to your scan
application; the image is intended only for preview purposes. Furthermore, for
Personal and Professional VRS scanners, when you close your scan application or
select another scanner source, the VRS image cache is cleared.
For information on the VRS Viewer window and using the Zoom, see the section
Using the VRS Viewer on page 32. For information on updating image properties, see
Updating Images Using the VRS Interactive Properties Dialog Box section on page 34.
X To preview an image
30
1
Scan a document similar to the type you plan to scan.
2
From the VRS menu, select Preview. VRS displays the last image scanned.
3
If desired, use the Zoom menu to adjust the magnification level.
4
Use the VRS Interactive Properties dialog box to change the image properties.
If you expect to use these settings on a regular basis, save them as a profile, so
they can be recalled as necessary. Refer to Using the Profile Tab on page 54.
5
When you are satisfied with the preview image, select the OK button on the
VRS Interactive Properties dialog box. The property settings are saved and
put into effect for the next batch of scanned documents.
VRS User’s Manual
Operating VRS
Using VRS While You Scan
VRS is designed so that you may modify images manually during a scanning session.
This is accomplished through the VRS Viewer and the VRS Interactive Properties
dialog box, which provides an interactive settings control equipped with controls for
real-time image correction. This section explains how to use VRS while you scan to
create great images.
When Does VRS Come into Play?
While scanning, the VRS Interactive Properties dialog box and the VRS Viewer open
under the following circumstances:
• When VRS intercepts an exception image for which the response is defined as
Interactive. See the VRS Administration Utility section on page 19.
• As defined by the active operating mode. See QC Modes on page 17.
The VRS Viewer and the VRS Interactive Properties dialog boxes open together. You
can use the VRS Interactive Properties dialog box to apply attribute changes to the
image in the VRS Viewer. For more information, see the next section, Using the VRS
Viewer, as well as the section, Updating Image Properties Using the VRS Interactive
Properties Dialog Box on page 34.
VRS User’s Manual
31
Chapter 2
Figure 2-26. VRS Viewer with VRS Interactive Properties Dialog Box
Using the VRS Viewer
The VRS Viewer displays scanned images for your inspection. The purpose of the
viewer is to show you what an image looks like when it scans, and to refresh the
image as you apply property changes.
The VRS Viewer includes a Zoom menu with a range of image magnification levels.
Figure 2-27. VRS Viewer Zoom Menu
32
VRS User’s Manual
Operating VRS
Using the Zoom Menu to Adjust the View
From the Zoom menu, you can magnify or reduce the image in the VRS Viewer. Using
the Fit Window setting, you can see the entire image in the viewer.
Using Mouse Buttons to Adjust the View
In the VRS Viewer, you can adjust the image view with the left and right buttons of
your mouse.
• Using the left mouse button, you can do the following:
3 View part of the image by clicking and dragging the selection rectangle
across the area you want to magnify.
3 Restore the image to the standard view by double-clicking the image.
• Using the right mouse button, once you have zoomed in on an image, you can
click and drag (or pan) the image in the VRS Viewer.
Note The VRS Viewer treats Close the same as Minimize. To exit the viewer, you
must click the OK or the Cancel button.
VRS User’s Manual
33
Chapter 2
Updating Image Properties
The VRS Interactive Properties dialog box consists of seven tabs, including three with
options for dynamically adjusting image properties as you scan.
Note If your scanning application is set to color mode and you are using VRS with a
Böwe Bell + Howell Spectrum II series scanner, an additional tab called Color appears
on this dialog box. For more information, refer to Advanced Color Processing on
page 93.
Figure 2-28. VRS Interactive Properties Dialog Box
When the dialog box opens for an exception condition, the status line lists the specific
cause for the warning or error. Otherwise, you see Status OK on the status line.
34
VRS User’s Manual
Operating VRS
VRS Interactive Properties Dialog Box Tabs
The standard VRS Interactive Properties dialog box consists of the seven tabs.
Clarity
The Clarity tab consists of settings for brightness, contrast, and gamma correction.
Use this tab to enable or disable Automatic Brightness. For details, refer to “Using the
Clarity Tab” on page 37.
Noise
The Noise tab consists of settings for applying character thinning/thickening (Line
Filter) or to remove unwanted speckling from an image. For details, refer to Using the
Noise Tab on page 49.
Note The Noise tab is only available when an application is set to scan images in
black and white.
Skew
The Skew tab contains controls to straighten (deskew) an image. In addition, use this
tab to enable or disable Automatic Deskew, enable an Image Crop option, or enable
Edge Cleanup. Settings on the Skew tab apply only to the current image in the VRS
Viewer window. For details, refer to “Using the Skew Tab” on page 51.
Note Image Crop and Edge Cleanup are only available for scanners that produce
black borders around the images.
Profile
Use the Profile tab to create and manage image property profiles (user-defined
settings from the Clarity, Noise, and Skew tabs). For details, refer to “Using the Profile
Tab” on page 54.
Options
Use the Options tab to activate optional features specific to your scanner. For details,
refer to “Using the Options Tab” on page 58.
Analysis
Use the Analysis tab to view a summary of the property settings for the most recently
scanned image. For details, refer to “Using the Analysis Tab” on page 60.
VRS User’s Manual
35
Chapter 2
About
Use the About tab to view information about your VRS version, as well as contact
information for Kofax Image Products, Inc. For details, refer to “Using the About Tab”
on page 61.
VRS Interactive Properties Dialog Box Buttons
These buttons are available from each of the VRS Interactive Properties dialog box
tabs. When VRS restarts, the dialog box resets to the last selected profile’s settings.
OK
Use the OK button to transmit the current settings to your scan application. If the VRS
Interactive Properties dialog box opened because of an exception, the settings will
only apply to the image in question. If the Interactive Properties dialog box appeared
as the result of a First Page QC mode, or in connection with the Preview option, then
the changes apply to subsequent scans or batches.
Cancel
Use the Cancel button in Preview to close the dialog without applying any changes. If
an exception is detected when scanning, use this button to return an error (without
the error image itself) to the scan application. In addition, the batch scan will be
stopped.
Reset
The Reset button clears any changes and resets all settings to their original values.
36
VRS User’s Manual
Operating VRS
Using the Clarity Tab
This section describes the Clarity tab of the VRS Interactive Properties dialog box. The
Clarity tab provides options to adjust the contrast, brightness, and gamma values for
an image. In general, a high Contrast value enhances faint text and lines in your
documents. Since Brightness increases or decreases the overall density of your
images, increasing the brightness level can clear up dark shaded documents. Finally,
Gamma Correct allows you to adjust images created with incorrect gamma encoding.
Note With the Böwe Bell + Howell Spectrum series scanner, the Clarity tab features
are available only when you scan in black and white or in grayscale mode. When you
use this scanner in color mode, the Clarity tab will be disabled if the VRS Interactive
Properties dialog box appears as the result of an exception or a QC mode setting.
Also, the Clarity tab will be visible if you select Preview mode, but no image will be
available to display in the viewer.
Figure 2-29. Clarity Tab
VRS User’s Manual
37
Chapter 2
Automatic Image Enhancement
As stated previously, VRS has the ability to monitor images, detect poor image
quality, and perform automatic image enhancements that greatly reduce image
quality and recognition errors. For more information about manual image
adjustment, refer to “Manual Image Adjustment” on page 46.
Brightness and Contrast
When the Auto Brightness check box is selected, VRS automatically assigns optimal
values for brightness and displays those values in the manual Brightness slider and
numeric text box. The Auto Brightness feature is not available when you scan images
in color. It becomes available only when scanning in grayscale and black and white.
Note Moving the Brightness slider, entering a value in the Brightness numeric text
box, or clicking in the Brightness-Contrast custom control turns off Auto Brightness.
Figure 2-30. Auto Brightness Check Box
Gamma and Gamma Correct
When a scanner scans your document, it determines how to convert the light intensity
of that document into pixels using a value called gamma. When scanners have an
incorrect gamma value or no gamma encoding, image quality can be adversely
affected. In most cases, VRS default settings will prevent this problem. The Gamma
slider and the Gamma Correct box are available for extreme cases in which
documents require manual gamma adjustments. Otherwise, you should keep the
gamma default value.
38
VRS User’s Manual
Operating VRS
Understanding Contrast, Brightness, and Gamma Settings in VRS
What are brightness, contrast, and gamma in VRS? When an image has high
brightness, it seems to give off more light. It is like looking at a drawing under a 45watt bulb, then looking at it using a 75-watt bulb. The drawing will seem “brighter”
under the 75-watt bulb. In the same way, moving the Brightness slider up will
increase the amount of light in the image. Moving it down will decrease the amount
of light.
The VRS manual brightness setting ranges from 0 (very dark) to 100 (very bright).
Adjusting the Manual Brightness setting by moving the Brightness slider, by entering
a new value in the Brightness numeric text box, or by clicking within the BrightnessContrast custom control causes Auto Brightness to be turned off.
Contrast is the amount of difference between the lightest and darkest areas on an
image. For example, no matter what flash you use, the ratio of light to dark in a
photograph stays the same. When you increase the contrast on a totally black and
white image (binary image), the white parts become whiter and the black parts
become blacker.
A Gamma value is a way to manually “sync up” the image you see on the screen with
what you are supposed to see. In other words, sometimes output devices (monitors,
televisions, etc.) do not produce the same image as the input devices (the scanner, for
example) tell them to produce. In VRS, moving the gamma slider to the right will
remove pixels from the entire image, which will create an overall appearance of
brightening the image. Moving the slider to the left will do the opposite—adding
pixels to make the overall image appear more dark, or dense.
VRS handles this gamma adjustment automatically for you, so even though the
gamma correction slider is available, you will not need it to adjust images. Gamma
should be considered as a scanner calibration and the default value should be
maintained.
Now let us put these image components to use in creating exceptional images.
Divide and Conquer
Every scanned image has two basic parts: the part you want and the part you do not
want. One of the major tasks of any image processing software is to separate these
two entities so that the desired elements are preserved. VRS excels at this task, but
you are probably wondering why. VRS takes advantage of two different technologies
to achieve this—simple thresholding and edge detection.
In simple thresholding, a grayscale image (256 levels of gray) is converted to a binary
image (two levels: black and white). This is done by first setting a threshold level,
which acts like a dividing line. Everything (all the pixels) above that number (level of
VRS User’s Manual
39
Chapter 2
gray) becomes white and everything below that number becomes black. Black pixels
are assigned a value of 1, and white pixels are assigned a value of 0. Because the
threshold level influences the brightness of the resulting image, we also refer to the
threshold level as the brightness level. So in VRS, the Brightness slider on its own acts
as a simple threshold level.
Simple Thresholding
Simple thresholding is fine for black text on white paper, but it is tricky when you
have a combination of dark and light text and lines, and dark and light background
surfaces on one page. Figure 2-31 shows a good example of this kind of document.
Figure 2-31. Color Scan of Original Document
A color or 24-bit image is an exact representation of how the original document looks,
much like a photograph of the original. A 24-bit image can contain more than 16
million different colors and is capable of showing all the shades, as well as the darkest
and faintest elements of a document.
It is important, however, to point out that while a 24-bit image can be converted to a
grayscale or a black and white image, a grayscale or black and white image cannot be
converted to a color image. Just as a photo taken on black and white film cannot be
40
VRS User’s Manual
Operating VRS
converted to a color photograph, an image cannot be converted to color if that original
color data was never captured.
Like the color image, an 8-bit grayscale or 256-level grayscale image also looks like a
photographic representation of the original, but without the color. Because it can
display up to 256 gray levels, it is suited for representing documents containing
different shades of text. Black and white only document scanners capture the
documents in 8-bit grayscale, but convert these images to single bit or pure black and
white images before sending the images to your application.
In this example, we will scan a document and show the effects of VRS Contrast,
Brightness, and Gamma settings on it. In the image shown in Figure 2-32, we have
scanned a document we will refer to as the “CORE” document as a Black and White
image at 200 DPI. If we first set the Contrast value to 0, then set the Brightness value
to 20 (remember that setting the Contrast to 0 is basically like using VRS as a simple
thresholding device), the faint text on the top of the page is visible, but the text behind
the highlighter is unreadable.
This text is
revealed.
This text
disappears.
Figure 2-32. Brightness with a Low Setting
With a high Brightness setting, such as 45, the highlighted text appears, but the faint
text becomes unreadable.
VRS User’s Manual
41
Chapter 2
Now this text
is hidden!
This text is
revealed.
Figure 2-33. Brightness with a High Setting
It becomes apparent that these kinds of situations cannot be solved with simple
thresholding. They need a technology that detects objects on a page—both faint and
dark—and sets the brightness level dynamically for each of these objects. This
technology is called edge detection.
Edge Detection
Edge detection in VRS is controlled with the Contrast slider. Edge detection, or edge
finding as it is sometimes called, is a technology that can recognize transitions of one
gray level to another level. The larger the difference between the levels of gray, the
more “edgy” the object is. With a low contrast level, only very edgy objects become
black (for instance black text on a white background); very faint text and lines would
still not appear because the transition from a white background to light gray is
relatively minor. Faint text and lines are therefore not “edgy.” A background, because
it does not have transitions from one level of gray to another, would not be edgy. A
gradient, because there are no sudden transitions from one level of gray to another,
would not be edgy.
Even something that is technically invisible to the eye, such as a piece of transparent
tape placed on a document, could be detected when contrast is set high enough, since
there is ultimately a transition from the tape to the paper surrounding it.
42
VRS User’s Manual
Operating VRS
Let us look at the CORE sample document with the lowest Contrast level—zero. In
addition, to truly see what Contrast does on its own, we will set the brightness value
to zero. When it is necessary, as in the case of the CORE document, Brightness and
Contrast take turns to output the best image. Contrast (Edge Detection) takes the
primary role in dealing with anything edgy, while the Brightness function deals with
everything else.
If you slide the Contrast slider to a level around 50, and set the Brightness to 29, you
can see how the Brightness slider does not affect the edgy objects, leaving that
completely to the edge detector. The only elements that are affected by the Brightness
slider are the non-edgy objects, typically large surfaces of the same gray level (the
inside of a highlighter, the background of a document, a shading on the document,
the inside of very big text or logos, etc.)
Figure 2-34. Contrast Set to 50, Brightness Set to 29
Then when the Contrast slider is on level 50, and you change the Brightness level, it
does not affect the text any more; it only makes the large surfaces white or black.
That’s why there’s a tendency to relate the contrast slider with the foreground or text
and the brightness slider with the background because the higher the contrast, the
clearer your text will be, and the higher the brightness the more the background will
VRS User’s Manual
43
Chapter 2
be cleared up. The lower the contrast, the less readable your text will be; the lower the
brightness the darker the background will turn.
Figure 2-35. Contrast Set to 50, Brightness Set to 77
Your Optimal Scan
The default settings will provide optimal results for most scans. For a list of default
settings, refer to Table 2-1. By simply scanning the CORE document without adjusting
the settings, you will get optimal results.
44
VRS User’s Manual
Operating VRS
Figure 2-36. Document Scanned With VRS Default Settings—Perfect!
VRS User’s Manual
45
Chapter 2
Manual Image Adjustment
VRS provides the option to manually adjust the settings for an image or images. You
can use the Clarity tab to make the adjustments.
Brightness-Contrast Custom Control
The Clarity tab includes custom controls (visual markers) to assist you in identifying
the optimal range for Brightness and Contrast.
Current brightness setting
Acceptable range of contrast and
brightness
Current contrast setting
Figure 2-37. Brightness-Contrast Custom Control
The Brightness-Contrast custom control indicates the current value of the Brightness
setting by means of a horizontal solid black line. The Brightness-Contrast custom
control indicates the current value of the Contrast setting by means of a vertical solid
black line. When Auto Brightness is enabled, the black lines (along with the slider) are
automatically adjusted to reflect the automatic brightness adjustment.
The Brightness-Contrast custom control indicates the current acceptable range of
detected brightness and detected contrast values by means of a rectangle with solid
blue lines. This box shows you the region of acceptable Brightness and Contrast
values. The box is centered on the 50-50 baseline settings for Brightness and Contrast,
with the borders representing the Brightness and Contrast threshold values from the
VRS Administration Utility dialog box. Valid VRS-detected values must fall within
the blue box. VRS detected values that fall outside the blue box borders are invalid
and they generate warnings.
46
VRS User’s Manual
Operating VRS
Brightness Text Box
When the VRS Interactive Properties dialog is launched, the Brightness numeric text
box on the Clarity tab indicates the current Brightness setting. If desired, the
Brightness setting may be changed manually using the Brightness numeric text box.
Brightness may be set from 0 (very dark) to 100 (very bright) for black and white,
grayscale, or color images. Keep in mind, though, that the Manual brightness setting
is not shared between black and white, grayscale, and color modes. Changing the
value of the manual brightness setting in black and white mode does not affect the
value of the manual brightness setting in grayscale or color mode, because VRS keeps
these values separate.
Contrast Text Box
When the VRS Interactive Properties dialog is launched, the Contrast numeric text
box indicates the current value of the Contrast setting. The Contrast value of an image
may be set manually using the Contrast numeric text box. The Contrast value may be
set from 0 (very low contrast) to 100 (very high contrast). Similar to the Brightness
setting, the Contrast setting is not shared between black and white, grayscale, and
color modes. You must enter a separate Contrast value for each mode.
Gamma Slider and Gamma Correct Text Box
The Gamma slider and Gamma numeric text box indicate the current value of the
Gamma setting, which can range from -100 (very dark gamma) to +100 (very light
gamma). Gamma may be set for black and white, grayscale, and color images, but is
only shared between black and white and grayscale modes. This means that changing
the value of the Gamma setting while in black and white mode also changes the
Gamma setting for grayscale mode because VRS internally uses a single value to
represent gamma for black and white and grayscale.
The Gamma setting is not shared between non-color and color modes, however.
Changing the value of the Gamma setting in black and white mode does not affect the
value of the Gamma setting in color as VRS uses a dedicated value to represent color
gamma.
X To update the Clarity tab settings
1
From the VRS Interactive Properties dialog box, select the Clarity tab.
a To adjust the contrast and brightness at the same time, click within the
boundaries of the brightness/contrast grid, then insert the pointer so that
the intersection of the crosshairs represents the desired values for
brightness and contrast. For best results, stay within the blue rectangle.
b To adjust the contrast and brightness separately, skip to the next step.
VRS User’s Manual
47
Chapter 2
2
In the Brightness text box, VRS displays the current brightness setting. To
change the setting, do one of the following:
• Click the arrows on the Brightness text box to increase or decrease the
brightness level.
• Click in the Brightness text box and type in a value.
• Move the Brightness slider control up or down to select a value.
Note As soon as you change the brightness value, the Auto Brightness option
is automatically disabled. To enable it again, select Auto Brightness again and
VRS will calculate and reapply the brightness level automatically.
3
In the Contrast text box, VRS displays the current contrast setting. To change
the setting, do one of the following:
• Click the arrows on the Contrast text box to increase or decrease the
contrast level.
• Click in the Contrast text box and type in a value.
• Move the Contrast slider control left or right to select a value.
4
In the Gamma text box, VRS displays the gamma correction setting. The
correction values range from Dark to Light, with Normal at the midpoint. To
change the setting, do one of the following:
• Click the arrows on the Gamma Correct text box to increase or decrease
the gamma level.
• Click in the Gamma text box and type in a value.
• Move the Gamma slider control left or right to select a value.
Note Changes made to the Clarity tab are handled according to the way the
Interactive Properties dialog box was launched. If the dialog box opened as
the result of an exception, the changes apply to the image in question only. If
the dialog box opened because you selected Preview or First Page mode, the
changes also apply to subsequent scans. When VRS restarts, the tab is reset to
the settings in the last selected profile. Böwe Bell + Howell Spectrum series
scanner users should refer to the note on page 37.
48
VRS User’s Manual
Operating VRS
Using the Noise Tab
Noise in an image consists of pixels accidentally and randomly added to the image
during image processing. The level of shading for these pixels is also random and can
vary quite a bit. Unfortunately, images attained through even the most sophisticated
sensors can still be contaminated by a variety of noise sources and they have to be
corrected.
The Noise tab gives you a set of filters that enhance image quality and remove
excessive speckling. As you adjust the Noise settings, the effects are applied to the
image in the VRS Viewer window. You can fine-tune the settings until the image
appearance meets your quality standards.
Note The VRS Noise tab is only available when your scanner is set to do black and
white scanning. In addition, the Enhancement Filter option is not yet available in this
version of VRS; the drop-down box is reserved for future use.
Figure 2-38. Noise Tab
VRS User’s Manual
49
Chapter 2
Note Changes made to this tab are handled according to circumstances under which
the VRS Interactive Properties dialog box launched. If the dialog box opened as the
result of an exception, changes apply to the exception image only. If the dialog box
opened because you selected Preview or First Page mode, changes apply to all
subsequent scans. Upon restart, VRS is reset to the last selected profile’s settings.
Removing Noise from a Document
Follow these general rules for removing noise from a document:
• If you have batches of mixed documents with varying quality, never use the
Speckle Removal filter. You could risk losing information on documents.
• If the noise was produced by bleed-through of text from the backside or by
background patterns such as on a boarding pass, decrease the contrast. If text
starts to disappear as well, compensate by lowering the Brightness slider.
• If the noise is produced by shaded backgrounds, gradients, or dark-colored
paper, increase the brightness.
• If you have only 1 or 2 kinds of documents with consistent quality, try to apply
various levels of the speckle removal filters.
• If the filter removes part of the characters even at low levels of the speckle
removal filter, apply the rules for mixed batches.
X To update the Noise settings
1
From the VRS Interactive Properties dialog box, select the Noise tab.
2
Use the Line Filter slider to select the amount of thinning/thickening to apply
to image elements.
a Move toward Thin for image elements ballooned or blended together.
b Move toward the Thick setting for image elements too thin or too light.
3
Use the Speckle Removal Filter slider to remove unwanted black dots.
a Move the slider toward Small if removal of small dots will achieve the
desired image quality.
b Move the slider toward Medium if removal of small and medium dots will
achieve the desired image quality.
c Move the slider toward Large if removal of small, medium, and large dots
will achieve the desired image quality.
Note Moving the slider far to the right may interfere with text recognition.
50
VRS User’s Manual
Operating VRS
Using the Skew Tab
The Skew tab allows you to control auto deskew, auto crop, edge cleanup settings and
to perform manual skew adjustment on an image. Images can be rotated up to 360
degrees clockwise or counter-clockwise using the movable angle control arm, or they
can be automatically deskewed by selecting the Deskew check box. If necessary, you
can fine-tune the rotation with the Fine Angle Adjustment slider, or enter an amount
in the Angle box. When the Angle box lists 0.00, the image is displayed as it was
originally scanned.
Figure 2-39. Skew Tab
Changes made to this tab are handled according to circumstances under which the
VRS Interactive Properties dialog box launched. If the dialog box opened as the result
of an exception, changes to Deskew, Auto Crop, or Edge Cleanup apply to the
exception image only. If the dialog box opened because you selected Preview or First
Page mode, Deskew, Auto Crop, and Edge Cleanup settings apply to the exception
image as well as subsequent scans.
If the dialog box opened as the result of an exception, changes to Manual Skew
Adjustment or Fine Angle Adjustment apply to the exception image only. Changes
made when you select Preview are discarded when the OK or Cancel buttons are
VRS User’s Manual
51
Chapter 2
selected. If you are in First Page Mode when an exception occurs, changes to the
Manual Skew Adjustment or Fine Angle Adjustment apply to the exception image
only.
Upon restart, VRS is always reset to the last selected profile’s settings.
X To change the Skew tab settings
1
From the VRS Interactive Properties dialog box, select the Skew tab.
2
Adjust the movable angle control arm until the image is straight:
a Click anywhere on the grid to position the angle control arm.
- or b Position the mouse over the vertical arm, click, and hold. The cursor will
change to a hand.
c Drag the arm counter-clockwise to rotate the image to the left, or
clockwise to rotate it to the right. You can rotate the image up to 360
degrees.
3
Using the Fine Angle Adjustment slider, you can fine-tune the deskew angle
in single degree, or partial degree, increments, as follows:
a By moving the slider all the way to the left, you select a complete onedegree, counter-clockwise angle adjustment.
b By moving the slider all the way to the right, you select a complete onedegree, clockwise angle adjustment.
c By moving the slider to a position in between the leftmost or rightmost
setting, you select an angle shift that is less than a full degree. Each line on
the slider scale represents 5 percent of one degree.
When you use a scanner that produces white borders around the scanned images, the
deskew correction is calculated based on horizontal and vertical text lines in the
image. When you use a scanner that produces black borders around the images, VRS
switches to using black borders and not the content of the document to determine the
skew correction with faster and better results.
When you use a scanner that produces black borders, the Auto Crop option is
enabled. Select this option to automatically crop every page to its original size. Auto
Crop is important for a precise registration of each image in order to perform accurate
optical character recognition (OCR).
52
VRS User’s Manual
Operating VRS
Figure 2-40. Skew Tab - Deskew, Crop, and Edge Cleanup Options
Edge Cleanup activates the VRS feature that automatically removes any black borders
around the image. It is different from image cropping because it does not crop the
image to its actual size. Instead, it replaces any black pixels in the border around the
image with white pixels, preserving the width and length of the image size
determined by the image crop.
Black Background
Scanner Image
Deskew Enabled
Auto Crop Enabled
Edge Cleanup
Enabled
Figure 2-41. Edge Cleanup Process
Note Because VRS requires black borders around the document to perform Image
Crop and Edge Cleanup, these features are not available when your scanner produces
white borders around the images, or in other words, has a white background. Refer
to the VRS Installation Guide to determine if your scanner produces white or black
borders around images (has a white or a black background).
VRS User’s Manual
53
Chapter 2
Using the Profile Tab
As stated already, VRS allows you to scan documents and accurately capture data in
the shortest time possible without any adjustments. However, invariably there are
going to be documents that will evade even the best imaging software. You can use
the VRS Interactive Properties dialog box to correct each image, but if you are going to
be scanning large amounts of problematic documents, the best solution is to create
custom profiles for them.
Figure 2-42. Profile Tab
A profile is a combination of settings from the Clarity, Noise, and Skew tabs. A profile
works like a memorized strategy for image correction and enhancement. With the
exception of the Default profile, which is pre-determined and created when you
install VRS, profiles are created by the user. However, VRS uses the profile Default
settings unless you define and select another profile.
The Profile tab helps you set up and manage VRS image property profiles. From the
Profile tab, you can define, update, load, and remove profiles. You can establish
multiple profiles to accommodate different scanning situations. You are not limited
on the number of profiles you can create. However, only the first eight profiles will be
54
VRS User’s Manual
Operating VRS
assigned a shortcut key, and only 10 profiles at a time will be visible in the Available
Profiles window.
It is recommended that you do not update the Default settings as they can only be
restored by reinstalling the software or by using the Restore Default Values Utility. In
addition, reinstalling VRS will overwrite any profiles you have created and/or
modified. For more information, refer to VRS Restore Default Values Utility on page 75.
Note Changes made to this tab are handled according to when the VRS Interactive
Properties dialog box was launched. If the dialog box opened as the result of an
exception, the changes will apply to the image in question only. If the dialog box
opened because you selected Preview or First Page mode, the changes will apply to
subsequent scans. When VRS restarts, the dialog box resets to the last selected profile.
Selecting, Creating, and Deleting Profiles
Use these instructions to select, create, and delete profiles.
X To set up a profile
1
Open the VRS Interactive Properties dialog box and make selections from the
Clarity, Noise, and Skew tabs.
2
Select the Profile tab.
3
In the New Profile text box, assign a name to the new profile. Be sure to assign
a profile name with alphanumeric characters; refer to Table 2-6.
Table 2-6. Invalid Characters for Profile Names
Character
Description
Character
Description
:
Colon
'
Single quotation
;
Semicolon
"
Double
quotation
\
Backslash
>
Greater than
/
Slash
<
Less than
|
Pipe
^
Caret
&
Ampersand
.
Period
?
Question mark
VRS User’s Manual
55
Chapter 2
4
Select Save As. The new profile name appears in the Available Profiles list,
and it becomes the active profile.
5
Notice how VRS automatically associates a function key to the first 8 profiles.
You can change the sequence of any profile and its associated function key by
moving a profile up or down with the Move Up and Move Down buttons.
6
The function keys are only active when the VRS Interactive Properties dialog
box is active. Once you have created a profile, the Cancel button will not undo
the changes to the Profile tab. You will need to change the active profile or
remove it as described in the following topics.
X To change the active profile
1
At the VRS Interactive Properties dialog box, select the Profile tab.
2
From the Available Profiles list, select the profile you want to use.
3
Select the Load button. (This step is important; clicking the OK button before
you click the Load button will not change the active profile.)
4
Click the OK button.
- or -
1
From the VRS Interactive Properties dialog box, select the Profile tab.
2
Do one of the following:
• From the Available Profiles list, double-click the name of the profile you
want to use.
• Press the corresponding function key on the computer keyboard to load a
profile. The function keys are only active when the VRS Interactive
Properties dialog box is selected.
- or -
1
From the VRS menu, select the Profile command.
2
When the Profiles submenu opens, select the name of the profile you want to
use. The profile selection stays in effect until you change it again.
Note If an image is open in the VRS Viewer when you change the active
profile, the image is refreshed with the new settings.
56
VRS User’s Manual
Operating VRS
X To remove a profile from the Available Profiles list
1
From the VRS Interactive Properties dialog box, select the Profile tab.
2
From the Available Profiles list, select the profile(s) you want to remove.
3
Click Remove. The profile name clears from the Available Profiles list.
4
If the deleted profile was the last profile in use, select another profile from the
Available Profiles list and click the Load button to select it.
VRS User’s Manual
57
Chapter 2
Using the Options Tab
Some scanner features are only available from the Options tab. If VRS supports your
scanner’s Advanced Settings or Advanced Properties dialog box, the Special Features
button will be enabled. If your scanner driver does not support an Advanced Settings
dialog box, this button will be unavailable.
Note The Options tab is hidden unless the VirtualReScan Interactive Properties
dialog box is invoked in Preview mode. In addition, while the Advanced Settings
dialog box is displayed, the VRS Interactive Properties dialog box is not available.
Figure 2-43. Options Tab
Clicking the Special Features button when it is enabled invokes the Advanced
Settings dialog box for your scanner. Once you have made selections to the Advanced
Settings dialog box and clicked OK, those changes will remain in effect until you
change them again.
Some of the available features may include:
• Color Dropout (Böwe Bell + Howell Spectrum series, Fujitsu fi-4860C,
Fujitsu fi 4990C, and Fujitsu M3091DC)
58
VRS User’s Manual
Operating VRS
• Lamp Saver Mode
• Endorser (such as Panasonic models and OEMs, Canon DR-5080C,
Fujitsu fi 4990C, Fujitsu fi-4860C, and Böwe Bell + Howell Spectrum series).
• Density
• Emphasis
• Document Form
Note Use the Special Features option with caution. Some features may interfere with
the optimal performance of VRS.
Figure 2-44. Böwe Bell + Howell Spectrum Series Advanced Settings Dialog Box
For more information regarding VRS support of advanced scanner properties, refer to
VRS Interactive Properties Dialog Box Tabs on page 35.
VRS User’s Manual
59
Chapter 2
Using the Analysis Tab
The Analysis tab summarizes the properties for the current image in the VRS Viewer
at the time VRS scans the image. The information on the Analysis tab may help you
identify threshold values for contrast and brightness on the VRS Administration
Utility, as well as settings for contrast and brightness on the Clarity tab.
If you enable Auto Brightness on the Clarity tab, the brightness value on the Analysis
tab is automatically adjusted. With the exception of the Speckle Count (the number of
pixels that are removed from the image when using the Speckle Removal slider in the
Noise tab), none of the Analysis tab information is updated as you apply image
property changes. You cannot edit the information on the Analysis tab.
Note If you are using VRS with a scanner that supports Automatic Color Detection
and Color Background Saturation, an additional group box called Color Information
appears on this dialog box. For more information, refer to Advanced Color Processing
on page 93.
Figure 2-45. Analysis Tab
60
VRS User’s Manual
Operating VRS
Using the About Tab
The About tab lists the VRS version information, along with the contact information
for Kofax Image Products. For direct access to the Internet, you may either:
• Click the VRS Online button to access the VRS product Web site, from which
you can download product updates.
• Select www.kofax.com to visit the Kofax Web site.
Figure 2-46. About Tab
VRS User’s Manual
61
Chapter 2
VRS Advanced Properties Dialog Box Overview
Users of the Böwe Bell + Howell Spectrum series, the Fujitsu fi-4990C, and the Fujitsu
fi-4860C have access to the VRS Advanced Properties dialog box via the Special
Features button on the Options tab. The Advanced Properties dialog box is made up
of the following tabs: Endorser, Color, Picking Rectangle, Rotation, and About. Each
tab is described in this section.
Figure 2-47. Advanced Properties Dialog Box
Some settings from the VRS Interactive Properties dialog box take precedence over
settings on the Advanced Properties dialog box tabs. Image processing tasks will
occur in this order:
1
VRS Interactive Properties Deskew (if enabled)
2
VRS Interactive Properties Auto Crop (if enabled)
3
Settings from the Advanced Properties Picking Rectangle tab
4
Settings from the Advanced Properties Rotation tab
Endorser Tab
VRS supports basic endorsing and annotation. For VRS Production-class scanners
that are equipped with endorsers, you can set up endorsing properties using the
Endorser tab of the Advanced Properties dialog box. Through the Endorser tab, you
62
VRS User’s Manual
Operating VRS
will be able to build a text string from a text prefix and numeric counter value, and
then use the string to endorse and/or annotate pages and images. Once added to the
page or image, however, endorser and annotation strings are permanent.
The Endorser tab is divided into two groups, the Options group and the Annotation
Options group. In the Options group, you can select from the following options:
• Endorsing Off, Annotation Off (default setting)
• Endorsing On, Annotation Off (mechanical endorsing only)
• Endorsing On, Annotation On (mechanical endorsing with electronic
annotation)
When No Endorser and No Annotation are selected, no string is created on either the
scanned page or on the resulting image. Selecting Enable Mechanical Endorser Only
means that the endorsing string is physically printed on the scanned page, but is not
placed on the image. By selecting Enable Mechanical Endorser and Electronic
Annotation, you are choosing to have the endorsing string appear both on the
document being scanned as well as on the resulting image.
When the Enable Mechanical Endorser and Electronic Annotation option is selected,
the options in the Annotation Options group become available. Annotation can be
performed on the document front, document back, and on both sides of a document,
but the default setting is to annotate the front side only.
Also available on the Advanced Properties dialog box is a Text Definition option,
which you can use to set and/or modify the contents of the endorser string. The Text
Definition button is disabled unless endorsing and/or annotation is selected.
VRS User’s Manual
63
Chapter 2
Text Definition Dialog Box
When the options for either Enable Mechanical Endorser Only or Enable Mechanical
Endorser and Electronic Annotation are enabled, selecting the Text Definition button
from the Advanced Properties dialog box launches the Text Definition dialog box.
Use this dialog box to customize the endorser and/or annotation string. The Text
Definition dialog box allows you to specify details about the endorsing string such as:
•
•
•
•
•
Prefix (selection of text and date format)
Location of the string relative to the Top and Left of the page
Number of digits in the Page Counter
Start number for the Page Counter
Step Value (increment or decrement values) for the page counter.
Figure 2-48. Text Definition Dialog Box
64
VRS User’s Manual
Operating VRS
Prefix
The Prefix is an optional sequence of characters that you can set to precede the rest of
your imprinting string. Typically, the prefix consists of a text string and a date. If no
prefix is manually entered into the Prefix box, an empty string will be returned. When
creating your text string, you will need to limit it to the characters in Table 2-7.
Table 2-7. Acceptable Prefix Text String Characters
space
0-9
% - _/\#.][()=+< > &
A-Z
a-z
You can manually enter the text string or date to be used during annotation, or you
can select from the Prefix drop-down list to insert pre-formatted date information into
the prefix string. These are the Prefix drop-down date format choices:
•
•
•
•
•
•
•
•
•
•
•
•
•
•
•
•
YYYY-MM-DD
DD-MMM-YY
DD MMM YYYY
MMM/DD/YYYY
MMM/DD/YY
MM/DD/YYYY
MM/DD/YY
MMM DD, YYYY
MM.DD.YYYY
MMM. DD, YY
YYYY
YY
MMM
MM
DD
YYDDD (Julian)
VRS User’s Manual
65
Chapter 2
Once set, the contents of the prefix are identical for every endorsing and annotation
occurrence for a batch. The counter, if enabled, will always be printed following the
prefix (base) string. Prefixes are, however, restricted to the number of characters listed
in Table 2-8. The number of allowable characters varies by scanner. Exceeding the
maximum string length will result in the string being truncated to the maximum
length and an audible alert.
Table 2-8. Maximum Number of Printable Characters in the Prefix
Page Counter
Fujitsu fi-4990C
Fujitsu fi-4860C
Böwe Bell + Howell
Spectrum series
No counter
30 characters
40 characters
22 characters
Five (5) digit
counter
25 characters (not
incl. counter)
35 characters (not incl.
counter)
NA
Eight (8) digit
counter
25 characters (not
incl. counter)
35 characters (not incl.
counter)
NA
One to ten (1-10)
digit counter
NA
NA
22 characters
Note Because the endorser/annotation string is made up of a text prefix and a
counter, consider their combined length when setting the string length.
Directly below the Prefix box are the Top and Left text boxes, which you can use to
specify the vertical and position of the annotation text string. A Units radio button
group located near the edit boxes allows text positioning values to be specified in
inches, millimeters, or pixels (DPI dependent). The default unit of measurement is
inches.
In the Top text box, you may specify the distance of the endorsing and annotation
string from the top of each page. The default and minimum value is zero, but the
maximum value is dependent on the paper size. Whole numbers are required when
entering pixels and millimeters, but when values are in inches, they can be entered in
.01-inch increments.
In the Left box, the distance of an annotation string from the left edge of a page can be
specified. The default and minimum value is zero, but the endorsing string is never
printed less than 20 mm from the top of the page. The maximum is dependent on
paper size. Whole numbers are required when entering pixels and millimeters. When
66
VRS User’s Manual
Operating VRS
values are in inches, however, they can be entered in .01-inch increments. The Left
edit box is disabled (grayed out) unless annotation is selected.
Note Not all scanners allow you to select a top and/or left position for your endorser
string. Refer to your scanner documentation for more information.
On the right side of the Text Definition dialog box is the Page Counter group, which is
used to enable the page counter, specify a starting number for your automatic
endorser/annotation counter, set the number of digits to use, and determine the
amount by which the counter will be incremented.
Enable
Select the Enable check box to activate the Page Counter feature. When the Enable
check box is clear, all other elements in the Page Counter group are disabled.
Digits
The page counter length can be specified via a drop-down list. The available values
depend on the scanner as well as on the installed endorsing hardware. Table 2-9 lists
the maximum number of digits per scanner and the resulting counter value. The list
contains only the available values for page counter length. Select None if you do not
wish to increment the counter.
Note This drop-down list is only available when the Enable check box is selected.
Table 2-9. Maximum Page Count per Scanner
Endorser and/or Page Fujitsu fi-4990C
Counter
Fujitsu fi-4860C
Böwe Bell +
Howell Spectrum
16-bit endorser: 5
digits (drop-down list
is disabled.)
65,535
65,535
NA
24-bit endorser: 5 or 8
digits
99,999 and 16,777,215
respectively
99,999 and 16,777,215
respectively
NA
1 to 10 digits; 5 digits
is the default
NA
NA
The n-digit page
counter will roll
over at ( 10**n) – 1.
VRS User’s Manual
67
Chapter 2
Start At
The starting page counter value is set to 1 initially, but it may be reset using the Start
At text box. When you start a new batch, the Page Counter Starting Value is the next
number in the sequence based on the final page counter value from the previous
batch. Again, you are free to enter a new value into the Start At text box instead.
Step Value
Select from the Step Value drop-down list to determine how the automatic endorser/
annotation counter is incremented on every page. Ideally, the counter should be set
based on the documents being scanned, how the batches are organized, and specific
user needs.
The following Step Values are available from the drop-down list.
•
•
•
•
Increment by one (default)
Increment by two
Decrement by one
Decrement by two
Note Decrementing is not available on the Böwe Bell + Howell Spectrum series.
Other Elements on This Dialog Box
The text displayed under Sample String shows how the current imprinting text will
look with any optional date stamp or counter expanded. The current date is used.
68
VRS User’s Manual
Operating VRS
Color Tab
VRS supports color features of the Böwe Bell + Howell Spectrum series, the Fujitsu
fi 4860C, and the Fujitsu fi-4990C through the Color tab. You can use the Color tab to
set up color-related features such as Color Dropout and JPEG Compression. The
Color tab follows the Endorser tab on the Advanced Properties dialog box. The Color
tab is made up of three groups: Front Side Dropout Color, Back Side Dropout Color,
and JPEG Compression.
Figure 2-49. Advanced Properties Dialog Box – Color Tab
In some cases, you may want to remove all instances of one color, such as the
background color, on a document in order to make the necessary data more accessible
to OCR engines, etc. One method to effectively “erase” this unwanted color during
scanning is to use color dropout. If you select a color to “drop out,” your scanner will
ignore that color, but capture everything else.
The Front Side Dropout Color and Back Side Dropout Color groups provide the
following dropout color choices: None, Red, Green, or Blue. The default is None. If a
scanner supports duplex, you can select different dropout colors for the front and for
the back side.
VRS User’s Manual
69
Chapter 2
Note The Böwe Bell + Howell Spectrum series scanners support color dropout. All
scanners in the series support front and back side color dropout except for the Böwe
Bell + Howell 8080 SB and Böwe Bell + Howell 8080 SC, which support single-sided
scanning only. For these scanners, the back side options for color dropout are
disabled.
JPEG (Joint Photographic Expert Group) is a standardized image format designed to
compress color and grayscale images. In the JPEG Compression group of the Color
tab, you can activate JPEG compression via the Enabled check box. When the Enabled
check box is selected, you may then select an image quality level of Good (65), Better
(80), Best (95), or Custom.
When the Custom image quality level option is selected, both a YUV value and a
Custom JPEG Compression Value may be set. The Custom value has a range of 1 to
100, with a default of 65. As a very general example, setting the JPEG Compression
Value at 100 would probably compress the image so lightly that it would be near its
original size; a JPEG Compression Value of 10, however, could result in major data
loss.
You may type a custom quality JPEG Compression Value into the text box provided,
or use the up and down arrows to select a value. Because results from the Custom
JPEG Compression Value cannot be predicted with certainty, use this setting with
caution. The key is to achieve an agreeable balance between better performance
(through optimum compression) and quality of the images. Avoid compression that
speeds up scanning yet loses necessary data.
YUV, a color-encoding scheme involving luminance (frame and field brightness or
“Y”) and chrominance (color information or “UV”), may be selected if desired from
the drop-down list. The choices for YUV may vary by scanner. The Fujitsu fi-4990C,
Fujitsu fi-4860C, and the Böwe Bell + Howell Spectrum series choices are 4-4-4 or 4-22, with a default of 4-2-2. When the JPEG Compression Enabled check box is clear, the
Quality, YUV, and quality Value choices are disabled.
70
VRS User’s Manual
Operating VRS
Picking Rectangle Tab
The Picking Rectangle tab allows you to select only the portion of an image to be
scanned or processed, effectively cropping off unwanted data. This feature is only
available for the Böwe Bell + Howell Spectrum series, the Fujitsu fi-4990C, and the
Fujitsu fi 4860C.
The Picking Rectangle tab is divided into two groups: Front Side and Back Side. If a
scanner supports duplex scanning, you may select picking rectangle settings for the
front or the back side, or both the front and the back side. For simplex scanners, only
the Front Side setting will be available: the Back Side options will be disabled (as is the
case with the Böwe Bell + Howell 8080 SB and Böwe Bell + Howell 8080 SC).
Figure 2-50. Advanced Properties Dialog Box – Picking Rectangle Tab
The Picking Rectangle tab allows you to enable and set the following:
• Unit of measurement to be used via the English or Pixels options
• Placement of the picking rectangle on the document--more specifically, the
distance from the top and left (offset) of the document edge using the up and
down arrows or by entering the distance into the Top and Left text boxes
• Width and Height of the picking rectangle using the up and down arrows or
by entering the picking rectangle dimensions into the appropriate text boxes
VRS User’s Manual
71
Chapter 2
Rotation Tab
For the Böwe Bell + Howell Spectrum series, the Fujitsu fi-4990C, and Fujitsu fi-4860C
scanners, a Rotation tab will be available from the Advanced Properties dialog box.
For other scanners, rotation options will be available from the scan application.
Figure 2-51. Advanced Properties Dialog Box – Rotation Tab
The Rotation tab contains a Front Side and a Back Side group. When a scanner
supports duplex scanning, the front side and/or the back side of a scanned image can
be rotated by 90, 180, or 270 degrees. Selecting 0 means no rotation. On simplex
scanners, only Front Side rotation is enabled.
When there is an image displayed in the VRS Viewer, the image displays at the
rotation angle plus the angle set on the VRS Interactive Properties Skew tab.
Furthermore, any rotation in ImageControls-based applications is independent of
(and performed after) the rotation set from the Rotation tab. Rotation tab settings
apply after deskew, crop, and settings from the Picking Rectangle tab. In other words,
image-processing tasks will occur in this order:
•
•
•
•
72
First, VRS deskew (if enabled)
Second, VRS crop (if enabled)
Third, settings from Picking Rectangle tab
Fourth, settings from Rotation tab
VRS User’s Manual
Operating VRS
About Tab
Located at the rightmost tab position of the Advanced Properties dialog box is the
About tab. The About tab provides valuable information particularly relevant to
Technical Support issues. In addition to listing the scanner firmware version and the
Enhanced Grayscale Adapter (EGSA) firmware version, the About tab also displays
whether a scanner endorser is installed and whether the endorser is a 16-bit or 24-bit
endorser (if applicable).
Figure 2-52. Advanced Properties Dialog Box – About Tab
VRS User’s Manual
73
Chapter 2
74
VRS User’s Manual
Appendix A
VRS Restore Default Values Utility
Overview
The VRS default settings have been carefully chosen to allow VRS to excel at a wide
range of documents without adjustments. In the day-to-day use of VRS, however,
these default settings may inadvertently be altered. The VRS Restore Default Values
(RDV) utility performs two valuable functions: it restores VRS settings to their
original values and sets the default VRS scanner without requiring VRS to be
reinstalled.
The Restore Default Values utility allows you to reset these values to their original
state while carefully preserving any custom profiles that may have been created in the
meantime. When you install VRS, the Restore Default Values utility is included as
part of your installation.
Installation Instructions
This section describes how to install and use the RDV utility.
Note The imgctls folder location depends on the destination folder set during the
installation process.
X How to install the VRS Restore Default Values utility
1
VRS User’s Manual
Go to C:\Program Files\Kofax\imgctls\install\RDV and double-click on
Setup.exe. The RDV installation will begin, as indicated by the RDV Setup
Welcome screen.
75
Appendix A
Figure A-1. RDV Setup Welcome Screen
2
Click Next. RDV setup will begin. When the progress indicator disappears,
the RDV installation utility is complete.
3
A shortcut to the RDV program is added to the Kofax VRS program folder.
X How to create a shortcut for the RDV utility on your desktop
76
1
Go to C:\Program Files\Kofax\imgctls\RDV and right-click on RDV.exe.
2
Select Create Shortcut from the right-click menu.
3
Click, drag, and drop Shortcut to RDV.exe onto your desktop.
VRS User’s Manual
VRS Restore Default Values Utility
Restoring VRS Settings
This procedure gives a quick overview of how to use the RDV utility.
X To restore VRS settings to the factory defaults
1
Double-click on the RDV desktop icon to launch the utility.
2
Select the Restore factory default settings option, which will update your
settings from the Restore Default Settings utility.
-orIf you want the most current VRS settings and have Internet access, select the
Download latest defaults from the Kofax Web site option. This will
automatically launch your Web browser and begin the download of the
factory default settings. Again, you must have Internet capability to use this
feature.
3
Click Apply.
4
Select OK. The settings will be restored.
Note There is no need to restore VRS settings to the factory defaults when you choose
to select another scanner as the default VRS scanner. Default settings are
automatically updated when you change the VRS scanner using this utility.
VRS User’s Manual
77
Appendix A
Changing the Default VRS Scanner
If you have used VRS with one scanner, but have switched to another scanner (or
scanners) at some point by reinstalling VRS, you may use the VRS Restore Default
Values Utility to change the default VRS scanner without reinstalling VRS again.
X To select another scanner as the default VRS scanner
1
Click twice on the RDV desktop icon to launch the utility.
2
On the Select scanner drop-down list in the VRS Scanner group, select the
scanner.
3
Click Apply. As a result, when Kofax VRS is listed as a source in your scan
application, this scanner will be used.
4
Click OK to close the utility.
If you are switching to a Canon DR-2080C, a Canon DR-3060, a Canon DR-3080C, a
Kodak i50, or a Kodak i60 scanner, you may receive an error message similar to the
following when you attempt to use the default scanner: "Missing or Corrupt
ISIS.pxw scanner driver file." This file is only installed by VRS when the scanner is
selected during the setup process.
X To install the ISIS.pxw (ISIS driver), do one of the following:
• Install the ISIS driver from the scanner manufacturer CD.
• Reinstall VRS and select the scanner during VRS setup.
If you are switching to a Canon CanoScan N 650U/N 656U, a Canon CanoScan
N 1220U, a Fujitsu fi-4110CU, an HP ScanJet 7400C series, or a Visioneer 9650 USB
scanner, please see the special TWAIN and/or USB installation instructions in
Chapter 2 of the VRS Installation Guide. Once you have installed the scanner using
these instructions, you will be able to use the VRS RDV utility to switch between
another scanner to this one and vice versa.
78
VRS User’s Manual
Appendix B
Long Paper Support
Overview
VRS supports long paper scanning for production-class scanners such as the Böwe
Bell + Howell Spectrum series, the Fujitsu fi-4990C, and the Fujitsu fi-4860C.
Activating Long Paper Support
Using VRS, you can scan duplex paper up to 36” in Black and White mode at 300 DPI
and below. With long paper support activated, images may not be rotated.
X To scan long paper (up to 36”) in VRS
1
Start your scan application (VCDemo is used in this example) and select
Source | Properties.
2
At the Scanner Properties dialog box, select Continuous Sheet.
Figure B-1. Scanner Properties Dialog Box
3
VRS User’s Manual
Click OK. You may now scan documents up to 36” in length.
79
Appendix B
80
VRS User’s Manual
Appendix C
VRS Non-Interactive Mode
Using Non-Interactive Mode vs. Interactive Mode
Users of the Böwe Bell + Howell Spectrum series scanners have the choice of selecting
VRS in a non-interactive mode at the time of installation. This mode is specifically
designed for Böwe Bell + Howell users who do not wish to see any VRS dialog boxes
while scanning, even though VRS is running conveniently in the background.
While this feature is automatically set during installation of a Böwe Bell + Howell
Spectrum II series scanner, VRS non-interactive mode can be switched back to
interactive mode.
X To switch the Böwe Bell + Howell Spectrum series scanner from noninteractive mode to interactive mode
1
Right-click on the VRS taskbar icon.
2
Select QC Modes | Hardware Warnings.
3
Select On Errors. Non-interactive mode will effectively be turned off.
4
In addition, you may go to the VRS Administration Utility and customize
how you want VRS to respond to hardware problems. Refer to Configuring
VRS Before You Scan on page 15 for more information.
VRS User’s Manual
81
Appendix C
82
VRS User’s Manual
Appendix D
Enhanced Bar Code Engine
Overview
Access to the Kofax Standard bar code recognition engine is provided through
ImageControls-based applications and ISIS-based applications. In addition to the
standard bar codes, you will have access to the Enhanced Bar Code feature if you are
using an ImageControls-based application or an ISIS-based application and do one
the following:
• Purchase the VRS for Professional Scanners with Adrenaline Image Processing
Engine bundle with the Enhanced Bar Code hardware key (dongle).
• Use VRS in combination with a Kofax 650iMV, 650iHV, or an Adrenaline 650i
as your SCSI scanner controller.
This section gives information on the bar code types supported, the differences
between the Standard Bar Code engine and the Enhanced Bar Code engine, and
instructions on how to switch between them. Refer to Using the Bar Code Properties
Dialog Box on page 87 for more information.
Standard vs. Enhanced Bar Code
With the Adrenaline Image Processing Engine, the ability to capture and read bar
codes has been expanded through the application of color technology. Because color
images provide more information to assist in bar code interpretation, the enhanced
bar code reader is able to achieve more accurate readings of all supported bar code
types at low DPI levels and varying levels of quality. The enhanced bar code also has
the ability to work with grayscale images in addition to having improved bitonal
recognition capability. Another significant advancement is the support of twodimensional (2D) bar codes.
If you are not familiar with this dialog box, refer to Using the Bar Code Properties Dialog
Box on page 87.
VRS User’s Manual
83
Appendix D
Figure D-1. Bar Code Properties Dialog Box
With the Enhanced Bar Code engine, you will be able to scan all the standard bar code
types with improved recognition, in addition to the 2D bar codes. The Enhanced Bar
Code engine supports the following bar codes:
•
•
•
•
•
•
•
•
•
•
•
•
•
•
84
Aztec
Codabar
Code 128
Code 39 (3 of 9)
Code 93
DataMatrix
EAN
Interleaved 2 of 5
Maxi Code
PDF 417
Postnet
QR
UPC-A
UPC-E
VRS User’s Manual
Enhanced Bar Code Engine
Standard bar codes include the following:
• Codabar
• Code 128
• Code 39 (3 of 9)
• Code 93
• EAN
• Interleaved 2 of 5
• Linear 2 of 5
• Postnet
• UPC-A
• UPC-E
How to Switch Between Bar Code Engines
While the Kofax Enhanced Bar Code recognition engine offers many advantages over
the standard bar code recognition engines, in some cases the processing speed may
vary. For those who wish to focus on processing speed rather than quality of
recognition, the Standard Algorithm may be preferable. To make this transition
easier, both algorithms are available for selection at any time without restarting the
scan application.
X To switch the active bar code engine
1
At the Bar Code Properties dialog box, go to the Bar Code Algorithm group.
2
Select one of the following check boxes:
• Standard Bar Codes
• Enhanced Bar Codes
3
The corresponding bar code types will immediately become available.
4
Select the desired bar code type(s). Hold down the Control key to select
multiple bar codes.
5
Click OK.
Note The 2D bar codes are not supported when you switch to the Standard
Bar Code algorithm.
VRS User’s Manual
85
Appendix D
Accessing the Bar Code Properties Dialog Box
How you access the Bar Code Properties dialog box varies according to your scan
application. From the Scan Demo application, as an example, you may select the Bar
Code check box in the Recognition group of the Image Scanning Properties dialog box
to enable your scan application to automatically recognize certain bar codes during
scanning.
Figure D-2. Scan Demo Image Properties Dialog Box
Clicking the Settings button launches the Bar Code Properties dialog box, where you
may customize how bar codes are handled. When a potential bar code is found, your
application examines the bar code and determines if it meets the requirements you
have selected. If so, it is decoded and bar code data is returned to your scan
application. This bar code data can then be used, for example, in indexing and
workflow operations, or for tracking inventory.
86
VRS User’s Manual
Enhanced Bar Code Engine
Using the Bar Code Properties Dialog Box
This section describes the options on the Bar Code Properties dialog box.
Recognition Group
The Recognition group of the Bar Code Properties dialog box gives you the ability to
enable bar code recognition, to select scanner-specific bar code recognition (if
available), and to implement the bar code learn feature.
Enable
Select the Enable check box to enable bar code recognition. Clear the check box to
disable bar code recognition.
Use Scanner
The Use Scanner option is reserved for scanners that have bar code recognition ability.
Learn
The bar code Learn feature automatically ascertains the most appropriate values
associated with bar codes on an image. It uses the selected bar code type(s) and search
direction(s) to detect bar codes on the current image, and updates the following
values:
•
•
•
•
Height
Width
Ratio
Quality
For best results, bar codes should be “learned” using the same scanner and scanner
settings that will be used to process images. In addition, you must know the type of
bar codes you are using for the Learn feature to work properly.
Note The Learn feature does not work with Postnet bar codes. In addition, the Learn
mode operates on one bar code at a time. You cannot "learn" multiple bar codes or
mixed bar code types with a single Learn operation.
VRS User’s Manual
87
Appendix D
Interpret Bar Code Group
Using the Interpret Bar Code option, you may translate bar codes as patch code.
Choose a patch code from the list, or select No Patch Code to disable this feature.
•
•
•
•
•
•
Patch I
Patch II
Patch III
Patch IV
Patch T
Patch VI
Bar Size Group
Under Bar Size, you can type or select the Height and Width of the bar size.
Height
The height of a bar code is the distance between the top of the bars and the bottom of
the bars. The minimum height is .015 inch and the maximum is 1.25 inches. You can
type or select the bar code height from the drop down list.
Width
The bar width, the physical thickness of the narrowest element in a bar code, ranges
from 0.010 to 0.050 inches. Type or select the width from the list.
Any Width
When the bar width is unknown, you can select this check box to allow the
application to automatically determine the bar width as it searches for potential bar
codes.
2 to 1 Ratio
Some bar code types support an optional ratio between the narrowest element and the
larger elements in the code. In a 2 to 1 ratio, the width of the largest elements is two
times larger than the narrowest element. For example, if the width of the narrowest
element is .20 inches, the width of the largest elements will be .40 inches.
Note The ratio setting only has meaning for Codabar, Code 39, Code 93, Interleaved 2
of 5, and Linear 2 of 5.
88
VRS User’s Manual
Enhanced Bar Code Engine
Search Direction Group
The application searches for bar codes in a linear fashion, examining the search area
for potential bar codes. For horizontal bar codes with an orientation of 0, for example,
it works down the image starting on the left and searching toward the right edge; for
vertical bar codes, it works across the image starting on the top edge and searches top
to bottom. Bar codes can be oriented on an image in four general directions. You can
select the 0, 90, 180, or 270 check box for the direction you would like to search.
Table D-1. Search Direction Options
Orientation
Direction on the Image
0
Horizontal, rotated 0 degrees, read left to right
90
Vertical, rotated 90 degrees, read top to bottom
180
Horizontal, rotated 180 degrees to the right, read right to left
270
Vertical, rotated 270 degrees to the right, read bottom to top
Quality Group
The bar code Quality refers to the condition of bar code elements on an image. For
example, sometimes the bar code elements are well defined; the black bars are clearly
delineated, and very little noise exists on the image. In some cases, the black bars are
too light, or noise exists in the bar code’s quiet zone. Because these factors can affect
the application’s ability to accurately read the bar code, you can specify the quality of
the bar codes being read.
• Good—Well delineated, have smooth edges, and are noise free.
• Normal—Generally well delineated, but may have some noise and rough
edges.
• Poor—Have jagged edges or other characteristics that might make them hard
to read.
Checksum Group
Note Checksum verification only has meaning for Code 39, Interleaved 2 of 5, and
Linear 2 of 5 bar code types. It is ignored for all other bar code types.
VRS User’s Manual
89
Appendix D
Usually the last character in the bar code, the checksum character helps to ensure that
the bar code is valid. Selecting the Enable check box in the Checksum group allows
the application to perform checksum verification.
90
VRS User’s Manual
Appendix E
Patch Code Recognition
Overview
A patch code is a pattern of horizontal black bars separated by spaces and typically
placed near the leading edge of a document to be scanned. It can be used to separate
documents or to stop the scanner. You may perform patch code recognition if you are
using an ImageControls-based or ISIS-based application and one of the following is
true:
• You purchased the VRS for Professional Scanners with the Adrenaline Image
Processing Engine bundle.
• You are using VRS in combination with a Kofax 650iMV, 650iHV, or an
Adrenaline 650i as your SCSI scanner controller.
The Patch Code Properties dialog box, shown in Figure E-1, can be used to enable,
disable, or specify the location of a patch code. In VCDemo, the Patch Code dialog box
is accessed via the Imaging menu. Other patch code options are set from the Units
option on the File menu in VCDemo.
Figure E-1. Patch Code Properties Dialog Box
VRS User’s Manual
91
Appendix E
Using the Patch Code Properties Dialog Box
Use the following options to enable patch code detection.
Enable
Select the Enable check box to take advantage of the patch code detection feature.
Left Offset to Center of Patch Code
The Left Offset to Center of Patch Code is a value you select from the left edge of the
page that defines a point near the center of the patch code. The offset value allows the
patch code detection feature to quickly locate the patch code on the page. This offset
can be any value in inches between 0 and the maximum page width. A value of 0
specifies searching anywhere in the horizontal direction for a patch code.
All patch codes are made up of narrow and wide bars as follows:
•
•
•
•
The narrow bars must be 0.08 inch in height.
The wide bars must be 0.20 inch in height.
The entire patch code must be 0.80 inch in height.
The entire patch code should be at least 2.0 inches in width.
To be detected, patch codes must be positioned correctly on the page:
• The patch code must be horizontal.
• It must be located at least 0.20 inches from the leading edge of the image.
• It must not extend beyond 3.75 inches from the leading edge of the image.
In compliance with the patch code specification for duplex scanning operations, patch
codes are only detected on the front side of a page. Patch codes on the back side of a
page are ignored.
Note As an alternative to using patch codes, you can specify that a bar code be
interpreted as a patch code, as well as a bar code. This might be useful, for example, if
there is always a bar code on the first page of each document. The Bar Code Properties
dialog box is used to configure bar codes for use as patch codes. For more
information, refer to Using the Bar Code Properties Dialog Box on page 87.
92
VRS User’s Manual
Appendix F
Advanced Color Processing
Overview
If your scanning application is set to color mode and you are using a Böwe Bell +
Howell Spectrum II series scanner, your VRS installation will include advanced color
image processing options. These options are accessible from the Color tab on the VRS
Interactive Properties dialog box.
You can use the options on the Color tab to implement features such as Automatic
Color Detection and Color Background Saturation. Additional options related to color
processing will also be available from the VRS Administration Utility and the
Analysis tab. For more information, refer to Color Confidence Out of Range Warning on
page 99 and Color Information on the Analysis Tab on page 100.
Automatic Color Detection
Automatic Color Detection is the ability to detect and process a color image, or color
content within an image. VRS can process a batch that contains both color and noncolor images; the non-color documents are output as bitonal images. Automatic Color
Detection includes a Color Object Size Detection setting that you can use to adjust
sensitivity to documents that include small amounts of color.
With Automatic Color Detection, VRS is capable of outputting a document or batch of
mixed image types as color or bitonal, based on automatic recognition of the image
content. You can configure Automatic Color Detection to detect or ignore small
amounts of color, or pages printed on color paper.
If you do not enable the Automatic Color Detection feature while scanning in color
mode, VRS will process every document as a color image.
Note When Color Detection and Blank Page Thresholding are both enabled, be aware
that a document detected as bitonal may not meet the criteria required to perform
Blank Page Thresholding.
VRS User’s Manual
93
Appendix F
Color Content Aggressiveness
When Automatic Color Detection is enabled, you can specify how aggressive VRS
should be in detecting the color content of documents. You can use the Color Content
Aggressiveness controls to increase/decrease the likelihood that VRS will accurately
detect color content. The range of aggressiveness spans from 0 to 255. To increase the
likelihood that VRS will detect color content in a document, you would assign a high
value. By assigning a low value to Color Content Aggressiveness, you decrease the
likelihood that VRS will detect color content in a document.
Small Color Object Detection
If you want VRS to detect small amounts of color that appear on otherwise bitonal
documents, you can enable Small Color Object Detection. With this feature enabled,
you can use the Color Object Size Aggressiveness control to specify how aggressive
VRS should be in detecting small amounts of color. The range of Color Object Size
Aggressiveness spans from 0 to 255. To increase the likelihood that VRS will detect
small amounts of color in a document, you would assign a high value. By assigning a
low value to Color Object Size Aggressiveness, you decrease the likelihood that VRS
will detect small amounts of color in a document.
Color Background Saturation
Color Background Saturation is the ability to apply special processing to the
background of a color document. When Color Background Saturation is in effect, the
background color can be changed to black or white. The background can also be
smoothed and converted to a specific color (the smoothed color is an aggregate of the
background colors detected). If Color Background Saturation is not enabled, no
special processing is performed on the background in color documents.
Color Saturation Aggressiveness
When Color Background Saturation is in effect, you can use the Color Saturation
Aggressiveness controls to specify the aggressiveness of the background processing.
The range of aggressiveness spans from 0 to 255. To increase the likelihood that VRS
will determine that a pixel is part of the image background, you would assign a high
value. By assigning a low value to Color Saturation Aggressiveness, you decrease the
likelihood that VRS will determine that a pixel is part of the image background.
94
VRS User’s Manual
Advanced Color Processing
Color Selection
You can use the Color Selection settings to override the results of Automatic Color
Detection. Color Selection overrides apply only to the current image in a batch. You
can select the following Color Selection options:
• Color: Image is processed in color, regardless of the results of the color
detection process.
• Black & White: Image is processed in black and white, regardless of the results
of the color detection process.
• Automatic: Image color is processed according to the results of the color
detection process. This is the default selection.
VRS User’s Manual
95
Appendix F
Using the Color Tab
Use the procedure in this section to specify values for Automatic Color Detection,
Color Background Saturation, and Color Selection.
X To configure the Color tab settings
1
From the VRS Interactive Properties dialog box, select the Color tab.
Figure F-1. Color Tab
2
Select the Enable check box if you want to enable Automatic Color Detection.
If this check box is not selected, a color image is always returned when you
scan in color mode, regardless of the color content of the document.
3
Adjust the Color Content Aggressiveness setting by doing one of the
following:
• Move the slider to the left to decrease the likelihood of detecting a color
document.
• Move the slider to the right to increase the likelihood of detecting a color
document.
• Click the arrows of the text box to increase or decrease the Color Content
Aggressiveness value.
96
VRS User’s Manual
Advanced Color Processing
• Click in the Color Content Aggressiveness text box and type a value.
4
Select the Color Object Size Detection check box if you want to the function
that is used to identify small amounts of color on otherwise bitonal
documents. If this check box is not selected, the scanner may not detect small
amounts of color.
5
Adjust the Color Object Size Aggressiveness setting by doing one of the
following:
• Move the slider to the left to decrease the likelihood of detecting small
amounts of color.
• Move the slider to the right to increase the likelihood of detecting small
amounts of color.
• Click the arrows of the text box to increase or decrease the Object Size
Aggressiveness value.
• Click in the Color Object Size Aggressiveness text box and type a value.
6
Select the Enable check box to turn on the Color Background Saturation
features which you can use to modify the background of a color image. If this
check box is not selected, the background region of a color image is not
altered when it is processed.
7
You can select from the following Background Saturation options for
processing images with color backgrounds:
• White: All background color is changed to white.
• Black: All background color is changed to black.
• Smooth: All background pixels are smoothed to the same value.
8
If you selected Smooth in the previous step, the outcome will be directly
affected by the Snap To White setting, as follows:
• If Snap to White is selected and the image background is close to white,
the resulting background color is white. The exact white color is
determined by the selections in the scanner panel interface.
• If Snap to White is selected and the background is not close to white, the
background color is set to a smoothed color value determined by the
scanner.
• If Snap to White is not selected, the background color is set to a smoothed
color value that is an aggregate of the detected background colors.
9
Adjust the Color Saturation Aggressiveness setting by doing one of the
following:
• Move the slider to the left to decrease the level of background region
processing in color documents. A low value decreases the likelihood that a
pixel will be determined to be part of the image background.
VRS User’s Manual
97
Appendix F
• Move the slider to the right to increase the level of background region
processing in color documents. A high value increases the likelihood that
a pixel will be determined to be part of the image background.
• Click the arrows of the text box to increase or decrease the Color
Saturation Aggressiveness value.
• Click in the Color Saturation Aggressiveness text box and type a value.
10 You can use the Color Selection settings to override the results of Automatic
Color Detection, and they apply only to the current image in a batch. These
settings are available only if Automatic Color Detection is enabled. You can
select the following options:
• Color: Image is processed in color, regardless of the results of the color
detection process.
• Black & White: Image is processed in black and white, regardless of the
results of the color detection process.
• Automatic: Image color is processed according to the results of the color
detection process. This is the default selection.
11 If you make adjustments that you do not want to save, click Reset to clear
them and restore the default values.
12 When you are satisfied with the new Color tab settings, click OK. The settings
are saved to the profile that is currently selected.
98
VRS User’s Manual
Advanced Color Processing
Color Confidence Out of Range Warning
When using the VRS advanced color processing features, you will notice that a Color
Confidence Out of Range warning appears on the Warnings tab.
Figure F-2. Color Confidence Warning
Color Confidence Out of Range
Use this threshold to define the valid range for color confidence values. When a
document is scanned, VRS evaluates the image to determine if it is color or bitonal.
VRS also determines how confident it is that the correct assessment was made. The
confidence level is expressed as a percentage.
VRS compares the percentage to the user-defined acceptable value, which is the Color
Confidence Out of Range threshold setting on the Warnings tab. Based on this realtime evaluation, VRS either accepts the image and allows it to be passed on to the scan
application, or intercepts it and responds according to the user-defined action in the
Warnings tab.
For example, if the threshold is 50 on the Warnings tab, VRS accepts any image with a
color confidence value of 50 or higher. Therefore, an image with a color confidence
value less than 50 would fall below the valid range and generate a warning. VRS
would respond by taking the action listed on the Warnings tab for Color Confidence
Out of Range, as shown in Figure F-2.
VRS User’s Manual
99
Appendix F
Color Information on the Analysis Tab
When using the VRS advanced color processing features, you will notice that a group
box called Color Information appears on the Analysis tab. The two Color Information
values relate to the current image in the VRS Viewer:
• Detected Color: This value indicates whether or not the current image has
been processed as a color image or a bitonal image. To make the
determination, VRS takes into account the values on the Color tab in the VRS
Interactive Properties dialog box. Based on those settings and the amount of
color on the image, VRS determines whether or not the image is color or
bitonal.
• Color Confidence: This value indicates how certain VRS is about reporting the
content of an image as either color or bitonal. The Color Confidence value is
directly affected by the Color tab settings, including the color detection
aggressiveness settings.
You can review the values in the Color Information group box to help identify the
proper threshold value for color confidence on the Warnings tab, as well as the proper
settings on the Color tab. For more information, refer to Color Confidence Out of Range
Warning on page 99 or Using the Color Tab on page 96.
100
VRS User’s Manual
Advanced Color Processing
Figure F-3. Analysis Tab with Color Information
VRS User’s Manual
101
Appendix F
102
VRS User’s Manual
Index
A
About tab
contact information, 61
version information, 61
Accelerated Scanning tab, 19, 26
Action types, 25
Auto Resolve, 25
Ignore Error, 25
Interactive, 25
Intervention, 25
Return Error, 25
Admin Utility, 15, 17, 19
Advanced color processing, 93, 99
Analysis tab
color information, 99
detected image clarity, 60
dimension, 60
missing corner, 60
skew angle, 60
speckle count, 60
Annotation, 62
Annotation string
customizing, 64
Auto Brightness, 38
Auto Crop, 51
Auto Crop Failure error, 24
Auto Deskew Failure error, 24
Auto Resolve action, 25
Auto Resolve Manager, 29
Automatic color detection, 93, 96
Automatic image enhancement, 1, 38
B
Background saturation, color, 94, 97
Bar code algorithm, 85
VRS User’s Manual
Bar code engines, 85
Bar code properties
bar size, 88
codabar, 88
Interpret Bar Code, 88
search attributes, 89
Bar Code Properties dialog box, 84, 87
Bar code recognition, 87
Checksum, 89
Code 39, 88
Code 93, 88
Interleaved 2 of 5, 88
Learn, 87
Linear 2 of 5, 88
Quality, 89
Search direction, 89
Bar codes
Enhanced Bar Code engine, 84
search direction, 89
standard bar code engine, 85
standard vs. enhanced, 83
Böwe Bell + Howell Spectrum II series scanners
advanced color processing, 93
Color tab, 34
Warnings tab, 21
Böwe Bell + Howell Spectrum series scanners
accelerated scanning, 26
Advanced Properties dialog box, 59
Clarity tab, 37
long paper support, 79
non-interactive mode, 18, 81
standard color features, 69
Brightness, 38
Brightness Out of Range warning, 21
Brightness-Contrast custom control, 46
103
Index
C
E
Certified scanners, 3
Checksum, 89
Clarity tab, 37
Codabar, 85
Code 128, 85
Code 39 (3 of 9), 85
Code 93, 85
Color background saturation, 94, 96
Color confidence, 99, 100
Color Confidence Out of Range warning, 99
Color content aggressiveness, 96
Color detection, 100
Color dropout, 69
Color object size detection, 97
Color processing, 93, 99
Color saturation aggressiveness, 97
Color selection, 96
settings, 95, 98
Color tab
Böwe Bell + Howell Spectrum II
scanners, 93, 96
Böwe Bell + Howell, Fujitsu scanners, 69
Compatible scanners, 3
Configurator, scanner, 3
Configuring VRS, 15
Continuous Sheet setting, 79
Contrast, 38
Contrast Out of Range warning, 21
Cover Open error, 23
Cropping unwanted data, 71
EAN, 85
EBC, 83
Edge cleanup, 51
Edge detection, 42
EGSA firmware version, 73
Endorser string
customizing, 64
Endorsing, 62
Enhanced Bar Code engine, 83
Error types, 23
auto crop failure, 24
auto deskew failure, 24
cover open, 23
feeder timeout, 24
multifeed, 23
out of paper, 23
paper jam, 23
scanner offline, 23
scanner page sensor, 24
scanner stop key, 24
Errors tab, 19, 23
F
Feeder Timeout error, 24
Firmware versions, 73
Fujitsu scanners
Advanced Properties dialog box, 59
long paper support, 79
G
D
Default settings, 1, 5
Admin Utility, 19
Default VRS scanner, 78
changing, 78
Deskew, 51
Despeckling, 2
Detected color, 100
Detected image clarity, 60
Documentation, viii
Dropout color, 69
104
Gamma, 38
H
Hardware Warnings option, 17, 18
Help, online, viii
I
Ignore Error action, 25
ImageControls
scan source, 5
Installation Guide, viii
Interactive action, 25
VRS User’s Manual
Index
Interactive mode, 81
Interfaces
ISIS, 11
scan, 8
TWAIN, 8
Interleaved 2 of 5, 85
Interpret Bar Code option, 88
Intervention action, 25
ISIS, 8
interface, 11
scan source, 5
K
Kofax
contact information, 61
Web site, 61
Kofax scanner configurator, 3
Kofax VRS scan interfaces, 8
P
Page count, 67
Page counter, 64
Paper Jam error, 23
Patch code
left offset to center, 92
Patch Code Properties dialog box, 91
Patch code recognition, 88
Picking rectangle, 71
Postnet, 85
Preview, 15
Preview command, 16
Previewing images, 30
Profile command, 16
Profile tab, 54
Profiles, 15, 54
naming conventions, 55
Q
L
Learn option, 87
Line filter, 50
Linear 2 of 5, 85
Long paper support, 79
QC Modes, 15
Quick reference, viii
R
Manual image enhancement, 1, 46
Mode menu, 17
Multifeed error, 23
RDV utility, 75
Release notes, viii
Restore Default Values utility
installation, 75
Return Error action, 25
Rotation, 72
N
S
Noise tab, 49
Non-certified scanners, 3
Non-Interactive mode, 81
Saturation, color background, 94
Scan interfaces, 8
Scan source
ImageControls, 5
ISIS, 5
TWAIN, 5
VirtualReScan, 5
Scanner configurator, 3
Scanner Offline error, 23
Scanner Page Sensor error, 24
Scanner Properties dialog box, 79
Scanner Stop Key error, 24
M
O
Object size aggressiveness, 97
Online help, viii
Operating VRS, 5
Options tab, 58
Out of Paper error, 23
VRS User’s Manual
105
Index
Scanners
certified, 3
compatible, 3
driver version, 73
non-certified, 3
Skew tab
auto crop, 51
deskew, 51
edge cleanup, 51
fine angle adjustments, 51
Snap To White setting, 97
Speckle count, 60
Speckle removal filters, 50
Standard vs. enhanced bar codes, 83
Starting VRS, 5
Support options, ix
T
Taskbar icon, 15
Technical support, ix
Text Definition dialog box, 64
TWAIN
interface, 8
scan source, 5
U
UPC-A, 85
UPC-E, 85
V
VRS
automatic image enhancement, 1
configuration, 15
default settings, 1, 5
documentation set, viii
manual image enhancement, 1
operating, 5
standard features, 2
starting, 5
Web site, 61
VRS Administration Utility, 15, 19
VRS Advanced Properties dialog box
About tab, 73
Color tab, 69
106
Endorser tab, 62
Picking Rectangle tab, 71
Rotation tab, 72
VRS Interactive Properties dialog box, 25
About tab, 61
Analysis tab, 60
Clarity tab, 37
Color tab, 96
Noise tab, 49
Options tab, 58
Profile tab, 54
Skew tab, 51
VRS ISIS interface, 11
VRS menu, 15, 16
Admin Utility, 17
Preview, 16
Profile, 16
QC modes, 17
VRS Restore Default Values utility, 75
VRS taskbar icon, 15
VRS TWAIN interface, 8
W
Warning types, 21, 99
Brightness Out of Range, 21
Color Confidence Out of Range, 99
Contrast Out of Range, 21
Warnings tab, 19, 21
Z
Zoom menu
VRS Viewer, 33
VRS User’s Manual