1
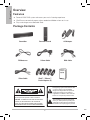
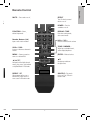
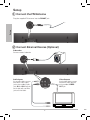
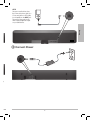
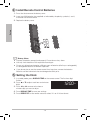
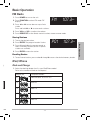
User`s Guide SBAR-51 Sound Bar and Docking Station Please read the following instructions carefully before connecting, operating or adjusting this product. Please keep this manual in a convenient place for future reference. Contents Important Safety Instructions..............................................................................................3 Re Warnings and Precautions...................................................................................................3 Ke Overview...............................................................................................................................4 Features...........................................................................................................................4 Package Contents............................................................................................................4 Front View........................................................................................................................5 Back View.........................................................................................................................6 Remote Control...............................................................................................................7 He Setup......................................................................................................................................8 Connect the FM Antenna................................................................................................8 Connect External Devices...............................................................................................8 Connect Power................................................................................................................9 Install Remote Control Batteries..................................................................................10 Setting the Clock...........................................................................................................10 Do app Basic Operation................................................................................................................... 11 FM Radio........................................................................................................................ 11 Storing Stations....................................................................................................... 11 Recalling Station..................................................................................................... 11 Playing an iPod / iPhone............................................................................................... 11 Dock and Charge your iPod / iPhone..................................................................... 11 Playing an iPod / iPhone.........................................................................................12 Audio Settings...............................................................................................................12 3D Sound.................................................................................................................12 Adjusting Bass and Treble.......................................................................................12 Display Brightness..................................................................................................12 Select Source.................................................................................................................13 Pro con Additional Information.......................................................................................................13 Troubleshooting............................................................................................................13 Specifications................................................................................................................13 FCC Information............................................................................................................14 Limited Warranty...........................................................................................................14 Fol Do Cle Do ins Do plu bla you rep On Us ma cau fro Un lon Re app dam has A redu rem pro ma be c Important Safety Instructions .......3 1. Read these instructions. .......3 2. Keep these instructions. .......4 .......4 .......4 .......5 .......6 .......7 3. Heed all warnings. .......8 .......8 .......8 .......9 .....10 .....10 8. Do not install near any heat sources such as radiators,heat registers,stoves,or other apparatus (including amplifiers) that produce heat. 4. Follow all instructions. 5. Do not use this apparatus near water. 6. Clean only with dry cloth. 7. Do not block any ventilation openings.Install in accordance with the manufacturer’s instructions. 9. Do not defeat the safety purpose of the polarized or grounding-type plug. A polarized plug has two blades with one wider than the other. A grounding type plug has two blades and a third grounding prong. The wide blade or the third prong are provided for your safety. If the provided plug does not fit into your outlet, consult an electrician for replacement of the obsolete outlet. ..... 11 ..... 11 ..... 11 ..... 11 ..... 11 ..... 11 .....12 .....12 .....12 .....12 .....12 .....13 10.Protect the power cord from being walked on or pinched particularly at plugs, convenience receptacles, and the point where they exit from the apparatus. .....13 .....13 .....13 .....14 .....14 Warnings and Precautions 11.Only use attachments/accessories specified by the manufacturer. 12.Use only with the cart,stand, tripod, bracket,or table specified by the manufacturer,or sold with the apparatus.When a cart is used, use caution when moving the cart / apparatus combination to avoid injury from tip-over. 13.Unplug this apparatus during lightning storms or when unused for long periods of time. 14.Refer all servicing to qualified service personnel. Servicing is required when the apparatus has been damaged in any way, such as power-supply cord or plug is damaged, liquid has been spilled or objects have fallen into the apparatus, the apparatus has been exposed to rain or moisture,does not operate normally, or has been dropped. CAUTION: TO PREVENT ELECTRIC SHOCK, MATCH WIDE BLADE OF PLUG TO WIDE SLOT, AND FULLY INSERT PLUG. To reduce the risk of electric shock, do not remove cover (or back). There are no userserviceable parts inside. Please refer any servicing to qualified service personnel. WARNING: Using this product near fluorescent lighting may cause interference with of the remote. If the product is displaying erratic behavior, move away from any fluorescent lighting. The product shall not be exposed to dripping or splashing and that no objects filled with liquids such as vases, shall be placed on apparatus. The mains plug is used as the disconnect devide. It shall remain readily operable and should not be obstructed druing intended use. To be completely disconnected the apparatus from supply mains, the main plug of the product shall be disconnected from the mians socket outlet completely. Overview Overview Features Powerful 50W RMS system enhances your music listening experience iPod Drawer conveniently opens when needed and hidden when not in use Plays and charges most dockable iPods Package Contents Soundbar Remote Control AC Adapter FM Antenna 3.5mm Cable RCA Cable CAUTION A User’s Guide Video Cable ! WARNING: To reduce the risk of fire or shock hazard, do not expose this product to rain or moisture. iPod™ / iPhone™ CAUTION: Dock Adapters (5) TO REDUCE THE RISK OF ELECTRIC SHOCK, DO NOT REMOVE THE COVER OR BACK. NO USER-SERVICEABLE PARTS INSIDE. REFER SERVICING TO QUALIFIED PERSONNEL. CAUTION A RISK OF ELECTRIC SHOCK DO NOT OPEN This lightning symbol is intended to alert you to the presence of uninsulated, dangerous voltage within this product’s enclosure that might be of sufficient magnitude to constitute a risk of electric shock. Do not open the product’s case. ! WARNING: To reduce the risk of fire or shock hazard, do not expose this product to rain or moisture. CAUTION: TO REDUCE THE RISK OF ELECTRIC SHOCK, DO NOT REMOVE THE COVER OR BACK. NO USER-SERVICEABLE PARTS INSIDE. REFER SERVICING TO QUALIFIED PERSONNEL. This lightning symbol is intended to alert you to the presence of uninsulated, dangerous voltage within this product’s enclosure that might be of sufficient magnitude to constitute a risk of electric shock. Do not open the product’s case. The exclamation symbol is intended to ! The exclamation symbol is intended to inform you that important operating and maintenance instructions are included in the literature accompanying this product. POWER Turn your soundbar on and off FUNCTION Select FM radio, iPod, IN1, IN 2, or AUX mode EFFECT Turn 3D virtural sound effect on and off, press and hold for 8 seconds to reset settings to default in standby mode VOL– / VOL+ Decrease and increase volume AUX 3.5 mm line input jack to connect addtional sound devices !Start hazard, TRIC SIDE. NNEL. iPhone / iPod Dock Select and insert the docking adapter for your iPhone/iPod model, then insert your iPhone or iPod alert ct’s ctric se. to and ed in duct. Press to open Overview Front View Overview Back View FM ANT Connect FM antenna SUB OUT Connect an external subwoofer STEREO RCA INPUT Connect to the audio output jacks on your external device (TV, DVD, game system, etc.) VIDEO OUT Connect to the video output jacks on your external device DC IN 15V Connect supplied DC15V power cord // Mount your Speaker (Optional) 1. Use 2 screws (not supplied) with heads no bigger than the mount holes on your speaker. 2. Place the mount holes and slide down to secure the speaker. MUTE – Turn sound on or off EFFECT Turn 3D virtual surround effect on or off POWER – Turn the soundbar on or off. FUNCTION – Select desired input mode DISPLAY / TIME Enter time setting mode, view current mode. Number Buttons (0-9) Input a radio station number. VOL + / VOL – Increase or decrease the volume SUB + / SUB – Increase or decrease subwoofer volume TONE / DIMMER – Adjust bass and treble levels, select display brightness. MENU – Return to previous menu on a docked iPod. ENTER – Make selections //; Navigate up and down through menus REPEAT / ST Select repeat options from a docked iPod, select stereo or mono sound in FM radio mode. SHUFFLE – Play tracks from your iPod / iPhone in random order. Navigate left and right through menus, play, pause, skip forward or skip backward in iPod mode. Overview 5V pplied wer cord Remote Control Setup 1 Connect the FM Antenna Setup Plug the supplied FM antenna into the FM ANT jack. 2 Connect External Devices (Optional) C Subwoofer Connect an external subwoofer Audio Inputs Use an audio cable to connect each device’s audio output jacks to the soundbar’s audio jacks, IN 1 or IN 2. Red jacks are for right audio, and white jacks are for left audio. Video Outputs Use the video cable to connect each device’s video input jack to the soundbar’s VIDEO OUT jack. AUX Connect an audio device using the 3.5mm mini-phono cable, or a 3.5 mm mini phono to RCA cable (not included) into the AUX jack. Connect the other end into the audio output/headphone output on your audio device. Setup 3 Connect Power connect ut jack EO 4 Install Remote Control Batteries 1. Press the tab to remove the battery cover. 2. Insert two AAA batteries (not supplied) as indicated by the polarity symbols (+ and –) marked on the remote control. Pre . Pre dis 3. Replace the battery cover. . Pre sta Setup Pre . Pre . Pre . Pre AAA AAA Tun . Pre sel sta . Pre b Battery Notes: To Dispose of batteries promptly and properly. Do not burn or bury them. Use only fresh batteries of the required size and type. Do not mix old and new batteries, different types of batteries (alkaline, or rechargeable), or rechargeable batteries of different capacities. Se If you do not plan to use the remote control for a long time, remove the batteries. Re Batteries can leak chemicals that can damage electronic parts. 5 Setting the Clock A 10 1. In standby mode, press DISPLAY/TIME on the remote control. The first hour digit flashes. 2. Press or to adjust each hour and minutes digits. 3. Press or to move to the hour or minutes digit you want to adjust. 12:00 AM 13 14 4. Press DISPLAY/TIME to save your settings. 5. Press REPEAT/ST on the remote control to select 12 h or 24 h time format. 15 16 10 Basic Operation d –) 1. Press POWER to turn on the unit. 2. Press FUNCTION to select FM mode. FM displays. 3. Press or station. FM 107.3 MHz to tune down or up to find a Press and hold or to auto search stations. 4. Press VOL + or VOL – to adjust the volume. 5. Press REPEAT/ST on the remote control to select stereo or mono mode. Storing Stations 1. Tune to the desired station. 2. Press ENTER. The program location flashes. P01 107.3 MHz 4. Press ENTER to store the station. Recalling Station 1. To recall stored stations, press number 0 through 9 to access the desired memory location. iPod/iPhone Dock and Charge 1. Select the docking adapter that fits your iPod/iPhone model. t AM Refer to the number marked on the adapters: Adapter No. Compatible Models 10 Video 60G/80G & Classic 10G 13 Nano 3G 14 Touch 1G 15 iPhone 3G 16 Touch 2G 11 Basic Operation 3. Press 0 through 9 on the remote control to select a memory location (total of 10 preset stations are available). eable), 0 FM Radio 2. Snap the adapter into the docking station. 3. Plug your iPod / iPhone into the adapter. play Playing Tracks Pre 1. Dock your iPod / iPhone. 2. Press POWER to turn on the soundbar. 3. Press FUNCTION to select iPod mode. IPOD displays. IPOD Basic Operation 4. Press ; to start and pause iPod / iPhone playback. Press or Press and hold or to skip to the previous track or to the next track. to search backwards or forwards in the current track. Press REPEAT/ST to select repeat the current track, repeat album or playlist or repeat off. Press SHUFFLE to play tracks in an album randomly in your iPod/iPhone. Press MENU to access the docked iPod menu. Press or to navigate iPod / iPhone menus. so n Note: Your iPod / iPhone must be updated with the latest firmware from Apple in order for it to work properly with your sound bar. Audio Settings 3D Sound Press EFFECTS to turn 3D sound on and off. 3D ON F Adjusting Bass and Treble 1. Press TONE/DIMMER on the remote control until the display shows BASS or TREB. BASS 00 2. Press VOL + or VOL – to adjust to the desired level. Display Brightness 1. Press TONE/DIMMER on the remote control until the display shows DIMMER level. Re DIMMER2 2. Press VOL + or VOL – to adjust to the display brightness to the desired level. 12 dB .