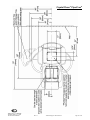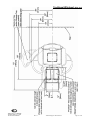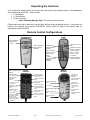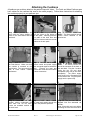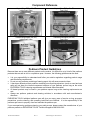
1
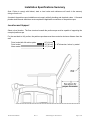
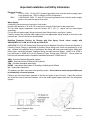
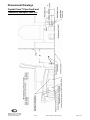
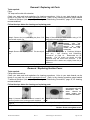
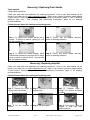
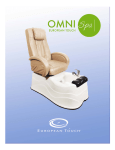
The World's Finest Pedicure Spas
OWNER’S MANUAL
FORTE’ SPA
&
ALTERA SPA
CRYSTAL CLEAN PIPE-FREE
&
TRADITIONAL WHIRLPOOL
Document ID:06080001
Rev: G
Technical Support: 800-626-6912
Page 1 of 24
European Touch - Limited Warranty
EUROPEAN TOUCH manufactures the Forte and Altera Whirlpool Pedicure Spas with the highest standards for
quality materials and workmanship accordingly; EUROPEAN TOUCH expressly warrants its products as follows:
To the original owner of the Forte or Altera Whirlpool Pedicure Spa (herein called “pedicure spa”): EUROPEAN
TOUCH may repair or replace, at its option, any pedicure spa found to be defective in material or workmanship
upon inspection by an authorized representative of EUROPEAN TOUCH. This limited warranty covers the following
components for the following time periods:
• Recirculating Pump: 24 months from date of shipment from manufacturer’s facility.
• All other components: 12 months from date of shipment from manufacturer’s facility.
The exchange of a pedicure spa is limited to supplying a replacement pedicure spa of comparable style and size.
EUROPEAN TOUCH may, at its own discretion, use refurbished parts or pedicure spas for replacement purposes.
Owner must pay all labor and shipping charges necessary to replace or repair the pedicure spa. NO
CONSEQUENTIAL, INCIDENTAL, CONTINGENT, COMPENSATORY, INDIRECT, SPECIAL, OR OTHER
DAMAGES WILL BE ALLOWED WHATSOEVER. This limited warranty is null and void if the pedicure spa is
removed from its place of initial installation, or is not installed in accordance with the specifications of European
Touch or federal, state or local codes and ordinances. Furthermore, this warranty does not apply if the pedicure spa
has been subject to misapplication, improper installation or maintenance, negligence, improper cleaning or other
circumstances beyond EUROPEAN TOUCH’s control.
NOT COVERED:
1. Damage to pump parts and/or motor parts due to obstruction in plumbing lines, etc.
2. Staining, fading or discoloration of plastic surfaces due to exposure and/or the use of harmful cleaning
agents or chemicals.
3. Staining, fading or discoloration caused by improper or poor water additives not related to maintenance of
proper water are not covered by this warranty.
4. Malfunctions or damage caused by improper installation; including, but not limited to, failure to meet local
and state plumbing, electrical, and building codes.
5. Staining, fading or discoloration of the vinyl seat, armrests, or footrest.
6. Damage resulting from standing in the basin.
7. Freight damage, misuse, modification, neglect, accident, natural disaster, and abuse.
8. Unauthorized repairs.
9. Damage while in possession of any party other than European Touch.
Should service be required for any reason of any defect or any malfunction during the warranty period, please
contact:
EUROPEAN TOUCH
Technical Support
Toll-Free: 800-626-6912
Phone: 414-357-7016
Fax: 414-357-6360
[email protected]
http://www.europeantouch.com
The owner agrees by using this pedicure spa (a) that the obligation of EUROPEAN TOUCH shall not extend to
indirect or contingent damages, or injury, which may result from such use and (b) that the obligations of
EUROPEAN TOUCH are limited to those set forth herein. This limited warranty is the exclusive remedy and is in
lieu of all other warranties, express or limited, including, but not limited to, any implied warranty of merchantability
or fitness for a particular purpose. No dealer or other person has any authority to bind EUROPEAN TOUCH to
changes or additions to this warranty or its products. Accordingly, EUROPEAN TOUCH is not responsible for any
such warranties or representations.
OTHER PROVISIONS:
• This limited warranty is limited to the original owner/end-user and is not transferable.
• European Touch shall not be liable for any other obligations or liabilities, including, but not limited to,
obligations or liabilities arising out of breach of contract or warranty, negligence, or other tort or any theory
of strict liability with respect to the pedicure spa or the acts or omissions of European Touch.
Any assistance European Touch provides to the original owner outside the terms, limitations or exclusions of this
limited warranty will not constitute a waiver of search terms, limitations or exclusions, nor will such assistance
extend or revive the warranty.
Document ID:06080001
Rev: G
Technical Support: 800-626-6912
Page 2 of 24
Certificate of Compliance
For
European Touch
8301 W. Parkland Court
Milwaukee, WI
U.S.A. 53223
For Compliance of:
Equipment: Whirlpool Pedicure Spa
Model No.: SOLACE – PF & SOLACE – PF PDP
Rated:
220-240VAC, 50Hz, 7.5A
To the following standard(s):
EN60335-1:2002
EN60335-2-32:2002
EN 55014-1 (Generic): 2001
EN 55014-2 (Generic): 2003
EN61000-4-2 (Criteria C): 2001
EN61000-4-3:2002
EN61000-4-4: 1995
EN61000-4-5: 2001
EN610004-6: 2001
EN61000-4-11: 2004
Project No.:
Issue Date:
8311-1
December 30, 2005
Expiry Date:
December 30, 2008
Issued by:
President
ONE STOP GLOBAL CERTIFICATION SOLUTIONS
Refer to project file for complete information on Certificate
Document ID:06080001
Rev: G
Technical Support: 800-626-6912
Page 3 of 24
OWNERS MANUAL For
Whirlpool Pedicure Spa Models:
FORTE’ and ALTERA
Important Information
Serial Number:
W/O Number:
Installed by:
Installation Date:
Serial Number
W/O Number
Note: Vietnamese and Korean translations available upon request.
Document ID:06080001
Rev: G
Technical Support: 800-626-6912
Page 4 of 24
Table of Contents
European Touch - Limited Warranty ...........................................................................................2
Certificate Of Compliance...........................................................................................................3
Important Information .................................................................................................................4
Introduction.................................................................................................................................6
Important Requirements .............................................................................................................6
Precautions .............................................................................................................................6
Health Risk Warning ...............................................................................................................6
Installation Specifications Summary ...........................................................................................7
Location And Support..............................................................................................................7
Important Installation And Utility Information ..............................................................................8
Dimensional Drawings ................................................................................................................9
Crystal Clean™ Pipe-Free® And Traditional Whirlpool (With Jets).........................................9
Crystal Clean™ Pipe-Free® ....................................................................................................10
Traditional Whirlpool (With Jets) ...........................................................................................11
Specifications ...........................................................................................................................12
Unpacking The Cushions..........................................................................................................14
Remote Control Configurations ................................................................................................14
Attaching The Cushions............................................................................................................15
Component Reference..............................................................................................................16
Pedicure Product Guidelines ....................................................................................................16
Crystal Clean™ Pipe-Free® Spa - Operating Instructions..........................................................17
Crystal Clean™ Pipe-Free® Spa - Cleaning And Disinfecting Procedures.................................18
Traditional Whirlpool (With Jets) - Operating Instructions.........................................................19
Traditional Whirlpool (With Jets) - Spa Cleaning And Disinfecting Procedures ........................20
Removal / Replacing Jet Parts..............................................................................................21
Removal / Replacing Suction Cover .....................................................................................21
Removing / Replacing Drain Handle .....................................................................................22
Removing / Replacing Impeller .............................................................................................22
History And Notes.....................................................................................................................23
Document ID:06080001
Rev: G
Technical Support: 800-626-6912
Page 5 of 24
Introduction
Thank you for selecting EUROPEAN TOUCH, the leading designer, manufacturer, and marketer of
pedicure spas in North America. The Forte’ and Altera pedicure spas (herein referred to as pedicure
spa) are innovative whirlpool pedicure spas that have been designed to serve you dependably for many
years. Please take time to thoroughly read this entire manual before installation and use. If you have
any problems or have questions regarding your pedicure spa, please contact EUROPEAN TOUCH’s
Technical Support Department at 1-800-626-6912, Monday through Friday 8 AM to 5 PM CST. After
hours calls are recorded and attended to the next business day.
Important Requirements
EUROPEAN TOUCH requires that you contact a local, licensed plumber and licensed electrician to
install your new pedicure spa. Installation must be in compliance with all your local and state building
codes. Your pedicure spa cannot operate efficiently or safely unless it is provided with adequate
electrical power, sufficient water pressure, proper water temperature, and required drainage
capabilities. Contact your local building inspector for information and local code compliance
procedures that need to be followed when having your pedicure spa installed. Subsequent inspections
and approvals that may be required are the responsibility of the purchaser. (See limited warranty
regarding incidental or consequential exclusions – page 2).
Precautions
•
•
•
•
•
•
Do not stand in the basin of the pedicure spa!
Excessive water temperature is dangerous and should be checked before use.
Maximum operating water temperature should not exceed 105° F (41° C) and the
maximum supply water temperature should not exceed 150° F (66° C).
Always enter and exit the pedicure spa slowly and carefully.
Close side arms rests before operating the chair seat movement.
Never bring or operate any electrical devices into or near the pedicure spa.
This pedicure spa has a weight capacity of 250 pounds (113.4kg).
Health Risk Warning
Individuals whose feet or legs are inflamed or have open wounds should not be allowed to use
the pedicure spa at any time. Nail technicians should advise clients to consult their physician
before using the pedicure spa if there is any sign of fungal infection, swelling, fracture, or
persistent pain. In some cases diabetics may experience improved circulation in their feet, but
should first consult their physician prior to receiving a pedicure. If the client experiences any
pain or discomfort, immediately discontinue the use of the pedicure spa.
Your client’s massage and pedicure spa experience should be pleasant and comfortable.
Document ID:06080001
Rev: G
Technical Support: 800-626-6912
Page 6 of 24
Installation Specifications Summary
Note: Failure to comply with federal, state or local codes and ordinances will result in the warranty
being null and void.
As stated, the pedicure spa installation must comply with all plumbing and electrical codes. A licensed
plumber and licensed electrician must complete the applicable connections of the pedicure spa.
Location and Support
Select a level location. The floor structure beneath the pedicure spa must be capable of supporting the
occupied pedicure spa.
For the seat back to fully recline, the pedicure spa base must be mounted a minimum distance from the
wall:
Forte’ model with full recline option
Forte’ model
Altera model
Document ID:06080001
Rev: G
25” (64 cm)
18” (46 cm)
12” (31 cm)
= “X” dimension, below, by model.
Technical Support: 800-626-6912
Page 7 of 24
Important Installation and Utility Information
Electrical Service:
110V:
A 110V, 60 Hz, 15 Amp GFCI protected grounded circuit must be used to supply power
to the pedicure spa. (220V if ordered in 220V configuration)
220V:
A 220-240VAC, 50Hz, 7.5 Amp GFCI protected grounded circuit must be used to supply
power to the pedicure spa per local code.
Water Supply:
All plumbing connections must conform to local codes.
Normal water pressure of 30 to 80 PSI is required to correctly fill the basin to the proper level.
°
°
The hot water supply temperature must not exceed 150 F (65 C). Adjust your hot water heater
accordingly.
For hot and cold water supply fittings and power drain fittings location, see figure 1 below.
Carefully connect the incoming water supply lines to the appropriate fittings located on the back of the
pedicure spa. Shut-off valves are recommended.
Backflow Protection Devices for Faucets with Side Spray: Check valves comply with
ANSI/ASME A112.18.3M, A112.18.1M, and CSA B125
ANSI/ASME A112.18.3M (Performance Requirements for Backflow Protection Devices and Systems in
Plumbing Fixture Fittings) is applicable to plumbing fixture fittings with outlets not protected by an air
gap. Included in the possible range of applications are fittings with hose connected outlets, fittings with
pullout spout, hand held showers, shampoo fittings and deck-mounted fittings. ASME A112.18.3M is
now referenced in ASME A112.18.1M (Plumbing Fixture Fittings) and CSA B125. Check valves are
listed to both standards with the Canadian Standards Association, IAPMO and UL.
ANSI - American National Standards Institute
ASME - American Society of Mechanical Engineers
CSA - Canadian Standards Association
IAPMO - International Association of Plumbing and Mechanical Officials
UL - Underwriters Laboratory
The pedicure spa drain must meet local plumbing codes. Check valve for drain (not provided) must
be installed by a licensed plumber.
Pedicure spa must be securely fastened to the floor as shown in figure 2 below. Fasten the pedicure
spa to the floor with at least two fasteners, one in the middle plastic support and one in the rear plastic
support.
Back of Pedicure Spa
Install Fasteners Here
Figure 1
Document ID:06080001
Figure 2
Rev: G
Technical Support: 800-626-6912
Page 8 of 24
Dimensional Drawings
Crystal Clean™ Pipe-Free® and
Traditional Whirlpool (With Jets)
Document ID:06080001
Rev: G
Technical Support: 800-626-6912
Page 9 of 24
Crystal Clean™ Pipe-Free®
Document ID:06080001
Rev: G
Technical Support: 800-626-6912
Page 10 of 24
Traditional Whirlpool (With Jets)
Document ID:06080001
Rev: G
Technical Support: 800-626-6912
Page 11 of 24
Specifications
Hot and cold water supply lines required (hot and cold shut offs may be installed under pedicure spa
base) See pages seven through ten.
Drain installation:
references noted on pages seven through ten, can be installed with optional
power drain pump or as gravity drain.
Overall dimensions without accessories, seat upright: 54" (138cm) L x 31" (79cm) W x 56" (143cm) H*
Without accessories, seat collapsed: (shipping position): 54" (138cm) L x 32" (82cm) W x 36" (92cm) H*
Shipping dimensions:
55" (140cm) L x 33" (84cm) W x 41" (105cm) H*
Empty weight:
150 Ibs (68kg)*
Shipping weight:
205 lbs (93kg)*
Capacity of basin:
5 U.S. Gallons (18.9L) = Traditional Whirlpool (with Jets)*
6.5 U.S. Gallons (25.6L) = Crystal Clean™ Pipe-Free®*
Whirlpool pump motor: 110V: 1/6 HP, 110V, 60HZ (alternate voltages available) (3/4 HP for Traditional
Whirlpool - with Jets)
220V: 1/6 HP, 110V, 50Hz (alternate voltages available) (3/4 HP for Traditional
Whirlpool - with Jets)
Forte’ seat and back motors: 30V DC Linear Actuators. Forte’ requires 18” (46 cm) of space between
pedicure spa and wall with standard actuator, and 25" (64 cm) with fully-reclining
actuator.*
Altera seat and back movement: 2 infinitely adjustable lockable gas cylinders for reclining/sliding. The
Altera requires 12" (31cm) of space between pedicure spa and wall in order for
seat to recline to its fullest extent.*
Massage motor:
12V AC, Adapter included (alternate voltages available)
Power source:
110V: 110V AC / 15 Amp, 60 Hz (GFCI Protected)
220V: 220-240VAC, 50Hz, 7.5 Amp (GFCI Protected)
Caution: Pedicure spa must be installed by a licensed electrician and a licensed plumber,
conforming to all local and national electrical codes.
Construction:
Linear Low Density Polyethylene (LLDPE), self-contained, pre-plumbed
Pipe-Free® water massage system (pipe-free pedicure spas): 'underfoot' footplate
water massage grooves, no closed loop circulating pipes, 100% fully drained,
and cleanable
Hydro-Therapeutic (Jet System: Traditional Whirlpool pedicure spas): PVC, two (2) fully-directional
jets, built-in air control
Electrical switches:
On/Off switch for whirlpool pump. Hand-held low voltage remote controls for
massage motors, heat, and seat/back position. Hot and Cold water supply lines
required.
UL listed/CE certified:
Complies with ASME/ANSI Whirlpool Bathtub Specs ASME/ANSI A112.19 7M1995 and A112.19.8M-1995. Backflow Protection Devices for Faucets with Side
Spray: Check valves comply with ANSI/ASME A112.18.3M, A112.18.1M, and
CSA B125.
Performance Limits: 1. This unit may loose one ore more functions when electrostatic contact
discharge in excess of 4KV gets into accessible conductive part of the unit and
can be restored by resetting the unit.
2. This unit may loose one ore more functions when power surge in excess of
2KV is applied to the AC input power port and can be restored by resetting the
unit.
3. This unit may loose one ore more functions when subjected to fast transient
voltages in excess of 0.5KV at 5 KHz repetition frequency and can not be
restored.
Crystal Clean
™
Limited warranty:
One (1) year from date of purchase.
Due to our policy of continuous improvements, all specifications are subject to change without notice.
*Note: All dimensions and weights are approximate
Document ID:06080001
Rev: G
Technical Support: 800-626-6912
Page 12 of 24
Attaching the Seat Back
Your pedicure spa shipped with the seat bottom and seat back already attached to the base. Follow
these instructions to connect the seat back to the pedicure spa:
Forte’
Altera
Step 1: Remove the hitch and clevis pins located Step 1: Remove the hitch and clevis pins
on the seat back mounting bracket on the back of located on the seat back mounting bracket on
the chair.
the back of the chair.
Step 2: Slide the seat bracket into the black end Step 2: Line up the hole on the seat bracket with
on the linear actuator, and line up the holes.
the hole on the cylinder end.
Step 3: Slide the clevis pin through the holes and Step 3: Slide the clevis pin through the holes
secure by inserting the hitch pin through the and secure by inserting the hitch pin through the
small hole on the clevis pin.
end hole on the clevis pin.
Document ID:06080001
Rev: G
Technical Support: 800-626-6912
Page 13 of 24
Unpacking the Cushions
Your cushion set is packaged in its own box within the pedicure spa shipping carton. All needed parts
are located inside of this box. These include:
• (1) Seat Back
• (1) Seat Bottom
• (2) Arm Cushions
o Altera Vibration Massage Only: The remote and junction box
Please make sure that all parts are removed from the box before discarding the box. If any parts are
missing, the customer must contact EUROPEAN TOUCH within 30 days of the delivery date for
replacement at 800-626-6912.
Remote Control Configurations
Forte’
Forte’/Altera
Seat Movement
Roller
Recline Seat Back:
Tilt Backward or
Forward.
Move Seat Bottom:
Slide Forward or
Backward.
Timer (15 min or 30
min).
Indicates that
Vibrate Feature is
Activated.
Indicates that Roller
Feature is Activated.
Area of Vibration:
Zone 1 = Upper.
Zone 2 = Lower.
Type of Vibrating
Massage: (Surge,
Steady, Pulse,
Wave).
Increase or
Decrease Intensity
of vibrating
massage.
Moving Display indicates
speed and pattern of Back
Massage.
Numerical Display
shows intensity levels.
LEDs show type of
FULL-BODY
Massage.
Select from 5 types of
FULL-BODY
Massages as
indicated by LEDs
above.
Adjust intensities Up
or Down.
Power On/Off:
automatically selects
15 min timer. Holding
switch for over 3
seconds activates 30
min timer as indicated
by LED above.
Document ID:06080001
Increase or
Decrease Speed of
vibrating massage.
Forte’
Altera
Vibration
Vibration
Numerical Display
indicates ten levels
of wave speed.
LED Shows
Massage Zone
Activated.
LED shows selected
Timer.
LED Shows Selected
Massage Time.
LED shows selected
Heat setting.
Select from 5 types
of BACK Massages
as indicated by LEDs
above.
Adjust Wave Speed
Up or Down.
Select Hi or Lo Heat
as shown by LEDs
above.
Rev: G
Activates the Massage
Zone 1.
Power On/Off.
Activates Massage
Wave.
Adjusts Intensity Up or
Down.
Activates the
Massage Zone 2.
Timer Selects
(Indicated in LEDs
Above).
Sets Massage on
Steady.
Adjusts Sensate Up
or Down.
Adjusts Speed Up or
Down.
Technical Support: 800-626-6912
Page 14 of 24
Attaching the Cushions
All pedicure spa cushions attach to the pedicure spa with Velcro. The Forte' and Altera Pedicure spas
have cables for the cushions that need to be routed properly. Follow these instructions for attaching
the cushions properly to your pedicure spa:
Step 1: Your pedicure spa will
come with the Velcro already in
place for the seat bottom and the
seat back.
Step 4: Remove the protective film
from the Velcro on the bottom of
the arm pads. Carefully place the
arm pads on the chair arms and
slide the remotes under the remote
holders on the arm pads.
Step 7: ALTERA VIBRATION
ONLY – The Altera cushion remote
control comes attached to the
junction box.
Step 2: Attach the seat bottom to
the chair bottom. Make sure that
the cushion is centered on the
chair bottom. The arms should be
able to close without cushion
interference.
Step 5: FORTE' ONLY – The
remote control and power supply
cord are taped together behind the
chair.
Remove the tape and
connect the cords from the cushion
to these connectors.
Step 8: ALTERA VIBRATION
Step 3: Route the seat back
cushion cables underneath the
chair back and out the back.
Center the seatback cushion on
the chair back.
Step 6: FORTE' ONLY – Route
the seat back cables through the
hole in the pedicure spa base.
Step 9: The remotes can be
slipped into the armrests as
shown.
Document ID:06080001
ONLY – The Altera junction box
should be mounted on the back of
the seat back. Plug the 2 cushion
cords into the red and white
receptacles (they can go into either
receptacle).
The power supply
cord plugs into the receptacle next
to the remote cord. Plug the power
supply into the power strip.
Note: Close side arms rests before
operating the chair seat movement.
Rev: G
Technical Support: 800-626-6912
Page 15 of 24
Component Reference
Crystal Clean™ Pipe-Free®
Inside Basin View
Crystal Clean™ Pipe-Free®
Front View
Traditional Whirlpool (with Jets)
Inside Basin View
Traditional Whirlpool (with Jets)
Front View
Pedicure Product Guidelines
Because there are so many different products on the market, it is difficult for us to list all of the pedicure
products that are safe to use in our pedicure spas. However, the following guidelines can be used:
•
•
•
•
•
It is your responsibility to understand and follow your state’s regulations regarding product usage
and disinfecting requirements.
Do not use any products containing a foaming agent; this will cause excessive foam.
It has been determined that products containing non-dissolving abrasives (such as sand and sea
salts) will not harm the internal component structure of your pedicure spa as long as the entire
EUROPEAN TOUCH cleaning requirements are followed without deviation.
Oil based products may be used in your pedicure spa as long as the cleaning requirements are
met.
Always use pedicure products and cleaning solutions in accordance with each manufacturer's
directions.
EUROPEAN TOUCH whirlpool pedicure spas will give you many years of service as long as proper
precautions, precise cleaning, and operating instructions are followed. It is the responsibility of the
pedicure spa owner to properly clean and maintain the pedicure spa.
If you are experiencing problems cleaning your pedicure spa, please contact the manufacturer of your
pedicure products or EUROPEAN TOUCH Technical Support at 800-626-6912.
Document ID:06080001
Rev: G
Technical Support: 800-626-6912
Page 16 of 24
Crystal Clean™ Pipe-Free® Spa - Operating Instructions
Preparing the Pedicure Spa for Operation:
After the pedicure spa is installed and the plumbing and electrical connections are made, clean and
disinfect the basin before initial use. Rinse the basin by using the attached water sprayer. Wipe the
basin dry with a clean towel.
To Operate the Pedicure Spa, Follow These Easy Steps:
Adding Water to the Pedicure Spa Basin:
1. Close the drain by turning the chrome drain handle counter-clockwise until it stops.
2. Add water to the basin by lifting upward on the water faucet fill handle. Turn the handle in a
counter-clockwise direction for cold water or clockwise for warm water as indicated by the red
(hot) and blue (cold) markings around the handle (CAUTION: hot water can burn skin). Continue
to add water until the fill line is reached. The fill line is indicated by the wavy (~~~~) line in the
basin.
3. Turn the off water by pushing the handle downward and center.
Operating the Crystal Clean™ Pipe-Free® System:
The Crystal Clean™ Pipe-Free® System eliminates pipes and jets that can harbor harmful bacteria while
at the same time delivering a soothing, quality foot massage. This unique system is driven by an
impeller that pulls water through the inlet cover and then forces the water outward through key
massage zones in the footplate. The end result is a soothing massage delivered to all areas of the foot:
front, back and bottom.
To start or stop the whirlpool, depress the On/Off button labeled “Jets” (NOTE: An indicator light on
the “Jets” button flashes when the footplate is improperly installed, or the basin contains no
water. As a result, the whirlpool will not function. To fix, simply check that the footplate is
securely fastened or add water to the basin).
Removing Water from the Pedicure Spa Basin:
First, make certain the whirlpool jets are turned off by turning the On/Off switch counter-clockwise to the
“Off” position.
If the pedicure spa is hooked up directly to a floor drain, simply open the drain by turning the drain
handle in a clockwise direction until it stops. You should see the water level lowering as water exits the
basin.
If the pedicure spa is equipped with the optional Power Drain Pump (PDP) feature, open the drain by
turning the drain handle in a clockwise direction until it stops. Press the button marked “Drain” on the
front panel. The water level will lower as water is pumped out of the basin. Turn the pump off by
pressing the “Drain” button on the front panel once the basin is fully drained (NOTE: the PDP will
automatically shut off after 2-1/2 minutes. We recommend turning off the pump manually if all
water has drained before automatic shut-off. Drain pump may overheat if operated more than
10 minutes in a 45 minutes period).
Warning:
It is extremely important to follow the cleaning instructions located on the following page.
Failure to clean the pedicure spa adequately can result in serious health issues for your clients
as well as the nail technician. Failing to clean your pedicure spa may also cause the pedicure
spa to not work properly. Always consult your local and state codes concerning pedicure chair
cleaning for further requirements.
Document ID:06080001
Rev: G
Technical Support: 800-626-6912
Page 17 of 24
Crystal Clean™ Pipe-Free® Spa - Cleaning and Disinfecting
Procedures
Always check with your state board for required cleaning and disinfecting procedures.
It is extremely important to clean and disinfect your pedicure spa after each pedicure, after the last pedicure of
the day, and once a week for overnight cleaning. Regular cleaning will help keep your pedicure spa in good
working condition. Proper and continuous cleaning will kill harmful bacteria and germs that can cause infection.
To clean the pedicure spa, follow these easy steps:
After Each Pedicure:
1. Drain water from the pedicure spa by turning the drain handle to the “Open” position.
2. Loosen the footplate by turning the footplate Knobs in a counter-clockwise direction. Remove the
footplate from the basin by lifting upward on the inlet cover. (NOTE: Gently press down on the
footplate center when loosening the footplate Knobs, as this will relieve pressure and help loosen
the Knobs.)
3. Remove all debris from the basin.
4. Clean all the surfaces of the basin and all components, as well as the top and bottom of the footplate and
both Knobs. Use low-sudsing soap or detergent and a non-abrasive brush. Remove all visible residue
from the inside of the basin and all other components. Clean off sensor on bottom of basin.
5. Rinse the basin with clean water using the sprayer.
6. Disinfect all components, surfaces, basin, top and bottom of footplate, and footplate Knobs with an EPAregistered disinfectant, in accordance with your state board requirements. *EPA disinfectants require
ten-minute contact.
7. Rinse the basin again with clean water using the sprayer.
8. Thoroughly dry the basin and all other components with a clean towel.
9. Replace the footplate and secure by simultaneously turning both footplate Knobs in a clockwise direction.
(NOTE: When replacing the footplate, carefully align the mounting studs with the mounting holes.
Tighten each knob until snug. Be careful not to over-tighten, as this can damage the Knobs.)
After Last Pedicure of the Day:
1. Drain water from the pedicure spa by turning the drain handle to the “Open” position.
2. Remove the drain cover as shown on page 21. Remove the impeller as shown on page 21. Remove all
debris. Then wash with low-sudsing soap or detergent using a soft brush. Disinfect the impeller and
drain cover as well as the area behind the drain cover. Replace drain cover and impeller.
3. Next repeat steps two through seven above as in “After Each Pedicure.”
4. After all components are put back into place, fill basin with clean warm water to the fill line.
5. Pour three teaspoons of low-foaming dishwasher crystals, (not gel) and 1 ounce of household bleach for
up to six gallons of water.
Follow your state board requirements as they may differ from the above step.
6. Turn on the whirlpool and let run for ten minutes.
7. Turn the whirlpool off and drain water from the basin.
8. Using the sprayer, rinse off all components, surfaces, and basin.
9. Refill the basin with clean water and turn the whirlpool on. Run for one minute to rinse.
10. Drain water from the basin and turn off the whirlpool.
11. Wipe dry with clean towel.
12. Make a record of the date and time of this cleaning and disinfecting.
Once a Week Overnight Cleaning:
In addition to the daily cleaning, the following cleaning procedures must be done every week:
1.
2.
3.
4.
5.
6.
Follow steps one through five above, as in “After the Last Pedicure of the Day.”
Turn on the whirlpool and let run for ten minutes.
Turn the whirlpool off and let the water sit overnight in the basin (six to ten hours).
In the morning, run the whirlpool for five minutes and drain the basin.
Rinse the basin with clean water using the sprayer and dry with a clean towel.
Make a record of the date and time of this cleaning and disinfecting.
CAUTION: Cleaning products that contain abrasives can damage the pedicure spa. Use
ONLY non-abrasive products to clean the pedicure spa.
Document ID:06080001
Rev: G
Technical Support: 800-626-6912
Page 18 of 24
Traditional Whirlpool (With Jets) - Operating Instructions
After the pedicure spa is installed and the plumbing and electrical connections are made, clean and
disinfect the basin before initial use. Rinse the basin by using the attached water sprayer. Wipe the
basin dry with a clean towel.
To Operate the Pedicure Spa, Follow These Easy Steps:
Adding Water to the Pedicure Spa Basin:
1. Close the drain by turning the chrome drain handle counter-clockwise until it stops.
2. Add water to the basin by lifting upward on the water faucet fill handle. Turn the handle in a
counter-clockwise direction for cold water or clockwise for warm water as indicated by the red
(hot) and blue (cold) markings around the handle (CAUTION: hot water can burn skin). Continue
to add water until the fill line is reached. The fill line is indicated by the wavy (~~~~) line in the
basin.
3. Turn the off water by pushing the handle downward and center.
Operating the Water Jets:
Each pedicure spa is equipped with two fully adjustable jets that create a soothing foot massage. To
operate, turn the whirlpool jets on by turning the On/Off Switch in a clockwise direction. To increase jet
strength, open each jet by simply rotating the adjustment cover in a counter-clockwise direction. To
decrease water pressure, close each jet by rotating the adjustment cover in a clockwise direction
(NOTE: The Jet heads should not be positioned directly at the suction cover. Doing so will
create a noisy “gurgling” sound as air is being forced directly into water pipes). Turn off the
whirlpool jets by turning the On/Off switch counter-clockwise to its original starting position.
Removing Water from the Pedicure Spa Basin:
First, make certain the whirlpool jets are off by turning the On/Off Switch counter-clockwise to the “Off”
position.
If the pedicure spa is hooked up directly to a floor drain, simply open the drain by turning the drain
handle in a clockwise direction until it stops. You should see the water level lowering as water exits the
basin.
If the pedicure spa is equipped with the optional Power Drain Pump (PDP) feature, open the drain by
turning the drain handle in a clockwise direction until it stops, and then press the button marked “Drain”
on the front panel. The water level will lower as water is pumped out of the basin. Turn the pump off
by pressing the “Drain” button on the front panel once the basin is fully drained. (NOTE: The Power
Drain Pump will automatically shut off after 2-1/2 minutes. We recommend turning off the pump
manually if all water has drained before automatic shut-off.)
Warning:
It is extremely important to follow the cleaning instructions located on the following page.
Failure to clean the pedicure spa adequately can result in serious health issues for your clients
as well as the nail technician. Failing to clean your pedicure spa may also cause the pedicure
spa to not work properly. Always consult your local and state codes concerning pedicure chair
cleaning for further requirements.
Document ID:06080001
Rev: G
Technical Support: 800-626-6912
Page 19 of 24
Traditional Whirlpool (With Jets) - Spa Cleaning and Disinfecting
Procedures
Always check with your state board for required cleaning and disinfecting procedures.
It is extremely important to clean and disinfect your pedicure spa after each pedicure, after the last pedicure of
the day, and once a week for overnight cleaning. Regular cleaning will help keep your pedicure spa in good
working condition. Proper and continuous cleaning will kill harmful bacteria and germs that can cause infection.
To clean the pedicure spa, follow these easy steps:
After Each Pedicure:
1. Drain water from the pedicure spa by turning the drain handle to the “Open” position. Remove all debris.
2. Clean all the surfaces of the basin and all components. Use low-sudsing soap or detergent, and a nonabrasive brush. Remove all visible residue from basin and then rinse with the sprayer.
3. Disinfect all surfaces and components with an EPA registered disinfectant in accordance with your state
board requirements. *EPA disinfectants require ten-minute contact.
4. Rinse off with clean water using the sprayer and wipe all parts dry with clean towel.
After Last Pedicure of the Day:
1. Drain water from the pedicure spa by turning the drain handle to the “Open” position. Remove all debris.
2. Remove the following:
a. Drain cover as shown on page 21.
b. Suction cover as shown on page 20.
c. Jets as shown on page 20.
3. Remove all debris then wash each component with low-sudsing soap, or detergent, using a soft brush.
Disinfect the components as well as the areas behind them with an EPA registered disinfectant. Follow
your state board requirements for disinfecting. Replace all components.
4. Clean all the surfaces of the basin using low–sudsing soap or detergent, and a non-abrasive brush.
Remove all visible residue from basin and then rinse with sprayer.
5. Fill basin with clean warm water to the fill line.
6. Pour into the basin three teaspoons of low-foaming dishwasher crystals (not gel) and 1 ounce of
household bleach for up to six gallons of water.
Follow your state board requirements as they may differ from the above step.
7. Turn on the whirlpool jets and let run for ten minutes.
8. Turn the jets off and drain water from the basin.
9. Rinse the basin and all other components with clean water using the sprayer.
10. Refill the basin with clean water. Turn the jets on and run for one minute.
11. Drain water from the basin and turn off the whirlpool jets. Then wipe dry with a clean towel.
12. Make a record of the date and time of this cleaning and disinfecting.
Once a Week Overnight Cleaning:
In addition to the daily cleaning, the following cleaning procedures must be done every week.
1. Follow steps one through seven as listed above as in “After Last Pedicure of the Day.”
2. Turn jets off after ten minutes and let solution sit over night in basin (six to ten hours).
3. The next morning drain, rinse, and wipe dry with a clean towel.
4. Make a record of the date and time of this cleaning and disinfecting.
CAUTION: Cleaning products that contain abrasives can damage the pedicure spa. Use
ONLY non-abrasive products to clean the pedicure spa.
Document ID:06080001
Rev: G
Technical Support: 800-626-6912
Page 20 of 24
Removal / Replacing Jet Parts
Tools required:
Pliers
7/8" deep well socket with extension
Check your state and local regulations for cleaning procedures. Links to your state boards can be
found on our web site, at www.europeantouch.com. Refer to the cleaning procedure page headed
“Traditional Whirlpool (With Jets) - Spa Cleaning and Disinfecting Procedures,” page 19, for cleaning
recommendations.
Follow the steps below for cleaning and replacing parts:
Step 1: Remove the jet eyeball using the pliers. Pull
forward with a quick tug.
Step 3: Remove the jet nozzle and nut using a 7/8"
deep-well socket and extension.
Clean this area, using low
foaming
soap
and
disinfectant, with a brush.
Remove
all
visible
residue and rinse with
clean water.
Step 2: Remove the adjusting cover. This should pull
out.
Step 4: For cleaning, refer to “Traditional Whirlpool
(With Jets) - Spa Cleaning and Disinfecting
Procedures” on page 19.
Reassemble the jet
assembly.
The jet nozzle nut should be hand
tightened using the socket with extension. If the
adjustment cover is hard to turn, slightly loosen the jet
nozzle nut.
Step 5: Reverse steps to reassemble.
Removal / Replacing Suction Cover
Tools required:
Philips head screwdriver
Check your state and local regulations for cleaning procedures. Links to your state boards can be
found on our web site, at www.europeantouch.com. Refer to the cleaning procedure page headed
“Traditional Whirlpool (With Jets) - Spa Cleaning and Disinfecting Procedures,” page 19, for cleaning
recommendations.
Follow the steps below for cleaning and replacing parts:
Clean this area, using
low foaming soap and
disinfectant, with a
brush.
Remove all
visible residue and
rinse with clean water.
Step 1: Unscrew Phillips head screw, located in the Step 2: Pull cover forward to remove.
center of suction cover, turning counter clockwise.
Step 3: For cleaning, refer to “Traditional Whirlpool (With Jets) - Spa Cleaning and Disinfecting Procedures” on
page 19.
Step 4: Put cover back on and replace Phillips head screw turning clockwise.
Caution: Do not over tighten screw.
Document ID:06080001
Rev: G
Technical Support: 800-626-6912
Page 21 of 24
Removing / Replacing Drain Handle
Tools required:
Phillips head screwdriver
Check your state and local regulations for cleaning procedures. Links to your state boards can be
found on our web site, at www.europeantouch.com. Refer to the cleaning procedure page headed
“Crystal Clean™ Pipe-Free® Spa - Cleaning and Disinfecting Procedures,” page 17, and “Traditional
Whirlpool (With Jets) - Spa Cleaning and Disinfecting Procedures,” page 19, for cleaning
recommendations.
Follow the steps below for cleaning and replacing parts:
Step 1: To remove the chrome handle pull it Step 3: Picture, with the adapter removed,
forward. If difficult to remove, gently pry it off shown for cleaning reference.
with the screwdriver.
Step 2: To remove the handle adapter, place Step 4: Picture, with Drain Plunger removed,
Phillips head screwdriver into upper slot to reach shown for cleaning reference.
screw, as shown in picture above. Unscrew and
then pull adapter forward.
Removing / Replacing Impeller
Check your state and local regulations for cleaning procedures. Links to your state boards can be
found on our web site, at www.europeantouch.com. Refer to the cleaning procedure page headed
“Crystal Clean™ Pipe-Free® Spa - Cleaning and Disinfecting Procedures,” page 17, for cleaning
recommendations.
Follow the steps below for cleaning and replacing parts:
Step 1: Remove the Knobs by Step 3: Unscrew to remove the Step 5: Complete steps 1
turning counter clockwise.
impeller knob.
through 4 in reverse to replace
the parts.
Step 2: Lift the footplate to Step 4: Lift the impeller.
remove.
Document ID:06080001
Rev: G
Step 6: Press firmly down on
footplate to help seal while
tightening Knobs.
Technical Support: 800-626-6912
Page 22 of 24
History and Notes
Document ID:06080001
Rev: G
Technical Support: 800-626-6912
Page 23 of 24
EUROPEAN TOUCH
8301 W. Parkland Court
Milwaukee, WI 53223
Phone Number:
Toll Free:
Fax:
Web Site:
Email:
414-357-7016
800-626-6912
414-357-6360
www.europeantouch.com
[email protected]
1/06-5c
Document ID:06080001
Rev: G
Technical Support: 800-626-6912
Page 24 of 24