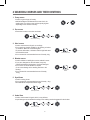
1
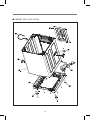
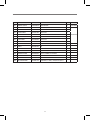
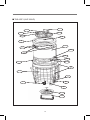
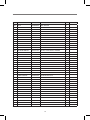
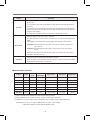
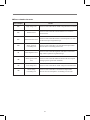
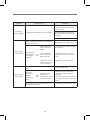
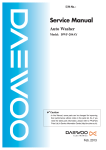
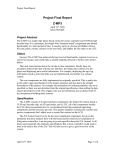
S/M No. :
Service Manual
Washing Machine
Model: KUF-320LD
✔Caution
: In this Manual, some parts can be changed for improving, their
performance without notice in the parts list. So, if you need the
latest parts information, please refer to PPL(Parts Price List) in
Service Information Center (http://svc.dwe.co.kr).
Oct. 2010
WASHING MACHINE
SERVICE MANUAL
1. Overview of washing machine...................................................... 1
.
.
.
1. Product features (KUF-320LD).................................................................................. 1
2. Comparison of product specifications........................................................................ 2
3. Names and functions of each part............................................................................. 3
.
4. Description of the control panel................................................................................. 4
2. WASHING COURSES AND THEIR CONTROLS................................. 5
3. AIR BUBBLE UP WASHING AND BUTTON CONTROLS.............. 6
4. Parts list by ass'y.................................................................................... 7
.
.
1. Wiring diagram.......................................................................................................... 7
2. Exploded view diagram............................................................................................. 8
.
3. Disassembly procedure........................................................................................... 14
5. Circuits.............................................................................................................. 15
.
.
.
.
1. Sequence chart....................................................................................................... 15
2. Operation for each button........................................................................................ 17
3. Error displays and causes of errors......................................................................... 20
4. Various test modes.................................................................................................. 22
.
5. Troubleshooting....................................................................................................... 24
1. Overview of the washing machine
1.Product features (KUF-320LD)
◈ New style design
◈ Sanitary washing with air bubbles and nano-silver
◈ 99.9% perfect sterilization effects with nano-silver
◈ Odor removal with nano-silver
◈ Tub clean with nano-silver
◈ Powerful water current with DD motor
◈ Prevention of black mold in the back of the washing machine
◈ Front loading detergent case
◈ Night light
◈ Low vibration and noise
◈ Convenient washing operation with the space for feet
1
2.Comparison of product specifications
No
Items
KUF-320LD
1
Rated power consumption
550W
2
Wash/Spin capacity
15 Kg
3
Weight
(Kg)
4
Exterior dimension
(W x H x D)
Net
Gross
60.5 Kg
65.5 Kg
Net
686 x 1,070 x 725
Gross
730 x 1,120 x 780
5
Standard water volume
310L
6
Water feeding method
Single feeding
7
Water drain method
Natural drain
8
Rated voltage
110V/60Hz
9
Washing method
Air bubbles + powerful water current
10
Spinning method
Centrifugal spin dry
11
Washing courses
6 courses (Standard, Soaking, Wool/Knitwear, Quick, Sport shoes, Tub clean)
12
Water level control
Electronic sensing
13
Display
1888 LED display + Course LED
14
Filter
Two nano-magic filters
15
Level meter
Installed
16
Door switch
Door lock switch + magnetic reed switch
17
Motor
DD motor
18
Nano silver
Nano silver pulsator
19
Blades rpm
About 135 rpm
20
Drum spinning rpm
About 700 rpm
21
Water pressure
29 kPA ~ 784 kPA (0.3 kgf.cm² ~ 8 kgf/cm²)
22
Standard water
level
6
124ℓ
5
107ℓ
4
97ℓ
3
77ℓ
2
66ℓ
1
55ℓ
2
3. Names and functions of each part
Cold water supply
Hot water supply
Door knob
Detergent case
Course selection dial
Controller
Power cord
Drain hose
Height
adjusting legs
Accessories
Water hose fixer (two)
Water supply hoses (two)
P
U
U
P
U
P
P
U
User manual
Drain hose
3
4. Description of the control panel
Water level
Reservation
Depending on the laundry
type, select one from hot,
lukewarm or cold water.
Use it to make a reservation.
You can reserve it from 2 to
48 hours in advance.
Water level
Wind dry
Select the desired amount
of water depending on the
amount of laundry.
Used to reduce
drying time after
spin dry.
Child protection function
Use it for the
swelling function.
washing
Use it to clean
the tub.
Spin dry
Use it to prevent a child from using the buttons
while in operation. Press the washing and rinsing
button at the same time for three seconds.
Swelling
Tub Clean
Washing
Use it to change
the level of spin
drying.
Use it to change
the spin drying
time.
Power
Spin dry level
4
Use it to change
the number of
rinses.
Use it to switch
on the
equipment.
Use it to change
the level of spin
drying.
Rinsing
Start/Pause
Use it to switch
on/off. Use it to add
the laundry.
2. Washing courses and their controls
1.Fuzzy course
• Used for a general type of laundry.
• Artificial intelligence will determine the water level, the
washing time, the rinsing count and the spin drying time
depending on the amount of laundry.
2.Eco course
• Economical course to save time and water.
Course Select saving.
Course Select saving.
Course Select saving.
3.Wool course
Course Select saving.
• Used to wash sweaters, lingerie or stockings.
• Do not wash any clothes marked for dry cleaning or leather
or cashmere. Must use neutral detergents.
Course Select wool.
• To prevent deformation, cold water and the high/med water
level should be used.
Course Select saving.
• Do not exceed the recommended amount of laundry -2kg.
4. Blanket course
• Used for blanket or bedding that can be washed in water.
• If you pour detergent into the cold water it may stay
Course
Select
wool.
Course
select
undissolved between the blankets. Use liquid detergent.
blanket.
• Do not use it for electric blanket or carpets.
(It can cause damage to the washing machine or the
laundry.)
CourseSelect
SelectGym
wool.
Shoes.
• Do not exceed the recommended amount of laundry
-3.5kg.
5.Gym Shoes
Course Select saving.
Course Select wool.
Course Select wool.
Course Select wool.
Course select
blanket.
Course select
blanket.
Course select
blanket.
Select Gym Shoes.
Course select
blanket.
• Used for running shoes.
Select
Shoes.
Select
UnderGym
Wear.
• Do not exceed the recommended amount of laundry – 2kg.
Select Gym Shoes.
• Air bubble Water temperature Water height
Course select
blanket.
Select Under Wear.
Select Under Wear.
Select Gym Shoes.
Select Under Wear.
6. Under Wear
Select Gym Shoes.
• Used to wash women’s lingerie,
which is very delicate.
• Liquid detergent recommended according to the washing method suggested for the clothes.
Select Under Wear.
Select Under Wear.
5
3. Air bubble up washing and button controls
■ Reservation washing
• Wool or washing tank cleaning can’t be reserved.
Drying time
10, 20, 30 or 40 minutes
Select a
Set the
desirable course. reservation time.
■ Wind dry
• Use a small amount of laundry.
• The Wind dry also removes moisture. It can reduce the drying time.
Drying time
10, 20, 30 or 40 minutes
Select a
Set the
desirable course. reservation time.
* If you need to adjust the washing/rinsing/drying time or count, then use each button before operation. Use each button to change the setting.
If you want to change it during operation, then press the pause button before changing.
* If you open the door while washing, rinsing or spin drying, the operation will be halted and the time
display window will display LE . Close the door and operation will resume.
Drying time
10, 20, 30 or 40 minutes
Select a
Set the
desirable course. reservation time.
Progress of washing/rinsing and spin drying
■ If you only want washing, rinsing and spin drying, then do as follows.
Use each button to change the setting.
• When the clean rinsing lamp is on, clean rinsing will proceed.
• In the wool or washing tank cleaning course, you can’t control washing, rinsing, spin drying.
Use each button to change the setting.
6
4. Parts list by ass'y
1.Wiring diagram(KUF-320LD)
7
2. Exploded view diagram (KUF-320LD)
■ PLATE T ASS'Y (KUF-320LD)
8
No.
Part Name
Part Code
Specifications
Q'ty
A01
PLATE T
3614541710
UV SPRAY HOT,COLD,RINSE
1
A02
SCREW TAPPING
7112503011
T1S,TRS,5*30 MFZN
2
A03
INLET BOX AS
3617511400
DWF-320 COLD=730,HOT=800,RINSE=660
1
A04
SCREW TAPPING
7122401408
T2S TRS 4x14 SUS
3
A05
CASE DETERGENT AS
36111T2800
DWF-320L SPRAY,BLACK
1
HARNESS AS
3612799Z10
320L,120V,FULL OPTION
1
A07
PANEL FRONT AS
36142T2A01
DWF-320L, STANDBY, SPRAY
1
A08
SCREW TAPPING
7122401411
T2S TRS 4x14 MFZN
1
A09
SWITCH DOOR AS
3619048020
DWF-320, REED SWITCH
1
A10
SCREW TAPPING
7122401411
T2S TRS 4x14 MFZN
1
A11
SWITCH DOOR SAFETY
3619048600
SF-030A19 CH14T, NON ARM
1
A12
SCREW TAPPING
7122401411
T2S TRS 4x14 MFZN
2
A13
CORD POWER
3611339050
7A125V0.75SQ VCTFK TAIWAN LP-70 2.3M
1
A14
UNIT LEVELER
3618971100
LEVELER, DWF-100AV/100AW
1
A15
LAMP AS
36100T1E00
DWF-320L LAMP, SPRAY
1
A16
HINGE DOOR L
3612904200
POM
1
A17
HINGE DOOR R
3612904300
POM
1
A18
SCREW TAPPING
7122401411
T2S TRS 4x14 MFZN
-
A19 DOOR AS
A20
SPRING DOOR L
A21
A22
36117ACP00 DWF-320L, GLASS DOOR AS
2
1
3615117400
DWF-320L
1
SPRING DOOR R
3615117500
DWF-320L
1
PANEL B
36142T2510
ABS UV_BASE, DWF-320L
1
A22
COVER PANEL B
3611432100
DWF-320L, ABS
1
A23
SCREW TAPPING
7122401411
T2S TRS 4x14 MFZN
2
A24
SWITCH SAFETY
3619047030
320'S
1
A25
SCREW TAPPING
7122401211
T2S TRS 4x12 MFZN
2
A26
SENSOR PRESSURE AS
3614801635
CDN-15N,180°,3PIN,L1=740,L2=90
1
A27
VALVE INLET
3615416310
DR-12AS:C-R.110-130V50/60HZ
1
A28
SCREW TAPPING
7122401411
T2S TRS 4x14 MFZN
3
A29
PCB AS
A30
REACTOR
3615800300
DWF-320L , RT-047UF
1
A31
SCREW TAPPING
7122401411
T2S TRS 4x14 MFZN
1
A32
UNIT BUBBLE PUMP AS
3618919955
CDK-116S,L=800,MOLEX(WH,TPA-RED)
1
3616007400
T2S TRS 4x10+24
2
A33 SPECIAL SCREW
PRPSSW2D95 DWF-320L,T,J,C,BB,1W
9
1
Remarks
■ CABINET ASS'Y (KUF-320LD)
09
10
No.
Part Name
Q'ty
Remarks
PRCACAZJ10 DWF-320LKTC
1
ASSY PART
B01-1 CABINET
361081W800
SGCC 0.8T , BLACK, DWF-320LKTC
1
B01-2 PLATE-UPPER
3614541300
SGCC 0.8T
1
B01-3 PLATE-LOWER
3614541400
SGCC 0.8T
1
B01-4 SUPP TUB FL
3615305300
SGCC 2.0T
1
B01-5 SUPP TUB FR
3615305400
SGCC 2.0T
1
B01-6 SUPP TUB BL
3615305500
SGCC 2.0T
1
B01-7 SUPP TUB BR
3615305600
SGCC 2.0T
1
B02 HANDLE CABINET
3612603300
PP , GY-349A
2
B03 BASE U
3610394100
PP
1
B04 LEG ADJUST AS
3617702122
VE
2
B05 FOOT
3612100340
VE , FRONT , SBR
2
B06 HARNESS OUTER
3610068700
50/0.18 , GREEN , ST710489-2
1
B07 COVER BACK
3611413605
SGCD 0.4T
1
B08 HOSE
4500D08220
ID=8.0
1
B09 UNIT DRAIN PUMP
36189S1400
LOW/60HZ,CU 40W,L=1400,BB CUT,B30-3
B01 CABINET SUB AS
Part Code
Specifications
11
1-PIECE PART
■ TUB ASS'Y (KUF-320LD)
T22
T21
T18
T20
T19
T16
T17
T09
T11
T10
T13
T12
T14
T15
T23
T03
T01
T07
T07
T02
T04
T06
T08
12
No.
T01
Part Name
Part Code
Specifications
Q'ty
TUB O
3618830300
FRPP, DWF-320
1
-
HOSE OVERFLOW
3613208901
PELD L=280mm
1
T02
CLUTCH DRAIN AS
3615418600
DWF-320LPSP
1
T03
SUSPENSION AS
36100T1J00
DWF-320, VP TYPE, SPRING 10 1/2 TURN WH
4
T04
DRAIN MOTOR
36196TAX00 SV-HJ7T24D, 100-110 50/60HZ
1
-
SCREW TAPPING
3616007001
SCM24H, 6.5x24 101S
3
T06
UNIT MOTOR AS
36189S1C00 DD TYPE,CLUTCH+SATOR+ROTOR
1
1
-
CLUTCH AS
3619301900
-
UNIT STATOR AS
36189S1A00 DWF-320'S, AMOTEC
1
-
UNIT ROTOR AS
36189S1B00 DWF-320'S ROTOR AS, AMOTEC
1
-
SCREW TAPPING
3616007001
SCM24H, 6.5x24 101S
8
-
SCREW TAPPING
3616029800
SCM24H, 6.5x30
6
BALANCER WEIGHT
3616111310
FDC450, 1.75KG, EPOXY, COATING
2
-
WASHER EPDM
3616065800
EPDM ID7.5 OD22 3.0T
6
-
WASHER PLAIN
3616065700
SCP1 ID8.4 OD22 2.0T
6
-
SCREW TAPPING
3616029800
SCM24H, 6.5x30
6
PROTECTOR MOTOR
3618345700
SGCC 1.6T
1
-
SPECIAL SCREW
3616007001
SCM24H, 6.5x24 101S
4
-
TUB I AS
3618830600
DWF-320
1
T09
TUB I
3618830500
SUS 0.5T, 1-PIECE
1
T10
TUB U
3618830400
SUS 1.2T
1
T11
FRAME FILTER
36122UDF00 PP, TB53
2
SCREW TAPPING
7122400814
T2S TRS 4x14 SUS
8
GUIDE FILTER
3612512000
PP
2
SCREW TAPPING
3616051629
SUS430 T2 TRS 5.5x16
4
T13
FILTER AS
3611911400
DWF-320, MAGIC FILTER AS
2
T14
CUSHION FLANGE
3611575200
ABS SHEET 0.5T
1
T15
FLANGE TUB
3617201M00 ALDC12
1
T07
T08
T12
-
-
DD CLUTCH, DWF-320
SPECIAL BOLT AS
3616065400
SUS M8x15, SCREW+WASHER+ SPRING/W
6
T16
SPECIAL NUT
3616064200
ZNDC
1
T17
BALANCER AS
3616111200
DWF-320, 5,400G
1
SPECIAL SCREW
3616051629
SUS430 T2 TRS 5.5x16
4
T18
PULSATOR AS
3619708500
DWF-320, 3-IMPELLER
1
T19
FAN IMPELLER
3611885600
PP
3
T20
CAP IMPELLER
3610919500
ABS, DWF-320
3
T21
CAP PULSATOR
3610915800
ABS, DWF-320
1
T22
SPECIAL SCREW
3616062629
STS430 6x26.5
1
T23
COVER TUB O
3611431800
PP
1
SCREW TAPPING
3616051629
SUS430 T2 TRS 5.5x16
4
-
-
13
Remarks
3. Disassembly procedure (KUF-320LD)
1. Front panel disassembly procedure (KUF-320LD)
1. P
ull out the detergent box
2. Remove the set screws from Panel F
➡
3. P
ush the front panel to the left and separate
the clamping hook
4. Remove the set screws for the PCB assembly
and separate the PCB assembly.
➡
2. Rear panel disassembly procedure (KUF-320LD)
1. Remove the rear panel set screws.
2. Lift up and separate the rear panel.
➡
➡
➡
➡
14
5. Circuits
1. Sequence chart
■ SEQUENCE CHART(KUF-320LD)
FUZZY
Classification
Time
Sensing
W
A
S
H
Water supply
4min.
Soak
30min.
Mid. spin
Medium
/High
High
▒
▒
▒
▒
▒
▒
▒
▒
▒
▒
▒
▒
▒
▒
▒
17min.
11min. 13min. 15min. 15min.
▒
▒
▒
▒
▒
▒
▒
6min.
▒
▒
▒
▒
▒
▒
▒
▒
2min.
▒
▒
▒
▒
▒
▒
▒
▒
▒
▒
▒
▒
▒
▒
▒
▒
5min.
▒
▒
▒
▒
▒
▒
4min.
▒
▒
▒
▒
▒
▒
▒
▒
Water supply
4min.
▒
▒
▒
▒
▒
▒
▒
▒
▒
▒
▒
▒
▒
▒
▒
Rinse 1
3min.
▒
▒
▒
▒
▒
▒
▒
2min.
▒
▒
▒
▒
▒
▒
2min.
▒
▒
▒
▒
▒
▒
▒
▒
▒
▒
▒
▒
▒
▒
▒
▒
▒
▒
▒
▒
5min.
▒
▒
▒
▒
▒
▒
Drain
Balancing spin
Mid. spin
▒ Rinse
▒
4min.
▒
▒
▒
▒
▒
▒
▒
Water supply
4min.
▒
▒
▒
▒
▒
▒
▒
▒
▒
▒
▒
▒
▒
▒
Rinse 2
3min.
▒
▒
▒
▒
▒
▒
▒
2min.
▒
▒
▒
▒
▒
▒
2min.
▒
▒
▒
▒
▒
▒
▒
▒
▒
▒
▒
▒
▒
▒
▒
▒
5min.(8min.)
▒
▒
▒
▒
▒
▒
3min.(6min.)
▒
▒
▒
▒
▒
▒
▒
▒
1min.
(4min.)
▒
▒
▒
▒
▒
▒
▒
▒
51
53
55
57
57
59
30
44
Drain
Balancing spin
S
P
I
N
Medium
15min
Balancing spin
R
I
N
S
E
Low
17min. 9min.
Drain
WOOL
Minimum
/Low
30min.
Washing
ECO
Minimum
▒
9min.(12min.)
7min.(10min.)
Main spin
Remaining time display
NOTE
1. Only one rinse will be applied to ECO course.
2. Spin time shown inside the parenthesis is the number shown on the display and the user select
time is shown at the front.
(Example) 9 min. (12 min.) ➔ 12 min. is displayed when user selects 9 minutes.
15
■ SEQUENCE CHART2 (KUF-320LD)
Classification
W
A
S
H
Sensing
Water supply
Soak
Drain
Balancing spin
Mid. spin
Water supply
Rinse 1
Drain
Balancing spin
R
I
N
S
E
Mid. spin
Water supply
Rinse 2
Drain
Balancing spin
Mid. spin
Water supply
Rinse 3
Drain
Balancing spin
S
P
I
N
Time
4min.
30min.
20min.
15min
10min.
2min.
5min.
4min.
4min.
3min.
2min.
2min.
5min.
4min.
4min.
3min.
2min.
2min.
5min.
4min.
4min.
3min.
2min.
2min.
9min.(12min.)
7min.(10min.)
5min.(8min.)
Main spin
3min.(6min.)
1min.
(4min.)
Remaining time display
NOTE
Blanket
Sport shoes
Underwear
▒
▒
▒
▒
▒
▒
▒
▒
▒
▒
▒
▒
▒
▒
▒
▒
▒
▒
▒
▒
▒
▒
▒
▒
▒
▒
▒
▒
▒
▒
▒
▒
▒
▒
▒
Tub clean
▒
▒
▒
▒
▒ 120min.
▒
▒
▒
▒
▒
▒
▒
▒
▒
▒
▒
▒
▒
▒
▒
▒
▒
▒
▒
▒
▒
▒
▒
▒
▒
▒
▒
▒
▒
▒
▒
▒
▒
▒
▒
▒
▒
▒
▒
▒
▒
▒
▒
▒
▒
▒
▒
▒
▒
▒
▒
▒
▒
▒
▒
▒
▒
76
47
46
180
1. Blanket course has 3 rinse stages.
2. Sport shoes course does not have mid-spin during the rinse stage and the main spin is done at
around 400 rpm.
16
2. Operation for each button
Button
Operation
Power
1. M
icro switch type is used to meet the 0.5W of standby power consumption requirement.
• Tact switch type is used for other regions that do not have 0.5W requirement. (D16
setting of F-PCB; D16 connected ➔ Tact SW, D16 disconnected ➔ Encoder SW)
2. When the “Power” button is pressed, the power supply relay is engaged and “---”
will be shown on the display.
3. All other LEDs are off.
4. Automatic power off function:
5. The power will be turned off immediately after finishing the washing course.
6. The power will also be turned off when there is no button input for 10 minutes.
7. Automatic power off function will be disabled if an error occurs.
Start/Pause
Water temp
1. Fuzzy course selected if the Start button is pressed without selecting any course.
1. Select the water valve to use.
2. This button will be removed for “Single Water” region
3. The sequence of selection is “Cold ➔ Cold + Hot ➔ Hot ➔ Cold”.
4. Only cold water is used for the Wool course and this button does not affect the operation.
(Internal water): Hot water is used for Tub Clean, Blanket, and Sport shoes courses)
5. ‘Cold’ water will be selected with the ‘Fuzzy’ course if this button is pressed in the
initial state.
6. Water valve operation at each stage depending on water temperature selection
Selection
Cold
Cold + Hot
Hot
UE
Wash
Cold value
Cold +Hot valve
Hot valve
Rinse
Cold valve
Cold + Hot valve
Cold + Hot valve
1. The order of selection is Minimum ➔ Minimum/Low ➔ Medium ➔ Medium-High ➔
High.
2. LED blinks sequentially during the load sensing stage.
3. Load sensing will not be enabled when water level is selected before the load sensing
stage, and the wash time will be set to the default value (15 min).
4. If water level is set after load sensing, only the water level will be changed while the
wash time remains to be the value set by the load sensing stage.
5. Water level cannot be changed for Tub Clean course
6. Water level section sequence for each course
• Fuzzy, ECO, and Sport shoes: Minimum ➔ Minimum/Low ➔ Low ➔ Medium ➔
Medium/High ➔ High ➔ Minimum
• Wool: Medium ➔ Medium/High ➔ High ➔ Medium
• Blanket: Medium ➔ Medium/High ➔ High ➔ Medium
• Underwear: Minimum → Minimum/Low ➔ Minimum
7. If the water level button is selected before load sensing in Fuzzy course, Medium/High
will be selected.
8. If the water level button is selected before load sensing in ECO course, Minimum/Low
will be selected.
9. If the water level button is selected at the initial state, Medium level and Fuzzy course
will be selected.
17
Button
Operation
Soak
1. S
oak time can be selected for all courses except the Wool course
2. Soak time is set to 120 minutes for Tub Clean course and 30 minutes for all other
courses.
3. If the Soak button is pressed before washing, the default wash time for each course will
be selected automatically.
Wash
1. W
ash time can be set from 0 min to 120 min in one minute step.
2. The washing time will be incremented every 0.3 seconds while pressing this button.
When the button is released, the selected washing time will blink for three seconds and
then overall course time will be shown on the display.
3. It can be selected for all courses except the Wool course.
4. Selection of wash time for each course
• Fuzzy, Blanket, Tub Clean, ECO,
• Sport shoes, and Underwear: 0 ~ 20 min
5. Only washing time can be selected if the Wash button is pressed right after power on.
6. If the washing time is set to 0 when the soaking is selected, the soaking will start
immediately.
Rinse
1. T
he sequence of selection is One rinse ➔ One main rinse ➔ Two rinses ➔
Two main rinses ➔ Three rinses ➔ Three main rinses ➔ Four rinses ➔
Four main rinses ➔ Five rinses ➔ Five main rinses ➔ No rinse.
2. The number of rinse is incremented every 0.7 seconds while pressing this button.
Upon releasing the button the selected number of rinse blinks for 3 seconds and the total
course time will be shown on the display.
3. This cannot be changed for the Wool course.
4. Main rinse cannot be selected for the Blanket or Tub Clean course.
5. Up to three rinse stages can be selected for ECO course with the selection sequence
of “rinse 1 ➔ main rinse 1 ➔ rinse 2 ➔ main rinses 2 ➔ rinses 3 ➔ main rinses 3 ➔
No rinse”.
6. Press this button right after power on to do Rinse only.
7. When the operation starts with the rinse operation, water filling for rinse mode is
performed before the rinse operation.
Spin time
1. The sequence of selection is 1 min ➔ 3 min ➔ 7 min ➔ 9 min ➔ 0.
2. Spin time cannot be changed for the Wool, Sport shoes, and Tub Clean courses.
3. If the Spin button is pressed right after power on, spin time will be set to 5 min and spin speed will be set to HIGH.
Spin speed
1. The sequence of selection is NIGHT TIME ➔ LOW ➔ MEDIUM ➔ HIGH ➔
Ex. HIGH.
2. Spin time has to be selected first before setting the speed.
3. Spin speed cannot be changed for the Wool, Sport shoes, and Tub Clean courses.
4. Spin speed selection for each course
• FUZZY, ECO, Blanket course: the selection sequence is NIGHT TIME ➔ LOW ➔
MEDIUM ➔ HIGH ➔ Ex. HIGH ➔ NIGHT TIME
• Underwear: The selection sequence is NIGHT TIME ➔ LOW ➔ MEDIUM ➔
NIGHT TIME.
5. If the Spin speed button is pressed in the initial state, the spin time will be set to ‘5 min’ and the spin speed will be set to ‘HIGH’.
18
Button
Air wash
Operation
1. T
he sequence of selection is 10 min ➔ 20 min ➔ 30 min ➔ 40 min ➔ 50 min ➔
60 min ➔ 0.
(5 min of balance spin time will be added in certain period of time after the selection by button.)
2. Air wash time is incremented by 10 min while pressing the button. When the button is
released, the selected air wash time blinks for three seconds and total course time will
be shown on the display.
3. This cannot be selected for the Wool, Underwear, and Tub Clean courses.
1. Reservation time can be set to 1 hour ~ 48 hours.
3. The reservation time is incremented by one hour in 0.3 sec interval while pressing this
button.
3. The minimum reservation time is one hour higher than the total course duration.
Reservation
Example 1) The minimum reservation time is two hours if the total course time is
1 hour 10 min.
Example 2) T
he minimum reservation time is one hour if the total course time is
30 min.
4. D
uring the reservation mode, only reservation time, reservation LED, course LED,
and Door Lock LED will be on.
Tub Clean
1. T
ub Clean course is selected when this button is pressed.
2. When this button is selected again while the Tub Clean course is selected, the washing
machine returns to the power on initial state.
■ Course button operation
Course
Cycles
Water
level
Water
temperature
Type of rinse
Spin speed
Display time
Fuzzy
“- - -“
-
Cold
2 general rinses
HIGH
---
ECO
6:1:3
-
Cold
1 main rinse
HIGH
30 min
Wool
6:2:3
MEDIUM
Cold
2 general rinses
NIGHT TIME
44 min
Blanket
20:3:5
HIGH
Cold
3 general rinses
HIGH
1 hour 16 min
Sport shoes
15:2:5
LOW
Cold
2 general rinses
NIGHT TIME
47 min
Underwear
10:2:1
LOW
Cold/Hot
2 general rinses
NIGHT TIME
46 min
Tub clean
20:2:5
HIGH
Cold
2 general rinses
Ex. HIGH
3 hours
① 2 hours of Soak time is added to the Tub Clean course by default.
② Water temperature for Underwear course is set to Cold in single water area.
③ Numbers in “Cycles” column mean “Wash time (min): Number of rinse: Spin time (min)”.
Example) ECO course: six min of washing time: one rinse: 3 min of spin.
* Main rinse cannot be selected for the Blanket course
19
3.Error displays and causes of errors
Error display
Details
• This error occurs when the water level sensor frequency is over 30 KHz or below 15
KHz and also when the frequency is increased suddenly by more than 1.44 KHz in
four seconds after filling up water.
➔ Water level sensor hose is off the position. (This feature will be applied later
after review in the future)
E9
dE
• This error occurs if the door lock is not set to open or close when the door lock
solenoid is operated more than 10 times.
• This error is cleared when the door is open.
• This error indicates that the door opens during the operation of the washing machine.
LE
Procedure to handle this error
Close the door then the lock is engaged and the course continues.
SE
• This error indicates that the safety switch is open right before entering the spin stage.
QE
• This error occurs when water is not drained for more than 15 minutes.
• This error occurs when the water level sensor frequency does not change by more
IE
than 0.08KHz for 10 minutes after the start of water filling, and also when the water
is not filled up for 60 minutes.
Procedure to handle this error
Open and close the door, check the water valve and water pressure, and press
Start/Pause button, then the error is cleared and water will be filled again.
• This error occurs when the unbalance switch is activated a third time after
performing the unbalance operation (water fill + wash) twice during the spin stage.
UE
Procedure to handle this error
Open the door, arrange the contents evenly, and close the door. Then the error will be
cleared and spinning will be performed again.
20
■ Errors related to the motor
Error display
Details
E5
High voltage error
E6
IPM Fault error
E7
Motor hall sensor error
E8
Motor operation
overloading error
This error occurs when there is no next hall sensor input within
320 msec due to overloading of the motor.
b1
Motor alignment error
This error occurs when the alignment of the motor at the initial
stage of motor operation is against the logic.
b2
Motor speed control
error
This error occurs when the difference between the current speed
and target speed is greater than 120 RPM.
b3
Low voltage error
This error occurs when the DC-LINK voltage is lower than 140V.
b4
Motor startup
overloading error
This error occurs when there is no hall sensor input within
400 msec at motor startup due to overloading or motor lock.
This error occurs when the DC-LINK voltage becomes over 500V.
This error occurs when the current to IPM is over 17A due to
various reasons.
This error occurs when the hall sensor is off the position or when
the hall sensor input is against the logic.
21
4.Various test modes
4-1. Electronic device operation test mode
1) Procedure to enter the test mode
- Press the Wash button three times while pressing the Water+ (water level) button in the initial state.
2) Operation procedure
- Use the Soak button to test various devices.
No.
1
2
3
4
5
6
7
8
9
10
11
12
13
14
15
16
17
18
19
20
21
22
23
24
Display
b00
14, 15, or 16
C-t
L_C, L_O
S-C, S_O
d_C, d_O
run, frequency
b1, frequency
b2, frequency
b3, frequency
b4, frequency
b5, frequency
b6, frequency
b7, frequency
b8, frequency
LP
dS
H(--)
C
r
bb
d1
d2
PP(--)
Test items
Option display
Wash capacity display
Dual/single water supply, pump/natural drain, Encoder/TACT option display
Door close or open
Safety switch close or open
Door lock switch close or open
Durability test running frequency display
Hall sensor error occurrence frequency display
IPM fault error occurrence frequency display
Overloading error occurrence frequency display
Motor alignment error occurrence frequency display
Motor speed control error occurrence frequency display
Over voltage error occurrence frequency display
Low voltage error occurrence frequency display
Overloading error during operation occurrence frequency display
LAMP operation test
Door lock solenoid operation test
Hot water valve operation test
Cold water valve operation test
Fabric softner valve operation test
Bubble pump operation test
Drain magnet operation test
Drain synchronous motor operation test
Pump motor operation test
22
4-2. Spin discharge test mode
1) How to enter
- In the initial condition, press the rinsing button three times while holding down the water level button.
2) Control procedures
- Using the spin dry button select the target RPM. (300 ~ 800RPM: steps of 20RPM)
- Press the start/pause button to start spin drying.
3) The current RPM is displayed during operation.
When it stops the target RPM is displayed.
4-3. EEPROM reset mode
1) Procedure to enter this mode
- Press the Spin speed button three times while pressing the Water level button in the initial state.
2) Press the Start/Pause button to reset the changed EEPROM values and to restore the values with the
factory default settings.
3) Quite often the EEPROM values need to be changed during the experiment and development process
and the modified program is usually downloaded with flash ROM writer. However, the values stored in
EEPROM are not erased in this case, and they can be restored easily using this mode.
4) Display contents
- “EEP ➔ ALL ➔ CLr” are displayed sequentially on the display
23
5. Troubleshooting
Symptom
Items to check
Resolution
• Check the power supply voltage
• Check the power loss or circuit
breaker
Check the power supply
Washing machine
is not turned on.
Check whether
the fuse is blown
➡
• Replace the fuse and
check the operation
in the test mode to
see whether the fuse
is blown again
• If the fuse is blown during water
filling, measure the resistance of
water supply valve and replace it if
it is shorted.
• If the fuse is blown during washing,
measure the resistance of the motor
and replace it if it is shorted.
Check the connection status of the connector
and corrosion of the cables.
• Replace the connector and harness
Check the input/out voltage of regulator IC on
the PCB assembly. (Input: 12V, output: 6V)
• Replace the regulator. If it does not
solve the problem, replace the PCB
assembly.
• Check the
connection status
of the connector,
and short failure of
motor windings.
• Replace the connector and harness.
• Replace the motor in case of short
failure.
• Replace the PCB assembly if there
is no short failure in the motor
windings.
Washing does
not work.
Check motor
operating noise
Spinning does
not work
Check the voltage between the terminals
of the drain synchronous motor.
• Replace the motor if it fails.
• Replace the PCB assembly if
synchronous motor is normal.
Check whether the faucet is closed.
• Turn on the faucet.
heck for existence of foreign substances in
C
the water supply valve.
• Clean the filter with brush.
Check whether the connection between the
hose and the water supply valve is correct
• Correct the connection between the
water supply hose and cold water
valve.
• Check the connection of the cold
water hose at the nozzle.
Check the sound of water supply valve
Check the contact status of the connector
terminals
• Replace the water supply valve if
the water supply still fails, and fix
the failure conditions to prevent the
recurrence of the same failure.
• Replace the PCB assembly if the
contacts are normal and problem is
not solved with the above methods.
Water is not
filled up.
➡
24
Symptom
Tub turning
during washing
Items to check
Resolution
• Remove any alien substances
between the lever clutch and the
link valve drain.
Open the door and check if the tub is rotating.
• Disassemble the rotor and check
the clutch and any damage in the
coupling.
• Replace the spring lift.
Water is continuously filled up even when the
machine is turned off.
Water supply
is not turned off
Water draining
does not work
After reaching
the HIGH level,
water supply
continues.
➡
• Replace the water supply valve.
• Check whether the
water level hose is
folded.
• Unfold the water level hose and fix
the condition.
• Check whether the
water level hose is
filled with water.
• Air leaks from water level hose.
• Replace the water level sensor or
hose.
• Operation is normal
when the water level
is set to “Medium”
• Replace the water level sensor.
Check whether the drain hose is placed on the
floor
• Lower the drain hose.
Check the
operation of
the drain
synchronous
motor
• Replace the drain synchronous
motor if the terminal voltage is
abnormal.
• If not, check the harness connection
• If everything is ok, then replace the
PCB.
➡
• Check the voltage
between the
terminals of the drain
synchronous motor
Check the connection between the link valve
drain and the sync motor.
25
• Connect the sync motor to the link.
Symptom
Lamp is not
turned on.
Items to check
Resolution
• Check the failure of the lamp.
• Replace the lamp
• Check the contact status of connector and
terminals
• Replace the PCB.
Check the levelness of the set.
• Adjust the levelness.
Check deformation of the safety lever.
• Replace the safety lever.
Check if the sync motor wire is tight.
• Replace the sync motor.
Check for alien substances in the discharge
valve bellows.
• Remove alien substances.
Check operation of the sync motor and the
level clutch by checking spin drying (d2) in
test mode.
• If you can move the lever switch to
the spin drying location (5mm or
more) then replace the sync motor.
• If normal, then disassemble the
rotor and check for damage in the
coupling and replace the spring.
26
DAEWOO ELECTRONICS CORP.
686, AHYEON-DONG MAPO-GU SEOUL, KOREA
C.P.O. BOX 8003 SEOUL, KOREA
TELEX: DWELEC K28177-8
cable: “daewooelec”
S/M No. :
PRINTED DATE: Oct. 2010
ABOUT THIS MANUAL
VISION CREATIVE. INC.
서울 종로구 통의동
6번지 이룸빌딩 4층
담
당
박준영 님 (서비스메뉴얼)
F.MODEL
B.MODEL
언
어
BUYER
BRAND
KUF-320LD
영문
DAEWOO
COUNTRY
1차
2차
일
정
3차
4차
5차
제
판
규
격
인
쇄
애드컴
MEMO 접수 : (총 32p)
101001 - 신규 총 15p(1~15)
(총 27p)
101011 - 수정 총 5p(목차,2,7,22,23)
101013 - 수정 총 1P(23)
연락처
VISION
담 당
방 문 수(choi)
TEL : 730-0660 FAX : 730-3788