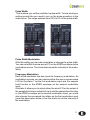
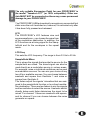
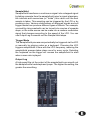
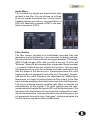
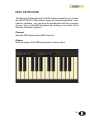
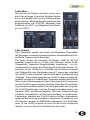
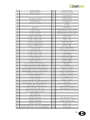
1
PRODYSSEY ASB
Authentic Sound Box
Disclaimer
Prodyssey ASB is manufactured by CreamWare Audio GmbH, Siegburg, Germany.
(C) CreamWare 1999 - 2006 - all rights reserved.
The following documentation, compiled by CreamWare Audio GmbH (henceforth called CreamWare), represents
the current state of the described product. The documentation may be updated on a regular basis. Any changes
which might ensue, including those necessitated by update specifications, are included in the latest version of
this documentation. CreamWare is under no obligation to notify any person, organization, or institution of such
changes or to make these changes public in any other way.
We must caution you that this publication may include technical inaccuracies or typographical errors.
CreamWare offers no warranty, either expressed or implied, for the contents of this documentation. You will find
the warranty regulations for the product at the end of this documentation.
In no event will CreamWare be liable for any loss of data or for errors in data use or processing resulting from the
use of this product or the documentation. In particular, CreamWare will not be responsible for any direct or
indirect damages (including lost profits, lost savings, delays or interruptions in the flow of business activities,
including but not limited to, special, incidental, consequential, or other similar damages) arising out of the use of
or inability to use this product or the associated documentation, even if CreamWare or any authorized CreamWare
representative has been advised of the possibility of such damages.
The use of registered names, trademarks, etc., in this publication does not imply, even in the absence of a
specific statement, that such names are exempt from the relevant protective laws and regulations (patent laws,
trademark laws etc.) and therefore free for general use. In no case does CreamWare guarantee that the information
given in this documentation is free of such third-party rights.
Neither this documentation nor any part thereof may be copied, translated, or reduced to any electronic medium
or machine form without the prior written consent from CreamWare Audio GmbH.
This product (and the associated documentation) is governed by the GTC (General Terms and Conditions) of
CreamWare Audio GmbH.
Index
Owner’s Manual
Disclaimer
Index
Introduction
2
3
4
Getting started
Making connections
Power adaptor
MIDI connection
Audio connection
Power switch
USB connection and drivers
Installation of Remote Software
Presets
6
6
6
7
7
7
8
8
The Control Panel
Portamento, Noise
VCO 1 and VCO 2
Modulation
LFO
Sample/Hold
Filter
Envelopes
Configuration Strip
9
9
11
12
13
14
17
19
Prodyssey Remote Software
General information
Panel layout
Main page
Add page
Prefs page, Hardware info
MIDI monitor
MIDI keyboard
Preset administration
23
23
24
25
29
31
32
33
Specifications
MIDI implementation table
Specifications
Warranty regulations
CE certificate
35
36
37
37
3
Welcome
Thank you for choosing the PRODYSSEY ASB. We are sure that
you are going to have just as much fun with your new PRODYSSEY
ASB as we had developing this unique and characteristic synthesizer.
Please read this manual thoroughly in order to fully take advantage
of the many features the PRODYSSEY ASB has to offer.
Introduction
The PRODYSSEY is a one-to-one reproduction of the ARP Odyssey synthesizer. The ARP Odyssey is a true analog synthesizer
from the 1970’s and has taken its proper place alongside other
classic synths. It can be considered a compact version of the halfmodular ARP 2600, making it ARP’s answer to the successful Minimoog. But this synth is much more than that. While it is based on
the classic analog synthesizer design – with oscillators, filters, and
amplifier – it also offers a number of interesting improvements that
make it unique and exciting. The most significant features are the
wide range of modulation possibilities and of course the sample/
hold section. Its small footprint and rich feature set made it an
immediate hit with experts who already knew the sweet and powerful sounds the thing was capable of producing. And so it’s no surprise that the Odyssey became a legend, with its capability to produce
the full gamut of tones in the sound spectrum, from deep basses to
cutting leads to impressive effects. Its diversity of sounds makes
the Odyssey one of the most sought after classic synths on today’s
used market, and it clearly hasn’t lost any of its original appeal.
4
We relied on our tried and true Circuit Modeling process in order to
preserve the original character of this instrument and to faithfully
reproduce its wide range of sounds. This process delivers extremely faithful sound reproduction and aliasing-free algorithms. We were
able to go beyond simply modeling certain aspects of this classic
instrument; in fact, we fully emulated it. Even the knob settings and
the behavior of the knobs themselves are identical to those of the
original instrument. Within the variations from unit to unit of the
original instrument, the PRODYSSEY perfectly reproduces the
sounds of the original ARP Odyssey. So go ahead and grab all of
your old patch sheets, or download a couple from the Web, and
conjure up some of those classic sounds. Or play around with the
synth’s new, expanded features, explore the integrated effects section, and create the sounds of tomorrow. Give your imagination free
reign!
The Creamware team wishes you lots of fun as you explore your
new PRODYSSEY ASB!
5
Getting started
Making Connections
Connecting the power adaptor
To connect your PRODYSSEY ASB to a mains supply, please use
the power adaptor supplied with the unit. First connect the power
adaptor to your PRODYSSEY ASB. Before plugging the adaptor's
plug into a mains socket, make sure it is compatible with the mains
voltage in your country. If you lose the power supply, a standard AC
or DC 12V / 1.5A power adaptor can be used as a replacement. The
PRODYSSEY ASB's power socket requires a hollow plug (5.5 mm x
2.1mm x 11.5 mm, centre positive).
Important Notice:
The only suitable Expression Pedal for your Prodyssey is the
model "YamahaTM FC7" (or 100% compatible). Other models
MUST NOT be connected as these may cause permanent damage to your Prodyssey !
MIDI connections
There are two ways to play your Prodyssey using MIDI:
1. Connect your Prodyssey directly to a master keyboard.
2. Connect your Prodyssey to your computer's MIDI port in
order to use it with a sequencer or with the Prodyssey's
Remote Software.
Connect the MIDI in and out of your PRODYSSEY ASB to the MIDI
in and out of your keyboard or computer. The MIDI input of your
PRODYSSEY ASB should be connected to the MIDI output of your
keyboard / computer, and vice versa.
The PRODYSSEY ASB's incoming MIDI signal can also control
another instrument if you connect the PRODYSSEY ASB's 'MIDI thru'
to the instrument's MIDI in. If your computer does not have a MIDI
port, you can use USB connection as an alternative.
6
Audio Connections
In order to hear the PRODYSSEY ASB, connect
its stereo outputs to the left / right inputs of a
mixer, a computer sound card or a HiFi system.
You can also process external signals by
plugging an audio sound source into your
PRODYSSEY ASB's input.
Power Switch
This is rather obvious, but in order to activate the
PRODYSSEY ASB please turn the power switch
on!
USB Connections and driver installation (Windows XP)
An alternative to using MIDI to connect your PRODYSSEY ASB to a
computer is to use the built-in USB interface. On a PC, this requires
Windows XP with Service Pack 2; the Mac version supports OS10.4.
After connecting the PRODYSSEY to a computer, Windows will
automatically recognize the PRODYSSEY ASB as an audio USB
instrument. No extra drivers are
required - you can start playing right
away! After starting your sequencer
program (shown here: Cubase SX),
you can use the USB audio
instrument driver as a MIDI port.
Once in a while, under older
versions of Windows XP (before
Service Pack 2), the USB port will
not re-appear on screen after disconnecting the PRODYSSEY ASB.
In this case, please reboot Windows XP. After rebooting, your USB
port should appear again.
Installation of the Remote Software
To install the Remote Software supplied with the PRODYSSEY ASB
on your PC, please put the CD-ROM labelled 'PRODYSSEY ASB'
into the CD-R drive of your computer. The 'Install dialogue' should
then automatically appear on your screen. (If you have de-activated
the automatic start function of your CD-R drive, please start the
installation by double-clicking the file 'setup.exe' on the CD.) On the
first page, please choose the language you'd like to use for the install
procedure and then confirm your choice by pressing the 'Next' button.
7
You will then see the message 'Welcome to the Installation' - please
continue by pressing 'Next'.
On the following page you will find the license agreement. Please
read it carefully and if you agree, select "I accept the license terms"
- then continue by pressing the 'Next' button. You can now set the
installation path within the 'Installation path' drop-down menu. If you
don’t set a dedicated path here, the Remote
Software will be installed to
“C:\Programs\Creamware\Prodyssey ASB
Remote”. Installation requires 6.7 MB of empty
hard disk space.
The 'Choose Start Menu
Folder' lets you choose
your own directory. If you don't make a choice,
a 'Prodyssey' directory will be created.
Presets
Preset administration is handled in the 'sound' section of the
'configuration strip'. There are 128 user and 128 factory presets. To
load a preset, press the 'preset' button, then use the 'down/up'
button or the data wheel to scroll through the presets. A preset
holds all parameter and effects settings, including the additional
settings found in the Remote Software’s 'Add page' (see below).
You can only save presets in the user bank - consequently, 'user' is
automatically selected when saving a preset.
8
The Control Panel
Portamento
Portamento allows you to smoothly transition (glide) the pitch
between consecutive notes. The fader determines the time
interval between the notes. Setting it to Minimum deactivates portamento completely. You can toggle the portamento
on/off with a footswitch.
Noise Generator
The noise generator allows you to select between White or
Pink Noise.
Voltage Controlled Oscillators (VCO1, VCO2)
Oscillators 1&2 are identical except for a few minor differences.
The audio mixer has a selector switch that lets you toggle between
sawtooth and square waveforms. You can also change the pulse
width either manually or via modulation. Each Oscillator has two
inputs for pitch modulation for which you can select the intensity.
Oscillator 1 can be used independently of the keyboard, making it
into an LFO. Oscillator 2 can be synced to Oscillator 1.
9
Coarse
Use this to set the oscillator frequency. The range can be adjusted
over 6 octaves.
Fine
Use this knob to detune the oscillators with respect to one another.
Detuning and then mixing two oscillators produces vibrations that
result in a more lively sound. The range can be adjusted over
approximately one octave.
Octave Up/Down
Unlike the original model, our remake is equipped with a switch that
allows you to set each oscillators’ frequency in octave steps over a
range of 3 octaves.
Keyboard On/Off
You can use this switch to disconnect Oscillator 1 from the keyboard in order to use it as an LFO. The oscillator is now running at
a much slower rate. Instead of frequencies spanning several octaves in the higher ranges, the “coarse” setting now ranges from just
0.2 Hz to 20 Hz.
Sync On/Off
This setting activates the hard sync from Oscillator 2 to Oscillator 1.
Hard sync makes the Oscillator 2 waveform re-start with each cycle
of the Oscillator 1 waveform. This process transfers the pitch from
Oscillator 1 to Oscillator 2. Depending on the “coarse” setting and
Oscillator 2’s frequency modulation, you can create different overtone spectra each time you re-start the waveform.
10
Pulse Width
This is where you set the oscillator’s pulse width. To hear what your
setting sounds like you need to turn on the pulse waveform in the
audio mixer. The range extends from 50% to 5% of the pulse width.
Pulse Width Modulation
With this setting you can use modulation to change the pulse width.
You can set either the sine wave LFO or the ADSR envelope as the
modulation source. The knob determines the intensity of the modulation.
Frequency Modulation
Each of the oscillators has two inputs for frequency modulation. As
modulation sources, you can choose either the sine or square wave
LFO for Oscillator 1 as the first modulation input and the sample/
hold function or the ADSR envelope as the second modulation
input.
Oscillator 2 allows you to select either the sine LFO or the output of
the sample/hold mixer as the first input and the sample/hold function
or the ADSR envelope as the second modulation input; you could
also choose the connected foot slider as the first modulation input
(read the description below). Use the knobs to set the intensity of
the modulation.
11
The only suitable Expression Pedal for your PRODYSSEY is
the model "YamahaTM FC7" (or 100% compatible). Other models MUST NOT be connected as these may cause permanent
damage to your PRODYSSEY!
The PRODYSSEY ASB automatically recognizes a connected foot
slider once the unit it switched on; however, it is activated only after
it has been fully pressed and released.
LFO
The PRODYSSEY’s LFO features sine and
square waveforms – you choose the wave form
at the modulation destination. In addition, the
LFO functions as a timing signal for the Sample/Hold and for the envelopes in the repeat
mode.
LFO Freq
This sets the LFO frequency. The range is from 0.2 Hz to 20 Hz.
Sample/Hold Mixer
This is where the signals that provide the source for the
sample/hold are mixed. The mixed signal can also be
used directly as a modulation source in various areas.
For example, noise or individual oscillators can be used
as modulation sources. You can mix your choice of any
two of four available sources. You can choose between
sawtooth and square from Oscillator 1 and noise or
square from Oscillator 2.
The faders adjust the signals’ intensities that are assigned to the sample/hold function or to a direct modulation destination. There are two faders to mix the signals
and two switches to select the source. A selector switch
directly below each fader determines the signal to be
mixed. For channel 1 these are sawtooth and square,
and for channel 2 you can choose between the noise
generator or square.
12
Sample/Hold
Sample/Hold transforms a continuous signal into a stepped signal
by taking a sample from the sample/hold mixer’s signal at assignable intervals and memorizes (or “holds”) this value until the next
sample is taken. This sampling can be triggered by the LFO or by
pressing a key. Various combinations of assigned signals and set
trigger modes can produce different types of effects. For example,
a smoothly rising sawtooth can be turned into a series of upwards
steps, or the noise source can be made into a random modulation
signal that changes according to the speed of the LFO. You can
use Output Lag to smooth out the Sample/Hold steps.
Trigger Mode
The Sample/Hold process can periodically be triggered via the LFO
or manually by playing notes on a keyboard. Choosing the LFO
triggers sample/hold in time with the LFO frequency, meaning the
sample/hold process takes place once for every cycle. Selecting
the keyboard as the trigger will causes the sample/hold to start
when a new note is played.
Output Lag
A high-pass filter at the output of the sample/hold can smooth out
the sample/hold’s hard steps and jumps. The higher the setting, the
greater the smoothing.
13
Audio Mixer
This is where the signals are mixed before they
get sent to the filter. You can choose up to three
of the six signals and adjust their volume levels.
Possible signals are noise or ring modulation of
OSC1&2, sawtooth or square of OSC1 and sawtooth or square of OSC2.
Filter Section
The filter section consists of a modulatable low-pass filter with
resonance and is followed by a non-resonant, frequency-adjustable high-pass filter. Each knob can be toggled between “Prodyssey”
(ARP 24-dB low-pass filter with a cutoff at around 12 kHz) and
“Minimax“ (Moog 24-db low-pass filter, a legendary Moog cascade)
– a powerful feature that the original did not have. The low-pass
filter determines not only the envelope and other modulations but
also the shape of the sound curve. Frequencies below the cutoff
frequency are not processed, hence the term “low-pass”; frequencies above the cutoff frequency are attenuated by 24dB/octave.
Resonance is a result of feeding back the filter output to the filter
input, thereby amplifying the frequencies near the cutoff frequency.
The circuit modeling process enables both filters to emulate the
characteristics of the original. The cutoff settings and the resonance behavior illustrate the typical ARP and Moog characters. The
high-pass filter that follows the low-pass filter works without resonance and modulation. Frequencies above the cutoff frequency are
not processed, hence the term “high-pass”; frequencies below the
cutoff frequency are attenuated by 6dB/octave.
14
Voltage-Controlled Filter
Adjustable parameters include the 24-db low-pass filter, “ARP” and
“MOOG” modes, cutoff, and resonance. In addition, you can select
three of six available modulation sources.
VCF Frequency: The cutoff frequency of the low-pass filter is the
frequency above which the spectrum is attenuated and overtones
are de-emphasized. This is where you manually change the cutoff
frequency.
VCF Resonance
Resonance results from feeding the filter output back to the filter
input: the frequencies near the cutoff frequency are thus emphasized. At full resonance the filter self-oscillates and creates a sine
wave at the set cutoff frequency.
VCF Modulation
The filter cutoff features three modulators that can be adjusted
according to intensity. There are three faders to adjust the intensities and three switches to select the sources. You can use a selector switch directly below each fader to choose the signal to be
mixed. For the first modulator you can select from Key Follow and
the Sample/Hold mixer, or alternatively the connected foot slider
(read the explanation below). For the second modulator you can
select from the Sample/Hold function and the LFO’s sine wave. For
the third modulator you can select either the AR or the ADSR envelope.
15
The only suitable Expression Pedal for your PRODYSSEY is
the model "YamahaTM FC7" (or 100% compatible). Other models MUST NOT be connected as these may cause permanent
damage to your PRODYSSEY!
The PRODYSSEY ASB automatically recognizes a connected foot
slider once the unit it switched on; however, it is activated only after
it has been fully pressed and released.
With Key Follow selected, the cutoff frequency follows the played
note according to the selected intensity. Setting the fader to maximum sets the frequency control to 100%, thus tuning the filter output, so it can be played via the keyboard.
Selecting the Sample/Hold function enables noise or one of the
oscillators to function as a modulation source for the filter cutoff.
This makes it possible to use Filter FM in the audible range, which
can create particularly interesting sounds.
The Sample/Hold function produces a stair-step or random modulation signal that can be used to create fascinating sound effects by
tweaking the cutoff and resonance. For example, you can try randomly jumping the cutoff frequency or playing a pattern. Play around
with the parameters of the Sample/Hold mixer and the Sample/
Hold itself.
You can use the LFO’s sine wave to modulate the filter periodically.
Change the LFO’s frequency to change the modulation rate.
You can use the AR or the ADSR envelope to modulate the filter
cutoff frequency. The cutoff frequency follows the envelope’s shape
according to the selected intensity.
HPF Cutoff Frequency
The cutoff frequency of the high-pass filter is the frequency below
which the spectrum is attenuated, and the sound’s fundamental
tone is de-emphasized. You can change the cutoff frequency manually. The high-pass filter has no resonance and cannot be modulated. Use it to create unusual sounds, like for example to re-create
the sound of analog hi-hats or other sounds that should be free of
bass components.
16
Voltage Controlled Amplifier
The envelope and the amplifier determine the sound’s
volume curve. You can use the AR or the ADSR envelope to modulate the amplifier. You will also find the
volume fader in this section of the synth.
VCA Gain
This is where you set the sound’s volume, which is independent of the envelope generated volume curve i.e.
the PRODYSSEY ASB sounds the same even with no
external keyboard, sequencer, etc.
Envelope Generators
Two envelopes are available for different modulation
uses. The first envelope provides settings for attack and
release, while sustain is fixed at maximum. The second
envelope is more complex and features attack, decay,
sustain, and release. You can select from various places on the synth which of the envelopes to use on the
modulation. The ADSR envelope can be used to control
the pitch, the pulse width, the cutoff frequency, and the
volume. The AR envelope can be used on the filter cutoff and the Amplifier. An added feature of the new version of the synth is that you can set the envelope generators’ velocity to change when you play on the keyboard.
Attack
The duration of the first envelope segment.
During the attack phase the envelope rises
for the selected time frame to maximum.
The selected intensity sets the rate of this
rise.
Decay
The duration of the second envelope segment. During the decay
phase the envelope level falls to the selected “sustain” level.
Sustain: The third segment of the envelope. This control sets the
level at which the envelope stays after decay phase while a note is
held. The sustain effect is dependent on the selected modulation
intensity.
17
Release
The fourth segment of the envelope. In the release phase the envelope falls back to zero.
AR Velocity/ADSR Velocity
This setting modulates all envelope levels in
response to velocity. Depending on the selected modulation level the envelope levels
can vary between minimum and maximum
according to these settings. The velocity affects the assigned modulation.
KEYB Repeat/Auto Repeat
The PRODYSSEY’s envelopes can be triggered either manually by
playing notes (via Keyboard Gate) or automatically by the LFO (via
LFO Repeat). When Keyboard Gate is activated you can play normally on the keyboard. The envelope is triggered by playing a note
on the keyboard, and letting go of the note releases the envelope.
Activating LFO Repeat repeats the envelope at the LFO’s tempo.
The LFO’s rising edge starts the envelope and the falling edge
closes the envelope according to the selected release time. You
can alter the LFO speed and selected envelope times to create a
variety of envelope shapes.
Activating Keyboard Repeat makes it possible to listen to the result
only when pressing a note on the keyboard. Activating LFO and
Auto-Repeat triggers the envelopes from the LFO.
ADSR KEYB Gate/LFO Repeat
This is where you select the trigger mode for the ADSR envelope.
AR KEYB Gate/LFO Repeat
This is where you select the trigger mode for the AR envelope.
KEYB Repeat/Auto Repeat
Enabling LFO Repeat and Keyboard Repeat
will cause envelopes to repeat for the duration that a note is held. Enabling Auto Repeat
with LFO Repeat will cause envelopes to
repeat endlessly.
18
Configuration Strip
The lower 'configuration strip' section of the control panel contains
various display features and controls to change system and effects
settings and to manage presets.
Match
This display enables you to view the programmed
value for every parameter of a currently active preset. When you turn a knob on the control panel, one
of the seven yellow 'match' LED's will blink. If the
altered value is smaller than the one stored in the
preset, a left-of-centre LED will light up; if the value is greater, an
LED on the right lights up. When the current front panel setting
matches the stored value, the central LED blinks. Using this visual
aid, you can easily work out and duplicate a preset's stored parameter settings.
Value
With the data wheel (on the left) and 'down/up' buttons you can set
configuration strip parameters such as MIDI channel and volume.
You can also toggle between polyphonic and monophonic modes
by pressing the 'down' and 'up' buttons at the same time: the display
shows 'ON' for polyphonic and 'OF' for monophonic mode.
19
MIDI
To change MIDI channel, press the 'channel' button and select the channel using the 'down/up'
buttons or the data wheel. If a small vertical line
appears in the display to the left of the channel
number, it indicates that the instrument receives
MIDI data on all channels simultaneously (this is
called MIDI 'omni mode'). In omni mode, MIDI
data is received on all sixteen channels, but transmitted only on the selected channel. When no vertical line is shown,
the instrument receives and sends MIDI data on one selected channel.
MIDI Values: MIDI Channel 1 … 16 (omni off)
MIDI Channel I1 … I16 (vertical lines = omni on)
Press the 'control' button to select the MIDI local mode using the
'down/up' buttons or the data wheel. The display toggles between
'ON' (indicating that the PRODYSSEY ASB is set to 'local on' mode)
and 'OF', indicating that 'local off' is selected. In 'local on' mode,
incoming MIDI messages are transmitted via the Prodyssey ASB's
MIDI out socket; in 'local off' mode, only front panel control changes
are sent to MIDI out.
Sound
To adjust the PRODYSSEY's overall
volume, press the 'volume' button and
use the 'down/up' buttons or data
wheel. This global volume setting is
not saved within presets.
Preset
To load a preset, press the 'preset' button, then use the 'down/up'
button or the data wheel to scroll through the preset list. A preset
holds all parameter and effects settings, including the settings in
the Remote Software’s 'Add page' (see below). Presets can only be
saved in the user bank, which is why 'user' is automatically selected
when saving a preset.
20
Having selected 'preset', you can press the 'user' button to switch
between the factory and user banks. (Please note that this function
will not work unless you press the 'preset' button first.)
User (secondary function)
The 'user' button has a secondary function which is activated by
holding it down for one second. This sends current front panel
settings to the PRODYSSEY's sound engine (and to the Remote
Software) so you can hear them in action. (Hidden parameters on
the Remote Software's 'Add page' will be set to their default values).
Store
To save a preset, press the 'store' button. The LED will start blinking
- now choose a preset number by turning the data wheel or by using
the 'down/up' buttons and press 'store' again. At this point the LED
will start flickering - press the 'store' button until the LED light goes
off. The preset is now stored under the chosen preset number.
Effects
Pressing the 'bypass' button turns all effects off. (Depending on
your effects settings, this might make some presets sound a little
louder.) Once selected, the 'bypass' LED will light and all effects will
be muted - pressing the button again cancels the 'bypass' and turns
the effects back on.
To choose an effects program, press the 'program' button and use
the data wheel or 'down/up' buttons to make a selection. There are
a total of five programs offering various combinations of chorus and
delay. As you can see from the 'effects programs' table below, the
three effects parameters (labelled 'Param 1 - 3' on the control panel) differ from program to program.
21
Effects programs:
PARAMETER 1
PARAMETER 2
PARAMETER 3
Chorus
Chorus Depth
Chorus Rate
Chorus Feedback
Delay Time
Delay Damping
Delay Time Left
Delay Time Right
Delay BPM
Delay BPM
Delay Note Left
Delay Note Right
Chorus Delay Time
Chorus Depth
Delay Time Left
Delay Time Right
Chorus Delay BPM
Delay BPM
Delay Note Left
Delay Note Right
Parameters value range:
C ontrol R ange
C horus D epth
C horus R ate
C horus Feedback
0 - 10
0.01 Hz - 20 Hz
-5 ... +5
D elay Time
0.3ms - 1,4860s
D elay B P M
72 - 192
D elay N ote
1/8P 1/8 1/8T 1/16P 1/16 1/16T
1/1 1/2P 1/2 1/2T 1/4P 1/4 1/4T
1/32P 1/32 1/32T 1/64P 1/64 1/64T
22
Prodyssey ASB
Remote Software
General
To control your PRODYSSEY ASB with the Remote Software, you
have to connect the PRODYSSEY ASB to a computer via USB or
MIDI.
Panel Layout
The Remote Software has three pages for sound control: the 'Main'
page duplicates the control panel of the PRODYSSEY ASB and
contains all the parameters you already know from the hardware.
The 'Add' page contains additional parameters which are not accessible from the PRODYSSEY ASB hardware - these include aftertouch and modulation wheel settings. Control settings for the
chorus, flanger and delay effects are found on the 'Effects' page.
An additional 'Prefs' page contains the Remote Software's system
settings and also a facility to update your PRODYSSEY ASB's operating system when updates become available.
On the Remote Software's lower panel you will find the preset administration section, an integrated virtual MIDI keyboard and also a
MIDI monitor which enables you to view incoming MIDI messages.
23
MAIN Page
Operation in Detail
Two features in the remote software function differently than those
in the hardware panel:
Global Octave
There is an additional switch to the left and below the Noise key to
set the footage. You can use this switch to change the footage for
the entire instrument.
AR/ADSR Velocity
There is a single controller for both parameters on the hardware
panel. With the remote software, you can individually control the
degree to which the velocity affects each envelope’s intensity.
Since the MAIN PAGE was already been covered in the hardware
section of the PRODYSSEY ASB, this section will go into the additional features of the remote software.
24
ADD Page
Additional Features
Bend Range
This is where you set the maximum detuning via pitch bend
in half tones. The value range covers 0 to 24 semitones.
Modulation Intensity
The maximum intensity of the engageable oscillation and
filter modulations that can be set via the modulation wheel.
BPM (MIDI Clock Setting)
This is where you select your MIDI tempo settings.
KEYBOARD NOTE
Low Note On
This enables the low-note priority, i.e., low tones have priority over
high tones. A high note cannot “steal” a low note. When low-note is
disabled then last-note-priority is in effect, meaning that the lastplayed note is always played back.
25
Retrig On
This switches the envelopes’ trigger mode from Legato to Retrigger. When Retrigger is enabled the envelope is re-started anew
each time legato notes are played. When Retrigger is disabled
legato notes are slurred without re-starting the envelope.
Single On
This setting switches the instrument’s voices to one voice, regardless of how many voices are loaded. This results in correct playback of solo sounds with portamento.
AFTERTOUCH
Pitch VCO1/2
Sets the intensity and direction of the oscillators’ pitch modulators.
This is how you can use aftertouch to control the pitch bend of the
oscillators. You can assign the modulation via a switch to Oscillator
1, Oscillator 2, or both.
Filter
Intensity and direction of the filter cutoff modulation. This lets you
create filter sweeps via aftertouch.
LFO Settings
You can select between “Hertz” (frequency) or “MIDI
Note.”
Level Ext. Input
Volume fader for the external audio signal at the audio inputs. This signal is assigned to the low-pass filter.
26
EFFECTS (Chorus/Delay)
The 'Add' page contains also controls for the chorus / flanger and
stereo delay effects built into your PRODYSSEY ASB.
Chorus / Flanger
Flanger
This switch toggles between the chorus and
flanger effects.
Rate
Controls the speed of the chorus / flanger modulation.
Depth
Sets the intensity of the modulation.
Phase
Sets the phase of the modulation from 0 to 180 degrees.
Feedback
Controls the amount of feedback (regeneration).
Dry / Wet
This controls the mix balance between the dry and effected signals
- a maximum setting gives 100% chorused / flanged sound with no
dry signal.
Delay Left / Right
This section contains separate controls for the left and right channels of the PRODYSSEY ASB's stereo delay effect.
BPM L
Click on this button to set the left channel delay to a musical note
length - if you click on the arrow to the right of the 'note' window, a
drop-down menu appears with values ranging from whole notes (1/
1) down to 64th note triplets (1/64T). (N.B. when the LFO is set to
'MIDI' on the 'Add page', the note length selected here will affect the
LFO speed.)
27
BPM R
Click here to set the right channel delay to a musical note length.
Cross
Controls the amount of left channel delay feedback signal sent to
the right channel.
Time (left / right)
Adjusts the time of the delay from 1 to 1365 milliseconds (= 1.365
seconds). If 'BPM' is selected, you can enter the value as a note
length.
Feedback (left / right)
Controls the amount of feedback applied to the delay effect. (This
affects the number of repeats you will hear.)
Hi Damp (left / right)
Controls the amount of 'treble damping' applied to the delay. (This
simulates the effect of old tape echo devices, whose repeats used
to grow successively duller on each reiteration!)
Level (left / right)
Controls the delay volume level.
Dry / Wet
As with the chorus / flanger effects, this controls the mix between
the dry and effected signals - a maximum setting gives a delay-only
sound with no dry signal mixed in.
28
PREFS PAGE
The 'Prefs' page is used to edit the PRODYSSEY ASB's system
settings.
MIDI In / Out
Device (in / out)
Use these windows to select the MIDI device (and port) you use for
connecting the Prodyssey ASB's MIDI in and out to your computer.
Channel (in / out)
Set the PRODYSSEY ASB's MIDI in and out channels.
Please make sure that you have set both MIDI in and MIDI out
channels correctly.
Hardware Info
In this section you will find details of your PRODYSSEY ASB's
hardware version, which you may need when downloading firmware updates.
Device
Displays the name of your unit.
Version
Shows the version number of your PRODYSSEY ASB's firmware.
Serial Number
Displays the serial number of your PRODYSSEY ASB.
29
Refresh
Click on this button to update the displayed information for the unit,
while reconnecting the software with the PRODYSSEY ASB again.
Firmware Update
This facility enables you to download software updates for your
PRODYSSEY ASB's operating system when they become available.
Activation Key
Enter the activation key code of your PRODYSSEY ASB here.
Firmware Source File
Displays the name of the update file to be downloaded.
Browse
Click on the 'Browse...' button to select the directory where the
update file will be saved.
Write
Click on the 'write' button to install the update on your PRODYSSEY
ASB.
30
MIDI MONITOR
The 'MIDI monitor' button is on the lower panel of the Remote
Software's display. Click on it to view a list of incoming and outgoing
MIDI messages.
Controls
Clear
Removes all entries from the MIDI monitor's display list.
31
MIDI KEYBOARD
The Remote Software's built-in MIDI keyboard enables you to play
the PRODYSSEY ASB without using an external keyboard or sequencer software - you can play the synthesizer with the computer
mouse. Turn on the MIDI keyboard by clicking on its switch of the
Remote Software's display.
Channel
Sets the MIDI keyboards's MIDI channel.
Octave
Sets the range of the MIDI keyboard in octave steps.
32
PRESET ADMINISTRATION
The Remote Software always displays the currently active preset's
name at the top right of its panel. Use the forward / back arrows to
the left of the preset name to step through the presets. When it
comes to more advanced preset management, the Remote
Software's integrated preset administration section is an easy and
convenient way of storing, exchanging and editing your presets.
Preset Window
Click on 'Preset' (on the lower part of the Remote Software's front
panel) to open the preset window and view lists of presets.
Open / Save File
When you click on the 'preset' button in the top left corner of the
preset window, a drop-down file menu appears. Select 'open file' to
open an existing preset file (which can contain multiple banks of
presets) from your computer's hard drive. You can save preset files
to create back-up copies, or to exchange with other PRODYSSEY
ASB users. The extension for preset files is *.pdy.
The Preset Bank
To save a preset to your computer hard drive, you first have to
create a bank. If no bank exists or you want to create additional
banks, select 'create bank' from the drop-down menu. Presets may
be dragged and dropped from one bank to another. (To change the
name of an existing bank, click and hold on its name, enter the new
name and press 'enter' - the new bank name is now stored.) Use
'new file', 'open file', 'save file' and 'save file as' to manage your
banks of presets.
33
Storing, deletion and changing of Presets
To store a single preset in a bank, please create a new entry by
selecting 'create preset' from the dropdown menu. The preset will
be added to the bottom of the preset list with the name 'New Preset'
- right click on the name to rename it. (You can also give it
a number and rating, define its category and add a comment.) After creating a new entry, store the edited preset
bank by clicking on 'save' or 'save as'. Right click on a
preset name to select further options, 'restore', 'overwrite'
and 'delete' (use 'restore' to load an existing preset).
Upload of Preset files
To transfer presets between the PRODYSSEY ASB hardware and
the Remote Software, click on the 'Box' button. You will see four
options in a drop-down menu:
1. Upload user bank to box
Ports user bank data from the Remote Software to the PRODYSSEY ASB unit.
2. Upload factory bank to box
Ports factory bank data from the Remote Software to the PRODYSSEY ASB unit.
3. Download user bank from box
Ports PRODYSSEY ASB user bank data to the Remote Software.
4. Download factory bank from box
Ports PRODYSSEY ASB factory bank data to the Remote Software.
34
35
Specifications
Technology
Physical Modelling,
Virtual Circuit Modelling
Number of Voices
12
Sampling Rate
44.1 kHz (internal oversampling)
Resolution
32 bit (Audio)
Analog Output
2 x 1/4 inch (6,3mm) unbalanced
Analog Input
2 x 1/4 inch (6,3mm) unbalanced
Control Inputs
Pedal, Switch
MIDI
In, Out, Thru
USB
Full Speed USB rev 1.1
Power Supply
AC or DC, 12V, 1.5 A
Dimensions (cm)
32,5 x 21 x 5 (front) / 9,5 (rear)
Weight
4,3 kg
Prodyssey back
Important Notice:
The only suitable Expression Pedal for your PRODYSSEY is
the model "YamahaTM FC7" (or 100% compatible). Other models MUST NOT be connected as these may cause permanent
damage to your PRODYSSEY!
36
Warranty Regulations
The hardware described within this documentation and the warranty regulations are governed by and granted
according to German Law.
CreamWare Audio GmbH (“CreamWare”) warrants, that the described product has been free of failures within
parts or components of the hardware and was found to be fully functional. Any single units has been checked by
Quality Assurance Department several times and with various measures, before this product has been delivered
to you. Therefore please carefully read the following information, which are important in the case of probable
damages or malfunctions:
If goods are being found defective, missing features described within the present documentation or becoming
defective due to eventual fabrication deficiency or material defects within the first six months after purchase,
then CreamWare shall at its sole discretion and evaluation replace or repair the defective parts or goods.
Multiple repairs shall be permissible. In case the malfunction or physical failure can not be fixed, customer
receives the right to refrain from the purchase with refund of the amount originally paid for the defective product.
Within the time frame of 6 to 24 months customer has to provide proof, that the claimed malfunction or defective
part or component has already been defective upon first delivery. In this case CreamWare will execute required
repair or replacement at no cost upon acceptance of customer’s proof by CreamWare.
Any deficiencies caused by transportation have to be declared within a 14 days period after receipt of goods by
written notice. Please note, that any warranty repair at no cost ruled by the above regulations requires registration
of name and address either online at the “My Page” area on the CreamWare website (www.creamware.com) or
by sending the proof of purchase together with the defective product.
To return defective goods, please contact the retailer where you purchased the product. As an alternative you
can also contact CreamWare directly to receive the RMA number for the defective product. PLEASE NOTE: It is
mandatory to return the product with the referring RMA number to avoid delays in repair. If possible, please also
add a description of the failure occurred to enable us executing the repair as soon as possible.
Non-compliance with the operation and maintenance instructions, any alterations or modifications to the goods
delivered, changing or utilizing any parts or materials not conforming to Sellers specifications will immediately
render any warranties null and void. For a warranty claim, customer has to prove to CreamWare beyond a
reasonable doubt that none of these aforesaid actions caused the goods to be defective or deficient.
CreamWare Audio GmbH
Fon
++49 2241 59 58 0
Fax
++49 2241 59 58 57
email
[email protected]
[email protected]
The hardware described within this documentation is herewith certified to conform to the requirements
set forth in the guidelines for electromagnetic acceptability (89/336/EWG)
CreamWare Audio GmbH, July 2006
sgn. Wolf Roth
37
Haftungsausschluss
Prodyssey ASB ist ein Produkt der CreamWare Audio GmbH in Siegburg.
(c) CreamWare 1998-2006 - alle Rechte vorbehalten.
Die nachfolgende Dokumentation wurde erstellt von CreamWare Audio GmbH (CreamWare), und beschreibt
den jeweils aktuellen Stand der Produktentwicklung. CreamWare behält sich sich vor, gegebenenfalls
Änderungen an der Dokumentation vorzunehmen, sofern dies notwendig erscheint. Eine Verpflichtung zur
Veröffentlichung oder Benachrichtigung von Anwendern der vorliegenden Dokumentation besteht nicht.
Wir weisen ausdrücklich darauf hin, dass die vorliegende Dokumentation typographische Fehler oder technische Ungenauigkeiten enthalten kann.
CreamWare übernimmt keinerlei Gewähr, weder ausdrücklich noch implizit, für den Inhalt der vorliegenden
Dokumentation. Die Gewährleistung für das beschriebene Produkt ist in den Gewährleistungsbestimmungen eingehend beschrieben.
In keinem Fall haftet CreamWare für jegliche Form von Datenverlust oder Datenfehlern im Rahmen der
Nutzung des Produktes oder vorliegender Dokumentation. Insbesondere schließt CreamWare jegliche Haftung für Folgeschäden aus( wie z.B. verlorene Gewinne, entgangene Preisnachlässe, Produktionsausfälle
sowie alle sonstigen Folgeschäden), welche sich aus der Nutzung des Produktes oder der Verwendung der
vorliegenden Dokumentation ergeben.
In der vorliegenden Dokumentation etwaig verwendete Bezeichnungen von Marken- oder Produktnamen
Dritter unterliegen gesetzlichen Bestimmungen des Patent- und Markenrechts und sind das Eigentum der
jeweiligen Rechteinhaber. Dies gilt auch dann, wenn im Text der entsprechende Hinweis nicht explizit
angebracht ist. In keinem Fall gewährleistet CreamWare, dass die vorliegende Dokumentation und die hierin
enthaltenen Informationen frei von Rechten Dritter sind.
Die vorliegende Dokumentation darf ohne vorherige schriftliche Einwilligung der CreamWare Audio GmbH
weder in Teilen oder zur Gänze kopiert, übersetzt oder auf elektronische Medien übertragen werden.
Produkt und zugehörige Dokumentation unterliegen den AGB (Allgemeine Geschäftsbedingungen) der CreamWare Audo GmbH zum jeweils aktuellen Stand.
38
Inhaltsverzeichnis
Benutzerhandbuch
Haftungsausschluss
Inhaltsverzeichnis
Einleitung
38
39
40
Erste Schritte
Anschluss des Netzteils
MIDI Verbindung
Audio Verbindung
Netzschalter
USB Verbindung und Treiberinstallation
Installation der Remote-Software
Presets
42
42
43
43
43
44
45
Die Bedienoberfläche
Portamento, Noise
VCO 1, VCO 2
Modulationen
LFO
Sample/Hold
Filter
Hüllkurven
Der Configuration Strip
46
46
48
49
50
51
54
57
Remote-Software
Allgemeines, Aufbau der Oberfläche
Main Page
Add Page
Effekte
Prefs Page
MIDI-Monitor
MIDI-Keyboard
Presetverwaltung
61
62
63
65
67
69
70
71
Spezifikationen
MIDI Implementationstabelle
Technische Daten
CE Konformitätserklärung
Gewährleistungsbestimmungen
Impressum
73
74
75
75
76
39
Willkommen
Vielen Dank, dass Sie sich für den PRODYSSEY ASB entschieden
haben. Wir sind uns sicher, Sie werden mit Ihrem PRODYSSEY
ASB genau so viel Spaß haben, wie auch wir an der Entwicklung
dieses einzigartigen und charakterstarken Synthesizers. Bitte lesen Sie diese Bedienungsanleitung aufmerksam durch, um alle
Funktionen des PRODYSSEY ASB kennen zu lernen und nutzen
zu können.
Einleitung
Der Prodyssey ist die 1:1 Nachbildung des ARP Odyssey Synthesizers. Der ARP Odyssey ist ein waschechter Analog-Synthesizer
aus den siebziger Jahren und zählt zu den Klassikern der Synthesizergeschichte. Er kann als kompakte Version des halbmodularen
ARP 2600 gesehen werden und ist damit die Antwort der Firma
ARP auf den erfolgreichen Minimoog. Dieser Synthesizer ist jedoch
weit mehr als das. Der Odyssey folgt zwar dem klassischen Aufbau
eines analogen Synthesizers, bestehend aus Oszillator, Filter und
Verstärker, bietet aber gleichzeitig viele interessante Erweiterungen, die ihn eigenständig machen und ganz besonders interessant
erscheinen lassen. Allen voran sind hier die vielfältigen Modulationsmöglichkeiten zu nennen und natürlich die Sample/Hold-Sektion. Die Kompaktheit, gepaart mit einer vielfältigen Ausstattung, lassen den Experten sofort erkennen, welche Kraft und welcher Charme
in seinen Klängen stecken mag. Und so begeistert der Odyssey
40
ohne wenn und aber, da er von kräftigen Bässen über schneidige
Lead-Sounds bis hin zu beeindruckenden Effektklängen die komplette Soundpalette beherrscht. Mit dieser Klangvielfalt ist der Odyssey heute einer der gesuchtesten klassischen Synthesizer und hat
somit nichts an Attraktivität von damals verloren.
Um den Charakter dieses Instruments zu bewahren und seine Klangvielfalt komplett wiederzugeben, kommt auch hier Creamwares Circuit Modelling Verfahren zum Einsatz. Dies bedeutet höchste Klangtreue und aliasingfreie Algorithmen. Es werden nicht nur Teile des
Instruments nachmodelliert, sondern das Instrument wird als ganzes emuliert. Dies geht soweit, dass die Reglereinstellungen und
das Verhalten der Regler dem Original entsprechen. Innerhalb der
Variationen von Modell zu Modell des Originals, bildet der PRODYSSEY den Sound des ARP Odyssey perfekt nach. Holen Sie
also wieder Ihre alten Patch Sheets hervor, oder laden Sie welche
aus dem Internet herunter, und empfinden Sie die Sounds von
damals nach. Oder nutzen Sie die erweiterten Möglichkeiten der
Synthesizer- und der integrierten Effektsektion, und kreieren Sie
die Sounds von morgen. Lassen Sie Ihrer Phantasie freien Lauf.
Viel Spaß mit dem PRODYSSEY ASB wünscht Ihnen Ihr
Creamware-Team!
41
Erste Schritte
Anschluss des Netzteils
Um den Prodyssey mit Netzspannung zu versorgen, stecken Sie
bitte das beiliegende Netzteil in die Steckdose. Verbinden Sie dann
das Netzteil mit der Netzbuchse Ihres Gerätes. Bitte achten Sie vor
dem ersten Gebrauch auf die Kompatibilität des Netzteils zu Ihrem
Stromnetz. Bei Verlust des Netzteils kann ein Standard AC oder DC
12V Netzteil mit 1.5 A verwendet werden.
Der Anschluss des Netzteils an den Prodyssey erfolgt über einen
Hohlstecker (5.5mm x 2.1mm x 11,5mm, centerpositiv).
Achtung - Wichtiger Hinweis:
Als Expression Pedal ist ausschließlich das Modell "YamahaTM
FC7" (oder 100% Kompatible) geeignet. Andere Modelle dürfen nicht angeschlossen werden - sie können zur Beschädigung Ihres Prodyssey führen!
MIDI Verbindung
Um den Prodyssey über MIDI spielen zu können, stehen Ihnen
zwei Möglichkeiten zur Verfügung:
1. Das Gerät wird direkt an ein Masterkeyboard angeschlossen,
2. o der das Gerät wird an den MIDI-Port Ihres Computers angeschlossen, um den Prodyssey in Verbindung mit einem Sequencer
und der Remote-Software nutzen zu können.
Verbinden Sie hierzu die MIDI-Ein- und Ausgänge des mit den MIDI
Ein- und Ausgängen Ihres Keyboards bzw. Computers. Dabei muss
der Eingang des ASB mit dem Ausgang Ihres Sequencer/Keyboards verbunden werden.
42
Den Ausgang des Prodyssey verbinden Sie bitte mit dem Eingang
Ihres Sequencers/Keyboards. Soll das eingehene MIDI-Signal noch
an ein anderes Gerät weitergeleitet werden, so verbinden Sie bitte
auch MIDI Thru. Steht Ihnen kein MIDI-Port zur Verfügung, so können Sie alternativ auch den USB-Port Ihres Computers verwenden.
Audio Verbindung
Um das Audiosignal des Prodyssey abzuhören,
verbinden Sie die Stereo Ausgänge mit den
Audio-Eingängen Ihres Mischpultes, Computers
oder Ihrer HiFi Anlage.
Um für die Klangerzeugung des Prodyssey auch externe Signale
nutzen zu können, verbinden Sie bitte auch den Audio-Eingang des
Prodyssey mit einer beliebigen Klangquelle.
Netzschalter
Bitte schalten Sie den Netzschalter ein, um den Prodyssey in Betrieb zu nehmen.
USB Verbindung und Treiberinstallation (Windows XP)
Um den Prodyssey auch ohne MIDI-Interface in Verbindung mit
einem Computer nutzen zu können, wurde ein USB-Anschluss integriert. Für diese Funktion wird eine Installation von Windows
XPTM mit Service Pack 2 benötigt.
Nach dem Anschliessen an Ihren Computer wird Windows XP™
Ihres Prodyssey als USB-Audio-Gerät erkennen. Für dieses Gerät
werden keine weiteren Treiber benötigt. Sie können also sofort mit
dem Spielen loslegen!
Nach dem Starten Ihres Sequencers (wie z.B. Cubase SX™) steht
Ihnen der USB-Audiogerät Treiber als MIDI-Port zur Verfügung. In
seltenen Fällen kann es passieren, dass eine ältere Version von
Windows XP™ (vor Service Pack 2) den USB Port nach dem Entfernen Ihres Gerätes nicht wieder frei gibt. In diesem Fall starten
Sie bitte WindowsXP™ neu. Nach dem Neustart steht Ihnen der
USB-Port wieder zur Verfügung.
43
Installation der Remote-Software
Um die Remote-Software zu installieren, legen Sie bitte die CD mit
der Aufschrift PRODYSSEY ASB in das CD-Laufwerk Ihres Computers. Im Normalfall wird sich dabei
der Installationsdialog von alleine öffnen.
Sollten Sie jedoch die automatische
Startfunktion Ihres CD-Laufwerks deaktiviert haben, so starten sie bitte die Anwendung "Setup.exe" manuell mittels
Doppelklick von der CD.
Bestätigen Sie den angezeigten "Willkommen
zur Installation" Dialog bitte mit "Next"
Im folgenden Dialog bestätigen Sie bitte die
Anerkenntnis der Lizenzbedingungen mit "I
agree with the...", wählen Sie dann "Next".
Den Installationspfad der Remote-Software
können Sie im Dialog "Directory" einstellen.
Standardmässig wird diese in das Verzeichnis
"C:\Programme\CreamWare\Prodyssey Remote" installiert, der hierfür erforderliche Speicherplatz beträgt etwa 6.0 MB.
Im "Startmenü-Ordner auswählen" haben Sie
die Möglichkeit, den Ordner für den StartmenüEintrag selbst zu bestimmen.
Als Standard wird ein Ordner "Prodyssey" angelegt und verwendet.
Im folgenden Dialog haben Sie noch einmal
die Möglichkeit, die von Ihnen vorgenommenen Einstellungen zu überprüfen. Wählen Sie
"Start" um den Kopiervorgang zu starten.
Bestätigen Sie nun den „End“ Dialog durch
Klick auf den Button „Exit“.
44
Das Aufrufen der Presets
Die Preset-Verwaltung am PRODYSSEY ASB erfolgt über die
Sound-Sektion im Configuration-Strip. Es stehen 128 User- und
128 Factory-Presets zur Auswahl.
Betätigen Sie den Taster PRESET, um das gewünschte Preset mit
den DOWN/UP-Tastern oder dem Datenrad zu wählen. Ein Preset
beinhaltet alle Einstellungen, die Parameter der„Add Page“ der
Remote-Software und somit auch die Effekte.
Presets können nur in die User-Bank gespeichert werden, deshalb
wird USER automatisch selektiert, wenn ein Preset gespeichert
werden soll.
45
Die Bedienoberfläche
Portamento
Durch Portamento werden aufeinanderfolgende Noten
von einem Ton in den nächsten fließend überführt. Der
Regler bestimmt die Zeit, mit der die Noten von einem
Ton in den nächsten überführt werden. Steht der Regler
auf Minimum, ist kein Portamento aktiv. Per Fußschalter
bzw. Fußtaster lässt sich das Portamento aktivieren.
Noise
Hier können Sie zwischen White und Pink Noise wählen.
Voltage Controlled Oscillators (VCO1, VCO2)
Die Oszillatoren gleichen sich bis auf ein paar wenige Unterschiede. Per Wahlschalter im Audio-Mixer kann jeweils zwischen den
Wellenformen Sägezahn und Rechteck gewählt werden. Die Pulsweite kann manuell und per Modulation verändert werden. Pro Oszillator gibt es zwei Eingänge mit wählbarer Intensität zur PitchModulation. Oszillator 1 lässt sich von der Tastatur unabhängig
verwenden, wodurch er zum LFO wird. Oszillator 2 kann zu Oszillator 1 synchronisiert werden.
46
Coarse
Stellen Sie hier die Frequenz des Oszillators ein, mit der er schwingt.
Der Regelbereich ersteckt sich über 6 Oktaven.
Fine
Benutzen Sie diesen Regler, um die beiden Oszillatoren gegeneinander zu verstimmen. Werden zwei Oszillatoren gegeneinander
verstimmt und gemischt, entstehen Schwebungen, der Klang wird
somit lebendiger. Der Regelbereich erstreckt sich ungefähr über
eine Oktave.
Octave Up/Down
Im Gegensatz zum Originalgerät haben Sie hier die Möglichkeit, die
Tonlage der Oszillatoren per Schalter unabhängig von einander in
Oktavschritten über einen Bereich von 3 Oktaven zu bestimmen.
Keyboard On/Off
Trennen Sie hiermit Oszillator 1 von der Tastatur, um ihn als LFO zu
verwenden. Der Oszillator schwingt jetzt viel langsamer. Statt über
mehrere Oktaven im hörbaren Bereich, regelt Coarse die Frequenz
nun von 0.2 Hz bis 20 Hz.
Sync On/Off
Aktiviert den Hard Sync von Oszillator 2 zu Oszillator 1. Beim Hard
Sync erfährt die Wellenform von Oszillator 2 mit jedem Periodendurchlauf von Oszillator 1 einen Neustart. Dadurch wird die Tonhöhe von Oszillator 1 auf Oszillator 2 übertragen. Je nach CoarseEinstellung und Frequenzmodulation von Oszillator 2 können unterschiedliche Obertonspektren erzeugt werden, die durch den Neustart der Wellenform entstehen.
47
Pulse Width
Stellen Sie hier die Pulsweite des Oszillators ein. Um das Ergebnis
Ihrer Einstellung zu hören, muss im Audio-Mixer die Pulswellenform eingeschaltet sein. Der Regelbereich erstreckt sich von 50%
bis 5% der Pulsweite.
Pulse Width Modulation
Hiermit können Sie die Pulsweite per Modulation ändern. Als Modulationsquelle steht wahlweise die Sinuswellenform des LFOs oder
die ADSR-Hüllkurve zur Verfügung. Der Regler bestimmt die Intensität der Modulation.
Frequenz Modulation
Jeder der Oszillatoren hat zwei Eingänge zur Frequenzmodulation.
Modulationsquellen für Oszillator 1 sind wahlweise Sinus oder Rechteck des LFO am ersten Modulationseingang und die Sample/HoldBaugruppe bzw. die ADSR-Hüllkurve am zweiten Modulationseingang.
Für Oszillator 2 stehen wahlweise der Sinus des LFO oder der
Ausgang des Sample/Hold-Mixers, alternativ das angeschlossene
Schwellpedal (siehe Ausführung weiter unten), am ersten Modulationseingang und die Sample/Hold-Baugruppe oder die ADSR-Hüllkurve am zweiten Modulationseingang zu Verfügung. Die Regler
bestimmen die Intensität der Modulation.
48
Als Expression Pedal ist ausschließlich das Modell "YamahaTM
FC7" (oder 100% Kompatible) geeignet. Andere Modelle dürfen nicht angeschlossen werden - sie können zur Beschädigung Ihres Prodyssey führen!
Beim Einschalten des PRODYSSEY ASB wird ein angeschlossenes Pedal automatisch erkannt. Dieses ist jedoch erst aktiv, wenn
der Pedalweg durchfahren wurde.
LFO
Der LFO des PRODYSSEY bietet die Wellenformen Sinus und Rechteck – die Wahl der
Wellenform findet am Modulationsziel statt.
Darüber hinaus fungiert der LFO beim Sample/Hold und den Hüllkurven im Repeat-Modus
als Taktgeber.
LFO Freq
Stellen Sie hier die Frequenz des LFO ein. Der
Regelbereich reicht von 0.2 Hz bis 20 Hz.
Sample/Hold Mixer
Hier werden die Signale gemischt, die dem Sample/Hold als Quelle dienen. Das hier gemischte Signal dient an verschiedenen Stellen auch direkt als
Modulationsquelle. So lassen sich zum Beispiel
Noise oder einzelne Oszillatoren als Modulationsquellen verwenden. Es können zwei von vier möglichen Quellen gemischt werden. Mögliche Quellen
sind Sägezahn oder Rechteck von Oszillator 1 und
Noise oder Rechteck von Oszillator 2.
Die Fader regeln die Intensitäten der Signale, die
der Sample/Hold-Baugruppe oder einem direkten
Modulationsziel zugeführt werden. Es gibt zwei Regler zum Mischen und zwei Schalter zur Anwahl der
Quelle. Welches Signal gemischt wird, ist abhängig
vom darunter liegenden Wahlschalter des jeweiligen Reglers. Für Kanal 1 stehen Sägezahn oder
Rechteck von Oszillator 1 zur Verfügung, für Kanal
2 steht Noise oder Rechteck von Oszillator 2 zur
Auswahl.
49
Sample/Hold
Sample/Hold erzeugt aus einem kontinuierlichen ein gestuftes Signal, indem es in bestimmbaren Abständen dem Signal des Sample/
Hold-Mixers eine Probe (Sample) entnimmt und diesen Wert bis
zur nächsten Probe speichert hält (Hold). Das Entnehmen der Probe kann vom LFO oder per Tastendruck ausgelöst werden. Je nach
zugeführtem Signal und eingestelltem Triggermodus entstehen somit unterschiedliche Effekte. Ein aufsteigender Sägezahn kann so
in eine aufsteigende Treppe verwandelt werden, oder aus Noise
entsteht ein zufälliges Modulationssignal, das sich in der Geschwindigkeit des LFOs ändert. Über Ouput Lag können die Schritte des
Sample/Hold geglättet werden.
Trigger Modus
Der Sample/Hold-Vorgang kann periodisch durch den LFO oder
manuell per Tastendruck ausgelöst werden. Ist der LFO gewählt,
so wird über die LFO-Frequenz der Sample/Hold-Vorgang getaktet,
d.h. der Sample/Hold-Vorgang findet einmal pro Periodendurchlauf
statt. Ist das Keyboard als Trigger gewählt, so wird der Vorgang bei
Tastendruck gestartet.
Output Lag
Die harten Schritte und Sprünge des Sample/Hold können über ein
Tiefpassfilter am Ausgang des Sample/Hold geglättet werden. Je
höher der Reglerwert, desto stärker wird geglättet.
50
Audio Mixer
Hier werden die Signale gemischt, bevor sie in
das Filter gelangen. Aus sechs Signalen können
bis zu drei gewählt und in der Lautstärke abgestimmt werden. Mögliche Signale sind Noise oder
Ringmodulation von OSC1&2, Sägezahn oder
Rechteck von OSC1 und Sägezahn oder Rechteck von OSC2.
Filter Sektion
Die Filtersektion besteht aus einem modulierbarem Tiefpassfilter
mit Resonanz und einem nachgeschaltetem Hochpassfilter mit einstellbarer Frequenz ohne Resonanz.
Per Taster können Sie zwischen „Prodyssey“ (ARP 24 dB Tiefpassfilter, begrenzt bei ca. 12 kHz) und „Minimax“ (Moog 24 dbTiefpassfilter, legendäre Moog-Kaskade) umschalten – ein Leistungsmerkmal, welches das Originalgerät nicht bieten konnte. Zusammen mit der Hüllkurve und anderen Modulationen bestimmt
das Tiefpassfilter den Klangfarbenverlauf. Frequenzen unterhalb
der Cutoff Frequenz bleiben unbearbeitet, daher die Bezeichnung
„Tiefpass“. Frequenzen oberhalb der Cutoff Frequenz werden abgesenkt und zwar mit 24dB/Oktave. Resonanz entsteht durch Rückführung des Filterausgangs auf den Filtereingang, die Frequenzen
um die Cutoff Frequenz werden verstärkt. Dank des Circuit Modelling Verfahren besitzen beide Filter die Eigenheiten des Originals,
die Cutoff-Einstellungen und das Resonanzverhalten zeigen den
typischen ARP- und Moog-Charakter. Das dem Tiefpass nachgeschaltete Hochpassfilter ist nicht resonanzfähig und modulierbar.
Frequenzen oberhalb der Cutoff Frequenz bleiben unbearbeitet,
daher die Bezeichnung Hochpass. Frequenzen unterhalb der Cutoff Frequenz werden mit 6dB/Oktave abgesenkt. Der Einstellbereich für die Cutoff Frequenz ist auch für sehr tiefe Frequenzen
möglich, um mehr Raum für Modulationen zu lassen.
51
Voltage Controlled Filter
24 db-Tiefpassfilter, Charakteristik „ARP“ und „Moog“, Cutoff und
Resonanz sind einstellbar. Weiterhin stehen drei Modulationen aus
insgesamt sechs Modulationsquellen zur Verfügung.
VCF Frequency: Die Cutoff Frequenz ist die Frequenz, oberhalb
derer das Spektrum beschnitten wird, Obertöne werden abgesenkt.
Hier verändern Sie manuell die Cutoff-Frequenz.
VCF Resonance
Resonanz entsteht durch Rückkopplung des Filterausgangs auf
den Filtereingang: Die Frequenzen um die Cutoff Frequenz werden verstärkt. Bei voller Resonanz schwingt das Filter in Eigenresonanz und erzeugt einen Sinuston mit der eingestellten CutoffFrequenz.
VCF Modulation
Das Filter besitzt drei in der Intensität einstellbare Modulationen.
Es gibt drei Regler für Intensitäten und drei Schalter zur Anwahl der
Quelle. Welches Signal das Filter moduliert, ist abhängig vom darunter liegenden Wahlschalter des jeweiligen Reglers. Bei der ersten Modulation kann zwischen Keyfollow und Sample/Hold-Mixer,
alternativ das angeschlossene Schwellpedal (siehe Ausführung
weiter unten), gewählt werden. Für die zweite Modulation stehen
die Sample/Hold-Baugruppe und die Sinusschwingung des LFO
zur Verfügung. Für die dritte Modulation steht die AR- oder ADSRHüllkurve zur Wahl.
52
Als Expression Pedal ist ausschließlich das Modell "YamahaTM
FC7" (oder 100% Kompatible) geeignet. Andere Modelle dürfen nicht angeschlossen werden - sie können zur Beschädigung Ihres Prodyssey führen!
Beim Einschalten des PRODYSSEY ASB wird ein angeschlossenes Pedal automatisch erkannt. Dieses ist jedoch erst aktiv, wenn
der Pedalweg durchfahren wurde.
Bei Keyfollow folgt die Cutoff-Frequenz mit der eingestellten Intensität der gespielten Note. Ist der Regler auf Maximum gestellt, so
folgt die Frequenz zu 100%, in diesem Fall ist das Filter von der
Tastatur aus oktavrein spielbar.
Ist die Sample/Hold-Baugruppe gewählt, kann Noise oder einer der
Oszillatoren als Modulationsquelle für das Filter dienen. Somit ist
Filter-FM im hörbaren Bereich möglich, was besonders reizvolle
Klangspektren erzeugt.
Die Sample/Hold-Baugruppe liefert ein treppenartiges oder auch
zufälliges Modulationssignal, das bei entsprechender Einstellung
von Cutoff und Resonanz faszinierende Klangeffekte erzeugt. Lassen Sie z.B. die Cutoff-Frequenz zufällig springen oder ein kleines
Muster spielen. Experimentieren Sie dazu mit den Parametern des
Sample/Hold-Mixers und des Sample/Hold.
Per Sinusschwingung des LFO modulieren Sie das Filter periodisch.
Verändern Sie die Frequenz des LFO, um die Geschwindigkeit der
Modulation zu ändern.
Für eine Hüllkurven-Modulation steht die AR- oder die ADSR-Hüllkurve zur Verfügung. Die Cutoff-Frequenz folgt mit der eingestellten Intensität dem Verlauf der Hüllkurve.
HPF Cutoff Frequency
Die Cutoff Frequenz des Hochpass-Filters ist die Frequenz, unterhalb der das Spektrum beschnitten wird, der Grundtonbereich des
Klanges wird beschnitten. Verändern Sie hier die Cutoff-Frequenz
manuell. Das Hochpassfilter besitzt keine Resonanz und kann nicht
moduliert werden. Verwenden Sie es, um außergewöhnliche Klangeffekte zu erzeugen, wie z.B. Nachbildung analoger Hihats oder
andere Geräusche, die keine Bassanteile haben sollen.
53
Voltage Controlled Amplifier
Zusammen mit der Hüllkurve bestimmt der Amplifier
den Lautstärke-Verlauf des Klangs. Zur Modulation
des Amplifiers steht die AR- oder die ADSR-Hüllkurve
zur Verfügung. Der Volume-Regler befindet sich auch
in dieser Sektion.
VCA Gain
Hier bestimmen Sie die Lautstärke des Klanges, der
unabhängig von der dynamischen Lautstärkeformung
durch die Hüllkurvengeneratoren zur Verfügung steht,
d.h. der PRODYSSEY ASB klingt somit auch ohne
Tastatur, Sequencer, etc.
Envelope Generators
Es stehen zwei Hüllkurven für verschiedene Modulationen zur Verfügung. Die erste Hüllkurve liefert Einstellwerte für Attack und Release, der Sustain befindet sich auf Maximum. Die zweite Hüllkurve ist komplexer und besitzt Attack, Decay, Sustain und Release.
Welche der Hüllkurven auf die Modulation wirkt, lässt
sich an verschiedenen Stellen des Synthesizers wählen. Die ADSR-Hüllkurve kann zum Steuern der Tonhöhe, der Pulsweite, der Cutoff-Frequenz und der Lautstärke dienen. Die ARHüllkurve kann auf Filter-Cutoff und Amplifier wirken. Als Erweiterung zum Original regieren die Envelope Generatoren per einstellbarem Velocity-Wert auf die Anschlagstärke beim Tastenspiel.
Attack
Dauer des ersten Hüllkurvensegments. In der Attack-Phase steigt
die Hüllkurve in der eingestellten Zeit auf Maximum. Die Stärke des
Anstiegs wird durch die an der eingestellten Intensität bestimmt.
Decay
Dauer des zweiten Hüllkurvensegments. In der Decay-Phase fällt
die Hüllkurve auf den unter „Sustain“ eingestellten Wert.
54
Sustain
Drittes Segment der Hüllkurve. Wert, auf dem die Hüllkurve nach
Ablauf der Decay-Zeit bei gehaltener Taste verweilt. Die Wirkung
von Sustain ist abhängig von der eingestellten Intensität an der
Modulation.
Release
Viertes Segment der Hüllkurve. In der Release-Phase fällt die Hüllkurve zurück auf Null.
AR Velocity/ADSR Velocity
Modulation aller Level der Hüllkurve per Anschlagsstärke. Je nach
eingestellter Modulationsstärke werden die Pegel der Hüllkurve
zwischen Minimum und Maximum durch die Anschlagsstärke variiert. Die Anschlagsstärke nimmt Einfluss auf die jeweilige Modulation.
KEYB Repeat/Auto Repeat
Die Hüllkurven des PRODYSSEY können entweder manuell per
Tastendruck (Keyboard Gate) oder automatisch durch den LFO
(LFO Repeat) ausgelöst werden. Bei aktiviertem Keyboard Gate
können Sie ganz normal auf der Tastatur spielen. Die Hüllkurve
wird durch Tastendruck gestartet und mit Loslassen der Taste in
der Release-Zeit geschlossen. Mit aktiviertem LFO Repeat wird die
Hüllkurve im Tempo des LFO wiederholt. Die aufsteigende Flanke
des LFO startet die Hüllkurve, die abfallende Flanke schließt die
Hüllkurve mit der eingestellten Release-Zeit. Je nach LFO-Geschwindigkeit und eingestellten Hüllkurvenzeiten kommen sie somit zu unterschiedlichen Hüllkurvenverläufen.
Bei aktiviertem Keyboard Repeat ist das Ergebnis nur bei Drücken
einer Taste zu hören. Durch Aktivieren von LFO- und Auto-Repeat
werden die Hüllkurven vom LFO ausgelöst.
55
ADSR KEYB Gate/LFO Repeat
Wählen Sie hier den Trigger-Modus für die ADSR-Hüllkurve.
AR Kybd Gate/Lfo Repeat: Wählen Sie hier den Trigger-Modus für
die AR-Hüllkurve.
KEYB Repeat/Auto Repeat
Keyboard Repeat wiederholt Hüllkurven mit eingeschaltetem LFO
Repeat nur solange, wie eine Taste gedrückt ist. Schalten Sie Auto
Repeat ein, um Hüllkurven mit LFO Repeat endlos zu wiederholen.
56
Der Configuration-Strip
Der Configuration Strip ist für besondere System-Einstellungen,
Presetverwaltung und Anzeigeelemente vorgesehen.
MATCH
Diese Anzeige erlaubt es Ihnen, die bei einem gewählten Preset eingestellten Werte abzuholen bzw.
einzustellen. Drehen Sie solange an dem neben der
Anzeige befindlichen Drehregler, bis die mittlere LED
(PRESET) blinkt. Ist Ihr eingestellter Wert kleiner als der Wert im
Preset, leuchtet eine der ersten drei LEDs (links). Ist der Wert im
Preset größer als Ihr eingestellter Wert, leuchtet eine der drei rechten LEDs . Auf diese Weise können Sie schnell und einfach den
Presetwert finden.
VALUE
Mit dem Datenrad (links) und den DOWN/UP-Tastern stellen Sie
Parameter des ConfigurationStrips ein, wie z. B. den MIDI-Kanal
oder die Lautstärke (Volume). Es gibt zwei verschiedene Spielweisen: monophon (einstimmig) und polyphon (mehrstimmig). Wenn
sie die DOWN/UP-Taster gleichzeitig drücken, können sie den Modus umschalten (MONO/POLY). Im Display steht dann „of“ für monophon und „on“ für polyphon.
57
MIDI
Channel
Betätigen Sie den Taster CHANNEL, um den gewünschten MIDIKanal mit den DOWN/UP-Tastern oder dem Datenrad einzustellen.
Steht ein vertikaler kleiner Strich vor der Kanalzahl, empfängt das
Gerät auf allen MIDI-Kanälen (Omni-Mode). Gesendet wird auf
dem eingestellten Kanal. Ohne Strich wird nur auf dem eingestellten Kanal gesendet und empfangen.
Wertebereich:
MIDI Kanal 1 ... 16 Omni Off
MIDI Kanal |1 ... |16 Omni On (Strich)
Control
Betätigen Sie den Taster CONTROL, um den gewünschten MIDILocal-Modus mit den DOWN/UP-Tastern oder dem Datenrad einzustellen. „Local Off“ ist gewählt wenn das Display „of“ zeigt, „Local
On“ bei „on“. Local Off-Modus: Die lokalen Controller sind ausgeschaltet.
SOUND
Volume
Betätigen Sie den Taster VOLUME, um die Lautstärke mit den
DOWN/UP-Tastern oder dem Datenrad einzustellen. Diese Lautstärke ist nicht in einem Preset gespeichert, sondern es ist die
Lautstärke des Gerätes.
58
Preset, User Store
Betätigen Sie den Taster PRESET, um das gewünschte Preset mit
den DOWN/UP-Tastern oder dem Datenrad zu wählen. Ein Preset
beinhaltet alle Einstellungen, die Parameter der „Add Page“ der
Remotesoftware und somit auch die Effekte. Presets können nur in
die User-Bank gespeichert werden, deshalb wird USER automatisch selektiert, wenn ein Preset gespeichert werden soll.
Betätigen Sie den Taster USER, um zwischen Factory- und UserBank hin- und herzuschalten. Dies ist nur möglich, wenn PRESET
aktiv ist.
Die zweite Funktion des Tasters USER wird durch langes Drücken
aktiviert. In diesem Fall werden alle sichtbaren Parameter der Hardware so übernommen, wie sie eingestellt sind. Die nicht sichtbaren
Parameter werden auf die Grundeinstellungen gesetzt.
Betätigen Sie den Taster STORE, um ein Preset zu speichern. Die
LED beginnt dann zu blinken. Wählen Sie mit dem Datenrad oder
mit den UP/DOWN-Tastern eine Presetnummer aus und drücken
Sie nochmals STORE. Die LED beginnt schneller zu blinken. Drükken Sie die Taste so lange, bis die LED wieder erlischt. Das Preset
ist jetzt unter der gewählten Nummer gespeichert.
EFFECTS
Betätigen Sie den Taster BYPASS, um den Effektweg zu umgehen.
Je nach Einstellung wird das Signal ohne Effekte etwas lauter als
mit Effekten sein. Wenn die LED leuchtet, ist BYPASS aktiv, und
die Effekte sind nicht hörbar. Ein erneutes Drücken des Tasters
deaktiviert die Bypass-Funktion wieder.
Betätigen Sie den Taster PROGRAM, um den gewünschten Effektalgorithmus mit den DOWN/UP-Tastern oder dem Datenrad einzustellen. Insgesamt stehen fünf Modi für die zwei Effekte (Chorus,
Delay) zur Verfügung. Die Belegungen für die Parameter der Effekte (PARAM1 bis 3) sind für jedes Programm unterschiedlich.
59
Die Effektprogramme:
PARAMETER 1
PARAMETER 2
PARAMETER 3
Chorus
Chorus Depth
Chorus Rate
Chorus Feedback
Delay Time
Delay Damping
Delay Time Left
Delay Time Right
Delay BPM
Delay BPM
Delay Note Left
Delay Note Right
Chorus Delay Time
Chorus Depth
Delay Time Left
Delay Time Right
Chorus Delay BPM
Delay BPM
Delay Note Left
Delay Note Right
Die Wertebereiche der Parameter:
C ontrol R ange
C horus D epth
C horus R ate
C horus Feedback
D elay Time
D elay B P M
0 - 10
0.01 Hz - 20 Hz
-5 ... +5
0.3ms - 1,4860s
72 - 192
1/1 1/2P 1/2 1/2T 1/4P 1/4 1/4T
D elay N ote
1/8P 1/8 1/8T 1/16P 1/16 1/16T
1/32P 1/32 1/32T 1/64P 1/64 1/64T
60
PRODYSSEY ASB
Remote Software
Allgemeines
Um den Prodyssey durch die Remote-Software steuern zu können,
muss der Prodyssey über USB oder MIDI mit dem Computer verbunden sein. Da beim ersten Start der notwendige MIDI-Treiber
noch nicht eingestellt ist, kommt es zu Fehlermeldungen. Quittieren
Sie diese mit „OK“ und stellen Sie auf der Prefs-Page den verwendeten Treiber und den MIDI-Kanal für Ein- und Ausgang ein. Der
USB-Treiber des Prodyssey erscheint als USB Audiogerät. Klicken
Sie nun auf Refresh, woraufhin die Seriennummer und die Softwareversionen des Gerätes angezeigt werden. Durch das Schließen der Software werden die Einstellungen gespeichert.
Aufbau der Oberfläche
In der Remote-Software stehen Ihnen 3 verschiedene Seiten zur
Verfügung. Die Main-Page mit den gerätetypischen Funktionen, die
Add-Page mit zusätzlichen Effekten und erweiterten Einstellungen,
sowie die Prefs-Page mit allen Informationen zu Systemeinstellungen. Desweiteren steht Ihnen zur Verfügung: der Preset-Dialog,
MIDI-Monitor und ein MIDI-Keyboard.
61
Die Bedienung im Einzelnen
MAIN PAGE
In der Remote-Software gibt es zu den bereits beschriebenen Parametern des Hardware-Panels zwei Unterschiede.
Global Octave
Links unterhalb des Noise-Schalters befindet sich ein weiterer Schalter für die Oktavlage. Mit diesem Schalter können Sie die Oktavlage des gesamten Gerätes beeinflussen.
AR/ADSR Velocity
Auf dem Hardware-Panel lassen sich beide Parameter lediglich
gemeinsam steuern. Mit der Remote Software können Sie die Beeinflussung der Hüllkurvenintensität durch die Anschlagsstärke für
jede Hüllkurve getrennt regeln.
62
ADD PAGE
Additional Features
Bend Range
Stellen Sie hier die maximale Verstimmung durch Pitchbend
in Halbtönen ein. Der Wertebereich beträgt 0 bis 24 Halbtöne.
Modulation Intensity
Maximale Intensität der zuschaltbaren Modulationen auf Oszillatoren und Filter, die durch das Modulationsrad bestimmt
werden kann.
BPM
Nehmen Sie hier Einstellungen zum MIDI-Tempo vor.
KEYBOARD MODE
Low Note On
Schaltet die Low-Note-Priority ein, d.h. tiefe Töne haben gegenüber
hohen Vorrang. Eine hohe Note kann keine tiefe Note stehlen. Ist
Low-Note abgeschaltet, so gilt Last-Note-Priority, es wird immer die
zuletzt gespielte Note wiedergegeben.
63
Retrig On
Schaltet den Trigger-Modus der Hüllkurven von Legato auf Retrigger um. Ist Retrig eingeschaltet, wird beim Legatospiel die Hüllkurve jedesmal von neuem gestartet. Bei abgeschaltetem Retrig werden beim Legatospiel die Noten gebunden wiedergegeben, ohne
Neustart der Hüllkurve.
Single On
Schaltet, egal wie viele Stimmen geladen sind, die Stimmenverwaltung des Instruments auf eine Stimme. Die korrekte Wiedergabe
von Solo-Sounds mit Portamento wird somit garantiert.
AFTERTOUCH
Pitch VCO1/2
Intensität und Richtung der Modulation auf die Tonhöhe der Oszillatoren. Sie können somit einen Pitchbend der Oszillatoren per Aftertouch steuern. Die
Modulation kann per Wahlschalter auf Oszillator 1,
Oszillator 2 oder beide gelegt werden.
Filter
Intensität und Richtung der Modulation auf den Filter Cutoff. Sie
können somit Filtersweeps per Aftertouch erzeugen.
LFO Settings
Wahlmöglichkeit für Einstellung „Hertz“ oder „MIDI Note“.
Level Ext. Input
Lautstärkeregler für das externe Audiosignal der Audio-Eingänge.
Dieses Signal wird dem Tiefpassfilter zugeführt.
64
EFFECTS (Chorus/Delay)
Die Add-Page beinhaltet Bedienelemente für den eingebauten Chorus/Flanger und für den Delay-Effekt Ihres ASB.
CHORUS/FLANGER
Chorus/Flanger
Wählen Sie hier zwischen Chorus und Flanger Algorithmus. Rate regelt den Wert Modulationsgeschwindigkeit.
Depth
Hier können Sie die Intensität der Modulation einstellen.
Phase
Stellen sie hier die Phase der Modulation ein.
Feedback
Regelt die Intensität der Rückkopplung ein.
Dry/Wet
Regelt den Effektanteil.
DELAY
Left Cannel
regelt die Einstellungen des Delay Effektes im linken Kanal.
Right Channel
regelt die Einstellungen des Delay Effektes im rechten Kanal.
Time
Stellen Sie hier die Zeit für das Delay ein. Ist BPM aktiv, so können
sie den Wert in Notenlänge angeben, als Standard stellen Sie die
Zeit in Millisekunden ein.
65
Feedback
regelt den Anteil an Rückkopplung im Delayweg. In der Praxis wirkt
sich dieser Parameter auf die Anzahl an Echos aus.
Damp
Hier wird die Intensität der Höhendämpfung eingestellt.
Level
Level regelt die Lautstärke unabhängig für den linken und rechten
Kanal.
Tempo
Hier können Sie den Wert für das Delay-Tempo in BPM eingeben.
Dry/Wet
Regelt den Effektanteil.
66
PREFS PAGE
Hier ändern Sie Systemeinstellungen des PRODYSSEY ASB.
MIDI IN
Device
Wählen Sie hier den Eingangsport, an dem
Ihr ASB angeschlossen ist. Für diese Verbindung kann ein MIDI-Port Ihres Rechners, oder
die USB-Verbindung verwendet werden.
Channel
Wählen Sie hier den Midikanal, über welchen Sie Ihren ASB ansteuern möchten. (Wählbar bei MIDI In und MIDI Out)
MIDI OUT
Hier können Sie die Einstellungen für den MIDI-Ausgang Ihres ASB
konfigurieren. Auch hier können Sie zwischen an Ihrem Rechner
angeschlossenen MIDI-Geräten oder der USB-Verbindung zum ASB
wählen. Bitte achten Sie darauf, dass in jedem Fall Ein- sowie
Ausgang verbunden sind.
Hardware Info
In dieser Sektion werden Informationen zu Ihrem PRODYSSEY
ASB angezeigt.
Device
Name des angeschlossenen Gerätes
Version
Versionsnummer der Firmware der Hauptplatine.
Serial Number
Die Seriennummer Ihres PRODYSSEY.
Refresh
Aktualisiert die Anzeige bei neu angeschlossenem Gerät und stellt
die Verbindung wieder her.
67
Firmware Update
Die Installation aktueller Firmware Ihres PRODYSSEY ASB ist innerhalb der Firmware-Sektion möglich.
Activation Key
Tragen Sie hier den Aktivierungsschlüssel Ihres PRODYSSEY ASB
ein. Sie erhalten Ihn, falls notwendig, von unserem Support.
DSP Software
Hier wird die Version der aktuell verwendeten klangerzeugenden
Software angezeigt.
Firmware Source File
Zeigt Ihnen die von Ihnen ausgewählte Update-Datei an.
Browse
Wählen Sie hier den Ort, an dem sich die Datei mit dem Update
befindet.
Write
Mit "Write" installieren Sie das Update auf Ihrem PRODYSSEY.
68
MIDI MONITOR
Der MIDI-Monitor zeigt ein- und ausgehende MIDI-Nachrichten an.
Clear
Löscht die Anzeige des MIDI-Monitors.
69
MIDI KEYBOARD
Das MIDI-Keyboard ermöglicht es Ihnen, auch ohne Sequencer
oder Keyboard Klänge des Prodyssey mit der Maus zu spielen.
Sie erreichen MIDI-Keyboard und MIDI-Monitor über den entsprechenden Button der Remote Software.
Channel
Hier wird der MIDI-Kanal eingestellt, auf dem gesendet werden soll.
Octave
stellt den spielbaren Notenbereich in Oktavschritten ein.
70
Presetverwaltung
Die Presetverwaltung der Remote-Software ermöglicht das Speichern, Austauschen und Editieren von eigenen Presets.
Open Presetlist
Öffnet die Presetliste.
Open File
Öffnet ein Preset-File. Sie können die Presetliste
als Datei speichern, um sie mit anderen Usern
auszutauschen oder um Sicherungskopien anzufertigen.
Der Erweiterung der Presetdatei ist *.PDY. Mit den
Pfeilen neben dem Preset-Knopf können sie durch
die Presets "steppen".
Das Erstellen von Bänken
Um ein Preset speichern zu können, wird eine Bank benötigt. Ist
noch keine Bank vorhanden oder möchten Sie Ihre eigene Bank
erstellen, so wählen Sie bitte aus dem Sprungmenu "Create Bank".
Möchten sie den Namen der Bank ändern, so drücken Sie bitte bei
ausgewählter Bank die Taste F2 Ihrer Computertastatur. Nach dem
Eingeben eines Presetnamens bestätigen Sie die Eingabe mit der
Entertaste.
Speichern, Löschen und Ändern von Presets
Um ein Preset zu speichern, erzeugen Sie bitte einen freien Presetplatz über den Sprungmenu Eintrag "Create". Ist ein Programmplatz angelegt, so können Sie das Preset mit dem Eintrag "Save"
speichern oder bereits vorhandene Presets überschreiben. Mittels
Taste "Restore" können Sie ein gewähltes Preset erneut anwenden.
Mit den Funktionen "New File", "Open File", "Save File" und "Save
File As" können Sie die Datei der Presetliste bearbeiten.
Upload der Presetdaten
Um die Preset-Daten der ASB-Hardware. mit denen der RemoteSoftware austauschen zu können, haben Sie unter "Box" vier Optionen:
71
Upload User Bank to Box
Überträgt Daten der User-Bank von der Remote-Software auf den
ASB.
Upload Faktory Bank to Box
Überträgt Daten der Factory-Bank von der Remote-Software auf
den ASB.
Upload Use Bank from Box
Überträgt die Daten der User-Bank von Ihrem ASB zur RemoteSoftware.
Upload Faktory Bank from Box
Überträgt Daten der Factory-Bank von Ihrem ASB zur RemoteSoftware.
72
73
Technische Daten
Technologie
Physical Modelling,
Virtual Circuit Modelling
Stimmenanzahl
12 Stimmen
Sampling Rate
44.1 kHz (internes oversampling)
Auflösung
32 bit (Audio)
Analoger Eingang
6,3mm Klinke, asymmetrisch
Analoger Ausgang
6,3mm Klinke, asymmetrisch
Controller Eingänge
Pedal, Switch
MIDI
In, Out, Thru
USB
Full Speed USB rev 1.1
Netzteil
AC oder DC, 12V, 1.5 A
Abmessungen (cm)
32,5 x 21 x 5 (vorne) / 9,5 (hinten)
Gewicht
4,3 kg
Anschlüsse des Prodyssey:
Achtung - Wichtiger Hinweis:
Als Expression Pedal ist ausschließlich das Modell "YamahaTM
FC7" (oder 100% Kompatible) geeignet.
Andere Modelle dürfen nicht angeschlossen werden - sie können zur Beschädigung Ihres Prodyssey führen!
Gewährleistungsbestimmungen
Für die Hardware des beschriebenen Produktes gelten die gesetzlichen Bestimmungen zur Produktmängelhaftung
der Bundesrepublik Deutschland.
Die CreamWare Audio GmbH (“CreamWare”) gewährleistet für das beschriebene Produkt, dass es bei der
Herstellung frei von Material- und Herstellungsmängeln ist. Hierfür wurde jedes einzelne Gerät von unserer
Qualitätssicherung vielfach und sorgfältig getestet, bevor es ausgeliefert wurde. Bitte beachten Sie daher bei
etwaigen Mängeln die nachfolgend aufgeführten HInweise.
Innerhalb von 6 Monaten nach Erwerb wird CreamWare bei physikalischen Mängeln an der Hardware diesen
Mangel kostenfrei für Sie beheben. Die Behebung erfolgt in der Regel durch Reparatur oder Instandsetzung.
Kann auch nach dreimaliger Reparatur der aufgetretene Mangel nicht behoben werden, besteht ein Anspruch
auf Wandlung oder Rücktritt vom Kauf. Kann bei der Überprüfung kein physikalischer Mangel festgestellt werden,
ist die Überprüfung kostenpflichtig.
Im Zeitraum von 6 bis 24 Monaten nach Erwerb hat der Erwerber den Nachweis zu führen, dass der aufgetretene
Mangel bereits bei Auslieferung vorhanden war. In diesem Fall wird die Reparatur oder Instandsetzung nach
Vorlage der entsprechenden Nachweise ebenfalls kostenfrei durchgeführt. In allen anderen Fällen ist die
Instandsetzung kostenpflichtig. Für den Erfolg durchgeführter Instandsetzungsmaßnahmen kann insbesondere
nach Ablauf der Gewähleistung keine Gewähr übernommen werden.
Transportschäden an Produkten sind innerhalb von 14 Tagen nach Erhalt CreamWare schriftlich zur Kenntnis
zu geben. Für den Anspruch auf Durchführung einer Instandsetzung aus Gewährleistung ist das Produkte unter
Angabe von Name und Wohnsitz zu registrieren oder bei Einsendung eine Kopie des Kaufbelegs beizufügen.
Bei Rücksendungen kontaktieren Sie bitte den Händler, bei dem Sie das Produkt erworben haben zur weiteren
Bearbeitung. Alternativ können Sie auch bei CreamWare vor Rücksendung eines defekten Produktes eine RMA
Nummer erhalten, die bei der Rücksendung unbedingt anzugeben ist, um Verzögerungen in der Bearbeitung zu
vermeiden. Fügen Sie nach Möglichkeit eine detaillierte Fehlerbeschreibung bei, damit eine Reparatur auch in
Ihrem Interesse zügig durchgeführt werden kann.
Bei Schäden durch Mißbrauch, Unfall, Fahrlässigkeit, eigenmächtige Eingriffe, Änderungen oder Modifikationen
am Produkt einschließlich der Betriebssoftware sowie mechanischer oder elektronischer Bauteile oder bei
Schäden, die auf Nichtbeachtung der in dieser Anleitung gegebenen schriftlichen Anweisungen für
ordnungsgemäßen Einbau, Wartung und Benutzung zurückführbar sind, entfällt jeglicher
Gewährleistungsanspruch.
CreamWare Audio GmbH
Tel.
++49 (0) 2241 59 58 0
Fax
++49 (0) 2241 59 58 57
email
[email protected]
[email protected]
Hiermit wird bestätigt, dass die CreamWare-Hardware den Anforderungen entspricht, die in der
Richtlinie des Rates zur Angleichung der Rechtsvorschriften der Mitgliedstaaten über die elektromagnetische Verträglichkeit (89/336/EWG) festgelegt sind.
CreamWare Audio GmbH, Juli 2006
gez. Wolf Roth
CreamWare Audio GmbH
Am Turm 11 - 13
53721 Siegburg
Germany
Register HRB 5804, AG Siegburg
VAT-ID: DE813874968
Tel.: +49 2241 59 58 0
Fax +49 2241 59 58 57
www.creamware.de
www.creamware.com